ROYAL Manual Typewriter Instruction Manual
Additional Features:
Impression Regulator – The force of the keystroke can be adjusted to either “light” or “heavy”. For light impression move Impression Regulator (8) down to “L”
position. For heavy impression Regulator up to “H” position.
Carriage Release –
The tension on the carriage can be released by pressing the Carriage Release 23 and sliding the carriage to either the right or left.
Automatic Space Key –
The carriage will move rapidly toward the left when the Automatic Space 12 Key ~ is pressed
Paper Support –
The Paper Support 1 holds paper in an upright position. To use, press the raised portion of the Paper Support, to partially lift the arm. Raise the arm by rotating it into the vertical position. To return the Paper Support, rotate the arm back to horizontal position.
Shift Keys –
There is a Left Shift Key 11 and a Right Shift Keye 14 which are used to type capital letters and the top symbols shown on keys.
Shift Lock –
The Shift Lock Key 10 permanently engages the shift key function to allow for ALL CAP typing. To engage the shift lock feature , push the Shift Lock Key
down. To release Shift lock, press either of the Shift keys.
Typewriter Diagram
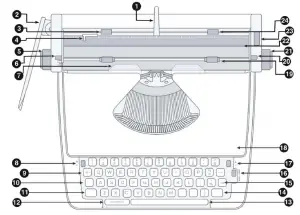
- PAPER SUPPORT
- CARRIAGE RETURN LEVER
- LEFT MARGIN STOP
- PAPER GUIDE
- LEFT ROLLER KNOB
- LINE SPACING SELECTOR
- ALIGNMENT GUIDE
- IMPRESSION REGULATOR
- MARGIN OVERRIDE KEY
- SHIFT LOCK KEY
- LEFT SH I FT KEY
- AUTOMATIC
- SPACE KEY
- SPACE BAR
- RIGHT SHIFT KEY
- TAB KEY
- RIBBON COLOR SELECTOR
- TAB SET/TAB CLEAR LEVER
- TOP HOUSING
- PAPER RETENTION BAR
- PAPER RELEASE LEVER
- RIGHT ROLLER KNOB
- PAPER INSERT SLOT e CARRIAGE RELEASE
- RIGHT MARGIN STOP
- LEFT RIBBON CONTROL ARM
- LEFT RIBBON GUIDE POSTS
- GRIGHT RIBBON SPOOL
- LEFT RIBBON SPOOL SHAFT
- RIBBON CARRIER
- GRIGHT RIBBON SPOOLSHAFT
- LEFT RIBBON SPOOL
- RIGHT RIBBON GUIDE POSTS
- GRIGHT RIBBON CONTROL ARM
Getting Started:
- Unpack machine and remove the transit safety devices.
- Keyboard steel protection rod
- & 3: Carriage track plastic stopper (two pcs)
- Carriage return lever plastic stopper
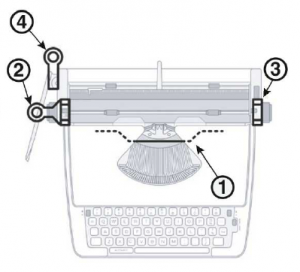

- Raise Carriage Return Lever f). Your typewriter will come with the Carriage Return Lever in the down position. Always lift Carriage Return Lever into raised position when operating typewriter.
- Typecast should be kept clean and free of dust Occasional oil is recommended to keep moving parts in smooth working condition.
Adjust Paper Margins:
- Margin Stops 3) f24) are located near the back of the typewriter carriage.
- Slide stops to the right and left to set paper margins. Margins determine at what point the typewriter starts and stops.
- Margins can be overridden by pressing the Margin Override Key
Set Line Spacing:
- There are four setting which determine the line spacing of your typewriter.
R: No spacing. Carriage will move but paper will not advance upward.
1: Single spacing
-: One and a half spacing
2: Double spacing - To set line spacing, move Line Spacing Selector 6 to correspond with the desired spacing.
Load Paper:
- Align left edge of paper with Paper Guide 4
- Insert paper into Paper Insert Slot 22 until paper stops.
- Turn either the Left Roller Knob 5 or Right Roller Knob 21 to advance paper.
- Advance paper to top of transparent Alignment Guide 7.
- To align or straighten paper, release tension on Roller by pushing the Paper Release Lever 20 toward back of machine. Manually adjust paper using the transparent Alignment Guide 7. Restore tension on roller by pulling Paper Release Lever toward front of machine.
- Lift Paper Retention Bar 19 to raised position.
- Advance paper using either Carriage Return Lever 2 or the Roller Knobs 5 ) 21 to desired starting position.
- Return Paper Retention Bar 21 to down position.
- You can set or remove tabs using the Space Bar and Tab Set Lever17
- To set tab, press Space Bar 13 desired number of spaces and push Tab Set Lever 17 up to”+”. Repeat as needed.
- To clear tab , press Tab Key~. When typewriter carriage stops at tab , move Tab Set Lever down to”-“
Paper Return:
- The Carriage Return Lever 2 is designed to return the carriage to its left margin starting position. Prior to reaching the right margin position, there will be an audible
bell. This bell indicates when the carriage should be returned to the left margin . To return the carriage, push the Carriage Return Lever to the right Move the carriage
until it stops. This will also advance the paper based upon line spacing setting.
Change Type Color:
- To type using the black portion of the ribbon , move Ribbon Color Selector 16down to “BLK” position.
- To type using the color portion of the ribbon, move Ribbon Color Selector up to “CLR” position.
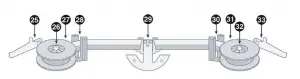
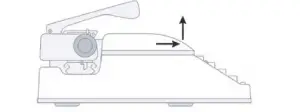
Changing Typewriter Ribbon:
- Remove Top Housing 18 by sliding Top Housing forward then lift it from the typewriter
- Swing Ribbon Control Arms 25) 23) away from spool.
- Remove Ribbon Spools 27 31 from Ribbon Spool Shafts 26 /32
- Place new spool of ribbon onto Ribbon Spool Shafts 26/32
- Ribbon Control Arms 25/33 should be on the outside of spool.
- Place ribbon in between left and right Ribbon Guide Posts 28/30
- Lift Ribbon Carrier 29 ) and thread ribbon through Ribbon Carrier .
- Replace Top Housing 18 by inserting the pins underneath Top Housing into key
- holes on body of typewriter, push Top Housing down, and slide toward back of typewriter.

WARRANTY, REGISTRATION and TECHNICAL SUPPORT
PLEASE FILL OUT AND RETURN THE PRODUCT REGISTRATION CARD INCLUDED WITH YOUR NEW ROYAL PRODUCT OR FILL OUT THE PRODUCT REGISTRATION FORM ON THE ROYAL WEB PAGE AT: http:// www.royal.com.
BE SURE TO KEEP A COPY OF YOUR SALES RECEIPT!
STANDARD WARRANTY
ROYAL CONSUMER INFORMATION PRODUCTS, INC. (“Royal”), at 11 60 U.S. Highway 22 East, Suite 301 Bridgewater, NJ 08807 USA WARRANTS that your NEW Product is free of defects of workmanship and materials. If there is a defect or malfunction of this product, Royal wi ll repair
it free of charge as follows:
PARTS: New or comparable rebuilt parts in exchange for defective parts for ONE ( 1) YEAR from date of customer purchase.
LABOR: Royal provides labor warranty for ONE (1) YEAR from date of end-user purchase. Product must be sent postage prepaid and insured to Royal in accordance with the warranty procedures outl ined below. At completion of the repair, the consumer will be responsible for the cost for any parts or services no longer covered under the
warranty.
This warranty does not apply to persons who purchased th is product second-hand or used. This warranty does not include adjustments, parts and/or repairs required by circumstances beyond the control of Royal, including but not limited to fi re or other casualty, accident, neglect, abuse, misuse, abnormal use or battery leakage damages.
THERE ARE NO OTHER EXPRESSED WARRANTIES EXCEPT AS STATED HEREIN. AFTER THE PERIOD OF EXPRESSED WARRANTY SET FORTH HEREIN, THERE ARE NO EXPRESSED OR IMPLIED WARRANTIES AND THOSE EXCLUDED INCLUDE THOSE OF MERCHANTABILITY AND FITNESS FOR PARTICULAR PURPOSE. Royal shall NOT be held liable for CONSEQUENTIAL DAMAGES resulting from any failure, defect or malfunction of this product. Some States do not allow limitations on how long an implied warranty lasts and some States do not allow the exclusion or limitation of incidental or consequential damages, so the
above limitations may not apply to you.
WARRANTY PROCEDURES
TO OBTAIN SERVICE UNDER THE TERMS OFTHISWARRANTY:
Please do the following:
- Send a copy of your ori ginal sales receipt showing original purchase date, along with your mailing and shipping addresses, the model name of the product and a note
describing the nature of the problem and a note describing the nature of the problem to: Royal Consumer Information Products, Inc. Warranty Processing 50 Hilton Street
Easton, PA 18042-7391 USA Do Not Return the Product to This Address! - You will receive a return authorization number via U.S Mail within 7-1 2 business days from the date your return request is received if it is determined that there is a basis for a replacement product. The return authorization form you receive will list the return procedures, applicable charges, if any, and the correct shipping address for the
returned product.
PRODUCT SUPPORT HOTLINE:
For questions on use of this product or this warranty cal l 1-800-272-6229 (in the U.S. and Canada) or in Mexico call 01-800-849-4826, Monday through Friday during normal business hours. You can also e-mail Royal at: [email protected]