![]()
ScopeCam 2 4k User Manual
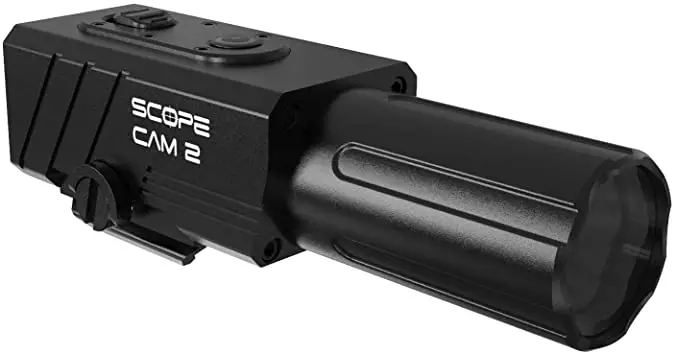
Instruction Diagram
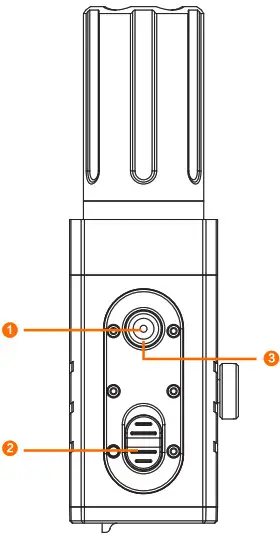
- WiFi Button
- Powering on /off SwItCh
- LEDI Red Light (Recording Status) / Blue Light(WIR Status)
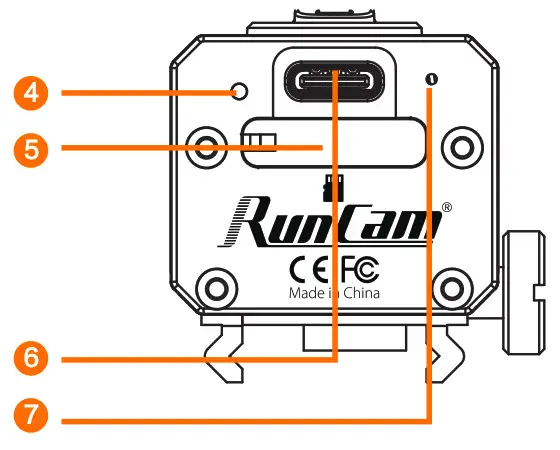
- LED2 Red Ughtf Recording Status)/ Green Light (Charging Status)
- Micro-SDCad Slot
- Type-C
- MICROPHONE
Charging:
Type-C only supports DC 5V power supply, please use a conventional phone charger or power bank. Greenlight will turn on during charging, while it will turn off when it is fully charged.lt takes about 2 hours to get fully charged.
Low Battey Reminder:
When the battery is lower than 896, the camera vibrates 4 times continuously, the 30s each vibration.
MicroSD Card Capacity up to 128GB; High-Speed SD card (Class 10/UHS-VUHS-IVUHS-III )is highly recommended
Note: The camera only supports FAT32 or exFAT format, SD cards over 64GE: must be formatted via the App.
Basic Camera Operation
| Start Recording | Push-button up,
LED1, LED2(Red Light) have a slow flash at 1s intervals simultaneously |
| Stop Recording | Push-button down,
LED1 and LED2(Red Light) turn off simultaneously |
| Open WiFi | Operational: Long Pressing WiFi button 3s in recording status
Waiting for a connection: LED1 ( Blue light flashes slowly at ls interval), Connected: LED1 (Blue Light is on) |
| Operation2: Long Pressing WiFi button 3s in shutdown status
Waiting for a connection: LED1( Blue light flashes slowly at ls interval) Connected: LED1 (Blue Light is on) |
|
| Close WiFi | Long pressing WiFi button 3s,
LED1 (Blue light) off, the camera turns off simultaneously |
| Forced shutdown | Long pressing WiFi button 8s |
| Abnormal Status | No SD card or SD card abnormality, LED1,
LED2 have a quick flash simultaneously |
Connection to the Computer
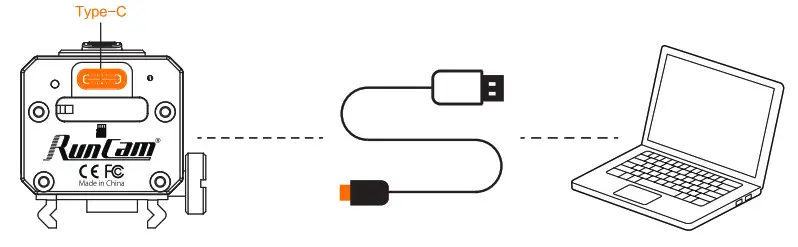
U Disk Mode:
Connecting to PC via TYPE-C to USB, the camera will enter into U disk mode automatically, recording indicator(red light) is on
WEBCAM/PCCAM/UVC Mode
Short pressing WiFi button to switch to WEBCAM/PCCAM/UVC mode in U disk mode, then Short pressing WiFi button can switch back and forth to U Disk or WEBCAM mode.
NOTICE: If the camera cannot be recognized after connecting to the computer, please confirm whether there is a microSD card in Scope cam 2. If the information in the SD card cannot be read normally, please replace the USB cable or retry the computer USB port.
App
- Long press WiFi button 3s, LED1(blue light) flashes, WiFi is started and waiting for a connection.
- Find the SSID connection of the Scope Cam 2 in the wireless network of the mobile phone and enter the password, after a successful connection, firmware update/WiFi indicator (blue light) is constantly on
- Default SSID: SCO2_4K_*****PW:1234567890
Android and iOS APP: Search ‘RunCam App’ on Google Play/App Store, or download on our website: https://runcarn.com/download/scopecam2-4k.
Technical Support Please
visit: https://supportsuncam.com/hc/en-us
Parameter
| Image Sensor | 1/2.S” SONY CMOS 8MP | ||
| Lens | 40mm«•FOV 8.2° | 25mm1FOV 14º | 3.6mm fiOV 150’ |
| ISO | 100/ 200/ 400 / 800/1600 | ||
| Shutter | 1∼1/500s | ||
| Resolution | 4K@30fps/2.7K@60fps/1080P@120fps/1080P@100fps/1080P@60fps/180P@50fps | ||
| Video format | MPQH764) | ||
| Memory Card | Mi‹:n› SD(Max 2S£x§) | ||
| File system | Fct32/cxFat | ||
| Battery | 14OOmAh | ||
| Battery life | Abo‹rt 160 iJninrftes (2.7K 60fps) / 210 ixin‹nes (T080P(‘‘60fps) | ||
| C1›arg ing time | About 120 icinrites | ||
| Wi-Fi | 2.4g | ||
| USB I r›terface | Tyg-C | ||
| W‹›rk C‹zrrerit | T 7SW ( Prrr¥ i : 2,7K/FCf[n & wi-fi ‹›ff) | ||
| Work Temp | -10°C – 4S°C | ||
| Housing Material | Aluminum alloy & PA | ||
| Vibration motor | Built-in | ||
| Waterproof | IP64 | ||
| Mount | Picatinny | ||
| Net Weight | 40mm@150g | 25mm@145g | 3.6mm@135g |
| Dimension | 112mm*32mm*36mm | 93mm*32mm*36mm | 79mm*32mm*36m |
RunCam Split 3
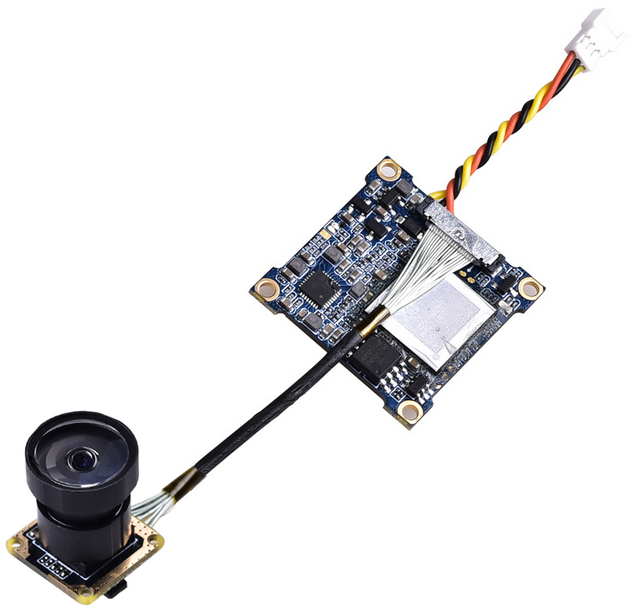
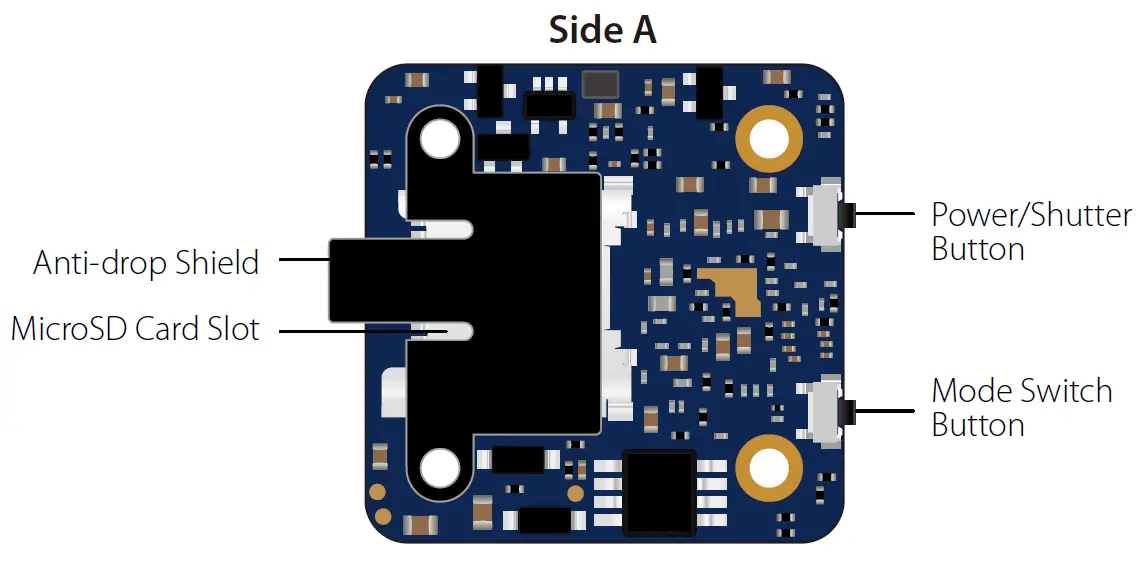
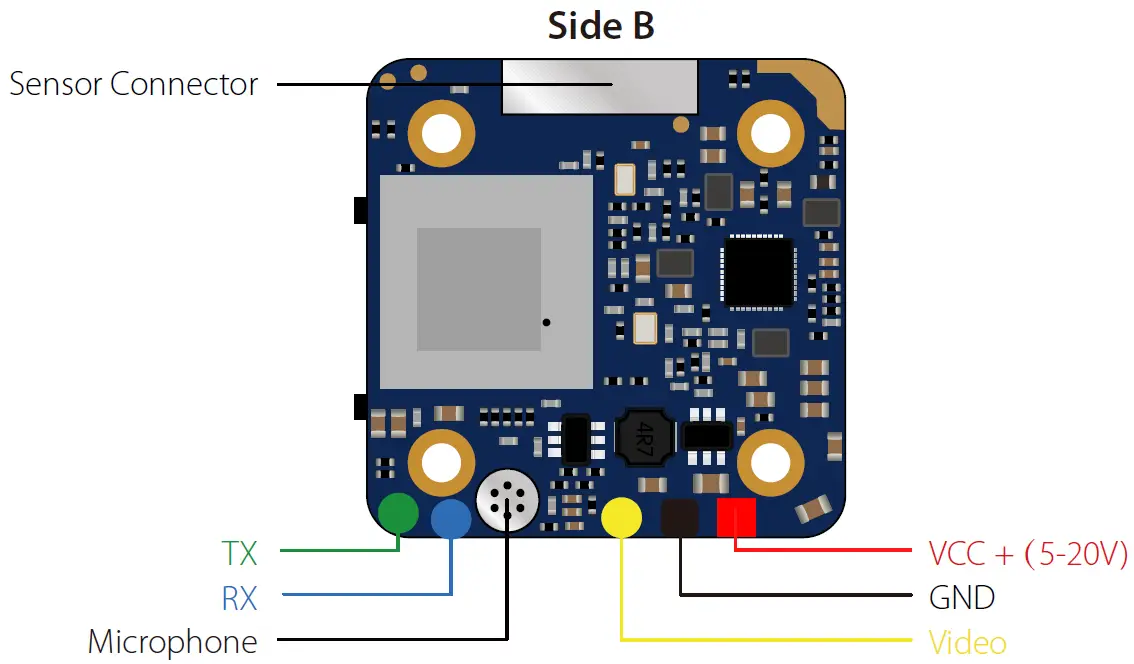
Instruction Diagram
Lens Module Connection Diagram

Micro SD Card
Capacity up to 64GB; Please use high speed cards(Class10/UHS-I/UHS-II)
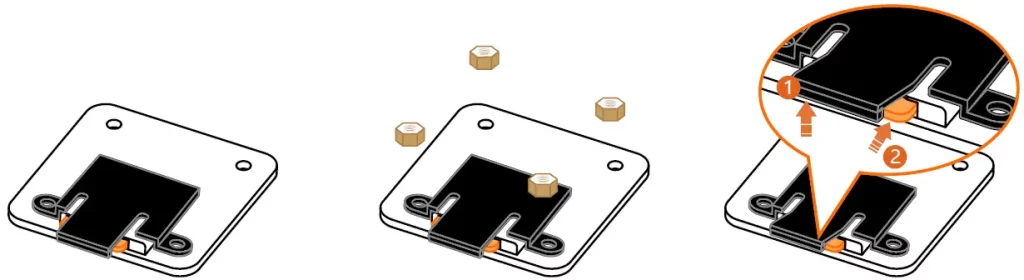
Please push the shield a little bit up with one hand like showed in above step 1 and then press the SD card(step 2) with another hand to let the card pop out.
Basic Camera Operation
| Powering On/Off | Long press the Power/Shutter button |
| Standby Mode | Camera Status Light: Blue is On |
| Mode Switching | In Standby Mode, long press the Mode Switch button to cycle through the two modes: Video/OSD settings. |
| Video Mode | Camera Status Light: Blue blinks Press the Power/Shutter button to start/stop recording. |
| OSD Setup Mode | Camera Status Light: Orange is On
|
| Firmware Upgrading | Camera Status Light: Orange blinks https://www.runcam.com/download/runcamsplit3series |
| Reset | In standby mode, press the Mode Switch button three times in rapid succession (within 2 seconds). When resetting is complete, the status light (orange) blinks twice. |
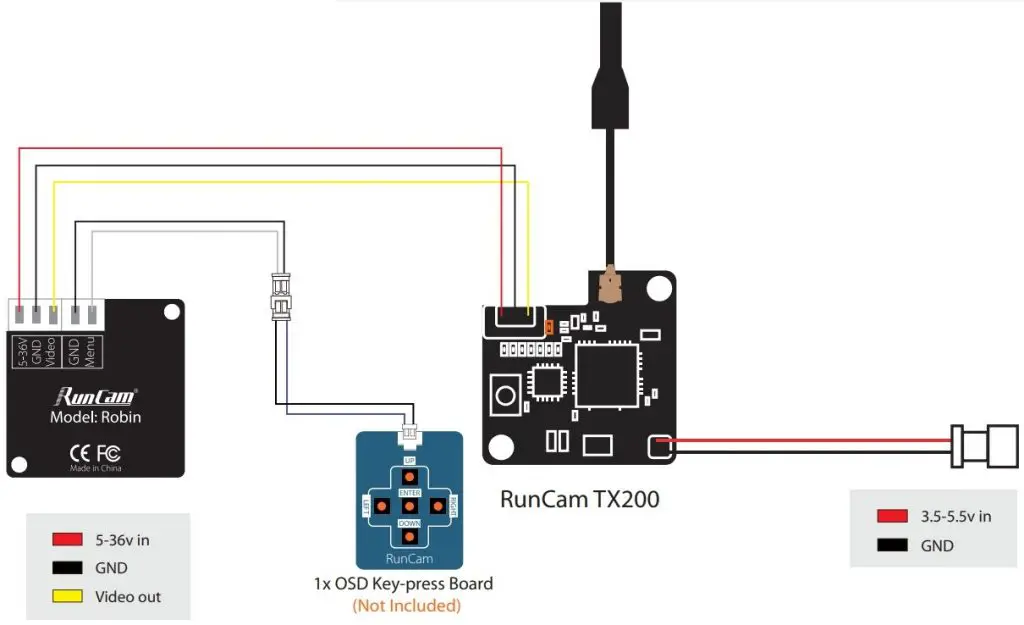
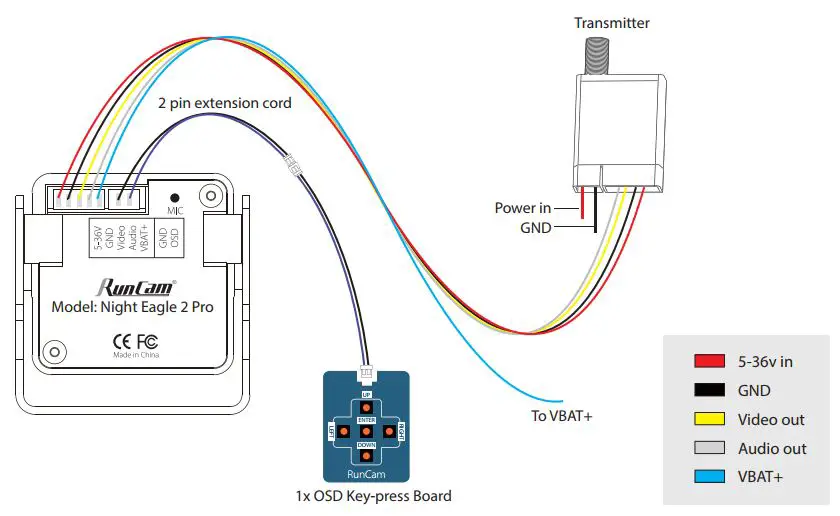
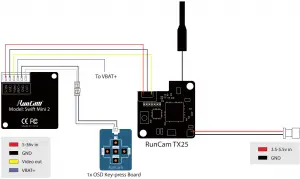
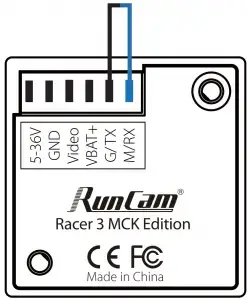
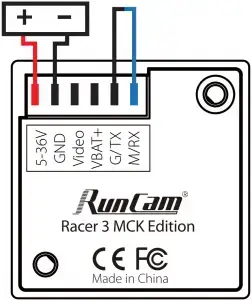
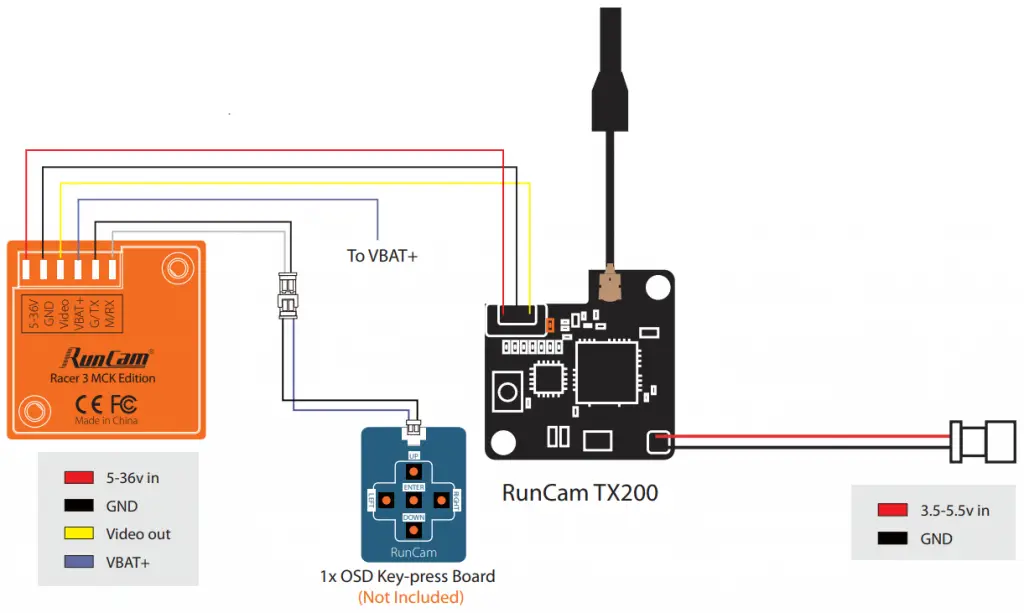
Transmitter Connection Diagram
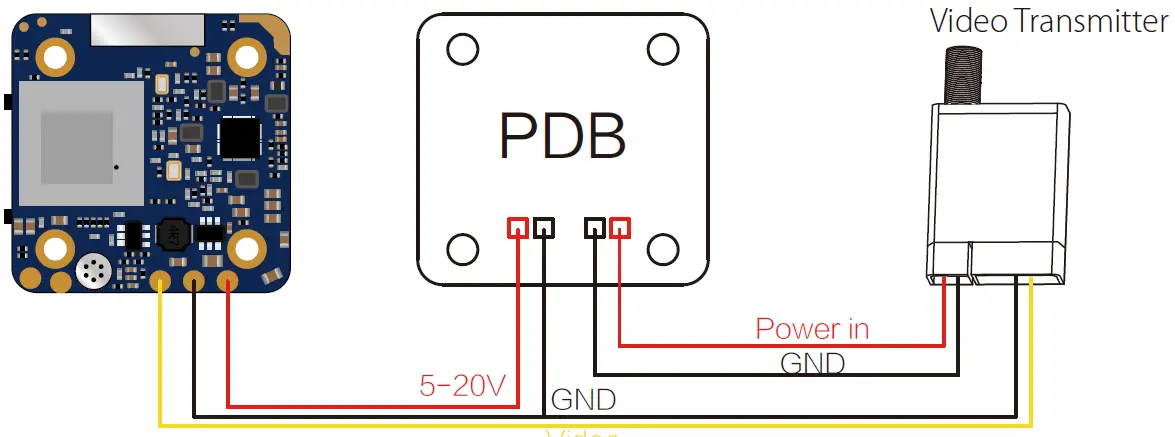
Warning: Current Input ≥1A (Don’t powered by VTx)
Flight Controller Set
Preparation
- Firmware: BetaFlight Firmware (≥3.2.0), CleanFlight Firmware(≥2.1.0), KISS Firmware (≥1.3-RC30) or INAV Firmware (≥1.7.3).
- Any available UART interface on the Flight Controller.
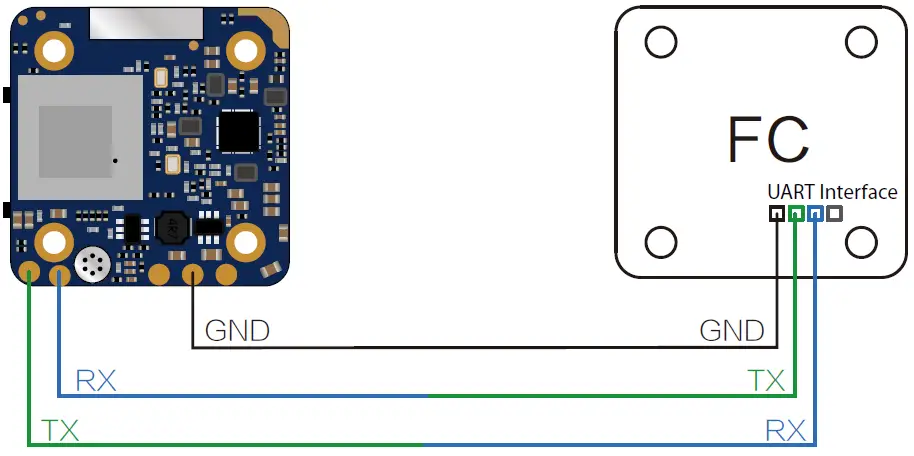
- Connect the Split 3 series with the UART interface of the Flight Controller
- Make the Flight Controller recognize the Split 3 series
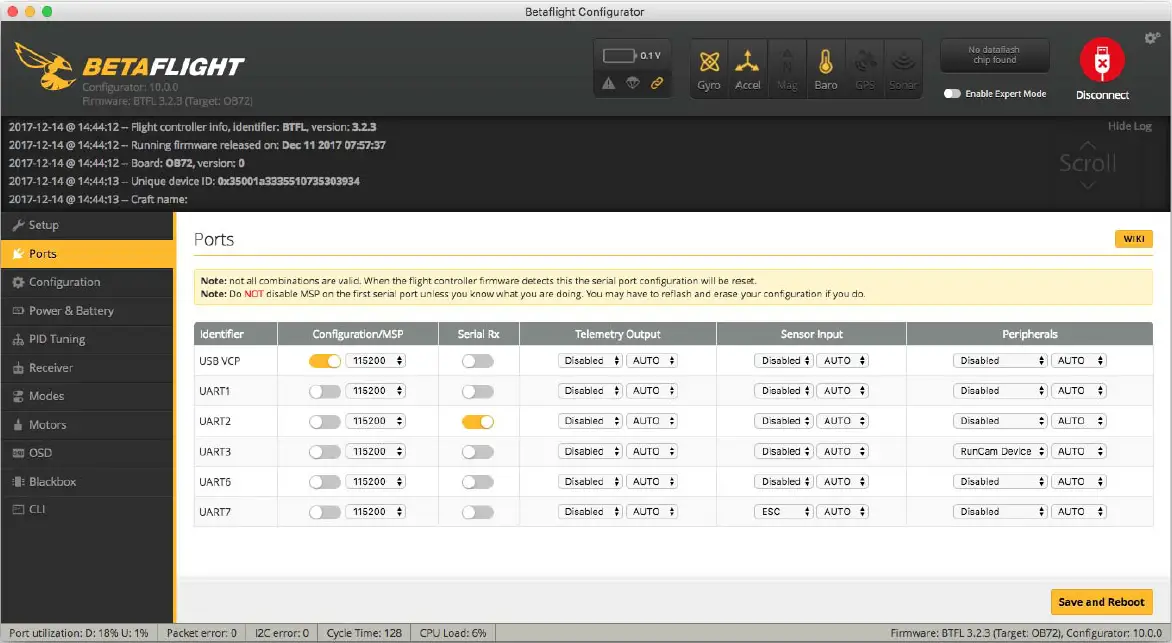
For example, we connect the Split 3 series to the UART 3 interface on the Flight Controller: connect the Flight Controller to the computer, then open the configurator software of the Flight Controller. (Open up the configurator that matches the firmware you are running, Betaflight Configurator for Betaflight, Cleanflight Configurator for Cleanflight). In the Peripherals column of the line UART3 (on the Ports tab), select RunCam Device and click Save And Reboot.
- Instructions of the functions of the camera and assigning transmitter channels to them
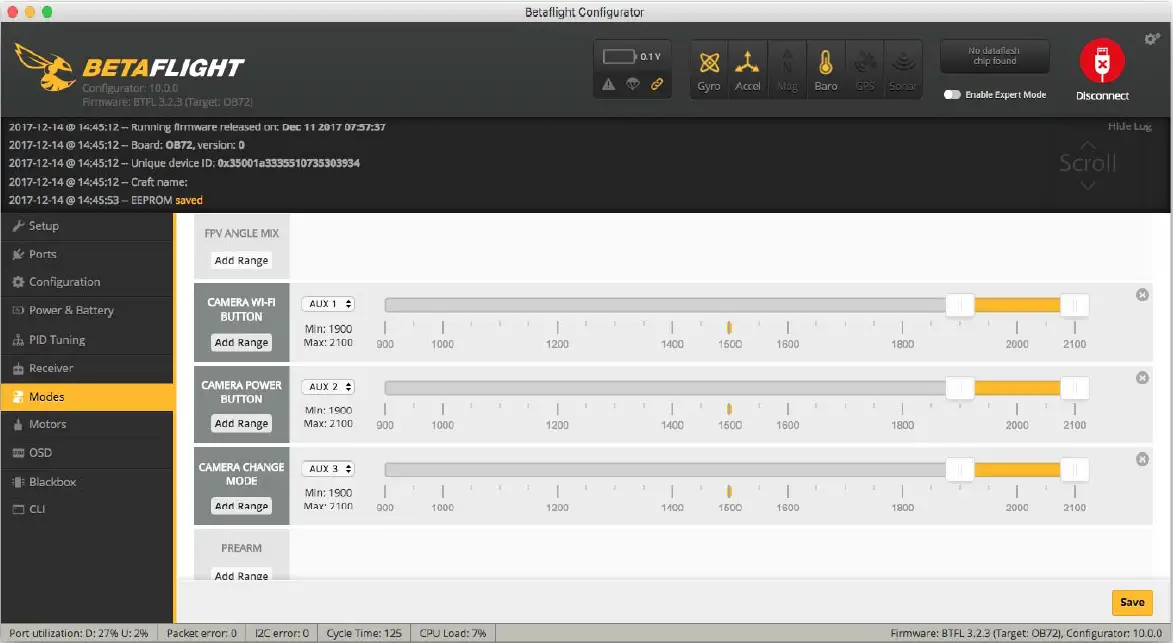
In the Flight Controller Configurator, navigate to the Modes tab. There are new CAMERA WI-FI, CAMERA POWER and CAMERA CHANGE modes
-
- CAMERA POWER: start/stop the video. When in the OSD of the camera, this is used to move to the next menu item.
- CAMERA CHANGE MODE: switch among the two modes: video and OSD setting mode. When in the OSD of the camera, this will exit the menu
Assign any available channel to the function you need, for example:
-
- Assign the AUX2 to the CAMERA POWER, range 1900-2100
- Assign the AUX3 to the CAMERA CHANGE MODE, range 1900-2100
- Assign the AUX2 to the CAMERA POWER, range 1900-2100
- Assign the channel to the switch of the controller
Please choose your Model on the controller, then access to the MIXER interface and assign the channel to the switch of the controller. Take opentx 2.2.0 for example, assign the channels CH5, CH6 and CH7 to SA, SB and SD respectively
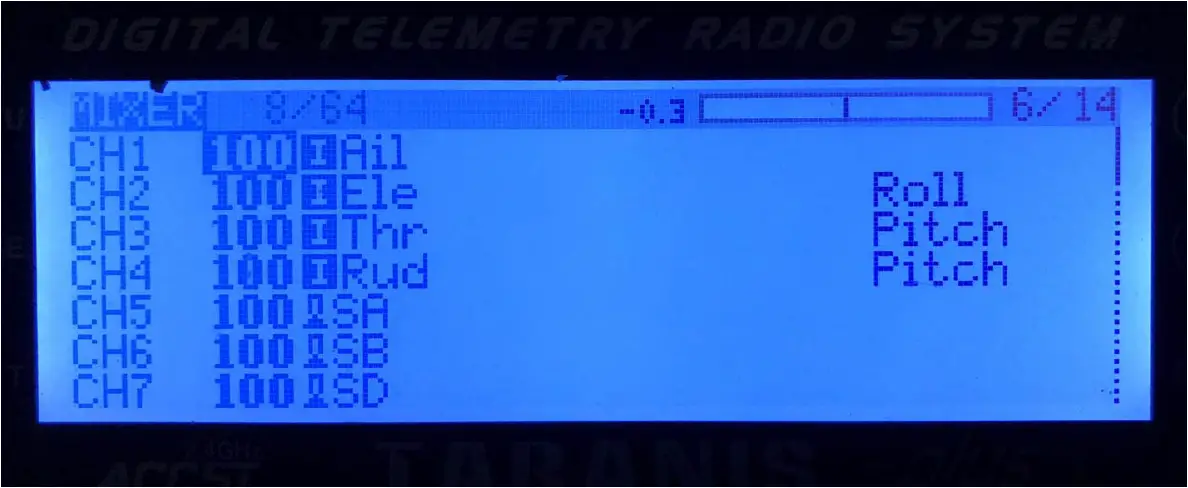
- Test
Power the Flight Controller and the Split 3 series- Set the SA to the bottom, the camera starts/stops the video
- Set the SD to the bottom, the camera switches among the two modes: video and OSD setting mode
Technical Support
Please visit: https://support.runcam.com
Parameter
| Model | Split 3 Micro | Split 3 Nano |
| Field of View(FOV) | Recording FOV 165°(FPV FOV: 165 ° @16:9, 130 ° @4:3) | |
| Video Resolution | 1080@60fps/1080@50fps/1080@30fps/720@60fps | |
| Video File Format | MOV | |
| Image Resolution | 2 MP | |
| TV Mode | NTSC (720*480)/PAL (720*576) Switchable | |
| Interface | JST 1.25mm / UART | |
| Max Micro SD Card Supported | 64G(need Class 6 or above, recommend Class 10/UHS-I/UHS-II/UHS-III) | |
| Mounting Hole Distance | 20*20mm | |
| PCB Size | 29*29mm | |
| Lens Module Size | 19*19mm | 14*14mm |
| Lens Specs | M12 | M8 |
| Power Input | DC 5-20V (Non-direct power supply from battery, Powered directly with battery will generate surges and burn the camera.) | |
| Working Current | 650mA @5V/270mA @12V | |
| Weight | 14g | 10.5g |
![]()
RunCam V 5 Orange User Manual

Instruction Diagram
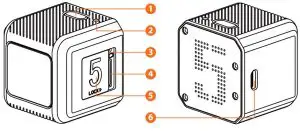
- Shutter Button
- Camera Status Light (LED)
- Reset Button
- SD Card Slot
- SD Card Locking Door
- Micro USB Port
Charging
Micro USB port supports DC 5-15V power supply. A DC 5V 1~2A charger is recommended. The Red LED will turn on during charging and turn off when charging is complete. It takes about 2 hours to get fully charged.
Low Battery Warnings
When powered on, if the charge is less than 25%, the Blue LED will continue to flash for 3 seconds.
Basic Camera Operation
| Powering On/Of |
|
| Mode Switch |
|
| Recording On/Of |
|
| Parameter Settings |
|
| Forced Shutdown |
|
| Formatting |
|
| Reset |
|
MicroSD Card
Insert the microSD card as indicated by the icon next to the card slot. Use brand name memory cards (sold separately) that meet these requirements:
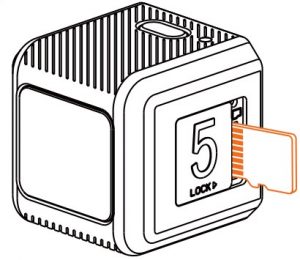
- MicroSD, microSDHC, or microSDXC
- U3 recommended (2.7K50/2.7K60 1080P120 requires U3 or above; other resolutions require U1 or above)
- Capacity up to 128GB
000
NOTICE: Use carefully when handling memory cards. Avoid liquids, dust, and debris. As a precaution, power off the camera before inserting or removing the card. Check manufacturer guidelines regarding use in acceptable temperature ranges.
Abnormal SD Card Status: If the blue light continues to flash quickly after powering on, it indicates that the SD card is not inserted, or full or cannot be recognized.
Connection to Computer
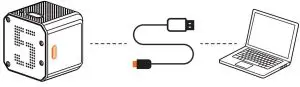
After turning on the camera, connect it to the computer via USB cable, then it will be recognized as a removable disc.
NOTICE: If the camera can not be recognized by the computer after connecting, please make sure that a microSD card is well inserted. If the information on microSD card can not be read normally, please try with another micro USB cable or USB port on the computer.
Firmware Upgrade
To ensure that the camera performs optimally, please use the latest firmware. Update method here: https://runcam.com/download/runcam5or
Video Bitrate and Codec
| Resolution | Video Quality | Codec | ||
| High | Medium | Low | ||
| 4K@30fps | 60Mbps | 50Mbps | 40Mbps | H.264 |
| 2.7K@60fps | 60Mbps | 50Mbps | 40Mbps | |
| 2.7K@50fps | 60Mbps | 50Mbps | 40Mbps | |
| 1440P@60fps | 40Mbps | 30Mbps | 20Mbps | |
| 1080P@120fps | 60Mbps | 50Mbps | 40Mbps | |
| 1080P@60fps | 45Mbps | 30Mbps | 22Mbps | |
Parameter
| Image Sensor | SONY IMX 377 (12MP) | ||||
| Video Resolution | 4K@30fps/2.7K@60fps/2.7K@50fps/ 1080P@120fps/1080P@60fps/1440P@60fps | ||||
| Field of View (FOV) | 145° | ||||
| Video File Format | MP4 | ||||
| TV-OUT | Support | ||||
| Communication Interface | Micro USB | ||||
| microSD Card supported | Up to 128G. U3 recommended (2.7K50/2.7K60 1080P120 requires U3 or above; other solutions require U1 or above) Please make sure that the file format of the SD card is FAT32, otherwise, it will easily cause errors. | ||||
| WiFi | Nonsupport | ||||
| Shutter | Auto | 1/30 | 1/60 | 1/120 | 1/240 |
| ISO | Auto/100/200/400/800/1600/3200 | ||||
| USB Power Input | DC 5-15V | ||||
| Battery Capacity | 900mAh | ||||
| Power Consumption | Max 620mA @5V | ||||
| Dimension | 38*38*36mm | ||||
| Net Weight | 56g (with battery) | ||||
Technical Support
Please visit: https://support.runcam.com
]]>
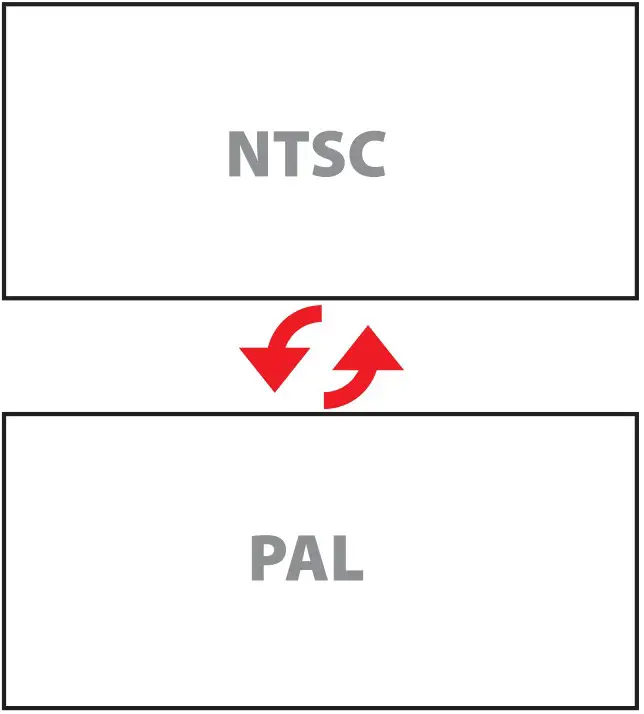
NTSC & PAL System Switchable
The default is NTSC system. If you want to change to PAL system, please:
- Short-circuit the two camera control pins.

- Then power on, camera will restart in PAL system in about 2 seconds.
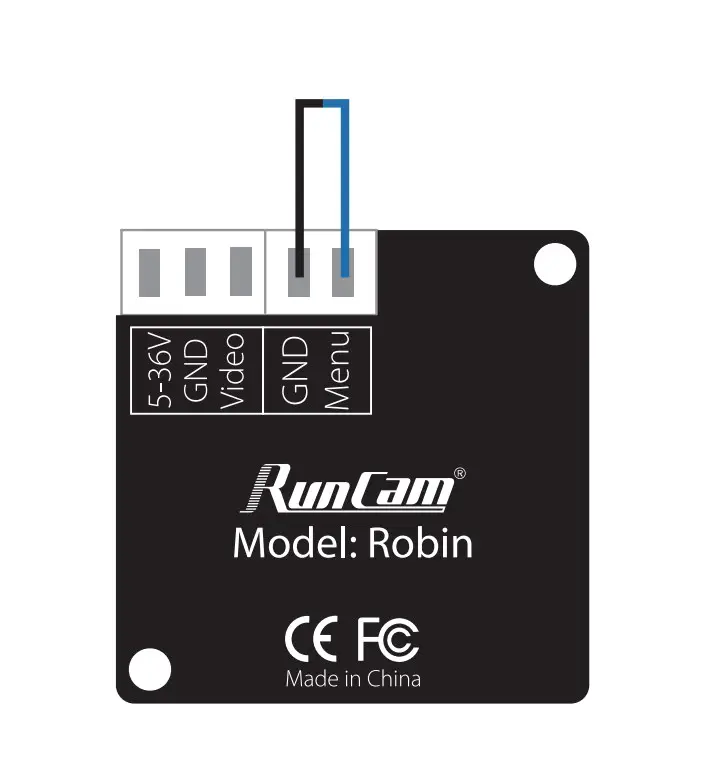
- The system can be saved after power off. After switching to the desired system, please unplug the short-circuit cable.
Joystick Control
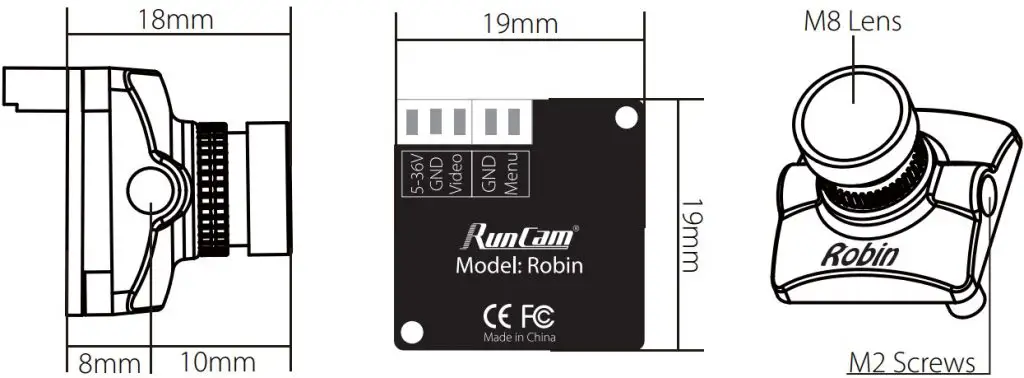
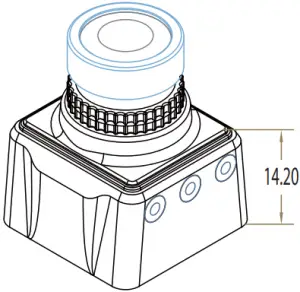
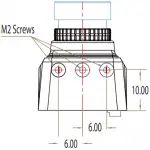
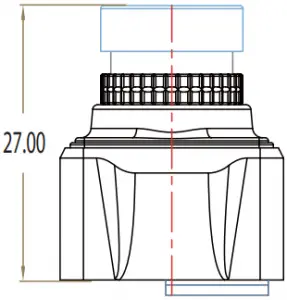
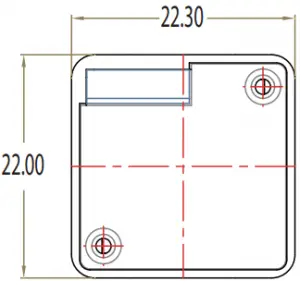
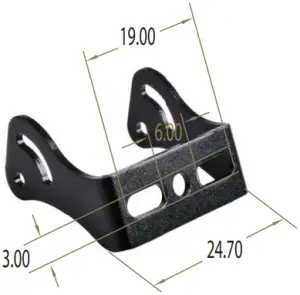
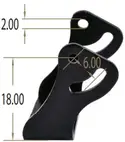
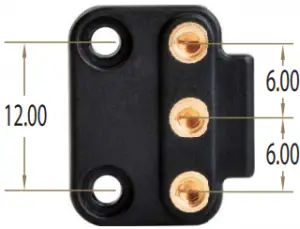
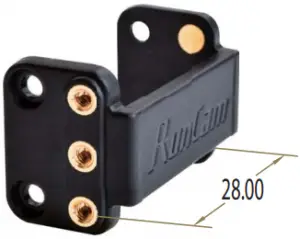
Dimensions & Installation
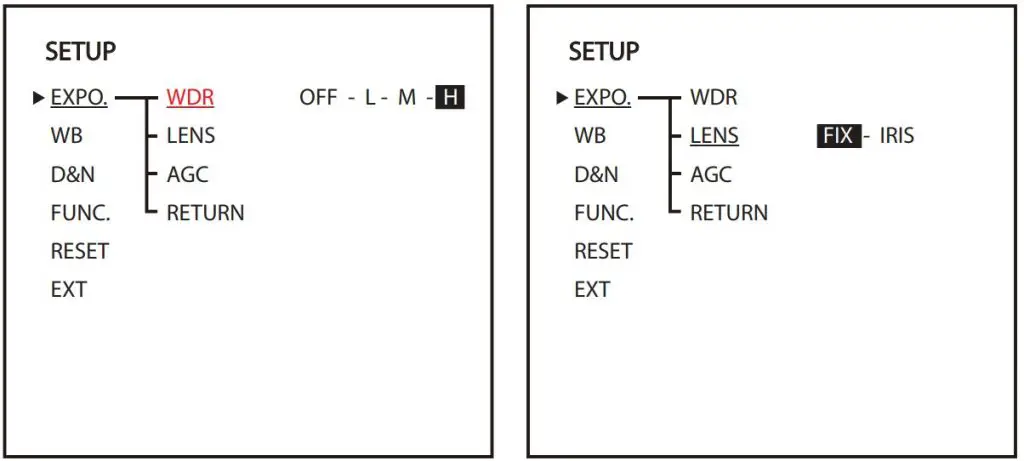
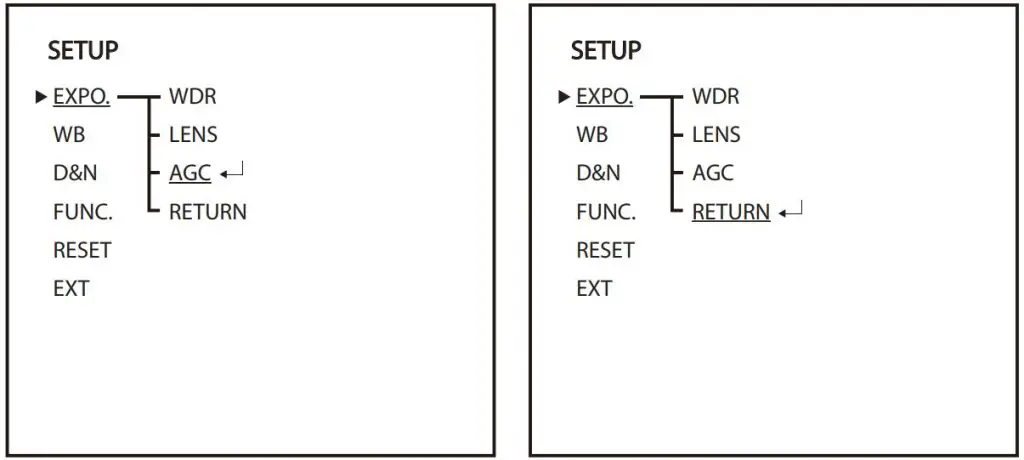
OSD Menu

Parameters
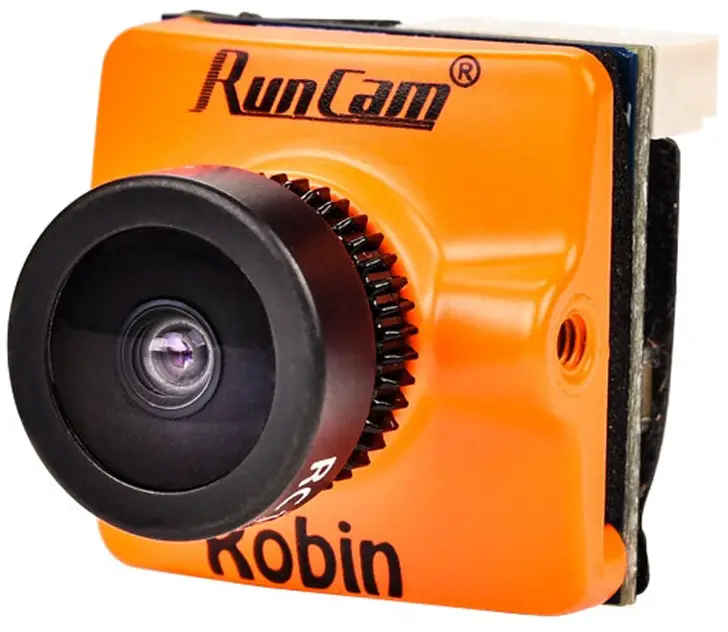
| Modell | Robiin |
| Image Sensor | 1/3″ 120dB WDR CMOS |
| Horizontal Resolution | 700TVL |
| Lens | 1.8mm (M8) FOV160° 2.1mm(M8) FOV 145° |
| Mirror/Flip | Available |
| Signal System | NTSC / PAL Switchable |
| S/N Ratio | >50dB |
| Electronic Shutter Speed | Auto |
| Auto Gain Control (AGC) | Auto |
| Min. Illumination | 0.01Lu[email protected] |
| WDR | 120dB |
| DNR | 2DNR |
| Day/Night | Color/B&W |
| Menu Control | JOYSTICK |
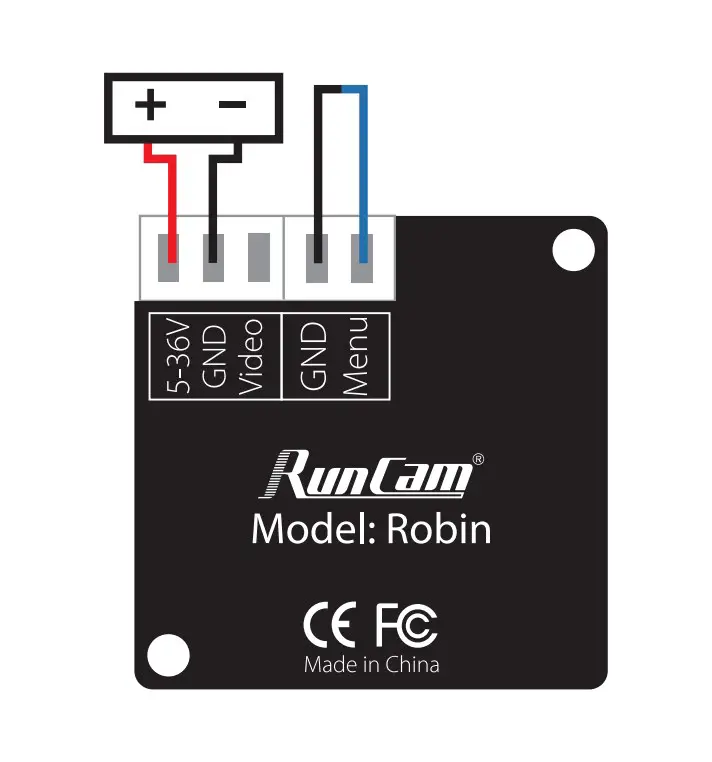
| Power | DC 5-36V |
| Current | 120mA@5V 50mA@12V |
| Housing Material | ABS |
| Net Weight | 5.5g |
| Dimensions | L19mm*W19mm*H18mm |
| Latency | 6ms(Min) |
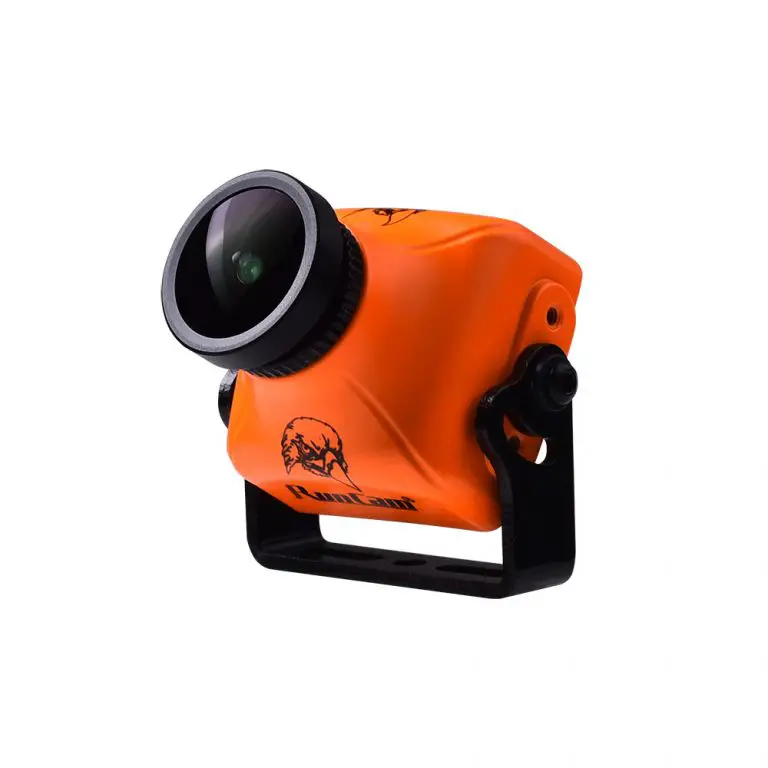
RunCam Night Eagle 2 Pro User Manual

Specifications
]]>
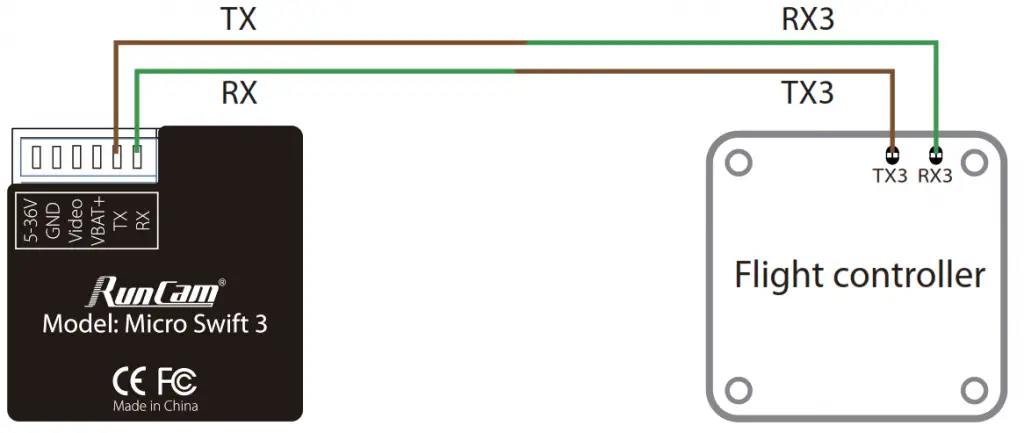
Flight controller wiring
Note: Take UART3 for example

Betaflight 3.3 or above setting
Remote control
When connected, Mode LED will be on and the buzzer on Flight Controller will beep for 3 times; When disconnected, Mode LED will be off and the buzzer on Flight Controller will beep for 2 times only; If connected successfully, take Micro Swift 2 for example, you can long-press the up button to enter the OSD menu, right button to switch preset scenes, left button to calibrate voltage and down button to reset OSD.
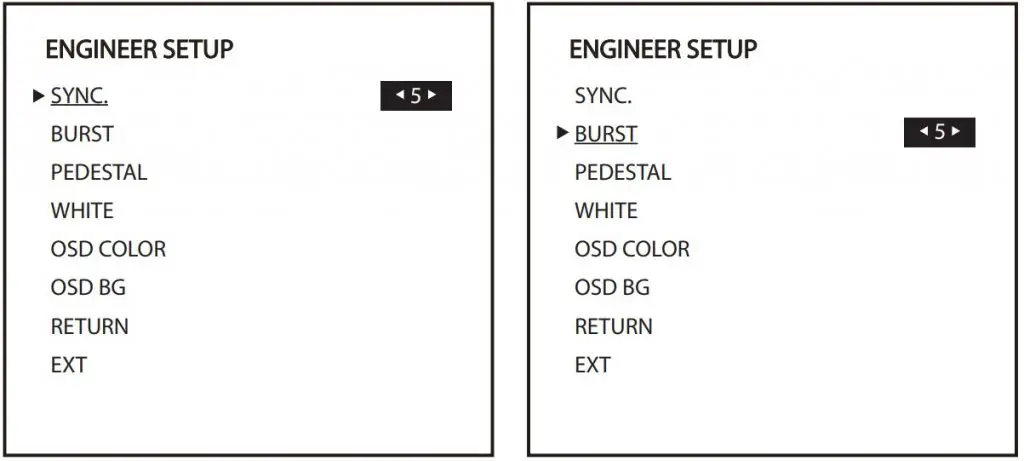
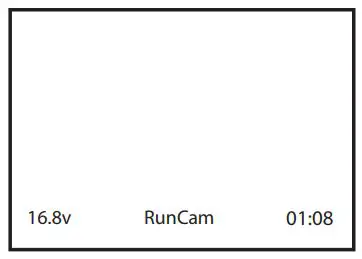
OSD Menu
QUICK SETTINGS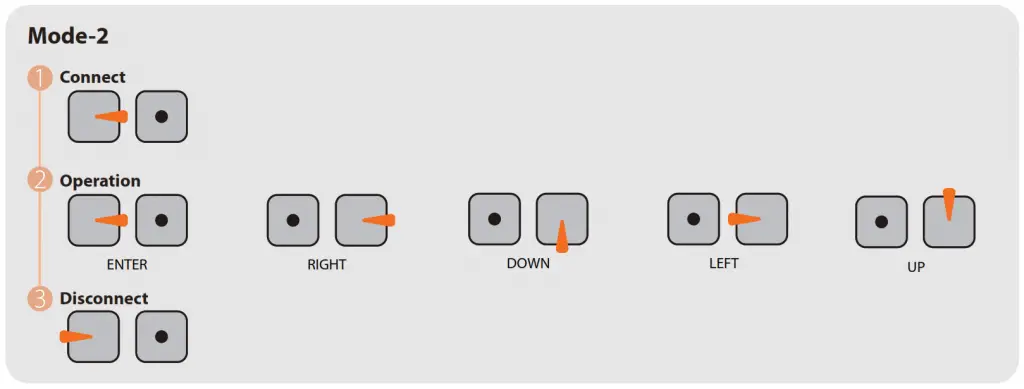
Quick settings:
- Long press UP button for three seconds to access to the OSD setting‘s screen
- Long press LEFT button for three seconds to calibrate the voltage. When the voltage text flashes, press UP/DOWN button to adjust it
- Long press DOWN button for ten seconds to reset OSD settings to default
- Long press RIGHT button for three seconds to switch between the camera presets
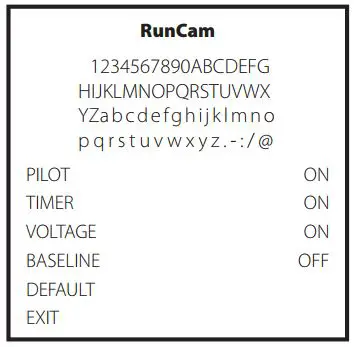
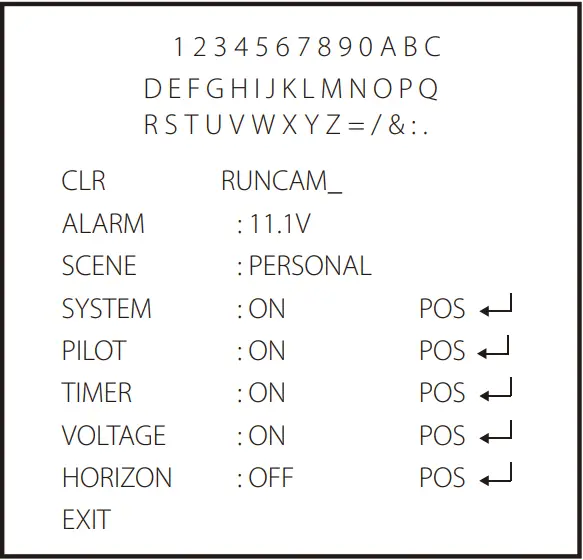
OSD Menu
- CLR: clear the ID character;
- ALARM: low voltage warning value, smartly judge the warning value of the battery when it’s low; if set it manually, then it saves the manual preset value;
- SCENE: switch the camera presets among Personal / Lightrax / Outdoor/ Indoor/ Cloudy / Twilight
- Press the middle button to switch ON / OFF, then move to POS to enter the position adjustment.
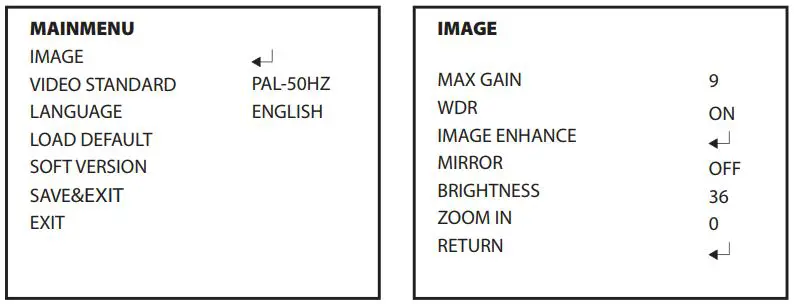
Camera Menu
MAIN MENU
- LANGUAGE (English/中文)
- WHITE BAL (ATW1 / ATW2 / AWC→ SET /MANUAL: MANUAL)
- DPC (Cover the lens then press enter key)
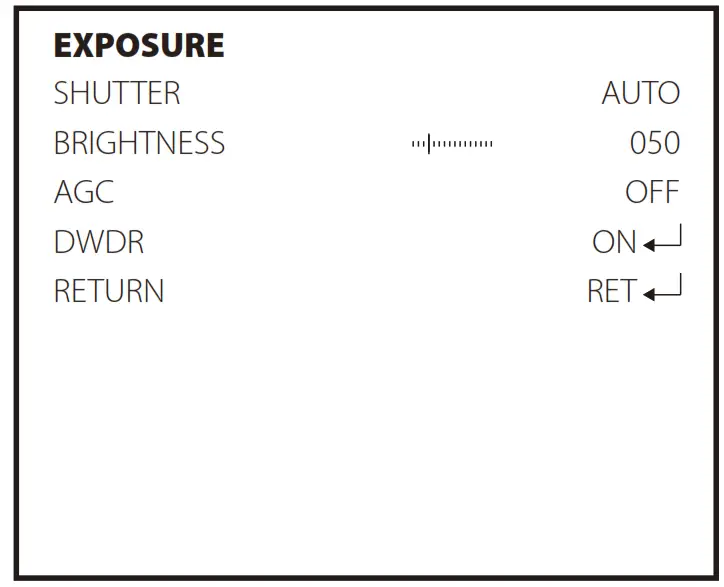
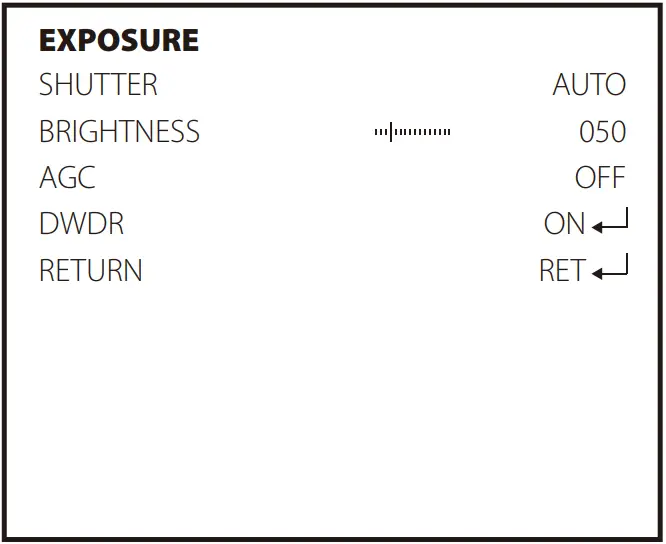
EXPOSURE

- SHUTTER (AUTO / 50-100000 / FLK)
- BRIGHTNESS (50 / 0-255)
- AGC (OFF / LOW / MIDDLE / HIGH)
- DWDR (ON: 63 0-63 / OFF)
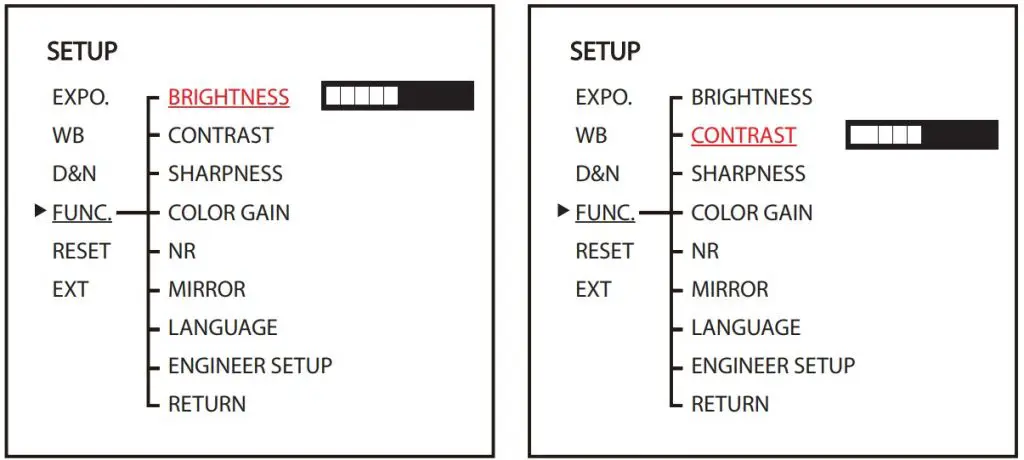
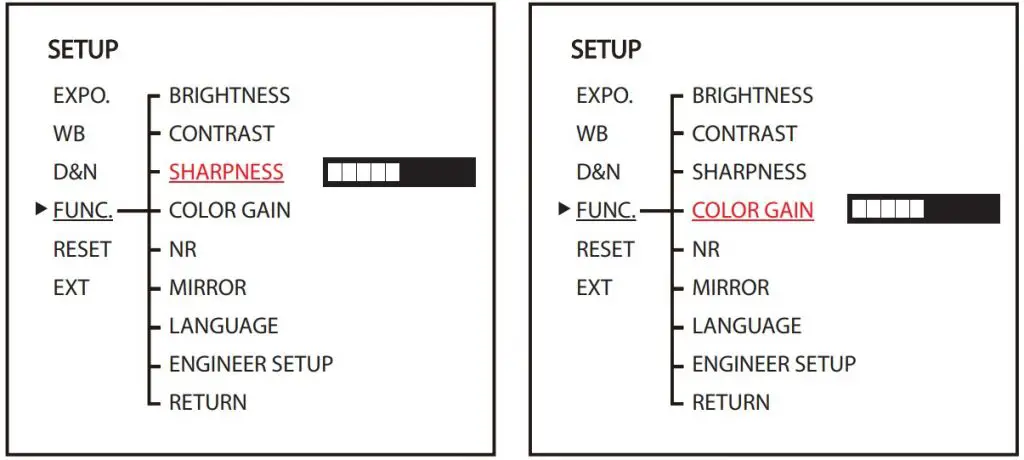
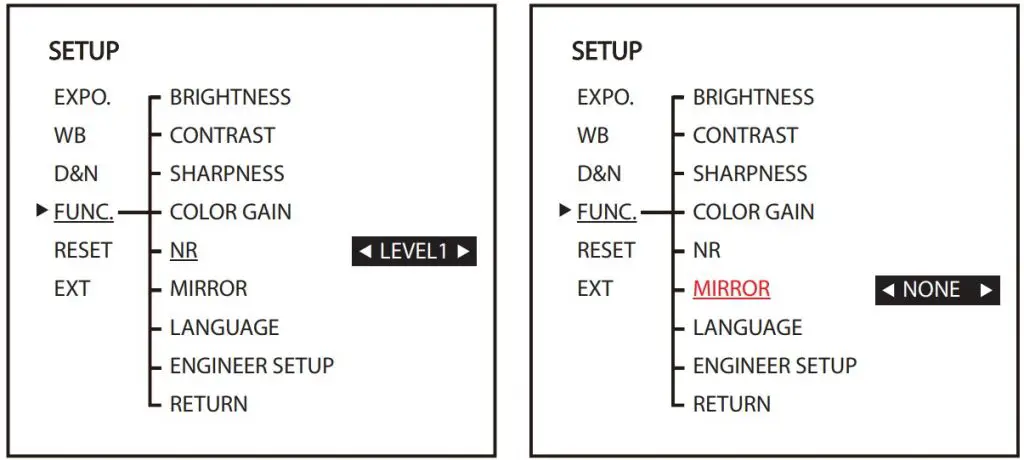
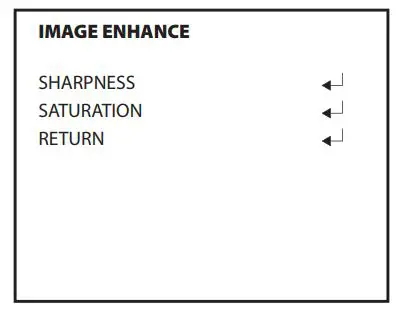
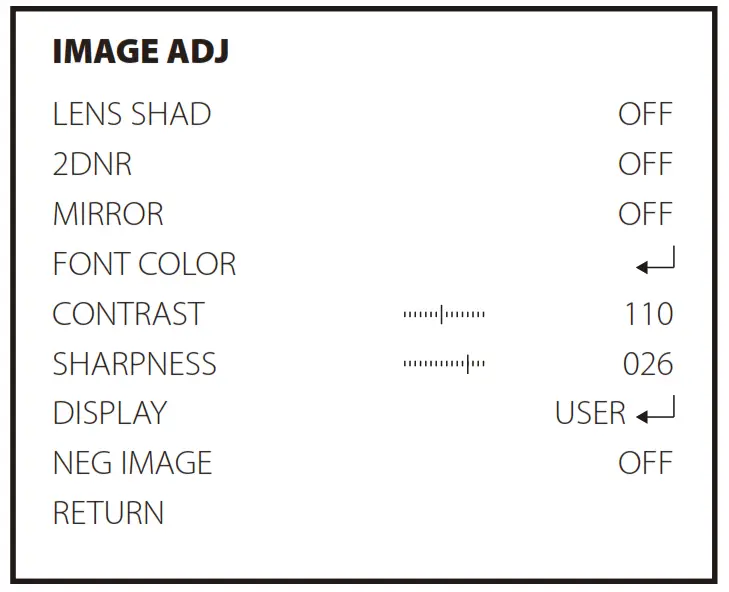
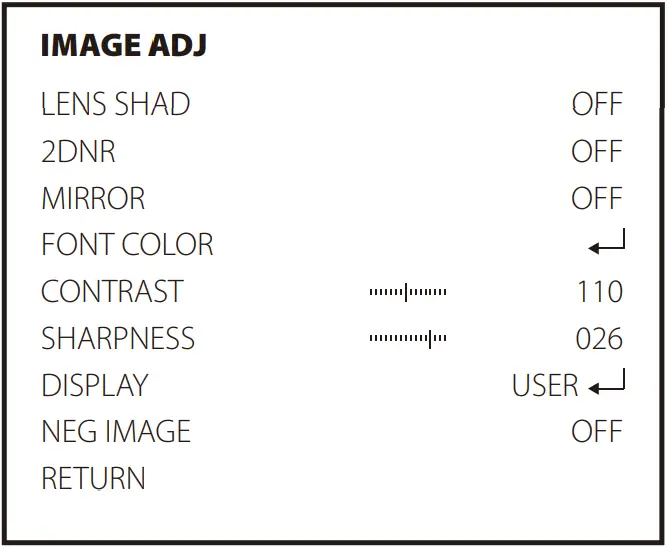
IMAGE ADJ

- LENS SHAD (OFF/ ON:22 0-255)
- CONTRAST (110 / 0-255)
- SHARPNESS (26 / 0-31)
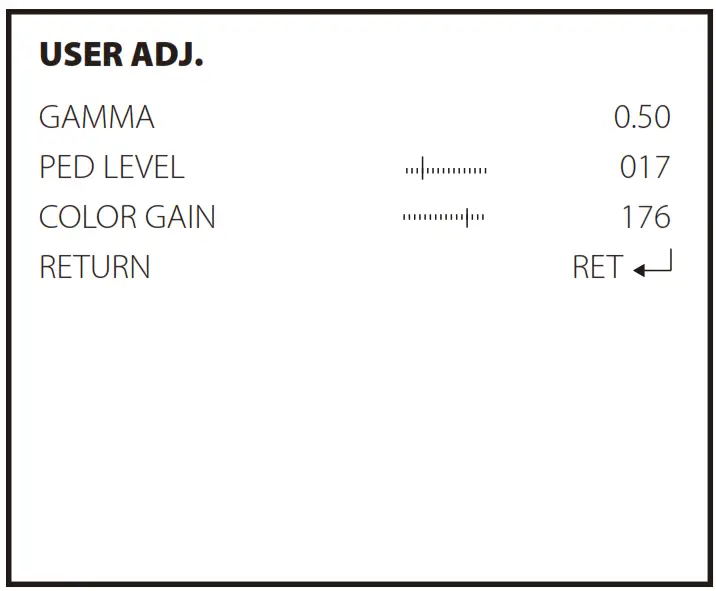
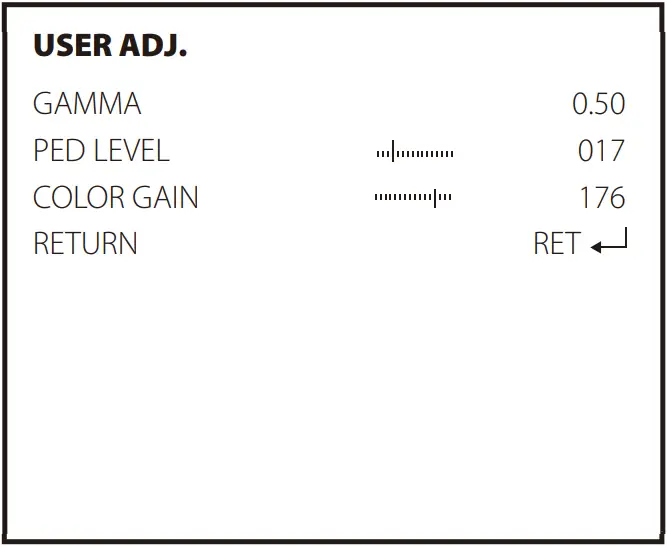
- DISPLAY (CRT/LCD/USER)
- GAMMA (0.5 / 0.05-1.0)
- PED LEVEL (17 / 0-63)
- COLOR GAIN (176 / 0-255)
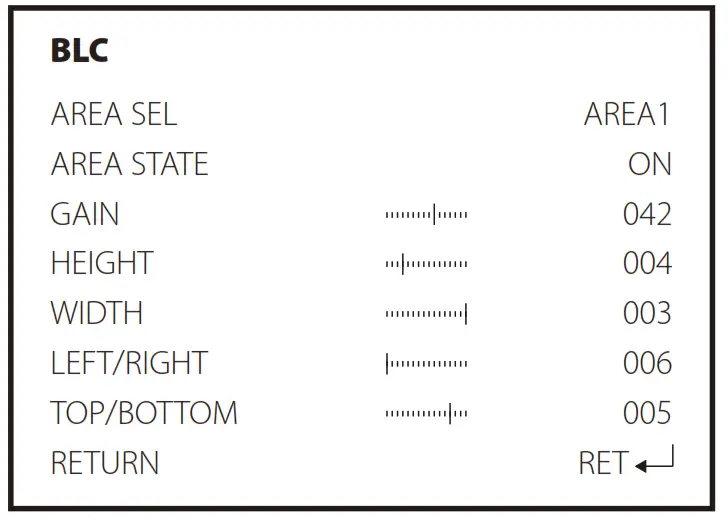
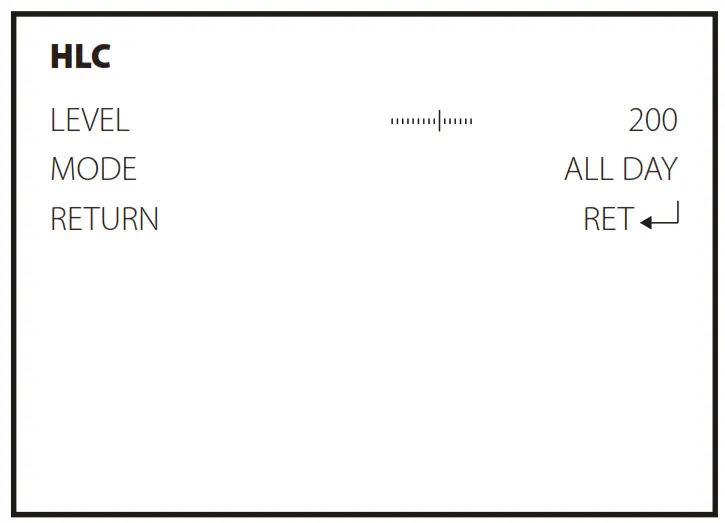
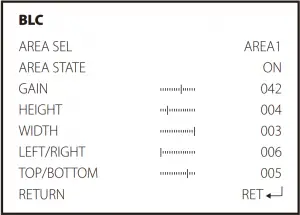
BACKLIGHT (BLC / HLC / OFF)
- AREA SEL (AREA1/AREA2)
- GAIN (042 / 0-255 )
- HEIGHT (4 / 0-10)
- WIDTH (3 / 0-9)
- LEFT/RIGHT (6 / 0-6)
- TOP/BOTTOM (10 / 0-10)
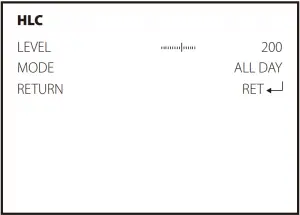
- LEVEL (200 / 0-255)
- MODE (ALL DAY / NIGHT ONLY )
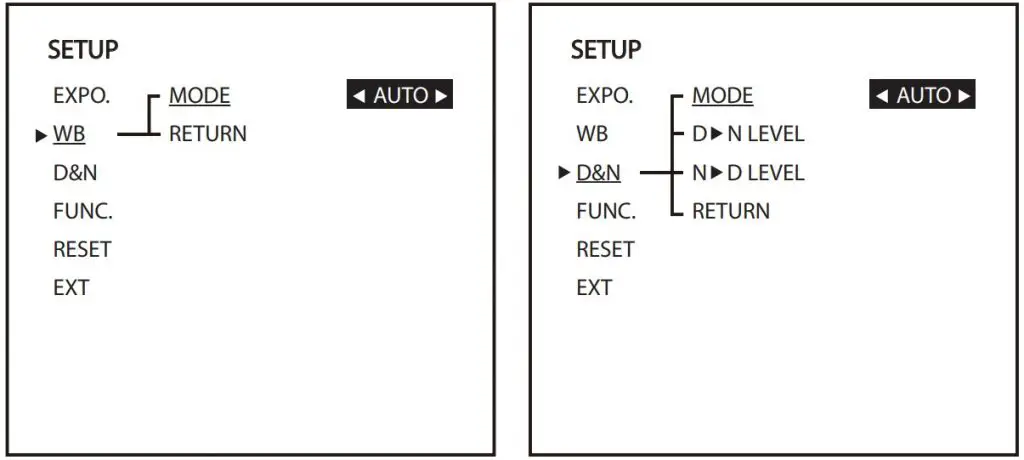
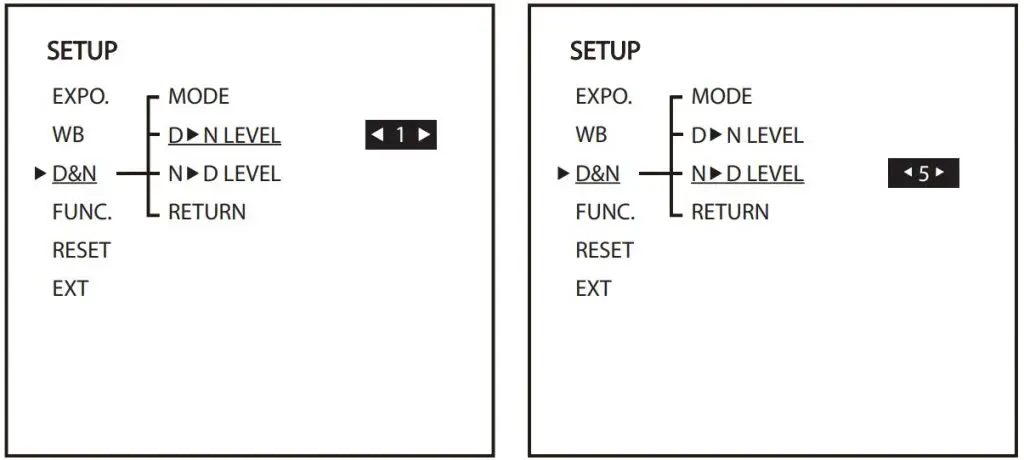
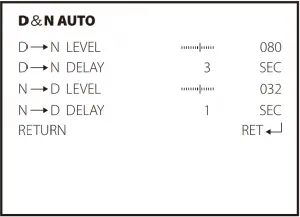
DAY & NIGHT(AUTO / COLOR / B&W / EXT)
- DAY NIGHT LEVEL (80 / 0-176)
- DAY NIGHT DELAY (3 / 1-30)
- NIGHT DAY LEVEL (032 / 0-255)
- NIGHT DAY DELAY (1 / 1-30)
- BURST (OFF/ON)
- IR SMART (OFF/ON)
- IR LEVEL (HIGH/LOW)
Parameters
| Model | RunCam Micro Swift 3 |
| Image Sensor | 1/3″ SONY Super HAD II CCD |
| Horizontal Resolution | 600TVL |
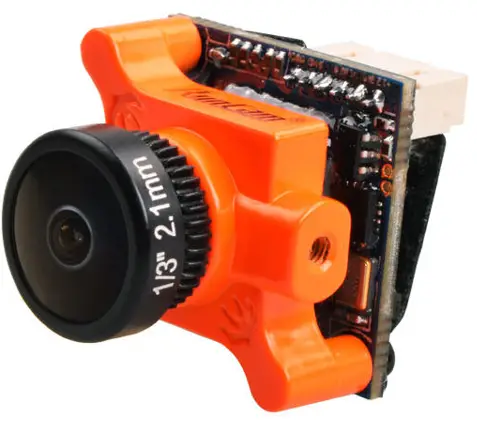
| Lens | 2.1mm (M12) FOV165° / 2.3mm(M12) FOV 150° |
| Signal System | PAL/NTSC |
| Integrated OSD | Yes |
| One Touch Scene Setting | Personal / Lightrax / Outdoor / Indoor / Cloudy /Twilight |
| S/N Ratio | >60dB (AGC OFF) |
| Electronic Shutter Speed | PAL: 1/50-100,000; NTSC: 1/60-100,000 |
| Auto Gain Control (AGC) | Yes |
| Min. Illumination | 0.01 [email protected] |
| WDR | D-WDR |
| DNR | 2DNR |
| Day/Night | Color/Auto/B&W |
| Remote Control | Flight Controllers : BetaFlight 33 / Butterflight 34/Cleanflight 22 |
| Power | DC 5-36V |
| Working Current | 60mA@12V / 120mA@5V |
| Net Weight | 9g(2.3mm) / 11g(2.1mm) |
| Dimensions | 19mm*19mm*25mm |

USER MANUAL
Connection
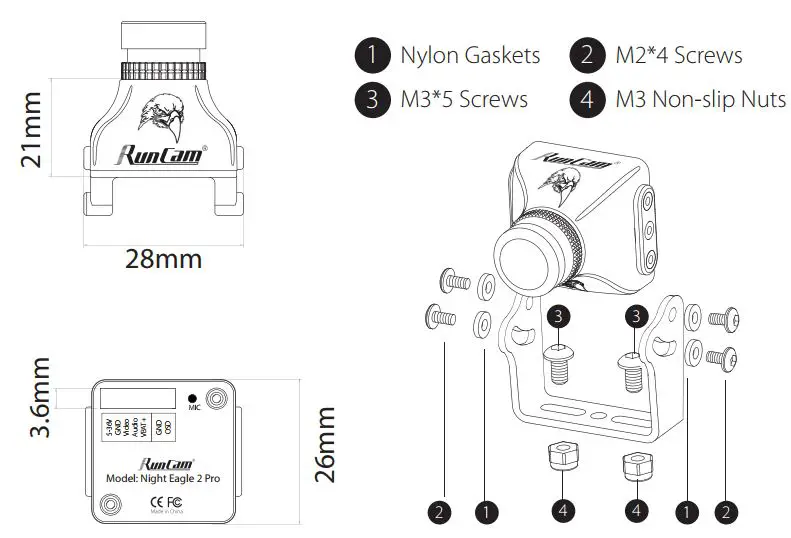
Dimensions & Installation

OSD Menu
- QUICK SETTINGS
Quick settings:
- Long press UP button for three seconds to access to the OSD setting’s screen
- Long press LEFT button for three seconds to calibrate the voltage. When the voltage text flashes, press UP/DOWN button to adjust it
- Long press DOWN button for ten seconds to reset OSD settings to default
- Loog press RIGHT button for three seconds to switch between the camera presets
OSD Menu
![]()
- CLR: clear the ID character;
- ALARM: low voltage warning value, smartly judge the warning value of the battery when it’s low; if set it manually, then it saves the manual preset value;
- SCENE: switch the camera presets among Personal / Lightrax / Outdoor/ Indoor/ Cloudy / Twilight
- Press the middle button to switch ON / OFF, then move to POS to enter the position adjustment..
Camera Menu
- MAIN MENU
- LANGUAGE (English/)
- WHITE BAL (ATW1 / ATW2 / AWC → SET / MANUAL: MANUAL)
- DPC (Cover the lens then press enter key)
- EXPOSURE

- SHUTTER (AUTO / 50-100000 / FLK)
- BRIGHTNESS (50 / 0-255)
- AGC (OFF / LOW / MIDDLE / HIGH)
- DWDR (ON: 63 0-63 / OFF)
Camera Menu
- IMAGE ADJ
- LENS SHAD (OFF/ ON:22 0-255)
- CONTRAST (110 / 0-255)
- SHARPNESS (26 / 0-31)
- DISPLAY (CRT/LCD/USER)
- GAMMA (0.5 / 0.05-1.0)
- PED LEVEL (17 / 0-63)
- COLOR GAIN (176 / 0-255)
Camera Menu
- BACKLIGHT (BLC / HLC / OFF)
- AREA SEL (AREA1/AREA2)
- GAIN (042 / 0-255 )
- HEIGHT (4 / 0-10)
- WIDTH (3 / 0-9)
- LEFT/RIGHT (6 / 0-6)
- TOP/BOTTOM (10 / 0-10)
- LEVEL (200 / 0-255)
- MODE (ALL DAY / NIGHT ONLY )
Camera Menu
- DAY & NIGHT (AUTO / COLOR / B&W / EXT)
- DAY → NIGHT LEVEL (80 / 0-176)
- DAY → NIGHT DELAY (3 / 1-30)
- NIGHT → DAY LEVEL (032 / 0-255)
- NIGHT → DAY DELAY (1 / 1-30)
- BURST (OFF/ON)
- IR SMART (OFF/ON)
- IR LEVEL (HIGH/LOW)
Parameters
| Model | RunCam Swift Mini 2 |
| Image Sensor | 1/3″ SONY Super HAD II CCD |
| Horizontal Resolution | 600TVL |
| Lens | 2.1mm (M12) FOV165° / 2.3mm(M12) FOV 150° |
| Signal System | PAL/NTSC |
| Integrated OSD | Yes |
| One Key Scene | Personal / Lightrax / Outdoor / Indoor / Cloudy / Twilight |
| S/N Ratio | >60dB (AGC OFF) |
| Electronic Shutter Speed | PAL: 1/50~100,000; NTSC: 1/60~100,000 |
| Auto Gain Control (AGC) | Yes |
| Min. Illumination | [email protected] |
| WDR | D-WDR |
| DNR | 2DNR |
| Day/Night | Color/Auto/B&W |
| Power | DC 5-36V |
| Current | 120mA@5V / 60mA@12V |
| Net Weight | 12g |
| Dimensions | L22.3mm*W22mm*H26mm |
Joystick Control & UART Control Switchable
The top left corner of the screen will shortly display the current control mode. The default is Joystick control mode.
- Short the two camera control pins
- Then power on, camera will auto switch between the two modes
- The mode can be saved after power off. After switching to the desired mode, please unplug the short-circuit cable.
UART Control works with Flight Controllers:
BetaFlight 3.3 or above / ButterFlight 3.4 or above / CleanFlight 2.2 or above / Kiss Flight RC36 or above
Joystick Control
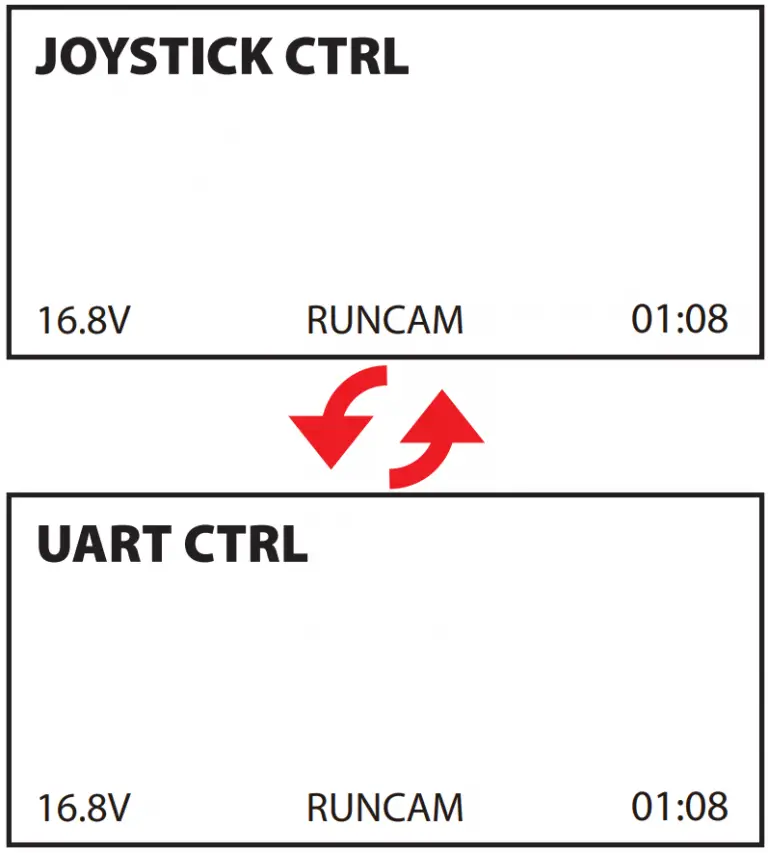
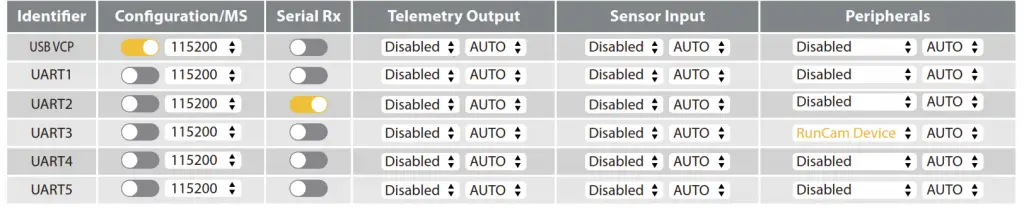
UART Control
Note: Take UART3 for example
| Identifier | Configuration/MS | Serial Rx | Telemetry Output | Sensor Input | Peripherals | |||
| USB VCP | 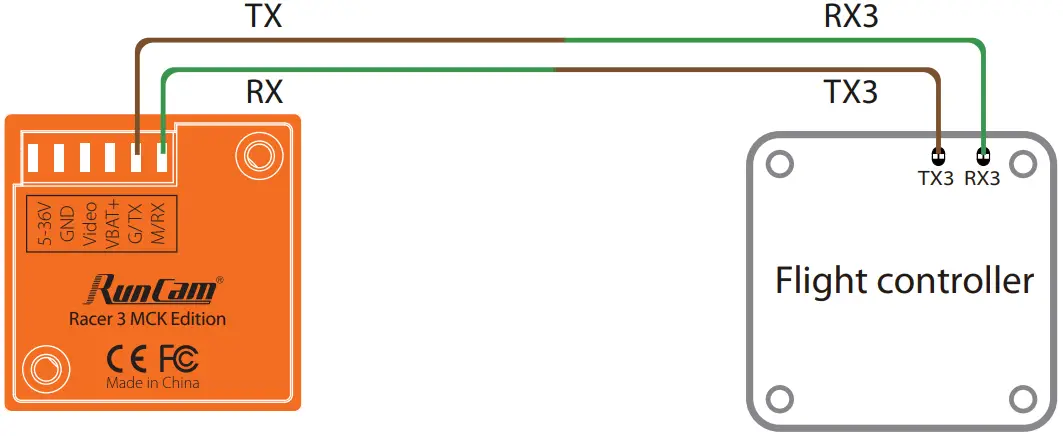 115200 115200 |
Disabled |
AUTO |
Disabled |
AUTO |
Disabled |
AUTO |
|
| UART1 | Disabled |
AUTO |
Disabled |
AUTO |
Disabled |
AUTO |
||
| UART2 | Disabled |
AUTO |
Disabled |
AUTO |
Disabled |
AUTO |
||
| UART3 | Disabled |
AUTO |
Disabled |
AUTO |
AUTO |
|||
| UART4 | Disabled |
AUTO |
Disabled |
AUTO |
Disabled |
AUTO |
||
| UART5 | Disabled |
AUTO |
Disabled |
AUTO |
Disabled |
AUTO |
||
Mode-2

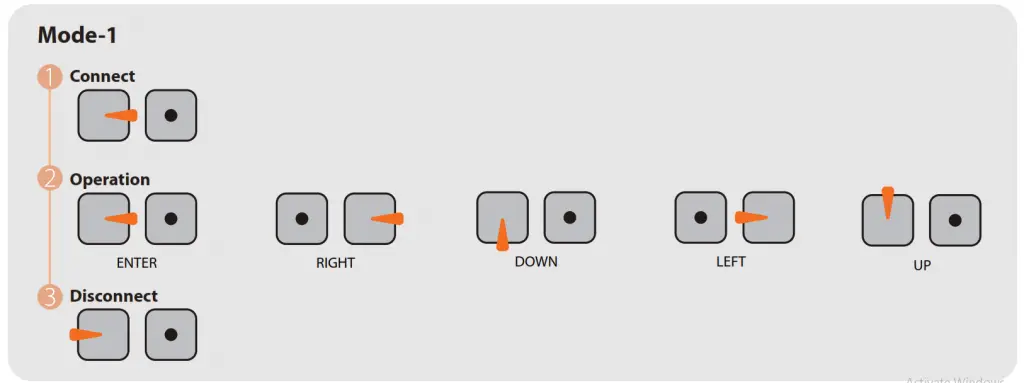
Mode-1

- When connected, The buzzer on Flight Controller will beep for 3 times; When disconnected, The buzzer on Flight Controller will beep for 2 times only; If connected successfully, you can long press the up button to enter the OSD menu, right button to switch preset scenes, left button to calibrate voltage and down button to reset OSD.
Dimensions & Installation

OSD Menu
- QUICK SETTINGS

Quick settings:
- Long press UP button for three seconds to access to the OSD setting‘s screen
- Long press LEFT button for three seconds to calibrate the voltage. When the voltage text flashes, press UP/DOWN button to adjust it
- Long press DOWN button for six seconds to reset OSD settings to default
- Long press RIGHT button for three seconds to switch between the camera presets
OSD Menu

- CLR: clear the ID character;
- ALARM: low voltage warning value, smartly judge the warning value of the battery when it’s low; if set it manually, then it saves the manual preset value;
- Press the middle button to switch ON / OFF, then move to POS to enter the position adjustment.
- Sharp View: Turn on, it will increase the image details, but also noise.
- WIDESCREEN: Dynamic stretching to aspect ratio of 16:9 to match with screen in 16:9,the image center won’t change but the edge will be widened.
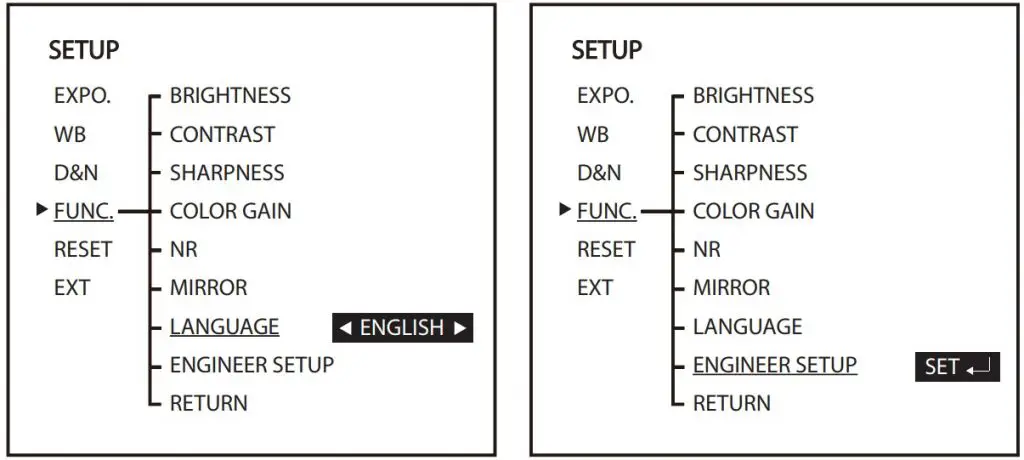
Camera Menu
- SETUP MENU

- LANGUAGE ( ENGLISH / DEUTSCH / FRANCAIS / PYCCKNN / PORTUGUES / ESPANOL / 中文 )

- FLIP ( OFF / H-FLIP / V-FLIP / HV-FLIP )
- BRIGHTNESS ( 128/ 0-255 )
- CONTRAST ( 138 / 0-255 )
- SHARPNESS ( 128 / 0-255 )
- HUE ( 90 / 0-180 )
- COLOR GAIN ( 138 / 0-255 )
Parameters
| Model | Runcam Racer MCK Edition |
| Image Sensor | Super WDR CMOS Sensor |
| Horizontal Resolution | 1000TVL |
| Lens | 1.8mm FOV 160° |
| Screen Format | 4:3 / Widescreen Switchable |
| Signal System | NTSC / PAL Switchable |
| Mirror/Flip | Available |
| Integrated OSD | Yes |
| One Touch Scene Setting | Personal/Lightrax/Darkness |
| S/N Ratio | >50dB |
| Electronic Shutter Speed | Auto |
| Min. Illumination | [email protected] |
| WDR | Super WDR |
| Day/Night | Auto |
| Menu Control | Joystick Control / UART Control Switchable |
| Power | DC 5-36V |
| Current | 110mA@5V / 40mA@12V |
| Housing Material | ABS |
| Net Weight | 5.5g |
| Dimensions | L19mm*W19mm*H18mm |
