![]() 27040-56 Electric Rice Cooker
27040-56 Electric Rice Cooker
User Manual

Read the instructions, keep them safe, pass them on if you pass the appliance on. Remove all packaging before use.
IMPORTANT SAFEGUARDS
Follow basic safety precautions, including:
This appliance can be used by children aged from 8 years and above and persons with reduced physical, sensory or mental capabilities or lack of experience and knowledge if they have been supervised/instructed and understand the hazards involved. Children shall not play with the appliance. Cleaning and user maintenance shall not be done by children unless they are older than 8 and supervised. Keep the appliance and cable out of reach of children under 8 years.
If the cable is damaged, it must be replaced by the manufacturer, its service agent, or someone similarly qualified, to avoid a hazard.
 The surfaces of the appliance will get hot.
 Do not use this appliance near bathtubs, showers, basins or other vessels containing water.
- Don’t put frozen meat or poultry in the appliance – defrost fully before use.
- Cook meat, poultry, and derivatives (mince, burgers, etc.) till the juices run clear. Cook fish till the flesh is opaque throughout.
- Don’t try to cook anything in the body of the cooker – cook only in the removable bowl.
- Don’t reach over the appliance, and keep hands, arms, face, etc. clear of the escaping steam.
- Fill with at least 1 cup of water.
- Don’t fill above the top of the fill mark.
- Don’t cover the appliance or put anything on top of it.
- Unplug the appliance when not in use.
- Don’t use accessories or attachments other than those we supply.
- Don’t use the appliance for any purpose other than those described in these instructions.
- Don’t use the appliance if it’s damaged or malfunctions.
HOUSEHOLD USE ONLY
PARTS
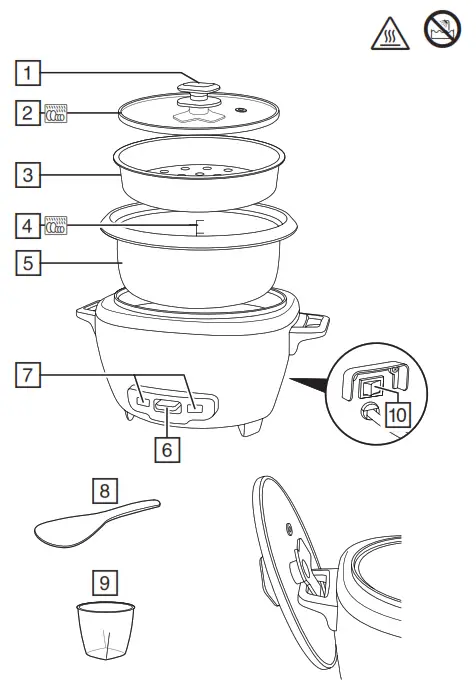
| 1. Knob 2. Lid 3. Basket 4. Fill mark 5. Bowl 6. Switch |
7. Lights 8. Spatula 9. Measuring cup 10. On/off switch |
BEFORE USING FOR THE FIRST TIME
Wash the bowl, lid, and basket in warm soapy water, rinse and dry
PREPARATION
- Sit the appliance on a stable, level, heat-resistant surface, near a power socket.
- Don’t use the appliance near or below curtains, shelves, cupboards, or anything else likely to be damaged by the escaping steam.
- Have oven gloves (or a cloth) to hand, and a heat-resistant mat or dinner plate to put the bowl on after cooking.
- Put the bowl inside the cooker.
COOKING
- Use the measuring cup to put the rice into the bowl.
- Fill the bowl with water up to the number corresponding to the number of cups of rice used.
- Give the bowl quarter of a turn each way, to ensure the bottom of the bowl makes good contact with the element.
- Put the lid on the bowl.
- Put the plug into the power socket. Move the on/off switch to I. Move the switch to the N position.
The N light will come on. - Move the switch to P. The N light will go out.
- When the rice is cooked, the switch will move to N, the Plight will go out, and the N light will come on.
- Let the rice rest for about 10 minutes, then unplug the cooker.
- Put on the oven gloves.
- Steam and hot air will escape when you lift the lid. Tilt it slightly to direct the steam away from you.
- Lift out the bowl and set it down on a heat-resistant mat or dinner plate.
- Use the spatula to turn and mix the rice, to let all the steam escape.
- Sometimes the layer of rice in contact with the bowl will form a crust.
- If you don’t want it you can remove it with the spatula, after you’ve served the rice.
ADDITIONAL INGREDIENTS
- If you add any additional ingredients (raisins, fruit, nuts, etc.), you should reduce the amount of rice to compensate for the amount of water they’ll absorb.
- Raisins and dried fruit will absorb as much water as rice, so put them into the measuring cup along with the rice.
- Nuts won’t generally absorb much water, so you can normally add them after you’ve measured the rice.
USING THE COOKER AS A STEAMER
- Add the required amount of water – Use method 1 or 2 above.
- Put the basket on top of the bowl and put the food into the basket.
- For uniform cooking, cut all pieces of food to roughly the same size.
- For peas, or anything that’ll break up or drop into the water, make a parcel with aluminum foil.
- Take care when removing the parcel – wear oven gloves and use plastic tongs/spoons.
- Put the lid on top of the basket.
- Operate the cooker the same way you would when cooking rice.
- Follow the steaming times.
- Don’t leave food in the cooker after steaming – it’ll go soggy.
- Note the type and quantity of food and the amount of water. Next time, adjust the amount of water and let the cooker look after the timing.
FINISHED?
- Switch off the appliance and unplug it.
- Don’t move the rice cooker with the full bowl inside it. It will be heavy, and the cable may catch on something as you move.
- Remove the bowl from the rice cooker before emptying it. If you try to remove food from the bowl while it’s in the rice cooker, you may spill the contents into the rice cooker. This will damage it.
CARE AND MAINTENANCE
- Switch off the appliance, unplug it and let it cool.
- Wash the lid, bowl, and rack in warm, soapy water, rinse and dry.
- Wipe all surfaces with a clean damp cloth.
 You may wash these parts in a dishwasher.
COOKING TIMES AND FOOD SAFETY
| food (fresh) | quantity | time (minutes) |
| asparagus | 400g | 15-18 |
| green beans | 200g | 20 |
| broccoli | 200g | 18 |
| brussels sprouts | 200g | 20 |
| cabbage (quarter) | 25-30 | |
| carrots (sliced) | 200g | 15-20 |
| cauliflower | 200g | 15 |
| corn cobs | 2 | 24-35 |
| courgette (sliced) | 200g | 10-12 |
| potatoes (quartered) | 400g | 25-30 |
| spinach | 200g | 5-8 |
| chicken (boneless) | 400g | 6-8 |
| fish fillets | 400g | 8-10 |
| fish steaks | 2 | 20-23 |
| prawns | 250g | 10-12 |
| lobster tail (frozen) | 12-15 | |
| mussels | 250g | 15 |
- Don’t use mussels that are open prior to cooking. Steam until the shells open fully, and discard any that aren’t open after cooking.
- These times are for a single layer of food. You’ll need to experiment to find the times which suit your favorite foods and food combinations.
- Cook meat, poultry, and derivatives (mince, burgers, etc.) till the juices run clear. Cook fish till the flesh is opaque throughout.
- You should cook leaf vegetables as little as possible, to keep them green and crisp. Plunging them into iced water will stop the cooking process.
RECYCLING
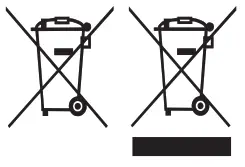 To avoid environmental and health problems due to hazardous substances, appliances and rechargeable and non-rechargeable batteries marked with one of these symbols must not be disposed of with unsorted municipal waste. Always dispose of electrical and electronic products and, where applicable, rechargeable and non-rechargeable batteries, at an appropriate official recycling/collection point.
22740-56
www.russellhobbs.com
Read the instructions, keep them safe, pass them on if you pass the appliance on. Remove all packaging before use.
IMPORTANT SAFEGUARDS
Follow basic safety precautions, including:
This appliance can be used by children aged 8 years and above and persons with reduced physical, sensory or mental capabilities or lack of experience and knowledge if they have been supervised/instructed and understand the hazards involved. Children shall not play with the appliance. Cleaning and user maintenance shall not be done by children unless they are older than 8 and supervised. Keep the appliance and cable out of reach of children under 8 years.
If the cable is damaged, it must be replaced by the manufacturer, its service agent, or someone similarly qualified, to avoid hazards.
The surfaces of the appliance will get hot.
![]() Do not use this appliance near bathtubs, showers, basins, or other vessels containing water.
Do not use this appliance near bathtubs, showers, basins, or other vessels containing water.
- Leave a space of at least 50mm all around the appliance.
- Don’t cover the appliance or put anything on top of it.
- Unplug the appliance when not in use, before moving, and before cleaning.
- Don’t use the appliance for any purpose other than those described in these instructions.
- Don’t operate the appliance if it’s damaged or malfunctions.
- Cooking pot is only suitable for gas and electric hobs. Not suitable for induction hobs.
- Do not leave the cooking pot unattended when cooking on the hob
HOUSEHOLD USE ONLY
PARTS
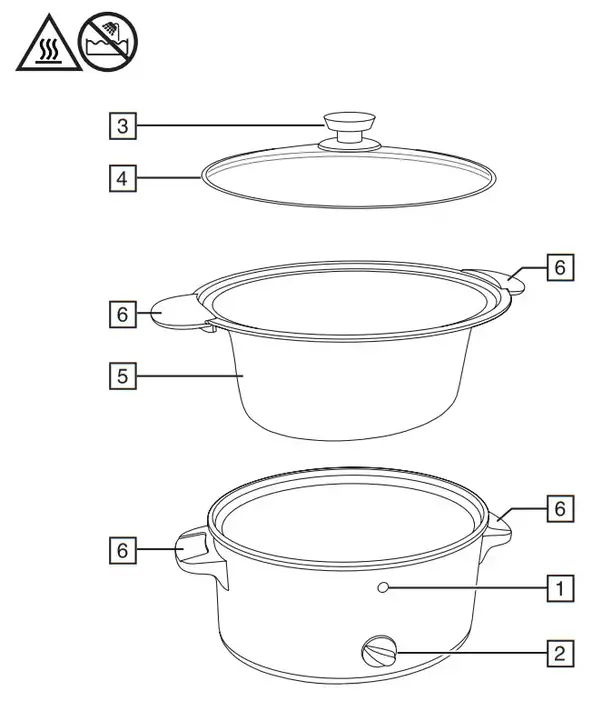
| 1 | Light | 4 | Lid |
| 2 | Temperature control | 5 | Cooking pot |
| 3 | Lid knob | 6 | Handle |
THE BENEFITS OF SLOW COOKING
Health: The gentle cooking action reduces damage to vitamins and retains more of the nutrients and flavours.
Economy: Long, slow cooking can tenderize the cheaper, tougher cuts of meat, and uses about a quarter of the power of the small ring on the average hob.
Convenience: Prepare the ingredients the night before, put them in the slow cooker before you leave, and have a delicious meal waiting for you when you get home.
TEMPERATURE CONTROL
| 0 | Off |
| 1 | For traditional slow cooking. |
| 2 | For “fast cooking”, using the appliance like an electric stewpot. |
| ≈ | For keeping the food warm after cooking. |
GENERAL
- Thaw frozen food completely before adding it to the cookpot.
- Brown the meat and sauté the vegetables in a pan or the cooking pot.
- You can use the cooking pot for searing browning, sautéing, or frying, suitable for gas and electric hobs only, prior to using the slow cooker.
Meat
- When roasting, the juices don’t spit or evaporate, so the flavor and nutritive value are retained. The size and shape of the joint, its quality, and the proportion of lean, fat, and bone, all affect cooking times. Experience will soon help you judge these.
- Avoid meat that has a high proportion of fat, or trim the excess fat.
Poultry
- Wash and dry the poultry and season inside and out.
- Brown the skin in its own fat or a little cooking oil, in a large frying pan.
Fish
- To retain flavor and texture, fish shouldn’t be cooked for long periods.
- Grease the base of the cookpot with butter or margarine.
- Clean, trim, and wash the fish. Dry and place in the cookpot.
- Season, sprinkle with lemon juice, then add the hot stock, water, or wine.
- Dot butter over the fish, and cook on low (1) for 2-3 hours.
Vegetables
- Quickly-cooked vegetables, like frozen peas and sweetcorn, must be thawed, then added half an hour before the end of cooking.
- Root vegetables, tubers, and bulbs (carrots, potatoes, onions) take much longer to cook than meat, so cut them into about 5mm thick slices, sticks, or dice, and sauté them gently for 2-3 minutes before adding to the cookpot.
Pulses (beans, peas, and lentils)
- You must boil dried beans (e.g. red kidney beans) for at least 10 minutes before adding them to the slow cooker. They’re poisonous if eaten raw or under-cooked.
- Soak dried peas and beans for 8 hours (or overnight) before cooking, to soften them.
- You don’t need to soak lentils overnight.
- When cooking with rice, use at least 150ml of cooking liquid for each 100g of rice. We’ve found that “easy-cook” rice gives the best results.
- Pasta gets too soft for slow cooking. If your recipe requires pasta, stir it in 30-40 minutes before the end of the cooking.
Soup
- Tasty, homemade soup can be left simmering all day or overnight.
- Brown the meat and vegetables in a pan.
- If thickening is required, stir in flour or cornflour, then gradually add the stock.
- Bring to the boil, season to taste, and transfer to the cookpot.
- Don’t add milk till the final half-hour of cooking. Cream or egg yolk may be added just before serving.
Puddings
- Use a heatproof pudding basin, which fits the cookpot without touching the sides.
- Fill the cookpot with enough water to come halfway up the basin.
PREPARATION
- Decide when you want to eat and when you want to start cooking.
- If you want to eat at 6 p.m., and you need to start cooking at 8 a.m., find a recipe that takes about 10 hours.
- Sit the appliance on a stable, level, heat-resistant surface.
- Set the temperature control to 0.
- For recipes without searing put the cookpot in the slow cooker, and fit the lid.
- Put the plug into the power socket.
- Set the temperature control to 2, and let the appliance preheat for 20 minutes.
- The light will come on.
SEARING
Important points when using the cooking pot for searing:
When searing on the hob, the cooking pot will become very hot. Handle with care using oven gloves!
On gas hobs, always use the correct sized burner. Do not use it on a burner that is larger than the base area of the cooking pot.
Use an oven glove to hold the cooking pot during use and when stirring.
- For recipes requiring ingredients to be seared, browned,sautéed, or fried. Always use silicone, heatproof plastic, or wood utensils to avoid scratching the nonstick surfaces. Never use metal spoons, spatulas, tongs, forks, or knives as these will damage the non-stick surface.
- If your recipe calls for searing, browning, sautéing, or frying ingredients prior to slow cooking, remove the cooking pot from the slow cooker and place it directly on a hob to cook ingredients as per a normal frypan.
- Hob use is only suitable for gas and electric hobs. Not suitable for induction hobs.
- Do not leave the cooking pot unattended when cooking on the hob.
- Do not use the lid when searing on the stovetop, otherwise, ingredients will not sear or brown.
- Once the food is seared or browned as required, add other ingredients and stir through.
- Using oven mitts grasp both handles and carefully place the cooking pot back into the slow cooker.
FILLING
When the cookpot has heated up:
- Use the lid knob to remove the lid.
- Put the ingredients into the cookpot, then add the boiling cooking liquid.
- Replace the lid.
- Set the temperature control to 1 for traditional slow cooking, set it to 2 if you’re using it as an electric stewpot.
FINISHED?
- Set the temperature control to 0. The light will go out.
- Unplug the appliance.
- Use the lid knob to remove the lid.
- Remove all the food from the cookpot.
If you’re not going to clean the cookpot immediately, fill it with warm water, to prevent the residual heat from baking any food debris on to the cookpot.
CARE AND MAINTENANCE
- Unplug the appliance and let it cool.
- Wipe all surfaces with a clean damp cloth.
- Wash the lid and cookpot in hot soapy water, using a cloth or sponge, then rinse and dry thoroughly.

To avoid environmental and health problems due to hazardous substances, appliances and rechargeable and non-rechargeable batteries marked with one of these symbols must not be disposed of with unsorted municipal waste. Always dispose of electrical and electronic products and, where applicable, rechargeable and non-rechargeable batteries, at an appropriate official recycling/collection point.
T22-9000405
22740-56 220-240V~50/60Hz 135-160Watts
22740-56 220-240В~50/60Гц 135-160 Вт
Russell Hobbs RHBL1300 Powercrush Blender Instruction Manual

2 YEAR WARRANTY
RHBL1300
INSTRUCTIONS & WARRANTY
IMPORTANT SAFEGUARDS
When using this appliance, basic safety precautions should always be followed, including the
following:
Read all instructions before, and follow whilst using this appliance.
- To protect against electric shock do not immerse the cord, plug or blender base of unit in water or any other liquid.
- Do not use outdoors.
- Do not use this appliance near bathtubs, showers, basins or other vessels containing water.
- This appliance is not intended for use by persons (including children) with reduced physical,
sensory or mental capabilities, or lack of experience and knowledge, unless they have been
given supervision or instruction concerning use of the appliance by a person responsible for
their safety. - This appliance is NOT a toy. Children should be supervised to ensure they do NOT play with the appliance.
- Cleaning or user maintenance shall not be carried out by children without the supervision of a person responsible for their safety.
- Always switch off and disconnect this appliance from the wall power outlet when not in use,
before fitting or removing parts and before cleaning the appliance. - To disconnect, turn off the wall power outlet, then grasp and remove the plug. Never pull by the cord.
- Do not operate this appliance with a damaged cord/plug or after the appliance has been
dropped, damaged or has malfunctioned in any manner. Contact customer service for
replacement, examination, repair or adjustment. - There are no user serviceable parts. If the power cord or appliance is damaged, it must be
repaired or replaced by the manufacturer or a similarly qualified person in order to avoid
hazard. - The use of attachments/accessories not recommended by the appliance manufacturer may
cause injuries or damage to the appliance and void warranty. - Do not use on an inclined plane or unstable surface.
- Keep the appliance and the power cord away from the edge of tables or countertops and out of reach of children and persons with reduced physical, sensory and mental capacities.
- Before switching on, ensure the blending jar has been assembled correctly and has been
seated onto the base. The motor will only operate if the jar has been properly seated onto the base. - Do not use the appliance if the blade is damaged.
- Care must be taken when handling any accessories with sharp edges. Cutting blades are very
sharp. Handle with extreme care and caution when removing from the bottle and during
cleaning. - Do not operate the appliance with an empty blending jar.
- Do not start the blender without the lid in place otherwise liquids/ingredients will be ejected. Always place your hand on top of the blending jar lid to hold the jar steady when blender is in use.
- WARNING: Do not blend hot liquids. Heated liquids/ingredients may be ejected due to sudden steaming, creating a possible scalding hazard. For your safety, we recommend liquids/ ingredients be cooled sufficiently (equal to or less than 40°C) before blending.
- Wait until the blades come to a complete stop before removing the blending jar from the motor unit.
- Do not run the motor for longer than 2 minutes. After 2 minutes, switch off for at least a further 2 minutes to allow the motor to cool down.
- Switch off and unplug the appliance before changing accessories or touching parts that move whilst in use.
- Do not attempt to defeat any safety interlock mechanisms.
- To prevent possible damage to the appliance do not use harsh abrasive or alkaline cleaning
agents. - Always clean the appliance after use.
- Follow the instructions when cleaning this appliance.
- Do not place on or near any heat sources.
- Misuse of the appliance may cause injury.
- Do not leave the appliance unattended when in use.
- Do not use appliance for other than its intended purpose.
- This appliance is not intended to be operated by means of an external timer or separate remote control system.
- For added safety, electrical appliances should be connected to a power outlet that is protected by a residual current device (RCD / ‘Safety Switch’) having a rated residual operating current not exceeding 30mA. Your switchboard may already incorporate an RCD. If unsure, call an electrician for verification and fitting if necessary.
This appliance is intended to be used in household and similar applications such as:
- Staff kitchen areas in shops, offices and other working environments;
- Farm houses;
- By clients in hotels, motels, and other residential type environments;
- Bed & breakfast type environments.
SAVE THESE INSTRUCTIONS.
Congratulations on the purchase of your new Russell Hobbs PowerCrush Blender with Quiet
Technology. Each unit is manufactured to ensure safety and reliability. Before using the appliance for the first time, please read the instruction booklet carefully and keep it for future reference. Pass it on if you pass on the appliance.
When using electrical appliances, basic safety precautions should always be followed.
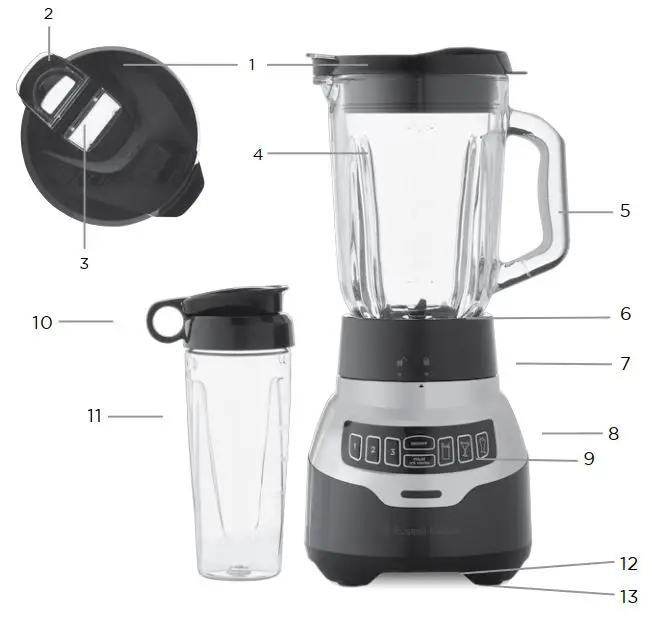
PARTS

- Dual-opening lid
- Pour spout
- Ingredient slot
- Blending jar
- Handle
- Blade assembly
- Jar base
- Base
- Digital control panel
- Personal blending bottle lid
- Personal blending bottle
- Cord storage (under base)
- Slip-resistant rubber feet
BEFORE FIRST USE
CAUTION: Handle blades carefully.
- Carefully remove all packaging material, any stickers and the plastic protector from the power plug.
- As some parts may be packed separately, check to ensure all items have been unpacked before disposing of the packaging.
- All parts need to be thoroughly cleaned before being used for the first time ( see ‘Care and Maintenance’).
- Remove and save instruction booklet.
BLENDING JAR ASSEMBLY
- Turn blending jar upside down and place flat on counter top or work surface.
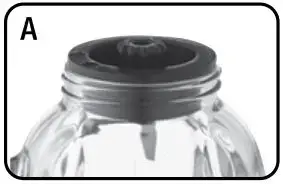
- Place the blade assembly in bottom opening of the jar with blades down. (A)

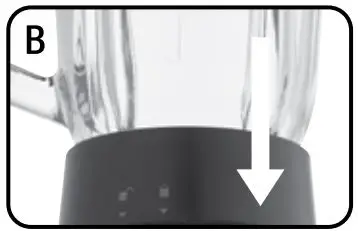
CAUTION: Blades are sharp. Handle carefully. - Place the jar base onto the blending jar and rotate clockwise until tight. It is important to tighten the assembly to avoid leaking while blending. (B)
- Turn assembled jar right side up.
- Place the dual-opening lid on blender jar.
- Uncoil power cord from storage area under the blender base.
- Place the blending jar on blender base and rotate clockwise until the locked symbol aligns with the arrow on the blender base. (C)
- Blender is now ready for use.
USING YOUR BLENDER
NOTE: Appliance should always have lid in place when in use.
- Make sure appliance is OFF.
- Place ingredients to be blended into jar. For best results, add ingredients in the
following order:
a. Liquids
b. Powders
c. Soft foods
d. Hard foods
e. Ice cubes last
Tip: When using frozen fruits it is not necessary to also add ice. - Place lid on jar; make sure the pour spout and ingredient slot are closed.
- Plug power cord into outlet. Press ON/OFF button. The LED light will show should turn a solid color to signify the blender is in standby mode. After 2 minutes the unit will automatically power off if no buttons are pressed. The LED will blink slowly when the blender is in use.
Note: When in use, do not leave blender unattended. When using hard foods, such as ice or cheese, keep one hand on the lid to keep blender in place. - Select the speed that best suits your desired task. (See SPEED AND FUNCTION CHART)
Important: Do not hold speed button. Simply press the desired speed, watch, and press
ON/OFF when the desired consistency is achieved. Holding the button for longer than 30
seconds will cause the blender to shut off. Unit must be turned off to reset. - When blending thick mixtures, such as smoothies and milkshakes, use the PULSE/ICE
CRUSH button for several seconds, then release. Repeat to mix ingredients and then run
continuously until food has reached desired consistency. Releasing PULSE stops the blending and the unit returns to STANDBY. You may use a spatula or utensil to move ingredients and thick mixtures around in the blender jar, but only after stopping the blender. Turn the blender OFF before using a utensil. - Open the ingredient slot to add ingredients while the blender is running. Drop ingredients through the opening. (D)
 CAUTION: Do not remove the lid while the blender is running.
 - When finished, press ON/OFF to stop blending. Make sure blades have completely
stopped before attempting to remove the blending jar from the base (refer to TROUBLESHOOTING for any issues). - Press ON/OFF to power off and unplug the blender.
- To remove the jar, twist to unlock position and grasp the handle and lift up.
- Open pour spout to serve.
Note: Unit will auto shutoff after 2 minutes without use. - Always unplug the appliance when not in use.
WARNING: Do not blend hot liquids. Heated liquids/ingredients may be ejected due to sudden steaming, creating a possible scalding hazard. For your safety, we recommend liquids/ ingredients be cooled sufficiently (equal to or less than 40°C) before blending.
USING THE PREPROGRAMMED FUNCTIONS
- Fill the assembled blending jar with the desired ingredients.
- Place the dual-opening lid on the jar.
- Place the jar on the base.
- Press desired preprogrammed button. The blender will automatically mix and blend the
following recipes with the press of a button:
– Smoothie: 30 seconds to blend fruits and vegetables to a smooth consistency.
– Icy drinks: Perfect for classic icy drinks like Margaritas with small ice crystals.
– Shake/Mix: Create thick, smooth and creamy frozen treats or use to combine other ingredients together.
USING THE PERSONAL BLENDING BOTTLE
Note: Do not blend hot liquids in the personal blending bottle.
- Place the personal blending bottle on a flat surface with the open end facing up. Fill the bottle with ingredients. Do not fill ingredients past the MAX fill line.
Note: For best results, add ingredients in the following order:
a. Liquids
b. Ice
c. Hard Foods
d. Soft Foods
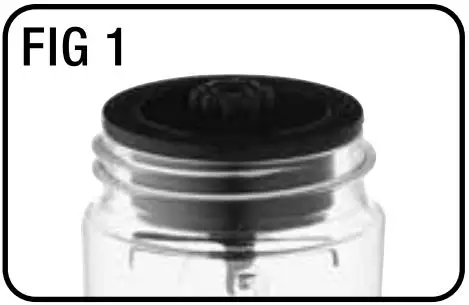
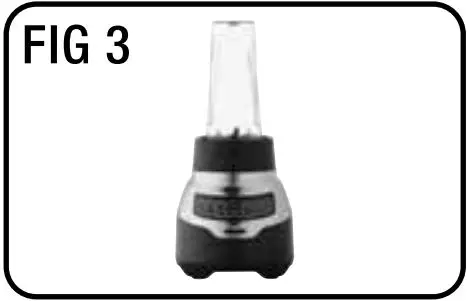
e. Powders - Place blade assembly in the bottle opening with blades down (see FIG 1.)

- Place jar base onto the bottle and rotate clockwise until it is tight.
It is important to tighten the assembly to prevent leaking during blending (see FIG 2.)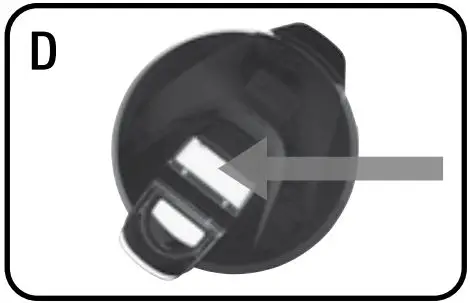
- Turn the personal blending bottle upside down and place on the blender base (see Fig 3.)
- Select speed 1 or use PULSE/ICE CRUSH to blend to desired consistency.
- Once blending has finished, remove the personal blending bottle by lifting off the base. Turn the bottle over and place it on a flat surface.
Note: Always make sure blades have stopped moving before removing the bottle.
Important: If the bottle gets stuck on the blending base or begins to loosen from the jar base, follow these steps: a. Unplug the unit.
b. Turn the bottle clockwise to tighten it onto the jar base. - Remove the jar base from the personal blending bottle by turning counterclockwise. Then
carefully remove blade assembly. - Place the personal blending bottle drinking lid on the bottle and enjoy your delicious
drinks on-the-go.
Caution: Blades are sharp. Handle carefully.
BLENDING TIPS AND TECHNIQUES
- Cut food into pieces no larger than 3⁄4″ for use in the blender.
- When preparing foods that have several different kinds of ingredients, always add liquid
ingredients first. - When ingredients splatter onto the sides of the jar or the mixture is very thick, press the
ON/OFF button to turn appliance off. Remove the lid and use a rubber spatula to scrape
down the sides of the jar and to redistribute the food, pushing food toward the blades.
Replace the lid and continue blending. - When making bread crumbs or blending dry goods, make sure blending jar and blade
assembly are completely dry. - The PULSE/ICE CRUSH function is helpful when short bursts of power are needed, such
as when preparing thick smoothies or milkshakes. Do not use pulse for more than 10
seconds at a time. Release the PULSE/ICE CRUSH button regularly, allow the blender to
rest briefly, then continue. - Do not run blender for longer than 1 ½ minutes at a time.
- Do not use if blender jar is chipped or cracked.
- It is helpful to begin the blending process on the lowest speed and then increase to a
higher speed, if necessary. - To stop blending at any time, press the ON/OFF button.
- Always operate the blender with the lid on the jar.
- Do not store foods in the blending jar.
- Do not overfill the blender (the blender is
DO NOT USE BLENDER TO BLEND:
- Large pieces of frozen foods
- Tough foods such as raw turnips, sweet potatoes and potatoes
- Bones
- Hard salami, pepperoni
- Boiling liquids
- Egg whites
- Dough
- Meats
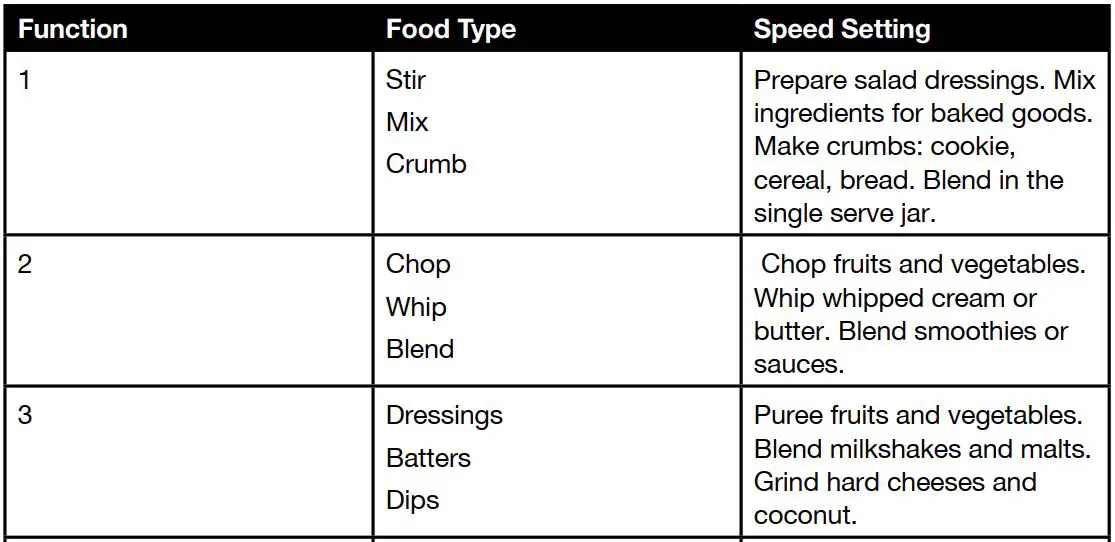
SPEED AND FUNCTION CHART

CARE AND MAINTENANCE
- Before cleaning, turn off and unplug the appliance.
- Lift the blending jar by the handle off the base.
- Remove jar base by turning it counterclockwise until loose.
- Remove the blade assembly.
Caution: Blades are sharp. Handle carefully. - Remove lid.
- Wash removable parts by hand or in the dishwasher. Place the jar on the bottom rack
and the rest of the parts on the top rack only.
CLEANING TIPS:
- For quick cleanup, combine 1 cup warm water and a drop of liquid dish soap in the blending jar.
- Cover and blend on Speed 2 for about 30 seconds.
- Discard liquid and rinse thoroughly.
- DO NOT place the jar parts in boiling liquids.
- Do not immerse the base in liquid. Wipe the base with a damp cloth and dry thoroughly.
- Remove stubborn spots by rubbing with a damp cloth and non-abrasive cleaner.
Note: If liquids spill onto the base, wipe with a damp cloth and dry thoroughly.
Do not use rough scouring pads or cleansers on parts or finish.
TROUBLESHOOTING
Legislation in some localities mandates that e-waste (anything with a plug, battery or cord) is disposed of through controlled recycling facilities and must not be disposed of in general household waste. For more information about recycling of electrical and battery operated appliances, please contact your local council or your local household waste disposal service.
Spectrum Brands Australia Pty Ltd
Locked Bag 3004 Braeside
Victoria 3195 Australia
Customer Service in Australia
Toll Free: 1800 623 118
Email: [email protected]
Website: www.spectrumbrands.com.au
Spectrum Brands New Zealand Ltd
PO Box 9817 Newmarket
Auckland 1149 New Zealand
Customer Service in New Zealand
Toll Free: 0800 736 776
Email: [email protected]
Website: www.spectrumbrands.co.nz
Spectrum Brands Australia Pty Ltd and Spectrum Brands New Zealand Ltd
Warranty Against Defects
In this warranty:
Australian Consumer Law means the Australian consumer law set out in Schedule 2 to the
Competition and Consumer Act 2010;
CGA means the New Zealand Consumer Guarantees Act 1993;
Goods means the product or equipment which was accompanied by this warranty and purchased in Australia or New Zealand, as the case may be;
Manufacturer, We or us means:
- for Goods purchased in Australia, Spectrum Brands Australia Pty Ltd ABN, 78 007 070 573; or
- for Goods purchased in New Zealand, Spectrum Brands New Zealand Ltd, as the case
may be, contact details as set out at the end of this warranty;
Supplier means the authorised distributor or retailer of the Goods that sold you the Goods in
Australia or in New Zealand; and You means you, the original end-user purchaser of the Goods.
- Our goods come with guarantees that cannot be excluded under the Australian Consumer
Law, or the CGA. You are entitled to a replacement or refund for a major failure and compensation for any other reasonably foreseeable loss or damage. You are also entitled to have the goods repaired or replaced if the goods fail to be of acceptable quality and the failure does not amount to a major failure. - The benefits provided by this Warranty are in addition to all other rights and remedies in
respect of the Goods which the consumer has under either the Australian Consumer Law
or the CGA. The original purchaser of the Goods is provided with the following Warranty
subject to the Warranty Conditions: - We warrant the Goods for all parts defective in workmanship or materials, for the period
of 2 years (Warranty Period) from the date of purchase. If the Goods prove defective within the Warranty Period by reason of improper workmanship or material, we may, at our own discretion, repair or replace the Goods without charge. Warranty Conditions - The Goods must be used in accordance with the manufacturer’s instructions. This Warranty does not apply should the defect in or failure of the Goods be attributable to misuse, abuse, accident or non-observance of manufacturer’s instructions on the part of the user. As far as the law permits, the manufacturer does not accept liability for any direct or consequential loss, damage or other expense caused by or arising out of any failure to use the Goods in accordance with the manufacturer’s instructions.
- Exhaustible components (such as batteries, filters and brushes) of the Goods are included under this Warranty only where there is a defect in workmanship or materials used.
- The warranty granted under clause 3 is limited to repair or replacement only.
- Any parts of the Goods replaced during repairs or any product replaced remain the property of the manufacturer. In the event of the Goods being replaced during the Warranty Period, the warranty on the replacement Goods will expire on the same date as for the Warranty Period on the original Goods which are replaced.
- In order to claim under the warranty granted under clause 3 you must:
(a) Retain this warranty with your receipt/proof of purchase; and
(b) Return the Goods to us at the relevant address or to the Supplier by prepaid freight within the Warranty Period accompanied with (i) the legible and unmodified original proof of purchase, which clearly indicates the name and address of the Supplier, the date and place of purchase, the product name or other product serial number and (ii) this warranty. - This warranty is immediately void if:
(a) Any serial number or appliance plate is removed or defaced;
(b) The Goods have been serviced or otherwise repaired by a person not authorised to do so by us or where non approved replaced parts are used. - The Goods are designed for domestic use only. The Goods must be connected to the
electrical voltage requirements as specified in the ratings label located on the Goods. - This warranty does not cover the cost of claiming under the warranty or transport of the Goods to and from the Supplier or us.
- This warranty is only valid and enforceable in Australia against Spectrum Brands Australia Pty Ltd and in New Zealand against Spectrum Brands New Zealand Ltd.
Contact us or the Supplier for further details.
Register your product online
If you live in Australia please visit: www.spectrumbrands.com.au/warranty
If you live in New Zealand Please visit: www.spectrumbrands.co.nz/warranty
Registration of your warranty is not compulsory, it gives us a record of your purchase AND entitles you to receive these benefits: Product information; Hints and tips; Recipes and news; Information on special price offers and promotions. Any questions? Please contact Customer Service for advice.
RECIPE BOOK
SERVES: 6 (1 cup).
INGREDIENTS:
- 4 cups apple juice
- 4 medium bananas, cut into 2 pieces
- 4 cups frozen whole strawberries
METHOD:
- Place ingredients in blender in order shown above. Cover and blend for 15 seconds, or until smooth.
Tip: Substitute orange juice for apple juice
SERVES: 6
INGREDIENTS:
- ½ cup orange flavored liquor
- 1 cup tequila
- 1 (6 oz.) can frozen limeade mix
- 4 cups ice cubes
METHOD:
- Place ingredients in blender with liquids first and ice last; cover. Blend on AUTO setting 1. Serve with lime wedges if desired.
SERVES: 4 (1 cup).
INGREDIENTS:
- 4 large scoops vanilla ice cream
- 1 cup cold milk
- ¼ cup malted milk powder
- 1 tsp vanilla extract
METHOD:
- Place ingredients into blender jar in order shown above; cover.
- Blend on AUTO setting 3.
Tip: Substitute your favorite ice cream flavor in place of vanilla.
]]>UNPACKING YOUR APPLIANCE
Before you use your appliance
- Remove all the packaging.
- Check the appliance after unpacking for any visual damage such as:
- Misaligned or damaged parts
- Damage to the controls
- Damage to the plug or cable
- If you can see any damage do not use the appliance
The appliance should not be used if it has been dropped or there are any visible signs of damage.
This appliance must be placed on a solid stable surface, away from walls, cabinets, furniture, curtains, etc. Position the appliance with minimum spacing of 100cm from the top and sides, front and back.
SAFETY INSTRUCTIONS
When using electrical appliances, basic safety precautions should always be observed, including the following:
- Read all instructions.
- Check that the mains voltage corresponds with the rating on the appliance.
- The appliance must not be left unattended while it is connected to the mains supply.
- Do not touch hot surfaces. Use the handle or the controls.
- To protect against electrical shock do not immerse cord, plug, or appliance in water or other liquid. Do not operate with wet hands.
- Do not let the cord hang over the edge of a worktop, table etc. or touch hot surfaces. Page
SAFETY INSTRUCTIONS
- Do not operate any appliance with a damaged cord or plug, or after the appliance malfunctions or is dropped or damaged in any manner. The supply cord can not be replaced. If the cord is damaged the appliance should be scrapped.
- The use of accessory attachments not recommended by the appliance manufacturer may cause fire, electric shock or injury.
- This appliance must not be immersed in any liquid
- To disconnect, remove the plug from the mains outlet. Do not pull the plug out by the cord.
- Warning: In order to avoid overheating, do not cover the heater.
- Never remove parts from the appliance, such as the feet, screws and so on.
- Never use the appliance near a bath, shower or a swimming pool.
- Never place flammable objects or clothing on top of the appliance.
- Allow a 100cm safe area around the appliance on the top and sides, front and back.
- Never use the appliance in a room with explosive gas such as petrol, or while using any kinds of flammable glues, sprays or solvents.
- Prevent overheating of the appliance by keeping the air inlets and outlets clean and free of anything that may cause blockage. Check all inlets and outlets regularly for accumulated dust. DO NOT COVER.
- Do not place any part of your body near the air inlet, outlet or on the fins ,to avoid personal injury, electric shock or fire.
- If overheating should occur, the built in overheating safety device will shut the appliance off. Note, the appliance will turn on again when it has cooled down sufficiently. Page 4
SAFETY INSTRUCTIONS
- Do not insert any foreign objects into the ventilation.
- Keep all ventilation clear of any draped fabric or curtains.
- The appliance must not be located immediately below a mains socket. Do not use the appliance with a programmer, timer or any other device that switches the appliance on automatically. A fire risk exists if the appliance is covered or positioned incorrectly.
- Caution : Some parts of this product can become very hot and cause burns. Particular attention must be given when children or vulnerable people are present.
- Do not operate this appliance for anything other than its intended use.
- This appliance is not intended for commercial use.
- This product is intended for household use only. Do not use outdoors.
- This product is only intended for heating.
- Warning: It is hazardous for anyone other than a competent person to carry out any service or repair operation which involves the removal of a cover which gives protection against exposure to electrical parts.
- This heater is filled with a precise quantity of special oil. Repairs requiring opening of the oil container are only to be made by the manufacturer or his service agent who should be contacted if there is an oil leak.
- When scrapping the heater, follow the regulations concerning the disposal of oil.
- Warning: Children should not use this appliance. Close supervision is necessary when any appliances are used near children.
SAFETY INSTRUCTIONS
- Warning: Children of less than 3 years should be kept away unless continuously supervised.
- Warning: Children aged from 3 years and less than 8 years shall only switch on/off the appliance provided that it has been placed or installed in its intended normal operating position and they have been given supervision or instruction concerning use of the appliance in a safe way and understand the hazards involved.
- Warning: Children aged from 3 years and less than 8 years shall not plug in, regulate and clean the appliance or perform user maintenance.
- Warning: This appliance is not intended for use by persons (including children) with reduced physical, sensory or mental capabilities, or lack of experience and knowledge, unless they have been given supervision or instruction concerning use of the appliance by a person responsible for their safety. Children should be supervised to make sure that they do not play with or use the appliance.
- Warning: In order to avoid overheating, do not cover the heater
- Warning: This appliance is not intended for use by persons (including children) with reduced physical, sensory or mental capabilities, or lack of experience and knowledge, unless they have been given supervision or instruction concerning use of the appliance by a person responsible for their safety. Children should be supervised to make sure that they do not play with or use the appliance.
- Warning Do not touch hot surfaces, do not block openings or cover appliance.
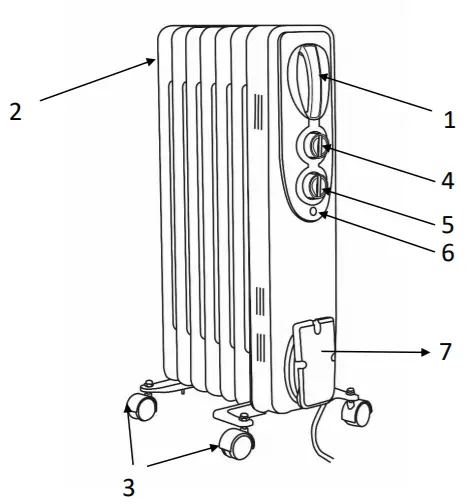
FEATURE DIAGRAM

- Handle
- Fins
- Castors/ Wheels
- Power /heat setting switches
- Thermostat control
- Thermostat indicator light
- Power cable storage
BASE ASSEMBLYF
- Attach the castors to the base plate and secure using the 4 x nuts supplied.
- Then turn the heater upside down and position between the end fins.
- Attach the base plates by hooking the 2 x U bolts through the fins and securing with the 4 x wing nuts.
- Once secure, turn the radiator round so that it is sitting on the wheels.

USING YOUR OIL FILLED RADIATOR
- Before connecting your appliance to the mains socket, position the appliance upright on the floor, at least 90cm away from the wall, away from curtains, furniture or wall coverings.
- Insert the mains plug into a suitable 13 amp mains socket.
- Turn the Power Control to the ‘I’, ‘II’ or ‘III’ position. The appliance has 3 power settings.Power Control Position RHOFR5001 RHOFR5002
OFF Power OFF Off Off
I Low heat ON 600W 800W
II Medium heat ON 900W 1.2kW
III High heat ON 1.5kW 2.0kW - Turn the Thermostat Control to the desired position. It is recommended to select the highest position to pre heat the appliance. It will take 5 10 minutes for the appliance to fully heat up, the time taken for the heater to heat the room it is located in will be dependent on the size of the room and the ambient temperature of the room. The indicator light will illuminate when the unit is working, but the light will cycle on and off when the thermostat control is set on a low setting and the heater is then maintaining the room temperature.
Note: this appliance will not operate if the thermostat has been set too low.
Note : If the thermostat dial is set toward the maximum setting and the power control is set to off then the indicator light will stay illuminated. No heat will be emitted as the power to the heating elements is off.USING YOUR OIL FILLED RADIATORNote: this appliance will not operate if is not placed on a stable surface. - When the room reaches the desired temperature, the radiator will cycle off and turn on again when the temperature drops.
- If the room temperature falls below the desired temperature, the heating elements will turn on again until the room temperature reaches the desired temperature.
Note
: this radiator is oil filled, and will cool down slowly after the power is shut off. Allow the radiator heater to cool prior to any movement, the built in carry handle should be used for easy movement.
Safety Protective
Devices The appliance is fitted with an over heat and tip over protection system.
- Overheat protection the power to the heating elements will automatically cut off if the temperature of the heating elements exceeds a certain limit. In the event of overheating, the heater will stop operating. Once the
appliance has completely cooled the appliance will then resume operating as normal. - Tip Over Switch The unit needs to be placed on a flat, firm and stable surface to ensure that the appliance contacts the floor firmly and internal tip over switch is level. If in the event that the unit tips over or is placed on an uneven or super very surface the appliance will not operate.
USING YOUR OIL FILLED RADIATOR
POWER CABLE STORAGE
When the appliance is not in use wrap the power cord around the storage hook to keep your appliance tidy and easy to store away.
The power cord must be completely unwrapped when plugged into the plug socket or in use.
CLEANING AND CARE
Before you clean the appliance, disconnect the mains plug from the wall socket.
- Allow the appliance to cool down completely before cleaning.
- Do not immerse cord, plug or appliance in any liquid or allow moisture to come into contact with electrical parts.
- Clean the outer surface using a moist cloth and wipe over with a dry, soft cloth.
- Do not use harsh detergents, abrasives or spray on cleaners.
- Don’t allow water to seep into the openings or come into contact with electrical connections.
- Allow sufficient drying time before operating again.
- Clean the air inlets and outlets regularly with a vacuum cleaner using the brush attachment (with regular use, at least twice a year).
- When the appliance is not in use. We recommend that, the heater is re packed in its original packaging and stored in a cool, dry place.
PROBLEM SOLVING
My appliance does not work when I turn it on:
- Check that your appliance is plugged in and the power is turned on at the mains socket.
- Try another mains socket.
- Check the appliance is in an upright position.
- Check that the thermostat setting has not been set too low.
- Check if the Overheat protection has operated by leaving the appliance plugged un and giving it time to cool down.
The heater should start to resume operating normally. - If the appliance still doesn’t work, do not try to repair it yourself.
If your appliance power is automatically cut off, follow the step below:
- Unplug your appliance from the mains socket and allow it to completely cool down.
- Inspect your appliance. Clean the air inlet and air outlet with a vacuum cleaner if necessary. If there are any signs of physical damage (e.g. melting, or burning of the case), do not attempt to use the appliance. Please leave all maintenance work to qualified personnel.
- Plug in the appliance and switch it on again. If it cuts off again, move the appliance to a better ventilated location.
GUARANTEE AND CUSTOMER SERVICES
At Russell Hobbs, we take all our customer feedback seriously. Feel free to contact our Customer Service Team, on 0345 209 7461, who will be more than happy to assist you.
This product is guaranteed for 12 months from the date of the original purchase. If any defect arises due to faulty materials or workmanship, the faulty product must be returned to the place of purchase. Refund or replacement is at the discretion of the retailer.
The following conditions apply:
- The product must be returned to the retailer with the original proof of purchase.
- The product must be installed and used in accordance with the instructions contained in this instruction guide and any other instructions for use which are supplied.
- It must be used for domestic purposes only and for its intended use.
- This warranty does not cover wear and tear, damage, misuse or consumable parts.
SPARE PARTS
To check the availability of the following spare parts, simply contact our friendly Customer Services team using the details provided at the bottom of this page. For
CONNECTION TO THE MAINS SUPPLY
This appliance is designed to operate from a mains supply of 220 240V~50Hz/ 60Hz
Check that the voltage marked on the product corresponds with your supply voltage.
How to change the fuse
- Slot the end of a screwdriver into the recess in the fuse holder of the plug.
- Pull the fuse holder upwards until free of the plug and slide the fuse out.
- Replace the fuse and replace fuse holder, pushing down until locked into place.
Important : Only ever use a 13 amp

SPECIFICATION
Model number RHOFR5001 (B)
Rated voltage 220V 240V ~ 50Hz/60Hz
Power consumption 1500W
Product dimensions (CMS) CMS)(H)62.5 x (W)24 x (D)33
Model number RHOFR5002 (B)
Rated voltage 220V 240V ~ 50Hz/ 60Hz
Power consumption 2000W
Product dimensions (CMS) CMS)(H)62.5 x (W)24 x (D)40.5
| Model number | RHOFR5001 (B) | |||||
| Item | Symbol | Value | Unit | Item | Unit | |
| Heat output | Type of heat input, for electric storage local space heaters only | |||||
| Nominal heat output | Pnom | 0.7311 | kW | manual heat charge control, with integrated thermostat | NA | |
| Minimum heatoutput
(indicative) |
Pmin | 0 | kW | manual heat charge control with room and/or outdoor temperature
feedback |
NA | |
| Maximum continuous heat
output |
Pmax,c | 0.7311 | kW | electronic heat charge control with room and/or outdoor temperature
feedback |
NA | |
| fan assisted heat output | NA | |||||
| Auxiliary electricity consumption | Type of heat output/room temperature control | |||||
| At nominal heat
output |
elmax | N/A | kW | single stage heat output and no
room temperature control |
No | |
| At minimum heat output | elmin | N/A | kW | Two or more manual stages, no room temperature control | No | |
| In standby mode | elSB | N/A | kW | with mechanic thermostat room
temperature control |
Yes | |
| with electronic room temperature
control |
No | |||||
| electronic room temperature
control plus day timer |
No | |||||
| electronic room temperature control plus week timer | No | |||||
| Other control options (multiple selections possible) | ||||||
| room temperature control, with
presence detection |
No | |||||
| room temperature control, with open windowdetection | No | |||||
| with distance control option | No | |||||
| with adaptive start control | No | |||||
| with working time limitation | No | |||||
| with black bulb sensor | No | |||||
| Contact details | G2S LIMITED | |||||
| WIGAN, WN2 4AY | ||||||
SPECIFICATION
| Model number | RHOFR5002 (B) | |||||
| Item | Symbol | Value | Unit | Item | Unit | |
| Heat output | Type of heat input, for electric storage local space heaters only | |||||
| Nominal heat output | Pnom | 0.8731 | kW | manual heat charge control, with integrated thermostat | NA | |
| Minimum heatoutput
(indicative) |
Pmin | 0 | kW | manual heat charge control with room and/or outdoor temperature
feedback |
NA | |
| Maximum continuous heat
output |
Pmax,c | 0.8731 | kW | electronic heat charge control with room and/or outdoor temperature
feedback |
NA | |
| fan assisted heat output | NA | |||||
| Auxiliary electricity consumption | Type of heat output/room temperature control | |||||
| At nominal heat
output |
elmax | N/A | kW | single stage heat output and no
room temperature control |
No | |
| At minimum heat output | elmin | N/A | kW | Two or more manual stages, no room temperature control | No | |
| In standby mode | elSB | N/A | kW | with mechanic thermostat room
temperature control |
Yes | |
| with electronic room temperature
control |
No | |||||
| electronic room temperature
control plus day timer |
No | |||||
| electronic room temperature control plus week timer | No | |||||
| Other control options (multiple selections possible) | ||||||
| room temperature control, with
presence detection |
No | |||||
| room temperature control, with open windowdetection | No | |||||
| with distance control option | No | |||||
| with adaptive start control | No | |||||
| with working time limitation | No | |||||
| with black bulb sensor | No | |||||
| Contact details | G2S LIMITED | |||||
| WIGAN, WN2 4AY | ||||||
 This symbol is known as the ‘Crossed-out wheelie bin Symbol’. When this symbol is marked on a product/batteries, it means that the product/batteries should not be disposed of with your general household waste. Only discard electrical/electronic/battery items in separate collection schemes, which cater for the recovery and recycling of materials contained within. Your co-operation is vital to make sure the success of these schemes and for the protection of the environment. For your nearest disposal facility, visit www.recycle-more.co.uk or ask in store for details. We reserve the right due to possible changes to design to alter the instruction manual without prior notice.

instructions

![]()
Read the instructions, keep them safe, pass them on if you pass the appliance on. Remove all packaging before use.
Follow basic safety precautions, including:
- This appliance can be used by children aged from 8 years and above and persons with reduced physical, sensory or mental capabilities or lack of experience and knowledge if they have been supervised/instructed and understand the hazards involved. Children shall not play with the appliance. Cleaning and user maintenance shall not be done by children unless they are older than 8 and supervised. Use and store the appliance out of reach of children.
- Use the iron, or set it on its heel, on a stable, level, heat-resistant surface, preferably an ironing board.
- Don’t leave the iron unattended while plugged in, or while it’s standing on the ironing board.
- Unplug the iron before filling, before cleaning, and after use.
- Don’t operate the appliance if it’s dropped or damaged, or if it malfunctions or leaks.
- If the cable is damaged, it must be replaced by the manufacturer, its service agent, or someone similarly qualified, in order to avoid hazard.
- The surfaces of the appliance will get hot don’t touch.
- Don’t put the appliance in liquid, don’t use it in a bathroom, near water, or outdoors.

- Don’t iron clothing while it’s being worn you’ll injure the wearer.
diagrams
1 light 5 cover 9 reservoir 2 temperature control 6 spray nozzle 10 heel 3 marker 7 steam vents Caution hot surface 4 water inlet 8 soleplate - Don’t use the appliance for any purpose other than those described in these instructions.
- Don’t scratch the soleplate avoid buttons, zips, etc.
- The appliance has a protective thermal fuse, which will blow if it overheats. If this happens, the appliance will stop working, and must be returned for repair.
household use only
- Remove any labels, stickers or packaging from the iron and soleplate.
- Don’t worry if the iron smokes a bit at first, it’ll stop as the element cures.
- Iron an old piece of cotton fabric, to clean the soleplate.
- Press the
 and
and  buttons 3 or 4 times, to check them.

- Check for textile care symbols
 .
. - Iron fabrics needing low temperatures
 first, then those that need medium temperatures , and finish with those needing high temperatures.
 FILLING
- The iron may be used with tap-water, but if you live in a hard-water area, you should use distilled water (not chemically descaled water).
- If you buy distilled water, check that it is marketed as suitable for irons.
- Don’t add anything to the water you’ll damage the iron.
- Unplug the appliance.
- Set the temperature control to
 ·
· - Place the iron on its soleplate.
- Open the cover.
- Pour water from the jug into the water inlet.
- Pour slowly, to allow the air in the reservoir to escape, and avoid an airlock.
- Don’t fill past the max mark on the reservoir, or water will escape in use.
- Close the cover. Wipe up any spillage.
SWITCH ON - Set the temperature control to.
- Sit the iron on its heel.
- Put the plug into the power socket.
- Turn the temperature control to bring the setting you want next to the marker.
- When the iron reaches the set temperature, the light will go off. It will then cycle on and off as the thermostat operates to maintain the temperature.
temperature setting guide
label marking temperature setting cool – nylon, acrylics, polyester warm – wool, polyester ixtures
 hot – cotton, linen
 do not iron
 If the instructions on the fabric label differ from this guide, follow the instructions on the label.
 STEAM IRONING
 - If you intend to use steam, the temperature setting must be S or higher.
- Wait till the light goes off, then start ironing.
SPRAY
Water spotting affects some fabrics. Test this on a hidden part of the fabric. - Lift the iron off the fabric.
- Aim the spray nozzle at the fabric.
- Press the button.
- You may have to press it 2 or 3 times to pump water through the system.
SHOT OF STEAM - If you intend to use steam, the temperature setting must be or higher.
- If you don’t, you’ll get water on your clothes, not steam.
- Lift the iron off the fabric.
- Press the button.
- You may have to press it 2 or 3 times to pump water through the system.
- Leave 4 seconds between shots, to let the steam build up.
 DRY IRONING
 - Do your dry ironing first, then switch off, fill the reservoir, and do your steam ironing.
- Wait till the light goes off, then start ironing.
 VERTICAL STEAMING
 - Remove wrinkles from hanging clothes, hanging curtains, and furnishing fabrics.
- Check that there is adequate ventilation behind the fabric, otherwise moisture may build up, causing mildew.
- Check that there is nothing behind the fabric that may be damaged by the steam.
- Check that pockets, turn-ups, and cuffs are empty.
- Set the temperature control to max.
- Lift the iron off the fabric.
- Press the button.
- You may have to press it 2 or 3 times to pump water through the system.
- Leave 4 seconds between shots, to let the steam build up.
AFTER USE - Set the temperature control to .
- Unplug the appliance.
- Open the cover.
- Hold it over a sink, turn it upside down, and drain the water from the reservoir, via the water inlet.
- Close the cover.
- Sit the iron on its heel.
- Leave it to cool down completely.
- When it’s cold, wipe off any moisture, and wind the cable round the heel.
- Store the iron on its heel, to avoid corrosion and damage to the soleplate.
 SELF CLEAN
 - To prevent scale building up, use the self clean function at least monthly in normal water areas, more often in hard water areas.
Products returned under guarantee with faults due to scale will be subject to a repair charge. - You’ll need a basin or a large bowl to catch the water coming out of the soleplate.
- Fill the reservoir to the max mark.
- Set the temperature control to max.
- Sit the iron on its heel.
- Put the plug into the power socket.
- Wait till the light goes off.
- Hold the iron over the basin or bowl, with the soleplate down.
- Press the
 button, and keep it pressed in.
 - Gently move the iron to and fro.
Keep clear of the escaping water and steam. - Water and steam will wash scale and dust through the soleplate.
- Carry on till the reservoir is empty.
- Release the button.
- Unplug the iron, and sit it on its heel to cool.
- When it’s cold, wipe off any moisture, and wind the cable round the heel.
- Store the iron on its heel, to avoid corrosion and damage to the soleplate.
CLEANING - Unplug the iron, and sit it on its heel to cool.
- Clean the outside surfaces of the appliance with a damp cloth.
- Remove spots from the soleplate with a little vinegar.
- Store the iron on its heel, to avoid corrosion and damage to the soleplate.
 ANTI-SCALE
 - The anti-scale agent incorporated in the iron helps prevent the build-up of scale.
- Don’t use a descaling solution, or you’ll destroy the anti-scale agent.
 ENVIRONMENTAL PROTECTION
To avoid environmental and health problems due to hazardous substances in electrical and electronic goods, appliances marked with this symbol mustn’t be disposed of with unsorted municipal waste, but recovered, reused, or recycled.
Please Read and Save this Use and Care Book.
IMPORTANT SAFEGUARDS
When using electrical appliances, basic safety precautions should always be followed, including the following:
- Read all Instructions.
- Do not touch hot surfaces. Use handles or knobs.
- To protect against fire, electric shock and injury to persons do not immerse cord, plug, kettle, or base in water or other liquid.
- Close supervision is necessary when any appliance is used by or near children.
- Unplug from outlet when not in use and before cleaning. Allow to cool before putting on or taking off parts, and before cleaning the appliance.
- Do not operate any appliance with a damaged cord or plug or after the appliance malfunctions, or has been damaged in any manner. Contact Consumer Support at the toll free number listed in the warranty section.
- The use of accessory attachments not recommended by the appliance manufacturer may result in fire, electric shock or injury to persons.
- Do not use outdoors
- Do not let cord hang over edge of table or counter, or touch hot surfaces.
- Do not place on or near a hot gas or electric burner, or in a heated oven.
- To disconnect, lift the ON/OFF switch to OFF (O) then remove plug from wall outlet.
- Do not use appliance for other than intended use.
- Scalding may occur if the lid is removed during the heating cycle.
- This appliance is not intended for use by persons (including children) with reduced physical, sensory or mental capabilities, or lack of experience and knowledge, unless they have been given supervision or instruction concerning use of the appliance by a person responsible or their safety.
- Children should be supervised to ensure that they do not play with the appliance.
SAVE THESE INSTRUCTIONS.
This product is for household use only.
GROUNDED PLUG
As a safety feature, this product is equipped with a grounded plug, which will only fit into a three-prong outlet. Do not attempt to defeat this safety feature. Improper connection of the grounding conductor may result in the risk of electric shock. Consult a qualified electrician if you are in doubt as to whether the outlet is properly grounded.
TAMPER-RESISTANT SCREW
Warning: This appliance is equipped with a tamper-resistant screw to prevent removal of the outer cover. To reduce the risk of fire or electric shock, do not attempt to remove the outer cover. There are no user-serviceable parts inside. Repair should be done only by authorized service personnel.
ELECTRICAL CORD
a) A short power-supply cord is provided to reduce the risks resulting from becoming entangled in or tripping over a longer cord.
b) Extension cords are available and may be used if care is exercised in their use.
c) If an extension cord is used:
- The marked electrical rating of the extension cord should be at least as great as the electrical rating of the appliance;
- If the appliance is of the grounded type, the extension cord should be
a grounding-type 3-wire cord; and - The cord should be arranged so that it will not drape over the counter top or tabletop where it can be pulled on by children or tripped over.
Note: If the power cord is damaged, please contact the warranty department listed in these instructions.

Product may vary slightly from what is illustrated.
How to Use
This appliance is for household use only.
BEFORE USING YOUR KETTLE
- Remove all packing materials, any stickers and the plastic band around the power plug.
- To register your product, go to www.prodprotect.com/russellhobbs.
- Wash all parts as instructed in CARE AND CLEANING section.
- Select a level surface where this unit is to be used allowing enough space for steam to escape without damage to counters, cabinets and walls.
- Fill kettle to maximum fill line with cold water. Bring to boil, discard and repeat. Kettle is now ready for use.
PARTS
- Filter (part no. KE7900-01 )
- Lid
- Lid release
- On/Off Switch
- Stand
FILLING
- Open the lid.
- Fill with at least 1 cup of water, but not above max.
- Close the lid. Always close the lid when boiling the kettle.
USING YOUR KETTLE
- Put the stand on a stable, level surface.
- Plug the stand into the wall socket.
- Put the kettle on the stand.
- Move the switch to I.
- The light will come on and the kettle will start to heat up.
- When the water boils the kettle will switch off.
- To switch off manually, move the switch to O, or simply lift the kettle off the stand.
GENERAL
When you lift the kettle, you may see moisture on the stand. Don’t worry – it’s the steam used to switch off automatically, which then condenses and
escapes via vents under the kettle.
BOIL DRY PROTECTION
- This will shorten the life of the element. A boil-dry cut-out will switch the kettle off.
- You must then remove the kettle from its stand to reset the cut-out.
- Sit the kettle on the work surface till it’s cold.
CARE AND MAINTENANCE
- Unplug the stand, and let the kettle cool before cleaning.
- Wipe all surfaces with a clean damp cloth.
- Keep the connectors dry.
- Open the lid and slide the filter out of the kettle.
- Rinse the filter under a running tap while brushing with a soft brush.
- Slide the filter back into the kettle until it clicks.
- Close the lid.
DESCALE REGULARLY, (AT LEAST MONTHLY).
Any other servicing should be performed by an authorized service representative.
- Fill kettle with 4 cups cold tap water and bring to a boil. Add 2 cups white vinegar, let stand for at least 1 hour or overnight and discard.
- Fill kettle to maximum fill line with cold water. Bring to boil, discard and repeat. Kettle is now ready for use.
NEED HELP?
Warranty Information
(Applies only in the United States and Canada)
For service, repair or any questions regarding your appliance, please call our
Customer Service Line at 1-800-947-3744. Please DO NOT return the product to the place
of purchase. Also, please DO NOT mail product back to manufacturer, nor bring it to a
service center. You may also want to consult www.prodprotect.com/russellhobbs.
What does it cover?
- Any defect in material or workmanship provided; however, the liability of Spectrum Brands, Inc. will not exceed the purchase price of product.
How long is the warranty valid?
- In the United States: Two years from the date of original purchase with proof of such purchase.
- In Canada: Two years from the date of original purchase with proof of such purchase. Canadian residents can register online for an extra year of warranty at: www.prodprotect.com/russellhobbs.
What will we do to help you?
• Provide you with a reasonably similar replacement product that is either new or factory refurbished.
How do you get service?
• Save your receipt as proof of date of sale.
• Visit the online service website at www.prodprotect.com/russellhobbs, or call tollfree 1-800-947-3744, for general warranty service.
• If you need parts or accessories, please call 1-800-738-0245.
What does your warranty not cover?
- Damage from commercial use
- Damage from misuse, abuse or neglect
- Products that have been modified in any way
- Products used or serviced outside the country of purchase
- Glass parts and other accessory items that are packed with the unit
- Shipping and handling costs associated with the replacement of the unit
- Consequential or incidental damages (Please note, however, that some states do not allow the exclusion or limitation of consequential or incidental damages, so this
limitation may not apply to you.)
How does state law relate to this warranty?
- This warranty gives you specific legal rights. You may also have other rights that vary from state to state or province to province.
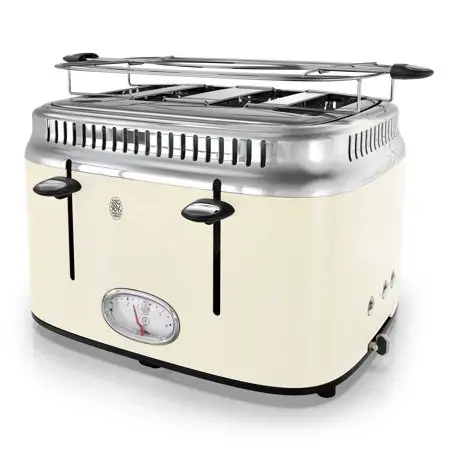
Russell Hobbs Retro Style 4-Slice Toaster
IMPORTANT SAFEGUARDS
When using electrical appliances, basic safety precautions should always be followed, including the following:
- Read all instructions.
- Do not touch hot surfaces. Use handles or knobs.
- To protect against fire, electric shock and injury to persons do not immerse cord, plugs or appliance in water or other liquid.
- Close supervision is necessary when any appliance is used by or near children.
- Unplug from outlet when not in use and before cleaning. Allow to cool before putting on or taking off parts, and before cleaning the appliance.
- Do not operate any appliance with a damaged cord or plug, or after the appliance malfunctions or has been damaged in any manner. Contact Consumer Support.
- The use of accessory attachments not recommended by the appliance manufacturer may cause injuries.
- Do not use outdoors.
- Do not let cord hang over edge of table or counter, or touch hot surfaces.
- Do not place on or near a hot gas or electric burner, or in a heated oven.
- To disconnect, push button, then remove plug from wall outlet.
- Do not use this appliance for other than intended use.
- Oversized foods, metal foil packages, or utensils must not be inserted in a toaster, as they may create a risk of fire or electric shock.
- A fire may occur if the toaster is covered or touching flammable material, including curtains, draperies, walls and the like, when in operation.
- Do not attempt to dislodge food when toaster is plugged in.
Warning: To prevent electrical shock, unplug before cleaning.
Warning: To reduce the risk of fire or electric shock, operate with crumb tray in place. - This appliance is not intended for use by persons (including children) with reduced physical, sensory or mental capabilities, or lack of experience and knowledge, unless they have been given supervision or instruction concerning use of the appliance by a person responsible for their safety.
- Children should be supervised to ensure that they do not play with the appliance.
- The appliance is not intended to be operated by means of an external timer or separate remote-control system.
SAVE THESE INSTRUCTIONS.
This product is for household use only.
POLARIZED PLUG
This appliance has a polarized plug (one blade is wider than the other). To reduce the risk of electric shock, this plug is intended to fit into a polarized outlet only one way. If the plug does not fit fully into the outlet, reverse the plug. If it still does not fit, contact a qualified electrician. Do not attempt to modify the plug in any way.
TAMPER-RESISTANT SCREW
Warning: This appliance is equipped with a tamper-resistant screw to prevent removal of the outer cover. To reduce the risk of fire or electric shock, do not attempt to remove the outer cover. There are no user-serviceable parts inside. Repair should be done only by authorized service personnel.
ELECTRICAL CORD
A short power-supply cord is provided to reduce the risks resulting from becoming entangled in or tripping over a longer cord.
Extension cords are available and may be used if care is exercised in their use.
If an extension cord is used:
- The marked electrical rating of the extension cord should be at least as great as the electrical rating of the appliance;
- If the appliance is of the grounded type, the extension cord should be a grounding-type 3-wire cord; and
- The cord should be arranged so that it will not drape over the counter top or tabletop where it can be pulled on by children or tripped over.
Note: If the power cord is damaged, please contact the warranty department listed in these instructions.

How to Use
This appliance is for household use only.
GETTING STARTED
- Remove all packing materials, any stickers and the plastic band around the power plug.
- To register your product, go to www.prodprotect.com/russellhobbs.
- Wash all parts as instructed in CARE and MAINTENANCE section.
- Select a level surface where this unit is to be used allowing enough space for steam to escape without damage to counters, cabinets and walls.
- Set the browning level to maximum (6). Operate the appliance empty, to cure the new elements. This may smell a bit, but it’s nothing to worry about. Ensure the room is well ventilated.
PARTS
- toasting slots
- lever
- browning control
- crumb tray, left (part no. TR9250-02)
- crumb tray, right (part no. TR9250-01)
- warming rack (part no. TR9250-03)
- handle
- toasting time gauge
TOASTING TIME GAUGE
The gauge shows the amount of time it will take to make the toast at the selected browning control setting.
- If you cancel toasting by pressing the button, the gauge will stay at the time it was showing when you pressed the button. If you restart toasting by lowering the lever, the gauge will move to the 6 mark then readjust to show the correct toasting time.
- If you change the position of the browning control during toasting, the gauge will move to the 6 mark then readjust to show the correct toasting time.
It will also adjust itself automatically when you use the frozen bread or bagel buttons.
TOASTING BREAD
- Set the toaster upright on a firm, level, heat-resistant surface.
- Put the plug into the power socket.
- Turn the browning control to the required setting (1 = light, 6 = dark).
- Put bread into the toasting slots (maximum thickness 1 inch).
- Press the lever down fully. It won’t lock down unless the toaster is connected to the electricity supply.
- The toasting time gauge will show the toasting time and start to count down.
- When it reaches 0, the toast will pop up.
- To stop toasting, press the button.
FROZEN BREAD
- Leave the browning control at your favoured setting, insert the frozen bread, lower the lever, then press the button.
- The light will come on, and the toasting time will be altered automatically to give the same degree of browning you get with unfrozen bread.
- The toasting time gauge will show the toasting time and start to count down.
- When it reaches 0, the toast will pop up.
BAGELS
- Insert cut bagel into the slots with cut side toward the outside of the toaster.
- Leave the browning control at your favoured setting, lower the lever, then press the button.
- The toasting time gauge will show the toasting time and start to count down.
- When it reaches 0, the bagel will pop up.
WARMING RACK
Note: Don’t use the warming rack to warm frozen, buttered, coated, iced, or filled buns.
- Place the warming rack on top of the toaster, with the feet inside the slots.
- Place the buns on top of the warming rack.
- Set the browning level to 2. Then lower the lever.
- When the lever pops up, remove the warmed buns.
- Don’t touch the warming rack wires – they’ll be hot.
- Remove the warming rack before using the toaster normally.
CARE AND MAINTENANCE
Empty the crumb trays regularly.
- Unplug the appliance and let it cool.
- Wipe outer surfaces with a damp cloth.
NEED HELP?
Warranty Information
(Applies only in the United States and Canada)
For service, repair or any questions regarding your appliance, please call our Customer Service Line at 1-800-947-3744. Please DO NOT return the product to the place of purchase. Also, please DO NOT mail product back to manufacturer, nor bring it to a service center. You may also want to consult www.prodprotect.com/russellhobbs.
What does it cover?
Any defect in material or workmanship provided; however, the liability of Spectrum Brands, Inc. will not exceed the purchase price of product.
How long is the warranty valid?
- In the United States: Two years from the date of original purchase with proof of such purchase.
- In Canada: Two years from the date of original purchase with proof of such purchase. Canadian residents can register online for an extra year of warranty at: www.prodprotect.com/russellhobbs.
What will we do to help you?
Provide you with a reasonably similar replacement product that is either new or factory refurbished.
How do you get service?
- Save your receipt as proof of date of sale.
- Visit the online service website at www.prodprotect.com/russellhobbs, or call tollfree 1-800-947-3744, for general warranty service.
- If you need parts or accessories, please call 1-800-738-0245.
What does your warranty not cover?
- Damage from commercial use
- Damage from misuse, abuse or neglect
- Products that have been modified in any way
- Products used or serviced outside the country of purchase
- Glass parts and other accessory items that are packed with the unit
- Shipping and handling costs associated with the replacement of the unit
- Consequential or incidental damages (Please note, however, that some states do not allow the exclusion or limitation of consequential or incidental damages, so this limitation may not apply to you.)
How does state law relate to this warranty?
This warranty gives you specific legal rights. You may also have other rights that vary from state to state or province to province.
![]()