APC Back-UPS Pro BX850 User Manual

Safety and General Information
Inspect the package contents upon receipt. Notify the carrier and dealer if there is any damage.
SAVE THESE INSTRUCTIONS – This section contains important instructions that should be followed during installation and maintenance of the UPS and batteries.
![]()
DANGER
HAZARD OF ELECTRIC SHOCK, EXPLOSION, OR ARC FLASH
- This UPS is intended for indoor use only.
- Do not operate this UPS in direct sunlight, in contact with fluids, or where there is excessive dust or humidity.
- Connect the UPS power cable directly to a wall outlet.
- Be sure the air vents on the UPS are not blocked. Allow adequate space for proper ventilation.
Failure to follow these instructions will result in death or serious injury.
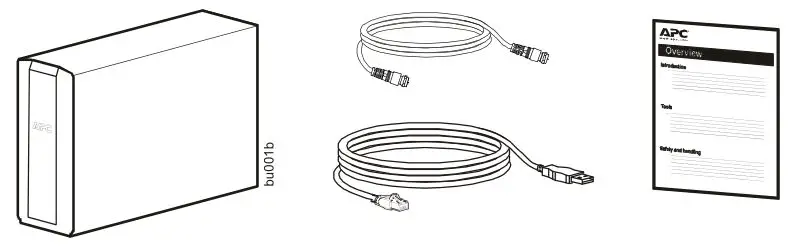
Inventory
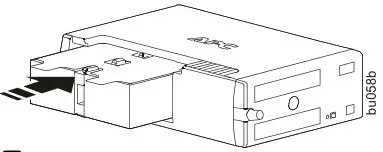
Connect the Battery
The UPS is shipped with the battery disconnected.
BX850/1000M/M-LM60
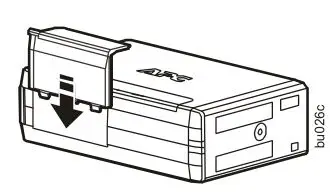
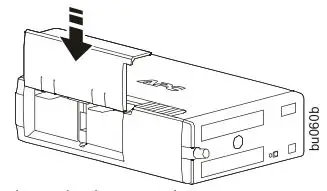
- Remove the battery door.

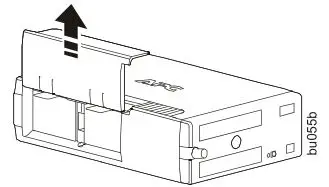
- Remove the battery. Connect the wire.
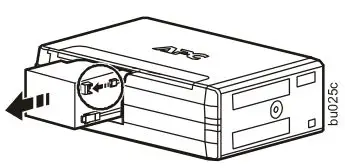
- Push the battery into the unit.

- Replace the battery door.
BX1350/1500M/M-LM60
- Remove the battery door.
- Remove the battery.
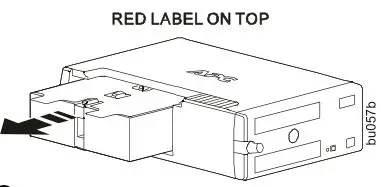
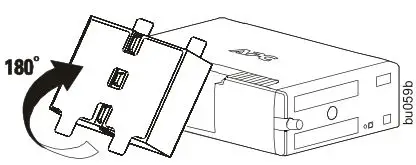
- Flip or turn the battery 180 degrees upward/downward to let green side of the label face up.
- Push the battery into the unit.
- Replace the battery door.
Install PowerChute ™ Personal Edition Software
Use PowerChute Personal Edition software to configure the UPS settings. During a power outage, PowerChute will save any open files on your computer and shut it down. When power is restored, it will restart the computer.
Note: PowerChute is only compatible with a Windows operating system. If you are using Mac OSX, use the native shutdown feature to protect your system. See the documentation provided with your computer.
Installation
Use the cable supplied with the Back-UPS to connect the data port on the Back-UPS to the USB port on your computer. On the computer, go to www.apc.com Search for “PowerChute Personal Edition” then click on “View Details” to download the latest version of PCPE software. Click the download link and select Software product. Select the appropriate operating system. Follow directions to download the software.
Connect the Equipment
Battery Backup and Surge Protected outlets
When the Back-UPS is receiving input power, the Battery Backup with Surge Protection outlets will supply power to connected equipment. During a power outage or other AC problems, the Battery Backup outlets receive power for a limited time from the Back-UPS.
Connect equipment such as printers, fax machines, scanners, or other peripherals that do not need battery backup power to the Surge Protection Only outlets. These outlets provide full-time protection from surges even if the Back-UPS is switched OFF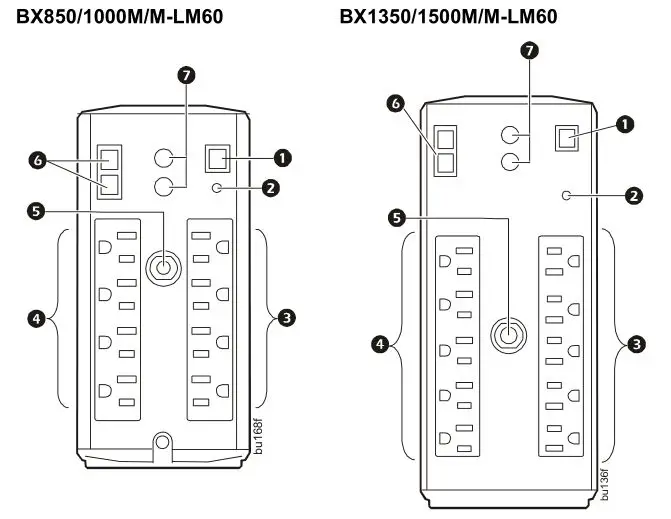

Operation
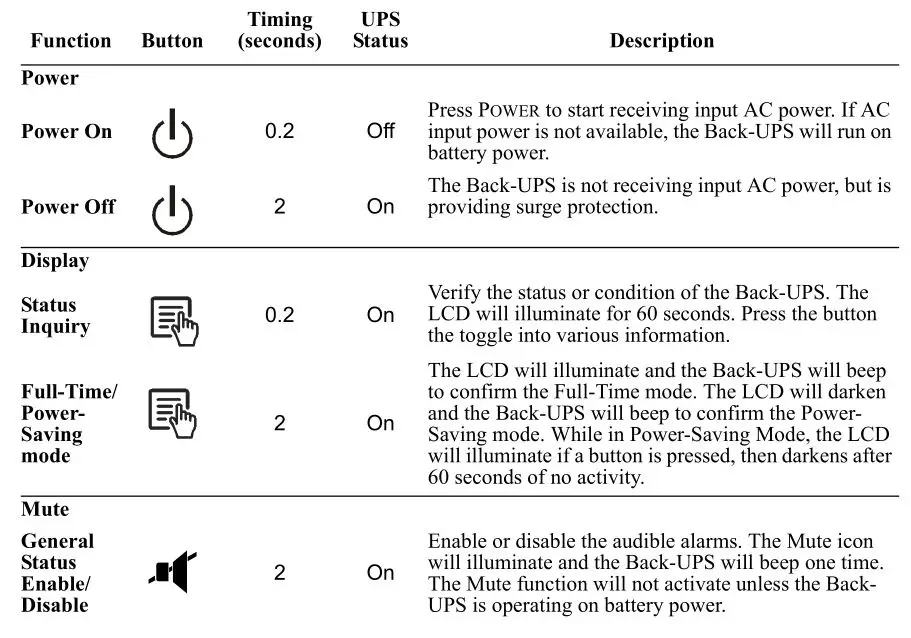
Power Saving Display
The display interface can be configured to be continuously illuminated, or to save energy, it can be configured to darken after a period of inactivity.
- Full Time Mode: Press and hold DISPLAY for two seconds. The display will illuminate and the Back-UPS will beep to confirm the Full Time mode.
- Power Saving Mode: Press and hold DISPLAY for two seconds. The display will darken and the Back-UPS will beep to confirm the Power Saving mode. While in Power Saving Mode, the display will illuminate if a button is pressed, it then darkens after 60 seconds of no activity.
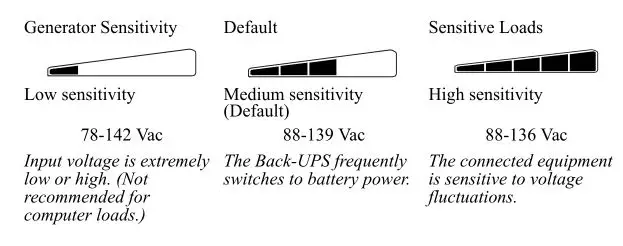
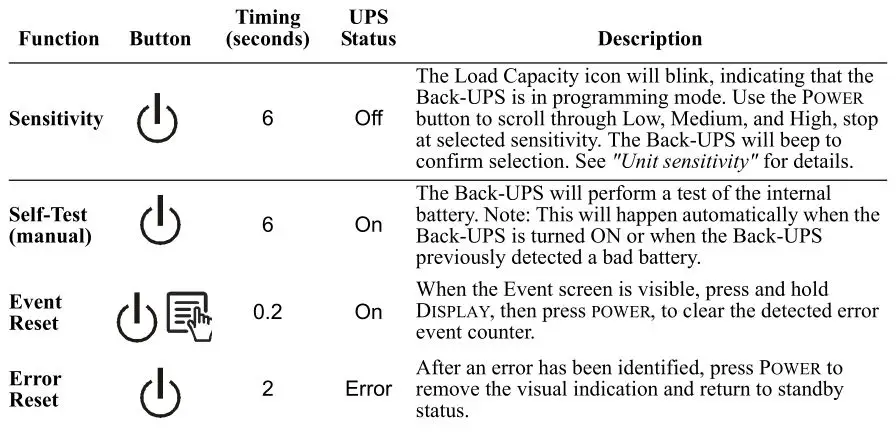
Unit sensitivity
Adjust the sensitivity of the Back-UPS to control when it will switch to battery power; the higher the sensitivity, the more often the Back-UPS will switch to battery power.
- Ensure the Back-UPS is connected to AC power, but is OFF.
- Press and hold the P OWER button for six seconds. The L OAD C APACITY bar will flash on and off, indicating that the Back-UPS is in programming mode.
- Press POWER again to rotate through the menu options. Stop at selected sensitivity. The Back-UPS will beep to confirm the selection.
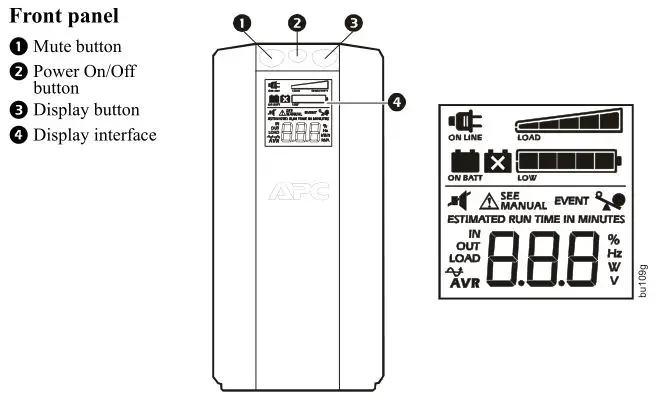
Front Panel Buttons and Display Interface
Use the three buttons on the front panel of the Back-UPS and the display interface to configure the Back-UPS.

Alarms and System Errors
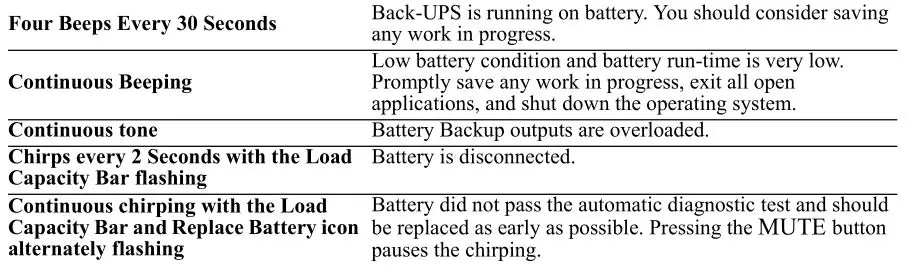
Audible Indicators
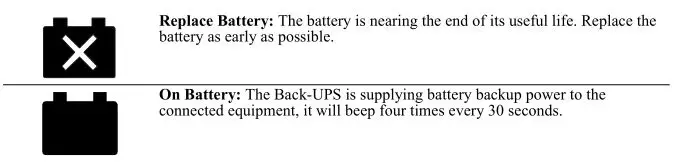
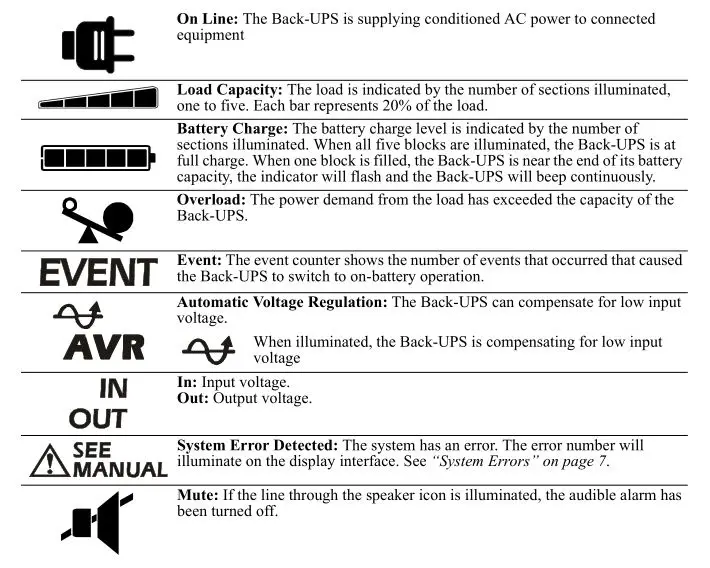
Status Icons
![]()
System Errors
The Back-UPS will display these error messages. Except for errors F01 and F02, contact SEIT Technical Support.

Function Button Quick Reference
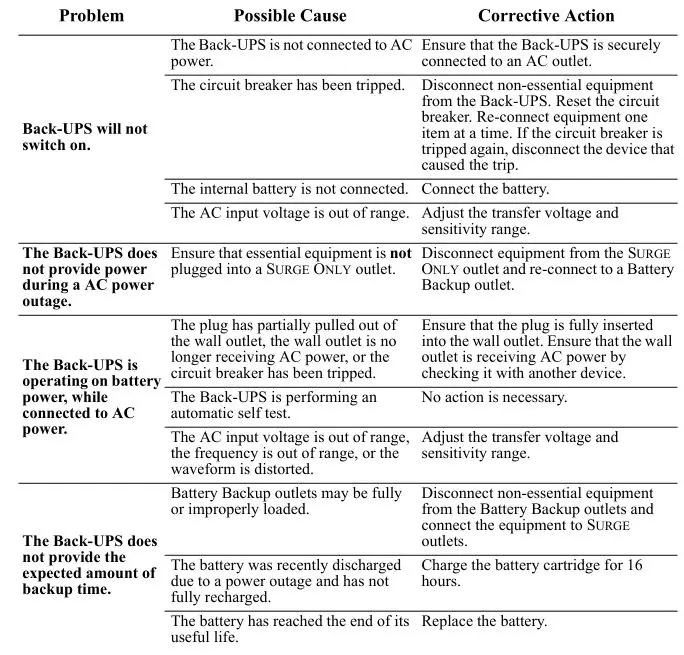
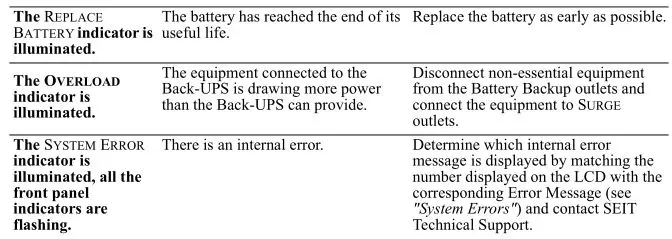
Troubleshooting
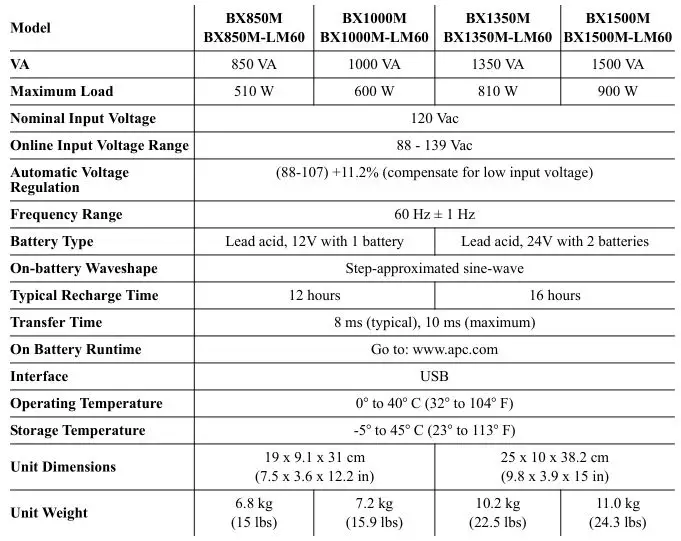
Specifications
Replacement Battery
The battery typically lasts for 3 to 5 years, a shorter period if subjected to frequent outages or elevated temperatures. Battery replacement parts for Back-UPS BX850M/M-LM60 is RBC17, for BX1000M/M-LM60 is APCRBC158, for BX1350M/M-LM60 is APCRBC123, and for BX1500M/M-LM60 is APCRBC124. Delaying the replacement of parts may corrode the batteries in the cartridge. Recycle spent battery cartridges.
Warranty
The standard warranty is three (3) years from the date of purchase. Schneider Electric IT (SEIT) standard procedure is to replace the original unit with a factory reconditioned unit. Customers who must have the original unit back due to the assignment of asset tags and set depreciation schedules must declare such a need at first contact with an SEIT Technical Support representative. SEIT will ship the replacement unit once the defective unit has been received by the repair department, or cross ship upon the receipt of a valid credit card number. The customer pays for shipping the unit to SEIT. SEIT pays ground freight transportation costs to ship the replacement unit to the customer.
APC by Schneider Electric IT Customer Support Worldwide
For country specific customer support, go to the APC by Schneider Electric Web site, www.apc.com.
![]()
Select models are ENERGY STAR ® qualified.
For more information on your specific model go to www.apc.com.
![]()
This UPS is certified to comply with California Battery Charger System regulations. For more information go to www.apc.com/company/us/en/sustainability/energy-efficiency/california-battery-charger-regulations/
EMC Compliance
This equipment has been tested and found to comply with the limits for a Class B digital device, pursuant to part 15 of the FCC Rules. These limits are designed to provide reasonable protection against harmful interference in a residential installation. This equipment generates, uses and can radiate radio frequency energy and, if not installed and used in accordance with the instructions, may cause harmful interference to radio communications. However, there is no guarantee that interference will not occur in a particular installation. If this equipment does cause harmful interference to radio or
television reception, which can be determined by turning the equipment off and on, the user is encouraged to try to correct the interference by one or more of the following measures:
- Reorient or relocate the receiving antenna.
- Increase the separation between the equipment and receiver.
- Connect the equipment into an outlet on a circuit different from that to which the receiver is connected.
- Consult the dealer or an experienced radio/TV technician for help.
© 2017 APC by Schneider Electric. APC, the APC logo, and Back-UPS are owned by Schneider Electric Industries S.A.S. or their affiliated companies. All other trademarks are property of their respective owners.
EN 990-5813A
07/2017