BTFREQ™ WIRELESS HANDS-FREE CAR KIT
FEATURES
- Bluetooth hands-free calling and music streaming
- 2 USB charging ports for charging mobile phones and other devices
SPECIFICATIONS:
A2DP Bluetooth calling audio streaming HFP
- Bluetooth hands-free calling FM transmitter frequency range: 88.1-107.9MHZ
- Input power: 12-24VDC
- USB outputs: 5V, 2.4A -5V, 1A

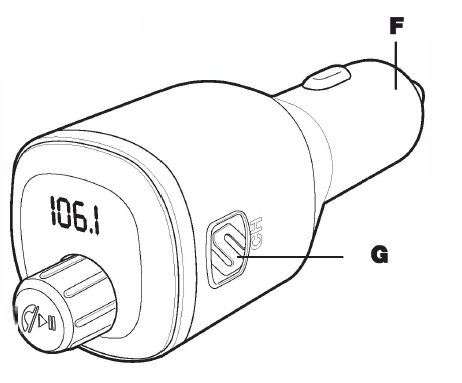
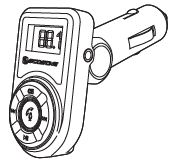
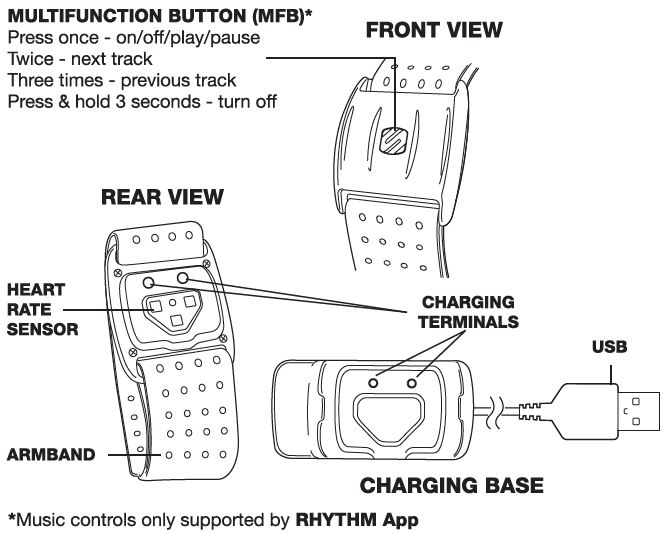
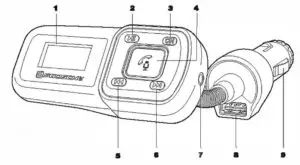
A. LED Screen
B. 5V, 2.4A Charging Port
C. 5V, 1A Charging Port
D. Microphone
E. Multi-Function Button/Knob
F. 12VPlug
G. Channel Button
Questions?
Need help with your Product? Call Customer Service at: (800) 363-4490 x1
Bluetooth is a registered trademark of Bluetooth SIG, Inc. Register your product online at www.scosche.com/register
©2019 SCOSCHE INDUSTRIES, INC.
POWER UP & BLUETOOTH PAIRING
Follow these steps to power up and pair your BTFREQ to your mobile device.
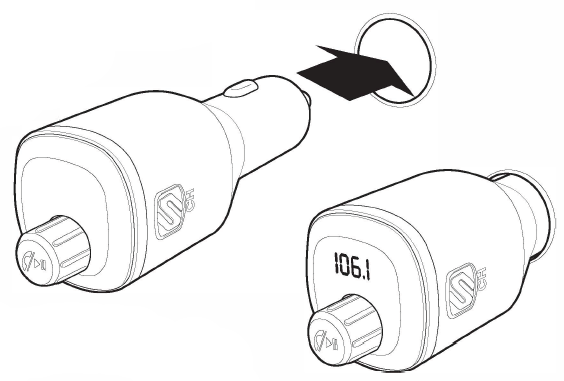
- Plug the BTFREQ into your car’s 12V power socket.
- Enter the Bluetooth settings in your mobile device and enable the Bluetooth function. From the list of available accessories, find and select the “Scosche BTFM4”.
- Your phone will confirm once it is connected.
CONNECTING TO YOUR CAR’S STEREO
The BTFREQ has a small FM radio transmitter that can broadcast to your car’s stereo.
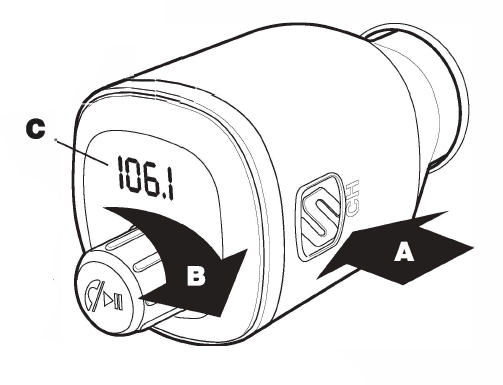
- Find a weak station on your FM radio that has no active broadcast signal. ,,,_
- Press the “CH” button (A), C then turn the Multi-Function Button/Knob left or right (B) to tune the BTFREQ to match the frequency of your FM radio (C).
- If you experience interference you may have entered an area where there is an active broadcast signal on the station you are tuned to. Repeat the above steps to find a different clear station.
Note: Press “CH” button to change frequencies on BTFREQ (A).
USING THE BTFREQ
Once you have paired the BTFREQ to your phone (see Power up and Pairing section) and have connected the BTFREQ to your stereo (see page 4) you can begin using your BTFREQ.
Streaming Music
Stream music using the music player on your phone. You can use the controls on the BTFREQ to control the music settings:
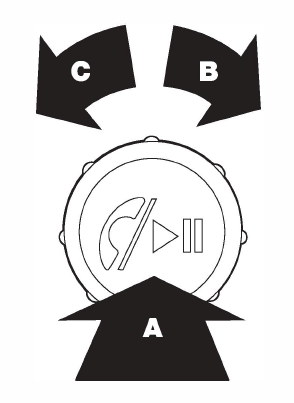
- Play/Pause -Tap the MFB/K once (A)
- Track Forward -Turn MFB/K to the right (B)
- Track Back -Turn MFB/K to the left (C)
Making a call
Use your mobile phone to make a call as you normally would. Phone call audio will automatically stream through the BTFREQ.
- Hang Up -Tap the MFB/K once (A)
- Redial last number called -Double tap MFB/K (A)
Receiving a call
Phone call will come in through the BTFREQ.
- Press MFB/K once to answer the call (A)
- Press MFB/K once to end the call (A)
- Press and hold MFB/K to reject the call (A)
Voice assistant activation
Press and hold the Multi-function button for 3 seconds to activate your smartphone’s voice assistant.
DUAL-PORT USB CHARGER
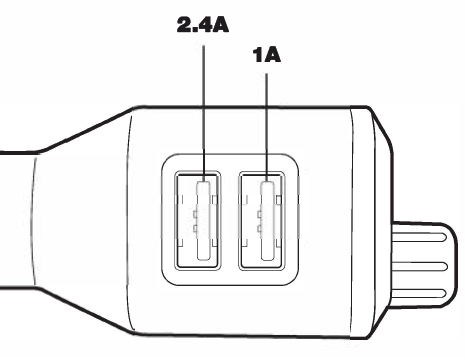
Your BTFREQ includes 2.4A and 1A USB charging ports to charge your devices while driving. Simply connect using a cable suitable for your device (not included).
FCC STATEMENT
This device complies with Part 15 of the FCC Rules. Operation is subject to the following two conditions:
(1) This device may not cause harmful interference, and
(2) this device must accept any interference received, including interference that may cause undesired operation.
This transmitter must not be co-located or operating in conjunction with any other antenna or transmitter. Changes or modifications not expressly approved by the party responsible for compliance could void the user’s authority to operate the equipment.
This equipment has been tested and found to comply with the limits for a Class B digital device, pursuant to Part 15 of the FCC Rules. These limits are designed to provide reasonable protection against harmful interference in a residential installation. This equipment generates uses and can radiate radio frequency energy and, if not installed and used in accordance with the instructions, may cause harmful interference to radio communications. However, there is no guarantee that interference will not occur in a particular installation. If this equipment does cause harmful interference to radio or television reception, which can be determined by turning the equipment off and on, the user is encouraged to try to correct the interference by one or more of the following measures:
- Reorient or relocate the receiving antenna.
- Increase the separation between the equipment and receiver.
- Connect the equipment into an outlet on a circuit different from that to which the receiver is connected.
- Consult the dealer or an experienced radio /TV technician for help.
Radiation Exposure Statement: The product complies with the FCC/IC RF Exposure for Low Power Consumer Wireless Power Transfer. RF exposure limit set forth for an uncontrolled environment and are safe for intended operation as described in this manual. The further RF exposure that compliance was demonstrated at 10cm and greater separation from the user body or set the device to lower output power if such function is available.
IC STATEMENT
This device complies with Industry Canada’s license-exempt RSSs. Operation is subject to the following two conditions:
- This device may not cause interference; and
- This device must accept any interference, including interference that may cause undesired operation of the device.
The tern “IC:” before the certification/registration number only signifies that the Industry Ganada technical specifications were met. This product meets the applicable Industry Ganada technical specifications.
For complete warranty details, please visit us at www.scosche.com or call (800) 363-4490
]]>
HANDS-FREE CAR KIT
WITH BLUETOOTH TRANSMITTER
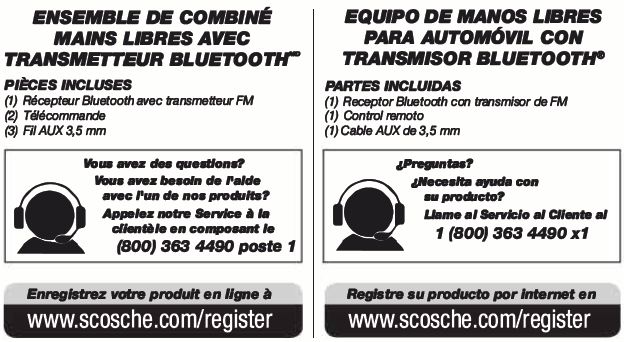
PARTS INCLUDED
(1) Bluetooth receiver with FM transmitter
(1) Remote control
(1) 3.5mm AUX cable
Register your product online at www.scosche.com/register
OVERVIEW

Features
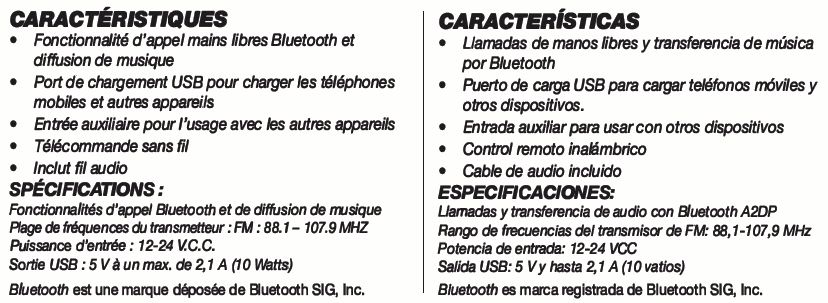
- Bluetooth hands-free calling and music streaming
- USB charging port for charging mobile phones and other devices
- Auxiliary Input for use with other devices
- Wireless remote control
- Includes audio cable
SPECIFICATIONS:
A2DP 8/uetooth calling and audio streaming FM transmitter frequency range: 88.1 107.9MHZ
Input power: 12-24VDC
USB output: 5V at up to 2.1 amps (1 O watts)
Bluetooth is a registered trademark of Bluetooth SIG, Inc.
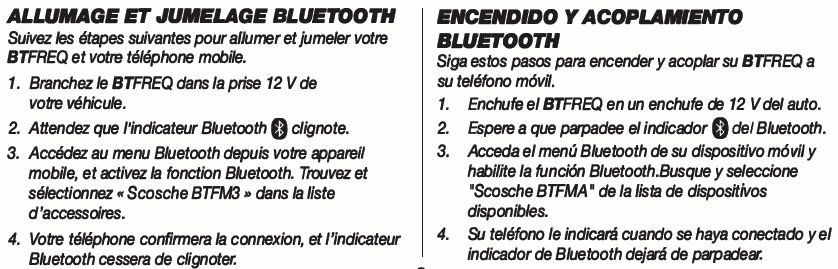
POWER UP & BLUETOOTH PAIRING
Follow these steps to power up and pair your BTFREQ to your mobile phone.
- Plug the BTFREQ into your cars 12V power socket.
- Wait for the Bluetooth indicator Oto flash.
- Access the Bluetooth menu on your mobile device, and enable the 8/uetooth function. From the list of available accessories find and select “Scosche BTFM3”.
- Your phone will confirm once it is connected, and the Bluetooth indicator will stop flashing.
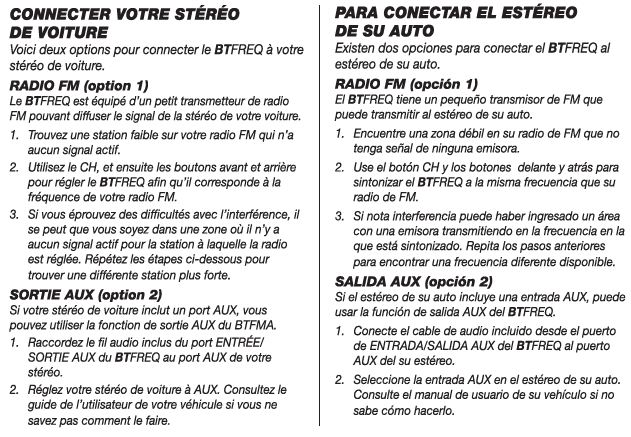
CONNECTING TO YOUR CAR’S STEREO
There are two options for connecting the BTFREQ to your car stereo.
FM RADIO (option 1)
The BTFREQ has a small FM radio transmitter that can broadcast to your car’s stereo.
- Find a weak station on your FM radio that has no active broadcast signal.
- Use the CH, then the Forward and Back buttons to tune the BTFREQ to match the frequency of your FM radio.
- If you experience interference you may have entered an area where there is an active broadcast signal on the station you are tuned to. Repeat the above steps to find a different clear station.
AUX OUT (option 2)
If your car stereo includes an AUX port you can use the BTFREQ’s AUX out feature.
- Connect the included audio cable from the AUX IN/OUT port on the BTFREQ to the AUX port in your stereo.
- Set your car stereo source to AUX. Consult your vehicle owners manual if you are not sure how.
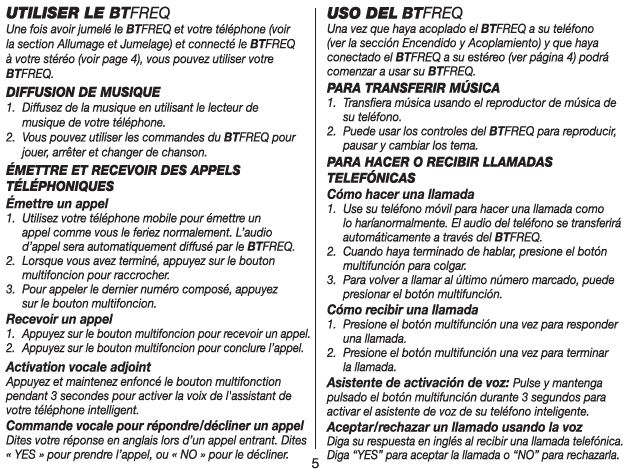
USING THE BTFREQ
Once you have paired the BTFREQ to your phone (see Power up and Pairing section) and have connected the BTFREQ to your stereo (see page 4) you can begin using your BTFREQ.
STREAMING MUSIC
1. Stream music by using the music player on your phone.
2. You can use the controls on the BTFREQ to play, pause and change tracks.
MAKING AND RECEIVING PHONE CALLS
Making a call
- Use your mobile phone to make a call as you normally would. Phone call audio will automatically stream through the BTFREQ.
- When you are finished talking, press the Multi-function button to hang up.
- To call the last number dialed you can press the Multi-function button.
Receiving a call
- Press the Multi-function button once to receive a call.
- Press the Multi-function button once to end the call.
Voice assistant activation
Press and hold the Multi-function button for 3 seconds to activate your smartphone’s voice assistant.
Voice answer/decline call
Speak your response on an incoming phone call. Say “YES” to receive a call, or “NO” to decline a call.
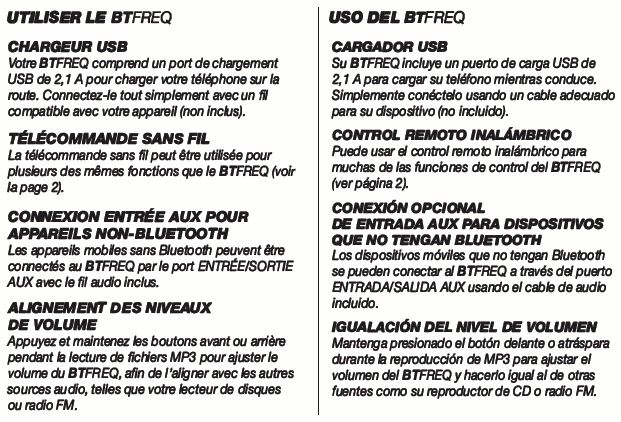
USB CHARGER
Your BTFREQ includes a 2.1A USB charging port to charge your phone while driving. Simply connect using a cable suitable for your device (not included).
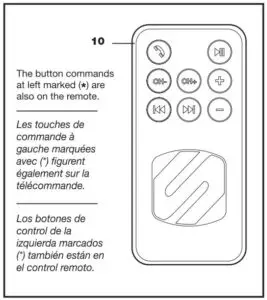
WIRELESS REMOTE
The wireless remote can be used for many of the same functions as the controls on the
BTFREQ (see page 2).
OPTIONAL AUX IN CONNECTION FOR NON-BLUETOOTH DEVICES
Mobile devices without Bluetooth can be connected to the BTFREQ through the AUX IN/OUT port using the included audio cable.
VOLUME LEVEL MATCHING
Press and hold the Forward or Back buttons during MP3 playback to adjust the BTFREQ volume to match other sources like your CD player, or FM radio.
FCC STATEMENT
FCC STATEMENT
This device complies with Part 15 of the FCC Rules. Operation is subject to the following two conditions: (1) This device may not cause harmful interference, and (2) this device must accept any inter1erence received, including interference that may cause undesired
operation. This transmitter must not be co-located or operating in conjunction with any other antenna or transmitter. Changes or modifications not expressly approved by the party responsible for compliance could void the user’s authority to operate the equipment.
This equipment has been tested and found to comply with the limits for a Class B digital device, pursuant to Part 15 of the FCC Rules. These limits are designed to provide reasonable protection against harmful interference in a residential installation. This equipment generates uses and can radiate radio frequency energy and, if not installed and used in accordance with the instructions, may cause harmful interference to radio communications. However, there is no guarantee that interference will not occur in a particular installation. If this equipment does cause harmful interference to radio or television reception, which can be determined by turning the equipment off and on, the user is encouraged to try to correct the interference by one or more of the following measures:
- Reorient or relocate the receiving antenna.
- Increase the separation between the equipment and receiver.
- Connect the equipment into an outlet on a circuit different from that to which the receiver is connected.
- Consult the dealer or an experienced radio/TV technician for help.
Radiation Exposure Statement: The product complies with the FCC/IC RF Exposure for Low Power Consumer Wireless Power Transfer. RF exposure limit set forth for an uncontrolled environment and are safe for intended operation as described in this manual. The further RF exposure that compliance was demonstrated at 10cm and greater separation from the user body or set the device to lower output power if such function is available.
IC STATEMENT
This device complies with Industry Canada’s license-exempt RSSs. Operation is subject to the following two conditions:
- This device may not cause interference; and
- This device must accept any interference, induding interference that may cause undesired operation of the device.
The tenn “IC:” before the certification/registration number only signffies that the Industry Canada technical specifications were met. This product meets the applicable Industry Canada technical specifications.
For complete warranty details, please visit us at www.scosche.com or call (800) 363-4490


USER MANUAL
!!WARNING!!
This is not a medical device and is intended for training and recreational use only.
Consult a physician prior to use to determine appropriate heart rate zones.
NOTICE
The RHYTHM+ Heart Monitor is waterproof to IEC Standard 60529 IP67. It can
withstand immersion in 1 meter of water for 30 minutes. Prolonged submersion
can cause damage to the unit.

About PerformTek®
PerformTek9 Precision Biometrics is a patent-protected sensor technology which continuously measures real-time biometric data with a high degree of accuracy and consistency, and uses this data to give people meaningful fitness assessments. It seamlessly integrates into audio earbuds and other wearable devices, such as armbands and wristbands, and can connect with smartphone apps people are already using while exercising. PerformTek® sensor technology allows you to capture accurate data such as heart rate, distance, speed, cadence, calories burned and VO2 max (aerobic fitness level).
 PerformTek® and the PerformTek® design are registered trademarks of Valencell, Inc. and may not be used for any purpose without the express prior written consent of Valencell, Inc. Patent: Valencell Inc Patents
GETTING STARTED
Charging
Charge the SCOSCHE” RHYTHM+ for 2 hours or until a solid blue light indicates the unit is fully charged.
- Attach the charging base to the SCOSCHE” RHYTHM+ unit (Figure 1).
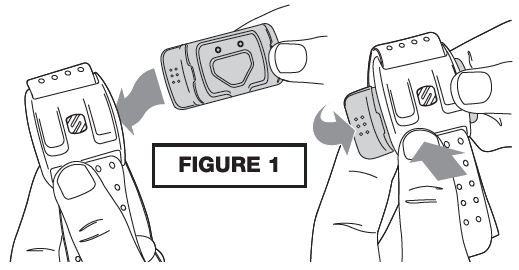
- Connect the USB to a wall charger or your computer.
- A red flashing LED indicates that the unit is charging.
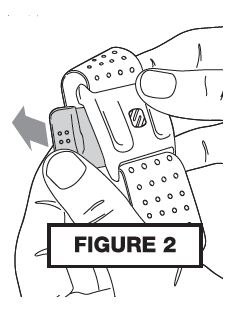
- Remove the charging base as shown (Figure 2).
USING THE ARMBAND MONITOR
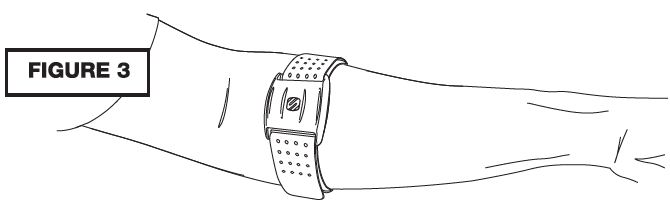
Wear armband on the upper portion of the forearm. Sensor should be on the inside or top of forearm. It should be worn snug enough not to move on your arm, but NOT so tight that it restricts arm circulation (Figure 3).
Initial Setup with Bluetooth Smart Fitness Apps
- Set B/uetooth on the device to ON.
- Find the Sensor Settings menu in the B/uetooth Smart Fitness App.
- Connect the RHYTHM+ am1band by turning it on.
Initial Setup with Bluetooth Smart devices
(Sports Watches & Fitness Equipment)
- From the device settings menu select “Add HR sensor”
- Connect the RHYTHM+ am1band by turning it on.
Initial Setup with ANT+ devices (Sports Watches & Fitness Equipment)
Turn on the am1band and move within range of your display device.
Note: Heart Rate Monitoring will work with most B/uetooth Smart Fitness Apps. Music Controls are only supported in the RHYTHM App and will also work with Apps which have integrated the Scosche BLE SDK (available at www.scosche.com). For a list of the latest Apps that have integrated the Scosche BLE SDK please visit www.scosche.com.
LED Indicators (Bluetooth Smart Operation)
- Alternating RED/BLUE -the armband is waiting for a connection.
a) Am1band will only power down if removed from the forearm for more than
5 minutes. - Three (3) BLUE blinks -the armband has connected successfully.
- Slow PURPLE blink -you are in your HR zone, or no HR zone has been selected, but the monitor is running.
- Slow BLUE blink -you are below your HR zone.
- Slow RED blink -you are above your HR zone.
Note: HR zones are only supported in the RHYTHM App and will also work with Apps that have integrated the Scosche BLE SDK.
LED Indicators (ANT+ Mode)
- RED blink -The HR monitor is on and normal operation.
CARE INSTRUCTIONS
- To ensure accurate readings, clean the sensor lens with a soft cloth.
- Use a soft cloth with ONLY mild hand soap and cool water to wipe down the armband, sensors and plastic housing.
- Use a cotton swab and ONLY rubbing alcohol to clean the charging contacts.
- Do not use any abrasive chemicals to clean the RHYTHM+ Armband, sensors or plastic housing. T his will cause permanent damage.
LIMITED WARRANTY
Scosche Industries Inc. warrants this product to be free from defects in material and workmanship for a period of 1 year from purchase. This Scosche product is sold with the understanding that the purchaser has independently determined the suitability of this product.
This warranty is offered to the original purchaser of the product only. This warranty does not cover the product if physically damaged, subject to negligence or misuse, abuse, alteration, accident, or an act of GOO. This warranty does not apply to product which has water or physically damaged by accident or which has been misused, disassembled or altered.
The original dated sales slip or proof of purchase will establish warranty eligibility. If the
product should prove defective within the warranty period, return the product with proof of purchase to Scosche Industries Inc. Scosche, at its option, will replace or repair the product free of charge and return the product postage paid.
In no event shall Scosche Industries, Inc. be responsible for clalms beyond the replacement value of the defective product, or in any way be liable or responsible for consequential or incidental damages. No empress warranties and no implied warranties, whether for fitness or any particular use or otherwise, except as set forth above (which is made expressly in lieu of all other warranties) shall apply to products sold by Scosche. Scosche Industries cannot be held responsible for discrepancies/inconsistencies that may occur due to automotive manufacturing changes or option.

Scosche BTFREQ Bluetooth FM Transmitter BTFMA BTFMI User Manual
Parts included
- Bluetooth receiver with FM transmitter.
- Remote control
- 3.5mm AUX cable

- LED SCREEN
- PLAY/PAUSE
- CHANNEL BUTTON
- MULTIFUCTION BUTTON
- BACK/ VOLUME-
- FORWARD/ VOLUME+
- 3.5MM AUX IN/OUT
- 2.1A USB CHARGING PORT
- 12V PLUG
- REMOTE
FEATURES
- Bluetooth hands free calling and music streaming
- USB charging port for charging mobile phones and other devices. Auxiliary Input for use with other devices
- Wireless remote control
- Includes audio cable
SPECIFICATIONS:
A2DP Bluetooth calling and audio streaming FM transmitter frequency
- Range: 88.1-107.9MHZ
- Input power: 12-24VDC
- USB output: 5V at up to 2.1 amps (10 watts)
POWER UP AND BLUETOOTH PAIRING
Follow these steps to power up and pair your BTFREQ to your mobile phone.
- Plug the BTFREQ into your cars 12V power socket.
- Wait for the Bluetooth indicator to flash.
- Access the Bluetooth menu on your mobile device, and enable the Bluetooth function. From the list of available accessories find and select “Scosche BTFMA”.
- Your phone will confirm once it is connected, and the Bluetooth indicator will stop flashing.
Bluetooth is a registered trademark of Bluetooth SIG, Inc.
CONNECTING TO YOUR CAR’S STEREO
There are two options for connecting the BTFREQ to your car stereo.
FM RADIO (option 1)
The BTFREQ has a small FM radio transmitter that can broadcast to your car’s stereo.
- Find a weak station on your FM radio that has no active broadcast signal.
- Use the CH, then the Forward and Back buttons to tune the BTFREQ to match the frequency of your FM radio.
- If you experience interference you may have entered an area where there is an active broadcast signal on the station you are tuned to. Repeat the above steps to find a different clear station
AUX OUT (option 2)
If your car stereo includes an AUX port you can use the BTFREQ’s AUX out feature.
- Connect the included audio cable from the AUX IN/OUT port on the BTFREQ to the AUX port in your stereo.
- Set your car stereo source to AUX. Consult your vehicle owners manual if you are not sure how.
USING THE BTFREQ
Once you have paired the BTFREQ to your phone (see Power up and pairing section) and have connected the BTFREQ to your stereo (see Connecting to your cars stereo) you can begin using your BTFREQ.
STREAMING MUSIC
- Stream music by using the music player on your phone.
- You can use the controls on the BTFREQ to play, pause and change tracks.
MAKING AND RECEIVING PHONE CALLS
Making a call
- Use your mobile phone to make a call as you normally would. Phone call audio will automatically stream through the BTFREQ
- When you are finished talking, press the Multi function button to hang up.
- To call the last number dialed you can press the Multifunction button.
Receiving a call
- Press the Multifunction button once to receive a call.
- Press the Multifunction button once to end the call.
Voice Assistant activation
Press and hold the Multifunction button for 3 seconds to activate your smart phone’s voice assistant.
USB CHARGER
Your BTFREQ includes a 2.1A USB charger to charge your phone while driving. Simply connect using a cable suitable for your device (not included).
WIRELESS REMOTE
The wireless remote can be used for many of the same functions as the controls on the BTFREQ (see page 2).
OPTIONAL AUX IN CONNECTION FOR NON-BLUETOOTH DEVICES
Mobile devices without Bluetooth can be connected to the BTFREQ through the AUX IN/OUT port using the included audio cable.
VOLUME LEVEL MATCHING
Press and hold the Forward or Back buttons during MP3 playback to adjust the BTFREQ volume to match other sources like your CD player, or FM radio.
FCC AUTHORIZATION
This device complies with FCC Rules Part 15. Operation is subject to the following two conditions:
- This device may not cause interference, and
- This device must accept any interference that may be received, including interference that may cause undesired operation. The manufacturer is not responsible for any radio or TV interference caused by unauthorized modification to this equipment. Such modification could void the user’s authority to operate the equipment
FCC ID: IKQBTFM
IC NOTE
This device complies with Industry Canada licence-exempt RSS standard(s).
Operation is subject to the following two conditions:
- This device may not cause interference, and
- This device must accept any interference, including interference that may cause undesired operation of the device. Under Industry Canada regulations, this radio transmitter may only operate using an antenna of a type and maximum (or lesser) gain approved for the transmitter by Industry Canada. To reduce potential radio interference to other users, the antenna type and its gain should be so chosen that the equivalent isotropically radiated power (e.i.r.p.) is not more than that necessary for successful communication. IC: 6955A-BTFM
LIMITED WARRANTY
Scosche Industries Inc. warrants this product to be free from defects in material and workmanship for a period of 1 year from purchase.
This Scosche product is sold with the understanding that the purchaser has independently determined the suitability of this product.
This warranty is offered to the original purchaser of the product only.
This warranty does not cover the product if physically damaged, subject to negligence or misuse, abuse, alteration, accident, or an act of GOD.
This warranty does not apply to product which has water or physically damaged by accident or which has been misused, disassembled or altered.
The original dated sales slip or proof of purchase will establish warranty eligibility.
If the product should prove defective within the warranty period, return the product with proof of purchase to Scosche Industries Inc. Scosche, at its option, will replace or repair the product free of charge and return the product postage paid.
In no event shall Scosche Industries, Inc. be responsible for claims beyond the replacement value of the defective product, or in any way be liable or responsible for consequential or incidental damages.
No empress warranties and no implied warranties, whether for fitness or any particular use or otherwise, except as set forth above (which is made expressly in lieu of all other warranties) shall apply to products sold by Scosche.
Scosche Industries cannot be held responsible for discrepancies/ inconsistencies that may occur due to automotive manufacturing changes or option.
For All Australian Sales
This document details the terms and conditions of the warranty provided with this product. Please disregard any other representations contained on this product’s packaging or provided with this product which constitute or appear to constitute a warranty.
This warranty is offered by Scosche Industries, 1550 Pacific Ave, Oxnard, CA 93033 United States. We can be called on 1 (805) 486 4450 or emailed at [email protected]
Subject to the exclusions and limitations set out below, we warrant to you that if you purchase a product directly from us, or from any of our authorized resellers, that it will not contain defects which are a result of faulty manufacturer workmanship or materials. This warranty subsists for 1 year from the date of purchase.
Subject to any rights you have under the Australian Consumer Law, we will not be liable for defects which are a result of damage or loss caused by factors beyond our control, any product which has not been maintained according to any care or maintenance instructions provided with the product, any alterations to a product which are not performed by us, or damage or defects caused to the product due to unusual or non-recommended use. We will not be liable for any special, indirect, consequential or economic loss or damage or loss of profits whatsoever suffered by you or any other person resulting from any act or omission by us.
Our total liability in respect of this Warranty against Defects is limited to the replacement of the goods.
Any claim made under this warranty must be made by contacting Scosche Industries. Scosche will then put you in touch with the closest company to you that will cover warranties. All Returns of defective product will be sent at your expense, to be exchanged for a replacement.
This Warranty against Defects is provided in addition to other rights and remedies that you may have at law. Our goods come with guarantees that cannot be excluded under the Australian Consumer Law. You are entitled to a replacement or refund for a major failure and for compensation for any reasonably foreseeable loss or damage. You are also entitled to have the goods repaired or replaced if the goods fail to be of acceptable quality and the failure does not amount to major failure.
]]>SCOSCHE® GM5201B IN-DASH STEREO INSTALLATION KIT FOR 2010-UP CHEVROLET CAMARO WITH TOUCH-SCREEN INTERFACE
PARTS LIST:
- Main panel with built-in touch screen (*)
- Stereo mounting bracket (left)
- Stereo mounting bracket (right)
- Dash pocket for single din mount
- Power harness (not shown-see page 3)
SOLD SEPARATELY: CAMOSM OnStar retention interface (not shown -see page 3)

INTRODUCTION/PRELIMINARY
This premium installation kit is for 2010-Up Chevrolet Camaro vehicles. Included are all the parts you need to mount your car stereo or CD player into your vehicle’s dash. Refer to the individual instruction in this manual to remove your vehicle’s factory radio and assemble the kit.
CAUTION
DISCONNECT YOUR VEHICLE’S NEGATIVE BATTERY TERMINAL BEFORE THE INSTALLATION TO HELP PREVENT ELECTRICAL DAMAGE. WE RECOMMEND THE USE OF A VOLT/OHM METER OVER A TEST LIGHT TO CHECK WIRING. A TEST LIGHT OR GROUNDED WIRE PROBE CAN CAUSE DAMAGE TO THE VEHICLE’S COMPUTER AND/OR DIAGNOSTIC SYSTEMS. AVOID ALL FACTORY AIRBAG WIRING – AIRBAGS CAN ACCIDENTALLY DEPLOY CAUSING SERIOUS INJURY OR DEATH.
NOTES
- See your vehicle’s instructions for any special tools your installation might require.
- Read all instructions accompanying your car stereo for proper wiring and mounting instructions.
LIABILITY DISCLAIMER
This instruction booklet is based on carefully documented data and research of automobile dash disassembly, wire harness/ codes and information pertaining to installation of this kit (GM5201 B) in 2010-Up Chevrolet Camara vehicles. Scosche Industries, Inc. cannot be held responsible for discrepancies/inconsistencies that may occur due to the automobile manufacturing changes or options, or damage that may occur in the automobile during the installation of components while using this booklet.
If you have any further questions, call our toll free technical help line at: 1-800-621-3695×3
FACTORY STEREO REMOVAL
2010-UP CHEVROLET CAMARO
- Turn ignition to the ON position and shift vehicle into drive.
NOTE: In order to complete step 1 the battery must be connected. After completing step 1, disconnect the negative battery cable and proceed to step 2. - Use a Panel-safe Removal Tool (PR1) to unclip Auxiliary gauge panel, unplug and remove.
- Use a small flathead screw driver, unclip screw cap located on the lower front side of the shift knob.
- Extract (1) T-20 Torx screw to remove gear shift knob.
- Extract (4) 7mm screws securing shifter console, then with pick tool, unclip (1) clip located on each side under the shifter console, unplug and remove.
- Use PRT to unclip each side panel from the center console.
- Extract (1) Phillips head screw from each side located on the outer area of the center console.
- Extract (1) Phillips head screw from each side of center console’s rear panel, lift and pull back to remove.
- Extract (3) Phillips head screws behind center console’s armrest.
- Extract (1) Phillips head screw in front of beverage holder.
- Use PRT to unclip 12V and USB/3.5mm housing inside the armrest, unplug and remove.
- Use PRT to unclip center console and remove.
- Extract (2) 7mm screws securing radio panel located under and to the rear of NC controls. Use PRT to unclip radio fascia panel, unplug, and remove.
- Extract (4) 7mm screws securing radio chassis/ Drive assembly, unplug, lift away and remove
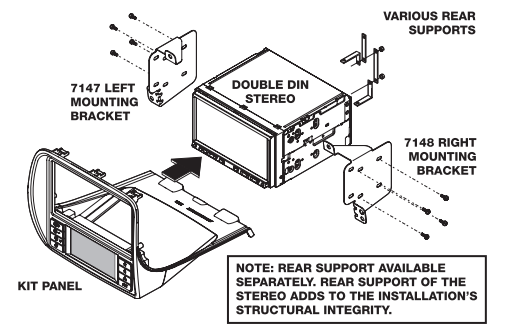
STEREO ASSEMBLY/ MOUNTING
SINGLE DIN ISO INSTALLATION
- Attach 6552 pocket to the back the of main kit panel with the (2) supplied screws as shown below.
- Mount the 7147 and 7148 left and right brackets to the sides of the aftermarket stereo using the screws supplied with the stereo.
- Connect and mount the stereo in the dash. The main kit panel/pocket assembly mounts to the dash over the stereo.
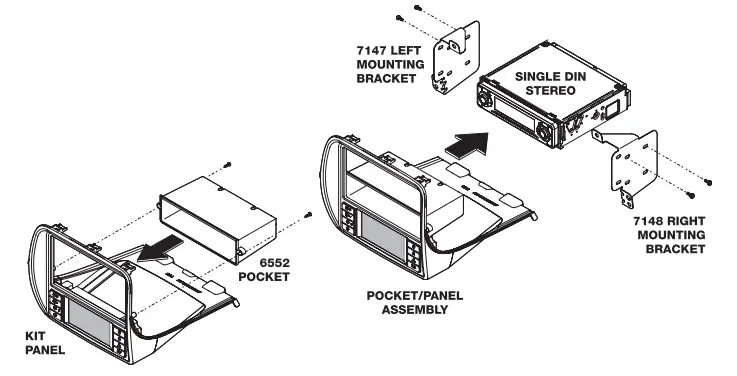
DOUBLE DIN ISO INSTALLATION
- Mount the 7147 and 7148 left and right brackets to the sides of the aftermarket stereo using the screws supplied with the stereo.
- Connect and mount the stereo in the dash. The main kit panel mounts to the dash over the stereo.
GM5201 B WIRING DIAGRAM
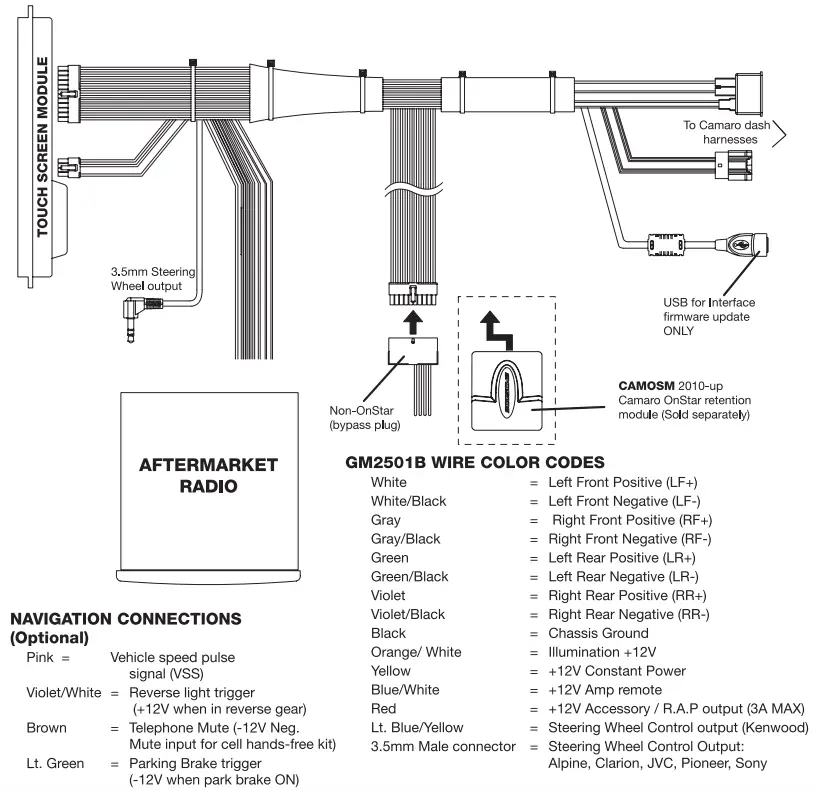
VEHICLE STARTUP
CONNECTION AND INITIALIZATION PROCEDURE
IMPORTANT NOTE! The connection and startup process below must be followed, or the HVAC touch screen system may not operate properly.
- Re-route factory HVAC connector to radio cavity.
- Connect factory radio connector to Scosche harness.
- Connect factory HVAC connector to Scosche harness.
- IF USING OPTIONAL OnStar® MODULE: Remove looped 20 pin connector from Scosche harness and connect OnStar® module*.
- Move OnStar® module, radio connector, and HVAC connector to the left of the radio cavity.
- Route the 8 and 24 pin connectors of Scosche harness to original location of HVAC connector.
- Connect the Scosche harness along with antenna and all other accessories to the aftermarket radio and insert into radio cavity.
- Enter the car and shut all doors and remove the key.
- Wait approximately 5 minutes for the vehicles computer to enter a sleep state (approx. 2 minutes after dome light turns off).
- You may now connect the 24 pin and 8 pin connectors to the new HVAC controller.
- While still in the vehicle with the doors shut, insert the key and start the vehicle’s engine.
*THE OnStar® MODULE MUST BE CONNECTED BEFORE THE NEW HVAC CONTROLLER CAN BE CONNECTED.*
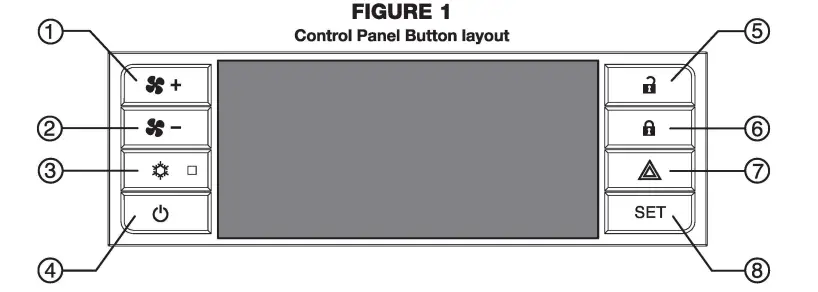
CLIMATE & CONVENIENCE CONTROLS
The Scosche Touch Screen Interface replaces the factory climate, convenience and personalization controls built into the OEM Factory GM Radio system. This solution provides improved ergonomics while adding touch screen capabilities unique to this system. Read the following sections to familiarize yourself with the operating controls and settings.
- Fan speed UP
- Fan speed DOWN
- Air conditioning ON/OFF
- Climate power ON/OFF
- Power unlock
- Power lock
- Hazard warning flashers
- SET (Settings)
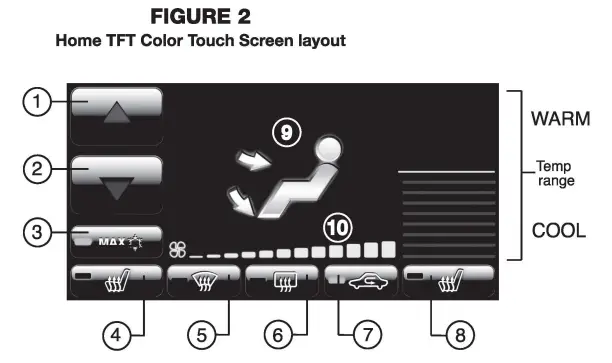
- Air Temp Up
- Air Temp Down
- Max A/C On/Off
- Driver’s Heated Seat
- Defrost
- Rear Defog
- Recirculate
- Pass Heated Seat
- Vent Mode
- Fan Speed Indicator

POWER
Press the Power button (Fig.1, #4) to toggle the climate controls On or Off.
POWER DOOR LOCK CONTROL
 Press the Lock button (Fig.1, #6) to lock both doors.
 Press the Unlock button (Fig.1 , #5) to unlock both doors.
HAZARD WARNING FLASHERS
 Press the Hazard button (Fig.1, #7) to activate flashing signal lamps (flash on and off). This warns ~ others that you are having trouble. Press again to turn the flashers off.
SETTINGS /MENU ACCESS

Press the SET button (Fig.1, #8) to access touch screen, vehicle features and other settings. See “Display Screen” or “Vehicle Feature/Settings” sections for additional information.
FAN SPEED CONTROL

To increase fan speed, press the fan speed UP button on the control panel (pg. 4, Fig. 1, #1). On the color TFT touch screen a graphic level indicator will move up indicating the current fan speed (pg. 4, Fig. 2, #10). There are a total of 12 fan speed increments from completely off to maximum.

To decrease fan speed, press the fan speed DOWN button on the control panel (pg. 4, Fig. 1, #2). – On the color TFT touch screen a graphic level indicator will move down indicating the current fan speed (pg. 4, Fig. 2, #10). Continue pressing the DOWN button to turn fan completely off.
TEMPERATURE CONTROL
Use the UP and DOWN arrows (pg. 4, Fig. 2, #1 & #2) on the color TFT touch screen to adjust vehicle air temperature. Touch the Red arrow to increase air temp. Touch the Blue arrow to decrease air temp. The temperature indicator will move up or down indicating the current temperature level. The temperature range is color-coded: Red indicates warmer air and Blue indicates cooler air.
AIR FLOW/ VENT CONTROL
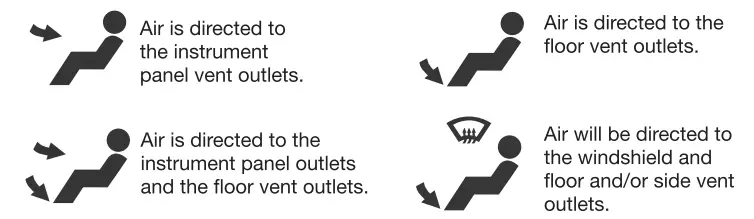
Touch the vent control mode (pg. 4, Fig. 2, #9) on the color TFT touch screen to toggle through the current vent mode. Graphics are displayed according to the selected vent and airflow pattern.
DEFOG / DEFROST CONTROL

Touch the Defog (pg. 4, Fig. 2, #5) on the Color TFT touch screen to turn Defog On or Off. This configuration clears windows of fog or moisture. Air will be directed to the windshield and floor outlets.

Touch the Rear window defogger (pg. 4, Fig. 2, #6] on the Color TFT touch screen to turn the rear window defogger on or off. The rear window defogger turns off automatically 12 minutes. It can also be turned off by turning the ignition to ACC (ACCESSORY) or OFF position. If turned on again it runs for 6 minutes before turning off. At higher vehicle speeds, the rear defogger can stay on continuously.
NOTE: For best results clear the windows of snow or ice before defrost settings. DO NOT OPERATE VEHICLE UNTIL WINDOWS ARE CLEAR!
AIR CONDITIONING
 To turn the air conditioning ON or OFF press A/C button on the control panel (pg. 4, Fig. 1, #3). A Blue indicator light turns on. If the fan is turned off or the outside temperature falls below freezing, the air conditioning will not work. The air conditioning might automatically come on when Defrost mode is selected.
 Touch the MAX A/C button (pg. 4, Fig. 2, #3) on the color TFT touch screen to turn on Max A/C. Maximum cooling will occur with the temperature is adjusted to lowest cold setting and the Fan speed is set at maximum. MAX A/C is used to cool the car down as quickly as possible. Touch the Max A/C button again to return to the previous Fan speed and temp setting.

Touch the Re-circulate button (pg. 4, Fig. 2, #7) on the color TFT touch screen to turn on recirculation. Air will be re-circulated inside the vehicle. This mode helps to quickly cool the air inside the vehicle or prevent outside air and odors from entering. Operating recirculation mode while the A/C is off increases humidity and may cause the windows to fog. Recirculation is not available in the Defrost or Defog modes.
HEATED SEATS
 Touch the driver’s seat heater (pg. 4, Fig. 2, #4) button on the color TFT touch screen to turn on the driver’s seat heater. The engine must be running to use heated seats. A Button graphic will show the level of heat selected: Two lights= high or one light= low). Press the button repeatedly to cycle through the temperature settings or to turn the heated seat OFF.
Touch the passenger’s seat heater (pg. 4, Fig. 2, #8] button on the color TFT touch screen to turn on the Passenger’s seat heater. The engine must be running to use heated seats. A button graphic will show the level of heat selected: Two lights = high or one light = low). Press the button repeatedly to cycle through the temperature settings or to turn the heated seat OFF.
DISPLAY SCREEN SETTINGS
- Display Settings
- Car Settings
- Back/Return
- Day Theme Setting (override)
- Night Theme Setting (override)
- Auto Theme Setting (Vehicle-controlled)
- Brightness Control (TFT screen)
- Preview Window
Other: Software version number appears on lower left corner of set screen.
SETTINGS MENU
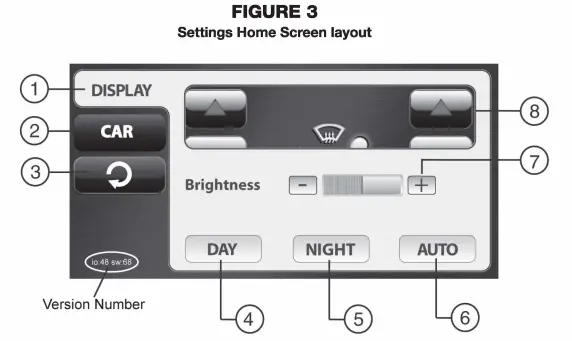
Press the “Set” button (Fig. 1, #8) on the control panel to access the user controlled features and settings. The “Settings” Home Screen will appear (Fig. 3) above.
DISPLAY TAB (Default Settings Screen)
Touch the “Display” Tab (Fig. 3, #1) to access various settings for the Touch Screen.
CAR TAB
Touch the “Car” Tab (Fig. 3, #2) to go the second settings menu for access to vehicle comfort and convenience features. See next section “Vehicle Feature Settings”.
RETURN BUTTON
Touch the return button (Fig. 3, #3) to exit settings mode.
DAY THEME
Touch the “DAY” button (Fig. 3, #4) to assign Daytime color theme for the Color TFT touch screen. This setting will keep the display with light colored background regardless of outside environment (overrides Factory control).
NIGHT THEME
Touch the “NIGHT’ button (Fig. 3, #5) to assign Nighttime color theme for the Color TFT touch screen. This setting will keep the display with dark colored background regardless of outside environment (overrides Factory control).
AUTO THEME (Default)
Touch the “AUTO” button (Fig. 3, #6) to assign Automatic (Factory) control of the TFT color theme. This setting will keep Data-controlled switching color theme according to the outside environment. (Light for Daytime / Dark for Nighttime.
BRIGHTNESS
Touch the “+”/”-” Brightness buttons (Fig. 3, #7) to adjust the Brightness of the Color TFT touch screen.
PREVIEW WINDOW
Provides a quick preview of DAY/NIGHT setting changes.
VEHICLE FEATURE / SETTINGS
The color TFT touch screen interface is used to access the vehicle’s built-in customization features.
VEHICLE SETTINGS MENU
Press the “Set” button (see page 4, Fig. 1, #8) on the control panel to access the user controlled features and settings. The “Settings” Home Screen will appear (see page 6, Fig. 3) . Press the CAR button (see page 6, Fig. 3, #2) to access the vehicle features list as shown in Fig. 4 (below).
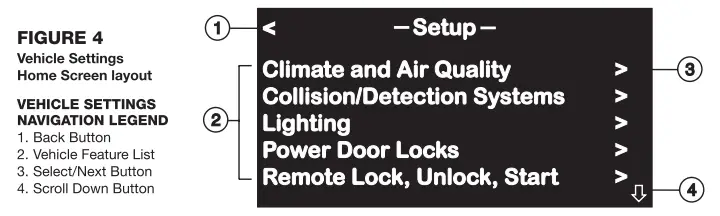
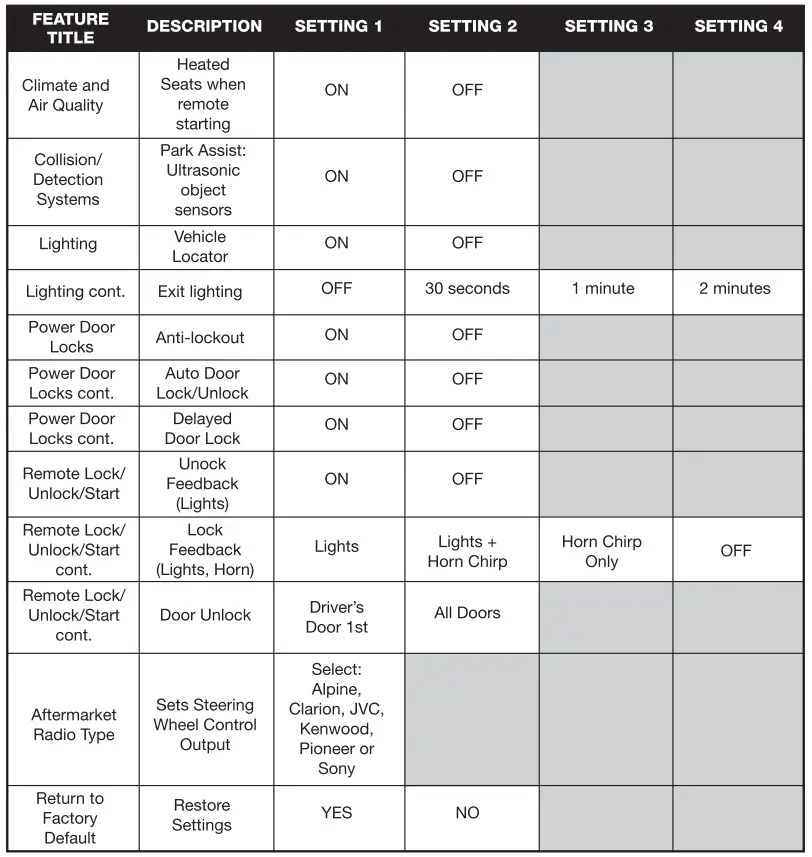
VEHICLE FEATURE DETAILS
- Climate and Air Quality
Heated Seats: On or Off when vehicle is remote started - Collision/Detection Systems
Park Assist feature: Enable or Disable the vehicle’s ultrasonic bumper object sensors (Depends on vehicle options/equipment) - Lighting
Exit Lighting: Set exterior lights delay when exiting vehicle at night
Vehicle Locator Lights: Set exterior lights ON or OFF when unlocking/approaching at night - Power Door Locks
Unlocked Door Anti Lockout: Prevents vehicle locking if Driver door is open (Helps to prevent keys from being locked inside).
Auto Door Unlock: Vehicle unlocks when Shifted into Park (Auto trans) or when Key is removed (Manual Trans)
Delayed Door Lock: Delays door locking - Remote Lock/Unlock/Start
Unlock Feedback (Lights): Enable or Disable vehicle’s Light Flash when Unlocking vehicle with Remote
Locking Feedback: Select the type of audible/visual Lock indicator when Locking vehicle with the Remote – Lights Flash, Lights and Horn blip, or Horn blip only
Door Unlock Options: Selectable unlocking when using remote: Driver’s door first or Both doors at once.
Remote Vehicle Starting: Enable or Disable Remote Vehicle Starting - Aftermarket Radio Type (Steering Wheel Control output)
Select type of Aftermarket Radio for steering wheel interface configuration (Pioneer, Sony, Alpine, Kenwood, Clarion, JVC) - Return to Factory Settings
Restores all customized settings to Factory default: Yes or No
CHANGING FEATURE SETTINGS
HOW TO CHANGE VEHICLE SETTINGS
- Press the “SET” button to access the Configuration/Settings Menu (see page 4, Fig. 1, #8)
- Touch the “CAR” button on the TFT screen (page 6, Fig. 3, #2) to bring up the Car Feature list.
- Touch the name of the Feature you would like to access/change the settings (page 7, Fig. 4 #2). Note: you may need to scroll down to view all options.
- Touch the option value you wish to change and the selected value will turn to GREEN or RED color text.
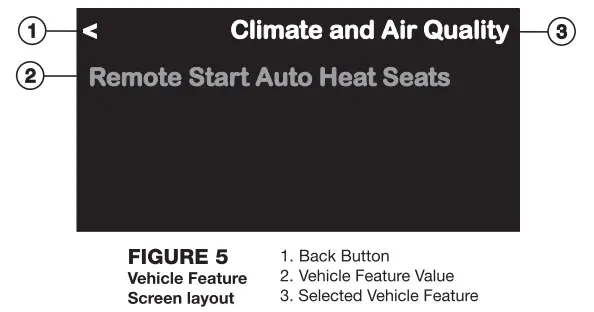
- Touch the Back button (Fig. 5, #1, above) to go back one level or view other features.
STEERING WHEEL CONTROLS
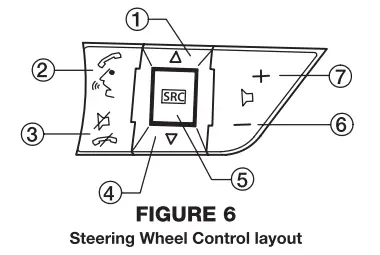
STEERING WHEEL CONTROL OPERATION (WHEN VEHICLE IS EQUIPPED)
- Seek/Track UP (click SRC button upward)
- Activate OnStar® (if equipped)*
- De-activate OnStar® I Mute Audio
- Seek/Track DOWN (click SRC button downward)
- SRC (Source) – Press in to change source
- Volume DOWN
- Volume UP
*Consult vehicles original owner’s manual for GM OnStar” instructions
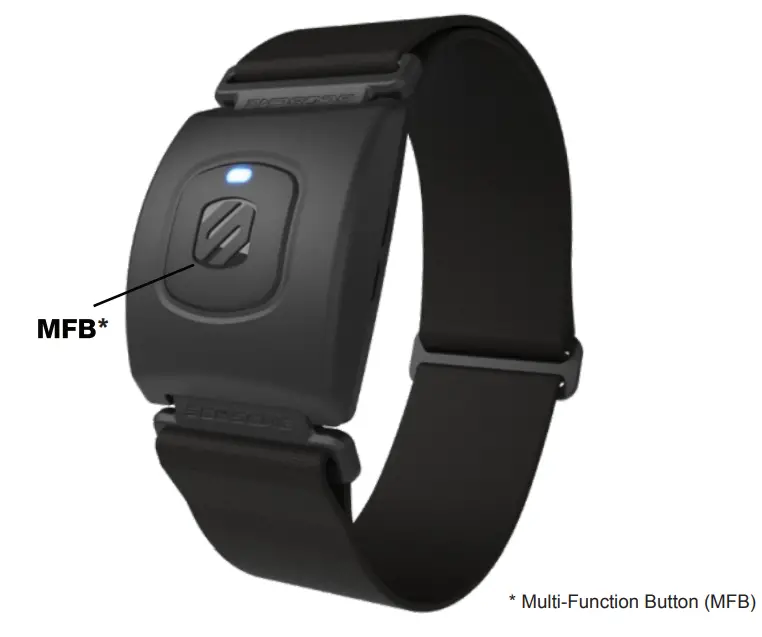
SCOSCHE B08BNB2N5C RTHM+2.0 Heart Rate Armband Monitor with Dual Band Radio ANT+ and Bluetooth Smart

Power On/Off:
Turn On- Press & hold MFB for 2 seconds
Turn Off- Press & hold MFB for 3 seconds
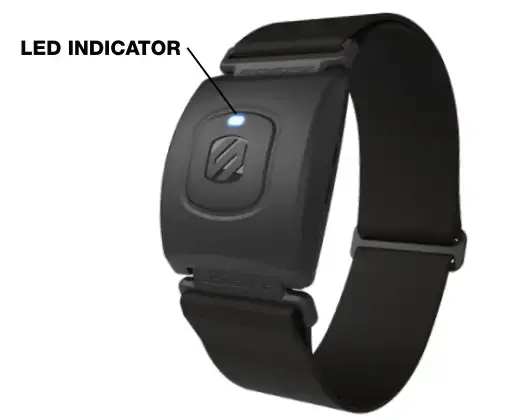
LED Status:
- Red/Blue – Bluetooth Pairing Mode
- (3) Blue Blinks – Successful Bluetooth Connection
- Blue Normal Operation
Initial Setup with Bluetooth
Smart Fitness Apps
- Bluetooth is turned ON within your device.
- Find the Sensor Settings menu in the Bluetooth Smart Fitness App.
- Turn on your RHYTHM+2.0 and select it in the app to connect.
Initial Setup with Bluetooth & ANT+ Smart devices
(Sports Watches & Fitness Equipment)
- From the device settings menu select “Add HR sensor”
- Turn on your RHYTHM+2.0 and select it to connect.
Scan QR code for more info