![]() Quick Start Guide
Quick Start Guide
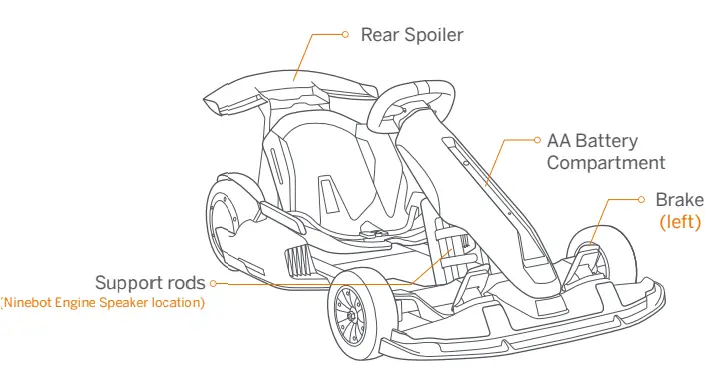
The assembled GoKart Pro
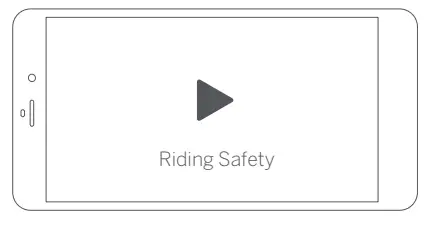
Scan the QR code above to watch the Disassembly and Riding Safety Video.

Adjustment
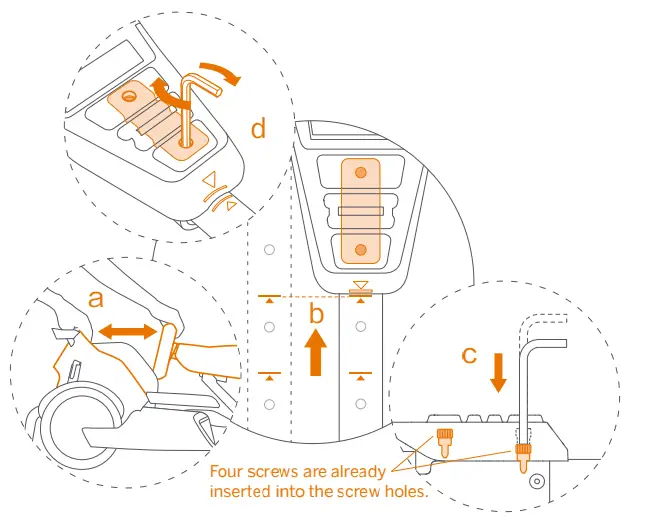
Stretch the frame and adjust the length of the body
a. With both hands holding the steering wheel and the seat, stretch the frame out to a suitable position along the horizontal direction of the connection tube.
b. Align the scalable structure of the frame with the marking on the connection tube.
c. Positioning: Use the short hex wrench to press the two screws into the holes on the left and right connection tube in order, as shown in the figure on the right (The screw is set to a depth of about 1 cm for successful position).
d.Tighten the 4 screws.
Adjust the steering wheel height
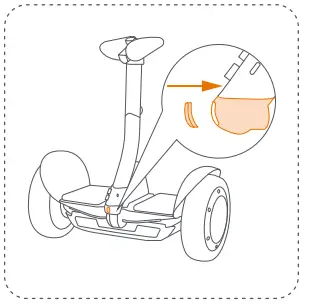
 Remove the speaker before adjusting the height of the steering wheel.
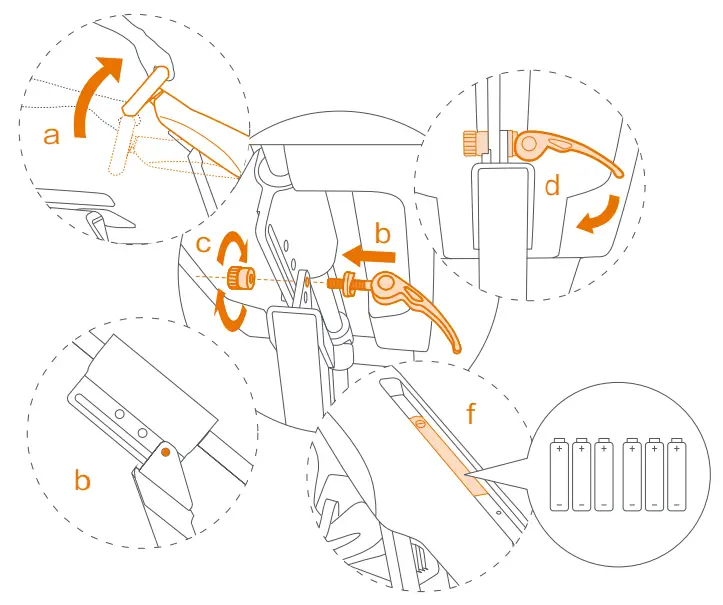
a. Raise the steering wheel to a suitable height.
b. Insert the quick release screw into the hole of the corresponding height.
(Insert the quick release screw into the hole of the corresponding height.)
c. Tighten the quick release nut.
d. Press to fix the steering wheel quick-release components.
e. Ensure the steering wheel does not shake.
Otherwise, repeat the steps b, c, d, e.
Installation of Accessories
Install the Rear Spoiler
Note: Do not press or lift the rear spoiler during installation.
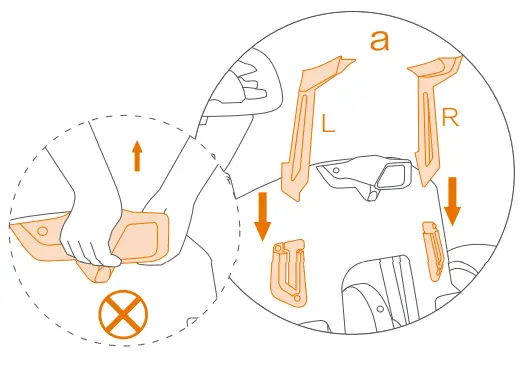
a. Insert the rear spoiler bracket into the slot.
 b. Use the 2.5 mm hex wrench to tighten the 6 screws into the main body of the rear spoiler. (See Accessory No. 2).
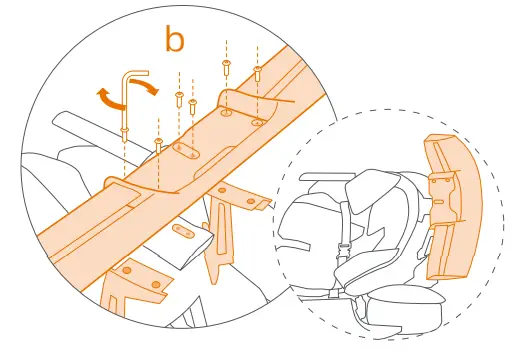
Install the Ninebot Engine Speaker
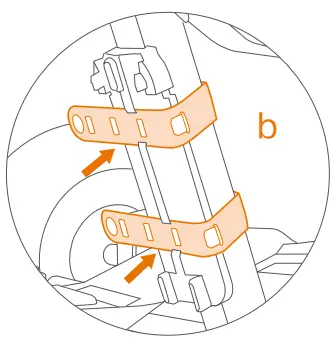
a. Place the base in a proper position (as shown below) and wrap the strap around the vehicle body and fasten the strap.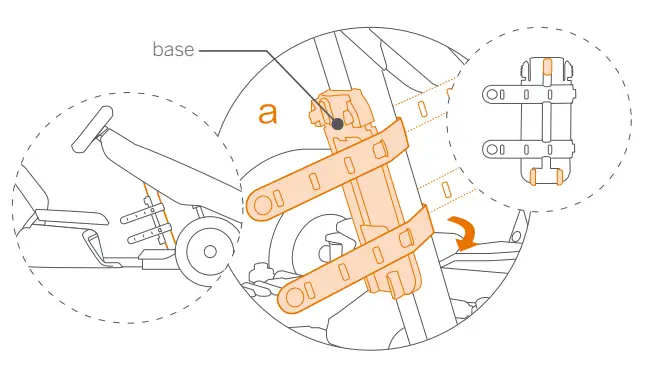 b. Press the remaining part of the strap into the storage slot.
c Align the holes on the bottom of the speaker. Press down until you hear a “click” sound.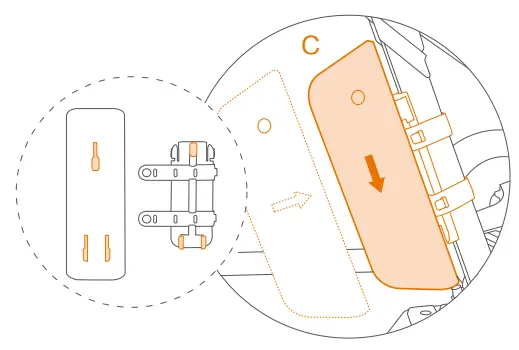
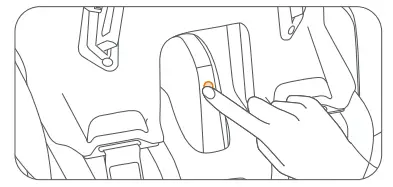
Remove the Speaker: Press the disassembly switch while lifting the speaker upward.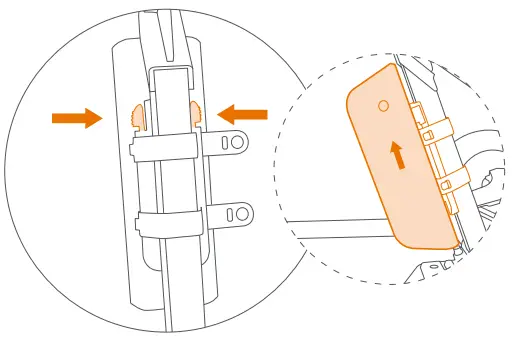
* For more information about the speaker, see the user manual of Ninebot Engine Speaker.
Before the First Drive
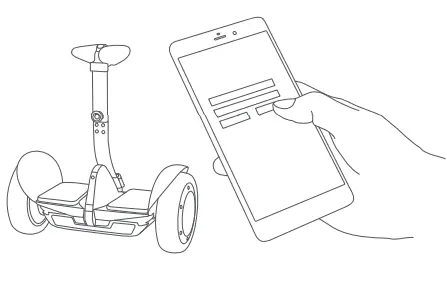
For your safety, a new Gokart is inactivated. Please activate your Gokart via the App before first use.
You can also find our app in the Apple App Store as well as the Google Play Store, simply search “Segway-Ninebot”

How to activate:
- Install the App and register/log in.
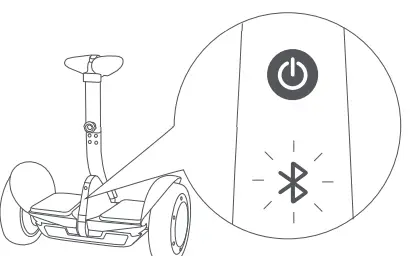
- Press the power button on the S-Max to turn on the Gokart Pro. The Gokart will automatically power off when idle for 10 minutes.
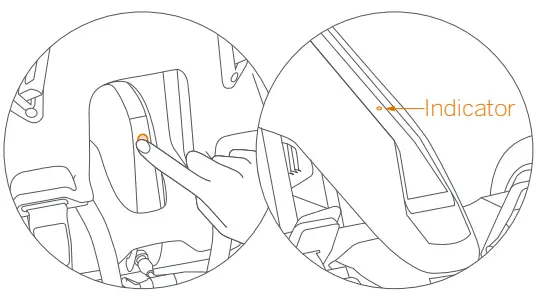
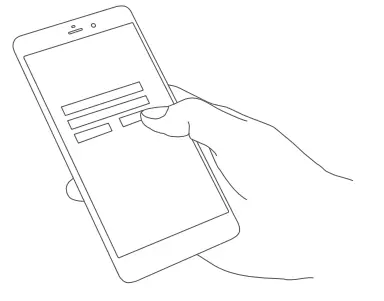
- Open the App, Click Vehicle > Search device to connect to your Gokart Pro. The vehicle will beep when the connection is successful. The Bluetooth icon will stop blinking and remain illuminated.
- Follow the instructions in the app to activate the Gokart and complete the corresponding tutorial and exercises.
Ninebot Engine Speaker:
* The Speaker and the App cannot be connected to the Gokart at the same time. If you have connected the App, disconnect the App from the Gokart first, confirm that the indicator light of the Gokart is flashing blue, and then pair the Speaker.
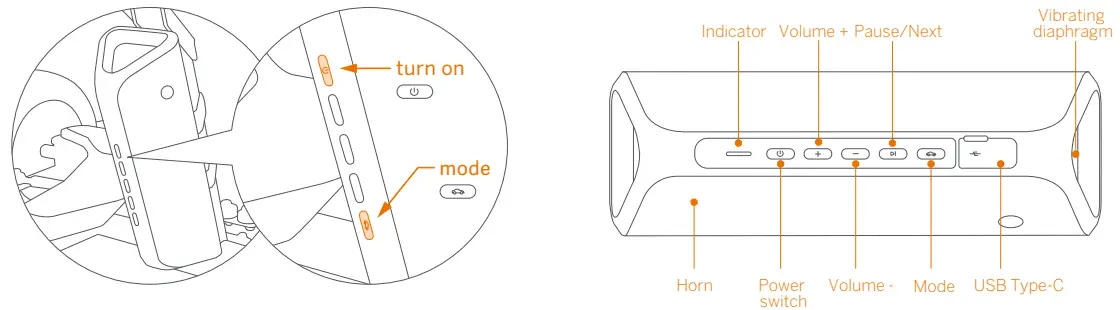 Press the power switch to turn on the speaker. Press and hold the Mode button to start pairing.
Learning to Drive
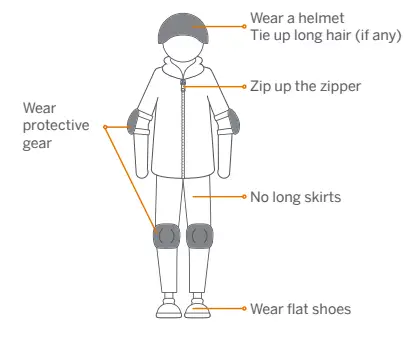
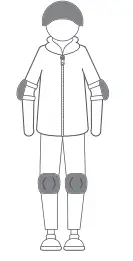
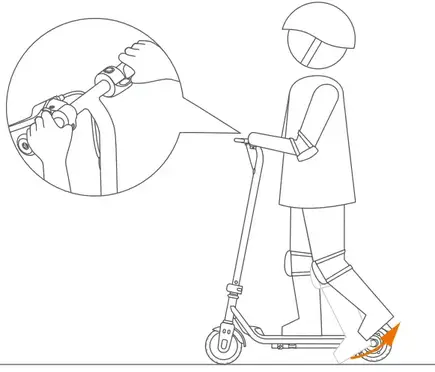
 You are at risk of injury when driving a Gokart, please dress properly as shown in the picture. Minors must learn and drive under adult supervision.
Correct dress code
- Fastening the seat belt
Sitting on the seat, buckle the left and right parts of the seat belt in front of you.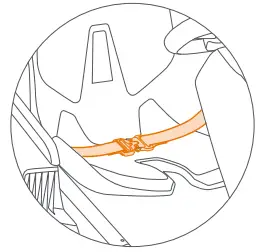
- Driving
Acceleration: lightly press the throttle (right pedal) to go forward.
Deceleration: lightly press the brake (left pedal) to decelerate.
* Do not pump the brake pedal to decelerate. Steering: steer the Gokart by slightly turning the steering wheel clockwise or counterclockwise.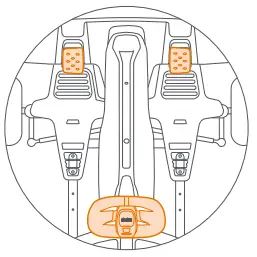
- Reversing
When the Gokart is stopped, double-press the brake (left pedal). After you hear a beep, the Gokart has switched to reverse mode. Press the throttle to drive the Gokart in reverse. Double-press the brake (left pedal) again to return to forwarding mode.
- Emergency braking
In the event of a situation that requires an emergency stop, pull the hand brake handle on the right side of the Gokart to engage the emergency brake.
* Only use the emergency brake when necessary. Frequent use can deform the tire.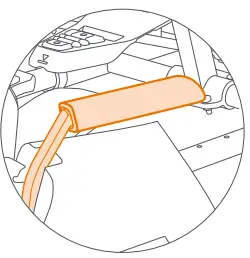
Ninebot S-Max Quick Start Guide
(Hereinafter referred to as S-Max)
Remove the S-Max body from the Gokart
Power off the Gokart before disassembly.
- Rotate counter-clockwise to unplug the power extension cord.
- Loosen the traps and take out the S-Max body.
* If lifting the frame by yourself, do not lift the backside more than 19° or you may damage the bumper.
Do not lift the Rear Spoiler.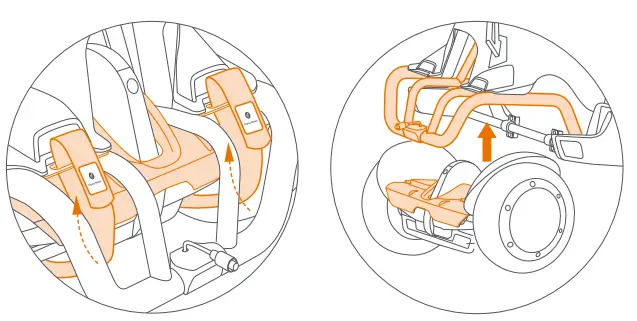
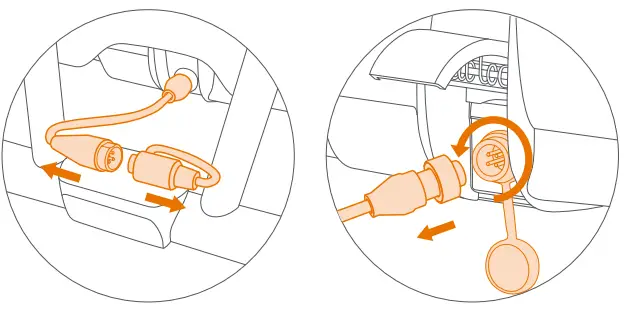
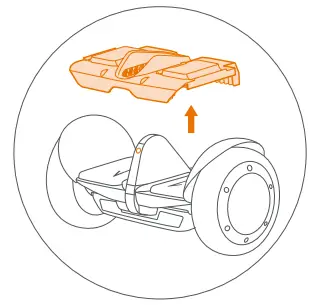
- Remove the adaptor pad of S-Max.
Assembling Your S-Max
Install the steering bar
- Insert the steering bar into the S-Max body.
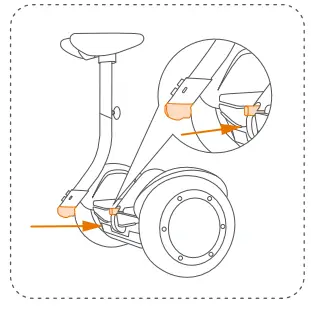
- Tighten the two screws. (See Accessories No. 3)
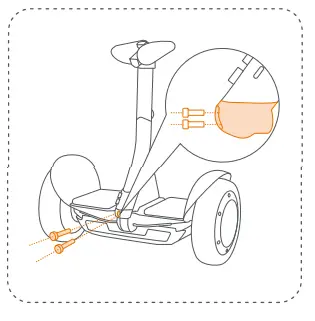
- Put the cap on.
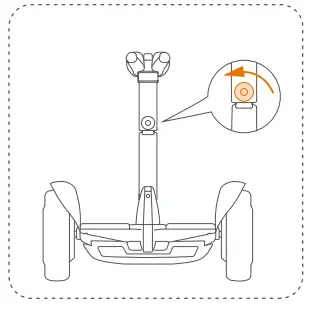
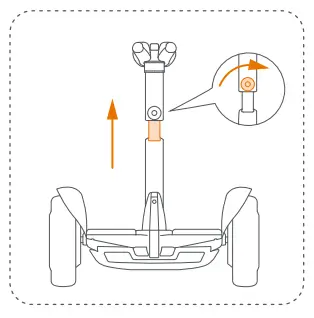
Adjust the knee pad height
- Rotate the height adjustment knob counter-clockwise.
- Lift the knee pads to the desired height. Rotate the height adjustment knob clockwise to tighten.
 * Lift the guide bar to help steer the S-Max without a rider when powered on.
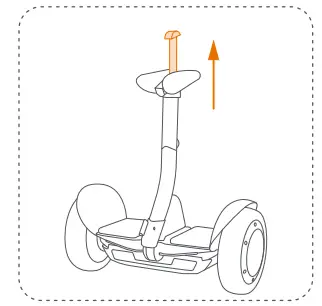
WARNING
DO NOT use to lift or carry the S-Max.
Before the First Ride
There are safety risks when learning to ride the S-Max. You must read the Safety Instructions and follow the New Rider Tutorial in the App before your first ride.
For your safety, your S-Max is not activated at this time and will beep occasionally after Power ON.
Until activated, the S-Max maintains a very low riding speed and steering sensitivity. Install the App on your mobile device (with Bluetooth 4.1 or above), connect to the S-Max with Bluetooth, and follow the App instructions to activate your S-Max and follow the training procedures.
Scan the QR code to download the App (iOS 9.0 or above, Android™ 4.3 or above).
- Install the App and register/log in.
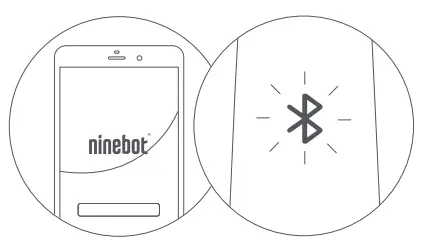
- Power ON the S-Max. The Bluetooth icon blinking indicates the S-Max is waiting for a connection.
- Click Vehicle > Search device to connect to your S-Max. The S-Max will beep when the connection is successful. The Bluetooth icon will stop blinking and remain illuminated.
- BEFORE RIDING, MAKE SURE TO SWITCH THE S-MAX TO SELF-BALANCING MODE IN THE APP. Follow the prompts to watch the Riding Safety video, complete the New Rider Tutorial, and then activate the S-Max.
* When the mode is switched successfully, you will hear two beeps.
Warnings and Cautions
WARNING
Wear an approved helmet and other protective gear to minimize any possible injury.
Sudden speed changes and turns are forbidden during riding.
 Riders can be seriously injured with such actions.
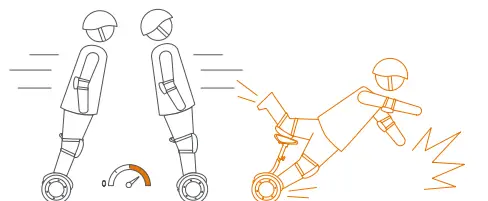
When the vehicle tilts back or sounds alarmed, please slow down immediately till the vehicle is back to the normal position.
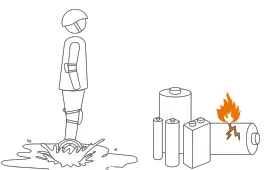
Water contact with Li-ion batteries can increase the risk of fire.
Do not expose the vehicle to the rain or ride it in the rain for a long period of time. When the vehicle is not used, please store it in dry and cool surroundings.
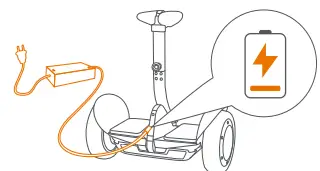
Charge the battery in time to avoid over-discharging and causing damage.
The standby time is around 120 to 180 days when the battery is fully charged. Please charge the battery in time or over-discharging may cause damage.
Ninebot kick scooter
ZING C8/C10/C20
User Manual
Before first use, please scan the QR code on the scooter and follow the New Rider Tutorial to activate the scooter.
Welcome
Thanks for choosing the Ninebot eKickScooter ZING C8/C10/C20 (referred to as the scooter in this manual)! The scooter is specially designed for smooth and safe riding. It combines the power of electricity and the style of a traditional scooter. Enjoy an effortless gliding experience on this cool scooter. Before you start, make sure the rider meets the age, height, and weight requirements below.
![]() Please read the User Manual carefully and understand the assembly and usage before allowing a child to ride it.
Please read the User Manual carefully and understand the assembly and usage before allowing a child to ride it.
Please do not discard this manual as it is a permanent part of this product.
Riding Safety
- The product is for recreation only. It is not intended for transportation. Do not modify the scooter in any way to change the purpose for which it was designed. In order to master riding skills, the rider needs to practice. Use with caution since skill is required to avoid falls or collisions causing injury to the user or third parties.
- Segway parties are not responsible for any injuries, damages or legal disputes caused by a rider’s inexperience or failure to follow the instructions in this manual.
- Remember that whenever you ride the scooter, you risk injury from loss of control, collisions, and falls. To reduce the risk, you must read and follow all “CAUTION” and “
 WARNING” notices. Please understand that you can reduce the risk by following the instructions and warnings in this manual, but you cannot eliminate all the risks. Please use common sense when riding.
- The assembly and adjustment should ONLY be done by adults. The scooter contains small parts which can pose a choking hazard. To avoid suffocation, do not allow children to touch plastic covering. Children must always be under parental supervision. Children under the age of 6 must be kept away from the product.
- DO NOT allow anyone to ride the scooter on his/her own unless he/she, and the supervising adults, have carefully read this manual. It’s your responsibility to assure a new rider’s safety. Assist new riders until they are familiar with the basic operation of the scooter. The rider must wear a helmet and other protective gear. When you give the product to others, please deliver the User Manual together.
![]() WARNING
WARNING
Protective equipment should be worn. Not to be used in traffic.
Never hitch a ride with another vehicle.
Riding Surfaces and Environment:
- This scooter is designed for riding on flat, dry, paved surfaces. Please ride in an open outdoor space. Make sure there are no pedestrians, skateboards, bikes, scooters and other riders in your surroundings.
- Never use in roadways, near motor vehicles, near steep inclines or steps, swimming pools or other bodies of water. Avoid construction sites, sudden surface changes, drainage grates, potholes, cracks, hydrants, parked cars, speed bumps and other obstacles. Don’t ride on loose grounds (such as rocks, gravel or sand).
- Do not ride in extreme temperature conditions or in low visibility, such as at dawn/dusk or at night. Do not ride in the snow or in the rain. Submersion in water may cause battery damage, catch fire or even explode.
![]() WARNING
WARNING
DO NOT ride in the rain or through puddles.
When Riding:
- One rider ONLY!
- Always wear a helmet and other protective gear (such as elbow pads and knee pads) when riding the scooter. Use an approved bicycle or skateboard helmet that fits properly with the chin strap in place, and provides protection for the back of your head.
- DO NOT bypass. Slow down when entering unfamiliar areas. Use caution when riding in areas with trees, posts, or fences. Always slow down when turning.
- Be alert and aware of the surroundings both far ahead and in front of you when riding. Your eyes are your best tool for safely avoiding obstacles and low traction surfaces (including, but not limited to, wet ground, loose sand, loose gravel, and ice).
- Avoid sudden acceleration and deceleration. Never ride faster than n the designed top speed (the top speed can be affected by rider weight, battery level, incline, etc.). As with other vehicles, faster speeds require a longer braking distance.
Sudden braking on low traction surfaces could lead to wheel slip or falls. Be cautious and always keep a safe distance between you and others when riding. - Keep both hands on the handlebar and do not carry a cargo of any kind. DO NOT use a cell phone, camera, headphones, earbuds or perform any other activities while riding. DO NOT ride downhill.
- Do not touch moving or spinning wheels. Keep your hair, clothing, or similar articles from coming in contact with the moving parts.
- Please get off the scooter and walk along with it when you encounter special road surfaces such as speed bumps and potholes.
![]() WARNING
WARNING
If the scooter makes an abnormal sound or signals an alarm, stop riding immediately. Do NOT take your hands off the handlebar and DO NOT ride with one hand or on one foot. DO NOT use mobile phones or wear headphones while riding. DO NOT press the electronic throttle when you walk along with the scooter. Who Should Not Ride:
I. Anyone under the influence of alcohol, drugs, or intoxicants.
II. Anyone who suffers from diseases (especially in the head, heart, back, and neck) that put them at risk if they engage in strenuous physical activity.
III. Anyone who has a health condition that would interfere with their ability to maintain balance.
IV. Anyone whose age, height, and weight is outside the stated limits (see Specifications).
V. Those with compromised mental abilities who cannot understand the risks and proper operation of the vehicle.
VI. Anyone who is pregnant.
Safe Use:
- Do not ride the scooter when the ambient temperature exceeds the operating temperature of the product (see Specifications), because low/high temperatures can decrease vehicle performance and even lead to accidents.
- Always park with the kickstand on a flat and stable surface. Once the scooter is on its stand, check its stability to avoid any risk of falling (by slip, wind or slight jolt). Do not park in a busy area, but rather along a wall.
- It is recommended to conduct regular maintenance of the scooter (see Maintenance ).
- Please read the User Manual before charging the battery (see How to Charge).
![]() WARNING
WARNING
- Only use the charger specified by the manufacturer. Only use the battery supplied by the manufacturer.
- Never allow your child to touch any vehicle parts with gaps such as the folding mechanism, fender, wheels, the brake system, etc. Do not touch the brake or hub motor after riding, so as to avoid burns due to increased temperature.
Parts and Functions
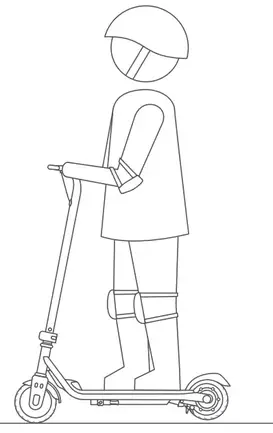
Please familiarize yourself with each part. This manual uses C10 as an example and pictures are for illustration purposes only.
The actual product may vary. 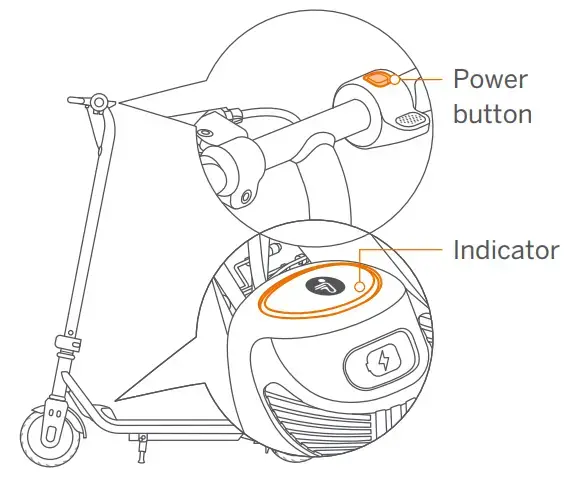
Power button
Press the button to power on or change riding modes. The Turbo mode is set as default when turned on. Hold for 2s to power o!.
| Modelo | Turbo mode Cruise mode Safe mode | |||
| Max. speed | ZING C8 | 10 mph (16 km/h) | 10 mph (16 km/h) | 6.2 mph (10 km/h) |
| ZING C10 | 11.2 mph (18 km/h) | 11.2 mph (18 km/h) | 6.2 mph (10 km/h) | |
| ZING C20 | 12.4 mph (20 km/h) | 12.4 mph (20 km/h) | 6.2 mph (10 km/h) | |
| Indicator | solid, with 1 beep | blink slowly, with 2 beeps | blink fast, with 3 beeps | |
| Ambient light (for ZING C10 and 020 only) | full-color pulsing | blue pulsing | red pulsing | |
Battery indication
The color of the indicator shows the battery level: >10% white, ≤10% red.
* When an abnormality occurs, the indicator will flash and an alarm will start beeping.
Assembly
ZING C8, ZING C10
- Flip the quick-release clamp to the closed position to secure the stem.
- NOTE: If the stem is shaky, you can adjust the knob to tighten it.
- Press the quick-release button and insert the stem into the front fork. The button will pop out automatically.
ZING C20
- Insert the stem to the bottom.* Align the positioning groove and the positioning screw, then slide the screw into the groove.
- Lock the folding clamp and flip the safety clamp to the closed position.
- Tighten the two screws alternately several times. * Once tightened, attempt to wiggle the handlebar to ensure it is safely secured.
![]() WARNING
WARNING
Power off the scooter before assembling. The brake cable should not wrap around the stem.
Pre-ride Checklist
- Make sure there are no loose fasteners and damaged components. Check all functional parts like the frame, handlebar, tires and make sure the steering system is well adjusted. Ensure that all locking devices are engaged.
- Check the brake for proper function. When you squeeze the brake lever, there should be positive braking action.
- Battery: if the battery level is low (the indicator is red), please fully charge the battery to ensure safe riding. Always wear a helmet and protective equipment like knee pads and elbow pads.
- Always wear shoes and proper outfit (sports shoes and clothes are recommended). Never ride barefoot or in sandals.
- Long hair should be tied back to prevent it from blocking your vision.
- Do not attempt your first ride in any area where you might encounter children, pedestrians, pets, vehicles, bicycles, or other obstacles and potential hazards.
- Check and obey local traffic laws and regulations for scooters.
- CAUTION: If you have any concern over the safety of the product and/or there is a symptom of abnormality, please stop using the product immediately and contact customer service for support.
Learn to Ride
WARNING
Always wear a helmet and other protective gear to minimize any possible injury in the learning process. To reduce the risk of injury, adult supervision is required.
Turn on the scooter. If the indicator is red, please charge immediately (see How to Charge).
CAUTION Please scan the QR code on the scooter to learn how to activate it before your first ride. For the safety of the rider, please ride in Safe mode until the rider is comfortable enough to use Turbo mode.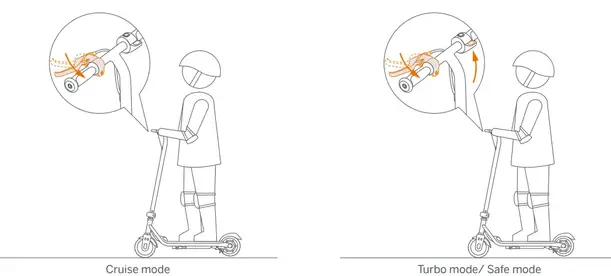
Hold the handlebar firmly with both hands. Place one foot on the footboard and start kicking with the other foot.
 When the scooter starts cruising, place both feet on the footboard and keep your balance.
 Accelerate and Decelerate
| Cruise mode (indicator blinks slowly) |
Turbo mode (indicator is always on ) |
Safe mode (indicator blinks fast ) |
|
| Acceleration | Kick and go | Press the throttle lightly | |
| Deceleration | Squeeze the brake lever | Release the throttle and squeeze the brake lever |
Accelerate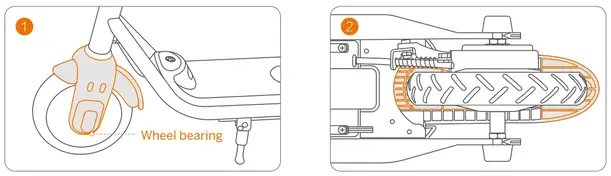
Decelerate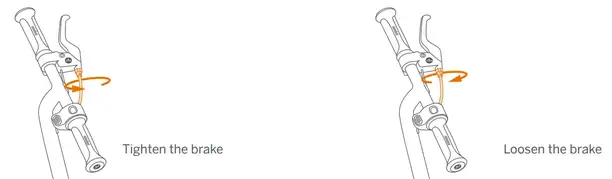
![]() WARNING
WARNING
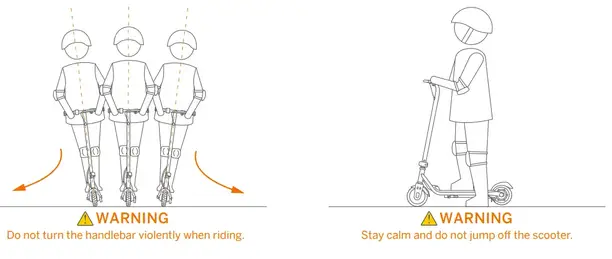
Stay alert and avoid abrupt acceleration or deceleration. Otherwise you risk serious injury due to imbalance, loss of traction, and falls.
DO NOT perform stunts of any kind. Both tires must remain on the ground at all times.
To turn, shift your body and turn the handlebar slightly.
When the scooter has stopped cruising, step off one foot at a time. Be extra cautious when dismounting for the first time.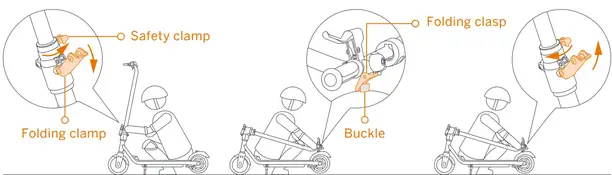
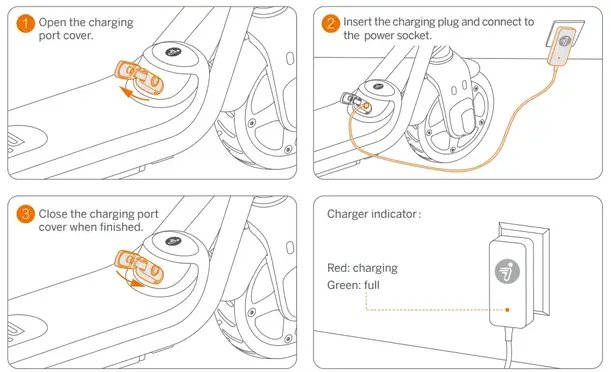
How to Charge
CAUTION
The charger is not a toy. Children should not be allowed to touch the charging device. Before and during charging, make sure the scooter is turned off.
Charging steps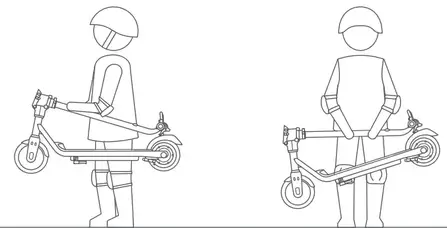
![]() WARNING
WARNING
- Use only the charger specified by the manufacturer. Other types can burst and catch fire.
- Do not attempt to charge your scooter if the charger or the power outlet is wet.
- When there is an abnormal smell, sound or light display, stop charging immediately and contact after-sales service.
- Keep away from flammable and explosive materials when charging, and place the scooter in a place out of the reach of children.
- When not charging, disconnect the charger from the power socket.
Specifications
| Item | ZING C8 | ZING C10 | ZING C20 | |
| Weight and Size | Net Weight | Approx. 17.4 lbs (7.9 kg) | Approx. 17.9 lbs (8.1 kg) | Approx. 23.4 lbs (10.6 kg) |
| Length x Width x Height | Appro x. 31.5 x 13.7 x 33.4 in (800 x 350 x 850mm) | Approx. 313 x 15.7 x 37.4 in (800 x 400 x 950mm) | Approx. 36.2 x 15.7 x 40.2 in (920 x 400 x 1020mm) | |
| Rider Requirement | Payload | 44-110 lbs (20-50 kg) | 44-132 lbs (20-60 kg) | 44-165 lbs (20-75 kg) |
| Recommended Age | 6-12 yrs. | 8-14 yrs. | 10+ yrs. | |
| Recommended Height | 3’9″-4’9″ (115-145 cm) | 4’3″-513″ (130-160 cm) | 47″-5110″ (140-180 cm) | |
| Vehicle s Parameter |
Max. speed | Approx.10 mph (16 km/h) | Approx.11.2 mph (18 km/h) | Approx.12A mph (20 km/h) |
| Typical Range :‘: | Approx. 6.2 miles (10 km) | Approx.12.4 miles (20 km) | ||
| Traversable Terrain | Flat surface. paved road: obstacles < 0.4 in (1 cm): gaps <1.2 in (3 cm) | |||
| Operating Temperature | 14-104°F (-10-40°C) | |||
| Storage Temperature | -4-122°F (-20-50°C): 41-86°F (5-30°C) recommended | |||
| IP Rating | IPX4 | |||
| Charging time | Approx. 3 h | I Approx. 6 h | ||
| Battery Pack | Battery Type | Lithium-ion battery | ||
| Nominal Voltage | 21.6 V | |||
| Charging Temperature | 32-113°F (0-45°C): 50-95°F (10-35°C) recommended | |||
| Nominal Capacity / Energy | 2500 mAh / 54 Wh | 5000 mAh / 108Wh | ||
| Battery Management System | Overheating. short circuit. overcurrent and overcharge protection | |||
| Motor | Nominal Power | 120 W (0.12 kW) | 150 W (0.15 kW) | |
| Max. Power | 180W (0.18 kW) | 260 W (0.26 kW) | ||
| Battery Charger | Input Voltage | 100-240 V- | ||
| Max. Output Voltage | 25.2 V = | |||
| Rated Output | 24.2 V.1.0 A | |||
| Output Power | 24.2 W (0.02 kW) | |||
| Others | Braking Method | Hand-operated brake | ||
| Tires | Solid tire: material: synthetic rubber | |||
| Frame Material | Steel | |||
| Handlebar Material | TPR | |||
| Foot Pad Material | Sandpaper | I Silicone | ||
[1] For ZING C8 and ZING C10: tested while riding with a full battery, 110 lbs (50 kg) load, 77°F (25°C), 60% of max. speed on average on pavement.
For ZING C20: tested while riding with a full battery, 132 lbs (60 kg) load, 77°F (25°C), 60% of max. speed on average on pavement.
* Some of the factors that affect range include: rider weight, number of starts and stops, ambient temperature, etc.
Maintenance
Maintenance should be carried out by an adult regularly.
Cleaning
Use a soft and wet cloth to clean. Stains hard to remove can be scrubbed with a toothbrush and toothpaste, then wiped off with a soft and wet cloth.
To prevent jamming to the wheels, wheel bearings, or brakes, please clean and check these areas (as shown in the gray highlighted areas below) for dirt and other foreign objects.
First, clean up the foreign objects, and then wipe clean with a soft wet cloth. Lubricate both sides of the bearing with lubricating oil or machine oil. If the problem still exists, please contact customer service.
CAUTION: To avoid the accumulation of foreign objects, DO NOT ride on muddy, dusty, grassy or slippery roads. Do not clean your scooter with alcohol, gasoline, acetone, or other corrosive/volatile solvents. These substances may damage the appearance and internal structure of your scooter. Do not wash your scooter with a power washer or hose.
![]() WARNING
WARNING
- Do not dispose of this product in a landfill, by incineration, or by mixing it with household trash. Serious danger/injury can occur because of the electrical components.
- Before cleaning, make sure the scooter is powered off, the power cord is unplugged, and the rubber cap on the charging port is tightly sealed; otherwise, you may damage the electrical components.
Storage
Before storage, please turn off the scooter and fully charge it to avoid over-discharge, which will cause permanent damage.
Charge the scooter every 30 days for long-time storage.
Store in a cool and dry place indoors. Exposure to sunlight and temperature extremes (both hot and cold) will accelerate the aging process of the vehicle components and may permanently damage the battery. If the temperature of the storage environment is lower than 32°F (0°C), do not charge it until after placing it in a warm environment, preferably over 50°F (10°C).
![]() WARNING
WARNING
- Prolonged exposure to UV rays, rain and the elements may damage the enclosure materials.
- Store indoors when not in use.
- Keep away from fire!
Battery
A well-maintained battery can perform well even after many miles of riding. Charge the battery after each ride and avoid draining the battery. When at 72°F (22°C), the battery performance is at its best and the vehicle can achieve a longer range. Electronics inside the battery record the charge-discharge condition of the battery; damage caused by over-charging or over-discharge will not be covered by the Limited Warranty.
![]() WARNING
WARNING
- For information about battery and electrical waste, please contact your household waste disposal service, your local or regional waste management office, or your point-of-sale.
- The battery is not replaceable. Do not attempt to replace or disassemble the battery. Do not dismantle or puncture the casing. Keep away from metal objects to prevent short circuits.
- Risk of fire and electric shock. No user-serviceable parts.
- Do not store or charge the battery at temperatures outside the stated limits (see Specifications).
- Never charge in areas forbidden by law.
Battery Charger
Regularly examine the charger for damage to the cord, plug, enclosure, and other parts. If any damage is found, stop using it until it is repaired or replaced.
![]() WARNING
WARNING
Risk of electric shock. Do not disassemble the case or touch the metal contacts. Charge Li-ion batteries ONLY!
Cable Tension Adjustment
When the brake is too tight or loose, you can thread in/out the brake cable adjuster. 
Others
- Before lifting, moving, or otherwise transporting the scooter, turn it off and fold the scooter. Handle with care and avoid violent force, such as throwing and heavy pressure. Keep away from fire and water.
- Tires supplied with the product are to be mounted on the wheel by a professional repairer. Removing the wheels is complicated and incorrect assembly can lead to instability and malfunctions.
In case of accidents or breakdowns, contact an authorized repairer if the product is still under warranty. If it’s not, you can contact any specialized repairer of your choice. You can ask for the list of authorized repairers from customer service available at www.segway.com.
Efforts have been made to simplify wording in the user manual for users. Where an action appears too complicated for a user, he/she is advised to contact an authorized or a specialized repairer or customer service.
NOTICE: INSURANCE
YOUR INSURANCE POLICIES MAY NOT PROVIDE COVERAGE FOR ACCIDENTS INVOLVING THE USE OF THIS SCOOTER. TO DETERMINE IF COVERAGE IS PROVIDED, PLEASE CONTACT YOUR INSURANCE COMPANY OR AGENT.
Certifications
For Model: ZING C8, ZING C10, ZING C20
This product is certified to ANSI/CAN/UL-2272 by TUV.
The battery complies with UN/DOT 38.3.
Federal Communications Commission (FCC) Compliance Statement for the USA
This device complies with part 15 of the FCC rules. Operation is subject to the following two conditions: (1) This device may not cause harmful interference, and (2) this device must accept any interference received, including interference that may cause undesired operation.
Note: This equipment has been tested and found to comply with the limits for a Class B digital device, pursuant to part 15 of the FCC Rules. These limits are designed to provide reasonable protection against harmful interference in a residential installation. This equipment generates, uses, and can radiate radio frequency energy and, if not installed and used in accordance with the instructions, may cause harmful interference to radio communications. However, there is no guarantee that interference will not occur in a particular installation. If this equipment does cause harmful interference to radio or television reception, which can be determined by turning the equipment off and on, the user is encouraged to try to correct the interference by one or more of the following measures:
– Reorient or relocate the receiving antenna.
– Increase the separation between the equipment and receiver.
– Connect the equipment into an outlet on a circuit different from that to which the receiver is connected.
– Consult the dealer or an experienced radio/TV technician for help.
Industry Canada (IC) Compliance Statement for Canada
This device complies with Industry Canada license-exempt RSS standard (s). Operation is subject to the following two conditions: (1) this device may not cause interference, and (2) this device must accept any interference, including interference that may cause undesired operation of the device.
CAN ICES-3 (B)/NMB-3(B)
Segway parties are not responsible for any changes or modifications not expressly approved by us. Such modifications could void the user’s authority to operate the equipment.
10. Trademark and Legal Statements
Ninebot is the registered trademark of Ninebot (Tianjin) Tech. Co., Ltd; Segway and the Rider Design are the registered trademarks of Segway Inc.; The respective owners reserve the rights of their trademarks referred to in this manual. We have attempted to include description and instruction for all the functions of the Ninebot kick scooter at the time of printing. However, due to constant improvement of product features and changes of design, your scooter may differ slightly from the one shown in this document. Visit www.segway.com to download the latest user materials. Please note that there are multiple Segway and Ninebot models with different functions, and some of the functions
mentioned herein may not apply to your unit. The manufacturer reserves the right to change the design and functionality of the scooter product and documentation without prior notice.
©2021 Ninebot (Beijing) Tech Co., Ltd. All rights reserved.
Legal Statement
IMPORTANT: Ninebot kick scooter (the “product”) is an off road product rather than a means for transportation. Be aware, the user shall agree to read the entire user manual and fully understand its content (especially the parts related to the safety riding).
- The “Segway parties” mentioned above and below is the Manufacturer (“Ninebot”) Segway Inc. (“Segway” ) and their affiliates (including but not limited to their parent company, subsidiary, affiliated companies, predecessor, subsequent the company, administrators, successors, assigns, officers, directors, managers, employees, members, shareholders, and agents, attorneys, insurers).
- This product can be dangerous to a user, other persons, and property in proximity to that. The user shall assume all the risks and losses in connection with the product (especially for those related to and/or arising out of violation of the instructions about warnings and caution statements). Such risks include but not limited to loss of control, failure of the product, and/or collusion) The consequences for such an incident can be severe, including but not limited to injuries, bodily injuries, death, and/or damages to property. Segway parties shall not be liable for any claim, liability, and loss related to such consequences if it is due to the user’s assumption of risk.
- The product is a means of entertainment and play. The user may not have the necessary and sufficient experience and skills to ride it, especially in complex environments and/or undesirable roads. Such risk may increase if the user has physical and/or mental impairment or disability. Such risk may also increase if the user is not sufficiently familiar with the functions, features, and performance of the product. Thus, new users shall learn and practice how to use this product properly and safely.
- The user shall regularly and periodically, as the circumstance requires, inspect and maintain the product. The user shall also conduct reasonable examination and inspection of the product every time before riding it. For instance, every time before riding the product, the user shall check and examine tire performance, battery level, and all functional parts. If abnormality, discoloration or change of color of material (especially in an area that receives high stress when the product is in motion or junction), scratch, crack, loose fasteners, and/or missing parts (such as screw, bolts and/or nut) which strongly indicates that it is not safe to ride the product.
- Since it is impossible to predict and/or anticipate all and every scenario, condition, and/or circumstances under which a product user may be exposed to risk and danger, the User Manual is not intended to be an exhaustive list on how to ride the product safely and/or avoid hazards related to the product. So, in addition, to adhere to the instructions, the user shall also ride and/or use the product with responsibility, carefulness, precaution, and best judgment.
- The users shall check and obey the local laws or regulations over the product. The laws and regulations may be different in different jurisdictions. Apart from the others, such laws and regulations may include:
a.A helmet may be legally required by local law or regulation in your jurisdiction.
b.Your product is not be allowed to be driven on a motorway or highway.
c.You may obtain more information related to legal requirements on the product from your local government. - The users shall immediately check whether the product and its accessories are in good condition upon receipt of the product.
- All the separate components and parts of the products must be properly installed per the User Manual. Inappropriate installation and/or assembly may significantly increase the risk of loss of control, product failure, collisions, and falls. The product may contain removable components and small parts. Please keep them out of the reach of children to avoid choking hazards.
- Do not dispose of this product in a landfill, by incineration, or by mixing with household trash. Serious danger/ injury can occur because of the electrical components and the battery. For information about battery and electrical waste, please contact your household waste disposal service, your local or regional waste management office, or your point-of-sale. The user shall not use any non-original accessories or dismantle or modify the product without authorization. All damages, injuries, and damages to property arising from that place will be your sole responsibility and risk.
- Segway parties reserve the right to make changes to the product, release firmware updates, and update this manual at any time. Segway parties may make improvements and changes to this user manual necessitated by typographical errors, inaccuracies of current information, or modifications to programs and/or equipment at any time and without notice. Such changes will, however, be incorporated into new editions of this user manual. All illustrations are for illustration purposes only and may not accurately depict the actual device. Actual products and functions may vary. Due to the update of the product, there may be some deviations in color, appearance, and other aspects between the
product listed in this manual and the product you purchased. Please refer to the actual product. - This document should be considered as a permanent part of the product, and it shall be provided to the user together with the product all the time. Thank you again for choosing the Ninebot kick scooter!
Contact
Contact us if you experience issues relating to riding, maintenance, and safety, or errors/faults with your scooter.
Americas:
Segway Inc.P.O. BOX 3925
Alhambra, CA, 91803, USA
Toll Free: 1-888-523-5583
Fax: 1-603-222-6002
Technical Support Email: [email protected]
Website: www.segway.com
Have your scooter serial number on hand when contacting Segway.
You can find the serial number on the underside of your scooter.
Appendix: Disassembly or Folding
How to disassemble ZING C8, ZING C10
Loosen the quick-release clamp.
Press the quick-release button.
Lift the stem up to detach it from the front fork.
 Folding and Unfolding ZING C20
Note: The following steps should be operated after powering off the scooter.
Folding
Hold the stem, loosen the safety clamp and the folding clamp.
Fold the stem and lock the folding clasp into the buckle on the rear fender.
Unfolding
Lift the folding clasp out of the buckle. Upright the stem and secure the folding clamp and the safety clamp.
Carrying
After folding the scooter, grip it tightly and hold the stem to carry it.
Before your first ride, for your safety, there is a speed limit on the device. The initial speed is limited to 3.1 mph (5 km/h) with the indicator light flashing and a buzzer warning sound. Please be sure to scan the QR code on the scooter to learn how to fully activate the scooter.
Actual product functions may not conform to the manual due to technical and firmware updates. For the latest feature introduction and safety guide, please visit www.segway.com.
SEGWAY PR0201 Ninebot Password Lock for KickScooters

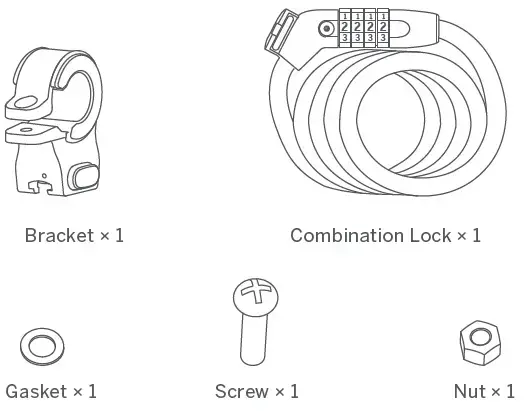
Packing List
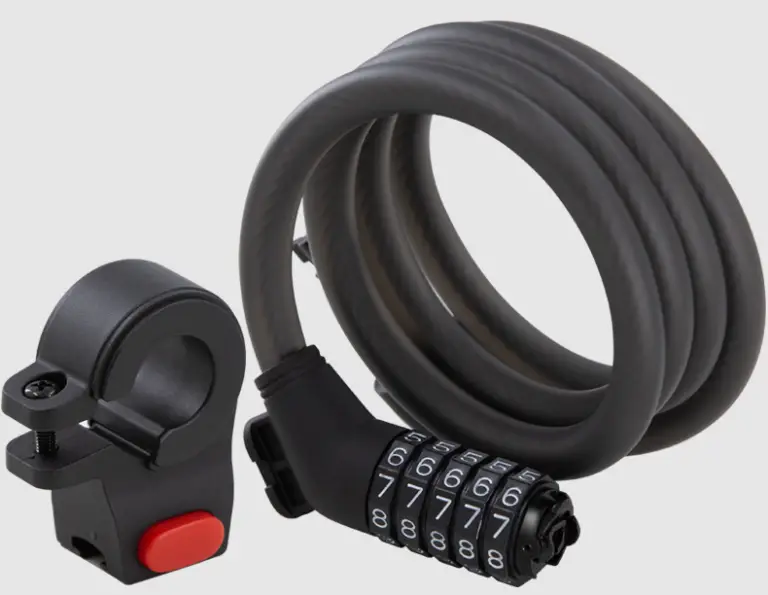
Mount
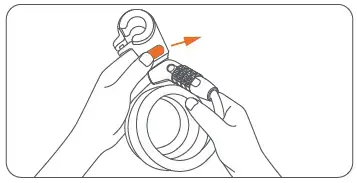
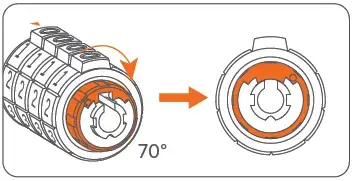
Press the red button on the bracket, and unplug the combination lock.
 Compatible handlebar diameter: 18~24mm Suitable for:
Ninebot KickScooter Max series, F series, Mi Electric Scooters,
Ninbeot eKickScooter series.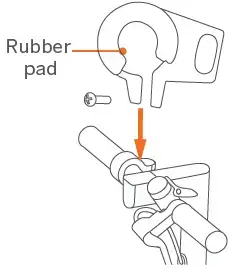
Compatible handlebar diameter: 28~36mm Suitable for:
Segway eScooter E series.
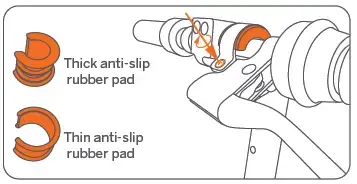
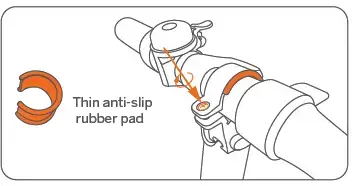
Note: The bracket contains two anti-slip rubber pads, please choose to use one or two according to your vehicle type.
Set the Code
- Align the numbers to unlock.
- Rotate the dial clockwise to the end.
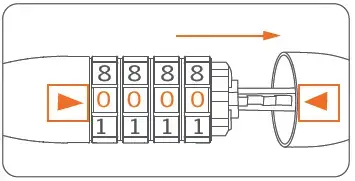
- Choose your code and align the numbers (shown with 1234 as an example).
- Rotate the dial to back to its position.
- Insert the key plug into the dial (only when the code is correct).

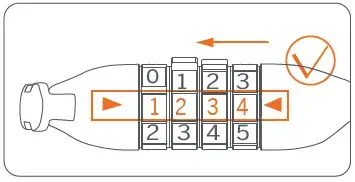
How to Lock
Please scramble the dials after locking your scooter.
The wheel-locking way is not available for the following models:
Ninebot KickScooter E25
Ninebot KickScooter MAX G30 & G30L Ninebot KickScooter Air T15 series
Trademark
Ninebot is the trademark of Ninebot (Beijing) Tech. Co., Ltd; The
respective owners reserve the rights of their trademarks referred to in this manual. We have attempted to include description and instructions for all
the functions of the Ninebot Password Lock for KickScooters at the time of printing. However, due to constant improvement of product features and changes of design, the product may differ slightly from the one shown in this document.
©2022 Ninebot (Beijing) Tech Co. Ltd. All rights reserved
Specifications
| Product name | Ninebot Password Lock for KickScooters |
| Model | PR0201 |
| Suitable for | Ninebot KickScooters, Ninbeot eKickScooters, Mi Electric Scooters. |
| Net Weight | Approx. 0.6 lbs (255 g) |
| Material | Steel cables, PVC, PP, ABS, Zinc alloy |
| Lock body (diameter × length) | Approx. 0.3 × 47.2 inch (10 mm × 1.2 m) |
| Lock cap (diameter × length) | Approx. 0.8 × 3.8 inch (21 × 96 mm) |
| Dial | Four cams with number on the surface, from 0 to 8. |
| Initial password | 0000 |
| Method of changing passward | Rotate the dial |
After-sales Service
Warranty
We offer 180 days warranty service for Ninebot Password Lock for KickScooters purchased directly from Segway official on-line store and authorized channels. In each case, the warranty period is measured starting on the date of purchase by the original consumer purchaser. The sales receipt from the first consumer purchase, is required in order to establish the start date of the warranty period. Please visit our official website in your region at below links to find more about the Limited Warranty and Dispute Resolution Agreement.
- The Americas: https://store.segway.com/warranty-information
- Europe: https://www.segway.com/international
- The APAC: https://ap-en.segway.com/download.html
THIS LIMITED WARRANTY DOES NOT IN ANY WAY AFFECT OR LIMIT THE STATUTORY RIGHTS YOU MAY HAVE AS A CONSUMER*
Customer Service
For product issues, please contact Segway online customer service in your region or send your requests via e-mail, Segway’s support personnel are available to assist you.
Segway Online Service Link
The Americas: https://segway-ninebot.force.com/hc/s/contactsupport
The Europe: https://www.segway.com/international
The APAC: https://ap-en.segway.com/service-locations.html
Segway Customer Support E-mail Address
The Americas: [email protected]
The Europe: [email protected]
The APAC: [email protected]