sensi Smart Thermostat Instruction Manual
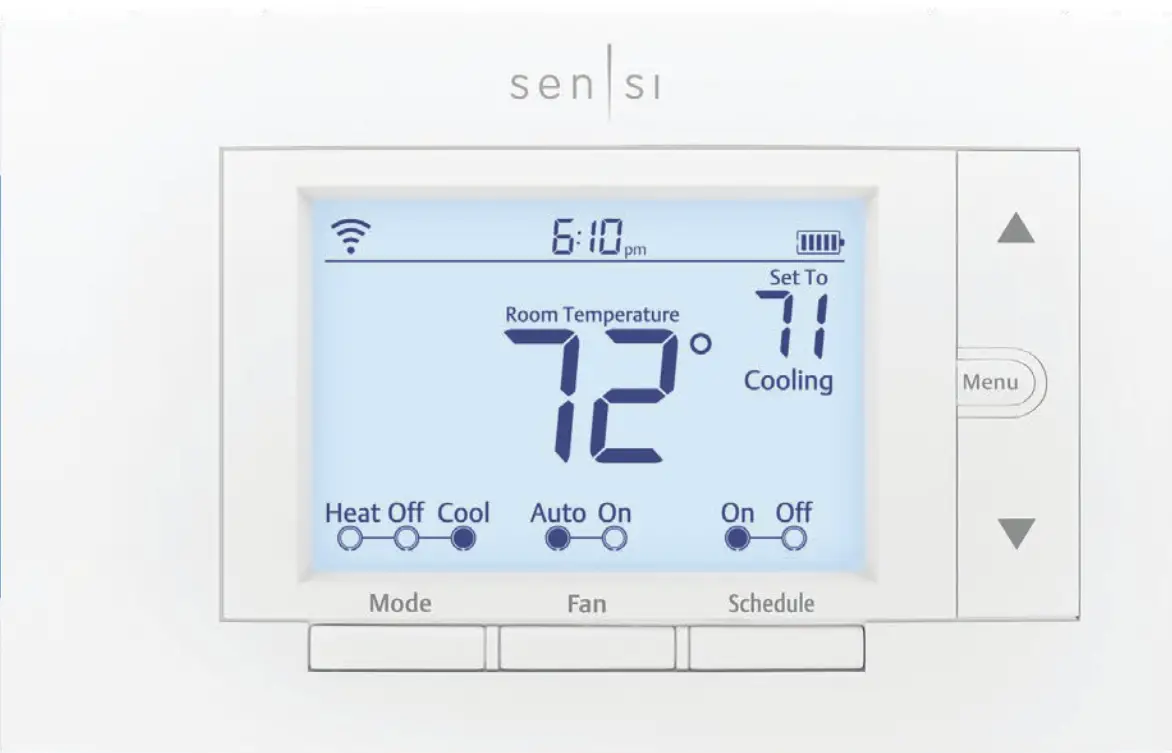
BUTTONS AND ICONS
The Sensi Smart Thermostat can be operated through Wi-Fi using the Sensi app or it can be operated at the actual wall unit. Advanced features such as thermostat settings, scheduling and email alerts are only available through the Sensi app.
 1. WI-FI STATUS ICON
Indicates Wi-Fi connection status. When you turn Wireless Off onthe thermostat, this is blank.
2. BACKLIGHT BUTTON
Illuminates the thermostat for 10 seconds
3. TIME
Displays current time.
4. KEYPAD LOCKOUT ICON
This icon indicates the thermostat is locked out. No changes can be made at the thermostat. (Can only be enabled from the Sensi app).
5. BATTERY ICON
When the bars get low, remember to change the 2 AA Alkaline batteries in the back of the thermostat faceplate.
6. UP ARROW BUTTON
Adjusts the temperature setpoint or thermostat configuration.
7. CURRENT SET TEMPERATURE
Current set temperature the thermostat will maintain.
8. MENU BUTTON
Access thermostat configurations. (See page 6 for more details).
9. DOWN ARROW BUTTON
Adjusts the temperature set point or thermostat configuration.
10. CURRENT ROOM TEMPERATURE
The room temperature at the thermostat.
11. SCHEDULE BUTTON
Toggles the schedule On or Off. (The thermostat runs a program based on time and temperature set points when Schedule is On).
12. FAN BUTTON
Switches fan mode from Auto or On. Leave the fan mode on Auto to allow the thermostat to control the fan as necessary.
13. MODE BUTTON
Switches system mode between Heat, Cool, Off or Aux. (Auto Mode is only available using the Sensi app).
BASIC FUNCTIONALITY
Switching System Mode
Press the “Mode” button to switch between all available system mode settings. When the Mode is “Off” the thermostat will not bring on your heating or cooling systems.
 Fan Mode
If you want to circulate the indoor blower, you can switch Fan to “On.” Turn the Fan back to “Auto” when you want the thermostat to control your indoor blower as necessary. Leaving the Fan in “On” will run your blower continuously.

Holding One Temperature
If you want to hold one temperature, turn Schedule “Off.” Then, adjust the setpoint using the up and down arrow buttons. The thermostat will hold this temperature, in the set Mode, until you turn Schedule back “On” or until you adjust the set point again using the up and down arrow buttons.

Temporary Hold
When your schedule is set to “On,” your Sensi thermostat controls your home based on the time and temperature settings in the current schedule. To temporarily change your temperature use the up and down arrows in the app or on the thermostat. Your Sensi thermostat will display “Temporarily Set To” on the thermostat and will hold your new temperature until the next scheduled set point with a minimum hold time of two hours.

Circulating Fan
If you want to circulate the air in your home using your indoor blower fan, you can set this feature in the app or at the thermostat. A percentage is selected to dictate how often the fan should run each hour, You can set 5% increments from 10% – 100%.
EXAMPLE: If you set the Circulating Fan to 50%, the fan will un 30 minutes every hour. If any heat/cool cycles occur during the hour, their runtime is subtracted from the overall fan run time.
Setting the feature from the thermostat:
1. Press “Menu”
2. Press “Next” until you come to “Fn Setup”.
3. Use the up arrow button to toggle the percentage you’d like the fan to run each hour.
4. Press “Exit”
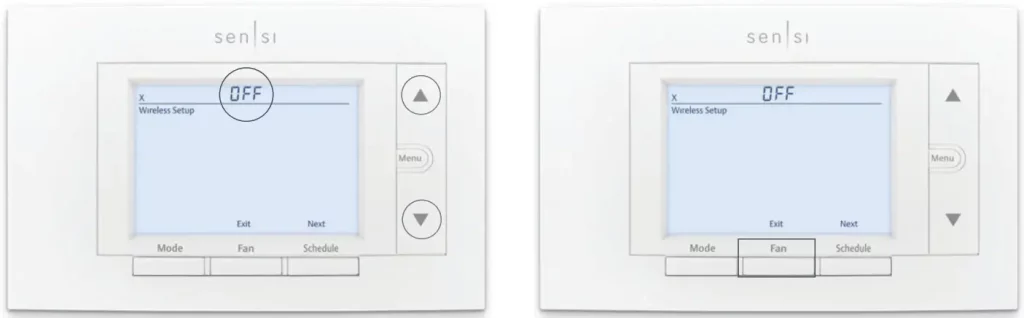
Turn Wi-Fi Off
If connecting to Wi-Fi is not an option, you can turn off Wi-Fi on the thermostat and manually set a time and a schedule from the wall unit. To turn off Wi-Fi:
1. Press “Menu”.
2. Press “Next” until you see “Wireless (Setup)” at the top of the screen. “On” should be flashing at the top.
3. Use the up or down arrow button to change it to “Off”.
4. Press “Exit”.

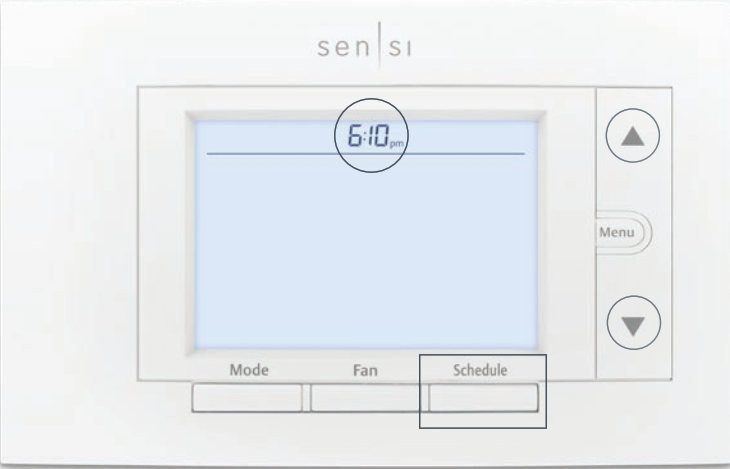
Setting the Time Manually
When connecting the thermostat to Wi-Fi, the time will sync automatically. If not connecting to Wi-Fi, follow these steps to set the time at the thermostat.
1. Turn Wi-Fi Off. (Refer to section “Turn Wi-Fi Off” on page 4).
2. Press and hold the “Schedule” button.
3. The screen will go blank and the time will start flashing at the top. Use the up and down arrow buttons to rotate through the times until you get to the appropriate time of day.
4. Press “Exit”.

Setting a Schedule
When connecting the thermostat to Wi-Fi, the schedule is programmed based on time and temperature set points from the Sensi app. If you are not connecting to Wi-Fi, follow these steps to set a basic 7 day schedule with 4 mandatory set points. (More robust scheduling options are only available through the Sensi app.)
1. Turn Wi-Fi Off. (Refer to section “Turn Wi-Fi Off” on page 4).
2. Use the “Mode” button to set which type of schedule it will be: Heat or Cool.
 3. Press and hold the “Schedule” button, until you see the time flash at the top of the screen
a. Adjust the time on the thermostat if needed, using the up and down arrow buttons.
4. Press “Next”
5. You will see a large number in the middle of the screen. This refers to your set point.
a. The time will be flashing at the top of the screen. Adjust the time of the first setpoint using the up and down arrow buttons.
b. Press “Next”. The setpoint will be flashing. Adjust the setpoint using the up and down arrow buttons.
c. Press “Next”.
d. Repeat steps a-c for the second, third and fourth set points.
6. Press “Exit”.
7. Make sure “Schedule” is set to “On” on the thermostat.

Example Schedule
If you need to keep track of your time and temperature set points, use this table.
SAMPLE SCHEDULE
| PERIOD | DAILY START TIME | DAILY TEMP | |
| Heat | 1st | 6:00 am | 70° F |
| 2nd | 8:00 am | 62° F | |
| 3rd | 5:00 pm | 70° F | |
| 4th | 10:00 pm | 62° F | |
| Cool | 1st | 6:00 am | 78° F |
| 2nd | 8:00 am | 85° F | |
| 3rd | 5:00 pm | 78° F | |
| 4th | 10:00 pm | 82° F | |
COMPLETE YOUR SCHEDULE
| PERIOD | DAILY START TIME | DAILY TEMP | |
| Heat | 1st | 6:00 am | |
| 2nd | 8:00 am | ||
| 3rd | 5:00 pm | ||
| 4th | 10:00 pm | ||
| Cool | 1st | 6:00 am | |
| 2nd | 8:00 am | ||
| 3rd | 5:00 pm | ||
| 4th | 10:00 pm | ||
MENU CONFIGURATIONS
Pressing “Menu” at the thermostat allows you to change a series of settings to customize the thermostat for your specific system. Refer to the chart below for a complete listing of thermostat configurations and what they stand for. If you are installing the thermostat on the wall for the first time, we highly recommend that you download the Sensi app and follow the installation instructions.
However, if you are experiencing an issue or you want to check your system configurations, you can manually configure your thermostat as well. Learn more about how to properly configure your thermostat by searching “configure” on our support site at sensi.emerson.com/en-us/support.
CONFIGURATION MENU ITEMS REFERENCE
| Display Code | Menu item | Default | Options |
| Wireless Setup Connects Thermostat to Wi-Fi network | Connect | ||
| Fahrenheit or Celsius | F | F c | |
| Outdoor Equipment Configuration Cooling or heat pumps | AC2 | AC1 – Conventional Cooling 1 (Single Stage) AC2– Conventional Cooling 2 (Two-Stage) HP1 – Heat Pump 1 (Single Stage) HP2– Heat Pump 2 (Two-Stage) AC0– No Cooling |
|
| Indoor Equipment Configuration For Gas or Electric Heat | EL2 | EL1– Electric 1 (Single Stage) EL2– Electric 2 (Two-Stage) FAn GA1 Gas 1 (Single Stage) GA2 Gas 2 (Two-Stage) |
|
| Reversing Valve Position Selects “O” or “B” Setting For Heat Pumps Only | 0 | O B 2 | |
| Fn | Circulating Fan | OFF | Off/10% – 100% (5% increments) |
| H AA | Humidification Add Accessory | OFF | Off/On |
| H SP | Humidification Set Point | OFF | Off/5% – 50% (5% increments) |
| dH AA | Dehumidification Add Accessory | Od | Od/Oc Od – Optimal dehumidification (Overcool to dehumidify) Oc – Optimal comfort (Wired dehumidification) |
| dH SP | Dehumidification SetPoint | OFF | Off/40% – 95% (5% increments) |
| Wireless Radio Turns Wi-Fi Radio On/Off | ON | Off/On |
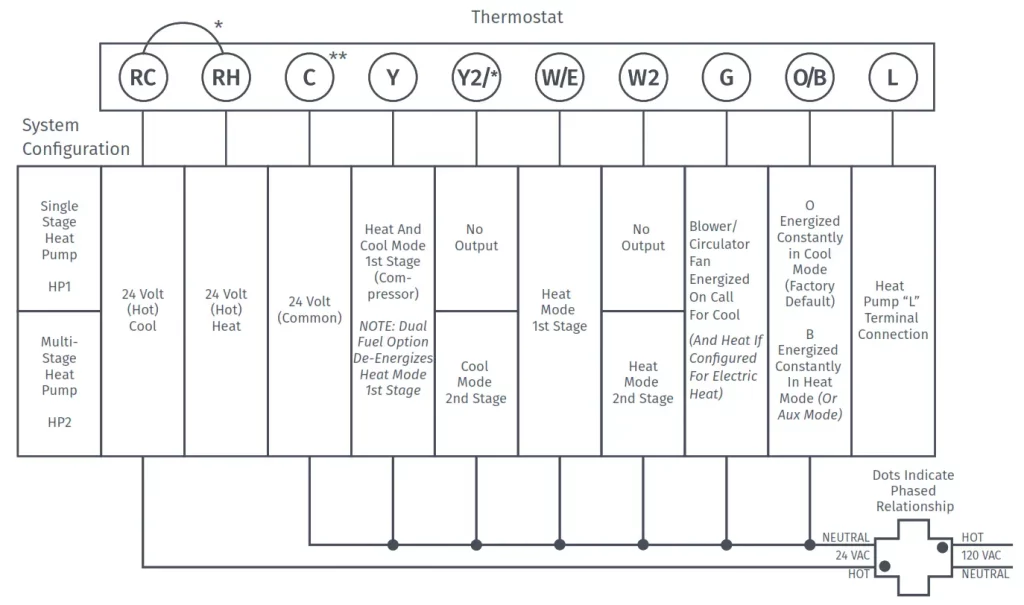
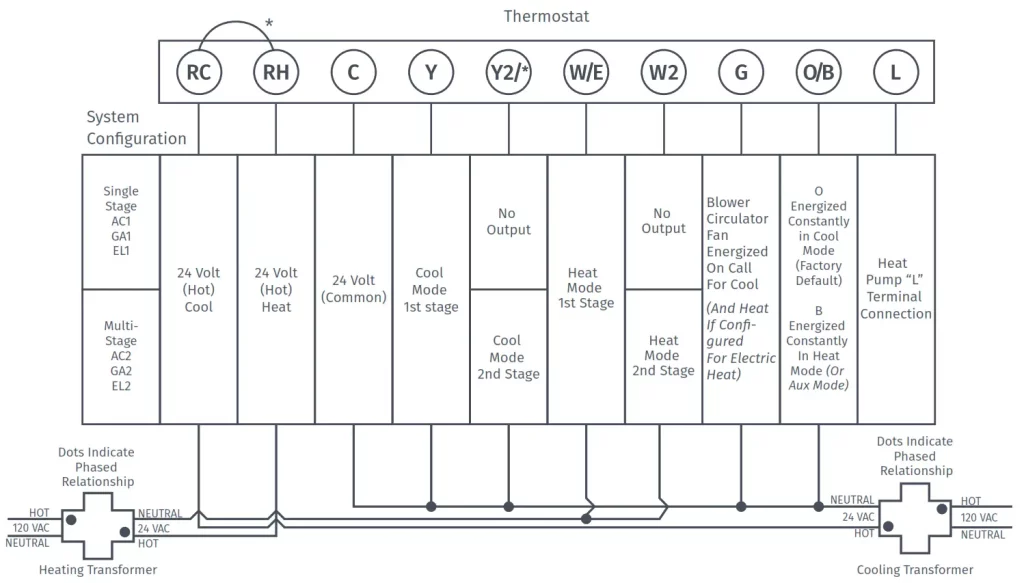
WIRING TERMINALS
See below for definitions of the wiring terminals on the sub-base of the thermostat.
Terminal outputs and wiring diagrams
| TERMINAL LABEL | DEFINITION |
| RH* | Power for heating, 24V |
| RC* | Power for cooling, 24V |
| C** | Common wire, 24V |
| G | Indoor blower (fan) |
| Y | First outdoor stage cooling on conventional systems or first heat and cool on heat pump systems |
| Y2/* | Second outdoor stage cooling on conventional systems or second heat and
cool on two stage heat pump systems or humidifier |
| W/E | First indoor stage heat on conventional systems or first stage auxiliary/emergency heat on heat pump systems |
| W2/* | Second indoor stage heat on conventional systems or second stage auxiliary/
emergency heat on heat pump systems or dehumidifier |
| O/B | Changeover (reverse valve) connection for heat pump or zone panel systems |
| L | Heat Pump system, “L” wire connection |
* If the old thermostat has separate RC and RH wires coming out of the wall, clip the RC/ RH jumper on the back of the thermostat above the battery compartment.
**The common wire could be labeled “C” on your old thermostat, or it could be labeled “B”
or “X.” Please refer to the owner’s manual of your old thermostat for clarification.
Does Wire Color Correspond to the Thermostat Terminals?
Wire color does not always correspond to the thermostat letters. A white wire may be attached to the “W” terminal on the old thermostat, or it may be attached to a different terminal with a different letter. Be sure to take a photo of the old thermostat that shows the wire colors and terminal letters before labeling and removing any wires.
BACK OF THE FACEPLATE
Below is a picture of the back of the Sensi thermostat faceplate. The backplate shows the jumper wires, battery compartment, and some useful information about your thermostat.

- SENSI SECURITY CODE
Necessary for connecting to Wi-Fi. Also found on the Welcome Guide in the packaging. - MODEL NUMBER
Illustrates whether you purchased the professional or the DIY model. - APPLE HOMEKIT CODE
The 8 digit code used to add Sensi Thermostat to Apple HomeKit.. - RC/RH INTERNAL JUMPER WIRE
Only clip this if you have separate RC and RH transformers coming out of the wall. - BATTERY COMPARTMENT
Two AA Alkaline batteries are used for backup purposes. When you see the battery indicator bar on the thermostat display reach 3 bars, replace these batteries to maintain Wi-Fi connectivity. - DATE CODE
When your thermostat was manufactured. - MAC ID
Unique number that identifies the thermostat.
FAQS
If the power goes out, will this thermostat continue with my settings when power is restored? Or will I have to reprogram it?
It’ll retain the settings
does display stay light when heating or cooling ? Or do we have to touch it to see if it is working ?
It changes from color when heat is engaged. Almost an orange color. The actual brightness does not change unless you physically touch it.
Can this be used with zoned systems?
one each zone
If the power goes out, is there a battery back up that allows you to control the heat manually?
There is no physical battery backup, but since it’s connected to the internet, your settings are saved. And you can pretty
much do anything off your phone with the app. If the power goes out, your hvac probably won’t work anyway.
Will this thermostat work with a two stage AC system?
According to the documentation yes, “Conventional 2H/2C”. I’m not utilizing it with that type of application.
What is the max temperature this can be set at? Our current one only goes up to 90. We would like it to only cool if over 95.
Yes… the UPPER value goes to 99 degrees.
Why is the thermostat beeping?
The thermostat may beep when you first turn it on. This is normal. If the thermostat continues to beep, turn the power off and then back on. If this does not stop the beeping, contact Customer Support at 1-866-972-8378.
How do I change the batteries in my Sensi Smart Thermostat?
To change the batteries in your thermostat, remove the faceplate to access the battery compartment. Remove the old batteries and replace with two new AA Alkaline batteries. Make sure that the positive (+) side of the battery is facing up. Replace the faceplate and turn your thermostat back on to continue using it.
What are my Wi-Fi network credentials?
Your Wi-Fi network credentials are printed on a sticker located inside your Sensi Smart Thermostat’s battery compartment.
Does this thermostat allow differential temperatures greater than 1°?
The Sensi Touch Smart Thermostat allows for a temperature offset of +/- 5 degrees.
is there a swing settings?
Yes, though they call it “cycle rate” and not “swing” and the setting is FAST, MEDIUM, or SLOW. You can set a separate “cycle rate” for heat and cool.
Does this unit work with 5 ghz internet?
The sensi touch is only 2.4 ghz
Does this thermostat have Heat, Cool, and Auto, modes?
Yes
Why is the white color version insanely more expensive?
The black and silver version are probably discounted due to being less popular. There may be a lot of them sitting on shelves not moving.
Does this thermostat (or any others ) keep a runtime of the unit? I would like to see how many times and duration of when the heat pump comes on.
Yes. Mine has a usage tab. It will tell you by day for the last week and by month. Runtime of ac, fan only, or heat.
If the power goes out, will this thermostat continue with my settings when power is restored? Or will I have to reprogram it?
It’ll retain the settings
does display stay light when heating or cooling ? Or do we have to touch it to see if it is working ?
It changes from color when heat is engaged. Almost an orange color. The actual brightness does not change unless you physically touch it.
Can this be used with zoned systems?
one each zone
If the power goes out, is there a battery back up that allows you to control the heat manually?
There is no physical battery backup, but since it’s connected to the internet, your settings are saved. And you can pretty much do anything off your phone with the app. If the power goes out, your hvac probably won’t work anyway.
Will this thermostat work with a two stage AC system?
According to the documentation yes, “Conventional 2H/2C”.
Can the thermostat controls be locked?
Not sure.
What is the max temperature this can be set at? Our current one only goes up to 90. We would like it to only cool if over 95.
Yes… the UPPER value goes to 99 degrees. Sounds like it’ll work for you.
is there a swing settings?
Yes, though they call it “cycle rate” and not “swing” and the setting is FAST, MEDIUM, or SLOW. You can set a separate “cycle rate” for heat and cool.
Does this unit work with 5 ghz internet?
The sensi touch is only 2.4 ghz
how easy this to program (not install) from the touch screen panel without using the app?
Easier to program through touch screen than though app, but app is not difficult.
Does the thermostat come with a mounting plate?
The mounting plate is included but does not cover anything larger than the size of the thermostat. amazon does sell a larger size back plate to cover extra holes or missing paint not included with this stat.
Does this thermostat have Heat, Cool, and Auto, modes?
Yes.
Why is the white color version insanely more expensive?
The black and silver version are probably discounted due to being less popular. There may be a lot of them sitting on shelves not moving.
Does this thermostat (or any others ) keep a runtime of the unit? I would like to see how many times and duration of when the heat pump comes on.
Yes. Mine has a usage tab. It will tell you by day for the last week and by month. Runtime of ac, fan only, or heat.
Does it work with baseboard heater?
If you are talking about electric baseboard heat (110v or 220V), no. If it’s hot water baseboard heat from a boiler system, then most likely it would work (that’s what I have, along with a separate A/C system, and it works great).
Will this work with a heat pump?
Yes it will. You will tell it in the settings you have a heat pump when setting it up.
Can it control central humidifier?
No
Does this work with orbi mesh system?
Yes have mine set to a mesh system.
Yes have mine set to a mesh system?
Yes. It also tells you how long your emergency heat is running and keeps daily and monthly records off it
VIDEO


Touch Wi-Fi
Thermostat PRO Installation
Designed by the pros for the pros
There are a lot of choices when it comes to buying a thermostat, but only one combines 125 years of experience and the latest connected home technology to empower your customers o take control of their comfort from anywhere. We proudly connect you to a professional-grade thermostat that you can offer your customers with confidence and that will keep you connected with them even after the initial install.
Sensi partner program
Always be the Contractor-On-Call with your customers. The Sensi app saves your contact information so when your customer needs service, you’re just a tap away. Register at www.sensiregistration.com.
Need help?
Visit sensicomfort.com/support for around-the-clock access to support articles, instructional downloads, and comprehensive support videos. Our highly-trained Sensi Support Team is available seven days a week.
![]() 1.888.605.7131
1.888.605.7131
![]() [email protected]
[email protected]
Easy to install and connect
Sensi is designed to install a standard thermostat. It gives you the flexibility to connect to Wi-Fi at installation or let your customer connect it later using the Sensi app.
MOBILE DEVICE COMPATIBILITY
| OPERATING SYSTEM | COMPATIBILITY |
| iOS | Yes |
| Android | Yes |
| Amazon Fire | Yes |
SMART HOME PLATFORM COMPATIBILITY
| OPERATING SYSTEM | COMPATIBILITY |
| Amazon Alexa | Yes |
| Android | Yes |
| Apple HomeKit | Yes |
HVAC SYSTEM COMPATIBILITY
| SYSTEM TYPE | COMPATIBILITY | MODIFICATIONS |
| ` Conventional heating and cooling • Gas furnace • Air conditioner • Electric furnace • Boiler |
Yes | Requires a common wire (c-wire) |
| Heat only • Gas furnace • Electric furnace • Boiler | Yes | Requires a common wire (c-wire) |
| Cool only • Air conditioner | Yes | Requires a common wire (c-wire) |
| Heat pump | Yes | Requires a common wire (c-wire) |
| Communicating proprietary systems | No | Needs standard HVAC wiring |
| Line voltage | No | Requires low voltage (20-30VAC) |
| Millivolt systems | No | Requires 20-30VAC |
ROUTER COMPATIBILITY
| ROUTER TYPE | COMPATIBILITY |
| Single-band router with 2.4 GHz band | Yes* |
| Dual-band router with 2.4 & 5.0 GHz band | Yes* |
| Single-band router with 5.0 GHz band | Yes |
*Sensi thermostats require an 802.11n 2.4 GHz Wi-Fi network and are compatible with most residential Wi-Fi networks, however, there are some known incompatible routers. Visit support.sensicomfort.com and search “router compatibility” for a list of known incompatible routers.
What’s in the box?
- Sensi Thermostat
- Screws and Anchors
- Wire Labels
Items needed for Wi-Fi connection:
- The homeowner’s compatible iOS or Android
- A device with the Sensi app installed and registered
- Your customer’s Wi-Fi network name (SSID) and password
- A Wi-Fi network with 802.11n 2.4GHz band
QUICK TIP: Ask the homeowner to download the Sensi app and gather their Wi-Fi information while you are installing the thermostat.
Installation
- Turn the terminal light switch on for better visibility.
- Install Sensi thermostat, referring to these terminal definitions, cross-references and wiring diagrams as needed:
| OLD
THERMOSTAT |
SENSI
THERMOSTAT |
CONVENTIONAL
SYSTEM |
HEAT PUMP
SYSTEM |
| RH | RH* | Power for heating, 24V | |
| RC, R | RC* | Power for cooling, 24V | |
| C, X, B** | C | Common wire, 24V | |
| Y, Y1 | Y | 1st stage cool | 1st outdoor stage heat |
| Y2 | Y2/* | 2nd stage cool | 2nd outdoor stage heat and cool |
| W, W1, W/E, Aux/E, E | W/E | 1st indoor
stage heat |
1st stage axillary/ emergency heat |
| W2*** | W2 | 2nd indoor
stage heat |
2nd stage axillary/ emergency heat |
| G | G | Indoor blower (fan) | |
| O,B,** O/B | O/B | Changeover (reversing valve) connection for heat pump or zone panel systems | |
| L | L | no function | “L” terminal connection |
* Two transformer systems (separate RC and RH wires), clip jumper located on the backplate to the right of the terminals.
** Label “B” as “C” only if the old thermostat also had a wire in “O”. If there is no wire on “O”-label the wire “B”.
*** On Heat Pump system with separate W2 and E wires, label both wires W/E (2 wires in one terminal).
SINGLE STAGE OR MULTI (STAGE SYSTEM NO HEAT PUMP) WITH TWO TRANSFORMERS
*Two transformers systems (separate RC and RH wires), clip internal RC/RH jumper, located on back of thermostat.
*Internal jumper between RC and RH, located on back of thermostat.
**Common connection required on Heat-only, Cool-only or Heat Pump systems.
Configuration
- Before configuring the thermostat, switch off the terminal light.
- Configure the thermostat to the appropriate system type. Press “Menu” on the thermostat and refer to these menu options as needed:
| OLD THERMOSTAT | Menu item | Default | HEAT PUMP SYSTEM |
| RH | Screen Brightness | Off | Adjust resting-state brightness with an option to turn off |
| RC, R | Backflow | Off | Off / On |
| C, X, B** | Home Screen Content | On On °F |
Indoor Humidity Time of Day °F / °C |
| Y, Y1 | Schedule | – | 5 / 2 Day Schedule |
| Y2 | Wi-Fi | O | Connect to Wi-Fi |
| W, W1, W/E, Aux/E, E | Time Setup | – | Set the date and time |
| W2*** | About Thermostat | – | Model Number/Reset |
| G | Advanced Setup | – | HVAC Equipment | Fan Mode Options |
| O,B,** O/B | HVAC Equipment | AC2 / EL2 AC2 EL2 O |
Outdoor Setup AC1/AC2/HP1/HP2/AC0 Indoor Setup GA1/GA2/EL1/EL2/Fan Reversing Valve Position O/B/3 |
| L | Fan Mode Options Circulating Fan | no function | Off – 100% (5% increments) Off |
3. Once the thermostat is installed and properly configured, test the equipment by following these steps:
- Turn on power to the system.
- Fan Operation
- If your system does not have a “G” terminal connection, skip to “Heating System” below.
- Press the “Fan” button on the thermostat and select the “On” position. The blower should begin to operate.
- Press the “Mode” button to turn off the system. Then press the “Fan” button on the thermostat and select the “Auto” position. The blower should stop immediately.
- Circulating Fan
- Press the “Menu” button on the thermostat and select “Advanced Setup” then select “Fan Mode Options”
- Press “On” to enable circulating fan and set the % run time from 10%-100% in 5% increments (default is OFF).
- The % run time is the percentage of time the fan shall run in a day. This calculation takes into account the amount of time the heating, cooling, and continuous fan have run during the same day.
- Heating System
- Press the “Mode” button on the thermostat and select the “Heat” position.
- Press the up arrow on the thermostat and adjust the setting to 1° above the current room temperature. The heating system should begin to operate and the thermostat display will turn red indicating heating on the screen.
- For heat pumps with auxiliary, press the up arrow on the thermostat and adjust the setting to 3° above the current room temperature. The auxiliary heat should begin to operate and the thermostat will indicate “Heating Auxiliary” on the screen.
- Press the down arrow on the thermostat and adjust the setting to 1° below the current room temperature. The heating system should stop operating and the display will go back to a neutral gray color.
- Cooling System
- Press the “Mode” button on the thermostat and select the “Cool” position.
- Press the down arrow and adjust the setting to 1° below the current room temperature. The blower should come on immediately at high speed, followed by cold air circulation. The thermostat display will turn blue. Note that there can be up to a 5-minute delay for this process.
This is indicated by a flashing setpoint temperature. - Press the up arrow and adjust the setting to 1° above the current room temperature. The cooling system should stop operating and the display will go to a neutral gray color.
- If you encounter any issues while testing the equipment, refer to the troubleshooting actions on page 14.
Troubleshooting
| SYMPTOM | POSSIBLE CAUSE | CORRECTIVE ACTION |
| No Heat/ No Cool/No Fan (common problem) | 1. Blown fuse or tripped circuit breaker 2. Furnace power switch to OFF 3. Furnace blower compartment door panel lose 4. Loose connection to the thermostat tor system |
1. Replace fuse or reset the breaker 2. Turn the switch to ON 3. Replace door panel in the proper position to engage safety interlock or door switch 4. Tighten connections |
| No Heat | 1. Thermostat not set to Heat 2. Loose connection to thermostat or system 3. Heating system requires service or thermostat requires replacement |
1. Set thermostat to Heat. 2. Verify thermostat and system wires are securely attached. 3. Diagnostic: Set Mode to Heat and raise the setpoint above room temperature. Within five minutes the thermostats should make a soft click sound and the display should turn red. This sound indicates the thermostat is operating properly. If the thermostat does not click, try resetting the thermostat. If the thermostat does not click after being reset, contact your heating and cooling service person or place of purchase for a replacement. If the thermostat clicks, verify the heating system is operating correctly. |
| No Cool | 1. Thermostat not set to Cool 2. Loose connection to thermostat or system 3. Cooling system requires service or thermostat requires replacement |
1. Set thermostat to Cool. 2. Verify thermostat and system wires are securely attached. 3. Diagnostic: Set Mode to Cool and lower setpoint below room temperature. The same procedures are as diagnostic for the “No Heat” condition except set the thermostat to Cool and lower the setpoint below the room temperature. There may be up to a five-minute delay before the thermostat clicks in Cooling if the AC Protection feature is on. |
| Heat, Cool or Fan Runs Constantly | Possible short in the wiring, thermostat, heat, cool or fan system |
Check each wire connection to verify they are not shorted or touching other wires. Try resetting the thermostat. |
| Thermostat Display & Thermometer Disagree | Thermostat display requires adjustment |
The display can be adjusted +/-5° using the Temperature Offset in Sensi app. |
| Display is Blank | The display could be turned off of you need a common wire (c- wire) |
Attach a common wire (c-wire)
or turn on the display. |
| Furnace (Air Conditioner) Cycles Too Fast or Slow | The location of the thermostat and/ or the size of the Heating System maybe influencing the cycle rate |
Digital thermostats provide precise control and cycle faster than older mechanical models. The system turns on and off more frequently but runs for a shorter time. If you would like to increase cycle time, choose Slow for the Cycle Rate in the Sensi app. |
| “
Call for Service” appears on the screen |
1. Heating or Cooling system is not able to heat/ cool the space to within 5 degrees of the setpoint within 2 hours 2. If “–” is displayed for the Room Temperature, a replacement thermostat is needed3. None of the buttons operate on the thermostat |
1. See corrective action for “No Heat” See corrective action for “No Cool” 2. Replace thermostat 3. Make sure keypad lockout is not turned on. If it’s OFF, try resetting the thermostat. Reset: Turn the power to your system off, wait 5 seconds, and turn it back on. |
| The fan turns on randomly | The fan has been set to run occasionally in the configuration menu |
Enter the configuration menu and make sure the ‘Fn’ fan run time percentage is OFF. |
Connecting Sensi to Wi-Fi
1. Ask the homeowner to download the free Sensi app onto their iOS or Android device.

2. Ask the homeowner to follow the prompts to create an account.
3. Once the homeowner has logged in, ask to use their device to connect the thermostat to the Wi-Fi.
QUICK TIP: You must have your customer’s Wi-Fi Network (SSID) and Password to complete the wireless setup.
4. Select “Connect Thermostat to WiFi” and follow the in-app prompts to complete the connection steps.
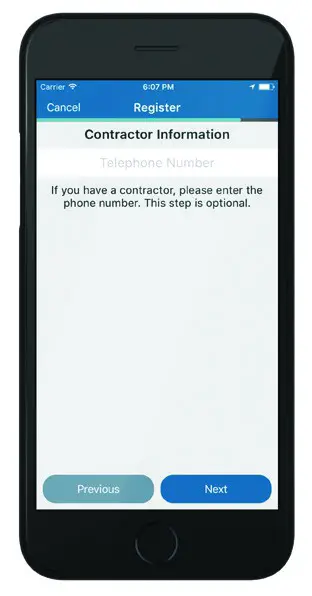
5. Once the thermostat is connected to Wi-Fi, enter your registered phone number by selecting “Settings”, at the bottom then “Contractor Info”.
Warnings
INSTALLER INFORMATION
FAILURE TO READ AND FOLLOW ALL INSTRUCTIONS CAREFULLY BEFORE INSTALLING
OR OPERATING THIS CONTROL COULD CAUSE PERSONAL INJURY AND/OR PROPERTY
DAMAGE.
 WARNING WARNING |
| WARNING: OUT OF PHASE TRANSFORMERS On two transformer systems, the transformers MUST be in phase.Measure the voltage across RC and RH. If more than 12 Volts AC is present between RC and RH, then the transformers are NOT in phase. To correct this condition, reverse the secondary low voltage connections at either the Heating or Cooling transformer. |
| CAUTION |
| To prevent electrical shock and/ or equipment damage, disconnect electric power to the system at the main circuit breaker box until installation is complete. |
| WARNING |
| FOR CALIFORNIA RESIDENTS: WARNING: This product contains a chemical known to the state of California to cause cancer and birth defects and other reproductive harm. |
| WARNING |
| VOLTAGE REQUIREMENTS
Do not use on circuits exceeding specified voltage. Higher voltage will damage control and could cause shock or fire hazards. Thermostat installation and all components of the control system shall conform to Class II circuits per the NEC code. |
| CAUTION |
| CAUTION: E5 Alert
If “Call For Service” is displayed on your Sensi thermostat, and E4 or E5 appears where the room temperature should be displayed or the backlight is flashing, please call our support team immediately at 888.605.7131 |
ATTENTION: MERCURY NOTICE
This product does not contain mercury. However, this product may replace a product that contains mercury. Mercury and products containing mercury must not be discarded in household trash. Refer to hermostatrecycle.org for a location to send products containing mercury.
For Your Customer
MAKE SURE TO LEAVE THE SENSI WELCOME GUIDE FOR YOUR CUSTOMER.
It provides helpful instructions and information on the following:
- How to connect their Sensi thermostat to Wi-Fi (if this has not already been completed) or connect additional devices
- Key features of the thermostat and the app and how they work
- Customer Support
0037-7682002