Square Stand
WHAT’S IN THE BOX
Let’s get you up and running. Everything you need to start selling is in the box—just make sure you have your compatible iPad ready.

SETTING UP SQUARE STAND
Start by connecting Square Stand to the hardware hub and power adapter. You can then connect your Square Reader and Dock to the hardware hub.
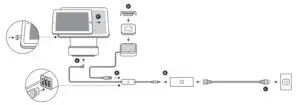
A. Connect Square Stand to the hardware hub
The hardware hub has two cables: one that connects to
the bottom of Square Stand and one that connects to the power adapter.
B. Connect the hardware hub to the power adapter
Plug the hardware hub into the power adapter, then connect the power adapter cable to the power adapter.
C. Plug into an outlet
Plug the power adapter cable into a power outlet.
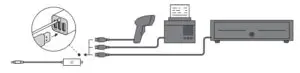
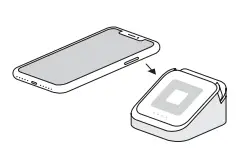
D.Slide Square Reader into Dock
Remove the retainer clip from Dock. Slide Square
Reader into Dock’s micro USB connector. Replace the retainer clip.
E.Plug in Dock
Plug Dock for Square Reader into the hardware hub.
Learn how to connect other accessories on the next page.
F.Insert your iPad into Square Stand
Pull out the security pin on the left side of Stand. Place
your iPad into Stand and connect your iPad to the
Lightning connector. Push the security pin into the headset
jack of your iPad to secure it to Stand. Open the Square
app on your iPad, follow the onscreen instructions, and you’re ready to start selling.
MANAGING YOUR ACCESSORIES AND IPAD
Accessories
Plug any optional USB accessories into the hardware hub, such as a bar code scanner, receipt printer, or cash drawer. Some accessories may need you to finish setup by going to Settings > Hardware in the Square app.
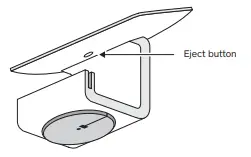
Removing your iPad
If you need to remove your iPad from Stand, remove the security pin from the headset jack of your iPad, then press the eject button located on the back of Stand.
Taking payments without a power source
When Stand isn’t plugged into a wall (and is just powered by your iPad), you can swipe mag stripe cards and connect to Square Reader via Bluetooth to accept contact less and chip payments.
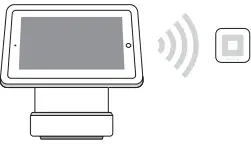
TAKING PAYMENTS
Square Stand lets you swipe cards with the built-in magstripe reader, and accept contactless and chip payments with the included Square Reader.

Dip
In the Square app, tap Charge and wait for a single green light to appear on Square Reader. Your customer can then insert a chip card into the reader. Leave it in place until you see four green lights.
Tap
In the Square app, tap Charge and wait for a single green light to appear on Square Reader. Your customer can then hold a contactless device or card near the reader to trigger payment.

Swipe
In the Square app, tap Charge. Run your customer’s magnetic-stripe card through the magstripe reader on Square Stand.
ADHESIVE MOUNT (OPTION 1)
Secure Stand to your counter with the included adhesive mounting plate.
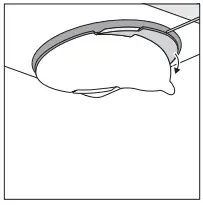
- Plug the hardware hub into Stand
Plug the cable from the hardware hub into the bottom of Stand. Note: If the cable exits the base of Stand on the right side (when the screen faces you), Stand will swivel clockwise. If the cable exits the base on the left side, Stand will swivel counterclockwise.
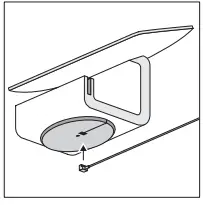
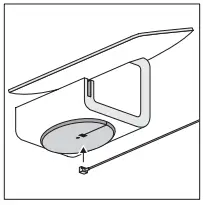
2. Screw in the adhesive mounting plate
Make sure the hardware hub cable is firmly pushed in, then screw in the adhesive mounting plate.
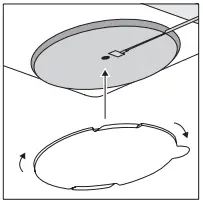
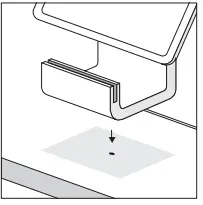
3. Remove the adhesive backing
Check that the plate is tightly screwed in and the base of Stand is locked with the cable exiting from your preferred side, then remove the adhesive backing.

4. Mount Stand to your countertop
Clean and dry the area where you want to mount Stand, then firmly adhere Stand into place. Press down for 30 seconds and wait 30 minutes for the adhesive to set.
DRILL MOUNT (OPTION 2)
Secure Stand to your counter with a drill and the included drill mount.

1. Drill the hole for the drill mount
With a 3/16″ drill bit, drill a hole into your counter. Make sure your bit will work on your counter material.
3. Plug the hardware hub into Stand
Plug the cable from the hardware hub into the bottom of Stand. Note: If the cable exits the base of Stand on the right side (when the screen faces you), Stand will swivel clockwise. If the cable exits the base on the left side, Stand will swivel counterclockwise.
3. Line up Stand with the drill hole
Line up the screw hole in the base of Stand with the hole in your counter. Double-check that the base of Stand is locked with the cable exiting from your preferred side.
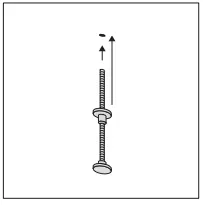
4. Mount Stand to your counter
Screw the drill mount into the base of Stand through the bottom of your counter. Turn the nut until it’s firmly against the bottom of your counter. Make sure the drill mount and Stand are secure and Stand can only swivel on a 180-degree axis.
HELP AND SUPPORT
Read our FAQs, learn more about compatible hardware, and get troubleshooting support at square.com/hardware-setup.
HARDWARE PROTECTION
If something goes wrong with your Square hardware, you’re covered for up to one year. Go to square.com/returns so we can make things right.
FREE 30-DAY RETURNS
Square guarantees a 30-day, risk-free return policy for all purchases made from square.com/shop. After a return is complete, a refund will be credited back to you.
REGULATORY INFORMATION
View regulatory and FCC information for Square Stand by opening the Square app and going to Support > Legal > Regulatory.
Your use of the Square app, Dock for Square Reader, Square Reader for contactless and chip, and Square Stand, including any warranties associated with these products, is governed by your agreements with Square and related policies available at square.com/legal. © 2020 Square, Inc. Square, the Square logo, Square Reader, and Square Stand are trademarks of Square, Inc. iPad, iPad Air, and iPad Pro are trademarks of Apple Inc., registered in the U.S. and other countries. App Store is a service mark of Apple Inc. Other marks and brands are the property of their respective owners.
Square Stand, Square Reader, and Dock for Square Reader
This device complies with part 15 of the FCC Rules. Operation is subject to the following two conditions: (1) This device may not cause harmful interference, and (2) this device must accept any interference received, including interference that may cause undesired operation.
NOTE: The grantee is not responsible for any changes or modifications not expressly approved by the party responsible for compliance. Such modifications could void the user’s authority to operate the equipment.
IMPORTANT NOTE: FCC RF Radiation Exposure Statement: This equipment complies with FCC RF radiation exposure limits set forth for an uncontrolled environment. This equipment should be installed and operated with a minimum distance of 20 cm between the radiator and any part of your body.
NOTE: This equipment has been tested and found to comply with the limits for a Class B digital device, pursuant to part 15 of the FCC Rules. These limits are designed to provide reasonable protection against harmful interference in a residential installation. This equipment generates, uses, and can radiate radio frequency energy and, if not installed and used in accordance with the instructions, may cause harmful interference to radio communications. However, there is no guarantee that interference will not occur in a particular installation. If this equipment does cause harmful interference to radio or television reception, which can be determined by turning the equipment off and on, the user is encouraged to try to correct the interference by one or more of the following measures:
- Reorient or relocate the receiving antenna.
- Increase the separation between the equipment and receiver.
- Connect the equipment into a circuit different from that to which the receiver is connected.
- Consult the dealer or an experienced radio/TV technician for help.