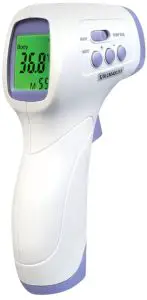
Body Infrared Thermometer
User’s Manual
Please read this manual before use!
Summary of Infrared Thermometer
Thank you for choosing our Infrared Thermometer. The PC868 Infrared Thermometer is used to measure the temperature of an object based on the relationship between temperature and measurable infrared radiation. Simply aim the unit’s probe toward the surface to be measured to obtain a quick and accurate temperature. To ensure proper use, please be sure to read this user manual carefully, paying close attention to the safety precautions.
- In order to use this product correctly, please read the user manual before use.
- In order to properly use this product, please carefully read the full text of this manual before using, in particular the “safety precautions” section.
- Please keep the instructions on the side for easy checking.
Basic principles:
All objects above absolute zero temperature emit a certain percentage of infrared radiation energy based on their temperature. The amount of the radiation energy and the distribution of the wavelength have very closely related. When the human forehead’s temperature is 36-37℃, it emits wavelength 9-13um of infrared radiation. Based on this principle, according to the relationship between surface forehead temperature and human forehead temperature, we are able to measure the human forehead’s actual temperature by measuring surface forehead temperature.
Safety precautions
Warning 
- Use of this thermometer is not intended as a substitute for consultation with your physician. It is dangerous for users to perform a self-evaluation and self-treatment based on the measuring result. Be sure to follow the doctor’s instructions.
- Keep the thermometer out of reach of children. For accidental swallow of battery or another component, please consult the doctor at once.
- Don’t throw the battery into fire.
Notice
- The device is a precision instrument, don’t drop, tramp or impose any vibration or impact on the thermometer.

- Do not touch the lens of the probe with your fingers, and do not disassemble the device by yourself.
- Before measuring forehead temperature, make sure the hair is removed, sweat dried.
- After you do some exercise, eat, and bathe, you should stay still indoor about 30 minutes before measurement.
- To make the measurement data reliable and stable, when ambient temperature varies a lot, the thermometer should be placed indoors for about 30 minutes before use.
- When we measure somebody continuously, the temperature should be measured every minute, if you need to measure yourself Continuously for a short time, there are some slight errors when you read the temperature, which is a normal phenomenon. At this time, we should choose the average. We recommend that you measure yourself continuously maximum of three in a unit of time, and because the temperature of the human will conduct to the thermometer, it may affect the accuracy of measurement.
- There is no absolute standard about the temperature of the human, so please try to collect the recording of Individual temperature in the usual, as a reference for having a fever or not.
- Do not measure the sites of scarred tissue or tissue compromised by skin disorders, because sensing body temperature from sites of scarred tissue or tissue compromised by skin disorders.
- Do not measure the site of forehead temperature if that patient has trauma on the forehead.
- Do not measure if that patient is treated with certain drug therapies.
- Do not immerse the device into water or any other liquid, and not direct sunlight exposure.
- Do not use a mobile or mobile or cordless phone near the thermometer when measuring.
- Body temperature may increase in the drug within the effort time limit. Please don’t measure.
- In order to ensure the accuracy of measurement data, please don’t take measurements of body temperature in a strong electromagnetic interference environment (such as microwave, high-frequency equipment operation environment).
- Do not disassemble, repair, or modify the unit.
- This thermometer is only a personal device, please do not use it with others.
- Not touch the battery output when measuring.
- The thermometer must be stored according to the technical specifications.
- The materials (ABS) of expected contact with the patient had passed the ISO 10993-5 and ISO 10993-10 standard test, with no toxicity, allergy, or irritation reaction. They are in compliance with the MDD requirements. Based on the current science and technology, other potential allergic reactions are unknown.
- The patent is an intended operator. The patient can measure, read data and replace the battery under normal circumstances and maintain the device and its accessories according to the user manual.
- The device is not intended for PATIENT transport outside a healthcare facility.
Recommendations 
- Don’t use this thermometer for other purposes.
- It is forbidden to leave the product exposed to any chemical solvent, direct sunshine, or high temperature.
- Don’t expose the thermometer to direct sunlight long time so as not to damage the battery.
- Do not measure while talking on the phone.
- Please report to MANUFACTURER if any unexpected operation or events occur.
Intended use
This thermometer is intended with non-contact to measure forehead temperature at home or hospital, including anyone, such as infants, children, and adults.
For safety reasons, children’s or the baby’s temperature must be measured by parents or adults.
Temperature measurement mode and range description
The infrared thermometer has the following measurement mode:
- Forehead temperature measurement mode — measure the skin the surface of the human forehead’s temperature accurately, take the place of a traditional mercury thermometer and electrical thermometer.
- Object temperature measurement mode ‒ you can measure the surface temperature of objects, such as ambient, bathwater and milk temperature, etc.
Normal temperature range for different measuring position
| Measuring position | Normal temperature (℃) | Normal temperature (℉) |
| Anus | 36.6-38.0 | 97.9-100.4 |
| Oral | 35.5-37.5 | 95.9-99.5 |
| Armpit | 34.7-37.3 | 94.5-99.1 |
| Forehead | 35.8-38.0 | 96.4-100.4 |
Normal forehead temperature range for different ages
| Ages | Normal temperature (℃) | Normal temperature (℉) |
| 0-2 years old | 36.4-38.0 | 97.5-100.4 |
| 3-10 years old | 36.1-37.8 | 97.0-100.0 |
| 11-65 years old | 35.9-37.6 | 96.6-99.7 |
| >65 years old | 35.8-37.5 | 96.4-99.5 |
NOTE: The normal temperature and difference between the different body parts are individual. The define yours, measure your temperature for a least 2 weeks at the same ear canal, forehead position, and time.
NOTE: When consulting your physician, communicate that the infrared thermometer PC868 temperature is a temperature measured which a position, note the individual’s normal infrared thermometer PC868 temperature range as an additional reference.
NOTE: Because the forehead temperature is affected obviously by the external environment (eg: environment, air convection and skin tone, etc), we advise that you take the forehead temperature only as a reference.
Feature
- Precise non-contact measurements
- User-selectable ℃ or ℉
- Set alarm temperature value
- Automatic data hold and auto power save
- Automatic selection range and display resolution 0.1℃ (0.1℉)
- 3 colors backlight
- 2 measurement modes: Forehead and surface mode
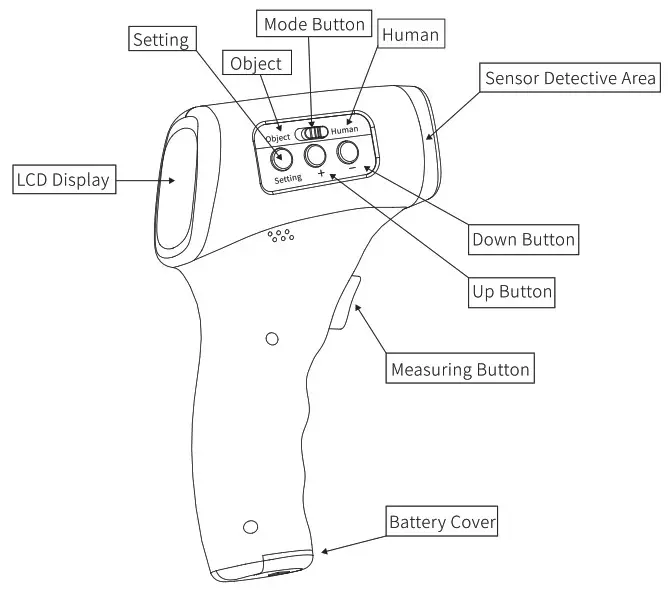
Overall description
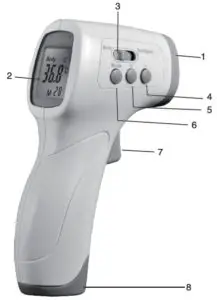
| 1. IR sensor | 2. LCD display |
| 3. Mode selection | 4. Down button |
| 5. UP button | 6. Mode button |
| 7. Measurement Trigger | 8. Battery cover |
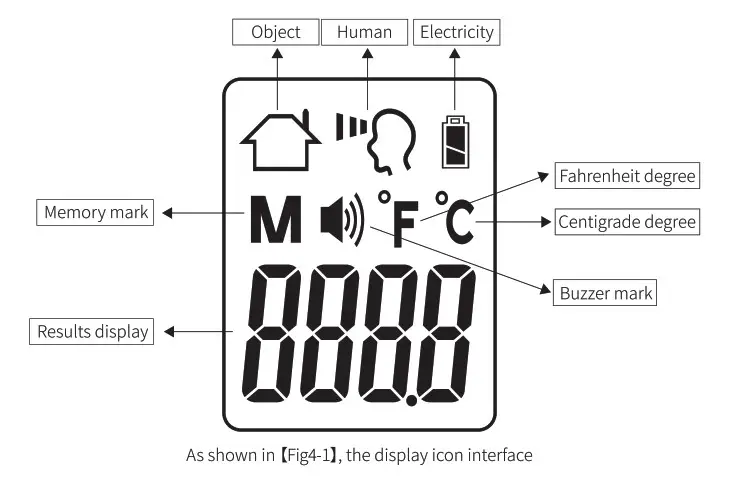
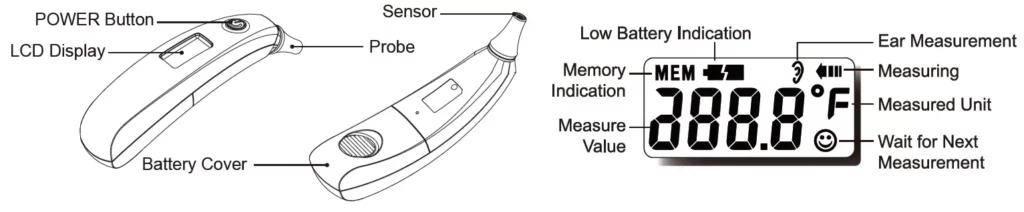
【LCD display description】
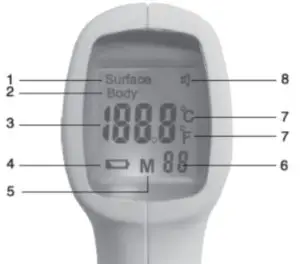
| 1. Surface mode symbol 2. Body mode symbol 3. Digital readout 4. Battery symbol |
5. Memory symbol 6. Save data readout 7. Temp. °C(Celsius)/ °F (Fahrenheit) scale 8. Buzzer symbol |
Operation Instruction
【Preparation】
- Check battery
Replace the batteries to ensure power supply if there is a low voltage icon for the thermometer. - Check sensor
If have pollution and spray, please clean it. (The cleaning method see chapter 8 Care and Cleaning for details.)
If the sensor’s lens is damaged, please stop using it. - Check thermometer
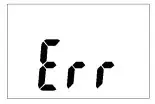
When you press the [Power/Scan] button, the system will have self-testing of software and hardware. If there are problems, the LCD will display the “Err” symbol. Check if the sensor laser is a dirty, damaged phenomenon. - In order to make the accurate measuring result, put the thermometer in the measurement environment for 30 minutes.
- Accuracy of unexpected fluctuations in ambient temperature may decrease the measurement results. When the thermometer at the same measurement position displayed at different ambient temperature or test temperature in front of the air conditioner, it will not be able to obtain accurate results.
- If you want to measure forehead temperature, clean the forehead, and arrange hair, make sure the forehead is naked and clean, in order to ensure the accuracy of measurement.
【Instruction for use】
Advice for the first use
For stable and reliable results, it is essential to check the infrared thermometer and changes as needed, as follows:
| 1st step: | Take the temperature of a person using a conventional thermometer, you will get 37.5℃ (99.5℉) for instance. |
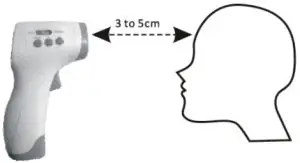
| 2nd step: | Take the temperature of the same person using the device keeping the 3 to 5cm distance between the thermometer and forehead (take care to remove any obstacle which could alter the measurement (hair, perspiration ….). If you get 37.5 ℃(99.5℉), the device is properly set and ready for use. If you get a lower temperature such as 36.4 ℃(97.5℉), your difference is 1.1℃(2.2℉). You should adjust the temperature on the device and add the difference, i.e.1.1℃(2.2℉). To do it, press the MODE button for 2 seconds, the screen displays F1, press MODE button again until you get F3, press the UP button in order to add the difference (in our example 1.1 ℃ (2.2℉). |
| 3rd step: | To check, take the temperature again using the product. |
U s e
- Install batteries
- For the first use or when inserting new batteries, please wait about 10 minutes for the warm-up of the apparatus.
- If the device is not used for a long time, once you turn it on again, the device will test the room temperature first and will delay turning on for one or two seconds.
- Select body mode, aim towards the forehead, form a distance of 5cm(2in), press the measuring key, the temperature is displayed immediately, accompanied by a beep sound. Make sure there is no hair, perspiration, cosmetic, or cap covered on the forehead.
- If the measurement temperature is 38.0℃ or more (can be set, refer to sub-clause 3)), the sound should be “be-be-be-be-be” 5 rapid sounds.
TEMPERATURE TAKING HINTS
– Before taking the temperature, please fix the forehead hair to prevent measured deviation.
– The sweat on the head or cosmetics can affect the accuracy of measurement, please maintain the cleanness of the forehead when measuring.
– It is normal that there may be temperature differences depending on various skin types and color since different skin types will reflect different voltages of infrared rays.
– Don’t use the thermometer outdoors. - Select object mode for measuring room temperature, surface temperature, etc.
TEMPERATURE TAKING HINTS
– For heat-insulated objects, please don’t measure the surface.
– For the hot liquid, please do not directly measure the surface, because the hot steam fog can condense in the sensor lens and cause the measurement deviation.
Setting operation
| Mode code | Function | Operation step | |||
| 1 | F1 | Set ℃/℉ scale | Press the MODE button for 2 seconds, the screen will display F1 on the bottom right, press UP or DOWN button can change the temperature unit for℃or℉. | ||
| 2 | F2 | Set alarm temp. | Press the MODE button for 2 seconds, the screen display F1, press MODE button to get F2, select UP to increase the threshold by 0.1℃ (0.1℉), DOWN to reduce it by 0.1℃(0.1℉). The alarm threshold default value is 38.0℃(100.4℉). | ||
| 3 | F3 | Set difference | Press the MODE button for 2 seconds, the screen display F1, press two times to get F3, select UP to increase the difference by 0.1℃(0.1℉), DOWN to reduce it by 0.1℃(0.1℉). In the case of seasonal or environmental changes, verification and adjustment should be carried out. Note: This function is only an effective body. |
||
| 4 | F4 | Set buzzer on/off | Press the MODE button for 2 seconds, the screen display F1, press 3 times to get F4. Select UP to turn on the buzzer, press DOWN to stop it. | ||
| 5 | Measurement mode | There are 2 measurement modes for this device. That is the forehead, surface. It is able to take the body temperature of human beings, take the temperature of an area or an object, food, a liquid, or a room. | |||
| Forehead mode | Put the mode selection button on the left, measurement range 32.0 to 43.0℃(86.0 to 109.4℉). | ||||
| Surface mode | Put the mode selection button on the right, measurement range 0 to 100℃(32.0 to 212.0℉). | ||||
| 6 | 3 colors backlight | In body mode, the device is able to judge whether a fever or not by a different color of backlight: 32.0 to 37.4℃(86.0 to 99.3℉) – Green 37.5 to 37.9℃(99.5 to 100.2℉) – Orange 38.0 to 43.0℃(100.4 to 109.4℉) – Red In surface mode, the backlight always keeps green. |
|||
| 7 | Data memory | Date memory automatically after temperature measurements, which will display at the right corner of the LCD. Press the UP or DOWN button to display the last temperature measurement. | |||
— Range of alarm temperature
When into the “F-2” mode, the range of settable alarm temperature is from 37.6℃(99.7℉) to 43.0℃(109.4℉).
— Range of temperature difference
When into the “F-3” mode, the range of settable temperature difference is from 5℃(9℉) to -5℃(-9℉).
Note: F-3 mode is only for professional doctor and nurse use!
Temperature measuring
–Taking Temperature in Forehead Temperature Mode (Adjusted Mode)
- Setup the measurement model to “Body mode” (the setup step to see the above “2) Function Setup mode”;
- Make sure the distance between the thermometer and forehead is 3-5cm, and press the button of [Power/Scan] directly to measure the forehead temperature.
- When you hear one beep sound, the LCD will show the result.
TEMPERATURE TAKING HINTS
– Before taking the temperature, please fix the forehead hair to prevent measured deviation.
– The sweat on the head or cosmetic can affect the accuracy of measurement, please maintain the cleanness of the forehead when measuring.
– It is normal that there may be temperature difference depending on various skin types and color since different skin type will reflect different voltage of infrared ray.
– Don’t use the thermometer outdoors.
NOTE:
- When measuring, if the environment exceed the 10-40℃ range will be showing Err;
- If the measured temperature result is < 32.0℃, the LCD will be showing Lo;
- If the measured temperature result is >43.0℃, the LCD will be showing Hi;
- If the measured temperature result is ≥38.0℃, the buzzer will be sent out “Beep—Beep—Beep”, a long one and two short ones.
- We recommend measurement for 3 times to reference and keep the interval between the two measurements by 5 minutes at least.
–Taking Temperature in Surface Temperature Mode (Direct Mode)
- Setup the measurement model to “Surface mode” (the setup step see the above “2) Function Setup mode”;
- Aim the probe tip at the object which will be measured.
- Press the [Power/Scan] button, then the measurement is completed.
It will show the measurement data after a “bi” sound. - If the measured temperature is higher than 100℃, display “Hi”.
If the measured temperature is below 0℃, display “Lo”.
TEMPERATURE TAKING HINTS
– For heat-insulated objects, please don’t measure the surface.
– For the hot liquid, please do not directly measure the surface, because the hot steam fog can condense in the sensor lens and cause the measurement deviation.
Automatic shutdown
If you do nothing after the temperature measurement is completed and 15 seconds later, the thermometer will automatically shut down.
Memory function
In the power-on state, press the Up/Down button into memory query mode, the LCD will be showing the recorded values or “ —-“ symbol if not recorded accompanied with memory M symbol. The PC868 can restore up to 99 sets of data. the query interface can display memory serial number, body mode, and recorded temperature values.
Remark: The temperature result of surface mode can not be saved. And the abnormal body temperature result can not be saved too (such as Lo, Err, or Hi).
Backlight unction
The backlight will be according to the different measuring temperature to lighting different color. The detailed as below table:
| Measuring temperature | Backlight | Lighting time |
| < 37.5℃ | Green backlight | 7s |
| 37.5 to 37.9℃ | Orange backlight | 7s |
| ≥38.0℃ | Red backlight | 7s |
| Remarks: This specification of this table is only for the factory default state. If the user into the setup mode to set the orange or red backing temperature, then will compliance with the setting result. | ||
Restore the factory default function
Press the [Setup] button for 5s to restore the factory default status. The factory default setup is “℃” and “Body measurement” mode.
Battery installment and replacement
- When the quantity of electric charge is not sufficient, the icon of the low battery will appear on the lower part of the screen. Though the battery still can be used, it would be perfect to replace it.
- When the quantity of electric charge of the battery is lower than the minimum value, “Lo” symbols will be displayed on the screen, and the battery icon flashes, and the sound of “Beep” is sent out. Unless you change a new battery, you can not use the thermometer to conduct measurements.
- Operation of changing the battery.
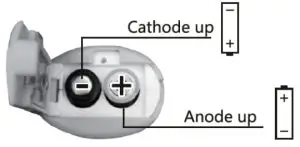
- Take out the old battery: Open the battery cap; put 2 new AAA batteries on with correct cathode direction into the battery seat.
 Notice:
- Please observe the related national laws of disposing of the abandoned battery and don’t litter to the garbage can.
- Please take out the battery if the device is not used for long periods of time.
- Please don’t put the battery in the fire.
To protect the environment, dispose of empty batteries at your retail store or at appropriate collection sites according to national or local regulations.
Care and cleaning
- The probe tip (lens) is the most precise part of the thermometer. Please keep clean and entirety in order to assure the accuracy of figure.
- The probe tip and lens are the most delicate part of the thermometer. It has to be clean and intact to ensure accurate readings.
- If the thermometer is ever accidentally used clean the probe and lens as follows:
- Very gently wipe the surface with a cotton swab or soft cloth moistened with alcohol. After the alcohol has completely dried out.
- If the lens is damaged, contact the distributor.
Clean the unit body: - Use a soft, dry cloth to clean the thermometer display and unit body.
- If very dirty, use a soft with alcohol to clean.
NOTES:
- Don does not use abrasive cleaners.
- Don’t use other non-recommended methods to perform disinfection.
- Non-waterproof, don’t use the abrasive cleaner to clean the product, don’t drop the thermometer in the water or the other liquid.
Maintenance
- We do not authorize any institution or individual to maintain and repair the product. If you suspect that the products have any questions, please contact the manufacturer or distributor to handle the case.
- The user must not attempt any repairs to the device or any of its accessories. Please contact the retailer for repair.
- Opening of the equipment by unauthorized agencies is not allowed and will terminate any claim to warranty.
WARNING: No modification of this equipment is allowed!
Calibration
The thermometer is initially calibrated at the time of manufacture.
If this thermometer is used according to the user’s instruction, periodic re-adjustment is not required. If any time your question the accuracy of measurement, please contact distributor or manufacturer, the contact information sees the last page.
Storage
- Don’t put the thermometer under the sunshine, high temperature, and moist environment or someplace which maybe get in touch with fire or is vulnerable to vibration.
- Take out the battery if don’t use the device for a long time.
Accessories
Only use original accessories. Check that the contents of the delivery are complete.
| Quantity | Parts |
| 1pc | PC868 device |
| 2pcs | AAA battery |
| 1pc | User Manual |
Trouble-shooting
| Troubles or error message | Checklists or situation | Countermeasures or solution |
| No response/Automatically reset | The batteries are used up? | Replace new batteries. |
| The battery in the wrong polarity or type? | Take out the batteries and replace new ones. Take out batteries and reinsert them correctly. |
|
| Poor battery contact | ||
| The thermometer shows the symbol “Hi” | Temperature hampered by an air flux. | Please leave the status and wait for 30 minutes to measure. Re-measure according to the manual. |
| In the forehead measurement mode: –Temperature readings are too close together. — Measured the other object, such as the sunlight, the air from the fireplace. Hi: Higher than 43.0℃; |
||
| In the object measurement mode: –Temperature readings are too close together. — The object temperature is higher than 100.0℃. Hi: Higher than 100.0℃; |
||
| The thermometer shows the symbol “Lo” | The hair and sweat prevent the temperature achievement. | |
| Temperature hampered by an air flux. | ||
| In the forehead measurement mode: — The measuring distance is too far. — Measured the other object, such as the air from the air conditioner. Lo: Less than 32.0℃ |
||
| In the object measurement mode: — The measuring distance is too far. — Have water vapor condenses on the lens. Lo: Less than 0℃ |
||
 |
The ambient temperature is beyond of range of measurement (10℃-40℃) | Keep the thermometer in the room Whose Temperature is (10℃-40℃) for 30 minutes |
| The sensor or hardware is damaged | Excluding the possibility of temperature allowance first, then send the device to your dealer for repair | |
 |
Lower battery, however, you can’t use it | Replace the new battery. |
Specifications
| Device name | Infrared Thermometer |
| Model | PC868 |
| Measurement mode | Forehead and object temperature modes |
| Power supply | d.c.3V, 2 pcs AAA battery |
| Measuring range: | For forehead temperature: 32.0-43.0℃ For object surface temperature: 0-100℃ |
| Measuring accuracy: (At laboratory conditions) | for forehead temperature: ± 0.2 during 35. 5℃ -42.0℃; ± 0.3 during 32.0℃ -35.4℃ and 42.1℃ -43.0℃ |
| Clinical repeatability: | Within ±0.3℃ |
| Resolution of display | 0.1℃/0.1℉ |
| Operation condition | 10-40℃, Relative humidity 15-85%, 70-106KPa |
| Storage condition | -25-50℃, Relative humidity ≤95%, 70-106KPa |
| Size | 149(L)×95(W)×45(H)mm |
| Weight | Approx. 145g(including battery) |
| High body temperature hint | ≥38℃ |
| Grade of waterproof | IP22 |
| Electric shock | Internally powered ME equipment |
| Applied part | Type BF applied part, including the whole unit |
| Mode of operation | Continuous operation |
| Product life | 5 years |
| Software version | V1.0 |
| Note: Not intended to be sterilized. Not for use in an OXYGEN RICH ENVIRONMENT |
|
*The above specifications are subject to change without prior notice.
Standard list
Shenzhen PACOM Medical Instruments Co., Ltd declares that the PC868 complies with the following applicable standards:
| EN 980 | Symbols for use in the labeling of medical devices |
| EN 1041 | Information supplied by the manufacturer with medical devices |
| EN 60601-1 | Medical electrical equipment Part 1: General requirements for basic safety and essential performance Medical electrical equipment — Part 1-2: General |
| EN 60601-1-2 | requirements for basic safety and essential performance – Collateral standard: Electromagnetic compatibility – Requirements and tests Medical electrical equipment ‒ Part1-6: General |
| EN 60601-1-6 | requirements for basic safety and essential performance ‒ Collateral standard: Usability |
| EN 60601-1-11 | Medical electrical equipment ‒ Part 1-11: General requirements for basic safety and essential performance ‒ Collateral standard: Requirements for medical electrical equipment and medical electrical systems used in home healthcare environment Clinical thermometers ‒ Part 5: Performance of infra-red |
| EN 12470-5 | ear thermometers (with maximum device) Medical electrical equipment part 2-56: particular |
| ISO 80601-2-56 | requirements for basic safety and essential performance of clinical thermometers for body temperature measurement |
| EN 62304 | Medical device software – Software life-cycle processes Medical devices ‒ Application of usability engineering to |
| EN 62366 | medical devicesBiological evaluation of medical devices – Part 1: Evaluation |
| EN ISO 10993-1 | and testing within a risk management process |
Disposal
 Dispose of the device in accordance with the regulation applicable at the place of operation. Dispose of at public collection point in the EU countries ‒ 2002/96/EC WEEE Directive.
If you have any queries, please refer to the local authorities responsible for waste disposal.
NOTES:
- Handing of battery and wastes method, please act according to the native law to proceed to handle.
- Take out the battery if you are not going to use the unit for a long time.
![]() To protect the environment, dispose of empty batteries at your retail store or at appropriate collection sites according to national or local regulations.
To protect the environment, dispose of empty batteries at your retail store or at appropriate collection sites according to national or local regulations.
Dispose of at public collection point in the EU countries ‒ 2006/66/EC Directive.
Normalized symbols
 |
Follow operating instructions |
 |
BF type applied part |
|
Disposal in accordance with Directive 2002/97/EC (WEEE) |
 |
Complies with the European Medical Device Directive (93/42/EEC and amended Directive 2007/47/EC. Notified Body is SGS FIMKO YO. |
| Manufacturer information: The manufacturer is: Shenzhen PACOM Medical Instruments Co., Ltd. |
|
 |
Authorized Representative in the European Community. The European representative is: Shanghai International Holding Corp. GmbH (Europe) |
IP22 |
IP code of the device: this device’s grade of against ingress of solid foreign objects — ≧ 12.5mm diameter (and the against access to hazardous parts with finger); the grade of waterproof is dripping (150 tilted). |
 |
Batch code |
 |
Date of manufacture |
EMC DECLARATION
- The digital thermometer needs special precautions regarding EMC and needs to be installed and put into service according to the MEC information provided in the ACCOMPANYING DOCUMENTS.
- Wireless communications equipment such as wireless home network devices, mobile phones, cordless telephones and their base stations, walkie-talkies can effect this equipment and should be kept at least a distance d=3.3m away from the equipment. (Note: As indicated in Table 6 of IEC 60601-1-2:2007 of ME EQUIPMENT, a typical cell phone with a maximum output power of 2W yields d=3.3m at an IMMUNITY LEVEL of 3V/m).
Guarantee
We grant you a lifetime guarantee after the date of purchase for one year. Any damage caused by improper handling shall not be covered by the guarantee. Batter and packaging are also excluded from the guarantee. All other damage claims are excluded. A guarantee claim must be submitted with the purchase receipt. Please pack your defective instrument well and send it with sufficient postage to the distributor.
![]() Shenzhen Pacom Medical Instruments Co., Ltd.
Shenzhen Pacom Medical Instruments Co., Ltd.
Address: On the 8th floor of B District, B Building, No.5, Industry
five road, Jiangbian Community, Songgang,
Shenzhen, China.
Tel:86-755-32920339
Website: www.pacomsz.com
Shanghai International Holding Corp. GmbH (Europe)
Address: Eiffestrasse 80, 20537 Hamburg Germany
Tel: 0049-40-2513175
Fax: 0049-40-255726
E-mail: [email protected]
INFRARED
THERMOMETER
Instruction Manual
ModeLASAP-D02
Manufacturer: ASAP Technology(Jiangxi)Co.,Ltd
Add: West District Industrial Park,343100 JI’ AN TOWN, Jiangxi, China Factory
Add: West District Industrial Park,343100 .11′ AN TOWN, Jiangxi, China
Tel: +86 796 7118988
version: vl. 1
Product Presentation
This product is a professional infrared thermometer for measuring temperature. It is widely used in all industries. It is easy to use, with Mode selection, LCD display, Buzzer reminder, Memory access, Backlight selection, Temperature transformation setting, Alarm threshold setting, Automatic shutdown functions, etc.
[Product parameter Major structure]
Product parameter
Temperature measuring range: 32.0 °C-42.9°C
Temperature measuring time: about 1 second
The best measuring distance: 1-5cm
Display mode: LCD screen display
Product size: 154x96X42mm
Product weight: C93g
This infrared thermometer has an automatic shutdown and self-detection function. Current consumption: OFF 10µA, ON‘.100mA
Power: 2xAA battery(3.0V)
Major structure
It is made of ABS plastic housing, cup copper head construction, copper head construction, lens, PCB circuit board, IC, electrical resistance, electric capacity, infrared sensor, LCD, buzzer and battery. [Usage range) It is used to measure the temperature of all kinds of objects.
Basic Operation Principle
Getting a better knowledge of the principle of infrared temperature measurement can help you to use this product correctly and make the test data accurately.
- All objects are in a degree above absolute zero because the internal motion of charged particles will do outward radiation energy in a different wavelength way.
- The temperature of the object is proportional to the intensity of the radiation energy, the higher the temperature, the greater the radiation energy.
- An object’s outward radiation energy is mainly to show by infrared radiation, so you can measure an object’s temperature by measuring the radiation’s strength of infrared energy of objects.
- This infrared thermometer can measure object’s release of weak infrared radiation energy accurately. After a complex processing and all kinds of compensation, correction o make accurate temperature data this product is with built-in infrared detectors and related hardware, software that helps to receive, recording and analyzing the tested objects and it’s environment temperature. Therefore, once the user put this product close to an object and presses the measuring button, it can activate the infrared sensor right away, detect the object’s heat energy by the passive infrared sensor to measure temperature quickly and accurately.
Appearance Structure
As shown in (Fig3-1),the appearance of the whole machine is composed of the following parts:
|
|
Display Icon
Technical Parameters
| Measuring way | Non-contact infrared temperature measurement | |
| Measuring range | 32°C-42.9°C | |
| Display accuracy | 0.1°C | |
| Test accuracy | 32.0°C-34.9°C | ±0.3°C |
| 35.0°C-42.0°C | ± 0.2°C | |
| 42.1°C-42.9°C | ±0.3°C | |
| Usage environment | Environment temperature 16″0–35^C /Relative humidity C.80% / Atmospheric pressure 860h Pa-1060h Pa |
|
| Transport and storage environment |
Environment temperature-20°C—+50°C / Relative humidity-.C.85% / Atmospheric pressure 80KPa— 106KPa |
| Power | DV3V(2AA batteries) |
| Display unit | Centigrade degree(°C)/Fahrenheit degree(°F) |
| Automatic shutdown | About 8 seconds |
| Power reminder | 2.5V±0.2V |
| Backlight | Three color backlight |
| Memory group number | 32 groups for human and object temperature data each |
| Weight | C 93g |
Manual Guide
1) Buttons
Measuring button: short press to measure/power on
Up button(+): up data button to check forward record, alarm value setting, fine-tune Settings, buzzer, measuring unit setting, delete current memory
Down button(-): down data button to check the backward record, alarm value setting, fine-tune Settings, buzzer, measuring unit setting
Mode button: object/human
Setting button: setting enter
2) Measuring human’ s temperature
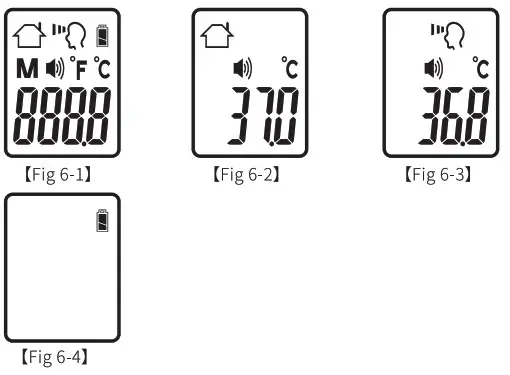
- Press the measuring button, about is to show the current temperature on the display screen, as the picture (Fig6-1)shows
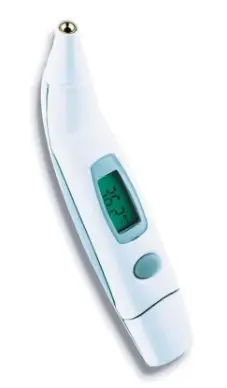
- Switch the Mode to measure human’ s temperature like the picture (Fig6-3] shows.
- Aim the thermometer probe among the forehead and remain vertical, make the distance is about 1 to 5 cm, press the measuring button to start measure, when hearing a sound “dee”, the measurement is complete. If the temperature higher the alarm point, it will make a sound “dee dee dee” to alarm.
- Without using, it will power off automatically after 8 seconds.
3) Measuring object’s temperature
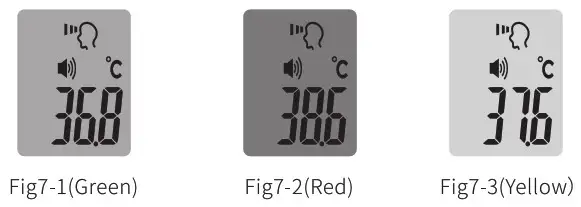
- Press the measuring button, about Is to show the current temperature on the display screen, like the picture (Fig6-1Ishows.
- Switch the mode from measuring the temperature of a human’s forehead to objects, like the picture (Fig6-2)shows.
- Aim the thermometer probe among the tested objects and remain vertical, make the distance is about 1 to 5 cm, press the measuring button to start measure, when hearing a sound “dee”, the measurement is complete.
- Without using, it will power off automatically after 8 seconds.
Measuring Result
- I-1 mode:if less than 37.5°C, it shows Green backlight, like the picture (Fig7-1) ; If more than or equal to 37.5°C but less than 38.6°C, it shows Yellow backlight, like the picture(Fig7-3] ; If more than or equal to 38.6°C but less than 43.0°C, it shows Red backlight, like the picture( Fig7-2]
- W Mode: Green backlight, like the picture(Fig7-1]
- Overtemperature Mode:
• Overtemperature Mode:
- 1. When the human body’ s temperature is lower than 32 degree, “Lo” will show on the display screen and make six short sound “dee dee dee dee dee dee”, the backlight turns to Red. Like picture (Fig7-2).
- When the human body’s temperature is higher than 42.9 degree, “HI” will show on the display screen and make six short sound “dee dee dee dee dee dee”, the backlight turns to Red. Like picture (Fig7-2).
- When an object’s temperature is lower than 0 degrees, “Lo” will show on the display screen and make six short sounds “dee dee dee dee dee dee”, the backlight turns to Red. Like picture ( Fig7-21.
- When an object’s temperature is higher than 80 degrees, “HI” will show on the display screen and make six short sounds “dee dee dee dee dee dee”, the backlight turns to Red. Like picture IFig7-21.
- Under testing temperature of an object, when environment’ temperature lower than 0 degrees; Under testing temperature of human, when environment’ temperature lower than 10 degrees. “Lo” will show on the display screen and make six short sounds “dee dee dee dee dee dee”, the backlight turns to Red. Like the picture [Fig7-2].
- When the environment’s temperature higher 40 degrees, “HI” will show on the display screen and make six short sounds “dee dee dee dee dee dee”, the backlight turns to Red. Like picture (Fig7-21.
Setting Operation
- Measuring mode setting Slide the Mode button to change mode of human or object.
| Menu | Function | Down button | Up button | Initial value | Remark |
| F-1 | Temperature unit setting |
Temperature unit switching |
Temperature unit switching |
Centigrade degree |
Can choose with memory function |
| F-2 | Alarm setting | Reduce 0.1 degree |
Increase 0.1 degree |
38 degrees | The objects’ mode
is invalid; valid range |
| F-3 | Temperature transformation |
Reduce 0.1 degree |
Increase 0.1 degree |
0.0 degree | The objects’ mode isinvalid;valid range +_ 1.6 degrees |
| F-4 | Buzzer setting | On Off switch’setting |
On, Off switch setting |
On | Can choose with memory function |
- Temperature unit setting When Power on, long press Setting button for 2 seconds, it shows Fl on display screen. The current initial value is in centigrade degree. Press down or up button to switch the temperature unit. Press the Setting button to confirm and directly enter F2 alarm setting.
- Alarm setting
Long press the Setting button for 2 seconds and short press the Setting button once Fl appears on the display screen. It enters F2 alarm setting after the display screen shows F2. The current initial value is 38.0 °. Press the down button to shift down by 0.1 °, and the up button to shift up by 0.1 ° . Press the Setting button to confirm and directly enter F3 temperature transformation setting.
- Temperature transformation setting
Long press the Setting button for 2 seconds or short press the Setting button for two times to enter the F3 setting. The current initial value of the temperature migration interface is 0.0 degree. Press the down button to reduce 0.1 degree and the up button to increase 0.1 degree. Press the Setting button to confirm and directly enter F4 buzzer setting.
- Buzzer setting
Long press the Setting button for 2 seconds or short press Setting button for 3 times to enter the F4 buzzer setting. Current initial value of buzzer is on, press down/up button to switch the On and Off. Choose “on” or “off” on the display screen and confirm by pressing the Setting button. If do not want to save the Settings, do not need to press the mode setting button to save, wait 8 seconds before entering the sleep mode to exit.
- Memory record
After each measurement, the instrument will record the test data automatically and display it in the lower right corner of the screen. Press “up” and “down” button to view the stored value. There’ re 32 group numbers about both for human body’ s temperature and object’ s temperature. It will automatically overwritten when exceed 32 group numbers.
- Button wake up
After short pressing the measuring button, press it to start to wake up. At the same time, the screen will be fully displayed (500ms) and the temperature will be measured.
- Memory record delete
After Power on, long press “+” button for 3 seconds, when showing “CL?’ on screen means memory record has been deleted.
Battery Replacement
- When the battery voltage is lower than 2.51v, the power shortage icon as shown like picture [Fig 6-4]. It can only responds to the action of the button to wake up, but the measurement cannot continue. It’ s time to change battery.
Troubleshooting
| Error message | Reason | Handing method |
| HI | Human body, s ternperature >42.9°C Or object’ s temperatu re >80°C Or the environment’s temperature exceeds the maximum temperature range |
Please use it within the measurable temperature range. If can’ t fix, please contact after-sales service. |
| LO | Human body’ s temperature <32.0°C Or object’ s temperature <0 °C Or |
Please use it within the measurable temperature range. If can’t fix, please contact after-sales service. |
| the environment s temperature exceeds the minimum temperature range | ||
| Err | Data error | Please contact after-sales service |
| Battery icon flash | Battery low warning | Please change battery |
Transportation and Storage
- Transportation and storage environment of infrared thermometer: temperature: -20°C – +50°C; relative humidity < 85%;
- After product packaged, the packaging and transportation simulation test shall be Common transports are allowed, but rain, dampness, extrusion and mechanical collision should be avoided;
- The product should be kept in a well-ventilated and dry room. The packing box should be more than 500mm above the ground, and strong sunlight and other corrosive gases should be avoided indoors.
Matters Needing Attention
Infrared thermometer is a precision electronic product, please use with care and attention:
- Do not fall to the ground and distort the product body
- Do not decompose the product
- Non-contact infrared thermometer is without waterproof function, only can be wiped by dry cloth, can not be washed with water.
- Do not place it in direct sunlight at high temperature and in contact with any chemical solvent in order to prevent chemical changes to affect the operation function.
- Take out the battery when the infrared thermometer is not used for a long time.
- Please dispose the replaced waste batteries properly, do not dispose it to pollute environment or water.
- In order to obtain a stable and reliable measurement data, the measurement must be made in an environment higher than 16°C, preferably at room temperature of 23 – 25°C.
- If the ambient temperature is low, the infrared thermometer should be placed in an environment which above 16°C for 30 minutes before starting to use.
- when taking the temperature of the forehead, make sure that the forehead is clean and not blocked by sweat, hair or hat. Otherwise, the temperature measured will be too low.
- During object measurement mode, please note that the emissivity of the object will affect the measurement results. Please refer to the following commonly used object Glass :0.94, plastic :0.85, ceramics :0.93 water: 0.95, rubber: 0.91, oxidized stainless steel :0.85, polished stainless steel :0.25
Limited Warranty
Product Warranty Card
From the date after purchasing, free warranty for one year (two years maintenance fee will take into consideration the material artificial fee)
Our company don’t provide free warranty service for the following failures which caused by users’ personal reasonsAs follows:
- Disassemble or modified without authorization to cause the fault of product;
- Take it or fall down to cause the internal fault of product;
- Due to the improper use or by the lack of reasonable maintenance;
- Didn’t follow the instructions to use to cause operating failure;
- Due to the fault caused by natural calamities, such as flood, fire,
- The fault caused by the unauthorized repair shop’ s improper repair,
When asked free services, please present the valid warranty card and shopping vouchers. When asked warranty service, please bring the product to the point of sale for repair. Charge will be effected according to the regulations outside the scope of the warranty repair service.
Limited Warranty
Warranty Card
Purchase Date:…..
Distributor:………
Series Number:…… Store stamp
Certificate of Approvel
Model: ASAP-D02
Production Date: ….
Inspector:….
The product has been tested and proved to be qualified for delivery.
]]>Thermometers Digital Ear Thermometer

DEVICE DESCRIPTION AND INTENDED USE
The thermometer is an electronic device intended to measure the body (human) temperature. It is designed to absorb the infrared from human body to detect your temperature. It can be used with adult or pediatric patients and it can be used in household.
HOW TO USE
Measurement Consideration
CAUTION
- Make sure the measuring site is dry, clean prior to measurement taking.
- Clean the probe before and after each measurement to prevent cross-contamination, see Cleaning & Disinfection.
- After cleaning and disinfection the probe, please wait for at least 2 minutes to do a measurement.
- Straighten the ear canal.
For Children under 12 months: Make the ear canal straight by gently pulling the ear backward.
For Children over 12 months and Adults: Make the ear canal straight by gently pulling the ear backward and upward. - Place the probe inside the ear canal.
- Press and release power button to do a measurement.
Doing a Measurement
- Press and release the power button to turn on the device; it will auto self-diagnosis.
- After completing self-diagnosis, the device will be ready for measurement.
- Press and release the power button then read the temperature.
- The backlight will light up in accordance with the temperature, shown as below table.
| Temperature (°F) | Backlight |
| T ≤ 98.9 | Green Backlight |
| 99 ≤ T ≤ 99.4 | Yellow Backlight |
| 99.5 ≤ T | Red Backlight |
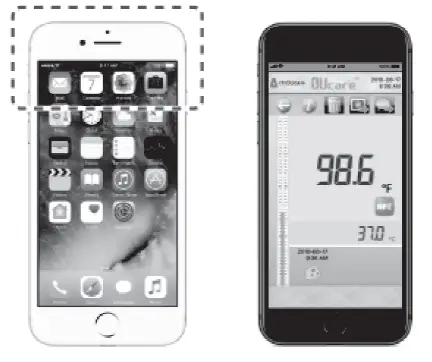
Read-back last memory by NFC
Install OUcare APP from Google play or App Store successfully. OUcare not only collect temperatures but also can do graph for checking temperature’s trend easily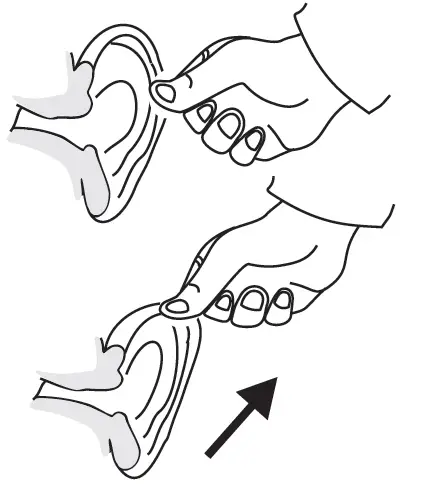
For Android mobile device: When the device is off, put mobile device above the thermometer, the last temperature will be read-back and show on mobile device.
For iPhone7 or above: The iOS should be 11.0 or above. When the device is off, press the icon of APP then close to the thermometer, the last temperature will be read-back and show on mobile device. Right side is a figure of NFC area of iPhone7.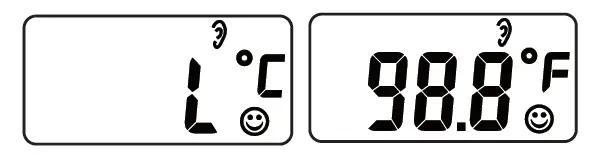
CONTRAINDICATIONS
The thermometer is contraindicated:
- Place the probe in scarred tissue or tissue compromised by any disorders of measuring site.
- Patients in trauma or treat with certain drug therapies of measuring site.
SETTING
Setting °C or °F Scale
- Turn on the device by pressing and release the button.
- Press and hold the button within first 2 seconds until °C or °F change, release the button as soon as change occurs.
- Press and hold the button again for 2 seconds to switch back and forth from °C or °F.

MEMORY FUNCTIONS
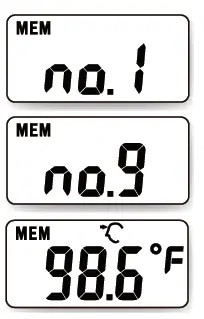
Recall Memory
- When the unit is off, press and hold the power button around 3 seconds until the last memory shows.
- You may continue to press and release the power button to recall up to 9 previous records.
- Discontinue pressing the power button to stop recalling memories.
- The memory will flash for times then the device is ready to do a new measurement.
Delete All Memory
When the device is in memory mode, press and hold the power button to delete all memories, then the device will be off automatically.
Otherwise,
- To stop deleting memories, do not press the power button when you see “dEL”.
- Then the device will return to memory mode after 2 seconds then it is ready for measurement.
DEVICE OVERVIEW & DISPLAY OVERVIEW
QUICK START
- Install batteries into the device. Make sure the polarity (+ and -) of the battery matches as shown in the battery compartment.
- Press and release the power button, you will hear a short beep. The device will be ready for measuring when two short beeps are heard.
- Place the probe on the measuring site.
- Press the power button then read the temperature on the display.
PRODUCT SPECIFICATION

BATTERY INSTALLMENT
WARNING
Use only same type of alkaline batteries to avoid incompatibility.
Memory may be erased after replacing a new battery.
- Replace with 2 new AAA batteries simultaneously when the low battery indication appears.
- Remove batteries if the device is not likely to be used for a long period of time.
- Do not dispose the batteries in a fire, the batteries will explode.
Replace Battery
- Remove the battery cover to insert batteries.
- Confirm the polarity (+ and -) of batteries are correct as indicated inside the compartment and insert batteries accordingly.
- Replace the battery cover.
CLEANING & DISINFECTION
- To clean and disinfect the device, use a cotton swab or pad moistened with 70% alcohol to wipe the Sensor and Probe.
- Use a cloth dampened with water or neutral detergent to clean and dry the device.
- Do not use thinner, benzene, and other harsh cleaners for cleaning the device.
- Do not immerse the unit in water or liquid of any kind. The unit is not water proof.
- Do not submerge or expose the device to water.
- Do not use corrosive detergent to clean the device. Clean and disinfect the thermometer before and after use.
Cleaning process:
- Pre-cleaning with cold water wash several times.
- Clean the probe with a solution of 5-10% mild detergent about 10-15 seconds.
- Continuously clean with cold water to avoid any chemical residues remaining on the device.
- Rinse the device with drinking water or distilled water to ensure the removal of all remnants of the cleaning agent.
- If necessary, repeat step 2 through step 4 in order to make sure the device is clean.
- A final wipe down by a clean wipe is necessary to avoid of water stains.
Disinfection process:
- To disinfect the device when completed the cleaning process.
- Wipe the probe with a cloth dipped in a disinfectant solution such as 70-75% isopropyl (rubbing) alcohol solution: contact time ≥10 minutes for disinfection.
- The disinfectant free rinse without residues.
Drying process:
- After cleaning and disinfection process above.
Put the device to air-dry in the room temperature 68-86°F, exposure time around 30-60 minutes.
CARE AND STORAGE
- Do not drop or crush the device. It is not shock proof.
- Do not dismantle or modify the device other than changing the batteries.
- Do not store the device in an extreme environment with direct sunlight, high/low temperatures or in a location with high humidity or severe dust.
Please contact your local agents or distributors if the device does not function properly as specified under Product Specification.
SAFETY INSTRUCTIONS
WARNING:
- Read the entire instruction manual before trying to operate the device.
- The device is delivered non-sterile; please clean the device before measuring.
- Stop using the device if malfunctions appear or if it operates abnormally.
- Children should not use the device without the supervision of an adult. Keep out of reach of unsupervised children.
- Do not use the device when flammable materials are around.
- Do not place the device on scarred tissue, open wounds or abrasions.
- If the device has been kept or stored in extreme temperatures, wait at least one hour for the device to return to room temperature before measuring.
- Do not touch the probe, unless the device is taking a measurement.
- The device is not water resistance, please keep dry.
- Do not drop the thermometer or expose it to heavy shock.
- Do not bite or swallow the probe and the battery cover.
- Do not let thermometer come into contact with any thinner or chemical solvents.
- Components may be harmful if swallowed. Contact a physician immediately should this occur.
- Do not use it if the display malfunctions or it operates irregularly.
- Do not put this unit in dishwasher.
- Performance of the thermometer may be degraded if: Operated or stored outside stated temperature and humidity ranges or if the patient’s temperature is below the ambient (room) temperature.
- Only use the thermometer indoors and do not use it near mobile phones or microwave ovens. In the case of thermometer whose maximum power exceeds 2W, the minimum distance from thermometer should be 3.3 meters (11 feet) .
- The reading is for reference, if you feel sick or uncomfortable, please contact the physician.
CAUTIONS:
- Do not scrape or scratch the probe as it will hamper the effectiveness of the device.
- Do not dismantle the device except when replacing the battery.
- Wait at least thirty minutes after exercising, bathing or eating before taking a measurement.
- If the subject’s body temperature is lower than the room temperature, a false reading may occur.
- To ensure the best performance of the device, please follow the Product Specification “Storage condition” regarding temperature and humidity ranges for storing the device
- Dispose of the device and battery according to your local regulatory or environmental protection agency.
- The device is not intended for use in the emergency medical services environment.
ABOUT BODY TEMPERATURE
A person’s normal body temperature can range from 95.9°F to 100.0°F throughout the day. We recommend taking your temperature at different times during the day when you are NOT sick. This will give you a preliminary reference to know what your normal temperature is and how it fluctuates during a normal day. Then, when you feel sick or uncomfortable, knowing this information will provide an index for a reliable diagnosis of a fever.
WARRANTY INFORMATION
Warranty:
The device itself (battery excluded) comes with one year warranty from purchase date if it is operated under normal circumstances without evidence of tampering. See exclusions below.
Warranty exclusions:
- If user does not properly operate the device according to the instructions as described in this manual.
- If the device shows signs of tampering or attempted modification.
- Improper handling, such as dropping, liquid or cleaner damage.
- Natural disasters (such as fire, flood, earthquake, lightning strike).
- If you do not have a receipt or proof of purchase showing date of purchase.
LOT NUMBER INFORMATION
LOT NO.(YYMM) on the device label means the year and month of manufacturing. For example, “1904” means the device was manufactured in April, 2019.
![]()
Thank you for purchasing a 180 Innovations product. Distributed by 180 Innovations, Lakewood, CO 80215 Made in China
www.180innovations.com
Toll free 877-299-6700
KD-153
INSTRUCTIONS FOR USE
Please read carefully before using
FEATURES
- Fast oral and rectal temperature measurement in around 20 seconds.
- Very sensitive unit, best for quick oral or rectal measurement.
- Easy to read digital LCD ( liquid crystal display ).
- Compact, accurate and durable LSI ( large scale integration ) unit.
- Temperature can be taken orally, rectally or underarm.
- If the thermometer is inadvertently left on after temperature stabilization , it will automatically shut off in about 3 minutes.
- Small , light weight unit. Universal use for the whole family.
- No hazard compared to broken mercury glass thermometers .
- Low battery indicator when the symbol ” CI “appears , the battery needs to be replaced .
- This unit is water resistant.
PARTS DESCRIPTION

SPECIFICATIONS

PRECAUTION
- Do not boil the probe . Instead , clean the unit by wiping it with a dry cloth and disinfect the probe with isopropyl ( rubbing ) alcohol .
- Do not drop the thermometer or expose it to heavy shock . The unit is not shock proof .
- Do not bend or bite the probe .
- Do not store the unit under direct sunlight, at a high temperature , or in high humidity or dust. Performance may be degraded.
- Stop using the thermometer if it operates erratically or if the display malfunctions .
- Keep out of the reach of unsupervised children .
- Clean the thermometer probe before storing .
- Do not attempt to disassemble the unit except to replace the battery .
- If the thermometer has been stored at below-freezing temperatures, allow it to warm naturally to room temperature before using
- Performance of the device may be degraded if operated or stored outside stated temperature and humidity ranges or the patient’s temperature is below ambient (room) temperature.
BATTERY REPLACEMENT
- When the symbol appears , the battery needs to be replaced .
- Pull the battery cover off in the direction shown.
- If necessary, use a pointed object such as a toothpick or insulated probe to pry loose the battery cover and the old battery. Avoid using any sharp metal object in this operation.
- Place a new 1.55 VDC button size battery type 192, LR 41 or equivalent in the chamber with the negative (-) side up and the positive (.) side down .
- Replace and fasten the battery cover securely.


Warning:
Discard old battery carefully, out of reach of young children. Swallowing the battery may be fatal. If the battery is swallowed, contact hospital immediately to have it removed. Do not dispose of the battery in a fire. It may explode.
HOW TO USE
1.Depress the ON/OFF button. The display will read

2. Release the ON/OFF button and the display will show L°F(L°C) with °F(°C) flashing.
3. Disinfect the probe with isopropyl (rubbing) alcohol. Place the probe in an appropriate position (oral, axillary, rectal).
4. Once the degree sign (°F or °C ) on the display has stopped flashing (usually within 15-30 seconds ) , the correct temperature is indicated. The temperature reading will not change after the °F(°C) stops flashing. For beeper models only, an alarm signal will sound for approximately 8 seconds when °F(°C) stop flashing.
5. The unit will automatically turn off in 3 minutes ( approx. ). However, to prolong battery life, it is best to turn the thermometer off by pressing the ON/OFF button once the temperature has been noted.
Special Features:
Normal Temperature Alarm: An alarm will sound when the peak temperature has registered and is ready-to-read. The “Normal Temperature” alarm (four quick beeps followed by a pause) will sound repeatedly for approximately 8 seconds.
Last-Temperature Memory Recall: When the ON/OFF button is depressed to activate the thermometer, hold down for approximately 5 seconds. The display of 188.8 will change to show the last measured temperature. This reading is displayed as long as the button is held down. When the button is released, the thermometer will be in “ready-to-measure” mode and the recalled temperature will be erased.
To change the scale from Fahrenheit (°F) to Centigrade (°C): After turning the thermometer on, immediately press the ON/OFF button again and release. The °F changes to a °C. Once the display shows an L with a flashing °F or °C, the device is ready to record and display a temperature. Follow the same directions to switch back from Centigrade to Fahrenheit.
NOTE : Always disinfect the thermometer before you use it.
NOTE : In Step 2, if the room temperature is greater than 90.0°F (32.0°C), it will be displayed rather than L°F(L°C).
NOTE : In Step 3, you may put a sanitary plastic probe shield on the sensor tip to help prevent cross-infection and contamination. Use of the probe cover may result in a 0.2°F(0.1 °C) difference from actual temperature. Dispose of any used probe shield and store the unit in a safe place.
RELIABLE METHODS TO MEASURE TEMPERATURE
THE TAKING OF BODY TEMPERATURES: Change in body temperature is one of the most important indicators of illness. It is important that accurate temperatures be taken. Even though the digital thermometer is used in similar manner to the glass thermometer, it is important that the simple instructions for use of this thermometer be followed closely and that the person taking the temperature understands body temperature.
BODY TEMPERATURE: A person’s body temperature will usually be several tenths to one full degree lower in the morning than it is in the late afternoon. Therefore, if your temperature is 97.9°F(36.6°C) in the morning, it could be 98.4°F(36.9°C) or more in the late afternoon and still be normal. To determine what your normal body temperature is you should take your temperature both in the early morning and in the late afternoon over several days. Children have the same normal temperature range as do adults. Afever for both children and adults is typically defined as a temperature over 99.5°F(37.5°C) (oral reading). Exercise, excessive clothing, hot bath, hot weather, warm food and drink can cause mild elevations of up to 100.4°F (38°C) to 101.2°F(38.4°C) in oral temperature. If you suspect one of these to be the cause of an elevated reading, eliminate the possible cause and retake the temperature in a half hour.
ORAL USE

Place the probe well under the patient’s tongue. Instruct the patient to keep their mouth closed while the thermometer is reading. A normal temperature by this method is usually considered between 96.8°F to 98.6°F(36.0°C to 37.5°C).
RECTAL USE
If rectal temperature is recommended by your doctor, you may use a probe cover. Insert thermometer into the probe cover. Lubricate the probe cover with a water soluble jelly for easier insertion . Do not use petroleum jelly . Insert tip of probe no more than 1/2 inch into rectum . STOP if you meet any resistance . The sensing device is on the very tip of the probe and there is no need to insertthe probe deep into the rectum . In general, the rectal temperature is around 1.0 to 2.0°F(0.5°C to 1.0°C) higher than oral temperature.
AXILLARY USE
Wipe armpit with a dry towel . Place probe in the patient’s armpit and keep the patient’s arm pressed firmly against their side. In general, the axillary temperature is around 1.0 to 2.0°F (0.5 to 1.0°C) lower than oral temperature. Note that in order to achieve better axillary temperature measurement result a minimum measuring time of 2-3minutes is recommended regardless of the beep sound.
NOTE: Children should be attended by an adult during the entire temperature recording process . After use , the digital thermometer should be stored in a safe place, out of reach of young children. If you compare temperatures between two thermometers , it is possible to have two different readings even if both thermometers are within their accuracy tolerances. Differences in how you take each reading and the thermometer’s tolerance range can account for nearly 0.2°F(0.1 °C) variability. REMEMBER: Find your normal temperature and watch for changes.
CLEANING INSTRUCTIONS
To clean the thermometer, wash the tip with a solution of mild detergent and cool water. Disinfect the thermometer by wiping the sensor and lower stem with a cloth dipped in a household antiseptic solution such as rubbing alcohol.
LIMITED WARRANTY
This thermometer has a Lifetime Warranty against manufacturer ‘s defect under normal, household use. Follow the direct ions closely will ensure years of dependable operation.
lithe thermometer does not function properly, first check the battery (see battery replacement instructions). Replace it if necessary.
FCC STATEMENT
NOTE:
POTENTIAL FOR RADIO/TELEVSION INTERFERENCE (for U.S.A. Only)
Operation is subject to the following two conditions: 1) This device may not cause harmful interference, and 2) this device must accept any interference received, including interference that may cause undesired operation.
This product has been tested and found to comply with the limits for a Class B digital device, pursuant to part 15 of the FCC rules.
These limits are designed to provide reasonable protection against harmful interference in a residential installation.The product generates, uses, and can radiate radio frequency energy and, if not installed and used in accordance with the instructions, may cause harmful interference to radio communications. However, there is no guarantee that interference will not occur in a particular installation. If the product does cause harmful interference to radio or television reception, which can be determined by turning the product on and off, the user is encouraged to try to correct the interference by one or more of the following measures:
- Reorient or relocate the receiving antenna
- Increase the separation between the product and the receiver.
- Consult the dealer or an experienced radio/TV technician for help.
Changes or modifications not expressly approved by the party responsible for compliance could void the user’s authority to operate the equipment.
KD-153-Digital-Clinical-Thermometer-User-ManualDownload
Questions about your Manual ? Post in the comments!