TREATLIFE 3-Way Smart Light Switch
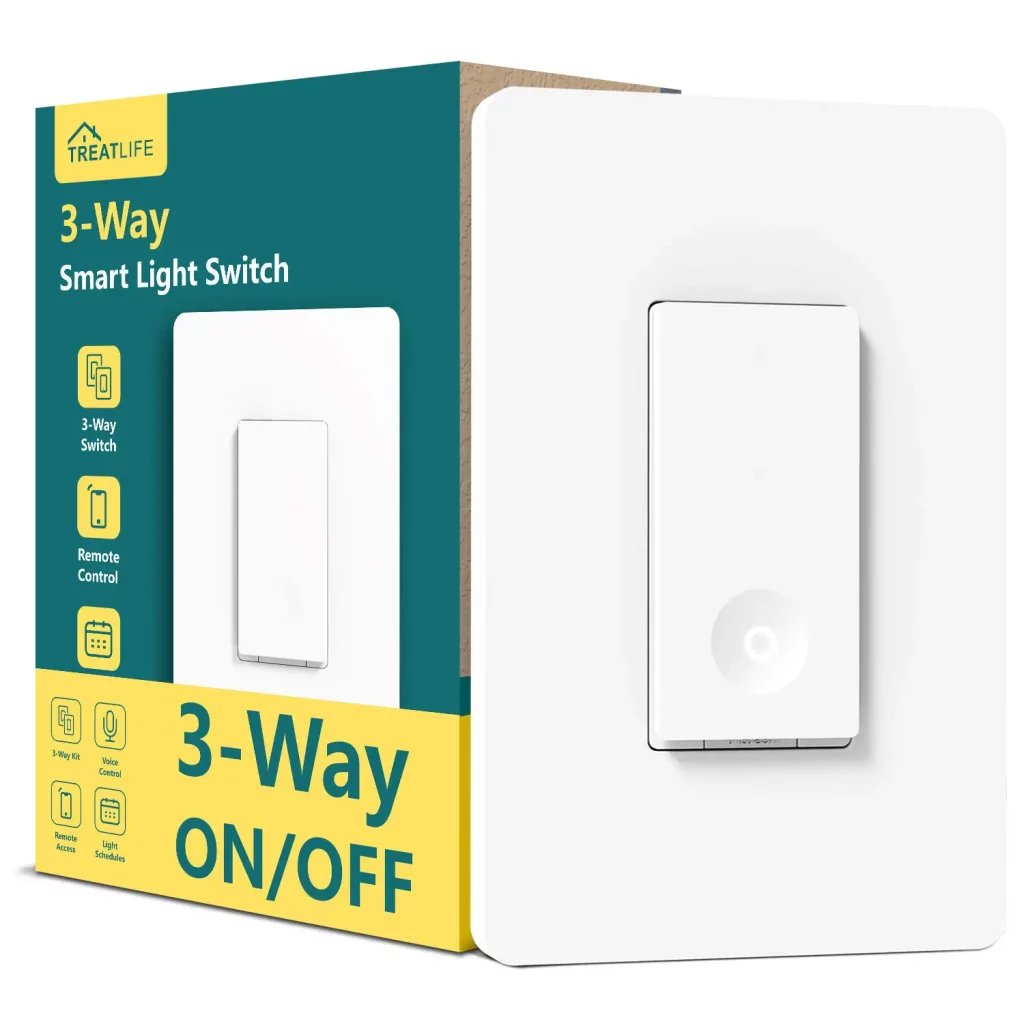
PRODUCT APPEARANCE
Indicator Light Status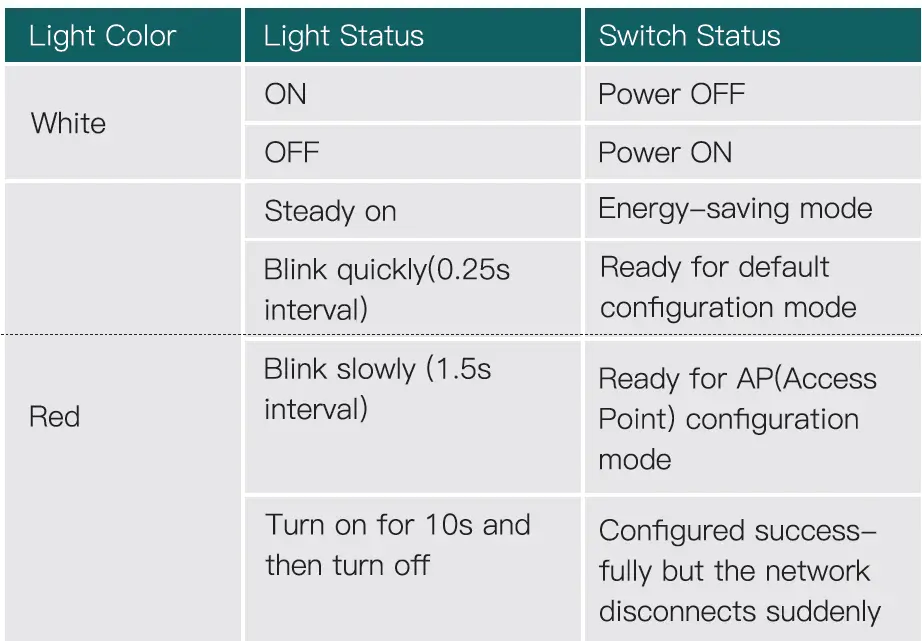
SAFETY INFORMATION
Risk of Electric Shock: Electricity can cause personal Injury and property damage If handled Improperly. If you era not sure about any pert of these Instructions, please seek professional assistance from a qualified electrician.
- Turn off the power at the circuit breaker and test that power is off before wiring.
- Check supported maximum wattage rating: 18OOW.
- Screwdriver
- Pliers
- Electrical Tester
INSTALLATION
- Make sure that the power at the circuit breaker Is off before wiring.
- Neutral Wire Is required. Confirm the wall box contains a Neutral Wire (typically white). If the wall box doesn’t have a Neutral Wire, please try another location In your home or call a professional electrician to install the switch.
- The wire colors Indicated ln this manual are the usual colors and may differ In some homes.
- Ensure the wire conductors are securely fastened to each wire.
- Ensure the WIFI signal ls strong before wiring.
- If you don’t have any wiring experience, please call a professional electrician.
Step 1: Turn off the circuit breaker and use the electrical tester to test the power.
Ensure the switch is off before wiring. 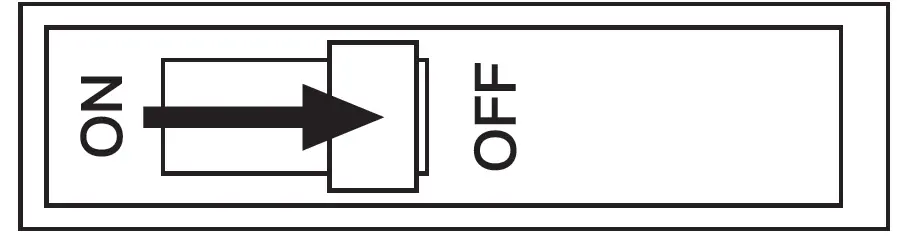
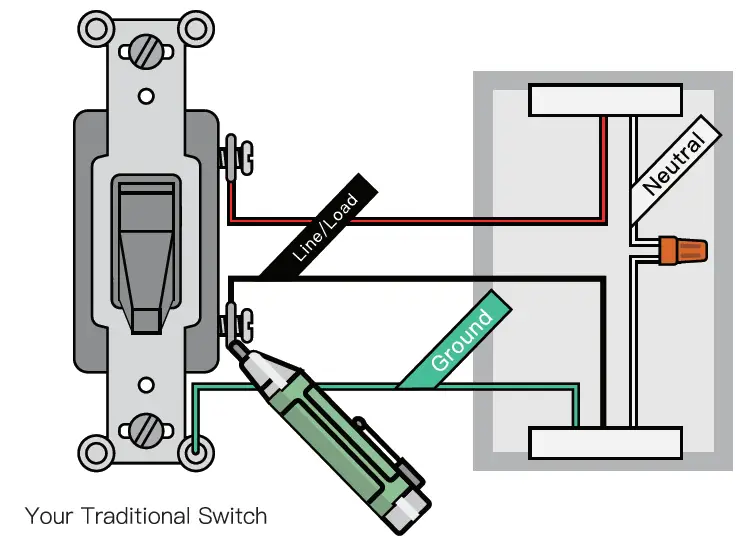
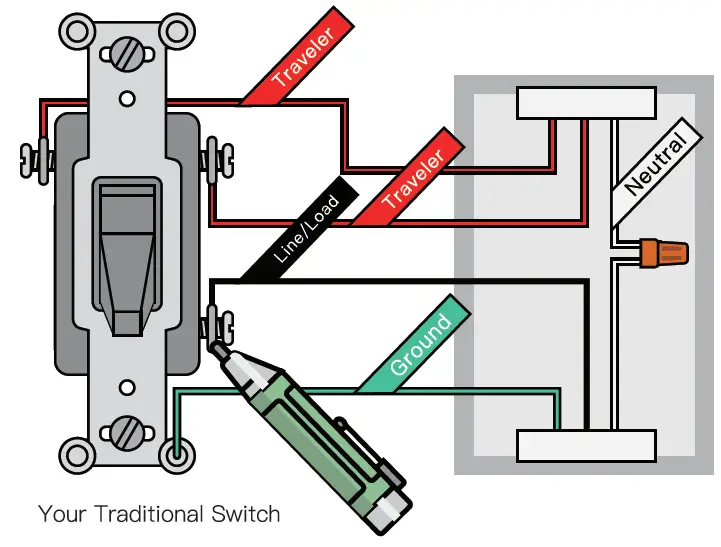
Step 2: Remove the existing wall plate; turn on the power at the circuit breaker and use an electrical tester to check which wire Is line/load wire; the electrical tester will give a visual and audible alert when It comes close to a line/load wire 11 the switch ls flipped on or off.
Please note that you should flip the switch on and off twice to identify the line/load wire because the electrical tester may also give an alert when lt comes close to a traveler wire If the switch is flipped on.
Tum off the power at the circuit breaker end use the electric tester to test if the power is off, and then pull the existing switch out.
Label the line/load wire and other wires; disconnect the wires from the existing switch with pliers.
- Single pole: for lights controlled from 1 location.
Follow the wiring diagram to connect the switch wires to the wires In the wall box with the wire conductors.
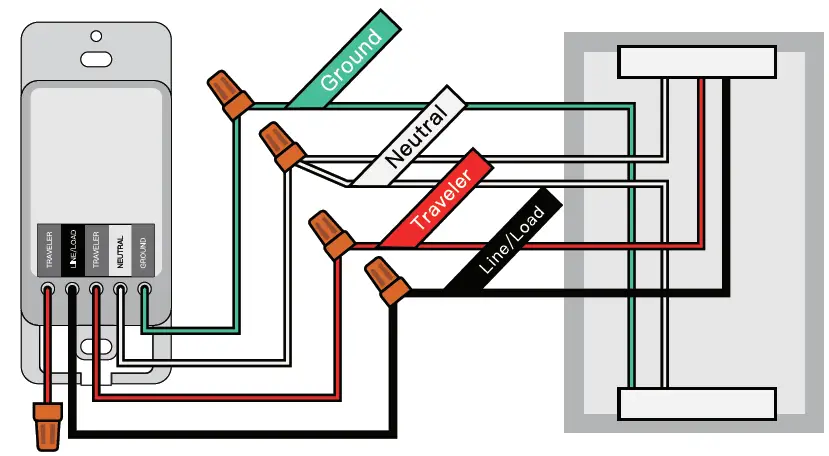
- 3-way switch: for lights controlled from 2 locations.
Follow the wiring diagram to connect the switch wires to the wires in the wall box with the wire conductor.;.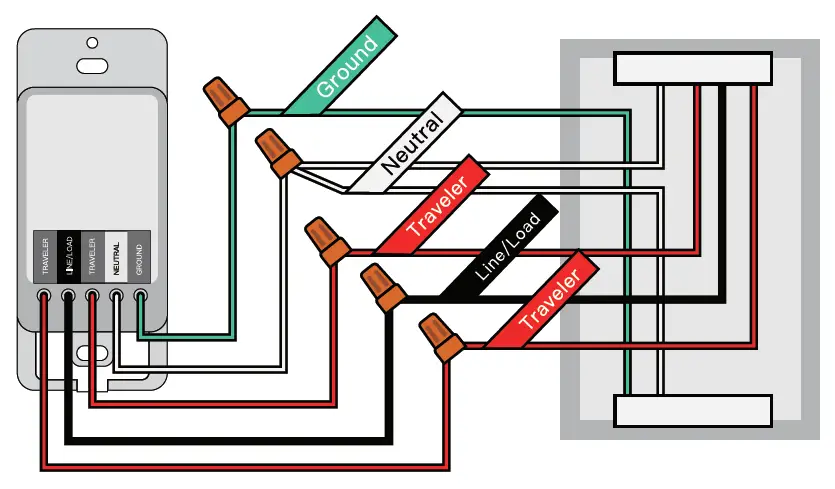
Step 3: Mount the switch with the provided screws and snap the wall plate on lt.
Step 4: Tum the power back on et the circuit breaker. 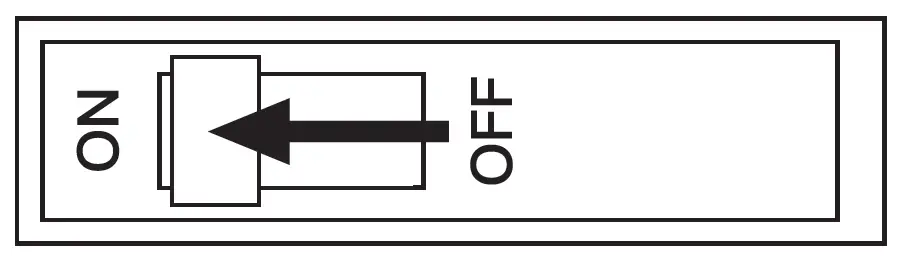
Step 5: Switch the light on.
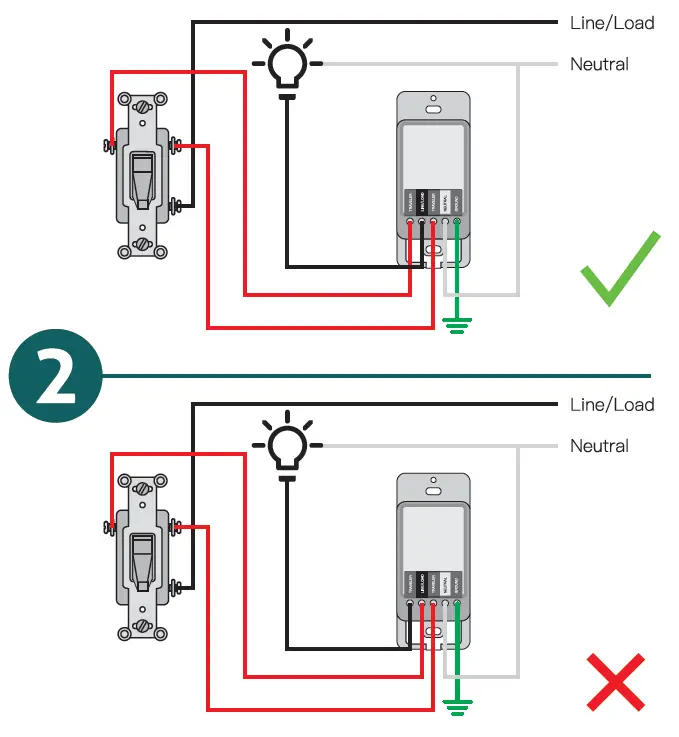
Smart Switch and Traditional Switch Wiring Diagram
When the smart switch cannot work properly, please check the following:
- Make sure that two Traveler Wires connected to the terminal of the smart switch are corresponding to the terminal of the old switch.
- Please try to Install the smart switch to another location in your home.

ADD DEVICES
Download Smart Life APP
Please seen the QR code or download Smart Llf& on App Store or Google Play. 
Registration or Log In
- Download “Smart Life” Application
- Enter the Register/Login interface; tap “Register” to create an account by entering your phone number to get verification code and “Set password”. Choose “Log in” if you already have II Smart Life account.
Configuration APP to the Switch
Preparation: Ensure the switch has connected with electricity; ensure your phone has connected to WIFI router and Is able to connect to the internet.
Note: This switch only supports 2AG network. If You have connected 5G network, please disconnect 5G network firstly.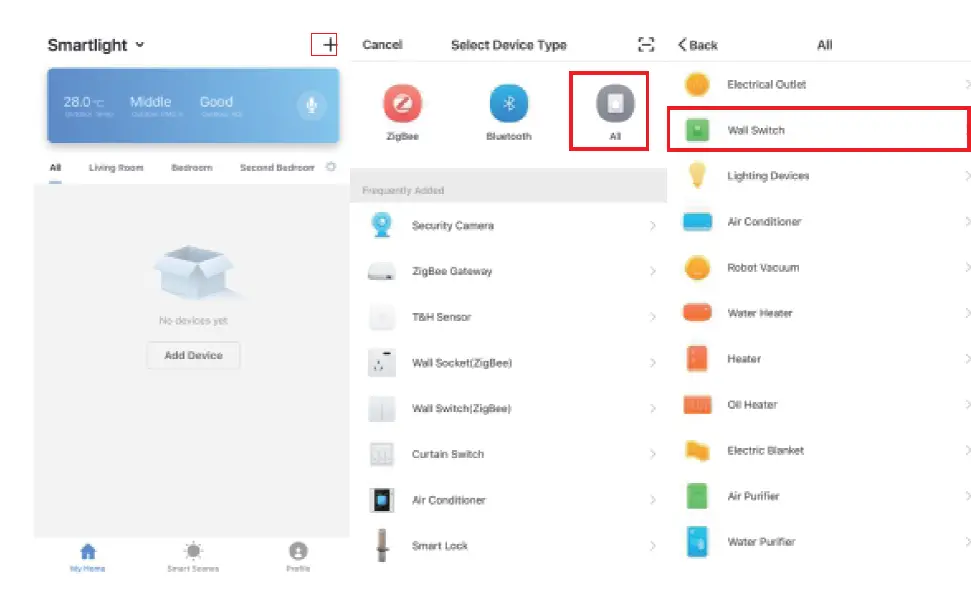
Default Configuration Mode
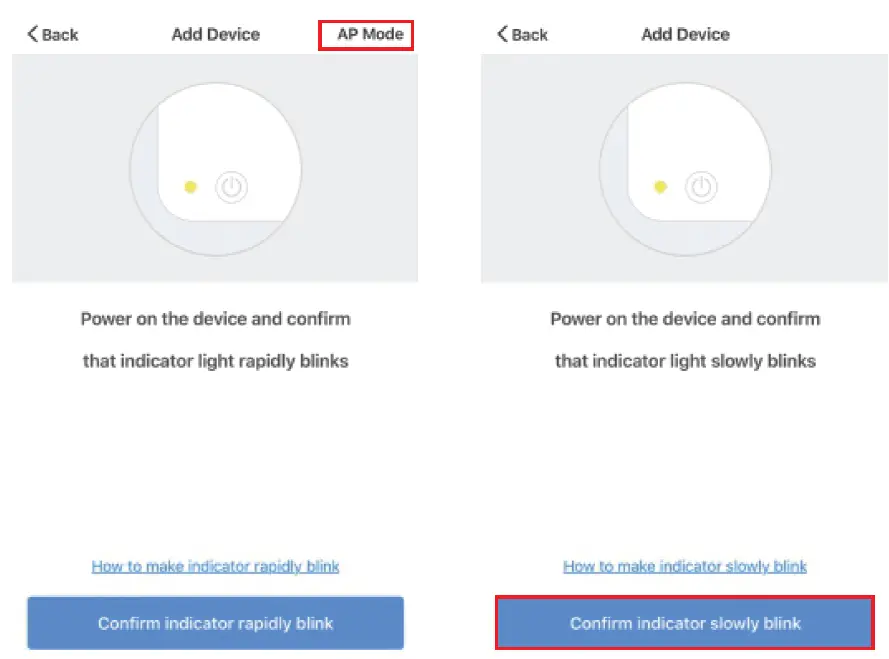
- Press and hold the manual switch for 5 seconds until the red Indicator light blinks quickly.
- Tap “Confirm Indicator rapidly blank”; enter WIFI Password; wait for completing the connection.
- Devices have added successfully; If you can only 1ind one switch, please start the above steps to con1igure the other switch again.
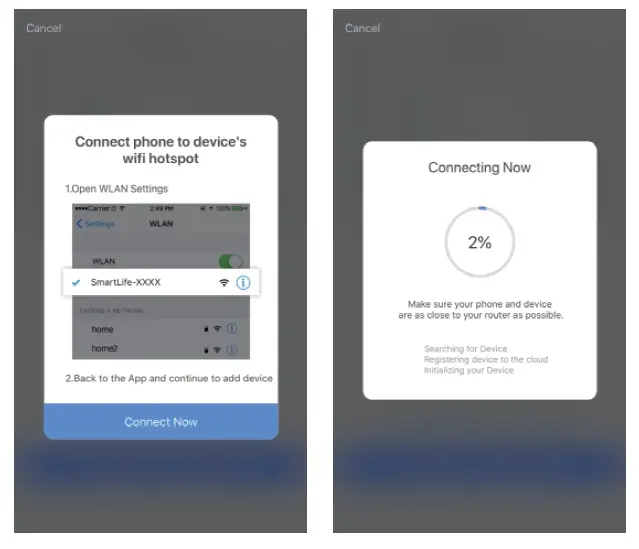
AP Mode
- If you cannot configure successfully with the default mode, please try to connect with AP Mode.
- Tap “AP Mode” on the top right comer.
- Press and hold the manual switch for 5 seconds, you can sea the rad Indicator light blinks quickly. Than press and hold for 5s again until the indicator light blinks slowly.
- Enter Wi-Fi Password.
- Open WLAN settings; connect with “SmartLife &-xxxx”
- Back to the App and continue to add the device and wait for completing the connection.
SET YOUR ECHO SPEAKER BY ALEXA APP
- If you have finished to Install Smart Life than open Amazon Alexa App; sign in your Alexa account and enter password.
- Click the menu on the left comer- click “Settings”; choose “Set up a new device” (choose a device, like Echo)
Note: When the below page appear;, long press the small dot on your Echo device until the light turns to yellow. Then click Continue on App.
Note: at this moment, the mobile phone can not open variety of VPN software.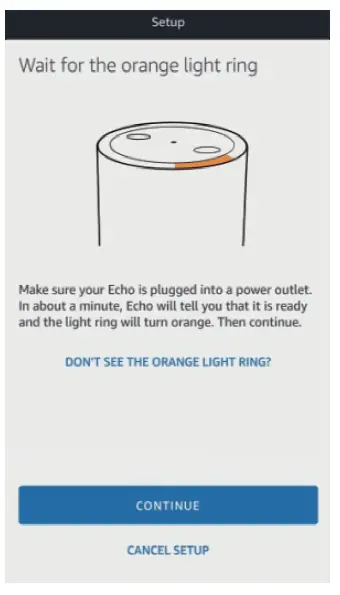
![]()
USER MANUAL
WiFi Smart Light Bulb
SL10
Need Help?
![]() [email protected]
[email protected]
Tech Support: www.treatlife.tech/pages/support
Specifications
| Input Voltage | 120V AC/60Hz |
| Wattage | 9W |
| Operating Temperature | -20°C-40°C(-4°F-104°F) |
| Luminous | 800Lm |
| Base | E26 |
| Wireless Frequency | 2.401-1z |
| Wireless Standard | IEEE802.11 b/g/n |
| Supported Operating Systems | Android 4.1 and above or OS 8.0 and above |
Download the TreatLife APP

https://smartapp.tuya.com/oittm
- Register or Log in
• Please scan the QR code or download the TreatLife APP on the APP Store or Google Play.
• Tap “Register” to create an account.
• Enter your phone number to get a verification code and create a password. Or, choose “Log in” if you already have a TreatLife account. - Configure the APP to the Bulb
• Ensure the bulb is connected to the power.
• Ensure your phone is connected to your Wi-Fi router and is able to connect to the internet.
Note: This bulb only supports 2.4GHz networks. If you are connected to a 5GHz network, please connect to a 2.4GHz network first.
Device Pairing
Note: Please complete the pairing process within 3 minutes after the bulb starts blinking.
Default Mode (EZ Mode)
- First, screw the bulb in gently.
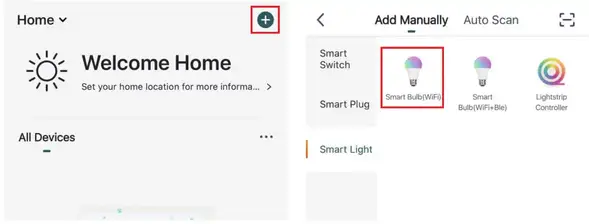
- Open the “TreatLife” APP, click the “+” symbol on the upper right corner of the device list, and select “Smart Bulb(WiFi)” in “Smart Light” options.

- Press the light switch “on-off-on-off-on”, then confirm the bulb is fast blinking.
- Tap “is fast blinking (0.5s/time)”.
- Enter your Wi-Fi Password.
- Wait for the bulb to complete the connection.
- Devices have been added successfully.
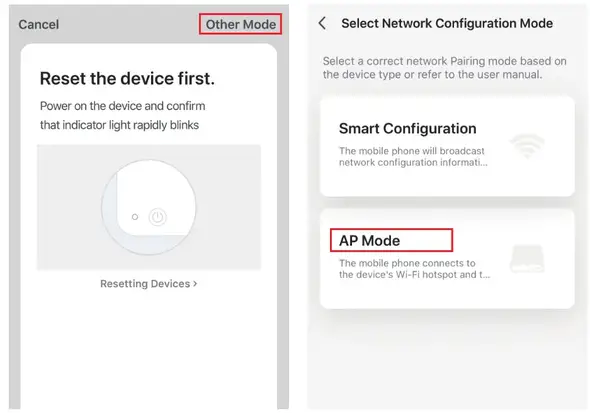
AP Mode
- If you cannot configure the bulb successfully with the Default Mode, please try to connect with AP Mode.
- Click the “+” symbol on the upper right corner of the device list, and select “Smart Bulb (WiFi)” in the “Smart Light” options.
- Switch “AP Mode”on the top right corner.
- Press the light switch “on-off-on-off-on”, then confirm the bulb is slowly blinking.
- Tap “is slowly blinking (2s/time)”.
- Enter Wi-Fi password.
- Go back to the APP and continue to add the device then wait for the connection to complete.
Link TreatLife to Alexa / Google Assistant
- Go to TreatLife>
 >More for instructions to link Alexa/Google Assistant.
Note: Please log In with your TreatLife account.
Key Steps to Link the Alexa Skill
- Click the Alexa icon, sign in to your Amazon account, and open the “Alexa Skills” link from the “Echo & Alexa” menu.
- Search for the “Smart Life”, and tap “Enable”.
- Enter your “TreatLife” APP Account and Password, then tap “Link Now” to enable the Skill.
APP Settings
Dimmable Cool & Warm:
- With standard white color, you can smoothly adjust it from warm white to cool white from 2700k to 6500k, just adjust the brightness as needed.
16 Million Colors:
- Create your favorite light effects with 16 million colors, to live in a colorful life.
Scene Setting:
- Create or choose a scene (Night, Read, Working, Leisure, Soft, Colorful, Dazzling, Gorgeous) to match your style and fit your mood.
Schedule:
- Create the timer or countdown to automatically turn on/off the light based on daily routines or to simulate occupancy while you are on vacation to trick potential intruders.
Note: Time variance is ±30s.
Troubleshooting
Can’t connect to the APP.
- Make sure the bulb Is blinking when you are attempting to connect to APP. Default Mode Paring: is fast blinking (0.5s/time). AP Mode Paring: is slowly blinking (2s/time).
- Finish the pairing within 3 minutes when the bulb starts blinking. (Refer to “Me-FAQ&FeedbaCk” in the APP)
- Move the bulb closer to your wireless router to ensure there is a strong Wi-Fi signal.
- If your router is 2.4GHz & 5GHz dual-band, the 4GHz band may not be turned on. Please configure the router settings to turn on the 2.4GHz band.
- Make sure you entered the correct Wi-Fi password.
Can’t Connect to the Alexa/Google Assistant.
- Check whether the Alexa / Google Assistant APP is correctly configured with the TreatLife APP account.
- Check whether the device name is duplicated.
- Please refer to the manual instruction or “Me–FAQ & Feedback–All-Third-party control issues” in the APP to reconnect to the Alexa/Google Assistant.
The Smart Bulb Stops Working Suddenly
- Remove the bulb and screw in again. Also, try moving the bulb to a different place that is closer to your wireless router.
- If the bulb still doesn’t work, please contact our support team.
FCC Caution:
This device complies with part 15 of the FCC Rules. Operation is subject to the following two conditions: (1) This device may not cause harmful interference, and (2) this device must accept any interference received, including interference that may cause undesired operation.
Any changes or modifications not expressly approved by the party responsible for compliance could void the user’s authority to operate the equipment.
Note: This equipment has been tested and found to comply with the limits for a Class B digital device, pursuant to part 15 of the FCC Rules. These limits are designed to provide reasonable protection against harmful interference in a residential installation. This equipment generates uses and can radiate radio frequency energy and, if not installed and used in accordance with the instructions, may cause harmful interference to radio communications. However, there is no guarantee that interference will not occur in a particular installation. If this equipment does cause harmful interference to radio or television reception, which can be determined by turning the equipment off and on, the user is encouraged to try to correct the interference by one or more of the following measures:
- Reorient or relocate the receiving antenna.
- Increase the separation between the equipment and receiver.
- Connect the equipment into an outlet on a circuit different from that to which the receiver is connected.
- Consult the dealer or an experienced radio/TV technician for
RSS (Category I Equipment):
This device complies with Innovation, Science, and Economic Development Canada’s license-exempt RSS standard(s). Operation is subject to the following two conditions:
- this device may not cause interference, and
- this device must accept any interference, including interference that may cause undesired operation of the device.
The device is in compliance with RF exposure guidelines, users can obtain Canadian information on RF exposure and compliance.The minimum distance from body to use the device is 20cm.
]]>