YAMAHA STAGEPAS 300 Portable PA System Owner’s Manual
Introduction
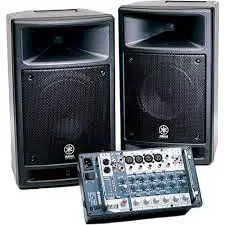
Thank you and congratulations on your purchase of the Yamaha PORTABLE PA SYSTEM STAGEPAS 300. The STAGEPAS 300 is a versatile, compact PA system consisting ot two speakers and a mixer. In order to get the most out of your new STAGEPAS 300 and its sophisticated functions, we suggest you read through this manual thoroughly. Also keep it in a safe place for future reference.
Features
- Two-way, 8-inch (20 cm) speaker system
The built-in speakers deliver high-quality powerful sound from an exceptionally compact cabinet. The scratch-resistant speakers are rugged enough for outdoor use. - Powered mixer
The powered mixer is a convenient, high-performance all-in-one unit that includes EQ and reverb. With four mono inputs and two stereo inputs, the STAGEPAS 300 can be connected to a wide range of instruments and devices. - Convenient storage
The STAGEPAS 300 can be used in even the most cramped quarters, inside or outside, since the mixer is built into one of the speaker cabinets. The other speaker has a special compartment for storing speaker cables and microphones, letting you put all you need for your performance in one convenient place.
Explanation of Graphical Symbols
 The lightning flash with arrowhead symbol within an equilateral triangle is intended to alert the user to the presence of uninsulated “dangerous voltage‘ within the product’s enclosure that may be of sufficient magnitude lo constitute a risk of electric shock to persons.
 The exclamation point within an equilateral triangle is amended to alert the user to the presence of important operating and maintenance (Servicing) instructions in the literature accompanying the product.
IMPORTANT SAFETY INSTRUCTION
- Read these instructions.
- Keep these instructions.
- Heed all warnings.
- Follow all instructions.
- Do not use this apparatus near water
- Clean only with dry cloth.
- Do not block any ventilation openings. Install in accordance with the manufacturer’s instructions.
- Do not install near any heat sources such as radiators, heat registers, stoves, or other apparatus (including amplifiers) that produce heat.
- Do not defeat the safely purpose of the polarized or grounding-type plug. A polarized plug has two blades with one wider than the other. A grounding type rind 9 third nrni indIna worm. The wide blade or the third outlet, consult an electrician for replacement of the obsolete outlet.
- Protect the power cord from being walked on or pinched particularly at plugs, convenience receptacles, and the point where they exit from the apparatus.
- Only use attachments/accessories specified by the manufacturer.
- Use only with the cart, stand, tnpod, bracket, or table specified by the manufacturer, or sold with the apparatus When a cart is used, use caution when moving the cart/apparatus combination to avoid injury from tip-over

- Unplug this apparatus during lightning storms or when unused for long periods of time.
- Refer all servicing to qualified service personnel. Servicing is required when the apparatus has been damaged in any way, such as power-supply cord or plug is damaged, liquid has been spilled or objects have fallen into the
Package Contents
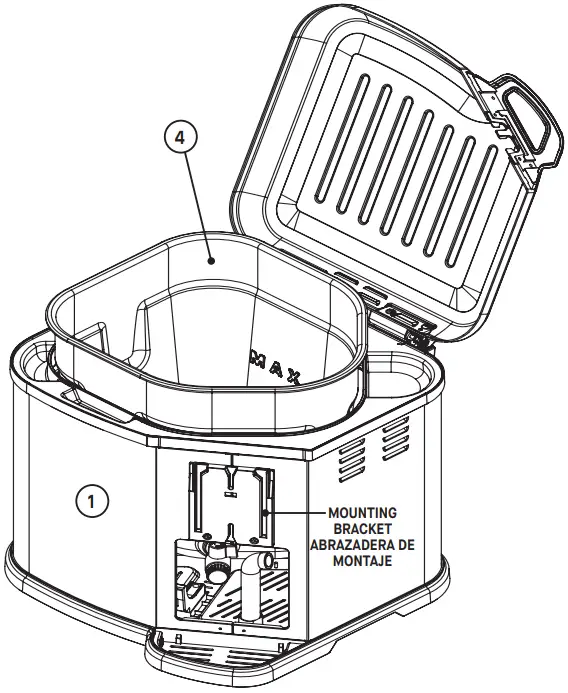
Two speakers. mixer, panel, power cord. two speaker cables, Owner’s Manual (this booklet)
NOTE: The mixer and the panel are installed in the speakers when the STAGEPAS 300 leaves the factory.
Before turning on the mixer
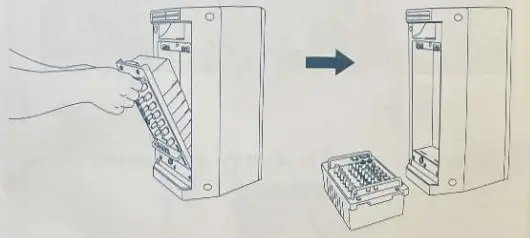
Remove the mixer
- Be suro that the mixer’s power switch is turned off.
- Use a screwdriver or coin to turn each screw on the mixer from LOCK to OPEN until it clicks.
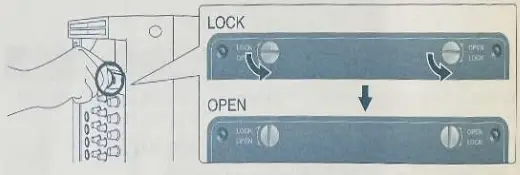
- Securely hold the mixer’s handles to remove It from the speaker.
caution
Use only the mixer’s handles when removing the mixer from the speaker and when carrying the mixer separate from the speaker.
NOTE: The mixer can also be used when Instated in the spoke the corresponding parts on the mixer, and then turn each screw from OPEN to LOCK until it clicks.
Power supply connections
- Make sure that the mixer’s power switch is turned off.
- Connect the included power cord to the [AC IN] jack.
- Plug the power cord into a power outlet.
Turning the poer on/off
Caution
- To avoid any loud, unexpected noise from the speakers, first turn on the power to those connected devices that are closest to the sound source.
Example: Sound source (CD player or instrument) STAGEPAS 300 When turning off the power to the system, reverse the order described above. - Before turning on the power, set the LEVEL controls and MASTER LEVEL control to their minimum setting (zero).
- Before connecting any devices including the supplied speakers, make sure to turn off the power for all devices. To avoid any possible malfunction, use only the speaker cables included with the device.
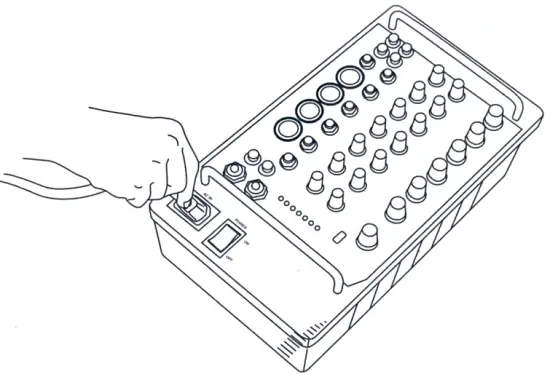
Press the mixer’s power switch to the ON position (the POWER indicator lights). To turn the power off, press the power switch to the OFF position (the POWER indicator turns off).
Troubleshooting
Power does not turn on
- Is the included power cord correctly connected to a power outlet?
Power shuts down suddenly
- Is the volume set at high for an extended period of time?
If the mixer is used at a volume beyond the permissible level, the protection circuit automatically turns the power off. Turn on the power again only after the mixer cools, since it cannot be turned on until the internal temperature goes down. Reduce the volume with the MASTER LEVEL control so that the LIMITER indicator flashes only briefly in response to the highest transient peaks. - Is the vent on the top panel of the mixer blocked?
Since inadequate ventilation can result in overheating the mixer, the protection circuit may come on automatically and the power may be turned off. Turn on the power again only after the mixer cools, since it cannot be turned on until the internal temperature goes down.
No sound is heard
- Are external instruments (including a microphone) or speakers correctly connected to the mixer?
- Are the LEVEL controls of all relevant channels and/or the MASTER LEVEL control set to appropriate levels? 0 Are the SPEAKER L/R jacks connected to the included speakers?
- Are the included speaker cables used?
If the connector of a speaker cable other than the included speaker cable touches any metal parts such as the mixer’s handle, no sound may result because of a short circuit. Use only the speaker cables included with the device. - Is the POWER indicator flashing? There may be a short in the speaker cable or the connection may be faulty. Check that the speaker cable is correctly connected to the mixer and reapply the power.
- If sound is not still output, contact your Yamaha dealer.
Sound is interrupted
- Is the volume set too high?
If the mixer is used at a volume beyond the permissible level, the sound may be interrupted as the protection circuit automatically turns the power off and resets repeatedly. Reduce the volume with the MASTER LEVEL control so that the LIMITER indicator flashes only briefly on the highest transient peaks.
Sound is distorted or noise is produced
- Are the LEVEL controls of all relevant channels and/or the MASTER LEVEL control set to appropriate levels?
- Are both XLR type and phone type jacks on channels 1-4 being used (connected) at the same time? Please connect to only one of these jacks on each channel.
- Is the input signal from the connected device set to an appropriate level?
Sound is not loud enough
- Are the LEVEL controls of all relevant channels and/or the MASTER LEVEL control set to appropriate levels?
- Are the MIC/LINE switches of each channels set appropriately?
- Are both XLR type and phone type jacks on channels 1-4 being used (connected) at the same time?
Please connect to only one of these jacks on each channel. - Is the input signal from the connected device set to an appropriate level?
Reverb is not applied to the sound
- Are the REVERB switches of each channels set to ON (
 )?
)? - Is the REVERB control set to an appropriate level?
Changing the sound quality
- Are the Equalizer controls (HIGH/LOW) set to appropriate levels?
- If you want to get a more powerful sound from the speakers, set the SPEECH/MUSIC switch to MUSIC ( ).
- If you want to get a clearer sound for announcements, set the SPEECH/MUSIC switch to SPEECH (
 ).
).
Using a single speaker
- You can use a single speaker. If you use a single speaker, the mixer outputs just one channel of the stereo signal, left or right.
Outputting the signal for monitoring
- Connect a powered speaker to the MONITOR OUT jack. The MONITOR OUT jack outputs the signal prior to routing through the MASTER LEVEL control. Adjust the level of output signal from the MONITOR OUT jack with the MONITOR OUT control. The MONITOR OUT control does not affect the MASTER LEVEL control. If the signals are output from the L (left) MONITOR OUT jack, the mixer feeds the mixed L and R signals to the jack.
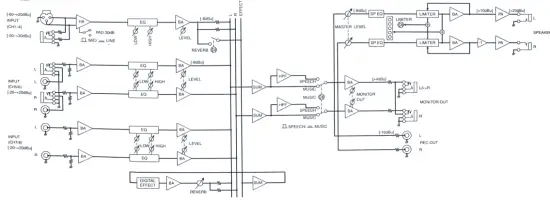
Block diagram
QUICK GUIDE
Getting sound out of the system
Using the included speakers, set up the system and try it out.
Connect the included speakers to the SPEAKER UR jack. Connect the sources (guitar, other instruments) to the input jacks. For details, see “Connection Example.”
Caution
Before connecting any devices, make sure to turn off the power for all devices (including microphones or the included speakers). To avoid any possible malfunction, use only the speaker cables included with the device. Also, before turning the power on or off, set the volume levels on all devices to minimum.
NOTE: For best results when connecting a electric guitar or bass guitar to the mixer, use a direct box, preamp (guitar amp), or amp simulator.
For low-level signals (such as that of microphones), set the switch to the MC ( ) position. For high-level signals (such as keyboard instruments and audio equipment), set the switch to the LINE ( ) position.
Controls and functions
- AC IN jack
Connect the included power cable here.
Caution
Be sure to use the included power cord. Use of other cords may result in malfunction, heat generation, or fire. - POWER switch
For turning the power to the mixer on and off. - SPEAKER UR jacks (for included speakers only)
These output the mixed signal channels from 1 to 7/8, and the level is adjusted with the MASTER LEVEL control. When connecting the included speakers, make sure to turn the power off first. Also, to avoid any possible malfunction, use only the included speakers and the speaker cables included with the device. - REC OUT UR jacks
These output the mixed signal channels from 1 to 7/8, and the level is unaffected by the MASTER LEVEL control. You can use these jacks, for example, to connect to an external recorder. - MONITOR OUT L (MONO) /R jacks
These output the mixed signal channels from 1 to 7/8, and the level is adjusted with the MONITOR OUT control. These jacks are convenient for connecting an external powered speaker for monitoring purposes. - Channel input jacks (CH 1 to 4)
For connecting a guitar, microphone, keyboard or other instrument/device. For low-level signals (such as that of microphones), set the MIC/LINE switch to the MIC ( ) position. For high-level signals (such as keyboard instruments and audio equipment), set the MIC/LINE switch to the LINE ( ) position.
NOTE: On any given channel, you may use either XLR or phone jack, but not both. Please connect to only one of these jacks on each channel. - Stereo channel input jacks (CH 5/6, 7/8)
Input the left and right channels of a stereo signal into the respective odd and even channels of the mixer.These inputs are intended mainly for use with instruments and equipment having stereo outputs, such as a synthesizer or CD player. NOTE: The channel 5/6 input provides two sets of jacks—both phone jacks and RCA-pin jacks. Either one one of these jacks may be used, but not both at the same time. Please connect to only one of these jacks on each channel. - MIC/LINE switch
Set this switch to MIC or LINE for channels 1 to 4, depending on the level of the input signal. For low-level signals (such as that of microphones), set the switch to the MIC ( ) position. For high-level signals (such as keyboard instruments and audio equipment), set the switch to the LINE ( ) position. - Equalizer
HIGH
Determines the level of the high frequency band for each channel. Rotating the knob clockwise boosts the high frequencies and produces a clearer, crisper sound. If you start getting feedback (a high-pitched squealing sound) or you want to make the sound softer and less harsh, turn the knob counterclockwise slightly.
LOW
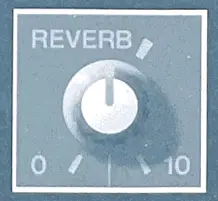
Determines the level of the low frequency band for each channel. Rotating the knob clockwise boosts the low frequencies and produces a deeper, warmer sound. If you start getting feedback or you want to make the sound less boomy, turn the knob counterclockwise slightly. - REVERB switch
Set this switch to ON to recreate the rich ambience of various performance environments, such as a concert hall or a night club. The switch lights up in green when REVERB is ON ( ).

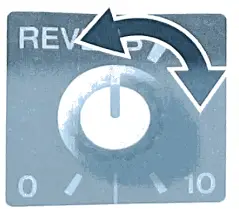
- REVERB control
Determines the overall level of the reverb or echo that is applied to the output signal. For best results, this level should not be set very high, to avoid possible feedback and to prevent the sound from becoming “muddy” with too much reverb.
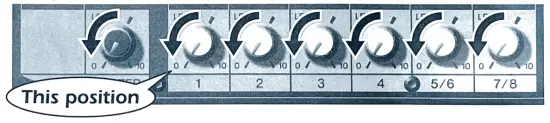
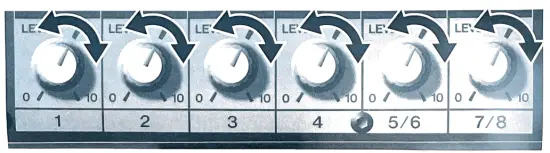
- LEVEL control
Use these controls to adjust the volume balance among the various channels.
Caution
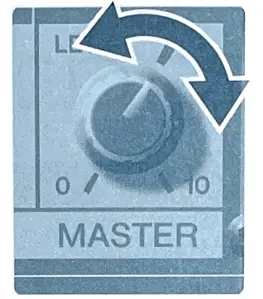
To reduce noise, set any LEVEL controls on unused channels to the minimum. - MASTER LEVEL Control
Determines the volume of the signal output from the SPEAKER LJR jacks. This allows you to adjust the overall volume without changing the relative volume balance among the various channels (made with the LEVEL controls) or the tone settings (made with the Equalizer). - SPEECH/MUSIC switch Set this switch to SPEECH ( ) to optimize the mixer settings and sound quality for s.eech nur noses and announcements. Set this to MUSIC ( ) to optimize the mixer for musical performance. the switch light up in yellow when it is set music ( ).
- MONITOR OUT Control
Determines the signal level output from the MONITOR OUT jack.
NOTE: The MASTER LEVEL Control does not affect the signal via the MONITOR OUT Control. - LEVEL meter
The LEVEL meter shows the level of the output signal from the SPEAKER UR jacks.
Caution
If the LIMITER flashes continuously, the internal power amplifier section is being excessively overloaded and may malfunction. Reduce the output level with the MASTER LEVEL control so that the indicator flashes only briefly on the highest transient peaks. - POWER indicator
This lights when the POWER switch is ON. When the indicator flashes, the protection circuit is operating. Check that the speaker cable is correctly connected to the mixer and reapply the power.
First, turn on the power to any connected devices, then turn the STAGEPAS 300 power on. If you’ve connected powered speakers to the mixer, turn on the power of the mixer first, then the powered speakers.
caution
To avoid any loud, unexpected noise from the speakers, first turn on the power to those connected devices that are closest to the sound source.
Example: Sound source (CD player or instrument) —> STAGEPAS 300 –> (Power amplifier) When turning off the power to the system, reverse the order described above.
Adjust the LEVEL Control of the corresponding channel so that the “0” LED lights up momentarily.
Caution
If the LIMITER indicator flashes continuously, the internal power amplifier section is being excessively overloaded and may malfunction.
Applying reverb or echo to the sound
Reverb recreates the warm ambience of an actual performance space, such as a concert hall or a night club.
For each channel you want to apply reverb, set the corresponding REVERB switch to ON ( ).

Use the REVERB control to adjust the overall reverb.
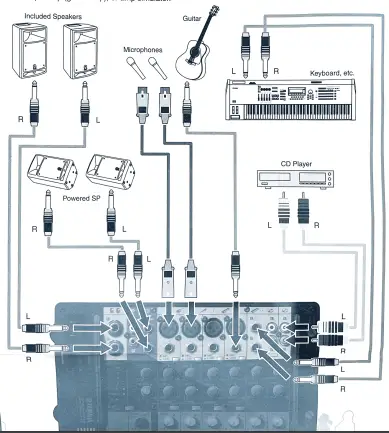
Connection example
The STAGEPAS 300 can be used in a wide variety of sound reinforcement applications, from a full-band performance onstage to solo street performance—providing a powerful, high-performance system in an exceptionally compact and portable package.
Connect a guitar or a microphone to the monaural input jacks (channels 1 to 4) and connect a keyboard to the stereo input jacks (channels 5/6 or 7/8). If you have a powered speaker, you can connect it to the MONITOR OUT jack for monitoring your vocals. For optimum results in band performance applications and to create a more powerful sound for music, make sure to set the SPEECH/MUSIC switch to MUSIC.
NOTE: For best results when connecting a electric guitar or bass guitar to the mixer, use a direct box, preamp (guitar amp), or amp simulator.