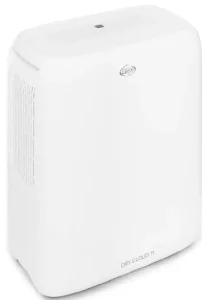

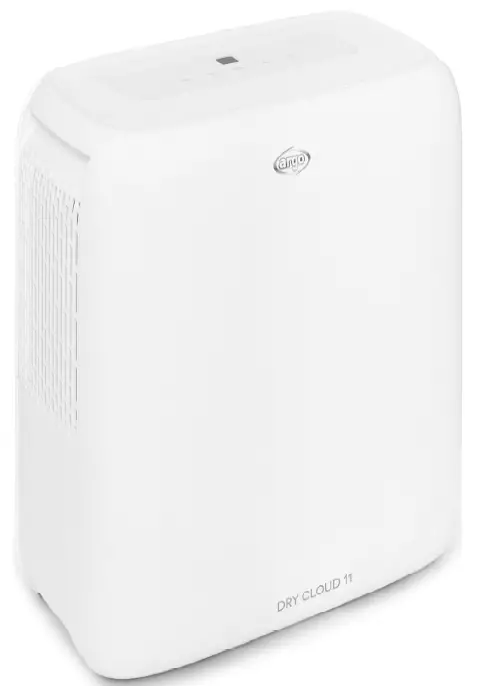
Argo B08668CY96 Dry Cloud 13 Dehumidifier
OPERATING INSTRUCTIONS
Read the instructions carefully before operating or servicing the dehumidifier. Observe all the safety instructions; failure to observe the instructions may lead to accidents and/or damage. Keep these instructions in a safe place for future reference.
- Appliance is filled with flammable gas R290.
- Before installing and using the appliance, read the owner manual.
- Before installing the appliance, read the installation manual.
- Any repairs you need, contact the nearest authorized Service Centre and strictly follow the manufacturer’s Service Manual.
The Refrigerant R290
- To realize the function of the air conditioner unit, a special refrigerant circulates in the system. The refrigerant is the fluoride R290 = 3 GWP (Global warming potential). This refrigerant is flammable and inodorous. It can lead to explosions under certain conditions, however the flammability of this refrigerant is very low and it can be ignited only by fire.
- Compared to other common refrigerants, R290 is a non-polluting refrigerant with no harm to the ozonosphere and a no effect upon the greenhouse effect. R290 has very good thermodynamic features which lead to a really high energy efficiency. The units therefore need less filling.
Warning:
Do not try to accelerate the defrosting process or to clean the appliance in different ways other than those recommended by the manufacturer. Should repair be necessary, contact your nearest authorized Service Centre. Any repairs carried out by unqualified personnel may be dangerous. The appliance has to be stored in a room that doesn’t have any continuously operating ignition sources. (for example: open flames, an operating gas appliance or an operating electric heater.) Do not pierce or burn. The appliance has to be installed, used and stored in a room with a floor area larger than 14 m2.
GENERAL OPERATING AND SAFETY INSTRUCTIONS
- This appliance is a highly efficient dehumidifier, designed for domestic use only!
- Use this dehumidifier only as outlined in this manual. Any other use not recommended by the manufacturer may cause fire, electric shock or malfunctions.
- The unit contains refrigerant; keep it vertical at all times.
- Once you have opened the unit, keep it vertical to allow the refrigerant to stabilise and wait two hours before operating it.
- Ensure that the required voltage and frequency (220-240V/50Hz) match the available power source.
- This appliance can be used by children aged from 8 years and above and people with reduced physical, sensory or mental capabilities or lack of experience and knowledge if they have been given supervision or instruction concerning use of the appliance in a safe way and understand the hazards involved.
- Children shall not play with the appliance.
- Cleaning and user maintenance shall not be made by children without supervision.
- Make sure the plug is inserted fully. Do not use multiple adapters. Do not touch the plug with wet hands. Make sure the plug is clean.
- Children aged between 3 and 8 years must only be able to turn the appliance on/off, provided that the appliance has been placed in its normal operating position, that instructions have been given on how to use the equipment safely, and that its risks have been understood.
- Children aged between 3 and 8 years must not be able to plug in, adjust, clean or perform any maintenance on the appliance.
- Disconnect the mains power when the appliance is not in use or during cleaning operations. Keeping the appliance plugged in may cause electric shocks or accidents.
- To disconnect the appliance, set the switch to OFF and remove the plug from the socket. Only pull on the plug. Do not pull the cord.
- Do not bend, drag or twist the cord, or apply force to remove it. Do not operate the unit if its cable or plug are damaged; doing so can cause fires or electric shock. If the power cord is damaged, it must be replaced by a service centre.
- Do not place heavy objects on top of the appliance.
- To prevent water spills, empty the water tank before moving the appliance.
- Do not tilt the dehumidifier onto one side or turn it upside down, as the water which runs out could damage the appliance.
- Do not operate the unit on unstable or sloping surfaces: water leaks can cause it to malfunction or cause excessive vibration and running noise.
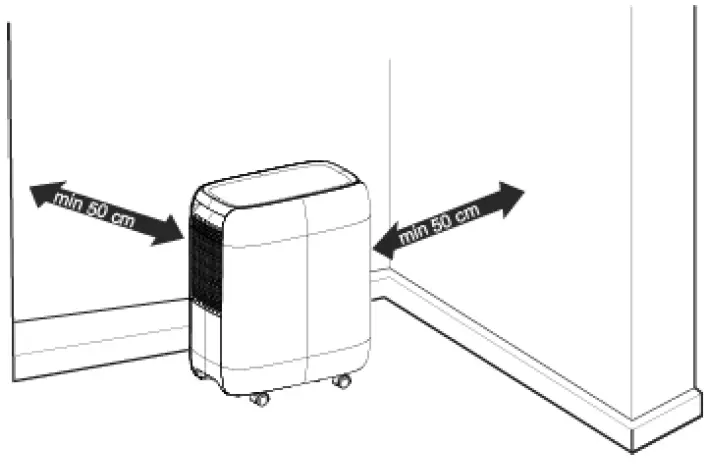
- The dehumidifier must be positioned at least 50 cm away from the wall or other obstacles, so that the heat can dissipate correctly.
- Close all open windows to maximise dehumidification efficiency.
- Do not insert objects or sharp instruments into the air outlet grille.
- Do not cover the air intake and outlet grilles in any way. WARNING! In the event of an anomaly, switch the appliance off and unplug it immediately. Do not dismantle, repair or modify this product freely. In the event of a malfunction, contact the after-sales service centre directly.
- Do not immerse the power cord, plug or any other part of the appliance in water or other liquids.
- Do not expose the dehumidifier to direct sunlight.
- Keep the appliance well away from sources of heat which could cause plastic parts to become warped.
- Do not spray insecticides, oils or paints near the appliance; doing so may damage its plastic parts or start a fire.
- Keep flammable gases and oils away from the appliance!
- Do not move the appliance while it is operating; doing so can cause leaks and malfunction.
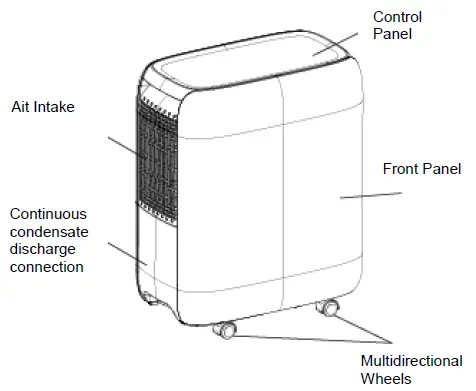
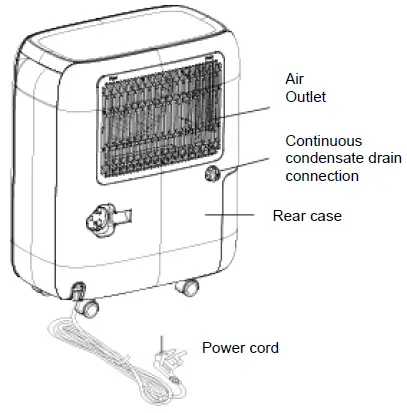
DESCRIPTION OF PARTS
FRONT VIEW
REARVIEW
The following space must be maintained to ensure the operating efficiency of the dehumidifier.
PRE-OPERATING CHECKS AND OPERATIONS
Before using the appliance, make sure the condensate collection tank is correctly positioned.
- Remove the tank following the direction of the arrow.
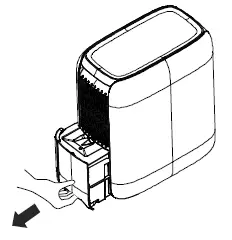 Remove from the tank the bubble plastic bag which contains the 4 wheels and the cable reel
- Reposition the tank, closing it perfectly4. Tilt the dehumidifier no more than 45° and remove the 4 rubber plugs, which will be replaced by 4 wheels that are inside the tank.
- Position the wheels on the 4 holes and push until the wheels are set firmly in place.
OPERATING INSTRUCTIONS
APPLIANCE START-UP
Place the product on a flat and stable heat-resistant surface, at least 1 metre away from flammable or heat-sensitive materials and 50 cm away from walls or other obstructions.
Make sure the water tank is in the correct position. Connect the power cord to a suitable electric socket (220-240V/50Hz). Turn the appliance on with ON/OFF on the control panel. The unit emits a “beep” signal and the corresponding LED lights up. The dehumidifier is designed to operate at ambient temperatures from + 5°C to + 32°C. If it is operated at low temperatures, ice may form on the evaporator, degrading its operation. When this happens, the dehumidifier goes into defrost mode. The compressor stops, but the fan continues running. The defrosting operation may start up and operate for some minutes; during the defrosting operation, the dehumidification function may intermit: please don’t turn off the switch or pull out the power plug of the dehumidifier. We recommend not using the dehumidifier in room temperatures lower than 5°C. Do not remove the tank when the unit is in operation. If you wish to make continuous draining of condensate, follow the instructions in the dedicated paragraph.
OPERATING PRECAUTIONS
The dehumidifier starts only if the humidity level in the room is higher than the set one. The dehumidifier will continue to operate until the set humidity level is reached, except for any interruptions due to filling the tank. When the water tank is full, the compressor stops running immediately and dehumidification stops; the fan stops after 3 minutes. Empty the tank and reposition it: after carrying out these operations, the unit will start operating again. After the machine has reached the set humidity ≤-5% RH of the set humidity, the compressor stops immediately while the fan stops after 9 minutes. When the humidity in the room is greater than or equal to the humidity set + 5% RH, the machine will start working again.
WARNING:
When the dehumidifier is running, the compressor produces heat and the appliance emits warm air into the room. The room temperature will therefore tend to increase. This is completely normal.
TURNING THE DEHUMIDIFIER OFF
To turn the dehumidifier off press the ON/OFF button. This shuts off power to the unit. Unplug the appliance if you do not intend to use it for some time.
HOW TO ELIMINATE CONDENSATE
The water extracted from the air can be collected in the provided front tank. When the tank is full, not inserted or not correctly inserted, the FULL TANK led turns on and the unit beeps for about 10 seconds, at the end of which the unit turns off. To switch off the appliance, press the ON/OFF button and wait a few seconds.
- Carefully remove the tank and following the direction of the arrow.
- Empty the tank.
- Reposition the tank following the direction of the arrow.
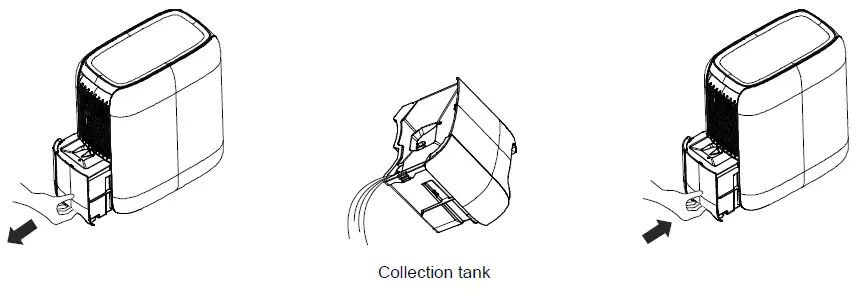
N.B. Do not use the drain hose when you are collecting condensation in the tank, otherwise water can leak out of the hose.
CONTINUOUS CONDENSATE DRAINAGE
The water can be continuously drained when using a PVC hose with an inner diameter of 14 mm (not supplied). Turn off the appliance and remove the plug before connecting the hose.
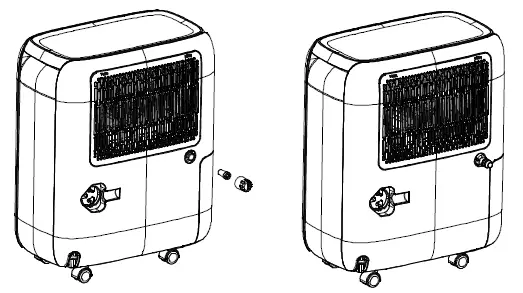
Remove the cap and safely connect the hose to the continuous condensate discharge connection, as shown in the figures below. The height of the drainage hose must not exceed that of the hole: do not block the drainage hose exit.

When disconnecting the tube, prepare a container to collect the remaining water from the tube.
CONTROL PANEL
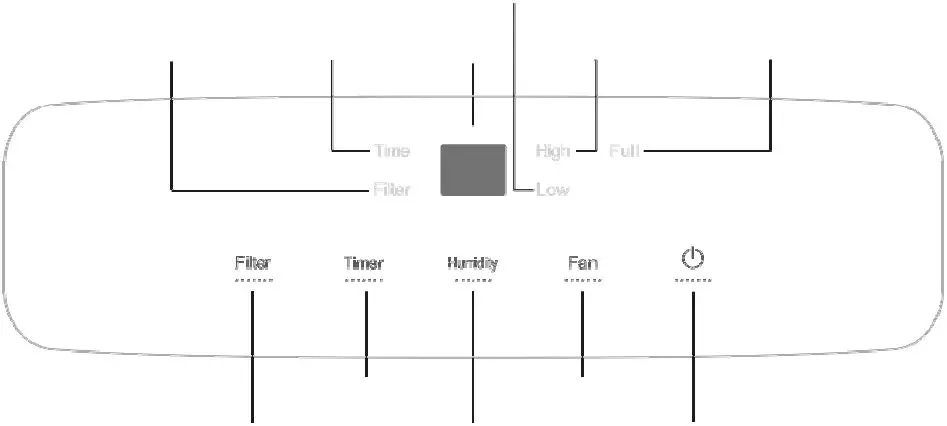
Each time the button is pressed, the unit emits an auditory signal.
BUTTONS & LEDS
- POWER BUTTON: press this button to turn the dehumidifier on and off.
- FAN SPEED BUTTON: press this button to adjust the ventilation speed (Low, High).
- HUMIDITY BUTTON: press this button to adjust the % of humidity to desired value (30-80%) – each step 5%
- ON/OFF TIMER BUTTON: Delayed on/off button. Allow to plan the on (if the unit is off) or the off (1-24 h)
- FILTER BUTTON – After 250 hours of operation, the FILTER RESET led turns on to indicate that it is time to clean the filter. Take the filter out and clean it. Then press the FILTER button.
- DISPLAY – it shows the relative humidity setting.
- LED Filter: filter needs to be cleaned.
- LED HIGH AND LOW FAN SPEED : it shows the set fan speed: High and Low.
- LED TIMER: it shows that the timer is set.
LED Full: When the tank is full or it’s not correctly positioned the LED Full comes on and the appliance stops running. A 10 second beep sounds. Remove the tank and empty it (as indicated in “HOW TO ELIMINATE CONDENSATION”), the restore it; the dehumidifier will start running again.
DEFROST: the dehumidifier is designed to operate at ambient temperatures from + 5°C to + 32°C.
If it is operated at low temperatures, ice may form on the evaporator, degrading its operation.
When this happens, the dehumidifier goes into defrost mode. The compressor stops, but the fan continues running. We recommend not using the dehumidifier in room temperatures lower than 5°C.
MEMORY FUNCTION: the dehumidifier starts up again after a power failure keeping last settings.
AUTOSTOP FUNCTION: if the humidity it’s lower than 5% respect to the one set by the humidifier automatically it stop.
CLEANING AND MAINTENANCE
MAINTENANCE OF THE HUMIDIFIER’S EXTERIOR SURFACE
Warning
Always pull the dehumidifier’s plug out of the power socket before cleaning it, to prevent electric shock and malfunction.
Warning
Do not wet the appliance or immerse it in water, otherwise electric shocks may occur. Use a damp and soft cloth to clean the exterior surface of the dehumidifier. Do not use solvents, petrol, xylene, talcum powder or brushes to clean the unit: these may damage the surface or colour of the casing.

CLEANING THE WATER TANK
We advise removing the tank once every few weeks to prevent mould and bacteria forming on it. Fill the tank with clean water a small amount of detergent; swill the water around in it, then it out and rinse it thoroughly.
CLEANING THE AIR FILTER
The filter is designed to remove dust or dirt from the air. If the filter is clogged by dust, electricity consumption will be higher than normal. Cleaning instructions:
- Remove the filter by simultaneously pressing “push” on the top left and right of the filter with 2 hands. Clean the filter washing it with warm soapy water. DO NOT USE ALCOHOL, BENZENE OR OTHER AGGRESSIVE PRODUCTS TO CLEAN THE FILTER. Leave the filter to dry naturally, then reposition it in its slot. Do not use hair dryer or fire to dry the filter. Do not use sponges or brushes to clean the filter because can damage it.
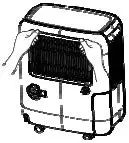
- Reinsert the filter
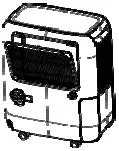
Do not use the dehumidifier without the filter as dust may affect the efficiency of the evaporator, resulting in higher energy consumption.
TROUBLESHOOTING
|
PROBLEM |
POTENTIAL CAUSE |
SOLUTION |
| The dehumidifier is not working.
It is not possible to adjust the settings. |
The temperature is above 32 ° C or below 5
°C. The internal tank is full. The tank is not positioned correctly. The power plug is not inserted correctly |
Empty the tank
Position the tank correctly Correctly connect the plug |
| The noise suddenly increases while running | The compressor has just started. There is a power connection problem.
The unit is placed on an uneven surface. |
Position the unit on an even and stable surface. |
| Reduced dehumidification effect | The room temperature is too low. The set humidity level is inadequate. The filter is full of dust.
The doors and windows are open. If the unit is running with a temperature between 5 and 15 °C, the unit will pause for automatic defrosting. The compressor will pause for short periods. After the defrost, the unit will resume normal operation. |
Reduce the humidity level. Clean the filter.
Close any doors and windows. Remove objects that obstruct the inflow and outflow of air. |
| At first, the air might have a musty smell | Due to the temperature difference of the heat exchanger, the air might have a strange smell
at first. |
|
| There is water in the tank even when using the hose for continuous condensation drainage | Check the drainage connections.
The drainage hose is not connected properly. |
Connect the hose correctly. Remove the drainage hose and replace it. |
| The ON/OFF LED does not turn on when the power is connected | There is no power or the plug is not inserted correctly. | Check the electrical power supply. Make sure that the electric circuit and plug are not damaged.
Make sure that the cable is not damaged. |
| The dehumidifier stops working during | Whether the room temperature is too high or | The dehumidifier may start |
| dehumidifying process. | too low and out of the working scope of the dehumidifier. | automatically when the room temperature returns to the working
scope. |
| The humidity of the room can’t reduce. | The room area is too big, which is over its application scope.
The door and windows of the room aren’t closed. The machine unit is operated with a kerosene heater which releases steam. |
|
| There is water in the tank. | Since each machine unit has taken operation test before leaving the factory, some water remains on the evaporator flows to the water
tank. |
|
| The FULL indicator LED is on. | When the water tank is full, the FULL indicator
led is on for reminding. |
REGULATION (EU) N. 517/2014 – F-GAS
- DRY CLOUD 11/13
- The unit contains R290, a natural greenhouse gas with global warming potential (GWP) = 3 DRY CLOUD 11: Kg. 0,045 = 0,000135 Tonn CO2 equiv.
- DRY CLOUD 13: Kg. 0,055 = 0,000165 Tonn CO2 equiv.
- Do not release R290 into the atmosphere.
INFORMATION FOR THE CORRECT DISPOSAL OF THE PRODUCT IN ACCORDANCE WITH EUROPEAN DIRECTIVE 2012/19/EU
This appliance may not be scrapped with domestic waste at the end of its life cycle. We call your attention to the crucial role played by the consumer in the re-use, recycling and other forms of recovery of such waste. The appliance must be scrapped by a sorted waste disposal centre or by returning it to the retailer (no charge is levied for this service), when you purchase a new equivalent appliance. Sorted disposal of electric and electronic equipment prevents the negative effects on the environment and human health resulting from improper scrapping, and also allows the materials from which it is made to be recovered and recycled, with significant savings in terms of energy and resources. The sorted disposal requirement is indicated by the crossed waste bin label affixed to the appliance.
