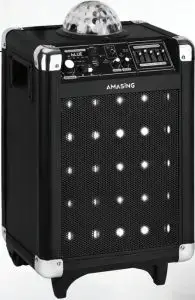
AMASING Karaoke Machine Portable PA Speaker Instruction Manual
Battery Precautions
- WARNING: Danger of explosion if batteries are incorrectly replaced. Replace only with the same or equivalent type of batteries.
- Only use the specified size and type of batteries for this product.
- If the product will not be used for a long period of time, remove batteries to prevent damage or injury from possible battery leakage.
- Do not try to recharge a battery not intended to be recharged–this can lead to overheating and rupture. (Follow battery manufacturer’s instructions.)
- Promptly remove batteries if consumed.
Care and Maintenance
- To preserve battery life, turn off the microphone when not in use. ·
- To prevent interference, do not hold the microphone too close to the karaoke machine speakers.
- The optimal distance of the wireless microphone is 30 meters (approx. 98 feet) from the karaoke machine speakers.
- Microphone wireless range and sound quality might be affected by low battery.
- Fully charge the karaoke machines before storing for a long period.
- The SD card can only be inserted in one direction. Do not force the SD card into the slot. If the card does not insert in easily, remove it, and try another direction.
- Select either USB mode or SD card mode to play music; both · modes can not be used simultaneously.
- To maintain peak performance and prevent battery issues, fully charge
- The karaoke machine at least once every three months.
Important Safety Information
- Keep this Instruction Manual for any future reference.
- Adhere to all Warnings.
- Do not place this product in or near water
- Only use a dry cloth to clean this product.
- Keep ventilation openings clear; do not block any of this product’s vents/openings.
- Install in accordance with manufacturer’s instructions.
- Do not install near any heat sources (i.e. radiators, heat registers, stoves, amplifiers or any other items that produce heat).
- Use the polarized plug or grounding type plug carefully. These plugs are made for safety purposes. A polarized plug has two blades with one wider than the other. A grounding type plug has two blades and a third grounding prong. The wide blade or the third prong are provided for your safety. When the provided plug does not fit into your outlet, consult an electrician for replacement of the obsolete outlet.
- Protect this product’s power cord. Prevent the power cord from being walked on or pinched–particularly at the plugs, convenience receptacles, and the point where they exit from the product.
- Only use this product with attachments/accessories specified by the manufacturer.
- Only use this product with a cart, stand, tripod, bracket, or table specified by the manufacturer, or sold with the apparatus. When a cart is used, use caution when moving the cart/apparatus combination to avoid injury from tip-over.
- Unplug the product during lightning storms or when unused for long periods of time.
- Refer all servicing to qualified service personnel. Servicing is required when the product has been damaged in any way, such as power-supply cord or plug is damaged, liquid has been spilled or objects have fallen into the product, the product has been exposed to rain or moisture, does not operate normally, or has been dropped.
Caution
CAUTION/WARNING: To reduce the risk of fire or electric shock, do not expose this product to water, rain or moisture. Do not place objects filled with water on this product.
CAUTION/WARNING: The main AC plug is used to disconnect the product–it should be readily accessible and operable during use. In order to completely disconnect this product from power, the plug should be completely removed from the AC outlet socket.
CAUTION/WARNING: To reduce the risk of fire or explosion, do not expose batteries to excessive heat such as sunshine, fire or other heat sources.
Thank you for purchasing this product!
Please read this Instruction Manual carefully before using this product to ensure proper use.
Remote Control
- Power
Places machine into power saving (standby) mode. Does not power the machine - Mode
Switch between music modes (AUX / Bluetooth / FM / SD / USB) - Numeric keypad
Select a song when on USB or SD mode or to set FM channel when on FM Mode - Mute
Mutes the music (but does not stop it) - Scan
Browse saved FM channels using the buttons - EQ
Choose from five pre-set EQ modes - REP (Repeat)
Click to enable/disable current track repeating (Works on USB & SD card modes only) - Previous
Go back to the previous track or previous FM channel - Next
Go forward to the next track or next FM channel - Play / Pause
To pause/play music playing or begin FM scan to store local FM channels - Volume Up
To increase the volume - Volume Down
To decrease the volume
5 Digital Display
Displays the battery capacity, FM frequency, Modes, and music play-time.
6 Play and FM controls
- Music controls
- PREV Previous song
- PLAY Play/Pause
- NEXT Next song
- FM Controls
- When on FM mode use these buttons to seek FM channels
- PREV Previous Stored Channel
- PLAY Hold button to Start FM scan to store all local channels
- NEXT Next Stored Channel
7 REC (Record function)
Select this option to record your voice (mics sound only): · Insert SD card or USB drive
- Switch microphone ON
- Press REC
- Speak or sing into the microphone
- When finished recording click REC to stop recording
- Remove and then re-insert SD card/USB drive
- The recording will automatically begin playing
8 SD slot & USB port
SD slot supports cards of AT/ FAT32 type, maximum 32GB
9 AUX IN
Used to play music from a portable device or T.V.
Plug in the 3.5mm AUX cable or the T.V. Audio to Aux cable to play music from your device.
10 MIC IN
Use to connect a 6.3mm wired microphone (microphone & cable not included)
11 Master Volume Control
Turn knob to adjust the speaker volume
12 Echo Volume
Adjust the microphones echo effect
13 MIC Volume
Adjust the microphones volume
14 MIC Priority
Use this button to lower the music and prioritise the microphone sound. Prioritising will stay in effect till the button is clicked again.
15 Master Equalizer (EQ)
16 Car Hardwired Power Supply
Power the karaoke machine via your car’s battery by hardwiring a 12V power cable from the karaoke machine to your car’s battery.
Control Panel

- Power ON/OFF
- Power with Disco: Press the left side of the toggle-switch to turn on the karaoke machine and disco ball.
- Power with no disco: Press the right side of the toggle-switch to turn on the karaoke machine only (no disco ball).
- Power off: Return the toggleswitch to the middle position to turn off both the karaoke machine and disco ball.
- Power input
Use the included 12v DC plug to charge the machine battery. - Charging Indicator
A red light indicates the battery is charging. A green light indicates the battery is fully charged. - Music modes
There are 5 modes to choose from:- Line-in mode: Use included cable (AUX or Audio to AUX) to connect the karaoke machine to your device or T.V.
- Bluetooth mode: Connect your device via the bluetooth on your phone’s settings to the machine.
- FM mode: To play music from FM radio stations.
- USB mode: Insert USB to access this mode to play stored music from a USB flash drive.
- SD card: Insert SD card to access this mode To play stored music from a SD card.
Get Started
The Amasing Karaoke Machine is easy and fun to use! Just plug, play, belt your fave songs… and rock on!
- Insert two AA batteries into each microphone. Then turn on the microphone you will see a green light flash once. The microphone is ready to use.
- Plug the 12V DC plug into the front of the machine and the other end into a wall outlet. The battery light indicator will turn on. Indicating charging in process.
- Allow for an initial 8 hour charge before using for the first time. Subsequent charges will only require 5 hours for a full charge.
- Select the mode of your choice and begin playing music while singing into the microphones.
- Enjoy an amazing time with your brand new amasing karaoke machine.
Support
We want you to be 100% satisfied and appreciate your feedback. If this product falls short of your expectations, please contact us at [email protected]t or give us a call at 844-AMA-SING
