
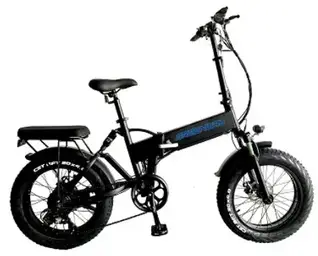
GREENWAY 8965105 20 Inch Electric Folding Bike Instruction Manual
IMPORTANCE
When using the electric bicycle basic safety precautions should always be followed including the following:
- Read all instructions.
- To protect against fire electric shock and injury to persons, do not immerse cord plugs or e-bike in water or other liquid.
- Close supervision is necessary when the e-bike is used by or near children.4. Unplug from outlet when not in charging and before cleaning.
- Do not operate the e-bike with a damaged cord or plug or after the ebikemal functions or has been damaged in any manner. Take the e-bike to the nearest authorized service bike shop for examination repair or adjustment.
- The use of accessory attachments not recommended by the e-bik manufacturer may result in fire electric shock or injury to persons.
- Do waterproof when suing on a rainy or snowy day.
- Never let the battery charge unattended.
- Never sleep near a battery that is charging.
- Do not let cord hang over the edge of table or counter, or touch hot surfaces.11. Do not place on or near a hot gas or electric burner or a heated oven.
- Always attach the plug to the battery first, then plug the cord into the wall outlet.
- Do not use the bike for other than intended use.
Save these instructions.
Your E-Bike
Introduction
We would like to thank you for your e-bike purchasing. For your safety and for the safety of others, we recommend that you obey all road regulations and wear a protective helmet. For optimal, safe and enjoyable use of the e-bike, make sure you thoroughly read this user guide before you first use it. Use the e-bike according to the user guide, or it may shorten the life cycle.
Have a pleasant ride!
General presentation of the vehicle
General information
| SKU#. | 8965105 | 8969113 |
| Weight of bike with battery: | 28.5KG | 29KG |
| Maximum assistance speed: | 32KM/H | 32KM/H |
| The dimensions of the bike (MM) (85% package): | L 1460 x W280 x H700 | L 1530 x W300 x H810 |
| Maximum Loading total weight: (includes the bike, battery and rider) | 150KG | 150KG |
8965105
8969113
Spare parts spec
| Spare parts name | 8965105 | 8969113 |
| Motor | BAFANG 36V,350W (20”) | BAFANG 36V,350W (26”) |
| Battery | 36V 10.40AH
LG Lithium battery cells |
36V 10.4AH
LG Lithium battery cells |
| Display | DMHC, TC-480 | DMHC, TC-480 |
| Front fork | Strong suspension fork with lock out | Suspension fork |
| E-Brake Lever | 5 STAR 106PD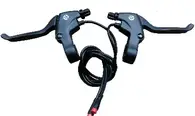 |
5 STAR 106PDD
|
| Disc Brake | Taiwan TEKTRO Mechanical disk brakes |
Taiwan TEKTRO Mechanical disk brakes |
| Derailleur | Shimano Tourney 7 Speed RD-FT35 |
Simano Tourney 7 Speed RD-TZ50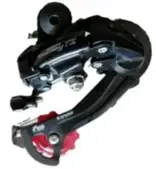 |
| Tire | CHAOYANG 20”X4.0” | CHAOYANG 26”X4.0” |
Function Display
Display Introduction
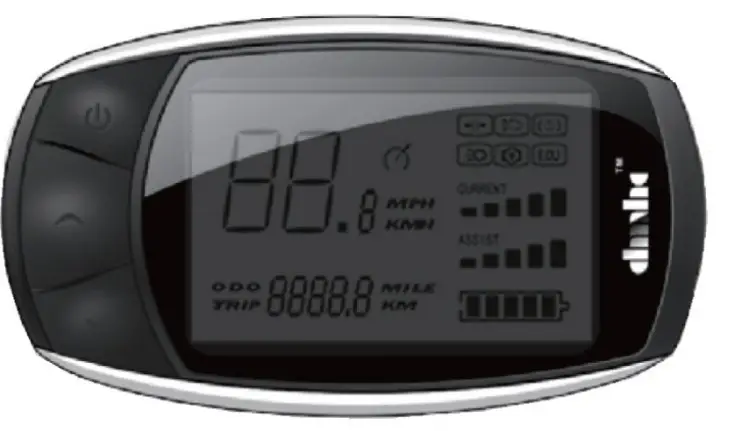
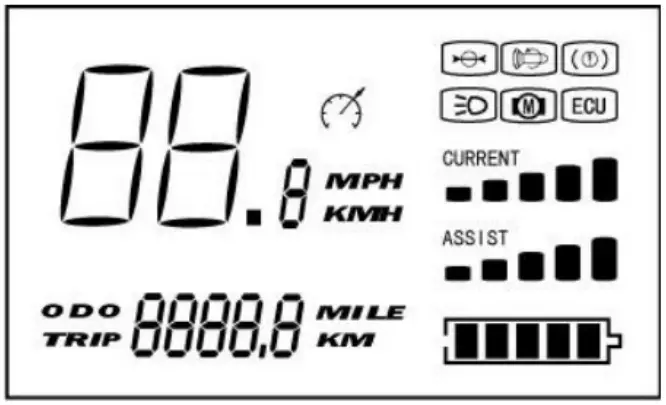
| Display | Function | Description |
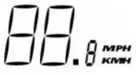 |
Speed | Speed, display unit by KM/H or MP/H |
 |
ODO/TRIP | ODO for accumulative total mileage TRIP for single mileage
Switch by function key |
 |
Battery indicator | Residual electricity display |
 |
Cruise identification | Display, for cruise state |
 |
Wheel diameter set | Manufacturer used to set up the diameter of the wheel |
 |
Throttle fault | Display throttle abnormal |
 |
Brake instruction | Display when brake If display when not brake, can judge for brake fault |
 |
Light instruction | Display lighting backlight |
 |
Motor fault | Display Motor hall fault |
 |
Controller fault | Display Controller failure |
 |
Current instruction | Points 5 level display the current current value |
 |
PAS instruction | 1-5 file display speed PAS |
| Key | Operation | Display | Function | Description |
 |
1x briefly | 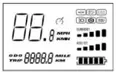 |
ON | Click can turn on TC480。After this, Illumination is switched on/off with a key press |
| Again 1x briefly |  |
Turn on/off the headlamp |
Click and turn on /off the light |
|
| 2x briefly |  |
Trip mileage reset | Continuous press 2 times TRIP mileage reset | |
| 1x long | 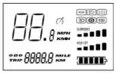 |
OFF | Pressing this button for longer switches the display off | |
 |
1x briefly |  |
PAS
increase |
Every click,PAS increase a gear,total of five gear |
| 2x briefly |  |
ODO
mileage |
Continuous press 2 times,ODO mileage is displayed | |
| 1x long |  |
ODO mileage reset | Long press 2 seconds ODO mileage reset | |
 |
1x briefly |  |
PAS
reduce |
Every click,PAS re a gear,total reduce of five gear |
| 2x briefly |  |
Trip
mileage |
Continuous press 2 times ,TRIP, mileage is displayed | |
| 1x long |  |
6KM/H | Long time press to enter the 6km/h implement mode | |
| Set the function 1(Wheel diameter setting) | ||||
 |
1×long |  |
Wheel diameter | See the following description |
Wheel diameter setting:
The circle marked two keys two keys at the same time long press 5 seconds to enter the wheel diameter settings, the default speed display area flashing for the instrument default factory rotation of the characters, 16-28 inch of any one value ), (The upper right corner of the instrument will appear icon ), that has entered the set wheel interface, while releasing the two keys, and then through the “plus” or “minus” key to adjust to the required value of the wheel diameter, adjustable The range is (16-28 inch) to adjust to the required wheel diameter value, and then press the circle marked two keys for 5 seconds until the speed display area character zero does not flash and the instrument appears in the upper right corner of the icon After the disappearance of the confirmation is completed
| Set the function 2(Speed Limitation) | ||||
 |
1×long | 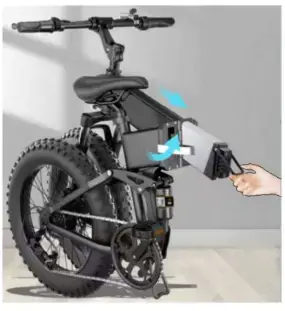 |
Speed Limitation | See the following description |
Speed Limitation setting :the circle marked two keys two keys while long press 5 seconds to enter the speed limit setting, the default speed display area flashing for the instrument default factory speed limit characters, while releasing the two keys, and then through the “plus” or “Down” key to adjust to the required speed limit, the adjustable range is 12-40, adjust the required speed limit value, and then press the circle marked two keys for 5 seconds until the speed display area character zero
Do not flash after confirmation. (40 on behalf of the speed limit, 12-39 for the corresponding speed limit)
Using the bike—Riding the bike
Before taking off, make sure that you activate the battery by pressing on the button located on the side of battery.
Turn on the display unit which is on the handlebars. Select your needed assistance level and start to pedal. You’ll find that the engine starts as soon as you start pedaling.
When you use the brakes, the contactor located within these brakes will halt the engine’s assistance immediately.
The left brake lever controls the rear brake. The right brake lever controls the front brake. You can also use the bike without electric assistance by turning off the battery (switch off the button or by adjusting the assistance level on 0). The engine will then feature zero resistance: you’ll be freewheeling. Select the appropriate gear by activating the 7-speed gear lever.
Please note: if you use the bike frequently, it is recommended that you inspect the state of the fork, the frame, the suspension and the fasteners. The materials and components maybe subject to different reactions to usage and wear.
If you have any doubts, contact your dealer, who will proceed with the necessary inspection
The battery
Installing and removing the battery
The battery is an important and costly part of the e-bike. It is designed to be locked into position with a key to preventing theft. You can take further precaution by removing the battery while the e-bike is parked unattended. You may also have a need to remove the battery from the e-bike to recharge it at a location where you cannot park your e-bike.
To remove the battery:
- fold the bike
- insert the key into the battery, hold pressing the key a bit until twist clockwise to the end (Note: You can’t remove the battery until the lock bar withdraws into the battery completely);
- slip off the battery ,the battery is quite heavy and you should take care not to drop it.
To put the battery back into place, insert the battery along to the guide rails. Push it closely against the controller box. Fasten the lock.
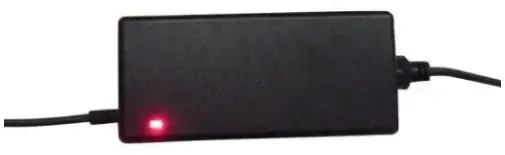
Charging the battery
Here are the steps to be followed when charging your battery:
| Step 1 | Turn the battery off. The LED lights will be off. |
| Step 2 | Plug the charger (which is off) into the socket and then insert the charger’s plug into the battery, which is also off. |
| Step 3 | the charger’s LED indicators lit up in the following manner:
the battery is full charged; you can unplug the charger. (B) |
- (A : Red light )
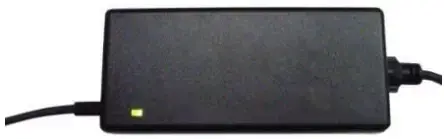
- (B : Green light )
It takes 3 – 6 hours for the battery to be fully charged when using the standard charger that’s supplied with your bike.
Battery autonomy and lifespan
The bike’s autonomy ranges from 40 to 100 kilometers, as it depends on many different factors (degree of assistance used, topology, rider’s weight, frequent stops/start-ups, hills, tire pressure, etc…)
If you don’t use your bike for a period of time exceeding 2 months, store it in a humidity-free area to protect the electronic components and make sure that the battery is neither completely charged nor completely discharged (2 LEDs lit up)
Note: Never store a completely discharged battery as it might result in permanent damage.
During the winter or long storage periods, it is recommended that you charge the battery halfway every 2 months. Don’t forget to switch it off. Store your battery at a temperature between 15° and 25°.
Battery safety instructions
- Your bike’s battery is an electric component made up of chemical elements. For your safety, it is imperative that you obey the following rules:
- Always handle with great care
- Always keep it away from children
- Do not take it apart or hit, pierce or submerge it
- Keep it away from temperatures exceeding 60°
- Never create a connection between the contacts located at the bottom of the battery Never let the battery charge unattended
- Never sleep near a battery that is charging
- Only use the charger that came with your bike or that was supplied by your dealer.
- If your battery is damaged, do not use it and take it back to your dealer as soon as possible
Safety and maintenance recommendations
Helmet
For safe riding, use a bicycle helmet.
Tires
Inspect the wear of your tires on a regular basis and verify the tire pressure at least once a month. Tire pressure: 40-65 PSI depending on the weight of the user.
Warranty
You are provided with a warranty for one year since the day you buy the bike.
Details regarding your bike’s warranty coverage terms are available from your dealer.
Have a pleasant ride!