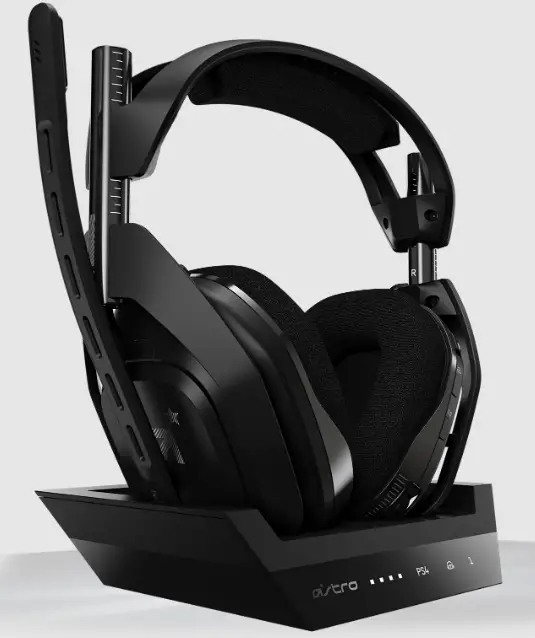
Astro a50 WIRELESS HEADSET
ASTRO Gaming’s A50 Wireless headset is the perfect gaming asset for the audio-savvy citizen who equally appreciates business and pleasure. Professionally-tuned ASTRO Audio paired with Dolby® Digital 7.1 Surround Sound keep you fully immersed in the experience. Whether you’re gaming, enjoying a feature film, or listening to your favorite album on repeat—control over the sound settings is just a touch away.
The A50s are equipped with KleerNet’s 5.8 GHz wireless technology, designed for unimpaired performance amongst the array of other RF traffic. ASTRO Gaming’s integrated MixAmp™ technology allows for precise control of game to voice balance, all fitting neatly into the contoured design of the A50. This guide will point to the various ways in which your A50’s can be adjusted to a setup that’s all your own.
Package Contents
Contents
So… you’ve breached the boxy exterior, and you’re working your way along the inside. You’ll find that your A50 comes bundled with some cables, each has a purpose that’s suited to your method of gameplay.
- OPTICAL CABLE
Provides clear Dolby® Digital surround sound across all platforms.
- USB POWER CABLE
Powers your MixAmp™ Transmitter (Tx) as well as voice chat for the PlayStation Network and PC gaming.
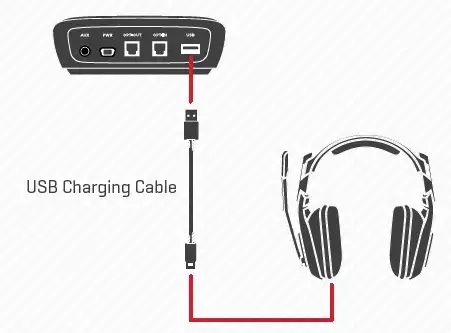
- USB CHARGING CABLE
Charges your A50 Wireless Headset from the MixAmp™ Transmitter.
- DISPLAY STAND
Holds the MixAmp™ Transmitter and A50 Wireless Headset for storage and charging.
System Configurations
PS4
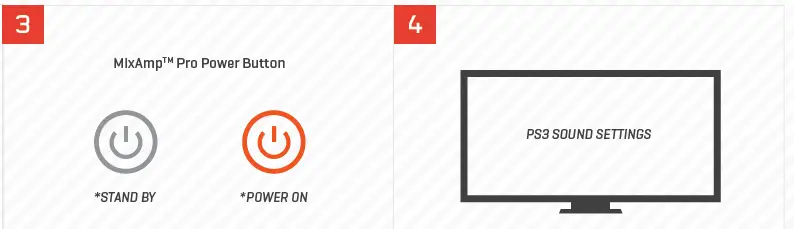
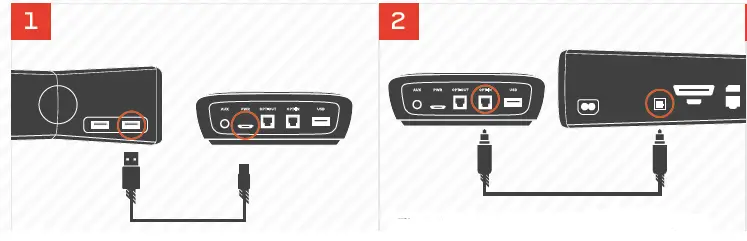
- Plug Micro-USB Cable into MixAmpTM Transmitter and PS4 for power.
- Plug the optical cable into the MixAmp™ Transmitter and back optical port of the PS4 for Dolby® Digital 7.1 Surround Sound (Be sure to remove the caps on the cable tips).
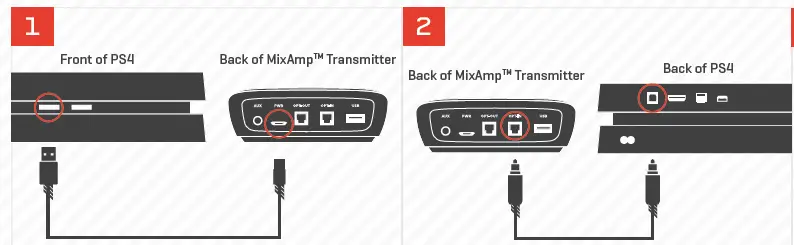
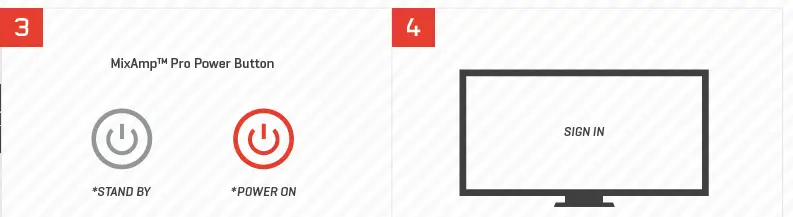
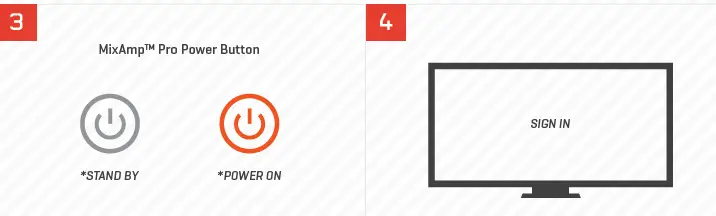
- Power on the PS4, then the MixAmp™ Transmitter. The headset and transmitter should already be paired (see page 10 for pairing instructions).
- The PS4 will automatically detect the headset; sign into a user profile when prompted.
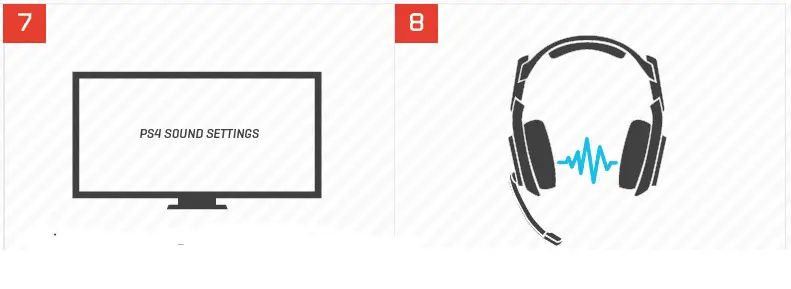
- Go to settings and select Sound and Screen, then select Primary Output Port and choose Digital Out (Optical).
- Go back to Audio Output Settings and select Audio Format (Priority), then select Bit Stream (Dolby).
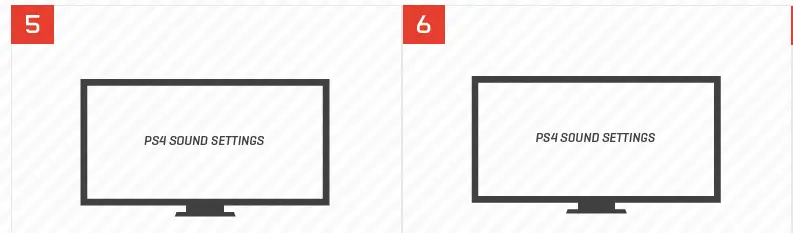
- Under the “Audio Output Settings” menu, select “Output to Headphones” and make sure “Chat Audio” is selected and not “All Audio.
- The A50 headset and PS4 are set up and ready to go. Game on!
PS3
- Plug Micro-USB cable into MixAmpTM Transmitter and PS3 for power.
- Plug Optical cable into MixAmpTM Transmitter & PS3 for Dolby® 7.1 Surround Sound.
Be sure to remove caps on the cable tips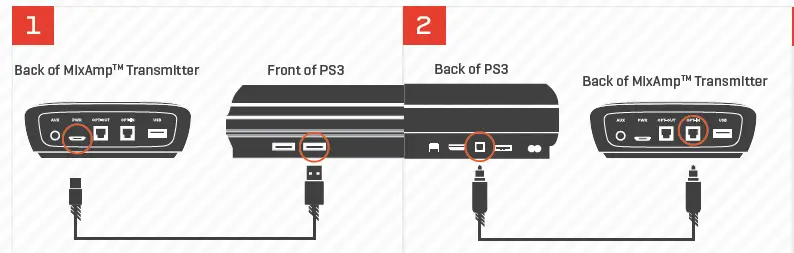
- Power on your PS3 first, then your MixAmp™ Transmitter and A50 Headset. *Your headset and transmitter should already be paired.
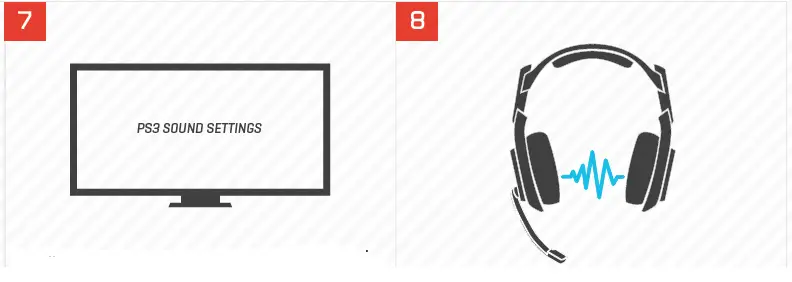
- To enable Game Audio, go to ‘Settings,’ then ‘Sound Settings,’ and select ‘Audio Output Settings.’
- Choose ‘Optical Digital’ and only activate ‘Dolby Digital 5.1 Ch’
Make sure that ‘DTS 5.1 Ch’ is NOT Selected - To enable Voice Chat, go to Settings, select Accessory Settings, and then Audio Device Settings.
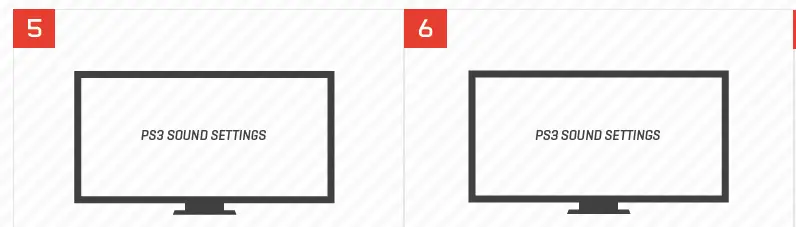
- Under both ‘Input Device’ and ‘Output Device,’ select ‘ASTRO Wireless Transmitter.’
- That’s it! Your A50 Wireless Headset and PS3 are set up and ready to game.
x360
- Plug the micro-USB cable into the MixAmp Transmitter and the USB port of the Xbox 360 for power.
- Plug the optical cable into the MixAmp Transmitter and optical port of the Xbox 360 for Dolby Digital 7.1 Surround Sound (Be sure to remove the caps on the cable tips).
- Power on your Xbox 360 first, then your MixAmp™ Transmitter and A50 Headset. The headset and transmitter should already be paired.
- Sign into a user profile when prompted.
- To use Xbox LIVE® Chat: Connect the Xbox LIVE® Cable from your Xbox 360 controller to the port located on the left earpiece of the A50. **Cable not included
- That’s it! Your A50 Wireless Headset and Xbox 360 are set up and ready to game.
**If you have a non-slim Xbox 360 and you use HDMI to connect to the TV, you will need an Xbox 360 Audio Dongle (not included). You may be able to pull audio from your TV’s optical pass-through. See Home Theater System Configuration page.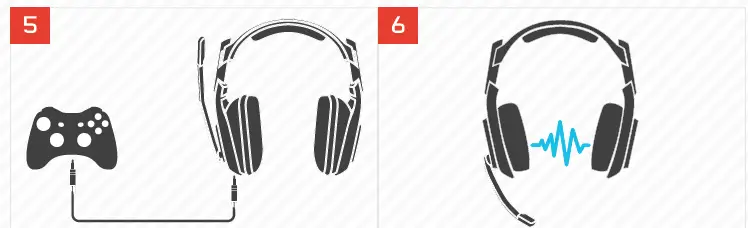
PC
- Plug Micro-USB Cable into MixAmpTM Transmitter and PC for power.
- Plug the optical cable into the MixAmp™ Transmitter and PC for Dolby® Digital 7.1 Surround Sound (Be sure to remove the caps on the cable tip

- Power on your PS3 first, then your MixAmp™
Transmitter and A50 Headset.
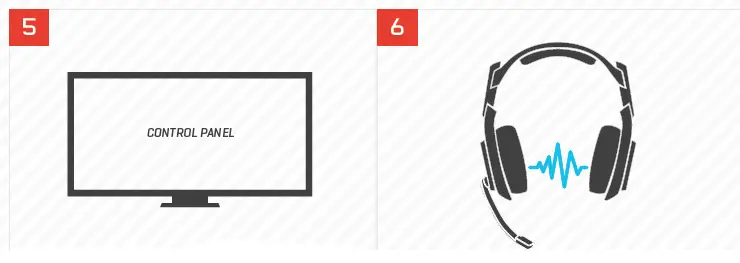
*Your headset and transmitter should already be paired, see front page for pairing instructions. (page 2) - To enable Game Audio on PC using Windows 7 Pro; go to Control Panel, select Sound, then Playback.
- Select ‘SPDIF Out’ or your digital output, then ‘Set as Default Device.’
- To enable Voice Chat; go to ‘Control Panel select Sound, then Recording.

- Select ‘ASTRO WIRELESS TRANSMITTER,’ then
‘Set as Default Device.’
To guarantee full functionality, be sure your sound card supports ‘Dolby Digital Technology. - That’s it! Your A50 Wireless Headset and PC are set up and ready to game.
MAC
- Plug micro-USB cable into the MixAmp™ Transmitter and USB port on the Mac for power.
- Attach a 3.5mm optical adapter* to the mini-optical cable provided, then plug into MixAmp™ Transmitter and Mac 3.5mm optical port.
- Power on the Mac, then turn on the MixAmp™ Transmitter and A50 headset. The headset and transmitter should already be paired
- To enable Game Audio, go to “Settings,” select “Sound,” then “Output” and choose “Digital Out.”

- To enable Voice Chat; go to “Settings,” select “Sound,” then “Input.” Select “ASTRO WIRELESS TRANSMITTER.”
- That’s it! Your A50 Wireless Headset and MAC are set up and ready to game.
HOME
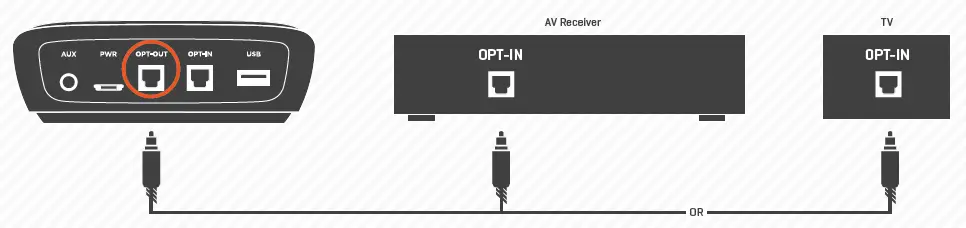
Optical pass-through gives you the ability to output the same optical signal your MixAmpâ„¢ Transmitter is receiving, allowing you to add an additional peripheral device without having to adjust any cables.
To Connect:
OPT-OUT to AV Receiver: Connect optical cable from the OPT-OUT port on the MixAmpâ„¢ Transmit-ter to the input on your AV Receiver.
Television Setup:
If your television comes equipped with optical pass-through functionality, simply connect the optical output on your television to the OPT-IN port on your MixAmp™ Transmitter, bypassing the optical port on your Xbox 360.
A50 LED BEHAVIOR
LED Indicator on A50 Headset:
- Solid Red, USB connected: Charging finished. Solid Red, USB disconnected: Powered on.
- Blinking Red + Audible Beep: Low Power, Charge Immediately.
- Solid Orange: Charging Lithium-Ion Battery.
- Blinking White: Pairing mode.
LED Indicators on MixAmp™ Tx:
- Power LED
- Off: Powered off. Solid Red: Powered on.
- Blinking White: Pairing mode.
- Dolby® LED
- Off: Dolby® Headphone disabled.
- Solid Red: Dolby® Headphone enabled.
A50 User INTERFACE
A50 Controls
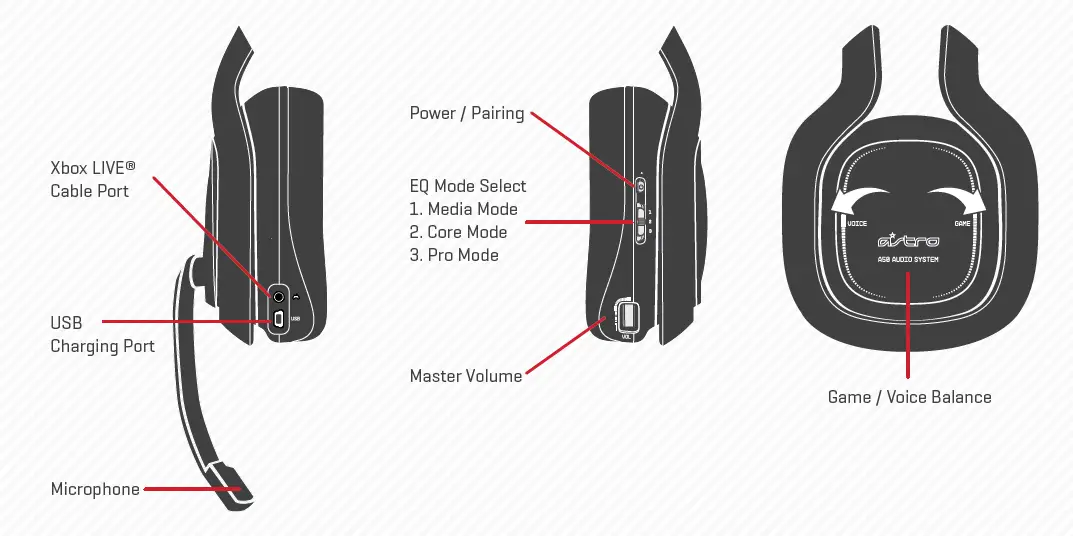
Game/Voice Balance: The A50’s integrated game and voice mixing functions are located on your right earpiece. The A50s come preset to a 50/50 balance. To adjust, press the button for the audio function you wish to incrementally increase. Holding down “Game” will cause the mixing function to isolate game sounds, quieting the voice. Pressing “Voice” will cause the mixer to decrease game sounds, amplifying voice.
While using this feature you may find your A50 emits a series of intermittent beeps. Rest assured, you haven’t been tricked into an ASTRO hearing test.
A50 Game/Voice Balance Beeps:
- At 50/50 Game + Voice: Emits a single beep
- At 100% Voice: Emits a two-tone beep (unique to max voice) ∆ At 100% Game: Emits a two-tone beep (unique to the max game)
Master Volume: The Master Volume wheel located on the bottom of the right earpiece adjusts overall volume control. Use the Master Volume in conjunction with Game/Voice Balance for total audio domination. Lecherous laughter is optional (but encouraged).
Microphone: The A50 fixed microphone operates when in the down/forward position. To activate the microphone’s mute feature, simply swing the microphone arm up to the vertical
(12 o’clock) position, where the microphone will click into place.
Equalizer (EQ) Modes: EQ modes are controlled by a switch located on the back of the right earpiece. The A50s come equipped with three separate EQ modes for better listening:
- Media: Enhanced bass, for movies and music
- Core: Balanced for single player gaming
- Pro: Boosted high frequencies for competitive gameplay
MixAMP® TX USER INTERFACE
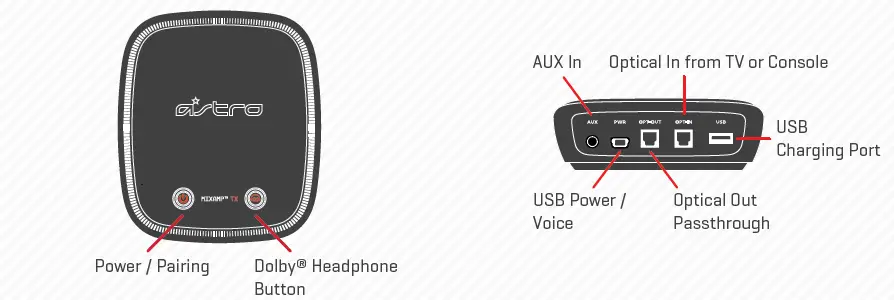
- Right Button: Dolby® Headphone Virtual 7.1 Digital Surround On/Off
MixAmp™ Tx – Rear: - PWR: Connect the USB Power Cable from this port to a free port on your console or PC to power the MixAmp™ Tx and enable voice capability*.
- AUX: Auxiliary In. Plug your media device into this port with an optional 3.5mm cable in order to wirelessly stream audio to your A50 headset. Intended for use with MP3 players, phones, and PCs (when optical digital out is not available).
- OPT-OUT: Optical Out Pass through, use this input to connect your home theater system.
- OPT IN: Use this input to connect the Optical Cable from TV, PC, or console
- USB: USB: Insert the USB Charging Cable into this socket, and attach the other end to the port on your A50s when not in use. This port is also utilized when updating to the latest firmware and is also needed to power Optical Passthrough.
Additional setup may be required for some systems. Don’t panic. Simply refer to the System Configuration for your gaming console or PC to get you all sorted out.
PAIRING
Your A50 and MixAmp™ TxD come pre-paired. It is only necessary to initiate the pairing process if there is no audio after setup is completed. Got it?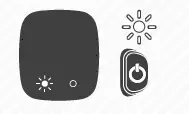
Locate the Power button on the face of the MixAmp™ Transmitter and on the right side of the A50 headset.
Begin pairing mode by simultaneously holding the power button on the MixAmp™ TxD unit and on the A50 headset until both of the buttons blink white. You can pair up to four A50 headsets to your MixAmp™ TxD. However only the first paired headset can use its microphone. We recommend muting the mics of all other paired headsets. For pairing multiple A50 headsets to your MixAmp™ TxD, repeat this process for each additional headset or after doing a firmware update.
The LED indicators on both devices will show solid white for three seconds, indicating that pairing has occurred.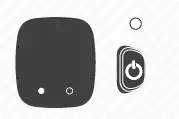
The LED indicators on both devices will show solid white for three seconds, indicating that pairing has occurred.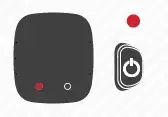
BATTERY and CHARGING
Charging
To charge your A50, attach the USB Charging Cable from the base of the MixAmp™ Tx to the charging port on the A50s. The indicator light on the A50 will show solid orange during charging and then solid red once your A50s are fully powered up and ready for action.
Battery Life
The non-removable lithium-Ion battery built into your A50s requires a five hour charging cycle to reach full power. Once fully charged, the battery is good for 8 -10 hours of on-head action time, depending on your degree of use.
DISPLAY STAND
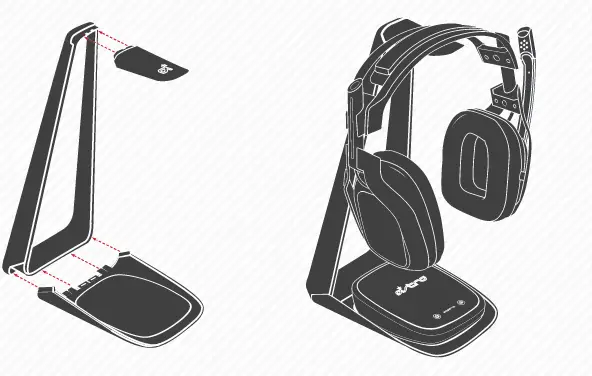
Display Stand – Permanent Assembly
Your display stand arrives in three parts: Base, Spine, and Beak. To assemble:
- Slide and snap in the tabbed edges of base piece into the corresponding edges of the spine.
- Slide and snap the tabbed edge of the beak into the top of the spine.
Once assembled, the Display Stand functions as a base for your MixAmp™Tx and A50s for charging and display. The stand is not meant to be taken apart.
SUPPORT
Firmware Updating
Keep your A50s and your platforms playing nice, and in proper working order by making sure you are running the latest firmware: http://www.astrogaming.com/firmware
Troubleshooting
See FAQ
http://www.astrogaming.com/faq
All ASTRO Gaming products come with an automatic 1-year warranty. Registration is not required. If you purchased ASTRO products from a 3rd party retailer, you don’t need to register it, but you will need to provide proof of purchase for any warranty claims.
Register ASTRO products here: http://www.astrogaming.com/register
Specs:
- Weight w/o cable: 0.81lbs/363 grams
- Max SPL: ~118 dB @1kHz
- Ear Coupling: Over-Ear
- Distortion: THD<1%
- Kessel Run Distance: Under 12 Parsecs
- Frequency Response: 20Hz – 20 KHz
- Connector: 2.5mm XBOX Live® chat port, Mini-USB port
- Microphone: 6.0mm uni-directional noise canceling
- Power Source: Mini-USB (USB 2.0 compatible)
- Battery Life: 8-10 Hours
- Wireless Radio: 5.8GHz Kleernet
- MixAmpTM Tx Inputs: Optical In, AUX In (3.5mm), USB Power, USB Chat Audio MixAmpTM Tx Outputs: Optical Passthrough, USB Charging Port
FCC STATEMENT
Federal Communications Commission (FCC) Statement
You are cautioned that changes or modifications not expressly approved by the part responsible for compliance could void the user’s authority to operate the equipment.
This equipment has been tested and found to comply with the limits for a Class B digital device, pursuant to part 15 of the FCC rules. These limits are designed to provide reasonable protection against harmful interference in a residential installation. This equipment generates, uses and can radiate radio frequency energy and, if not installed and used in accordance with the instructions, may cause harmful interference to radio communications. However, there is no guarantee that interference will not occur in a particular installation. If this equipment does cause harmful interference to radio or television reception, which can be determined by turning the equipment off and on, the user is encouraged to try to correct the interference by one or more of the following measures:
- Reorient or relocate the receiving antenna.
- Increase the separation between the equipment and receiver.
- Connect the equipment into an outlet on a circuit different from that to which the receiver is connected.
- Consult the dealer or an experienced radio/TV technician for help.
This device complies with Part 15 of the FCC Rules. Operation is subject to the following two conditions:
- This device may not cause harmful interference, and
- This device must accept any interference received, including interference that may cause undesired operation of the device.
FCC RF Radiation Exposure Statement:
This equipment complies with FCC radiation exposure limits set forth for an uncontrolled environment. End users must follow the specific operating instructions for satisfying RF exposure compliance. This transmitter must not be co-located or operating in conjunction with any other antenna or transmitter.
FCC RF Exposure requirements:
This device and its antenna(s) must not be co-located or operated in conjunction with any other antenna or transmitter.
THE MANUFACTURER IS NOT RESPONSIBLE FOR ANY RADIO OR TV INTERFERENCE CAUSED BY UNAUTHORIZED MODIFICATIONS TO THIS EQUIPMENT. SUCH MODIFICATIONS COULD VOID THE USER’S AUTHORITY TO OPERATE THE EQUIPMENT.
CANADA CONFORMITY
INDUSTRY CANADA CONFORMITY STATEMENT / DÉCLARATION DE CONFORMITÉ D’INDUSTRIE CANADA
This Class B digital apparatus complies with Canadian ICES-003.
CE DECLARATION OF CONFORMITY
Skullcandy, Inc. declares that this product is in compliance with the essential requirements and other relevant provisions of Directives 2004/108/EC. A copy of the Declaration of Conformity for this product may be obtained by contacting Skullcandy, Inc.
Note on environmental protection:
After the implementation of the European Directive 2012/19/EU in the national legal system, the following applies: Electrical and electronic devices may not be disposed of with domestic waste. Consumers are obliged by law to return electrical and electronic devices at the end of their service lives to the public collecting points set up for this purpose or point of sale. Details to this are defined by the national law of the respective country. Failure to dispose of electronic devices properly may have harmful effects on the environment and human health as a result of the presence of hazardous substances in the products. This symbol on the product, the instruction manual or the package indicates that a product is subject to these regulations. By recycling, reusing the materials or other forms of utilizing old devices, you are making an important contribution to protecting our environment.