![]() Solar Security Light 500
Solar Security Light 500
User Manual
 WARNING: Read and understand all instructions, warnings, and cautions before using this product. Failure to follow the instructions, warnings, and cautions may result in serious personal injury and/ or property damage.
Item #22260
SAVE THIS INSTRUCTION
GENERAL SAFETY RULES
Save the receipt and these instructions. It is important that you read the entire manual to become familiar with this product before you begin using it.
This product is designed for certain applications only. The distributor cannot be responsible for issues arising from modification. We strongly recommend this product not be modified and/or used for any application other than that for which it was designed. If you have any questions relative to a particular application, DO NOT use the product until you have first contacted the distributor to determine if it can or should be performed on the product.
For technical questions please call 1400-588-0590.
![]() CAUTION: Do not allow persons to operate or assemble this Solar Light until they have read this manual and have developed a thorough understanding of how the Solar Light works.
CAUTION: Do not allow persons to operate or assemble this Solar Light until they have read this manual and have developed a thorough understanding of how the Solar Light works.
![]() WARNING: The warnings, cautions, and instructions discussed in this instruction manual cannot cover all possible conditions or situations that could occur. It must be understood by the operator that common sense and caution are factors that cannot be built into this product but must be supplied by the operator.
WARNING: The warnings, cautions, and instructions discussed in this instruction manual cannot cover all possible conditions or situations that could occur. It must be understood by the operator that common sense and caution are factors that cannot be built into this product but must be supplied by the operator.
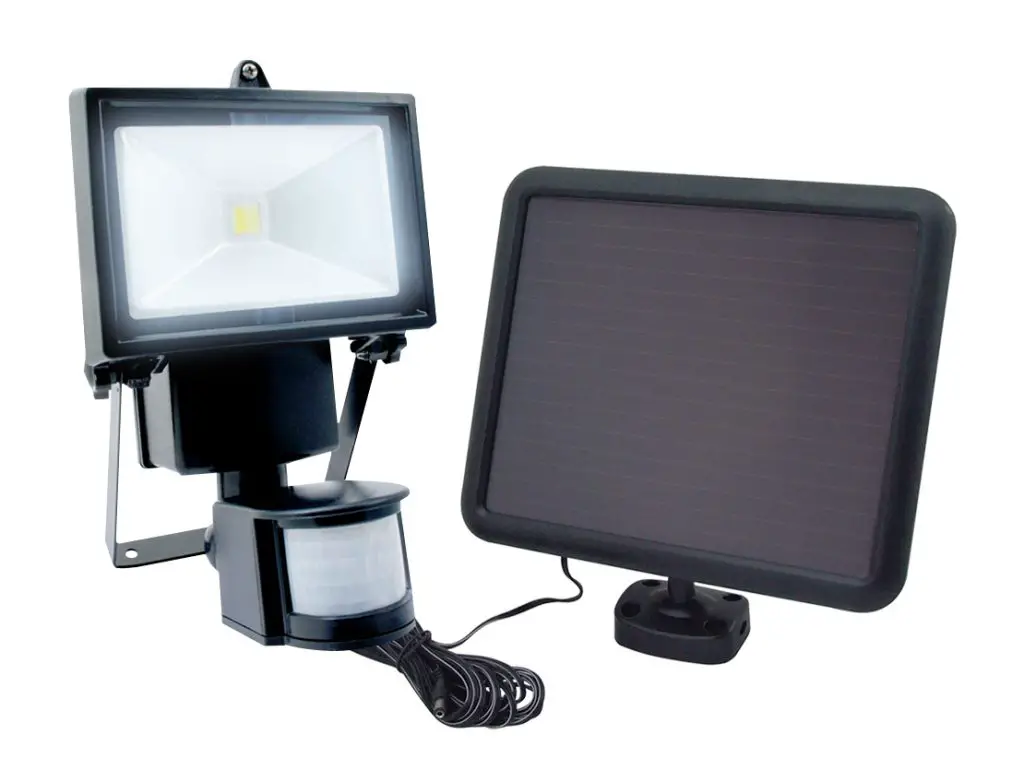
FEATURES
Your COB Security Light is the perfect system for the following:
- Entrance
- Garage
- Porch
- Eaves
- Emergency
| PARTS LIST | ||
| Part*, | Description | Qty. |
| 1 | Lamp | 1 |
| 2 | Solar Panel (5m Wire) | 1 |
| 3 | Screws and Anchors | 1 |
| 4 | Mounting Bracket | 1 |
| 5 | Manual | 1 |
USE AND CARE
- Do not modify the Solar Light in any way. Unauthorized modification may impair the function and/or safety and could affect the life of the equipment. There are specific applications for which the Solar Light was designed.
- Always check for damaged or worn-out parts before using the Solar Light. Broken parts will affect the Solar Light operation. Replace or repair damaged or worn parts immediately.
- Store idle Solar Light. When Solar Light is not in use, store it in a secure place out of the reach of children. Inspect it for good working condition prior to storage and before re-use.
ASSEMBLY
1. Lamp Unit Installation
- Mounting your light requires a screwdriver, pencil, and (in some circumstances) a power drill.
- Place the mounting bracket on the surface you wish to mount to.
- Mark with a pencil the position of the mounting bracket screw holes. This will enable you to pre-drill your screw holes.
- Once the mounting bracket is installed, ensuring all screws are tight, you are ready to position your COB Security Light
- Carefully route the wire from the solar panel to the lamp and plug it into the power socket.
- Adjust the motion sensor to your desired position. Your COB Security Light is now installed and ready to charge.
Note: Lamp unit should be mounted 6.5 9.8ft from the ground to ensure motion detection is optimized.
2. Solar Panel Wall or Roof Mounted Installation
- Choose an area that receives the maximum amount of sunlight possible
- Use the holes located on the solar panel mounting bracket to mark the mounting surface for installation
- Set the bracket on the surface you have chosen and secure it in place with the screws and anchors provided.
- Adjust the angle of the Solar Panel to ensure it receives optimum sunlight.
Note: The Solar Panel is equipped with a 5 ft. wire. The maximum distance between the lamp unit and solar panel can be 5 ft.
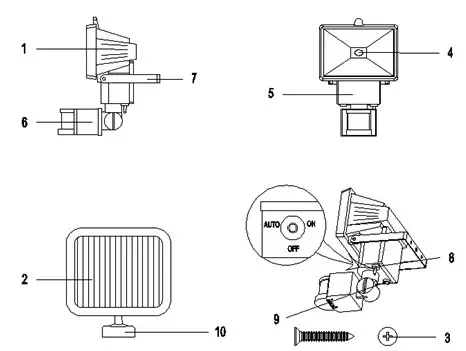
ASSEMBLY DIAGRAM
PARTS LIST AND ASSEMBLY DIAGRAM
| Part | Description | Part | Description |
| 1 | Lamp | 8 | ON OFF AUTO Switch |
| 2 | Solar Panel (5m wire) | 9 | Battery Housing outlet |
| 3 | Expansion screw | 10 | Solar Panel Mounting Bracket |
| 4 | 5W LED | 11 | LUX Adjusting Knob |
| 5 | Battery Housing | 12 | SENS Adjusting Knob |
| 6 | Motion Detector Head | 13 | TIME Adjusting Knob |
| 7 | “U” shaped Mounting Plate | 14 | NI-I-EM battery (not shown) |
OPERATION
- Before the Solar Motion Light can operate to its full capacity, the Solar Panel needs to be in sunlight for 3 days to fully charge the included battery. Charging should be done with the unit in the “OFF” position.
- Located at the bottom of the Battery Housing (5) there is a switch with three positions:
- Turn the switch to the “AUTO” position, the light will turn on automatically at night when motion is detected by the Motion Detector Head (6).
- Turn the switch to the “ON” position, the light can be used as a standard light for constant illumination.
- Turn the switch to the “OFF” position, the light will remain off and will not detect any movement.
HOW TO USE CONTROL DIALS
The Solar Motion Light has 3 different control dials which control the light’s duration, sensitivity to light, and sensitivity to motion.
LUX (LIGHT LEVEL)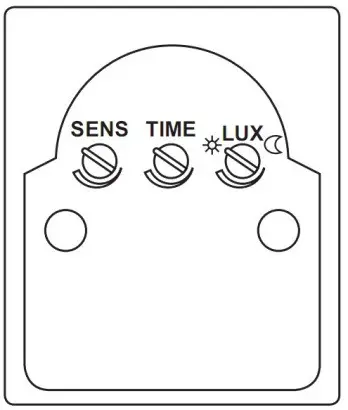
- The LUX Adjusting dial (9) tells the sensor the level of darkness that must be reached before the light turns on.
- If set to the maximum
 level, the light will go on in daylight.
 - If set to the minimum setting
 the sensor will only trigger the light to turn on at dusk or when it is dark out. This is the ideal position for general usage.
TIME
- The TIME Adjusting dial (11) sets the duration of illumination time.
- The TIME is adjustable from 8 seconds to 2 minutes. Rotating the dial clockwise will increase the illumination time.
SENS (SENSITIVITY
This determines the range of motion detection:
- Minimum position — Low Range.
- Mid Position – Normal setting.
- Maximum position – Maximum range.
LOCATION OF SOLAR LIGHT
For best results, please locate the Solar Panel from your COB Solar Light in a position where it can absorb direct sunlight on the solar panel, and generally tree from cover and shade.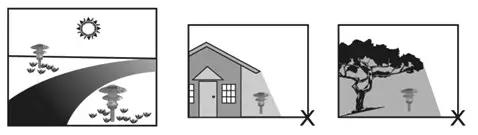
TROUBLESHOOTING
If the Solar Motion Light does not Illuminate when movement in front of the sensor is obvious, please observe the following:
- Ensure the solar panel is in a location where it will receive maximum sunlight during daytime hours.
- Ensure the lamp head is away from other light sources. Other light sources at night will prevent the unit from turning on.
- Ensure the switch is set to the “AUTO” or “ON’ position.
- Check batteries are installed correctly.
- Allow the solar panel to charge the batteries in direct sunlight for 3 days with the switch in the “OFF” position.
- Replace Batteries. Rechargeable batteries may last up to 600 charges. For best performance replace batteries every 12 months.
BATTERY REPLACEMENT
- The Battery Pack is located in the Battery Housing (5).
- Turn the switch (7) to the “OFF” position. Remove the four screws from the Battery Housing (5). Separate the Battery Pack connector. Remove old Battery Pack. Replace only with identical rechargeable Battery Pack.
- Check correct polarity of battery replacement.
- Replace the cover of the Battery Housing (5). Secure it with the four screws.
MAINTENANCE
Maintain your Solar light. It is recommended that the general condition of any Solar Light be examined before it is used. Clean the solar module with a damp towel to ensure the optimum performance of the Solar Light. Do not use any type of solvent for cleaning and be careful not to put too much pressure on the module while cleaning.
LIMITED WARRANTY
Nature Power warrants our products to the original purchaser that this product is free from defects in materials and workmanship for the period of one year from the date of purchase. In the case of a product defect, contact Nature Power customer service to receive troubleshooting. If a defective part or unit should be returned, a Return Authorization Number must be issued by Nature Power and the defective part or unit should be returned to the authorized location at the purchasers’ expense. A dated proof of purchase is required to receive warranty service. Once received at authorized location and defect proves to be the result of defective material and workmanship, the defective part or unit will be replaced at warrantors’ option and returned to the original purchaser at warrantors’ expense. No refunds will be granted by the warrantor, in the event of buyer’s remorse please contact your point of purchase within and in adherence to their return policy. Refunds are granted at the retailers’ discretion.
Dated proof of purchase is required
![]()
Please contact Nature Power Products to acquire more information:
1-800-588-0590
[email protected]
www.naturepowerproducts.com
Made in China