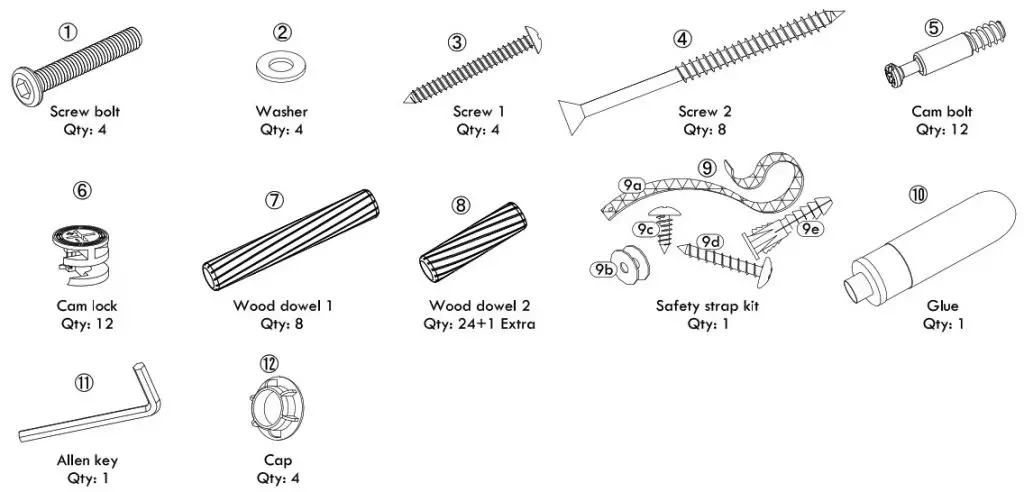
9 Cube Storage Organizer with Metal Base
View Fullscreen
9 CUBE STORAGE ORGANIZER WITH METAL BASE
RECOMMENDED NUMBER OF PEOPLE FOR ASSEMBLY: 1 ESTIMATED ASSEMBLY TIME: 1 HOUR
- CALL OUR TOLL-FREE NUMBER 1-800-729-1569 FOR FURTHER ASSISTANCE.
- ADDITIONAL PARTS ARE AVAILABLE FOR A FEE.
- THIS INSTRUCTION BOOKLET CONTAINS IMPORTANT SAFETY INFORMATION. PLEASE READ AND KEEP IT FOR FUTURE REFERENCE.
- DO NOT ALLOW CHILDREN TO CLIMB OR PLAY ON THE UNIT.
- CLEAN THE PRODUCT WITH YOUR FAVORITE FURNITURE POLISH AND A SOFT CLOTH.
- DO NOT USE HARSH CHEMICALS OR ABRASIVE CLEANERS.
- MOVE YOUR NEW FURNITURE CAREFULLY WITH TWO PEOPLE. NEVER PUSH OR DRAG THE UNIT.
DO NOT RETURN THE PRODUCT TO THE STORE. INDIVIDUAL STORES DO NOT STOCK PARTS. FOR MISSING OR DAMAGED PARTS CALL 1-800-729-1569. PARTS WILL BE SHIPPED FREE OF CHARGE.
FOR PROMPT, RELIABLE SERVICE, PLEASE HAVE YOUR ASSEMBLY MANUAL READY.
LOT NUMBER __________
DATE OF PURCHASE _/ /
![]() BEFORE STARTING
BEFORE STARTING
- Read and understand all the steps carefully before starting. If each step is not followed in the correct order the assembly will be difficult and may result in damages.
- Work in a spacious area, preferably on a carpeted surface, near where the unit will be used.
- Make sure all the parts are included. Most boards are labeled with a removable sticker.
Helpful hints
- Call our toll-free number if you need assistance. We are available to assist you Monday – Friday from 9:00 am – 5:00 pm Eastern Standard Time.
- 1-800-729-1569 USA only.
TOOLS NEEDED TO ASSEMBLE
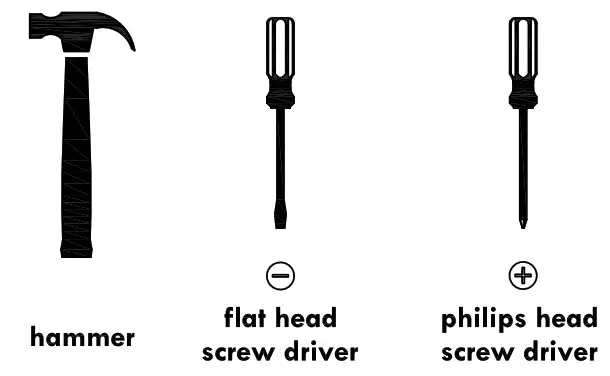
 DO NOT USE POWER TOOLS TO ASSEMBLE YOUR FURNITURE. POWER TOOLS MAY DAMAGE THE PARTS AND RESULT IN DAMAGE.
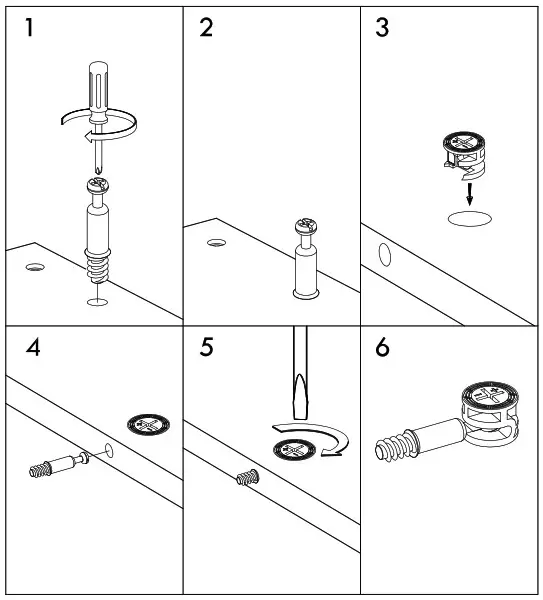
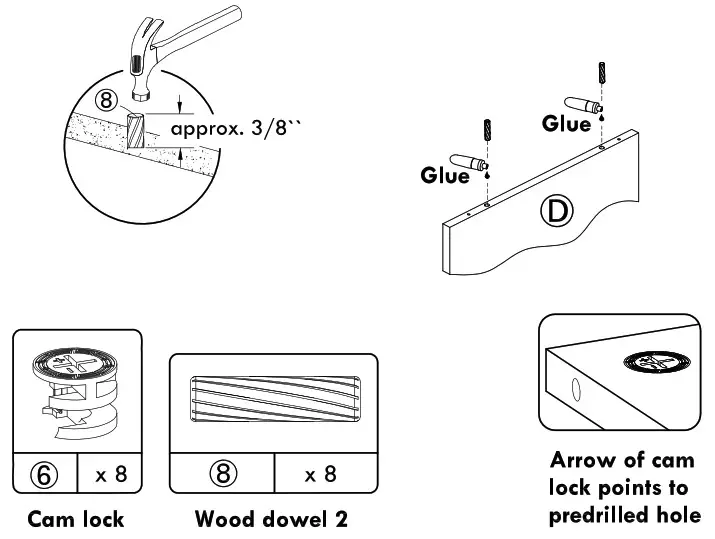
CAM FASTENING SYSTEM
- Screw the cam bolt into the predrilled panel. The screw should be tightened so no threads are visible.
- The larger ring of the cam should touch the panel.
- Insert the cam lock into the predrilled hole in the panel. The plus and minus signs should be facing the outside of the panel.
- Connect the previously tightened cam bolt with the panel connected into the cam lock.
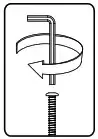
- Using a flat-head screwdriver, turn the cam lock halfway clockwise to secure the cam bolt.
- FAILURE TO PROPERLY SECURE THE CAM LOCK AND CAM BOLT COULD RESULT IN PRODUCT INSTABILITY AND FAILURE.
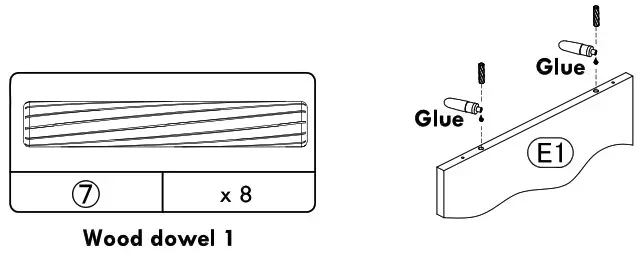
- Insert 2pcs wood dowel
7on each side. Place a dowel on the hole. Gently tap with a hammer to insert.
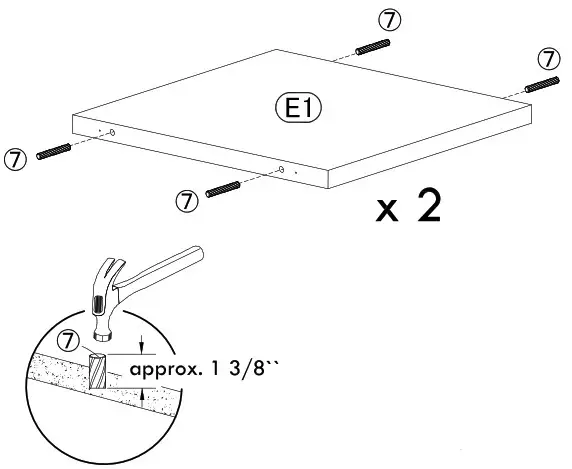 Warning! Additional glue for step 1. Glue needs to be put into the hole before inserting the wood dowel.
- Insert 2pcs wood dowel
8at one side. Place dowel on hole. Gently tap with hammer to insert.
 Warning! Additional glue for step 2. The glue needs to be put into the hole before inserting the wood dowel.
 - Screw-in the cam bolts into part A.
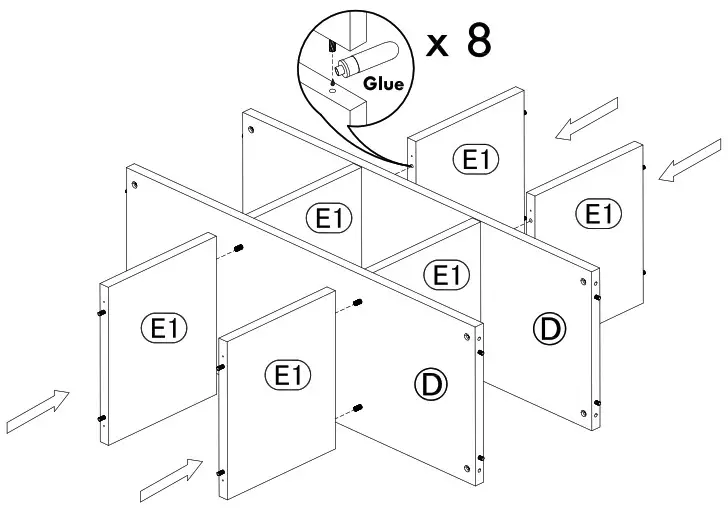
- Insert 2pcs wood dowel
8in each side.
 Warning! Additional glue for step 4. Glue needs to be put into the hole before inserting the wood dowel.
- Insert 2pcs wood dowel
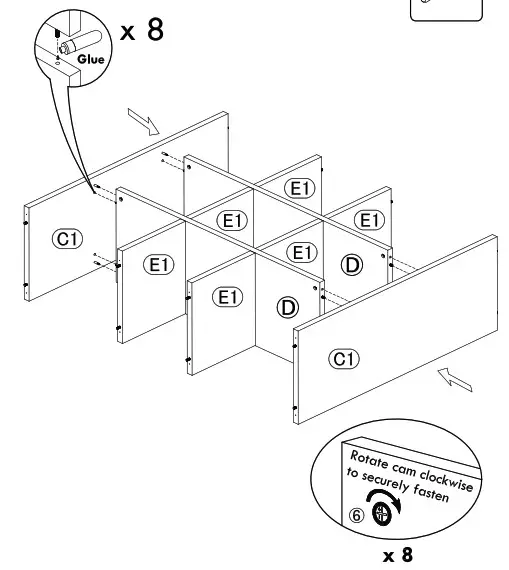
8on each side. Screw-in the cam bolts into part C1 with hand.
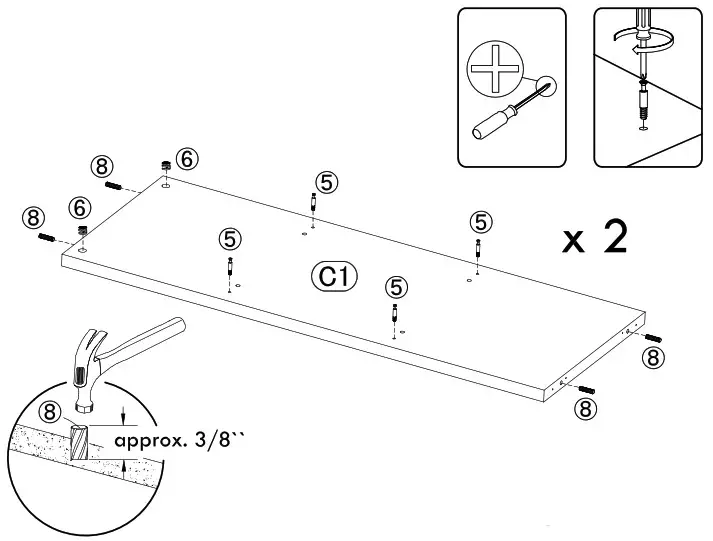 Warning! Additional glue for step 5. Glue needs to be put into the hole before inserting the wood dowel.

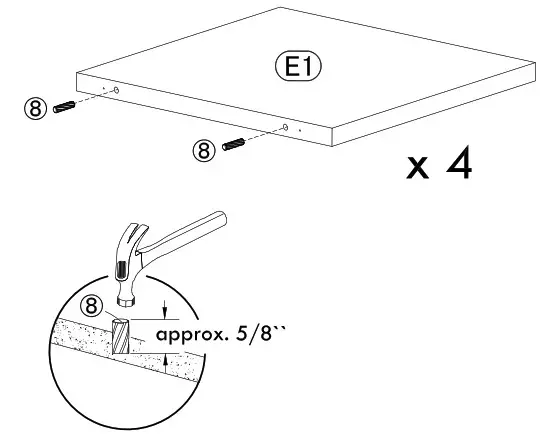
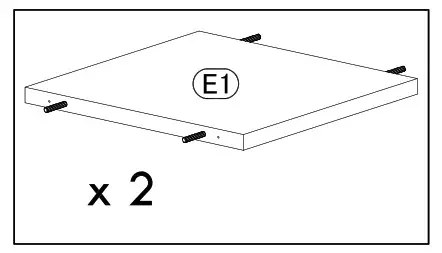
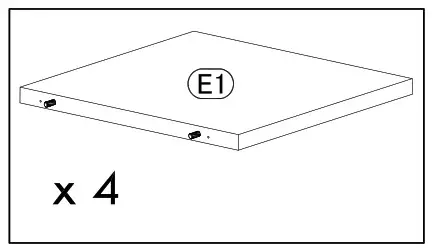
- Align and attach two-part E1 to the shelf.
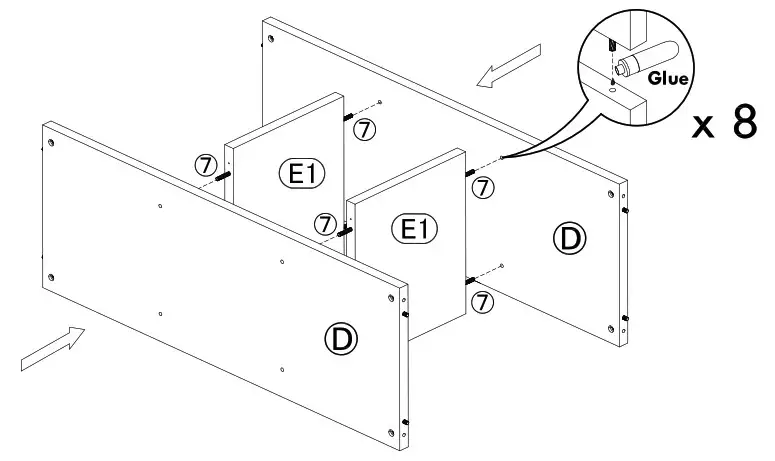
- Align and attach four-part E1 to the shelf as shown. Please pay attention to the direction of dowels on part E1.
- Align and attach part C1 to the structure and then tighten the cam locks.
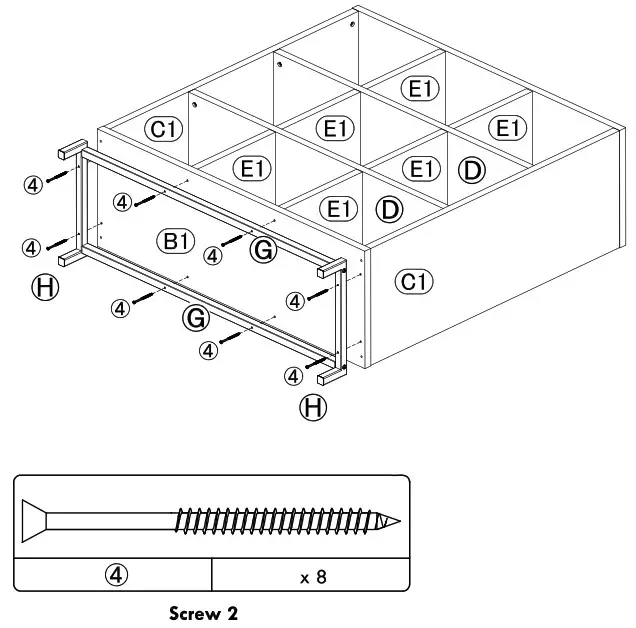
- Align and attach parts A & B1 to the structure and then tighten the cam locks. Fasten the safety strap into part A as shown.
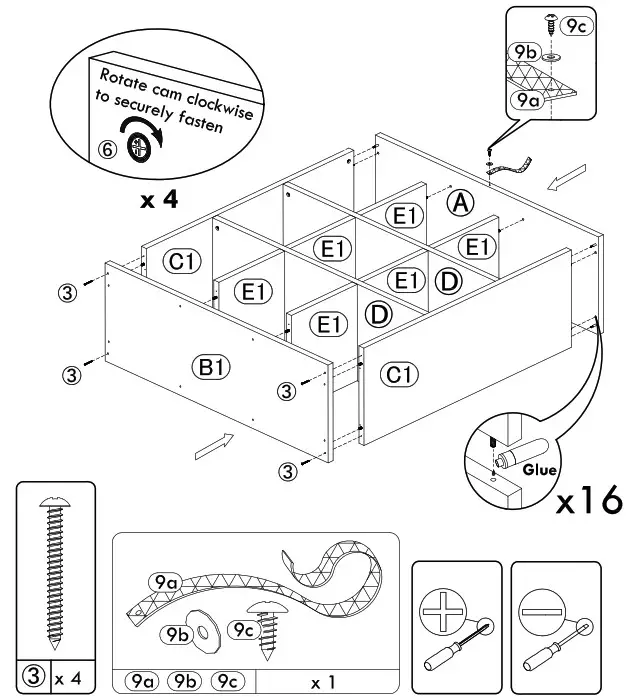
- Assemble the metal base with the attached Allen key as shown.
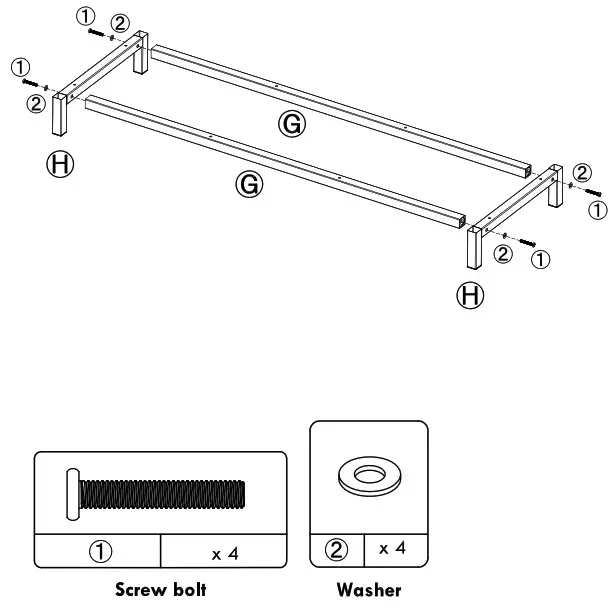
- Attach the metal base to the bottom of part B1, then insert the screw and tighten it.
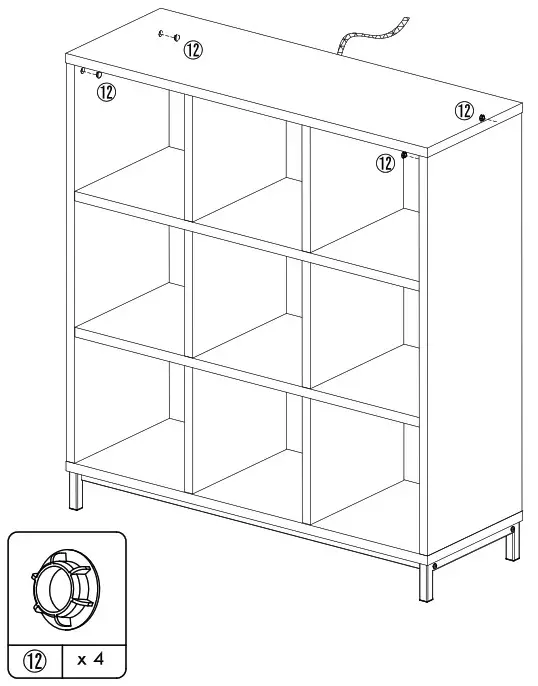
- Using the part
12to cover the hole of part C1.
- Now Your Unit Is Completed
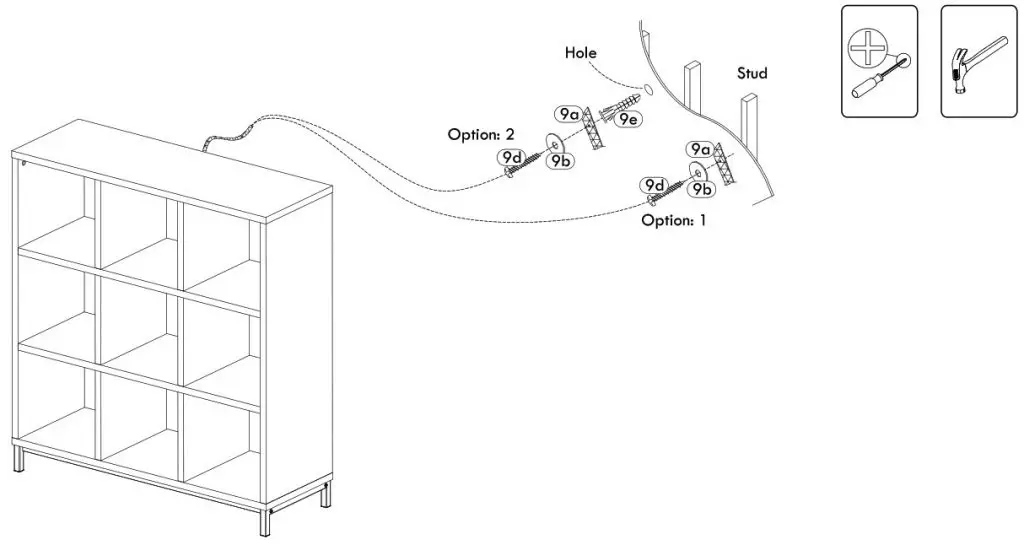
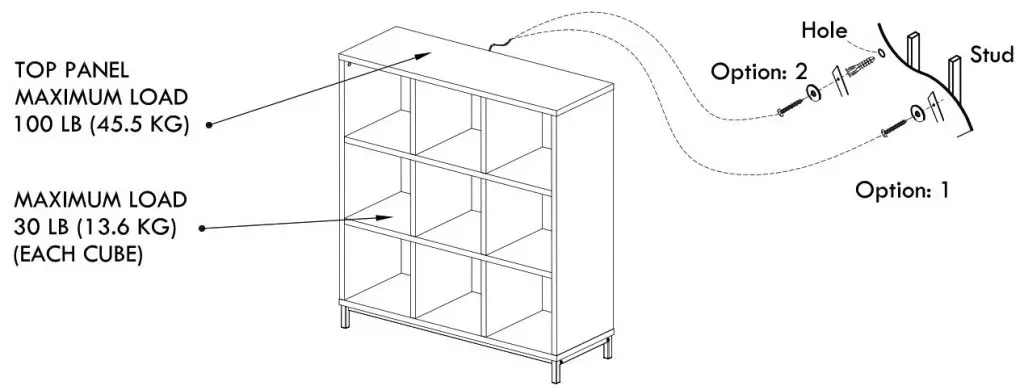
 Fasten the safety strap to the wall using OPTION 1 or 2 as shown.
Option 1: Fasten the strap (9a) to a stud in the wall using the screw (9d) through the washer (9b).
Option 2:
Drill a 3/16″ diameter hole in the wallboard. Tap the wall anchor (9e) into the hole until it is flush. Fasten the strap (9a) to the wall anchor (9e) using the screw (9d) through the washer (9b).
Quality Guarantee
Should this product be defective in workmanship or materials or fail under normal use, we will repair or replace it for up to (1) year from the date of purchase. This warranty gives you specific legal rights and you may also have other rights which vary from State to State.
Please call for replacement parts or assistance: 1-800-729-1569 Monday – Friday 9:00 am – 5:00 pm EST
Hussein Furniture (Longnan) Co., Ltd.
Designed in the USA
Made in China
![]()
We are available to assist you Monday -Friday
from 9:00 am – 5:00 pm Eastern Standard Time.
1-800-729-1569 USA only.