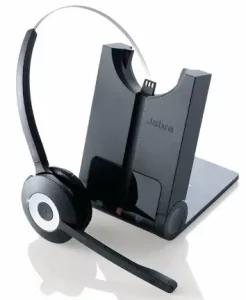

Jabra WHB003BS PRO 920 Wireless Headset System for Telephones
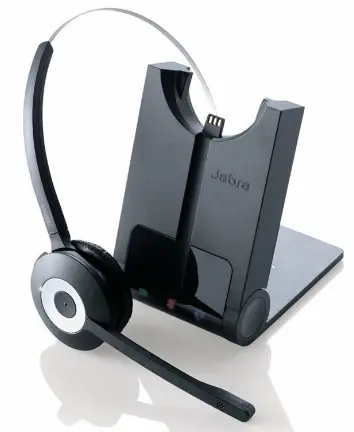
Jabra WHB003BS PRO 920 Wireless Headset System for Telephones
PACKAGE CONTENTS
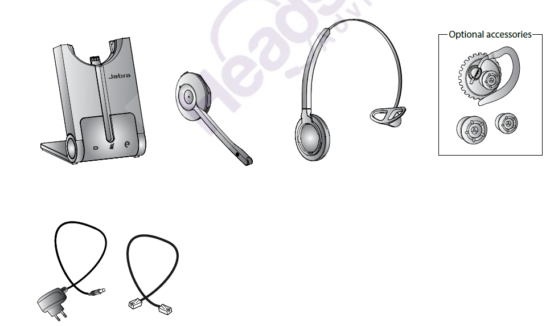
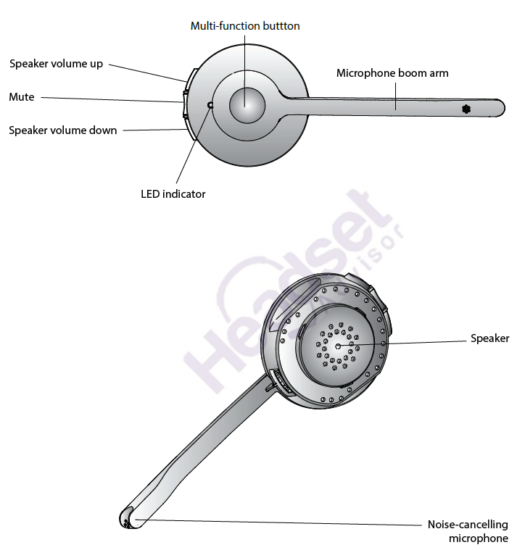
JABRA PRO 920 HEADSET
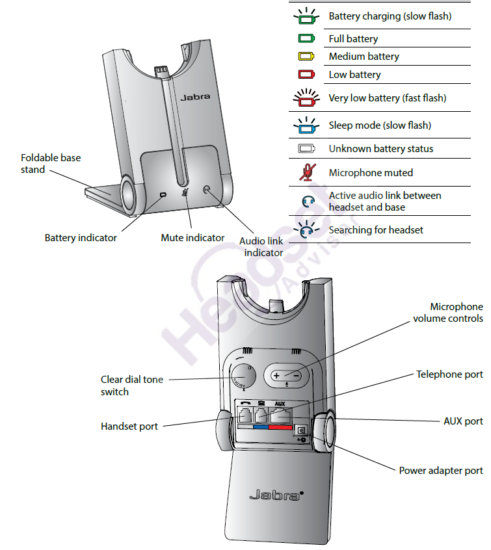
JABRA PRO 920 BASE
SETUP
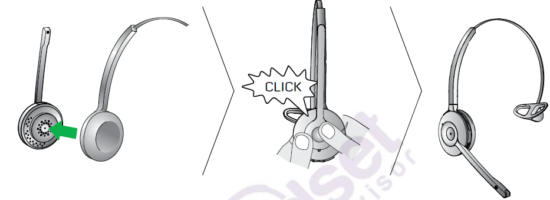
STEP 1: ATTACH THE HEADBAND
- Align the headset and the headband wearing-style attachment, as illustrated, and press firmly together until they click into place (snap-to-click).
- Rotate the microphone boom arm for left or right ear use.
- Adjust the length of the headband to fit snug against the head.
OPTIONAL ACCESSORIES
Attaching the earhook (not supplied in all regions)
- Assemble the earhook wearing-style attachment for left or right ear use. If necessary, remove the earbud and replace with another size for best fit.
- Align the headset and the earhook wearing-style attachment, as illustrated, and press firmly together until they click into place (snap-to-click).
- Shape the earhook to fit snug around the ear.

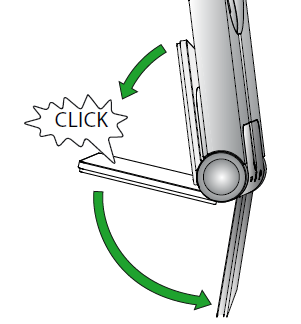
STEP 2: UNFOLD THE BASE
The Jabra PRO base stand can be folded into three positions: open, closed, and standing position.
STEP 3: SELECT AND CONNECT TO A DESK PHONE
Select which desk phone you are connecting to from the following 4 options:
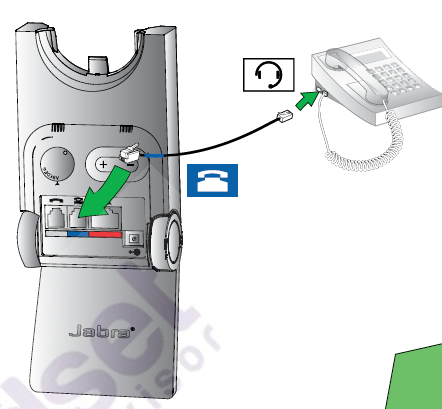
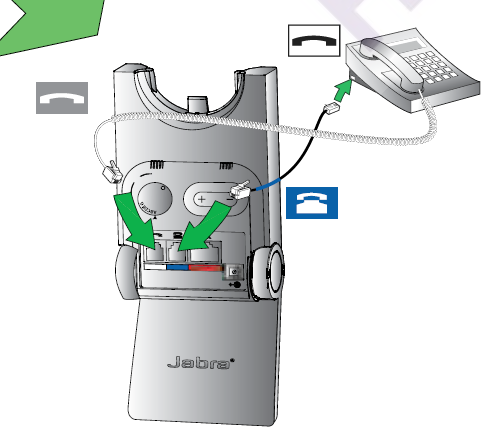
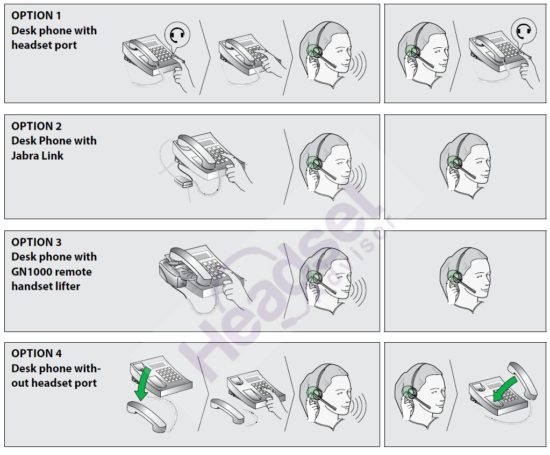
OPTION 1
Desk Phone with Headset Port This type of desk phone has a dedicated headset port (usually at the back of the phone). These phones typically have a button on the front panel for switching between handset and headset.
- Plug the supplied telephone cable into the port marked on the base.
- Connect the telephone cable to the headset port on the desk phone.
OPTION 2
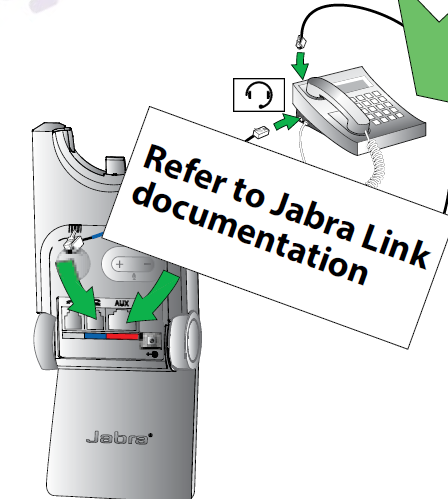
Desk Phone with Jabra Link A Jabra Link adapter enables an incoming call to be answered or ended by the headset multi-function button. Contact your local Jabra dealer to purchase a Jabra Link adapter for your specific desk phone.
- Connect the Jabra Link adapter as shown in adapter documentation supplied with the Jabra Link. On some phones the telephone cable will also need to be connected.
- Call your connected desk phone using another phone to enable the Jabra Link adapter. Wait 10 seconds before answering the phone.
OPTION 3
Desk Phone with GN1000 remote Handset Lifter
The GN1000 remote handset lifter manually lifts the desk phone handset to make or answer a call. For mounting instructions refer to documentation supplied with the GN1000.
- On the desk phone, unplug the handset cable from the phone body.
- Connect the handset cable to the port marked on the base.
- Plug the supplied telephone cable into the port marked on the base.
- Connect the telephone cable into the handset port on the desk phone.
- Connect the GN1000 cable into the port marked on the base.
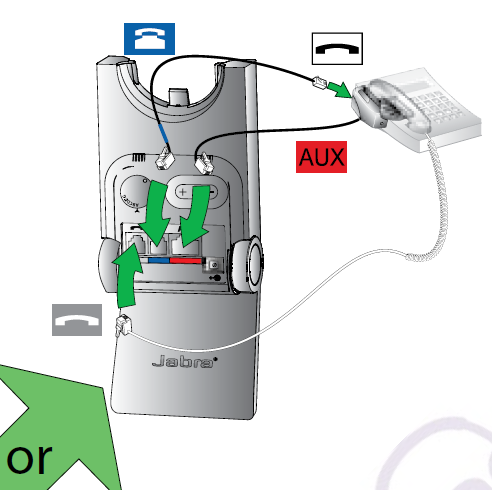
OPTION 4
Desk Phone without Headset Port
This desk phone does not have a dedicated headset port.
- On the desk phone, unplug the handset cable from the phone body.
- Connect the handset cable to the port marked on the base.
- Plug the supplied telephone cable into the port marked on the base.
- Connect the telephone cable into the handset port on the desk phone.
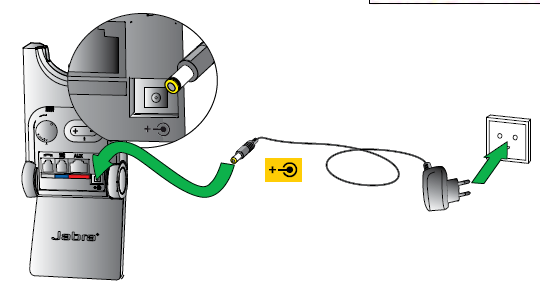
STEP 4: CONNECT TO POWER
- Plug the supplied power adapter into the port marked on the base.
- Connect the power adapter to the mains power socket.
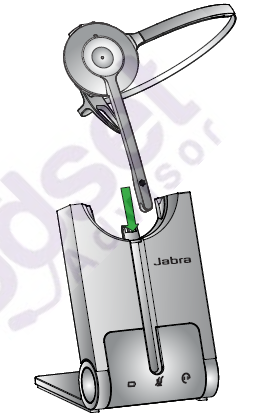
STEP 5: DOCK THE HEADSET
Dock the headset. When docked correctly the headset battery will begin charging, if needed. Charge for 20 minutes or until the battery indicator on the base steady green.
STEP 6: CONFIGURE THE SOUND
- Put on the headset, or tap the headset multi-function button if the headset is currently undocked.
- Get a dial tone by either pressing the headset button on the desk phone, or by lifting the desk phone handset. If there is no dial tone, check that all cables are connected correctly.
- Dial a friend or colleagues phone number using the desk phone. If you cannot hear anything refer to ‘Having sound problems?’ below.
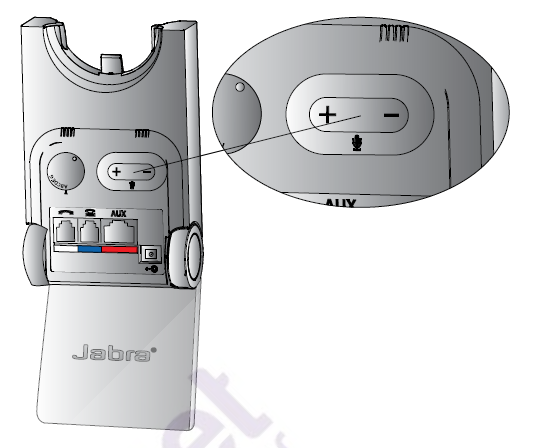
- Check your speaking volume. If the listener says your speaking volume is too quiet or too loud, adjust the microphone volume using the microphone + / – volume buttons on the back of the base. Ensure the listener does not adjust their own volume.
- When finished, end the call.
IMPORTANT
Having sound problems?
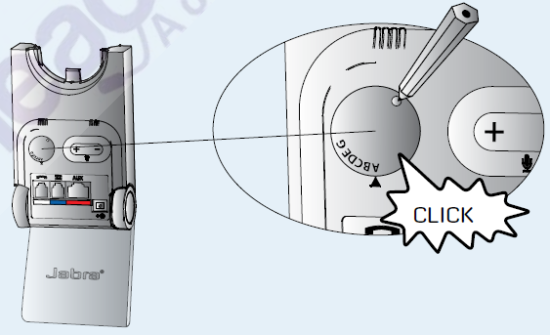
If you cannot hear anything during the test call, or the sound is distorted, try rotating the clear dial tone switch on the back of the base from A-G until the sound is optimal. For further details refer to the user manual.
YOU HAVE NOW SUCCESSFULLY CONNECTED YOUR JABRA PRO 920
HOW TO MAKE A CALL
DID YOU KNOW?
The Jabra PRO 920 has advanced settings that you can quickly and easily configure yourself. Refer to the User Manual to learn how.
DOWNLOAD RESOURCES
- Jabra WHB003BS PRO 920 Wireless Headset System for Telephones [pdf] User Guide WHB003BS, WHB003HS, PRO 920 Wireless Headset System for Telephones
- Read more: https://manuals.plus/jabra/whb003bs-pro-920-wireless-headset-system-for-telephones-manual#ixzz7hwLeos8T
FAQ’S
What is the difference between the Jabra PRO 920 and the Jabra PRO 930?
The Jabra PRO 930 has a USB connector and is powered by the computer. The Jabra PRO 920 has a power adapter and is powered by an AC outlet.
What are some of the key features of this headset?
This headset offers up to 8 hours of talk time, up to 300 hours standby time, wireless range up to 300 feet, noise-canceling microphone, call/volume control buttons on headset, mute button on base, easy-to-read display on base, battery status indicator on base, volume control on base, headset battery charge level indicator, mute button on headset, 3-year warranty.
What are some of my key benefits with this headset?
This headset offers wireless freedom from your desk phone while providing you with comfort-fit wearing style and superior sound quality. It also offers you up to 8 hours of talk time and up to 300 hours standby time. This product also offers you wireless range up to 300 feet for freedom from your desk phone as well as noise-canceling microphone for clear conversations in noisy environments. It also offers you call/volume control buttons on headset for ease in making or taking calls as well as mute button on base for convenience in muting your microphone when not in use or when making private calls. It also offers you easy-to-read display on base for information regarding calls received or missed as well as battery status indicator on base so that you can keep track of your battery life at all times. It also offers you volume control on base as well as headset battery charge level indicator so that you will always know when it is time to recharge your headset battery. Lastly, it offers you 3-year warranty for peace of mind knowing that your product will be covered if anything goes wrong with it during normal use during its lifetime.
Can I use a Jabra Pro 920 with a computer?
No, the Jabra Pro 920 does not support connection to a computer. The 14201-30 cable is used only to connect the headset to a desk phone.
How do I connect my Jabra Pro to my phone?
Android. Go to Settings and turn on Bluetooth. In the Bluetooth menu, click “Pair new device”. When your Jabra earbuds, headphones or headset appears in the list, tap it and it should be paired with your mobile device or phone.
How do I setup my Jabra 920?
Unplug GN1000 Lifter/EHS, if you have from the base/charger unit.
Dock headset onto base/charger unit.
While docked, press and hold the Multi function button. Hold for 6-7 seconds/ White LED Indicator flashes 3 times.
Plug your GN1000/EHS, if you have one.
What does flashing blue light mean on Jabra headset?
The battery indicator flashes blue when the unit enters sleep mode. This may happen after 8 hours of inactivity, for example if the USB host device is turned off, or if the USB cord is unplugged from the USB host device. See the User Manual for more information about sleep mode, and how to enable and disable it.
Why is Jabra headset not ringing?
If your Jabra wireless headset isn’t alerting you when your phone rings, usually means 1 of 3 things: Either the Handset lifter is not over the speaker, the ring sensor is off, or the ringer sensitivity control is turned down.
How do I reset my Jabra PRO 920?
To reset, follow these steps:
Put on your Jabra Pro 900 Series headset.
Simultaneously press and hold the Mute button and both Volume buttons until the voice prompt says “Factory default”.
Release the buttons. After resetting, the base will restart.
How do I turn off the ringer on my Jabra headset?
To turn on/off the ringtone signal in the headset, follow these steps.
In Jabra Direct, select your device.
Click Device.
In Device settings > Headset > Ringtone in headset, click the slider to turn the setting on/off.
Click Apply.
Where is the answer button on Jabra headset?
Prerequisites. Simultaneously press and release the Mute button and the Volume+ button to answer/end calls on supported softphones.
Why does my Jabra headset keep disconnecting and reconnecting?
Too much distance between the Bluetooth headset and the connected device can cause dropped connections. The maximum range for most headsets is 32 feet/10 meters. Try moving closer to the device you are connected to. And check the specifications on your headset to see how close you need to be for maximum connectivity.
VIDEO

Jabra WHB003BS PRO 920 Wireless Headset System for Telephones
www://emea.jabra.com/
