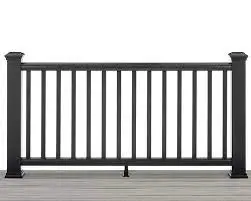

Trex Enhance Horizontal Railing

Installation Instructions
NOTES:
- TREX ENHANCE RAILINGS ARE DESIGNED TO BE INSTALLED OVER THE DECKING FRAME OR ON INSIDE OF RIM JOIST. NOTCHING OF PRESSURE-TREATED POSTS OR POSTS INSTALLED ON OUTSIDE OF RIM JOIST IS NOT ALLOWED.
- All Enhance Railing lengths are manufactured at CLEAR SPAN dimensions (spanning between space of posts): 72″ for 6′ clear span. Note that railings are designed to be slightly longer than required to allow for very slight play in post placement – trimming may be required. IT IS VERY IMPORTANT TO MEASURE FIRST.
Care and Cleaning
Maintaining the appearance of your Trex Enhance railing is important. Occasional washing is recommended. Over time your railing may show signs of weathering as a result of exposure to the elements. The frequency of cleaning will depend on the environment and exposure to various types of elements.
- Clean railing with standard cleaning vinegar or mild soap and water.
- For more detailed cleaning recommendations, please refer to the Trex Railing Care and Cleaning guide found on www.trex.com.
PARTS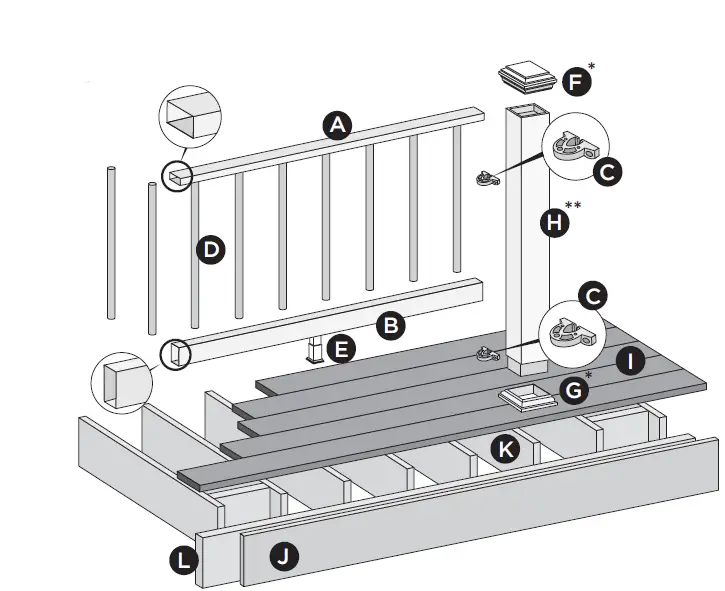
A. Top Rail
B. Bottom Rail
C. Brackets
D. Aluminum Round Balusters
E. Adjustable Foot Block
F. Post Sleeve Cap*
G. Post Sleeve Skirt*
H. Post Sleeve** – 4″ x 4″ x 48″
I. Trex Decking
J. Trex Fascia
K. Code-approved Wood Joist – 2″ x 8″
L. Code-approved Wood Rim Joist – 2″ x 8″ or Larger
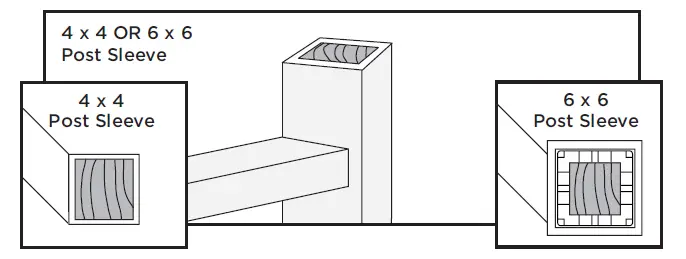
* Item not included in the railing kits. 4″ x 4″ post sleeve is designed to fit over 4″ x 4″ pressure-treated post. Actual size 4.45″ x 4.45″ x 48″
| DETERMINING BALUSTERS NEEDED | |
| Baluster Type | Per 6‘ Section |
| Horizontal Application | 15 |
Screws Supplied with RSB
C1. Wood screw for attachment of RSB to wood post/composite sleeve
C2. Self-drilling screw for attachment of RSB to rail.
HOW TO INSTALL STANDARD HORIZONTAL RAILING
Read all instructions BEFORE installation.
NOTE: Always consult local building codes for approved post installation.
Important: If using 48″ post sleeves, measure carefully to allow for clearance of both rail attachment as well as clearance for post cap attachment, and trim these before installing over pressure treated posts. For 36″ railing height, post sleeve should be cut at minimum of 40″.
Installing Pressure-Treated Posts
- PLEASE REFER TO LOCAL BUILDING CODE REQUIREMENTS PRIOR TO ATTACHING PRESSURE TREATED POSTS. ON THE FOLLOWING PAGE ARE INSTRUCTIONS GUIDELINES FOR GENERAL REQUIREMENTS.
- Posts are to be installed 6′ clear span to accommodate appropriate railing length.
- Attach posts using 1/2″ carriage bolts.
- Minimum joist size is 2″ x 8″.
- Top bolts must be 1″ from tops of joists.
- Bottom bolts must be 5-1/8″ from top bolts.
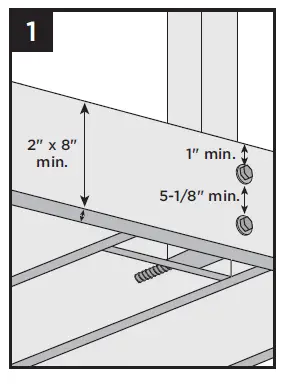
Note: Blocking MUST be added for extra strength.
Installing Post Sleeve Skirts and Post Sleeves
2. Slide post sleeve skirt over post and down to rest on decking surface. Slide post sleeve over post and position inside post sleeve skirt.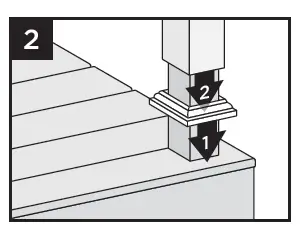
Note: Shims can be used to plumb post sleeves.
Cutting Railings (if required)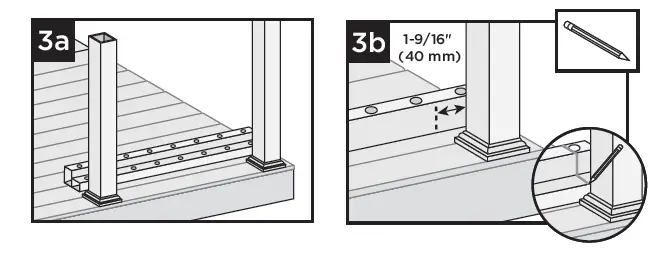
3a. Position bottom and top rails between posts, ensuring baluster holes are lined up and spaced evenly.
3b. Also allow for a minimum of 1-9/16″ (40 mm) on each end of rail for bracket placement AND baluster clearance. Mark rails at intersection of rail and post.
IMPORTANT NOTES REGARDING FOOT BLOCK INSTALLATION:
- Refer to detailed instructions included with foot block prior to installation of railing section as these include other required steps for proper installation.
Attaching Foot Block to Bottom Rail
4. Invert the bottom rail. Center and drill a hole using a 3/16″ drill bit. This will be the location for foot block attachment (to be installed last).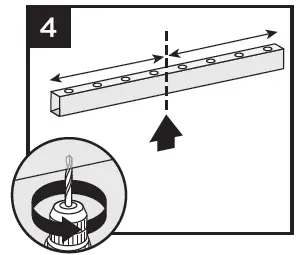
Attaching Brackets to Rails
5a. Position brackets on each end of TOP RAIL on the same side as baluster holes. Attach brackets using three #8-18×1″ self-drilling screws (provided).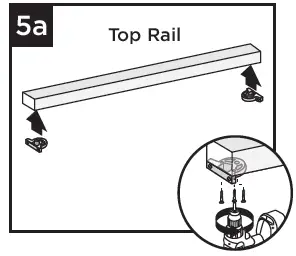
5b. Position brackets on each end of BOTTOM RAIL on the OPPOSITE SIDE of the baluster holes. Attach brackets using three #8-18×1″ self-drilling screws (provided).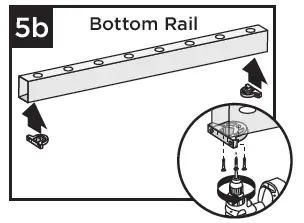
NOTE: For ease of bracket attachment place rail against stationary flat vertical surface along with bracket.
Assembling Railing Section
6a. On a clean flat surface lay bottom railing on its side. Make sure to allow enough room for installation of balusters and top rail. Place a scrap piece of 1″ decking board running parallel to bottom rail for support when installing balusters.
6b. Insert balusters into bottom rail slots until balusters are fully seated.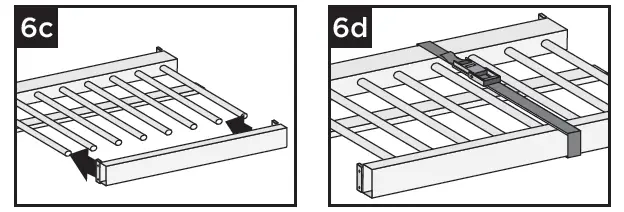
6c. Attach top rail to balusters, feeding each baluster into required slots. Start on one end and work towards the other.
6d. To help temporarily secure the railing section together, place a ratchet strap around the top and bottom rail and tighten until snug. DO NOT OVERTIGHTEN AS YOU CAN BEND THE RAILING.
Installing Railing Section to Posts
7a. Using scrap material (i.e. 2 x 4s, decking boards, etc.) cut at least three support blocks at 3-3/4″ in height. Place one each on decking surface beside each post and one near center of span.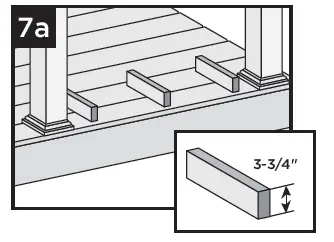
7b. Lift secured railing
section up, and CENTER this section in between the spanned posts on prepositioned support blocks.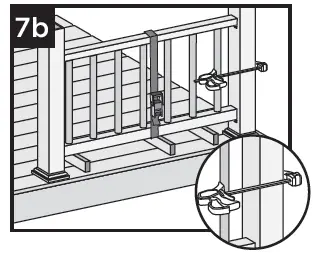
NOTE: To help stabilize railing section use a quick-grip clamp (or other type of clamp) and clamp the first baluster to post sleeve. (DO NOT OVERTIGHTEN CLAMP.)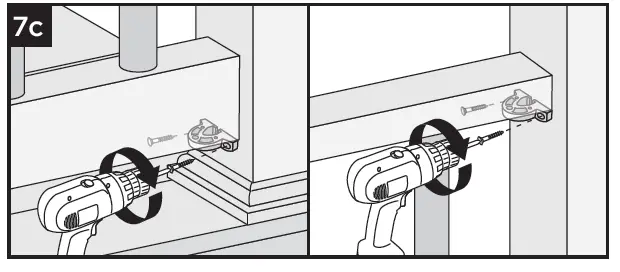
7c. Install both bottom and top brackets on each side to post using two #8-10×2″ wood screws (provided).
IMPORTANT NOTE: SET DRILL TO LOW SPEED AND LOW CLUTCH SETTING WHEN INSTALLING THESE SCREWS. DO NOT USE IMPACT DRIVER.
Attaching Post Caps and Installing Foot Block
8. Secure post caps with silicone or PVC adhesive. Attach foot block per foot block instructions.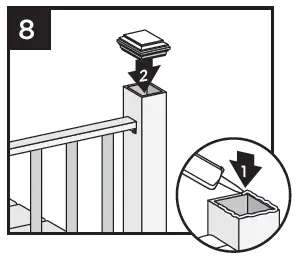
NOTE: Clean up any excess adhesive before it dries.
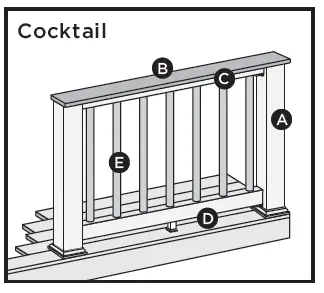
HOW TO INSTALL COCKTAIL RAILING
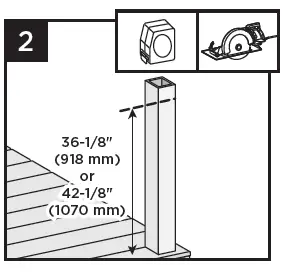
Post sleeves WILL NEED TO BE CUT.
A. Pressure-treated post with Trex post sleeve
NOTE:
- Only for use with 4″ x 4″ post sleeve.
- Trex post mounts or joist mount posts cannot be Enhance cocktail design.
B. Deck board top rail.
NOTES:
- Enhance and Escapes cannot be used
- Deck boards will need to be cut to fit each rail span
C. Enhance top rail
D. Enhance bottom rail
E. Enhance balusters
Important: ONLY use with pressure-treated 4 x 4 post (3.5″ nominal square) and 4″ x 4″ post sleeve. Trex Post Mounts or Joist Mount Posts cannot be used with Enhance Cocktail railing.
- Installing Pressure-Treated Posts, Post Sleeve Skirts and Post Sleeves See instructions on page 2.
Cutting Post and Post Sleeve - Mark and cut post and post sleeve measuring from deck surface:
- 36-1/8″ (918 mm) for 36″ (914 mm) height.
- 42-1/8″ (1070 mm) for 42″ (1067 mm) height.
- Cutting Railings See instructions on page 2.
- Attaching Foot Block to Bottom Railing See instructions on page 2.
Notes:- If installing in weather below 40°F, leave 1/8″ gap between deck boards.
- Deck boards can overhang end of last post maximum 1/2″.
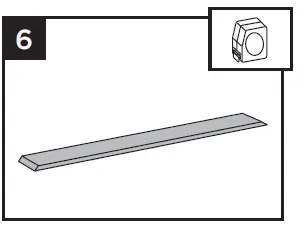
Cutting Deck Board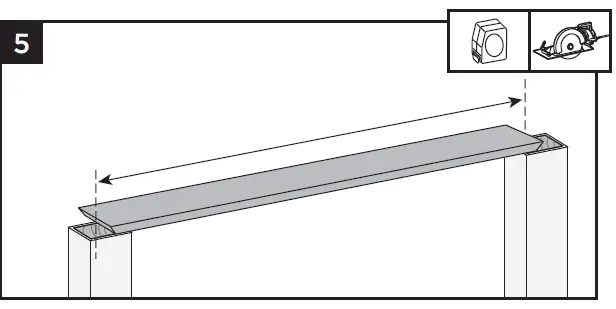
- Cut deck boards to appropriate length of railing span, remembering to include extra space on each side of the deck board to allow for attachment to the post. Decking boards must cover 1/2 of the pressure-treated post to allow this to be fastened later.
- Place inverted deck board (place top side of deck board down) on clean, flat surface. (DO NOT use Enhance or Escapes deck boards for top rail.)
 Attaching Deck Board to Enhance Top Rail
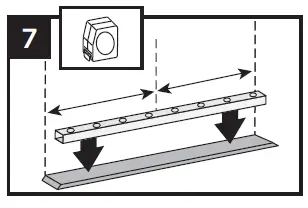
 - Place inverted Enhance top rail (orient properly so baluster holes are shown top side up), on the deck board, centered in both directions to allow final attachment to post.
- Secure deck board to Select top rail with #8-3/4″ truss-head self-drilling screws (not provided) approx. every 16″ on center. Screws are to be installed inside of the baluster holes into the decking board. DO NOT overtighten.
NOTE: A long drill bit will be required to fit inside the baluster holes.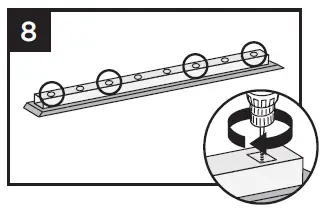
- Attaching Bracket to Rails See instructions on page 2.
- Assembling Railing Sections See instructions on page 3.
- Installing Railing Sections to Posts See instructions on page 3.
- Attaching Deck Board to Posts Attach boards on each post with Trex recommended composite screws (quantity of 2 per each board end).
- Installing Foot Block: Install foot block per detailed instructions.
 NOTE: Brackets are designed to be installed up to a 45° angle.
post sleeves work well for angles up to 45 degrees. Bottom rail brackets may need to be slightly offset to one side in order to fit properly to hold rail in place. Measure and mark first before attachment of bracket to rail to ensure bottom rail remains parallel to upper rail.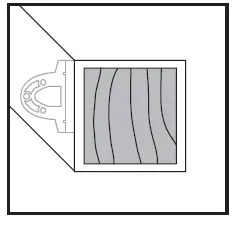
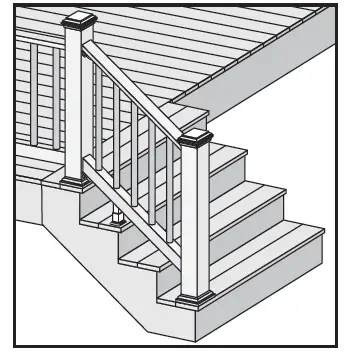
TREX ENHANCE® STAIR RAILING
IMPORTANT NOTES:
- TREX ENHANCE RAILINGS ARE DESIGNED TO BE INSTALLED OVER THE DECKING FRAME OR ON INSIDE OF RIM JOIST. NOTCHING OF PRESSURETREATED POSTS OR POSTS INSTALLED ON OUTSIDE OF RIM JOIST IS NOT ALLOWED.
- POST TO POST SPAN WILL BE LESS THAN 6′. PRIOR TO INSTALLING POSTS CALCULATE POST TO POST SPAN USING A MAXIMUM RAIL LENGTH REQUIRED AND THE ANGLE (32°-37°) AT WHICH THE RAILS WILL BE INSTALLED. DO NOT INSTALL STAIR POSTS AT 6′ SPAN, AS STAIR RAILINGS WILL THEN BE TOO SHORT.
Care and Cleaning
Maintaining the appearance of your Trex Enhance railing is important. The occasional wash is recommended as over time your railing may show signs of weathering as a result of exposure to the elements. The frequency of cleaning will depend on the environment and exposure to various types of elements.
- Clean railing using a standard cleaning vinegar or mild soap and water.
- For more detailed cleaning recommendations please refer to the Trex Railing Care and Cleaning guide found on www.trex.com.
PARTS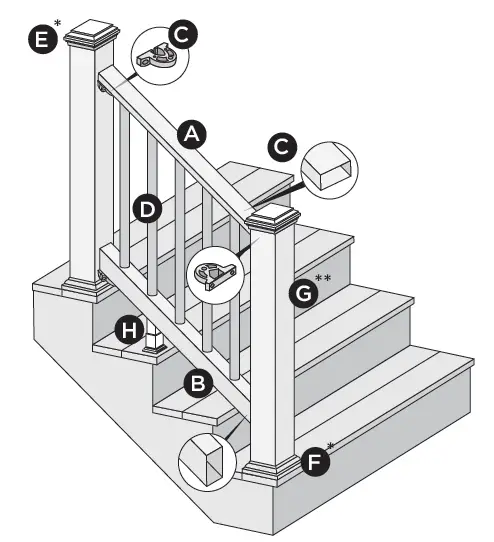
A. Enhance Stair Top Rail
B. Enhance Stair Bottom Rail
C. Brackets
D. Round Balusters
E. Post sleeve cap*
F. Post sleeve skirt*
G. Post sleeve – 4″ x 4″ **
H. Adjustable foot block (quantity of one is required for all railing span lengths)
* I tem not included in the Enhance railing kits. 4a” x 4″ post sleeve is designed to fit over 4×4 pressure-treated post.
| DETERMINING BALUSTERS NEEDED | |
| Baluster Type | Per 6‘ OC
Section |
| Stair Application | 12 |
NOTES:
- In most cases, a post and post sleeve longer than 39″ will be needed on the lower section of stair rail to accommodate stair angle.
- Make sure top and bottom posts for stairs are installed at nose of each tread.
- Ensure pressure-treated posts are installed at proper heights so when post sleeves are installed, both the pressure-treated post and post sleeve are flush at top.
Screws Supplied with Brackets
C1. Wood screw for attachment of bracket to wood post/composite sleeve.
C2. Self-drilling rail screw for attachment of railing to bracket.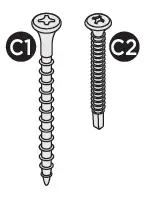
HOW TO INSTALL STANDARD RAILING
Installing Pressure-Treated Posts
- PLEASE REFER TO LOCAL BUILDING CODE REQUIREMENTS PRIOR TO ATTACHING PRESSURE TREATED POSTS.
- PRESSURE TREATED POSTS MUST BE INSTALLED ON INSIDE OF STAIR STRINGER AND AT NOSE OF STAIR TREAD.
- POST TO POST SPAN WILL BE LESS THAN 6′. PRIOR TO INSTALLING POSTS CALCULATE POST TO POST SPAN USING A MAXIMUM RAIL LENGTH REQUIRED AND THE ANGLE (32°-37°) AT WHICH THE RAILS WILL BE INSTALLED. DO NOT INSTALL STAIR POSTS AT 6′ SPAN, AS STAIR RAILINGS WILL THEN BE TOO SHORT.
- Attach posts using code approved hardware and also use added blocking.
- Bolts can be countersunk flush with framing to allow for fascia attachment.
- In most cases, a post and post sleeve longer than 39″ will be needed on the lower section of stair rail to accommodate stair angle.
NOTE: Blocking can be added for extra strength.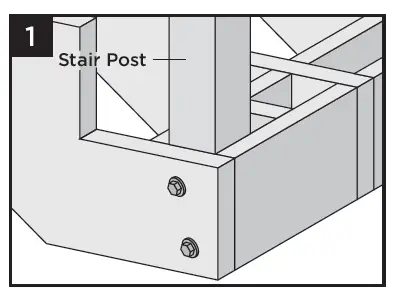
Installing Post Sleeve Skirts and Post Sleeves
2. Slide post sleeve skirt over post and down to rest on decking surface. Slide post sleeve over post and position inside post sleeve skirt.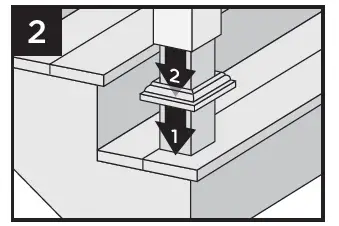
NOTE: Shims can be used to plumb post sleeves.
Measuring and Cutting Bottom Rail
3. Place a 1″ deckboard on the nose of the stair tread.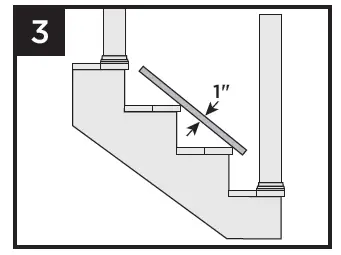
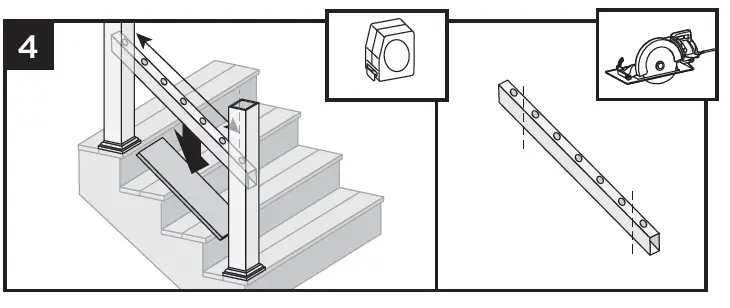
4. Set railing on top of deckboard, making sure baluster holes are vertically aligned and mark line at each intersection. When measuring, cut equal lengths from each side of railing allowing a minimum of 2″ on each end from the last baluster hole to the end of the rail. This will ensure proper baluster and bracket placement and equal spacing of balusters per each railing section.
IMPORTANT NOTE REGARDING FOOT BLOCK INSTALLATION:
- Refer to detailed instructions included with foot block prior to installation of railing section as these include other required steps for proper installation.
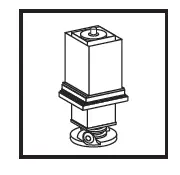
Marking Location for Foot Block to Bottom Rail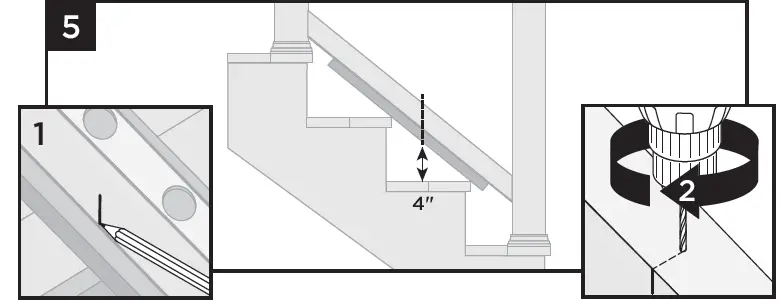
5. Mark approximate location for foot block, allowing a measurement of 4″ maximum. Invert the bottom rail, and at marked location drill a hole using a 3/16″ drill bit in the center of the channel. Foot block is to be installed at last step.
Attaching Brackets to Bottom Rail
6. Snap the top stair adaptor bracket (labeled TOP) to the standard bracket. Repeat for remaining bottom bracket.
TIP: Use a dap of super glue when snapping bracket together. This will help stabilize bracket when installing.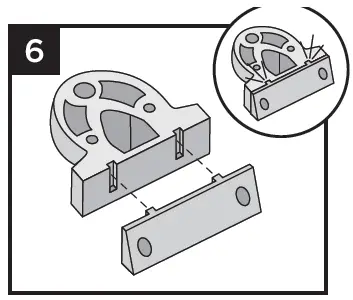
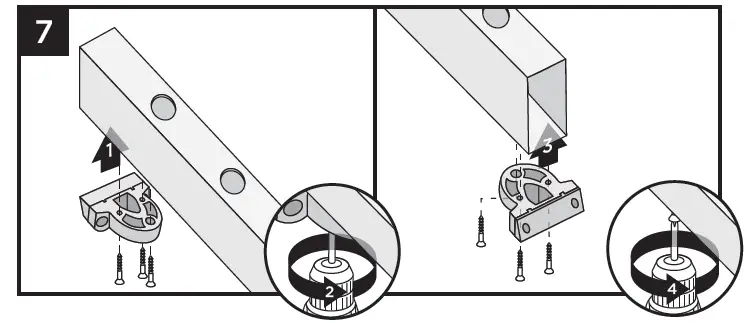
7. On the BOTTOM RAIL, attach the assembled bottom stair brackets to the OPPOSITE SIDE of the baluster holes. Attach both brackets using three #8-18 x 1″ self-drilling screws (provided).
Attachment of Bottom Rail to Post
NOTE: For attachment of brackets to posts, use at least a 3″ long drill bit or extension so as to not damage sides of rails when installing.
TIP: Pre-drill prior to screw installation using a 7/64″ drill bit
8a. Keeping deck board on stair treads, center bottom rail between posts and attach bottom rail stair bracket to upper post using two #8-10 x 3″ wood screws (provided).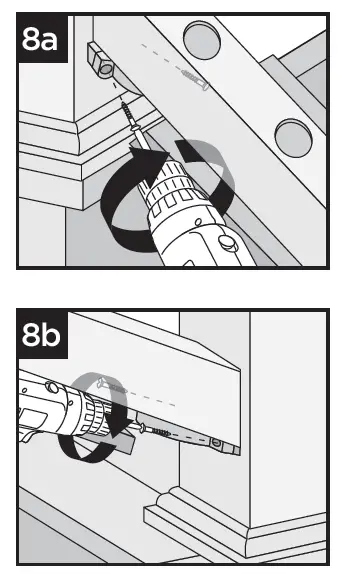
8b. Attach bottom stair rail stair bracket to lower post using two #8 10 x 3″ wood screws (provided). (deck board can now be removed).
IMPORTANT NOTE:
SET DRILL TO LOW SPEED AND LOW CLUTCH SETTING WHEN INSTALLING THESE SCREWS. DO NOT USE IMPACT DRIVER.
Measuring and Cutting Top Stair Rail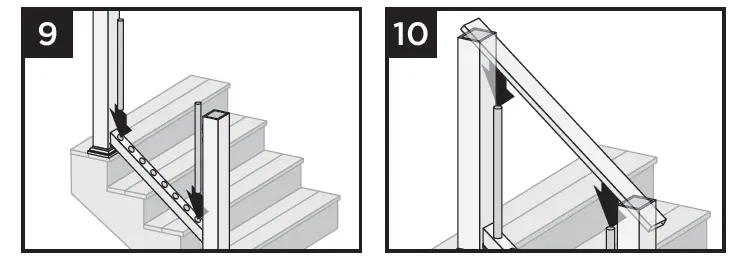
9. Place two balusters into lower stair rail at each end closest to the post.
10. Position top stair rail onto balusters, ensuring balusters are fully seated in rail (position to side of post), and ENSURE balusters are spaced evenly AND parallel with posts.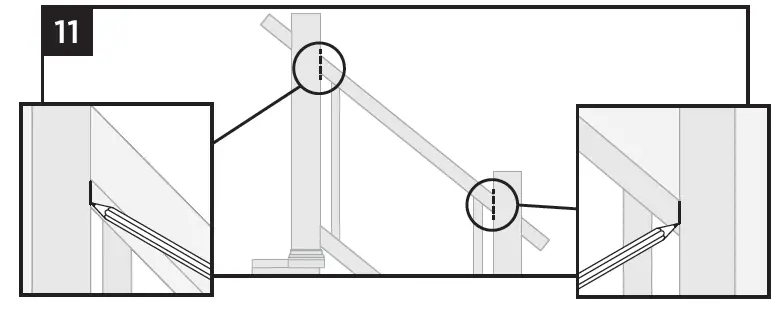
11. Mark top stair rail at post intersections.
12. Remove rail, and cut along the marks.
NOTE: Verify the height of the railing before installing rail to post to ensure this meets proper height requirements for stairs.
Attaching Brackets on Top Stair Rail
13. Snap the top stair adaptor bracket (labeled TOP) to the standard bracket. Repeat for remaining bracket.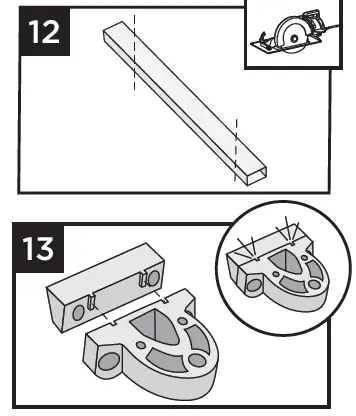
TIP: Use a dap of super glue when snapping bracket together to help stabilize bracket when installing.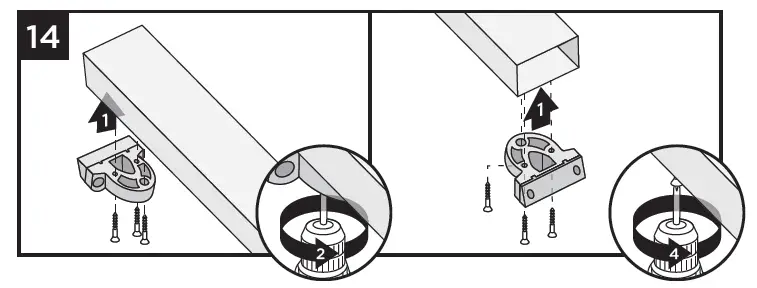
14. On the TOP RAIL, attach the assembled stair brackets to the side WITH the baluster holes. Attach both brackets using three #8-18 x 1″ self-drilling screws (provided).Installing Balusters
15. Slide remaining balusters into bottom rail until balusters are fully seated.
Attachment of Top Rail to Post
16. Place top rail onto balusters, allowing the top rail to rest on the surface of the balusters.
NOTE: For attachment of brackets to posts, use at least a 3″ long drill bit or extension so as to not damage sides of rails when installing.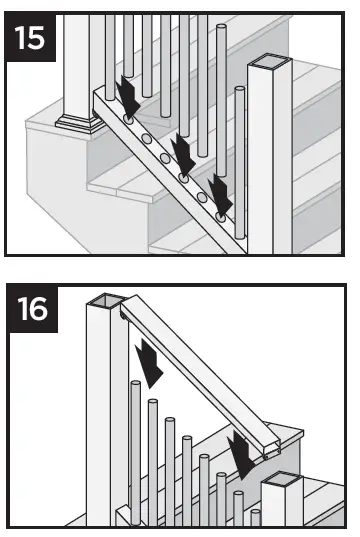
TIP: Pre-drill prior to screw installation using a 7/64″ drill bit.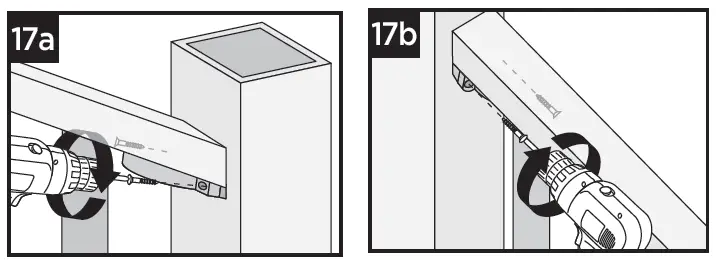
17a. Attach top stair rail bracket to upper post using two #8-10 x 3″ screws (provided).
17b. Attach top stair rail bracket to lower post using two #8-10 x 3″ screws (provided).
IMPORTANT NOTE: SET DRILL TO LOW SPEED AND LOW CLUTCH SETTING WHEN INSTALLING THESE SCREWS. DO NOT USE IMPACT DRIVER.
Attaching Post Caps and Installing Foot Block
18. Secure post caps with silicone or PVC adhesive. Attach foot block per foot block instructions.
NOTE: Clean up any excess adhesive before it dries.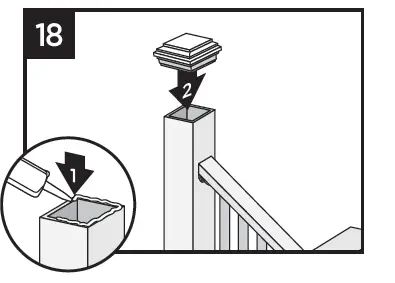
HOW TO INSTALL COCKTAIL STAIR RAILING
IMPORTANT NOTES:
- Only for use with pressure-treated 4×4 post(3.5″ nominal square) and 4″x4″ post sleeve. Trex post mounts or joist mount posts cannot be used with Trex Enhance stair cocktail. Cutting post and post sleeve only apply to the Cocktail style railing.
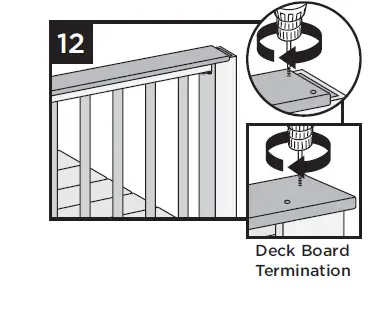
- THE DECK BOARD USED IN ENHANCE STAIR COCKTAIL RAILING WILL NEED TO TERMINATE AT THE UPPER STAIR POST AS SHOWN BELOW. THE DECK BOARD WILL HAVE TO BE TOE-NAILED INTO THE SIDE OF THE POST IN THESE AREAS USING 2 APPROPRIATE COMPOSITE DECKING SCREWS – PRE-DRILLING IS RECOMMENDED.
- Installing Pressure-Treated Posts See instructions on page 5. (See note above in regards to not cutting post/post sleeve).
- Installing Post Sleeve Skirts and Post Sleeves See instructions on page 6.
- Measuring and Cutting Bottom Stair Rail See instructions on page 6.
- Marking Location for Foot Block to Bottom Rail See instructions on page 6.
- Attaching Brackets to Bottom Rail See instructions on page 6.
- Attachment of Bottom Rail to Post See instructions on page 6.
- Measuring and Cutting Top Stair Rail See instructions on page 7.
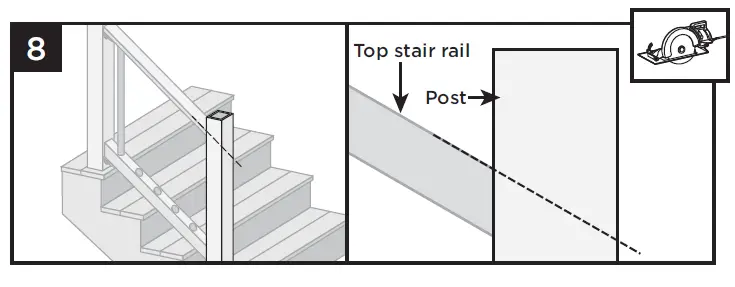
Cutting Post and Post Sleeve - Cut lower post/post sleeve at proper angle so this is flush with the top of the top rail.
- Attaching Brackets on Top Stair Rail See instructions on page 7.
Measuring and Cutting Deck Board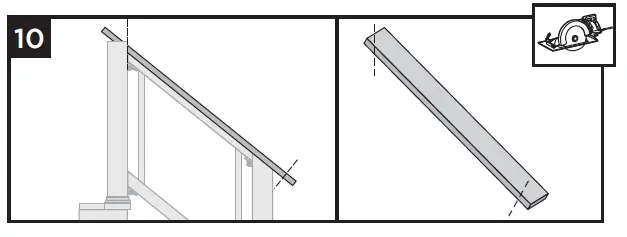
- .Measure accordingly and cut deck boards to appropriate length of railing span also allowing for additional decking material that will be installed over the lower stair rail post.
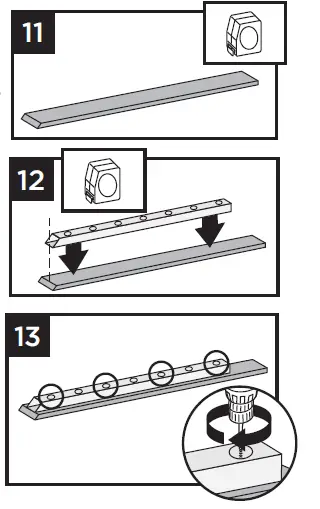
Attaching Deck Board to Enhance Top Stair Rail - Place inverted deck board (place top side of deck board down) on clean, flat surface.
Attaching Deck Board to Enhance Top Rail - Place inverted Enhance top rail (orient properly so baluster holes are shown top side up), on the deck board so the angled cuts will align properly along with centering the top rail on the deck board.
- Secure deck board to Enhance top rail with #8-3/4″ trusshead self-drilling screws (not provided) approximately every 16″ on center. Screws are to be installed inside of the baluster holes into the decking board.
NOTES:- DO NOT overtighten.
- Note that a long drill bit will be required to fit inside the baluster holes.
- Installing Balusters See instructions on page 7.
- Attachment of Top Rail to Post See instructions on page 7.
Attachment of Deck Board to Post
- Attach deck board to lower post with Trex-recommended composite screws (quantity of 2 per each post/board end).
- Where deck board terminates at upper post, PRE-DRILL and toenail two approved composite deck screws as shown into post, being careful to avoid hitting stair bracket.
Installation of Foot Block - Attach foot block per foot block instructions.
NOTE: Construction methods are always improving. Please ensure you have the most up-to-date installation instructions by visiting: trex.com
