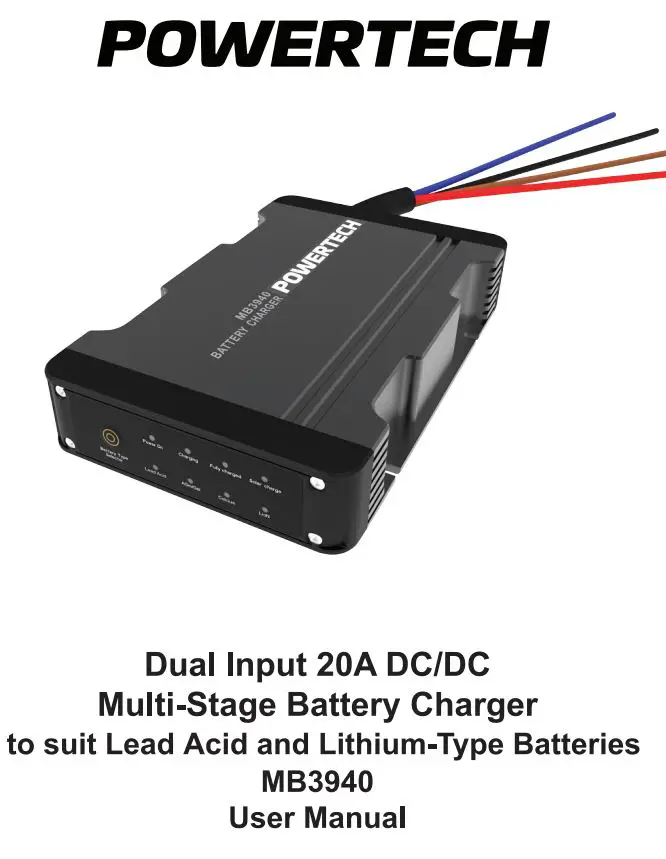
POWERTECH MB3940 Dual Input 20A DC/DC
 Multi-Stage Battery Charger to Suit
Lead Acid and Lithium-Type
Batteries User Manual
Important Safety Instructions
![]() WARNING!
WARNING!
To avoid any personal injury, please read the safety instructions below.
This battery charger is not intended for use by children or infirm persons without supervision.
FOR AUTOMOTIVE AND RECREATIONAL VEHICLE 12V DEEP CYCLE BATTERY USE ONLY. NOTTO BE USED WITH DRY CELL BATTERIES.
- During the charging process, do not use a naked flame near a battery. Batteries generate explosive gasses during the charging process that may explode.
- Never smoke or light cigarettes near a battery.
- Do not place tools on top of a battery or allow tools to fall on the battery to prevent the chance of a short circuit and sparks.
- Always wear eye protection when charging a battery.
- Ensure charging and testing is conducted in a well-ventilated area.
- Inadequate ventilation may over-heat the charger and cause in-efficient operation.
- This battery charger is not intended for outdoor operation. Do not expose it to moisture or extreme weather conditions.
- The ACID/FLUID within a battery is highly corrosive and poisonous. It can produce flammable and toxic gases when recharged and will explode if ignited. When working with batteries, always wear eye protection, remove jeweler and ensure the area is well ventilated. If spilled it will cause severe burning to eyes, skin, clothing, damage paintwork and corrode many metals. Ensure that power is disconnected from any appliance in the vicinity of the spill and immediately wash any area that has been affected with water.
The warnings, cautions and instructions detailed in this instruction manual cannot cover all possible conditions and situations that may occur. Common sense and caution are factors which cannot be built into this product and must be supplied by the operator.
Key Charger Features
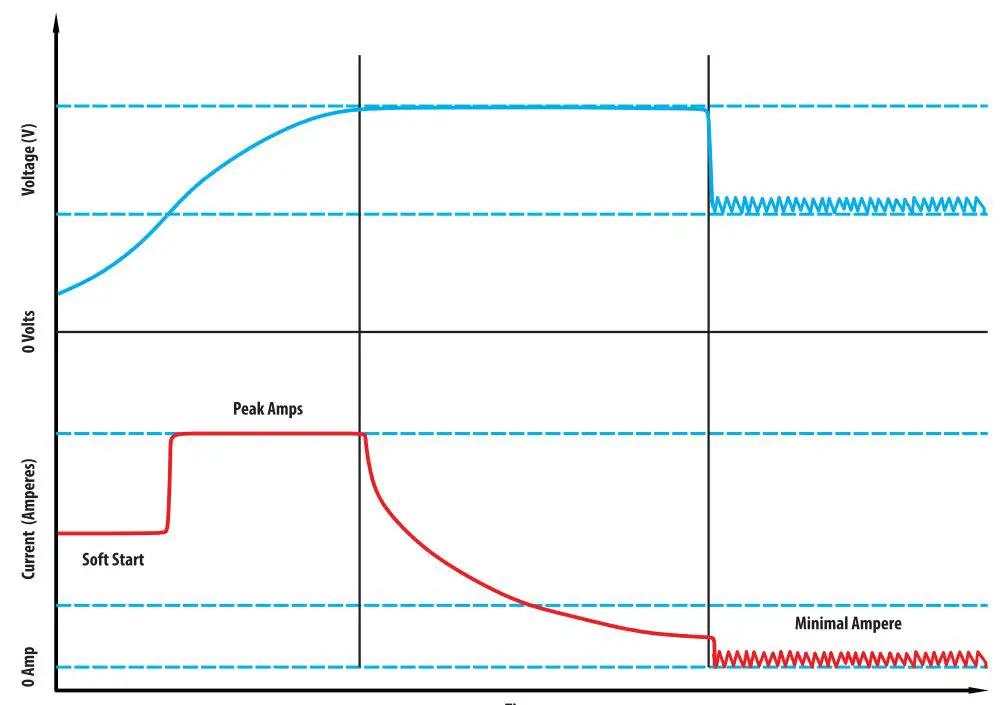
This charger is a sophisticated multi stage charger, utilizing switch mode
and fully automatic computerized control, designed to charge most 12 Volts AGM/Gel, Lead Acid Lion and Calcium batteries.

- Heavy duty aluminum case and mounting brackets
- Microchip monitoring and control
- Fully automatic high frequency multi stage charging
- Pulse mode technology that reduces oxidation, evens electrolyte consistency and minimizes temperature equating to longer battery life
- Easy push button chemistry select: AGM/Gel, Calcium, Lion, Deep Cycle, VRLA and conventional flooded Lead-Acid batteries
- Internal charger temperature monitoring and power output control
- LED indicators showing state of charge
- Over charging, short circuit and over temperature protection
- Reverse polarity protection:
1. Input reverse polarity protection
2. Output reverse polarity protection - Thermal overload protection
- Solar input overload protection
- Power cut memory function: once selected, the charger will remain on this battery type until it is changed
Installation Options/ Instructions
Installing the Charger
Installation of this unit will require twin core wiring – and suitable cable connectors (not included). See specifications page for details.
Any existing cables used in conjunction with this charger will require checking to ensure size is suitable gauge. Where necessary replace with suitable gauge wiring if they do not meet minimum specifications.*
- Locate where you are going to install the DC-DC charger. Ensure the charger is located in a suitable dry area in the vehicle or caravan.
- Ensure the charger is securely mounted. Charger can be mounted overhead, vertically or horizontally.
- Next, measure required cable length from the main vehicle battery through to the location of the DC-DC charger.
- Ensure ALL cabling meets specification and will not be exposed to excessive heat/moving parts or abrasion.

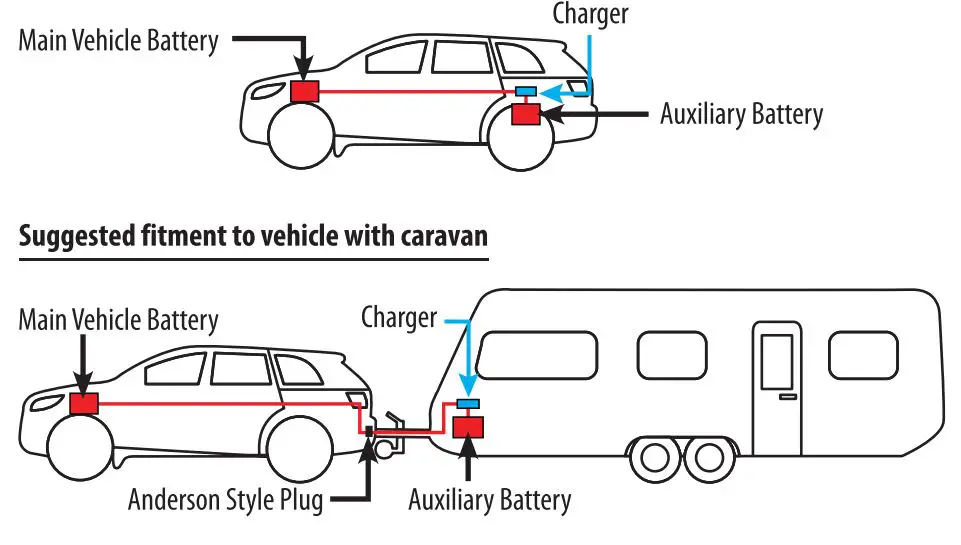
- If the charger is located in a camper/caravan we recommend the use of an Anderson style plug between the tow vehicle and the camper/caravan as shown below.
- Fit suitable connectors on either end of the twin core cables.
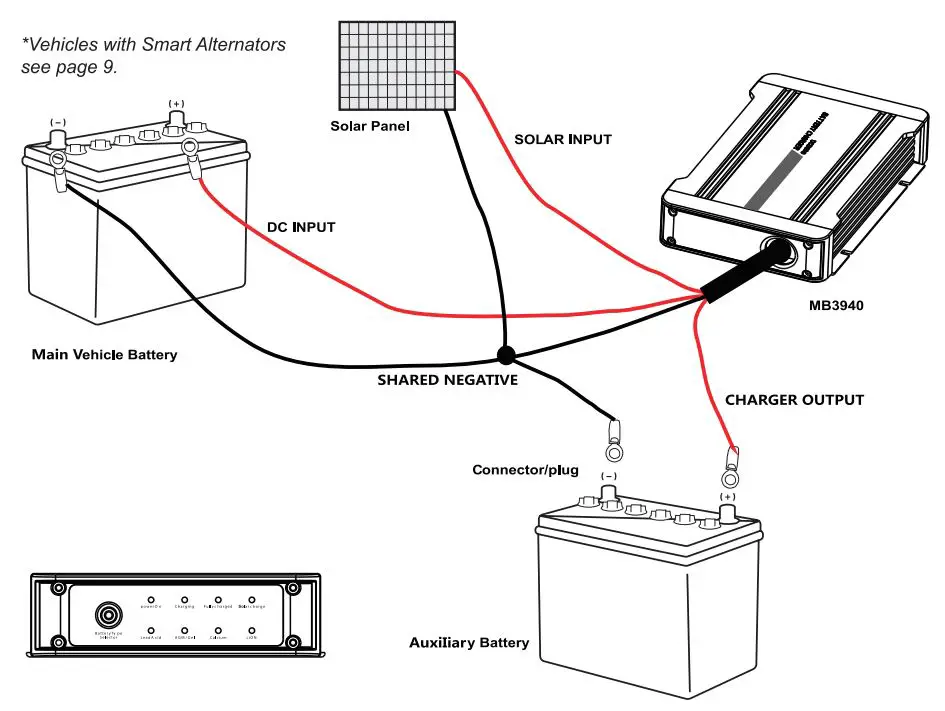
- Connect the auxiliary battery to(-) shared negative and(+) charger output using twin core wiring as per recommended cable size.

- Using the twin core wiring laid between the main starting battery and the DC-DC charger, connect the red(+) to the(+) DC input terminal and the black(-) to the(-) shared negative on the rear of the charger. Finally, make the power connections to the main starting battery of the vehicle. It is recommended to install a 25 Amp circuit breaker (not included) as shown on main diagram. The circuit breaker should be located close to the starting battery.
- Check all connections are tight.
Suggested fitment to vehicle only
Operating The Charger
CHARGER DISPLAY:
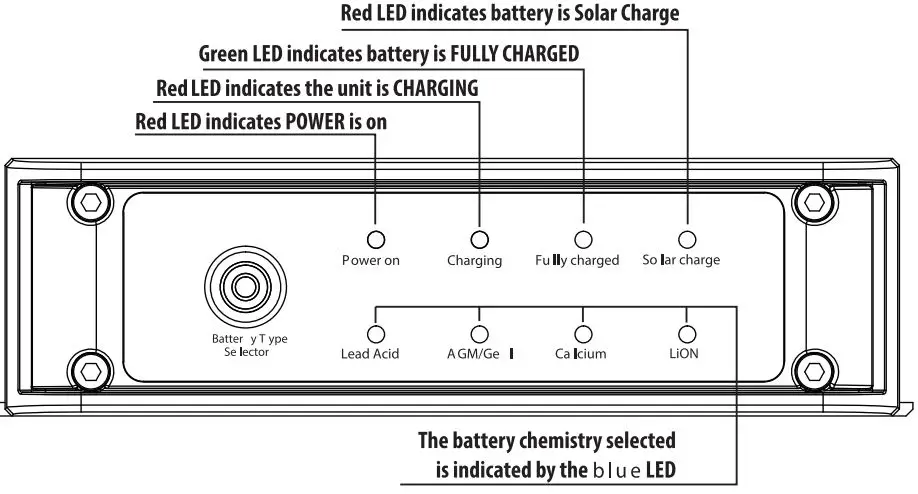
1. DC BATTERY
Once correctly installed, the MB3940 charger is a simple set and forget dual battery switch.
- Start the vehicle and let it idle.
- The charger will now recognize that there is charge being applied to the main starting battery.
- Once the main starting battery has reached 13.o volts the charger will begin to charge the auxiliary battery.
- The initial default setting is for AGM/Gel batteries.
- If you are charging a battery with a different chemistry simply change the battery type by pressing the battery type selector button on the front panel of the charger.
- Once selected, the charger will remain on this battery type until it is changed.
- The charger will continue to operate even after the vehicle has been switched off, however once the main starting battery falls below, 3.0 volts the charger will automatically shut off.
2. Solar Input
Once correctly installed, the MB3940 charger is a simple set and forget dual battery switch.
- Once connect the input terminal with solar panels positive and negative, the charger will transfer to solar charge mode.
- If you are charging a battery with a different chemistry simply change the battery type by pressing the battery type selector button on the front panel of the charger.
- Solar charging requires an input of 16 to 25 volts from solar panels. When available solar panel voltage falls below 16 volts no charge will be delivered to auxiliary battery.
Specifications
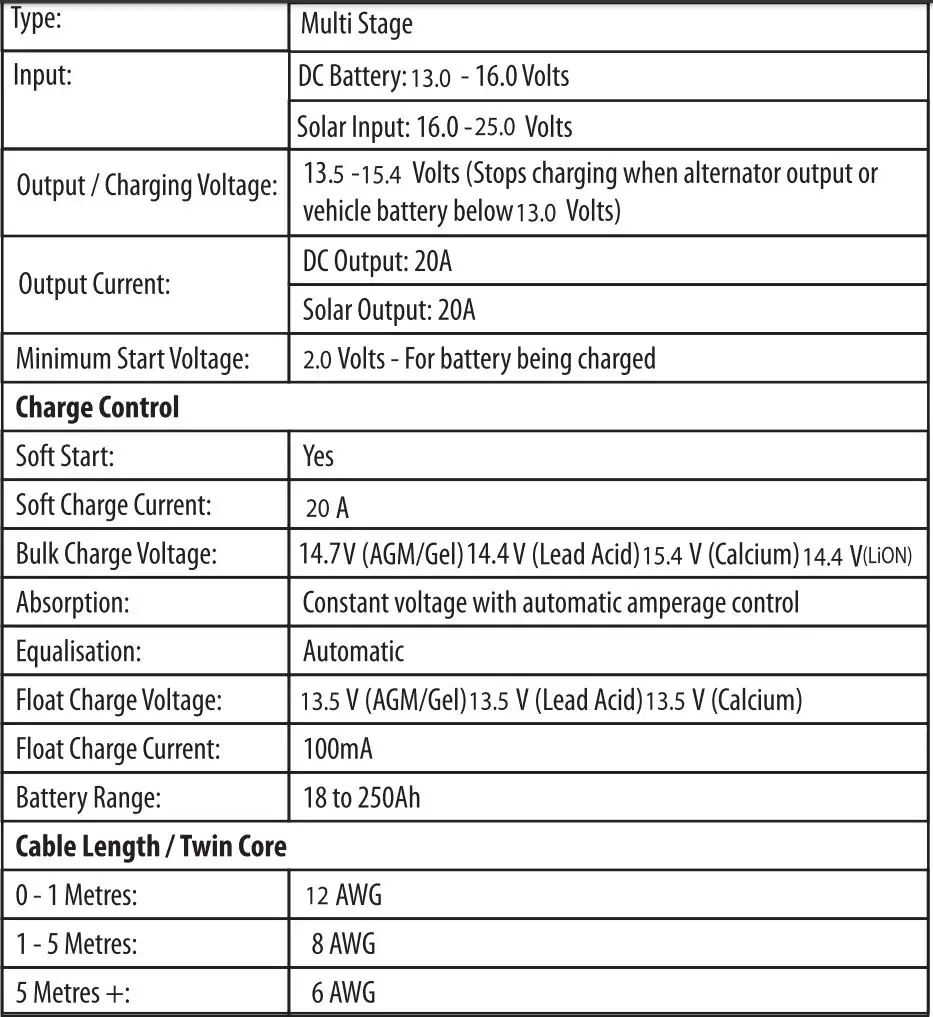
![]() WARNING!
WARNING!
Failure to use recommended wiring will severely impact on performance of DC to DC charger.
Charging voltages:
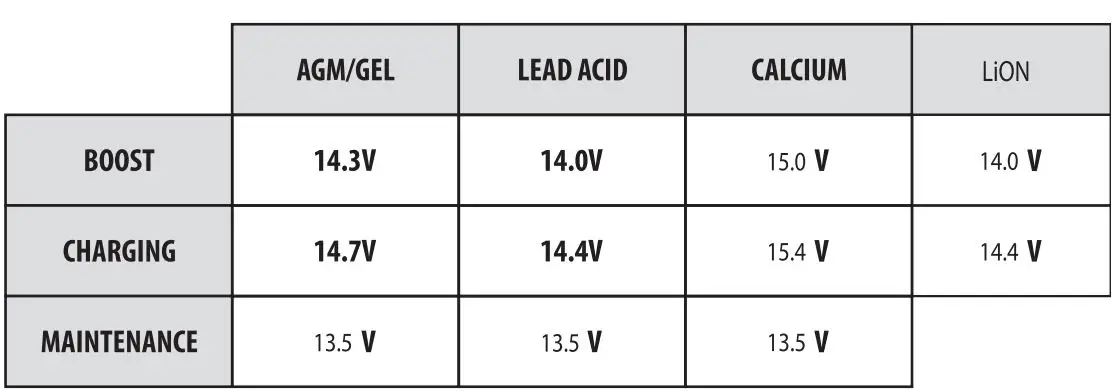
NOTE: Battery manufactures sometimes specify charging voltages. Not observing their charging instructions may void your battery’s warranty.
Additional Information
Deep cycle batteries
It is expected that this charger will be used to charge a ‘deep cycle’ type auxiliary battery. Deep cycle batteries are designed to provide battery power to run items like fridges and lighting in caravans and campers.
It is generally accepted that the life of a deep cycle battery can be extended if it is not discharged below 50% of its full capacity. A fully charged 100 amp battery in good condition should offer 50 amp hours of power without impacting on its normal life expectancy.
Your average compressor style fridge uses up to 5 amps. Over a 24 hour period it should use approximately 24 amp hours. Therefore if the 1 00AH battery is operating only the fridge (and receives no additional charge) it ideally will require recharging after 48 hours.
To replenish these 80 amp hours using a 20 amp DC -DC charger will require at least 5 hours of driving. A twenty amp unit will require at least 2.5 hours of driving to fully recharge the battery. Undercharging a battery and discharging to below 50% can severely impact on life expectancy of most deep cycle batteries.
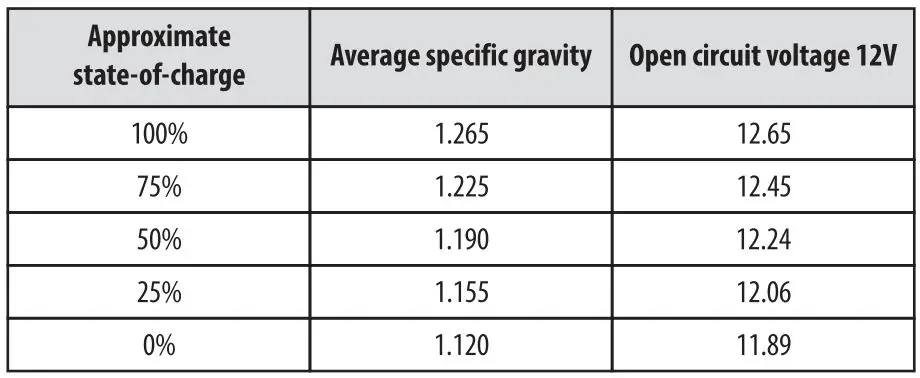
The readings are taken at room temperature of 26 °C (78 °F); the battery had rested for 24 hours after charge or discharge.
Voltage readings & specific gravity of electrolyte (lead acid batteries) can give an indication of your battery’ state of charge.
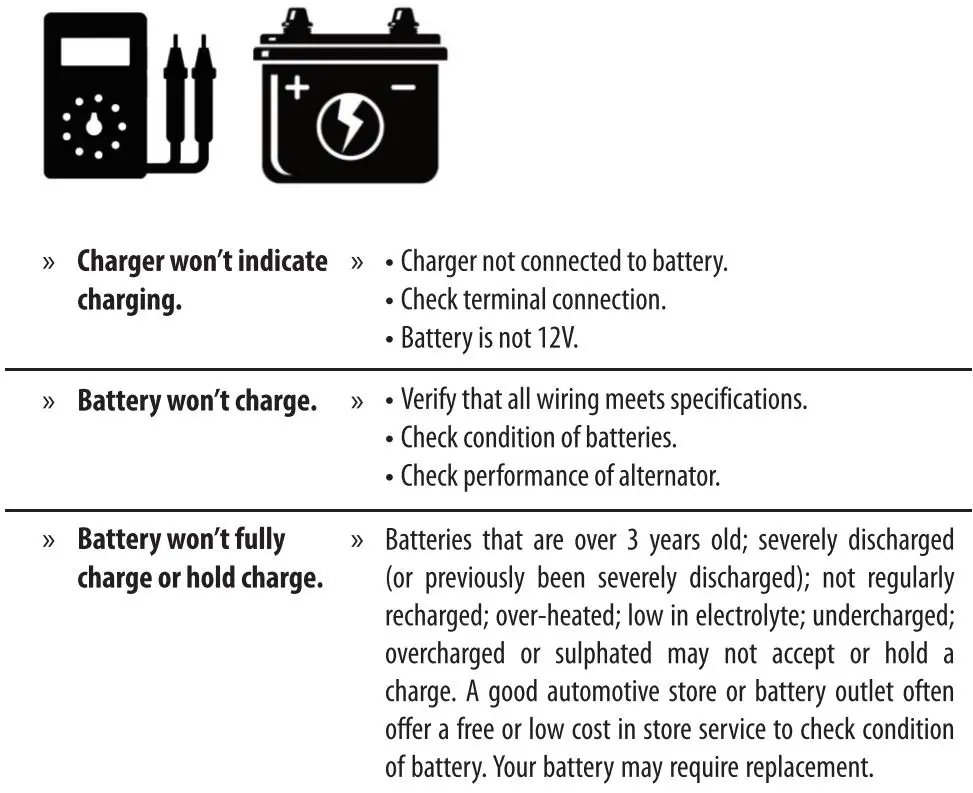
Fault Finding
Note for Vehicles using Smart Alternators:
The negative input terminal of the MB3940 must be connected to vehicle chassis NOT Starter Battery negative terminal.
Distributed by:
Electus Distribution Pty. Ltd. 320 Victoria Rd, Rydal mere NSW 2116 Australia
www.electusdistribution.com.au
Made in China
