INSTRUCTION MANUAL

Beurer Thermometer
Model: FT 60
3 in 1 Forehead thermometer
Dear customer,
We are happy that you have decided on a product from our range. Our name stands for high-quality and exhaustively tested products from the areas of warmth, gentle therapy, blood pressure, body temperature, weight, massage and air.
Please read these instructions for use carefully and follow the directions.
Yours faithfully,
The Beurer Team
1.Important notes
- This device is a sensitive electronic device. Please treat it carefully and do not expose it to any mechanical impacts.
- Do not expose the thermometer to direct sunlight.
- The FT60 thermometer is only designed for the measuring area on the human body stated in the instructions for use.
- The device should be in the room in which the measurement is made for at least 30 minutes before use.
- The thermometer is NOT waterproof. For this reason, direct contact with water or other liquids should be avoided.
- Clean the measuring tip after each use with a soft cloth moistened with disinfectant.
- Check before each use that the lens is intact. If it is damaged, please contact the dealer or service address.
- The thermometer was constructed for practical use but cannot replace a visit to the doctor.
- This device is not intended for commercial or clinical use.
- The device is intended only for the purpose given in these directions for use.
- Repairs must be carried out only by authorised service agents. Otherwise the guarantee becomes void.
- This device complies with EU Directive 93/42 EEC.
- This device complies with ASTM E 1965-98.
- This unit is in line with European Standard EN60601-1-2 and is subject to particular precautions with regard to electromagnetic compatibility (EMC). Please note that portable and mobile HF communication systems may interfere with this unit. For more details, please contact customer service at the address indicated.
- If you have further questions about using our devices, please contact your dealer or Customer Service.
- Please read these instructions for use carefully and keep them for later use, be sure to make them accessible to other users and observe the information they contain.
2. What you should know about using this thermometer
Before using a forehead thermometer, an ear thermometer or a conventional rod thermometer, the following should be noted: The different thermometers listed above are suitable for measuring body temperature in different parts of the body: forehead thermometer: measurement only on the forehead, ear thermometer: measurement only in the ear, rod thermometer: rectal (in the back passage), axillary (under the arm) or oral measurement (in the mouth). The temperature varies depending on the part of the body where the measurement is taken. The difference in healthy persons between different parts of the body can be between 0.2 – 1°C. The approximate normal temperature ranges are as follows:
- forehead temperature – measured with a forehead thermometer: 35.8 °C to 37.6 °C.
- Ear temperature, measured with an ear thermometer: 36.0 °C to 37.8 °C.
- Rectal temperature, measured with a conventional thermometer: 36.3 °C to 37.8 °C.
- orally measured temperature – measured with a conventional thermometer: 36.0 °C to 37.4 °C.
Beurer-Tip:
Temperatures measured with different thermometers cannot be compared with one another. You should therefore tell your doctor or bear in mind if you are diagnosing yourself what thermometer you used to take your temperature and in what part of the body.
The temperature of a healthy person is also influenced by the following factors:
- The person’s individual metabolism.
- Age (body temperature is higher in babies and small children and falls with increasing age. Greater temperature fluctuations occur faster and more often in children).
- Clothing.
- The outside temperature.
- The time of day (body temperature is lower in the morning and increases during the day towards evening).
- Preceding physical and, to a lesser extent, mental activity.
Beurer-Tip:
Taking the temperature gives a measurement that provides information about a person’s current body temperature. If you are uncertain about interpreting the results or if the result is abnormal (e.g. fever), you should consult your doctor.
This also applies in the case of slight temperature changes if there are other symptoms of illness such as agitation, severe sweating, flushed skin, fast pulse rate, tendency to collapse etc.
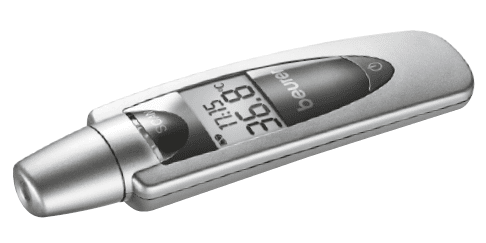
3. Description of device


4. Functions
This infrared thermometer is for measuring
– temperature at a person’s forehead,
– surface temperature of objects and liquids,
– ambient temperatures.
The thermometer also offers additional functionalities:
– 9 memory locations for simple plotting of changes in temperature,
– date and time, also with all stored temperatures measured,
– Optical and acoustic fever alarm at temperatures over 37.5 °C,
– switchable to °C and °F.
5. Operation
Remove the protective cap and switch on the thermometer with the “ ” button. After a short self-test and two short beep tones, the thermometer is ready for forehead temperature measurement.

5.1 Setting time and date
With the thermometer switched on, hold the “ ” button depressed for 5 seconds. As soon as the “SET” symbol appears in the display, you can use the “SCAN” button to set in turn the 12 or 24 hour mode, hour, minute, year, month and day (‚24‘ appears in the display for the 24-hour mode). Confi rm the values set in each case with the “ ” button.
5.2 Batteries
The Type 3V CR2032 battery is already fi tted and depending on usage has a life of around 3000 measurements. When the battery gets weak, the battery warning symbol appears . It is still possible to measure the temperature. Battery must be replaced. When the battery symbol fl ashes , the battery must be exchanged by sliding the battery compartment cover off to the rear. Switch off the device, press the batttery compartment lock with a sharp object and slide the battery compartment cover downwards at the same time.
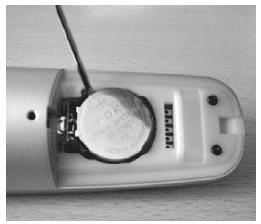
Insert a new battery of the same type with the positive pole at the top. Close the battery compartment cover again. Used batteries should not go into domestic refuse. You are legally obliged to dispose of the batteries correctly. Dispose of them through your electrical dealer or local recycling centre.
Note: you will fi nd these symbols on batteries containing toxic substances: Pb = battery contains lead, Cd = battery contains cadmium, Hg = battery contains mercury. The battery in this device does not contain toxic substances.

6. During use
Always ensure that the sensor is clean and undamaged. Switch on the thermometer with the “ ” button.
6.1 Forehead measurement
After a short self-test and two short beeps, the thermometer is ready for measuring the temperature at the forehead/temple. The infrared thermometer is in ‘Forehead thermometer’ mode. This is indicated by the symbol .
Note that
– the thermometer must have been at least 30 minutes in the room in which the measurement is made,
– the measuring result may be falsifi ed by physical activity, fundamentally increased sweat formation on the forehead,
consumption of vasoconstrictive medications and skin irritations,
– the forehead or temple must be free of sweat and cosmetics.
Apply the thermometer to the left or right temple and press the “SCAN” button. Move the thermometer to and over the temple. During the measurement you can hear short beeps signalling that the thermometer has found a new maximum temperature. The end of the measuring time is signalled with a long beep. Release the “SCAN” button. You can now read off the temperature measured. The LED is also illuminated according to the test result: a green LED indicates that body temperature is within the normal range, but a red LED lights up with measured values over 37.5 °C, i.e. it is a fever alarm. The measurement normally takes from 5 to 8 seconds, but can take up to 30 seconds.
The thermometer signals with two short beeps and a no longer flashing forehead symbol that the thermometer is ready for a new measurement.

6.2 Saving the temperatures measured
The temperature last measured, i.e. only the last temperature of a series measured, is saved automatically as soon as the thermometer is switched off. There are 9 memory locations available for this.
You can call up the last temperature measured with the “POWER ” button. The date and time are also shown. The LED does not support any requests for stored measured values. If you continue to hold down the “ POWER ” , you will enter a special measuring mode, in which the thermometer will not make a correct measurement. In this event, allow the thermometer to switch off automatically after about 1 minute and then switch it on again.
6.3 Surface temperatures
When you want to measure surface temperatures with this infrared thermometer, you must change to the “SCAN” mode.
With the thermometer switched on (standard forehead thermometer mode) keep the “ ” button depressed and at the same time press the “SCAN” button. This mode is indicated with the symbol. If you keep the “SCAN” button depressed, the surface temperature measured is continuously displayed. You can apply the sensor tip directly to the surface to be measured or measure at close range (do not immerse in liquids).
Note that the temperature displayed is the surface temperature measured but not adjusted. It cannot be compared with the forehead temperature.
6.4 Ambient temperature
After the measurement, the thermometer automatically switches to standby mode after about 1 minute, but only if the time has been set. This mode is identified by the symbol and the ambient temperature is shown continuously.
If you want to use the thermometer to measure the ambient temperature, it should be positioned so that the measurement is not influenced by solar radiation or other influences such as cold draughts from air-conditioning systems. In addition to the ambient temperature, which is updated once every minute, the date and time are displayed alternately.
6.5 Changing the temperature unit
You can display the temperature in degrees Celsius (°C) or degrees Fahrenheit (°F). With the thermometer switched off or in standby mode, select the unit by holding down the “SCAN” button and at the same time pressing the “ ” button.
Keep the two buttons depressed until the temperature unit changes. All stored temperatures are displayed in the new temperature unit.
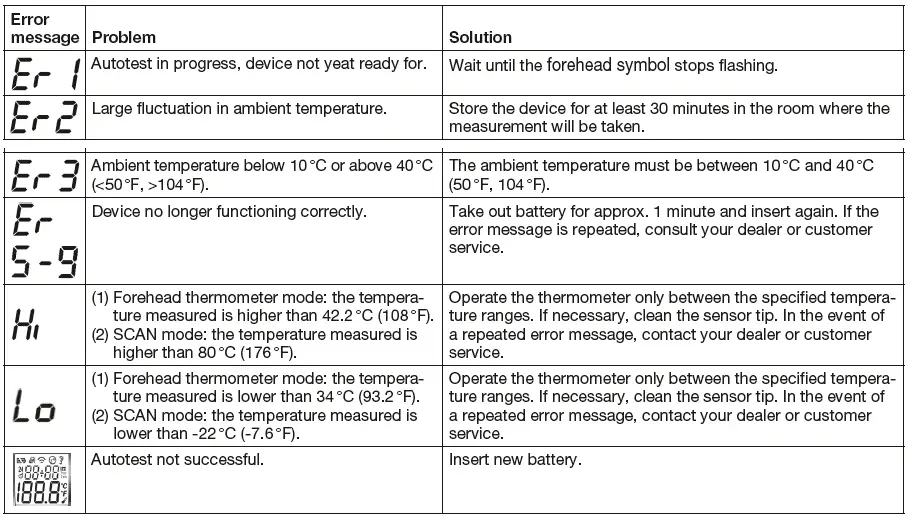
7. Trouble shooting
8. Cleaning, storage, disposal
Clean the sensor tip after every use. Use a clean cloth or cotton bud that can be moistened with disinfectant, alcohol or warm water.
To clean the entire device, use a soft cloth slightly moistened with a mild soapy solution. Water must never get into the device. If water gets into the device, remove the battery immediately. Only use the device again when it is completely dry.
Do not use any harsh cleaning agents.
Never immerse the device in water.
Always store the thermometer with the cap on in order to protect the sensor. The device must not be stored or used at too high or low a temperature or humidity (see 9. technical data), in sunlight, in association with an electrical current or in dusty locations. Otherwise, inaccuracies can occur.
If prolonged storage is intended, you should remove the battery.
Please dispose of the device in accordance with the directive 2002/96/EG – WEEE (Waste Electrical and Electronic Equipment). If you have any queries, please refer to the local authorities responsible for waste disposal.
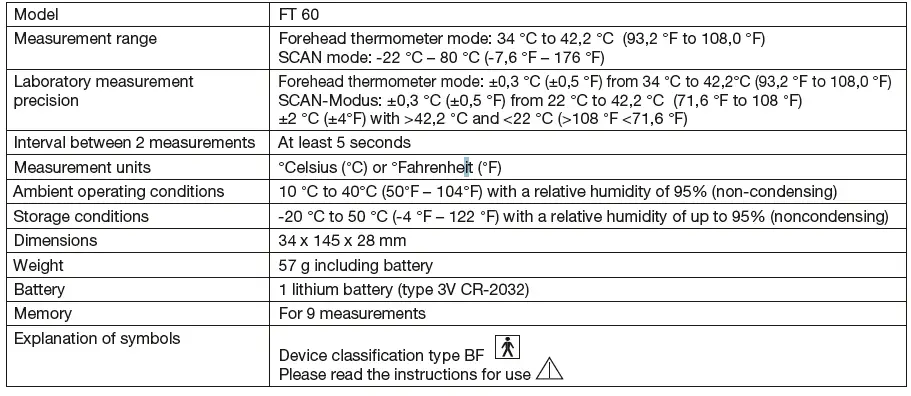
Technical data
Note: When the device is used outside the specifications, perfect functioning cannot be guaranteed. We reserve the right to make technical changes to improve and develop the product.