

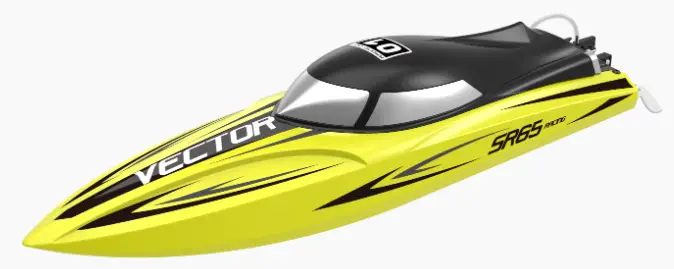
Volantex Vector Brushless High Speed RC Boat
WARNING:
The following terms are used throughout the product literature to indicate various levels of potential harm when operating this product:
NOTICE:
Procedures, which if not be properly followed, will create a possibility of physical property
damage AND or possibility of injury.
WARNING:
Read the ENTIRE instruction manual to become familiar with the features of the product
before operating. Fail to operate the product correctly can result in damage to the product, personal
property and cause serious injury.
This is a sophisticated hobby product. It must be operated with caution and common sense and requires some basic mechanical ability. Fail to operate this product in a safe and responsible manner could result in injury or damage to the product or other property. This product is not intended for use by children without direct adult supervision. Do not use with incompatible components or alter this product in any way outside of the instructions provided by VolantexRC Co.,Ltd.. This manual contains instructions for safety, operation and maintenance. It is essential to read and follow all the instructions and warnings in the manual, prior to assembly, setup or use, in order to operate correctly and avoid damage or serious injury.
AGE RECOMMENDATION: NOT FOR CHILDREN UNDER 14 YEARS. THIS IS NOT A TOY.
Safety Precautions and Warnings
As the user of this product, you are solely responsible for operating in a manner that does not endanger yourself and others or result in damage to the product or the property of others.
- Always keep a safe distance in all directions around your boat to avoid collisions or injury. This boat is controlled by a radio signal subjuct to interference from many sources outside your control. Interference can cause momentary loss of control.
- Always operate your boat in open spaces away from full-size vehicles, traffic and people.
- Always carefully follow the directions and warnings for this and any optional support equipment(chargers, rechargeable battery packs etc.).
- Always keep all chemicals, small parts and anything electrical out of the reach of children.
- Always avoid water exposure to all equipment not specially designed and protected for this purpose.
Moisture causes damage to electronics. - Never place any portion of the boat in your mouth as it could cause serious injury or even death.
- Never operate your boat with low transmitter batteries.
- Always keep your boat in sight and under control.
- Always use fully charged batteries.
- Always keep transmitter powered on while boat is powered.
- Always remove batteries before disassembly.
- Always keep moving parts clean.
- Always keep parts dry.
- Always let parts cool after using before touching.
- Always remove batteries after usage.
- Always ensure failsafe is properly set before running.
- Never operate a boat with damaged wiring.
Battery and Charging Warnings
CAUTION: All instructions and warnings must be followed exactly. Mishandling of Li-Po/Li-lon/Ni-Mh batteries can result in fire, personal injury, and/or property damage.
- The battery charger included with your boat is designed to safely balance and charge the specific Li-Po/Li-lon/Ni-Mh battery.
- By handling, charging or using the included battery, you shall assume all risks associated with Li-Po/Lilon/Ni-Mh battery.
- If at any time the battery begins to balloon or swell, discontinue use immediately. If charging or discharging, you should discontinue and disconnect.
Continue to use, charge or discharge a battery that is ballooning or swelling can result in fire. - Always store the battery at room temperature in a dry area for best results.
- Always transport or temporarily store the battery in a temperature range of 40-120 Fahrenheit degrees (5-49 degrees centigrade).Do not store battery or your boat in a car or direct sunlight. If stored in a hot car, the battery can be damaged or even cause fire.
- Always charge a battery away from flammable materials.
- Always inspect the battery before charging and never charge damaged batteries.
- Always disconnect the battery after charging, and allow the charger cool before next charge.
- Always constantly monitor the temperature of the battery pack while charging.
- ONLY USE A CHARGER SPECIALLY DESIGNED TO CHARGE SPECIFIC BATTERIES.
- Never discharge Li-Po cells till below 3V under load.
- Never cover waning lables with hook or loop strips.
- Never leave charging batteries unattended.
- Never charge batteries outside recommended levels.
- Never attempt to dismantle or alter the charger.
- Never allow minors to charge battery packs.
- Never charge batteries in extrmely hot or cold places(recommended between 40-120 Fahrenheit degrees I 5-49 degrees centigrade) or in direct sunlight.
Box Contents
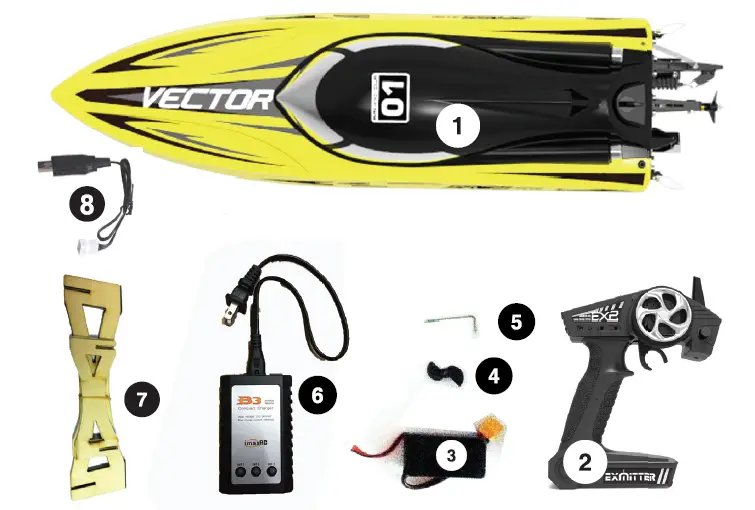
- Assembled Boat
- Radio Transmitter
- Lithium Battery(For RTR)
- Spare Propeller
- Hexagon Driver
- Balance Charger(For brushless RTR)
- Display Stand
- USB Charger(For brushed RTR)
Boat Batteries Installation

- Rotate the hatch of the hull cover by clockwise to unlock the hatch.
- Open the hull cover.
- Adhere included loop tape or velcro tape to the battery.
- Secure the boat battery on the hook strip in the boat.
- Secure the battery in the hull with the hook and loop strap as shown.
Check Radio System
CAUTION:
Always keep all body parts, hair and dangling or loose items away from a spinning propeller, as these can be entangled.
NOTICE:
Always power on the transmitter before powering on the ESC. Always power off the ESC before powering off the transmitter. Never transport the boat with the battery connected to the ESC.
- Turn the transmitter throttle and rudder trim to the middle position.
- Power on the transmitter.
- Connect a fully charged battery to the ESC.
- Ensure the rudder moves in the proper direction when the controller is moved left or right.
- Pull the throttle to max power position, then return the throttle to min power position, ensuring the propeller turns counterclockwise. The ESC auto-sensing voltage cutoff function will engage when the ESC detects a low battery charge. Release the throttle and recharge the battery when necessary.
NOTICE:
Read completely the radio appendix for more detailed instruction of using the radio. Make sure you have totally studied the radio manual appendix before you really start operating the boat with the radio.
Getting Started
- Power on the transmitter.
- Connect a fully charged battery.
- Test the transmitter’s control of the boat with the boat on the display stand.
- After launching the boat in the water, start driving slowly. If the boat does not go straight, adjust the trimmer on the transmitter to run it straight.
- Power off the ESC and disconnect the battery packs.
- Always turn off transmitter at last.
- Allow the motor, ESC and battery packs to cool before charging the battery or operating the boat again.
WARNING:
DO NOT TURN OFF THE TRANSMITTER BEFORE UNCONNECTING BATTERY OF RECEIVER, OR THE RECEIVER MAY PICK UP STRAY SIGNALS AND RUN OUT OF CONTROL TO CAUSE ACCIDENT!
NOTICE:
Always store the boat with hatch removed to prevent mold and mildew growth inside the hull.
Test Your Boat in Water
- Carefully place the boat in water.
- Operate the boat at slow speed near the shoreline. Avoid objects in water at all time.
- Once you are comfortable operating the boat at slow speed, make sure it is safe and then operate the boat farther from the shoreside.
Tip: If you are using too much steering trim on your transmitter to make the boat drive straight, return the trim to neutral and mechanically center the rudder. To do this, loosen the knob from the rudder horn, adjust the knob to a proper position linking to pushrod, make sure ruder is centered. - Bring the boat back when you notice it starts to run at low speed even when you pull up throttle to max.
Tips of Controlling
Keep away from watercraft, stationary objects, waves and other rapidly moving water, wildlife, floating debris or overhanging trees. You should able so careful to avoid boating in areas where there are many people, such as swimming areas, park waterways or fishing areas. Consult local laws and ordinances before choosing a location to pilot your boat. maximum speeds are only achieved when the water conditions are smooth and there is lttle wind. A sharp turn, wind or waves can turn over a boat when it is moving quickly. Always control your boat for the wind and water conditions so that the boat does not turn over. When running your boat for the first time, we recommend calm wind and water conditions so that you can learn how the boat responds to your control. When making turns, decrease the throttle in order to decrease speed and probability of flipping the boat over.
NOTICE:
When running at full speed in choppy waters, the propeller may exit and re-enter the water repeatedly and very quickly, subjecting the propeller to some stress. Frequent stress may damage the propeller.
CAUTION:
Never retrieve your boat from the water in extreme temperatures, turbulence or without supervision.
Motor Care
Prolong motor life by preventing overheating conditions. Undue motor wear results from frequent turns, stops and starts, pushing object, boating in rough or vegetation and boating continuously at high speed.
Over-temperature protection is installed on the ESC to prevent circuit damage, but cannot protect the motor from pushing against heavy resistance.
When You Finish
- Power off the ESC.
- Disconnect the battery in hull.
- Power off the transmitter.
- Remove batteries from boat and transmitter.
NOTICE:Always store the boat without hatch covered or inner liner sealed. Otherwise moisture may cause mold and mildew to grow in the boat.
Maintenance
Always replace the shaft when it is damaged or shows visible wear or injury and property damage may result.
Lubricating the shaft is vital to the life of the drivetrain. The lubricant also acts as a water seal, keeping water from entering the hull through the stuffing box.
Lubricate the shaft, propeller shaft and all moving parts after every 2-3 hours of operation. Always replace an parts that show visible wear or damage.
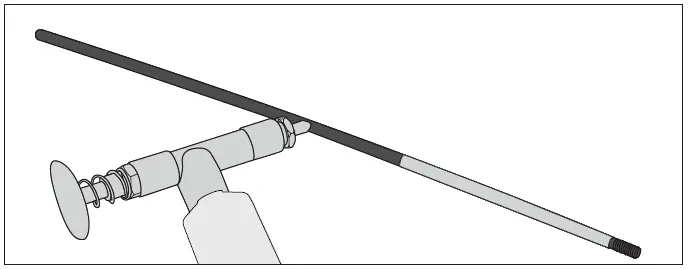
- Loosen the coupling between the motor and the shaft.
- Loosen setscrew from the shaft and remove the shaft from the back of the boat.
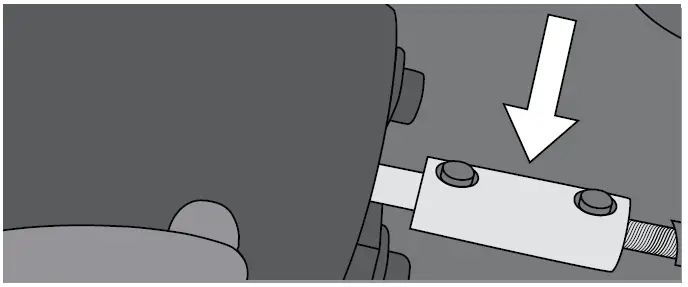 Tips: Use paper or cloth to touch the shaft.
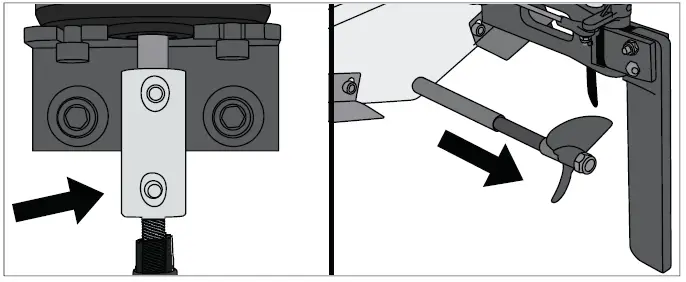
 - Remove the drive shaft by sliding it out of the stuffing box. Wipe lubricant and material from the shaft. Lubricate the full length of the shaft assembly up the drive dog with marine grease.
- Apply thread lock to the coupling setscrew. Thread lock will help prevent the shaft from loosening during usage.
- Carefully reinstall the drive shaft, ensuring that there is a 1-2mm gap between the prop strut and the drive dog to allow for shaft shrinkage under load.
NOTICE:
- Running the boat in salt water could cause some parts to corrode. If you run the boat in salt water, rinse it thoroughly in fres
h water after each use and lubricate the drive system. - Because of its corrosive effects, running RC boats in salt water is at the discretion of the user.
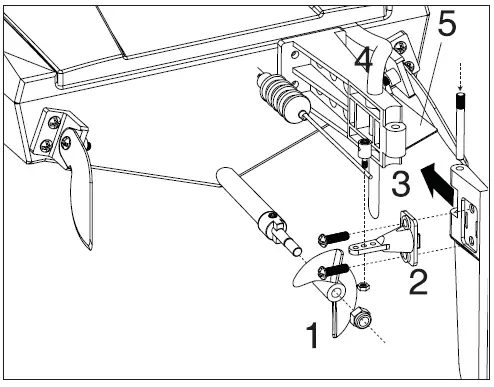
Rudder Installation
- Align the propeller with the drive dog on the flex shaft, then install the propeller using the included locknut.
- Install the rudder horn to the rudder by two screw.
- Install the rudder to the rudder holder and fix it by a bolt as show in the graphic.
- Connect the cooling line to the fitting on the top of the rudder.
- Ensure the trim tab panel is either perpendicular to or parallel to the bottom of the boat. If it’s needed to switch the angle of the panel, tie or release the screw which is touch the panel to switch the angle.
Check List
Before Boating
- Install fully charged batteries in your boat and transmitter.
- Connect the boat battery to ESC.
- Make sure the boat is bound to the transmitter(otherwise, bind the boat to the transmitter using the included binding instructions.)
- Make sure all linkages move freely on the boat.
- Ensure the motor mount is secured to the hull so that the motor stays steady.
- Perform a Control Direction Test with the transmitter.
- Adjust the steering rate on your transmitter as needed.
- Find a safe and open boating area.
- Plan a safe boating route for the water and wind conditions.
After Boating
- Always power off the receiver before powering off the transmitter to maintain control of the boat and to retain transmitter binding.
- Disconnect the battery from the receiver and remove the batteries from the boat.
- Fully dry the inside and outside of the boat, including the water cooling lines and jackets around the motor and ESC. Remove the hatch and radio box coverr before storing your boat.
- Repair any damage or wear to the boat.
- Lubricate the shaft.
- Make note of lessons learned from the trimming of your boat, including water and wind conditions. Tips: The hook and look strips in the boat retain water. To dry them press on them with a dry cloth.
Charging Instruction(For RTR)
For charging the included lithium battery, you can only use the included charger or a suitably compatible lithium battery charger.
Charging the lithium battery using a none lithium battery compatible charger (such as a NiCd or NiMH battery charger), or even a different lithium battery charger with the incorrect settings, may result in damage to the battery or even fire resulting in property damage and/or personal injury.
CAUTION: You must be careful to ensure proper polarity before making the connection.
Follow below steps to charge the lithium battery with the included charger.
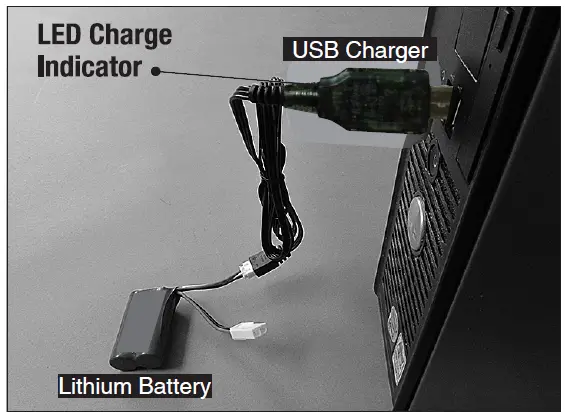
For USB charger:
- Power off your vehicle.
- Carefully plug the charger into the USB port on your computer or USB adaptor.
- Connect the battery into the charger.
- While charging, the red LED charge indicator will be solid on. The charging process takes approximate 3.5 hours. For safety reasons, never charge the battery over 4 hours.
- When the battery is fully charged, the green LED charge indicator will be solid on.
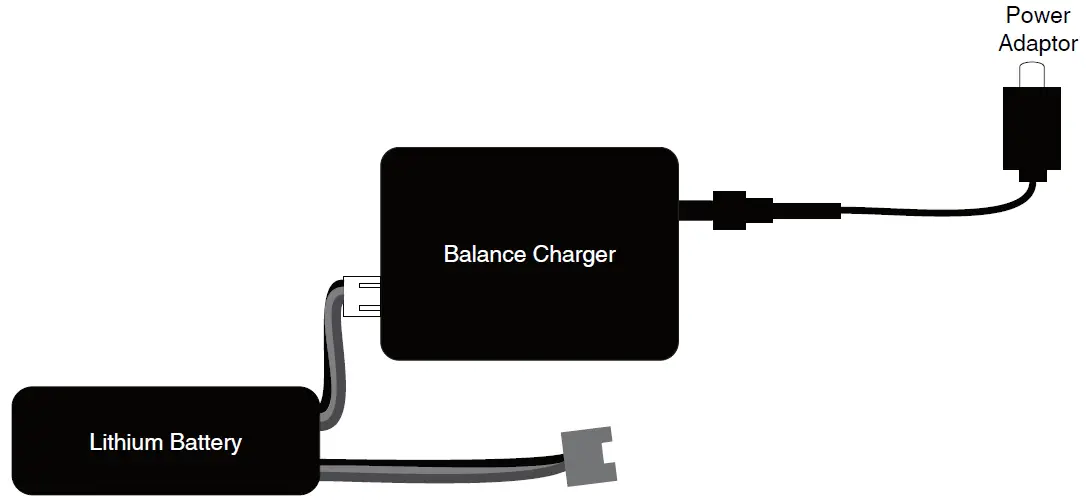
For balance charger & power adaptor set:
- Plug the included balance charger to the power adaptor, then plug the power adaptor into a compatible AC outlet(depends on different contries and area) , then connect the power output lead to the receptacle on the side of the balance charger The power adapter and balance charger are powered on when the green color LED indicator is glowing.
- Connect the white 4-pin connector from battery to the mating connector on the charger.
And while the white connectors are ‘keyed’ to minimize the risk of a reverse polarity connection, if you force them it is possible to make connection with the incorrect polarity potentially causing damage to the battery and/or charger. When the connectors are properly aligned for correct polarity, connecting them should require only a moderate amount of pressure to achieve the ‘click’ that indicates a secure connection. - When the battery is connected to the charger securely and with the proper polarity both the red color and green color LED indicators will glow. The battery will be charging anytime the red LED indicator is glowing.
- It will take approximately 1.5-2.5 hours to fully charge a mostly or fully discharged (not over-discharged) battery. And when the battery is fully charged the red LED indicator will stop glowing entirely. When the red LED indicator is no longer glowing you can disconnect the battery from the charger as it is now fully charged and ready for use.
CAUTION: Do not store the lithium battery fully charged.
For improved safety and longevity of the LiPo battery it’s best to store it only partially charged for any length of time. Storing the LiPo battery at approximately 50% charged (which is approximately 3.85V per cell) is typically best, however it will take some careful management of the charge time and the use of a volt meter to achieve this voltage.
If you have the equipment and skills to achieve the 50% charge level for storage it is recommended. If not, simply be sure to not store the battery fully charged whenever possible. In fact, as long as the battery will be stored at approximately room temperature and for no more than a few weeks before the next use, it may be best to store the battery in the discharged state after the last flight (as long as the battery was not over-discharged on the last flight).
Troubleshooting Guide
| Problem Possible Cause Solution | ||
| Boat does not respond to throttle but responds to other controls | Throttle servo travel is lower than 100% | Make sure throttle servo travel is 100% or greater |
| Throttle channel is reversed | Reverse throttle channel on transmitter | |
| Extra noise or extra vibration | Damaged propeller, shaft or motor | Replace damaged parts |
| Propeller is out of balance | Balance or replace propeller | |
| Reduced runtime or boat underpowered | Boat battery charge is low | Completely recharge battery |
| Boat battery is damaged | Replace boat battery and follow battery instructions | |
| Blocking or friction on shaft or propeller | Disassemble, lubricate and correctly align parts | |
| Boat conditions may be too cold | Make sure battery is warm before use | |
| Battery capacity may be too low for conditions | Replace battery or use a larger capacity battery | |
| Drive dog is too close | Loosen coupling at shaft and move away shaft a small amount | |
| Too little lubrication on shaft | Fully lubricate shaft | |
| Vegetation or other obstacles block the rudder or propeller | Remove boat from the water and obstacles | |
| Boat does not bind (during binding) to transmitter | Transmitter is too near boat during binding process | Move powered transmi tter a few feet from boat, disconnect and reconnect battery to boat |
| Boat or transmitter is too close to large metal object | Move boat or transmitter away from large metal object | |
| Bind plug is not installed correctly | Install bind plug and bind boat to transmitter | |
| Boat battery/ Transmitter battery charge is too low | Replace/recharge batteries | |
| ESC switch is off | Power on ESC switch | |
| Boat tends to dive in water or takes on water | The boat hull is not completely closed | Dry out the boat and ensure the hatch is fully closed on the hull before re turning the boat to the water |
| Center of gravity is too far forward | Move batteries back in the hull | |
| Trim tabs are angled incorrectly on the back of the boat | Angle each trim tab up a small amount to lift the bow or down a small amount to lower the bow | |
| Problem Possible Cause Solution | ||
| Boat does not link (after binding) to transmitter | Transmitter is too near boat during linking process | Move powered transmitter a few feet from boat, disconnect and reconnect battery to boat |
| Boat or transmitter is too close to large metal object | Move boat or transmitter away from large metal object | |
| Bind plug is left installed | Rebind transmitter to boat and remove bind plug before cycling power | |
| Boat battery/transmitter battery charge is too low | Replace/recharge batteries | |
| Transmitter may have been bound to a different boat (using different DSM Protocol) | Bind boat to transmitter | |
| ESC switch is off | Power on ESC switch | |
| Boat tends to turn one direction | Rudder or rudder trim is not centered | Repair rudder or adjust rudder and rudder trim for straight running when control is at neutral |
| Vertical fins of trim tabs are angled
incorrectly |
Angle the fins a small amount right or left so that the boat goes straight when the rudder is at neutral | |
| Rudder does not move | Rudder, linkage or servo damage | Replace or repair damaged parts and adjust controls |
| Wire is damaged or connections are loose | Do a check of wires and connections, connect or replace as needed | |
| Transmitter is not bound correctly or the incorrect boat was selected | Rebind or select correct boat in transmitter | |
| BEC (Battery Elimination Circuit) of the ESC is damaged | Replace ESC | |
| ESC switch is off | Power on ESC switch | |
| Controls reversed | Transmitter settings are reversed | Do the Control Direction Test and adjust controls on transmitter appropriately |
| Motor or ESC overheats | Blocked water cooler tubes | Clean or replace water tubes |
| Motor power pulses then motor loses power | ESC uses default soft Low Voltage Cut off (LVC) | Recharge boat battery or replace battery that is no longer performing |
| Weather conditions might be too cold | Postpone until weather is warmer | |
| Battery is old, worn out or damaged | Replace battery | |
| Battery Crating might be too small | Use recommended battery | |
| Boat does not link (after binding) to transmitter | Transmitter is too near boat during linking process | Move powered transmitter a few feet from boat, disconnect and reconnect battery to boat |
| Boat or transmitter is too close to large metal object | Move boat or transmitter away from large metal object | |
| Bind plug is left installed | Rebind transmitter to boat and remove bind plug before cycling power | |
| Boat battery/transmitter battery charge is too low | Replace/recharge batteries | |
| Transmitter may have been bound to a different (using different DSM Protocol) | Bind boat to transmitter | |
| ESC switch is off | Power on ESC switch | |
