
Ducky One 3 Mini DKON2161ST Mechanical Keyboard
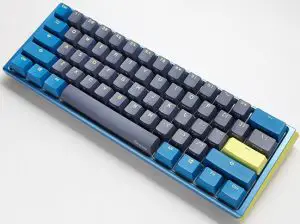
Ducky One 3 Mini DKON2161ST Mechanical Keyboard
Specifications
- Type: Mechanical keyboard
- LED:RGB LED
- Keycap material: PBT or ABS
- Printing method: Double-shotor Laser Engraved
- Origin of Production: Taiwan
- Size:310 x 110 x 40 mm
- Weight:650g
Features
- Hot-swappable Kailh sockets
- Various RGB LED lighting modes
- True USB Type-C interface, compatible with all Type-C devices
- Mouse functions for a convenient experience
- Miniature yet packed with features
- Supports Ducky Macro through hardware. Personalize functions as you like
- Products with PBT Double-shot Seamless keycaps, providing the perfectly exceptional typing experience
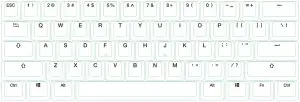
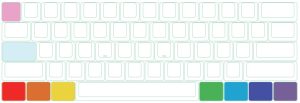
Standard Layer
Keyboard configuration diagram, US layout used as example
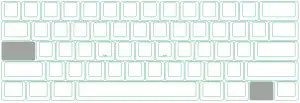
Fn Layer
Fn Layer
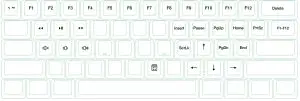
Fn + Alt Layer
RGB Backlit Modes
| Fn + Alt + T | First mode: Wave mode (Default) |  Seventh mode: Halo mode Seventh mode: Halo mode |
| Second mode: Color Cycle mode | Eighth mode: Breathe mode |
|
| Third mode: Rain Drop mode | Ninth mode: 100% Full Backlit mode |
|
| Fourth mode: Ripple mode | Tenth mode: Radar mode |
|
| Fifth mode: Rainbow Reactive mode | Eleventh mode: Backlit OFF | |
| Sixth mode: Reactive mode |
- All above modes can be adjusted with the following key sequence:
- Fn + Alt + /:Decrease speed
- Fn + Alt + ,:Increase speed
- Hold Fn + Alt + T for 3 seconds to turn off all backlit (including CM1 and CM2).
- Only the backlit modes with can be adjusted using the following:
- Fn + Alt + Z: Adjust color red (R) brightness. 10 Levels.
- Fn + Alt + X: Adjust color green (G) brightness. 10 Levels.
- Fn + Alt + C: Adjust color blue (B) brightness. 10 Levels.
- Fn + Alt + V: Erase red, green and blue color setting.
- Fn + Alt + Spacebar (Color palette):Activate color palette to display various colors on each key, press on the desired color, all the keys will automatically change to match.
RGB LED Zone Customization Modes
| Fn + Alt + G | CM1 cycle:
First step: Turn on user’s customized zone and color. Second step: Turn on user’s customized zone and color in breathe mode. Third step: Turn off CM1. |
| Fn + Alt + B | CM2 cycle:
First step: Turn on user’s customized zone and color. Second step: Turn on user’s customized zone and color in breathe mode. Third step: Turn off CM2. |
| Fn + Alt + Caps Lock (REC) | Press for 3 seconds until the G (CM1) and B (CM2) keys light up, choose the layer for setting, press it again and start recording. |
| Caps Lock + Z | Adjust color red (R) , 10 levels. |
| Caps Lock + X | Adjust color green (G), 10 levels. |
| Caps Lock + C | Adjust color blue (B), 10 levels. |
| Caps Lock + V | Erase all LED light |
| Caps Lock + Spacebar | Color palette |
| Caps Lock + Left Shift | REC over, finish recording |
Recording Steps:
- Adjust to the color first, then set the individual keys to be set to that color.
- Press Fn + Alt + Caps Lock for 3 seconds, the buttons G (CM1) and B (CM2) will illuminate then press G to set CM1 and press B to set CM2.
- When starting recording mode, Caps Lock will display the current LED color. The color can be adjusted by hitting Caps Lock + Z / X / C / V. After setting the desired color, hitting any key on the keyboard will set that key to the selected color.
- Repeating the above steps allows the user to set different colors to diffierent keys. If the key has been set, press again to cancel the setting.
- To finish recording, press Caps Lock + Left Shift (REC over) to finish recording. The color of the Caps Lock key is the value you set.
Note:
- When starting recording mode, Caps Lock will display the current LED Color.
- CM1、CM2 can work with other LED light modes at the same time. CM1 and CM2 can be turned on along with other lighting modes. In addition, CM1 has the priority over CM2 when the zone overlaps.
Press Fn + Alt + T for 3 seconds to turn off ALL backlit modes. - If there is no activity in 30 seconds in the recording mode, the recording session will terminate without saving.
- Caps Lock LED color follows the “100% Full Backlit mode” .
Multimedia Function
| Fn + W | Mouse cursor up | Fn + Q | Left mouse button |
| Fn + A | Mouse cursor left | Fn + E | Right mouse button |
| Fn + S | Mouse cursor down | Fn + R | Roller up |
| Fn + D | Mouse cursor right | Fn + F | Roller down |
Debounce Time Setting
| 5ms | Fn + Alt + Y | Hold the combine keys for 3 sec, the keyboard will flash 3 times to indicate the debounce time has been switched successfully. |
| 10ms (Default) | Fn + Alt + U | |
| 15ms | Fn + Alt + I | |
| 25ms | Fn + Alt + O |
Note
The method is to adjust the debounce time of the metal shrapnel in the mechanical shaft during the pressing process. The shorter the time, the sooner it can be triggered, but if the time is too short may cause misjudgement.
If it’s not necessary to change the time, the default value is recommended.
Display Mode
| Hold Fn + R_Alt + R_Ctrl for 3 sec |
| To display various LED backlit modes |
To display various LED backlit modes
- The entire keyboard will be disabled while cycling through various RGB modes.
- Unplug the keyboard to quit Display Mode.
Note: Used for showcasing purposes.


Reset to Factory Defaults
| US ANSI and EU ISO layout |
| Left Windows key + Right Windows key |
Note:
Hold for 3 seconds. The keyboard’s backlight will flash 3 times to indicate the keyboard has been reset.
Enable / Disable Windows Function (Windows Key Lock)
Fn + any Alt key + any Windows key for 3 seconds, the keyboard’s backlit will flash 3 times to indicate the keyboard has been enabled / disabled.
Key Switch Functions
Key Switch Functions
- Applicable keys: Fn/Alt/Ctrl/Windows/Caps lock
- Operation:
- Press Fn + Alt + k for 5 seconds.
- Until the ESC, L_Ctrl, L_Win, L_Alt, R_Alt, R_Win, Fn, R_Ctrl, and Caps lock keys are all lighting up. The colorways are respectively pink, red, orange, yellow, green, blue, indigo and purple.
- Except for Caps lock key, the rest of 6 keys are able to switch each function and color at will. (2 keys max at the same time)
- Pressing Caps lock once will change it to FN.
- Pressing Caps lock twice will change it to L_Ctrl.
- Press Esc key once to finish the switching function.
- Press Capslock again to resume Capslock.
Note: You can press Esc key to leave the switching function before starting it.

DIP Switch Functions
DIP switch functions
| DIP1 | OFF(Default) | ON |
| Disable F Row Toggle (FN+) | Enable F Row Toggle (FN+) | |
| DIP2 | OFF(Default) | ON |
| N-Key Rollover mode | 6-Key Rollover mode | |
| DIP3 | OFF(Default) | ON |
| Ducky Vender ID (VID) | Vender ID definable | |
| DIP4 | OFF(Default) | ON |
| Right Windows key is default | Right Windows key changes
to the Menu key |
Note
You can input the ideal VID in both situation, butthe VID can be only changed when DIP 3 turned on.
Step1. Profile selections
| Fn + Alt | 1 | Switch to profile 1 | Factory settings (Default) | ||
| 2 | Switch to profile 2 | ||||
| + | 3 | = | Switch to profile 3 | ||
| 4 | Switch to profile 4 | Customize Macro key features | |||
| 5 | Switch to profile 5 | ||||
| 6 | Switch to profile 6 | ||||
Note
- When keyboard is plugged in, Caps Lock and Number Keys will blink based on selected profile number.
- Adjust profile to 2~6 in order to set Macro.
- After profile is switched, Caps Lock or Indicator light will blink based on the current profile number
Step2. To start Macro recording
Press Fn + Alt + Tab for 3 seconds to start Macro recording. Once in recording mode the Caps Lock or indicator
lights will flash slowly.
Step3. Press a key to start recording Macro
Press on the key you want to use to activate Macro. The key pressed will blink (Non-backlit version will not) and the
Caps Lock or indicator lights will flash swiftly.
Step4. Recording Macro
Enter any key, and choose the Macro implementation and record time option.
Step5. To continue recording another key (Jump out the current recording file)
Press Fn + Alt to choose another key to continue recording.
Step6. Finish recording
Press Fn + Alt + Tab for 1 second to finish recording and back to the profile.
Hotkeys Function
| Fn + Alt + | Tab | Start recording : Press for 3 seconds. Finish recording: Press for 1 second. | |
| ESC | Caps Lock will blink in the amount of selected profile number. | ||
| Backspace | Delete current profile value. |
| Fn + Alt |
| Press for 1 sec to finish recording the current key and choose another key to record. |
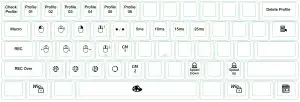
Setting Section
Ducky Mini Macro Configurable Keyboard Layer
- Standard Layer
- Fn Layer
- Fn + Alt Layer
Ducky Mini Macro Unsettable Key
- Fn
- Caps Lock
Note
- Support N keys recorded at the same time, and N keys recorded at the same time when outputting.
- Macro function will be based on the user’s typing speed and record it.
Multimedia Function Keys
| Fn + Windows key + Keys below | |||||||
| A | Mute | G | Previous playlist | M | Search | S | Mouse cursor up |
| B | Volume up | H | Calculator | N | Previous page | T | Mouse cursor down |
| C | Volume down | I | My computer | O | Next page | U | Mouse cursor left |
| D | Play / Pause | J | Browser | P | Mouse left click | V | Mouse cursor right |
| E | Stop | K | Q | Mouse right click | W | Mouse scroll up | |
| F | Next playlist | L | Multimedia | R | Mouse middle click | X | Mouse scroll down |
Note: Need to be recorded first before use.
Keyboard Button Function Keys
| Fn + Shift+ Keys below | |||
| A | Prompt profile value | N | Backlit mode:Wave mode (Default) |
| B | Profile 1 | O | Backlit mode:Color Cycle mode |
| C | Profile 2 | P | Backlit mode:Rain Drop mode |
| D | Profile 3 | Q | Backlit mode:Ripple mode |
| E | Profile 4 | R | Backlit mode:Random Reactive mode |
| F | Profile 5 | S | Backlit mode:Reactive mode |
| G | Profile 6 | T | Backlit mode:100% Full backlit mode |
| H | Backlit modes switching | U | Backlit mode:Breathe mode |
| I | Adjust color red | V | Backlit mode:Radar mode |
| J | Adjust color green | W | Backlit mode:Backlit OFF |
| K | Adjust color blue | X | The key “ . ” on number pad (Num_.) |
| L | Erase all value | Y | Number Lock |
| M | Color palette | ||
Note: Need to be recorded first before use.
Windows Common Function Keys
| Ctrl + C | Copy select item | Windows + D | Desktop |
| Ctrl + X | Cut select item | Windows + M | Minimize all windows |
| Ctrl + V | Paste select item | Windows + L | Lock computer or change user |
| Ctrl + Z | Undo | Windows + R | Open [Run] window |
| Ctrl + Y | Redo | Windows + F | Search files or folders |
| Ctrl + N | Open new file | Windows + ↑ | Maximize all windows |
| Ctrl + O | Open current file | Windows+ ↓ | Minimize windows |
| Ctrl + S | Save file change | Windows + ← | Maximize window to the left side |
| Ctrl + P | Print file | Windows + → | Maximize window to the right side |
| Alt + F4 | Quit the software | Windows + Home | Minimize all windows other than the one used |
http://windows.microsoft.com/en-us/windows/keyboard-shortcuts
Set-up Example
Note: Set the profile to profile 2~6 before setting Macro.
- Example A Configure the key “Z”to “Q” output.
Operation method
Press Fn + Alt + Tab for 3 seconds → Press Z → Press down Q → Press Fn + Alt → Press Fn + Alt + Tab for 1 second - Example B To set Z as show “desktop” (under Windows system)
Operation method
Press Fn + Alt + Tab for 3 seconds → Press Z → Press Windows key + D → Press Fn + Alt → Press Fn + Alt + Tab for 1 second - Example C To set Fn + Ctrl + M as “mute volume”
Operation method
Press Fn + Alt + Tab for 3 seconds → Press Fn + Ctrl + M → Press Fn + Windows key + A → Press Fn + Alt → Press Fn + Alt + Tab for 1 second - Example D To set Fn + Ctrl + Q as “Reactive mode”
Operation method
Press Fn + Alt + Tab for 3 seconds → Press Fn + Ctrl + Q → Press Fn + Shift + S → Press Fn + Alt → Press Fn + Alt +
Tab for 1 second
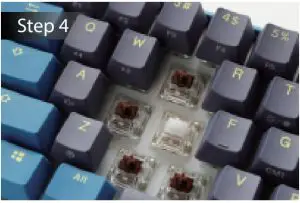
Hot-swap
Set-up Example
Use key puller to pull out the key caps

Use switch puller to pull out the switches
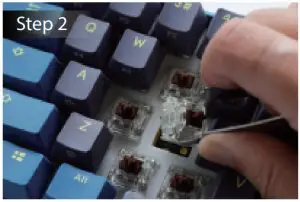
Align switch pins with the holes
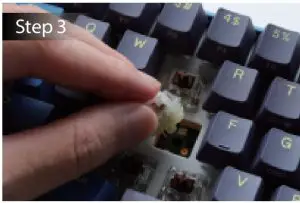
Gently push the switch in
Disclaimers and Warranty
- When using a Hot-swap model, make sure to support the hotswap socket with your finger when inserting the switch to ensure it does not damage the PCB from excessive force.
- Any liquid damage to the keyboard will void warranty.
- Modifications to the keyboard will void warranty.
Warranty is 1 year from date of purchase via our Official Vendors https://www.duckychannel.com.tw/en/location/global
Please contact the vendor you purchased from for RMA procedures.
What is the difference between Ducky One 3 Mini DKON2161ST and DKON1687?
Ducky One 3 Mini DKON2161ST is a smaller version of the Ducky One 2 DKON1687.
How to change the backlit modes?
Fn + Alt + T to cycle through all modes.
Why does the backlit not work after I install it?
Please make sure your computer supports USB Type-C, and the cable you are using is USB Type-C as well.
What is the warranty policy?
90 days warranty for all keyboards, accessories and cables. You can enjoy free repair or replacement service within 90 days of purchase. If you have any questions, please contact our customer service department via email or IM.
Is Ducky keyboard quiet?
The Cherry MX Silent Red keys are so quiet that even pesky anti-click coworkers in an open office won’t be bothered, but you still get the good feels of top-shelf mechanical switches. Ergonomically-speaking I love to type on it, the feedback and touch quality of the keys is perfect.
What is the fastest switch?
As we have previously discussed, the OmniPoint mechanical switch has ended the war for the “fastest” switch in the world with both it’s record-breaking actuation and response time. Not only are OmniPoint switches adjustable up to 5x faster than other keyboards, but their response time is 8x faster.
How do you change the color on a ducky one 3 Mini?
The color can be adjusted by hitting Caps Lock + Z / X / C / V. After setting the desired color, hitting any key on the keyboard will set that key to the selected color. Repeating the above steps allows the user to set different colors to diffierent keys.
What are the loudest keyboard switches?
The Blue switches are the loudest, but if you want a slightly quieter click, the Whites are an excellent option as well. The White switches are also slightly heavier, so if you type with a heavy hand, they can help protect you from bottoming out on each keystroke.
How can I learn keyboard keys?
So for your left hand the home key for pinky is a for the ring finger it’s s for the middle finger it’s D. And for the pointer finger its F. For your left hand the home keys are semicolon.
What are the switches on the back of a ducky keyboard?
There are 4 dip switches on the back of the Ducky that help you customize your board. The dip switches essentially help you determine which of your modifier keys you want where, and which ones you want on or off.
Is Ducky hot swappable?
All standard Ducky One 3 mechanical keyboards are hot-swappable and feature Kailh’s hot-swap sockets. Colored in a vibrant yellow, Kailh sockets are chosen for their impressive reliability.
Why are Ducky keyboards so good?
Overall, Ducky produces highly customizable keyboards, and you can purchase them in a variety of color variants, giving your gaming setup a unique aesthetic. They have outstanding typing quality, which is great if you also want to use them for the office, and they’re very well-made.