accu-chek Blood Glucose Meter

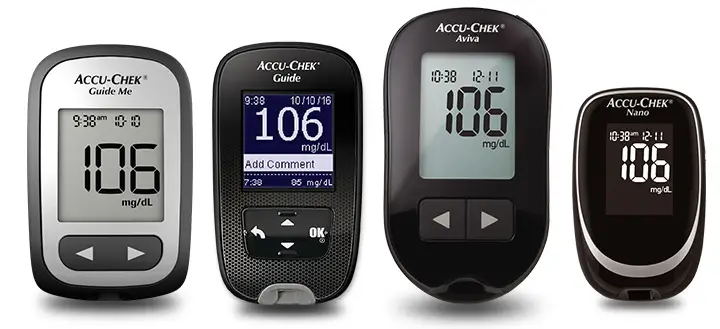
The Accu-Chek Aviva System
The Accu-Chek Aviva meter is designed to be used with the Accu-Chek Aviva test strip to quantitatively measure glucose in fresh venous, arterial, neonatal, and capillary whole blood as an aid in monitoring the effectiveness of glucose control. Capillary whole blood for testing of blood glucose can be obtained from fingertip and approved alternative sites (for example, forearm). Refer to the Alternative Site Testing (AST) section of this manual for approved alternative sites and associated limitations. The Accu-Chek Aviva meter with the Accu-Chek Aviva test strips provide a complete test system that is meant for in vitro diagnostic use by healthcare professionals in clinical settings and by people with diabetes at home. The system is not for use in diagnosis or screening of diabetes mellitus. Healthcare professional blood sample collection and preparation is described in the test strip package insert.
For use only with the Accu-Chek Aviva test strips and control solutions
Suitable for self-testing
The system includes:
- Accu-Chek Aviva meter with battery
- Accu-Chek Aviva test strips*
- Accu-Chek Aviva control solutions*
- Some items may not be included in the kit. They are a separate purchase.
Introduction
WARNING
- Inspect the test strip container before using the test strips for the first time. If you see any damage to the container, if anything prevents the cap from closing properly, or if the container was open before using for the first time, do not use the test strips. Do not perform a control test. Contact Roche. Damaged test strips can cause inaccurate results, which could lead to improper therapy.
- Choking hazard. Small parts. Keep away from children under the age of 3 years.
- Keep new and used batteries away from children. Ingestion or insertion into the body may cause chemical burns, perforation of soft tissues, and death. Severe burns may occur within 2 hours of swallowing. If you think a battery might have been swallowed or placed inside any part of the body, seek medical attention immediately.
- If the battery compartment does not close securely, stop using the product and keep it away from children. Contact Roche.
- Any object coming into contact with human blood is a potential source of infection (see: Clinical and Laboratory Standards Institute: Protection of Laboratory Workers from Occupationally Acquired Infections; Approved Guideline – Third Edition; CLSI document M29-A3, 2005).
Why Regular Blood Glucose Testing Is Important
Testing your blood glucose regularly can make a big difference in how you manage your diabetes every day. We have made it as simple as possible.
Important Information About Your New Meter
- The meter comes with a preset time and date. You may need to change the time to your time zone.
- If you follow the steps in this manual but still have symptoms that do not seem to match your test results, or if you have questions, talk to your healthcare professional.
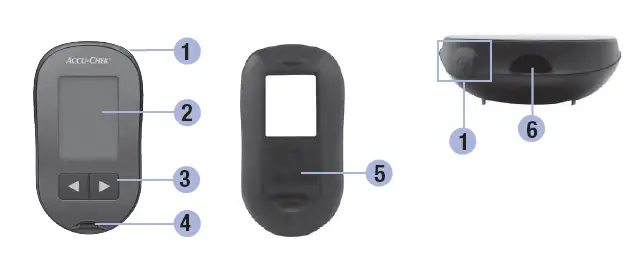
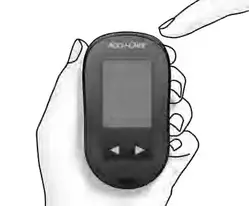
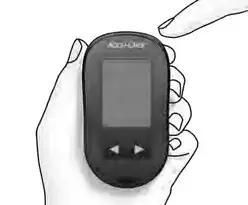
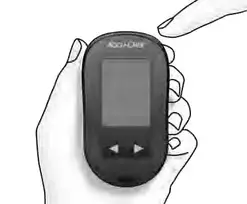
The Accu-Chek Aviva Meter
- Power/Set Button
Turns meter on or off and sets options. - Display
Shows results, messages, and test results stored in memory. - Right Arrow and Left Arrow Buttons Press to enter memory, adjust settings, and scroll through test results.
- Test Strip Slot
Insert test strip here. - Battery Door
- Infrared (IR) Window
Transfers data from meter to computer.
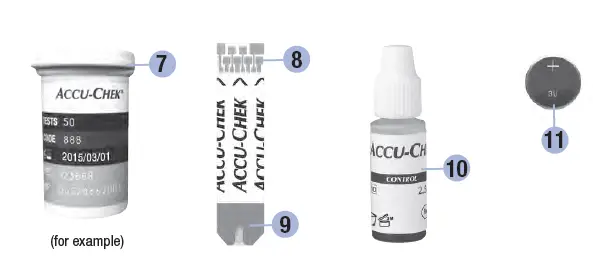
Your New System
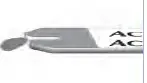
- Test Strip Container*
- Insert this end into meter.
- Yellow Window
Touch blood drop or control solution here. - Control Solution Bottle*
- Battery
Some items may not be included in the kit. They are a separate purchase.
Using the Accu-Chek Aviva System
- Use only Accu-Chek Aviva test strips.
- Use the test strip immediately after removing it from the test strip container.
- Do not apply blood or control solution to the test strip before inserting it into the meter.
- Close the test strip container tightly immediately after removing a test strip to protect the test strips from humidity.
- Store the unused test strips in their original test strip container with the cap closed.
- Check the use by date on the test strip container. Do not use the test strips after that date.
- Store the test strip container and meter in a cool, dry place such as a bedroom.
- Refer to the test strip package insert for test strip storage and system operating conditions.
WARNING Do not store test strips in high heat and moisture areas (bathroom or kitchen)! Heat and moisture can damage test strips.
Button Functions
Here are the functions of the power/set and arrow buttons on the meter. These functions are used throughout this manual. For more information on using these buttons during meter setup, see Chapter 3, Meter Memory, Setup, and Data Transfer.
| Button | Function | Action | |||
| Turn the meter on or off. | Press and release . | ||||
| (power/set | |||||
| button) | Enter the set-up mode. | Turn the meter on. Press and hold until set-up
appears on the display. |
|||
| Set the chosen feature. | Press and release . | ||||
| Exit the set-up mode at any time. | Press and hold until the flashing test strip symbol appears on the display. | ||||
| Check the display segments. | Turn the meter off. Press and hold to see the complete display. | ||||
| If one of the segments is missing or looks different | |||||
| from the picture, do not use the meter. Contact | |||||
| Roche. | |||||
| (right arrow and left arrow buttons) | Adjust settings for time and date, beeper, test reminders, and hypoglycemic alert. Enter memory. | Press and release Press and hold Press and release |
or | or
or |
.
to scroll faster. . |
| Mark a blood glucose result. | Press and release | or | . | ||
Performing a Blood Glucose Test with Blood from Your Fingertip
NOTE Blood samples taken from the palm are equivalent to blood samples taken from the fingertip. To receive Alternative Site Testing (AST) instructions and an AST cap for obtaining blood from the palm, contact Roche.
WARNING
Blood glucose results can be displayed in either mg/dL or mmol/L. The back label of the meter shows the unit of measurement. If the meter shows the wrong unit, contact Roche. If you do not know which unit of measurement is correct for you, contact your healthcare professional. Using the wrong unit of measurement may cause misinterpretation of your actual blood glucose level and may lead to improper therapy.
Blood Glucose Tests
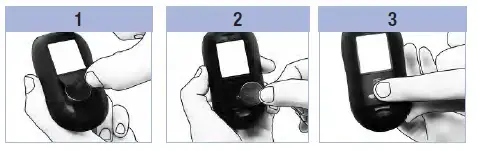
Before you perform your first blood glucose test, set up the meter correctly. You need the meter, a test strip, a lancing device, and a lancet.
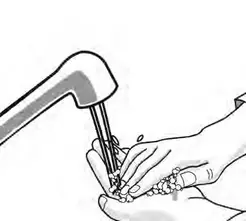
- Wash and dry your hands.

- Prepare the lancing device.
- Check the use by date on the test strip container. Do not use test strips past the use by date.
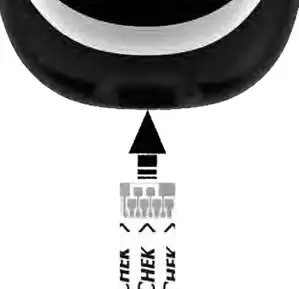
- Insert the test strip into the meter in the direction of the arrows. The meter turns on and beeps.
- When the blood drop symbol flashes, perform a fingerstick with the lancing device.
- Gently squeeze your finger to assist the blood flow. This helps you get a blood drop.
- Touch the blood drop to the front edge of the yellow window of the test strip.Do not put blood on top of the test strip.

- The test result appears on the display. To assign a marker to the test result, leave the test strip in the meter. See Chapter 2, Marking Blood Glucose Results and Setting the Post-Meal Test Reminder. Otherwise, remove and discard the used test strip. After a successful test, the meter turns itself off 5 seconds after the test strip is removed.
Performing a Blood Glucose Test with Blood from Your Palm, Forearm, or Upper Arm (Alternative Site Testing)
You have the option of obtaining a blood sample from other sites on your body besides the fingertip. Alternative sites include the palm, forearm, and upper arm. Blood obtained from the fingertip and palm can be used at any time to perform a blood glucose test.
If blood from the forearm or upper arm is used, there are certain times when testing is not appropriate. This is because your blood glucose level changes faster in your fingertip and palm than in the forearm and upper arm. These differences may cause you to misinterpret your actual blood glucose level, leading to improper therapy and potential adverse health effects.
Read the next section before you try testing from the forearm or upper arm.
| You may perform a forearm or upper arm test |
|
| You may NOT perform a forearm or upper arm test |
|
If you are interested in AST, talk to your healthcare professional first. To obtain an AST cap and detailed AST instructions, contact Roche.
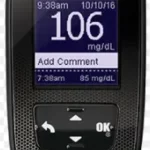
Marking Blood Glucose Results and Setting the Post-Meal Test Reminder
You can mark a blood glucose result to indicate a special event. If you select a test result marker, it is automatically stored in memory. When you review the test results in memory, these markers can help you remember what was different about the test result.
| Symbol | Function |
 |
Pre-Meal Marker Marking blood glucose results with a pre-meal marker provides more information about your test results to help you and your healthcare professional in the management of your diabetes. |
 |
Pre-Meal Marker with Post-Meal Test Reminder When a pre-meal result is marked with a post-meal test reminder, the meter beeps 1 or 2 hours after you test to remind you to do a post-meal test. |
 |
Post-Meal Marker Marking blood glucose results with a post-meal marker provides more information about your test results to help you and your healthcare professional in the management of your diabetes. The post-meal marker automatically appears with the test result if a test is performed 15 minutes before or after the post-meal test reminder is programmed to beep. Set the post-meal test reminder time to 1 or 2 hours in the set-up mode. The meter will beep 1 or 2 hours after the pre-meal test to remind you to do a post-meal test. |
 |
General Marker You might want to use the general marker to mark an event such as an AST result or exercise. |
Here is how to mark a test result and initiate a post‑meal test reminder:
- Perform a blood glucose test. The blood glucose result appears on the display.
- Leave the test strip in the meter. Press and release or to toggle through the test result markers and post‑meal test reminder.
- When the marker or test reminder that you wish to select appears on the display, remove the test strip
from the meter.
Unusual Blood Glucose Results
If your blood glucose result does not match how you feel, check this list to help solve the problem.
| Troubleshooting Checks | Action |
| 1. Were the test strips expired? | Discard the test strips if they are past the use by date. Repeat the blood glucose test with an unexpired test strip. |
| 2. Was the cap on the test strip container closed tightly? | Replace the test strips if you think the test strip container was uncapped for some time. Repeat the blood glucose test. |
| 3. Was the test strip used immediately after it was removed from the test strip container? | Repeat the blood glucose test with a new test strip. |
| 4. Were the test strips stored in a cool, dry place? | Repeat the blood glucose test with a properly stored test strip. |
| 5. Did you follow the directions? | See Chapter 2, Blood Glucose Tests, and repeat the blood glucose test. Contact Roche if you still have problems. |
| 6. Are the meter and test strips working properly? | Perform a control test. See Chapter 4, Performing a Control Test, for instructions. |
| 7. Are you still unsure of the problem? | Contact Roche. |
Symptoms of Low or High Blood Glucose
Being aware of the symptoms of low or high blood glucose can help you understand your test results and decide what to do if they seem unusual.
Low blood glucose (hypoglycemia): Symptoms of hypoglycemia may include, but are not limited to, anxiety, shakiness, sweating, headache, increased hunger, dizziness, pale skin color, sudden change in mood or irritability, fatigue, difficulty concentrating, clumsiness, palpitations, and/or confusion.
High blood glucose (hyperglycemia): Symptoms of hyperglycemia may include, but are not limited to, increased thirst, frequent urination, blurred vision, drowsiness, and/or unexplained weight loss.
WARNING
If you are experiencing any of these symptoms, or other unusual symptoms, test your blood glucose from the fingertip or palm. If your blood glucose result is displayed as LO or HI, contact your healthcare professional immediately.
Meter Memory, Setup, and Data Transfer
Memory Storing Blood Glucose and Control Results
The meter automatically stores up to 500 blood glucose results and up to 20 control results with the time and date of the result and any test result marker which you can review at any time. Test results are stored from the newest to the oldest, so set the time and date correctly in the meter. Having the correct time and date setting helps ensure appropriate interpretation of stored blood glucose results by you and your healthcare team.
NOTE
- The memory is not lost when the battery is replaced; however, confirm that the time and date are still correct. See Chapter 3, Setting the Time and Date.
- Once 500 blood glucose results are in memory, adding a new test result causes the oldest one to be deleted.
- If more than 500 blood glucose tests are performed within a 90-day period, only the most recent 500 test results are included in the 90-day average.
- Control results are stored in memory, but cannot be reviewed on the meter. To view stored control results, first transfer them to a compatible software application. Contact Roche for product availability.
- Control results are not included in the 7-, 14-, 30-, and 90-day averages.
- Only test results that have been assigned a pre-meal or post-meal marker are included in pre-meal and post-meal averages. All blood glucose results are included in the general 7-, 14-, 30-, and 90-day averages.
Memory Viewing Test Results in Memory
With the meter on or off, press and release or to enter memory. The most recent test result appears on the display.
| Button | Function | Action |
| (left arrow button) | Previous test results | Press to view previous test results from newest to oldest.
|
| (right arrow button) | General averages | Press to view 7-, 14-, 30-, and 90-day averages. n = number of test results in the average
|
| (right arrow button) | Pre-meal averages Continue to press to view 7-, 14-, 30-, and 90-day pre-meal Post-meal averages and post-meal averages. | |


WARNING
Do not change your therapy based on an individual test result in memory. Talk to your healthcare professional before changing therapy based on test results in memory.
Setup Using the Set‑Up Mode
The following features can be customized as required.
| Symbol | Function | Action | Factory Pre-set |
| Time and date | Set the time and date. | ||
 |
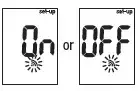
Beeper | Select On or OFF. Setting the beeper to OFF does not affect test results. The beeper must be On to use the test reminders feature. |  |
 |
Post-meal test reminder | Select 1 hour or 2 hours. The meter will beep 1 or 2 hours after the pre-meal test to remind you to do a post-meal test. |  |
 |
Test reminders | Select On or OFF. You can set up to 4 test reminders per day. | A-1 8:00 A-2 12:00 A-3 18:00 A-4 22:00 |
 |
Hypoglycemic alert | Select On or OFF. The hypoglycemic alert can be set to a level between 50 and 90 mg/dL to let you know when your blood glucose is possibly too low. |  |
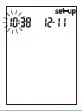
Setup Setting the Time and Date
- Press and release (power/set button) to turn the meter on. The flashing test strip symbol appears on the display.

- Press and hold until set-up appears on the display. The hour flashes.
- Press and release or to decrease or increase the hour. Press and release to set the hour. The minutes flash.

- Repeat step 3 to set minutes, day, month, and year. To set up more options, press and release . To exit, press and hold until the flashing test strip symbol appears on the display.

Setup Setting the Beeper On or OFF
NOTE The beeper prompts you:
- to apply blood or control solution to the test strip.
- when enough blood or control solution is drawn into the test strip.
- when the blood glucose or control test is complete.
- when a button is pressed.
- when it is time to perform a test (if you set the test reminders or post-meal test reminder).
- if an error occurred while performing a blood glucose or control test (even if the beeper is off, it still beeps for an error).
- Press and release to turn the meter on. The flashing test strip symbol appears on the display. Press and hold until set-up appears on the display.
- Press and release repeatedly until the flashing beeper symbol and On or OFF appear on the display.
- Press and release or to switch between On and OFF. To set up more options, press and release . To exit, press and hold until the flashing test strip symbol appears on the display.
Setup Setting the Post-Meal Test Reminder
NOTE
The post-meal test reminder:
- beeps 1 or 2 hours after the blood glucose test to remind you to do a post-meal test.
- beeps every 2 minutes up to 3 times.
- turns off by inserting a test strip or pressing any button.
- If a test was performed within 15 minutes of a test reminder, the test reminder does not beep.
- If the meter is on at the test reminder time, the test reminder does not beep.
- Exposure to cold conditions may disable test reminders until the meter is turned on.
- Press and release to turn the meter on. The flashing test strip symbol appears on the display. Press and hold until set-up appears on the display.

- Press and release repeatedly until set-up and the flashing 1Hr or 2Hr appear on the display.

- Press and release or to select 1Hr or 2Hr. Press and release to set the option. To set up more options, press and release . To exit, press and hold until the flashing test strip symbol appears on the display.
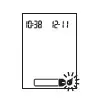
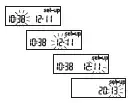
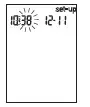
 This display appears when a post-meal test reminder occurs.
Setup Setting the Test Reminders
NOTE
Test reminders:
- beep at the same time each day.
- beep every 2 minutes up to 3 times.
- turn off by inserting a test strip or pressing any button.
- If a test was performed within 15 minutes of a test reminder, the test reminder does not beep.
- If the meter is on at the test reminder time, the test reminder does not beep.
- Exposure to cold conditions may disable test reminders until the meter is turned on.
- If a test reminder is off in set-up mode, any subsequent test reminders are also off. For example, if you set A-1 but turn off A-2, then
A- 3 and A-4 will automatically be off.
- Press and release to turn the meter on. The flashing tesat strip symbol appears on the display. Press and hold until set-up appears on the display.

- Press and release repeatedly until the bell symbol, OFF, set-up, and the flashing A-1 appear on the display.
- Press and release or to switch between On and OFF.
- press or release to adjust the hour. Press and release to set the hour. The minutes flash.
- Press and release or to select 00, 15, 30, or 45. These are the only choices. Press and release to set the minutes. The bell symbol, OFF, and the flashing A-2 appear on the display.
- Either set the A-2 test reminder or press and release to set up more options. To exit, press and hold until the flashing test strip symbol appears on the display.
Setup Setting the Hypoglycemic Alert
WARNING
- This function is no substitute for hypoglycemia training by your healthcare professional.
- Consumer: Before you set the hypoglycemic alert, talk to your healthcare professional to help you decide what blood glucose level is your hypoglycemic level.
- Healthcare professionals: The hypoglycemic level may vary from person to person. It is recommended to turn the hypoglycemic alert OFF when using the meter in a professional setting.
- Press and release to turn the meter on. The flashing test strip symbol appears on the display. Press and hold until set-up appears on the display.
- Press and release repeatedly until set-up, OFF, and the flashing appear on the display.

- Press and release or to switch between On and OFF. Press and release to set your choice. If you select On, set-up appears and flashes.

- Press and release or to adjust the level. Press and release to set the level. To exit, press and hold until the flashing test strip symbol appears on the display. The set-up mode is complete.
Data Transfer Transferring Results to a Computer
We offer a variety of software to help you transfer your results. For information on Accu-Chek software, contact Roche.
You can transfer your stored results to a computer to track, identify patterns, and print.
WARNING Transferring data to a computer from meters used for multiple-patient testing is NOT recommended since individual patient results cannot be identified.
Transferring Data Directly to a Computer Using Specialized Software and an Infrared Cable
- Install the software according to the instructions.
- To transfer the results to a computer, connect the infrared cable according to the instructions.
- Run the software program and follow the instructions for data transfer. Make sure the software is ready to accept data from the meter.
- With the meter off, press and hold both and until 2 arrows on the display alternately flash.
- Locate the infrared (IR) window on the top of the meter.
- Locate the IR window on the infrared cable.
- Place the meter on a flat surface. Point the 2 IR windows toward each other. They should be 3–10 cm apart.
- Do not move the infrared cable or meter during the data transfer.
- Follow the prompts on the software.
- The software program may shut off the meter automatically when the data transfer is complete. Should this occur, follow the prompts on the computer screen.

NOTE
- If the data did not transfer successfully, try again. Contact Roche if you still have problems.
- To make the most of the transfer feature, make sure the meter is set to the correct time and date.
Control Tests
When to Perform a Control Test
Performing a control test lets you know the meter and test strips are working properly. You should perform a control test when:
- you open a new test strip box.
- you think the test strips are damaged.
- you want to check the meter and test strips.
- the test strips were stored in extreme temperatures, humidity, or both.
- you dropped the meter.
- your test result does not match how you feel.
- you want to check if you are performing the test correctly.
About the Control Solution
- Use only Accu-Chek Aviva control solution.
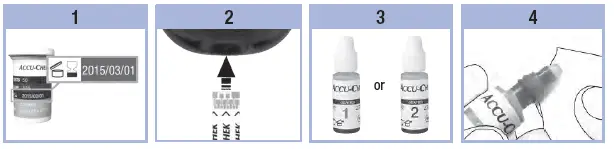
- Close the control solution bottle tightly after use.
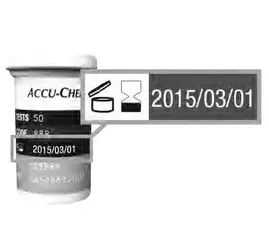
- Write the date you open the control solution bottle on the bottle label. The control solution must be discarded 3 months from the date the control solution bottle was opened (discard date) or on the use by date on the bottle label, whichever comes first.
- Do not use control solution that is past the use by or discard date.
- Refer to the control solution package insert for control solution storage conditions.
- The meter automatically recognizes the difference between the control solution and blood.
- The control results are not displayed in memory.
- The control solution can stain fabric. Remove stains by washing with soap and water.
Performing a Control Test
You need the meter, a test strip, and control solution Level 1 or Level 2.
- Check the use by date on the test strip container. Do not use test strips past the use by date.

- Insert the test strip into the meter in the direction of the arrows. Place the meter on a flat surface.
- Select the control solution to test. You will enter the level later in the test.
- Remove the cap from the control solution bottle. Wipe the tip of the bottle with a tissue. Squeeze the bottle until a tiny drop forms at the tip.
- Touch the drop to the front edge of the yellow window of the test strip until you see flash. Do not put control solution on top of the test strip.
- When you see flash, there is enough control solution in the test strip.
- Wipe the tip of the bottle with a tissue. Cap the bottle tightly.
- The control result, the bottle symbol, and a flashing L appear on the display. Do not remove the test strip yet. Press to mark the control result as a Level 1. Press a second time to mark the control result as a Level 2.
- Press and release to set the control level in the meter. OK and the control result alternate on the display if the control result is in range. Err and the control result alternate on the display if the control result is not in range. Remove and discard the used test strip. After a successful test, the meter turns off 5 seconds after the test strip is removed.
Understanding Out-of-Range Control Results
WARNING The control ranges are printed on the test strip container label. If the control result is out of range, check this list to help solve the problem.
| Troubleshooting Checks | Action |
| 1. Were the test strips or control solutions expired? | Discard the test strips or control solution if either is past the use by date. If the control solution was opened more than 3 months ago, discard it. Repeat the control test with an unexpired test strip and an unexpired control solution. |
| 2. Did you wipe the tip of the control solution bottle before use? | Wipe the tip of the bottle with a tissue. Repeat the control test with a new test strip and a fresh drop of control solution. |
| 3. Were the caps on the test strip container and the control solution bottle always closed tightly? | Replace the test strips or control solution if you think either was uncapped for some time. Repeat the control test. |
| 4. Was the test strip used immediately after it was removed from the test strip container? | Repeat the control test with a new test strip and a fresh drop of control solution. |
| 5. Were the test strips and control solutions stored in a cool, dry place? | Repeat the control test with a properly stored test strip or control solution. |
| 6. Did you follow the directions? | Read Chapter 4, Control Tests, and repeat the control test. |
| 7. Did you choose the correct control solution level, either 1 or 2, when you performed the control test? | If you chose the wrong control solution level, you can still compare the control result to the range printed on the test strip container. |
| 8. Are you still unsure of the problem? | Contact Roche. |
Maintenance and Troubleshooting
Meter Maintenance
The meter automatically tests its own systems every time you turn it on and lets you know if something is wrong. See Chapter 5, Display and Error Messages. If you drop the meter or think the results are not accurate, contact Roche.
WARNING
Keep new and used batteries away from children. See the warning in the Introduction of this User’s Manual for additional information.
Changing the Battery
- Open the battery door on the back of the meter by pushing the tab in the direction of the arrow and pulling the door up.
- Remove the old battery. Insert the new battery with the (+) side facing up.
- Put the battery door back in place and snap it closed.
NOTE
- The meter uses one 3-volt lithium battery, coin cell type CR2032. This type of battery can be found in many stores. It is a good idea to have a spare battery available.
- All results remain saved in the memory.
Cleaning the Meter
Keep the meter free of dust. If you need to clean or disinfect it, follow these guidelines carefully to help you get the best performance possible.
WARNING
- Do not allow liquid to enter any openings in the meter.
- Do not spray a cleaning solution directly onto the meter.
- Do not immerse the meter in liquid.
- Make sure the meter is turned off.
- Gently wipe the meter’s surface with a soft cloth slightly dampened (wring out any excess liquid) with one of these cleaning solutions:
- 70 % isopropyl alcohol
- Mild dishwashing liquid mixed with water
- 10 % household bleach solution (1 part bleach plus 9 parts water) made the same day
Display and Error Messages
WARNING
- Never make therapy decisions based on an error message.
- If you have any concerns or see any other error display, contact Roche.
| Display | Action |
| The meter will not turn on or the display is blank. |
|
 |
Battery power is low. Change the battery soon. |
 |
The meter is in set-up mode, waiting for you to change or confirm settings. |
 |
The meter is ready for you to insert a test strip. |
 |
The meter is ready for a drop of blood or control solution. |
 |
Blood glucose may be higher than the measurement range of the system. See Chapter 2, Unusual Blood Glucose Results. |
 |
Blood glucose may be lower than the measurement range of the system. See Chapter 2, Unusual Blood Glucose Results. |
 |
Blood glucose is below the defined hypoglycemic (low blood glucose) level. See Chapter 2, Unusual Blood Glucose Results. |
 |
A general marker was assigned to this test result. |
 |
A pre-meal marker was assigned to this test result. |
 |
A post-meal marker was assigned to this test result. |
 |
A pre-meal marker was assigned to this test result and the post-meal test reminder has been activated. |
 |
The test strip may be damaged or not properly inserted. Remove and reinsert the test strip or replace it if damaged. |
 |
|
 |
Not enough blood or control solution was drawn into the test strip for measurement or was applied after the test had started. Discard the test strip and repeat the blood glucose or control test. |
 |
Blood or control solution was applied to the test strip before the flashing drop symbol appeared on the display. Discard the test strip and repeat the blood glucose or control test. |
 |
An electronic error occurred, or in rare cases, a used test strip was removed and reinserted. Turn the meter off and on, or take the battery out for 20 seconds and reinsert it. Perform a blood glucose or control test. |
 |
The temperature is above or below the proper range for the system. Refer to the test strip package insert for system operating conditions. Move to an area with the appropriate conditions, wait 5 minutes, and repeat the blood glucose or control test. Do not artificially heat or cool the meter. |
 |
The battery is almost out of power. Change the battery now. If the message reappears after the battery has been replaced, remove the battery again, press any meter button, then reinsert the battery. |
 |
The time and date settings may be incorrect. Make sure the time and date are correct and adjust, if necessary. |
Technical Information
Product Limitations
See the literature packaged with the test strips and control solution for the latest information on product specifications and limitations.
| Specifications | |
| Blood volume Sample type Measuring time Measurement range
Test strip storage conditions System operating conditions Relative humidity operating range |
Refer to the test strip package insert. |
| Meter storage conditions | Temperature: -25–70 °C |
| Memory capacity | 500 blood glucose results and 20 control results with time and date |
| Automatic power off | 2 minutes |
| Power supply | One 3-volt lithium battery (coin cell type CR2032) |
| Display | LCD |
| Dimensions | 94 × 52 × 21 mm (LWH) |
| Weight | Approx. 59 g (with battery) |
| Construction | Hand-held |
| Protection class | III |
| Meter type | The Accu-Chek Aviva meter is suitable for continuous operation. |
| Control solution storage conditions | Refer to the control solution package insert. |
Electromagnetic Compatibility – This meter meets the electromagnetic immunity requirements as per EN ISO 15197 Annex A. The chosen basis for electrostatic discharge immunity testing was basic standard IEC 61000-4-2. In addition, the meter meets the electromagnetic emissions requirements as per EN 61326. The meter’s electromagnetic emission is thus low. Interference from the meter to other electrically-driven equipment is not anticipated.
Performance Analysis – Refer to the test strip package insert.
Test Principle – Refer to the test strip package insert.
Product Safety Information
WARNING
- Choking hazard. Small parts. Keep away from children under the age of 3 years.
- Strong electromagnetic fields may interfere with the proper operation of the meter. Do not use the meter close to sources of strong electromagnetic radiation.
- To avoid electrostatic discharge, do not use the meter in a very dry environment, especially one in which synthetic materials are present.
Discarding the Meter
WARNING
- During blood glucose testing, the meter itself may come into contact with blood. Used meters therefore carry a risk of infection. Before discarding the meter, remove the battery or batteries. Discard used meters according to the regulations applicable in your country. Contact the local council and authority for information about correct disposal.
- The meter falls outside the scope of the European Directive 2002/96/EC – Directive on waste electrical and electronic equipment (WEEE).
- Discard used batteries according to local environmental regulations.
Explanation of Symbols
These symbols may appear on the packaging, on the type plate, and in the instructions for the AccuChek Aviva meter.
 |
Consult instructions for use |
 |
Caution, refer to safety-related notes in the instructions for use accompanying this product. |
 |
Temperature limitation (store at) |
 |
Manufacturer |
 |
Catalogue number |
 |
In vitro diagnostic medical device |
 |
Global Trade Item Number |
 |
This product fulfils the requirements of the European Directive 98/79/EC on in vitro diagnostic medical devices. |
 |
3-volt coin cell type CR2032 |
 |
Keep new and used batteries away from children. |
Guarantee
The statutory provisions on rights in consumer goods sales in the country of purchase shall apply.
Additional Supplies
- Test Strips
Accu-Chek Aviva test strips - Control Solutions
Accu-Chek Aviva control solutions
Information for Healthcare Professionals
WARNING Healthcare Professionals: Follow the infection control procedures appropriate for your facility. Refer to the test strip package insert for additional healthcare professional information.
Sample Handling
Always wear gloves when handling blood-contaminated items. Always adhere to the recognized procedures for handling objects that are potentially contaminated with human material. Follow the hygiene and safety policy of your laboratory or institution. Prepare the selected blood collection site per facility policy.
Refer to the test strip package insert for additional information regarding acceptable sample types, anticoagulants, and handling instructions.
Recommending Alternative Site Testing to Patients
Decisions about whether to recommend Alternative Site Testing (AST) should take into account the motivation and knowledge level of the patient and his or her ability to understand the considerations relative to diabetes and AST. If you are considering recommending AST for your patients, you need to understand that there is a potential for a significant difference between fingertip or palm test results and test results obtained from the forearm or upper arm. The difference in capillary bed concentration and blood perfusion throughout the body can lead to sample site-to-site differences in blood glucose results. These physiological effects vary between individuals and can vary within a single individual based upon his or her behavior and relative physical condition.
Our studies involving alternative site testing of adults with diabetes show that most persons will find their glucose level changes more quickly in blood from the fingertip or palm than in blood from the forearm or upper arm. This is especially important when blood glucose levels are falling or rising rapidly. If your patient is used to making therapy decisions based upon fingertip or palm test results, he or she should consider the delay, or lag time, affecting the test results obtained with blood from the forearm or upper arm.