DCB331010M Built-In Double Oven
View Fullscreen
DCB331010M
EN User Manual Built-In Double Oven
USER MANUAL
2 www.aeg.com
CONTENTS
1. SAFETY INFORMATION………………………………………………………………………………… 2 2. SAFETY INSTRUCTIONS…………………………………………………………………………………4 3. PRODUCT DESCRIPTION……………………………………………………………………………….6 4. CONTROL PANEL…………………………………………………………………………………………. 7 5. BEFORE FIRST USE……………………………………………………………………………………….. 7 6. DAILY USE…………………………………………………………………………………………………….. 8 7. CLOCK FUNCTIONS………………………………………………………………………………………9 8. USING THE ACCESSORIES………………………………………………………………………….. 11 9. ADDITIONAL FUNCTIONS………………………………………………………………………….. 12 10. HINTS AND TIPS……………………………………………………………………………………….. 12 11. CARE AND CLEANING……………………………………………………………………………… 21 12. TROUBLESHOOTING………………………………………………………………………………… 23 13. ENERGY EFFICIENCY………………………………………………………………………………… 24
FOR PERFECT RESULTS
Thank you for choosing this AEG product. We have created it to give you impeccable performance for many years, with innovative technologies that help make life simpler features you might not find on ordinary appliances. Please spend a few minutes reading to get the very best from it. Visit our website for:
Get usage advice, brochures, trouble shooter, service information: www.aeg.com/webselfservice
Register your product for better service: www.registeraeg.com
Buy Accessories, Consumables and Original spare parts for your appliance: www.aeg.com/shop
CUSTOMER CARE AND SERVICE
Always use original spare parts. When contacting our Authorised Service Centre, ensure that you have the following data available: Model, PNC, Serial Number. The information can be found on the rating plate.
Warning / Caution-Safety information General information and tips Environmental information
Subject to change without notice.
1. SAFETY INFORMATION
Before the installation and use of the appliance, carefully read the supplied instructions. The
ENGLISH 3
manufacturer is not responsible for any injuries or damages that are the result of incorrect installation or usage. Always keep the instructions in a safe and accessible location for future reference.
1.1 Children and vulnerable people safety
· This appliance can be used by children aged from 8 years and above and persons with reduced physical, sensory or mental capabilities or lack of experience and knowledge if they have been given supervision or instruction concerning the use of the appliance in a safe way and understand the hazards involved.
· Children between 3 and 8 years of age and persons with very extensive and complex disabilities shall be kept away unless continuously supervised.
· Children of less than 3 years of age should be kept away unless continuously supervised.
· Do not let children play with the appliance. · Keep all packaging away from children and dispose of
it appropriately. · Keep children and pets away from the appliance when
it operates or when it cools down. Accessible parts are hot. · If the appliance has a child safety device, it should be activated. · Children shall not carry out cleaning and user maintenance of the appliance without supervision.
1.2 General Safety
· Only a qualified person must install this appliance and replace the cable.
· WARNING: The appliance and its accessible parts become hot during use. Care should be taken to avoid touching heating elements.
· Always use oven gloves to remove or put in accessories or ovenware.
· Before carrying out any maintenance, disconnect the appliance from the power supply.
4 www.aeg.com
· Ensure that the appliance is switched off before replacing the lamp to avoid the possibility of electric shock.
· Do not use a steam cleaner to clean the appliance. · Do not use harsh abrasive cleaners or sharp metal
scrapers to clean the glass door since they can scratch the surface, which may result in shattering of the glass. · If the mains power supply cable is damaged, it must be replaced by the manufacturer, its Authorised Service Centre or similarly qualified persons to avoid an electrical hazard. · To remove the shelf supports first pull the front of the shelf support and then the rear end away from the side walls. Install the shelf supports in the opposite sequence. · The means for disconnection must be incorporated in the fixed wiring in accordance with the wiring rules.
2. SAFETY INSTRUCTIONS
2.1 Installation
WARNING! Only a qualified person must install this appliance.
· Remove all the packaging. · Do not install or use a damaged
appliance. · Follow the installation instructions
supplied with the appliance. · Always take care when moving the
appliance as it is heavy. Always use safety gloves and enclosed footwear. · Do not pull the appliance by the handle. · Keep the minimum distance from other appliances and units. · Install the appliance in a safe and suitable place that meets installation requirements. · The appliance is equipped with an electric cooling system. It must be operated with the electric power supply.
2.2 Electrical connection
WARNING! Risk of fire and electric shock.
· All electrical connections should be made by a qualified electrician.
· The appliance must be earthed. · Make sure that the parameters on the
rating plate are compatible with the electrical ratings of the mains power supply. · Always use a correctly installed shockproof socket. · Do not use multi-plug adapters and extension cables. · Make sure not to cause damage to the mains plug and to the mains cable. Should the mains cable need to be replaced, this must be carried out by our Authorised Service Centre. · Do not let mains cables touch or come near the appliance door, especially when the door is hot. · The shock protection of live and insulated parts must be fastened in
ENGLISH 5
such a way that it cannot be removed without tools. · Connect the mains plug to the mains socket only at the end of the installation. Make sure that there is access to the mains plug after the installation. · If the mains socket is loose, do not connect the mains plug. · Do not pull the mains cable to disconnect the appliance. Always pull the mains plug. · Use only correct isolation devices: line protecting cut-outs, fuses (screw type fuses removed from the holder), earth leakage trips and contactors. · The electrical installation must have an isolation device which lets you disconnect the appliance from the mains at all poles. The isolation device must have a contact opening width of minimum 3 mm. · This appliance complies with the E.E.C. Directives.
2.3 Use
WARNING! Risk of injury, burns and electric shock or explosion.
· This appliance is for household use only.
· Do not change the specification of this appliance.
· Make sure that the ventilation openings are not blocked.
· Do not let the appliance stay unattended during operation.
· Deactivate the appliance after each use.
· Be careful when you open the appliance door while the appliance is in operation. Hot air can release.
· Do not operate the appliance with wet hands or when it has contact with water.
· Do not apply pressure on the open door.
· Do not use the appliance as a work surface or as a storage surface.
· Open the appliance door carefully. The use of ingredients with alcohol can cause a mixture of alcohol and air.
· Do not let sparks or open flames to come in contact with the appliance when you open the door.
· Do not put flammable products or items that are wet with flammable products in, near or on the appliance.
WARNING! Risk of damage to the appliance.
· To prevent damage or discoloration to the enamel: do not put ovenware or other objects in the appliance directly on the bottom. do not put aluminium foil directly on the bottom of cavity of the appliance. do not put water directly into the hot appliance. do not keep moist dishes and food in the appliance after you finish the cooking. be careful when you remove or install the accessories.
· Discoloration of the enamel or stainless steel has no effect on the performance of the appliance.
· Use a deep pan for moist cakes. Fruit juices cause stains that can be permanent.
· This appliance is for cooking purposes only. It must not be used for other purposes, for example room heating.
· Always cook with the oven door closed.
· If the appliance is installed behind a furniture panel (e.g. a door) make sure the door is never closed when the appliance is in operation. Heat and moisture can build up behind a closed furniture panel and cause subsequent damage to the appliance, the housing unit or the floor. Do not close the furniture panel until the appliance has cooled down completely after use.
2.4 Care and cleaning
WARNING! Risk of injury, fire, or damage to the appliance.
6 www.aeg.com
· Before maintenance, deactivate the appliance and disconnect the mains plug from the mains socket.
· Make sure the appliance is cold. There is the risk that the glass panels can break.
· Replace immediately the door glass panels when they are damaged. Contact the Authorised Service Centre.
· Be careful when you remove the door from the appliance. The door is heavy!
· Clean regularly the appliance to prevent the deterioration of the surface material.
· Clean the appliance with a moist soft cloth. Only use neutral detergents. Do not use any abrasive products, abrasive cleaning pads, solvents or metal objects.
· If you use an oven spray, follow the safety instruction on it’s packaging.
· Do not clean the catalytic enamel (if applicable) with any kind of detergent.
2.5 Internal lighting
WARNING! Risk of electric shock.
· The type of light bulb or halogen lamp used for this appliance is for household appliances only. Do not use it for house lighting.
· Before replacing the lamp, disconnect the appliance from the power supply.
· Only use lamps with the same specifications.
2.6 Service
· To repair the appliance contact an Authorised Service Centre.
· Use original spare parts only.
2.7 Disposal
WARNING! Risk of injury or suffocation.
· Disconnect the appliance from the mains supply.
· Cut off the mains electrical cable close to the appliance and dispose of it.
· Remove the door catch to prevent children or pets from becoming trapped in the appliance.
3. PRODUCT DESCRIPTION
3.1 General overview
1 23 4
4 3
12 2
1
5 4
12 3
2 1
567
8 9 11
8 9 10 11
1 Knob for the top oven functions 2 Knob for the top oven temperature 3 Temperature indicator / symbol for
the top oven
4 Display 5 Knob for the main oven functions 6 Temperature indicator / symbol for
the main oven
7 Knob for the main oven temperature 8 Heating element 9 Lamp 10 Fan 11 Shelf support, removable 12 Shelf positions
ENGLISH 7
3.2 Accessories
· Wire shelf For cookware, cake tins, roasts.
· Grill- / Roasting pan To bake and roast or as pan to collect fat.
4. CONTROL PANEL
4.1 Buttons
· Trivet For roasting and grilling.
Use the trivet only with the Grill- / roasting pan.
Sensor field / Button
Function MINUS CLOCK PLUS
Description To set the time. To set a clock function. To set the time.
4.2 Display
The display works only with the main oven.
A
B
C
A. Clock functions B. Timer C. Clock function
5. BEFORE FIRST USE
WARNING! Refer to Safety chapters.
To set the Time of day refer to “Clock functions” chapter.
5.1 Initial Cleaning
Remove all accessories and removable shelf supports from the oven.
Refer to “Care and cleaning” chapter.
Clean the oven and the accessories before first use.
Put the accessories and the removable shelf supports back to their initial position.
5.2 Preheating
Preheat the empty appliance to burn off the remaining grease.
Preheat the two ovens. Heat up one oven at a time. Set the functions listed below, if applicable.
1. Set the function and the temperature to 250ºC. Let the appliance operate for 1 hour.
8 www.aeg.com
2. Set the function and the temperature to 250ºC. Let the appliance operate for 15 minutes.
3. Set the function and the temperature to 250ºC.
6. DAILY USE
WARNING! Refer to Safety chapters.
6.1 Retractable knobs
To use the appliance press the knob. The knob comes out.
6.2 Setting a heating function
1. Turn the knob for the heating functions to select a heating function.
6.3 Top oven functions
Let the appliance operate for 15 minutes. Accessories can become hotter than usual. The appliance can emit an odour and smoke. This is normal. Make sure that the airflow is sufficient.
2. Turn the control knob to select the temperature.
The lamp turns on when the oven operates. 3. To turn off the oven, turn the knob
for the heating functions to the off position.
Oven function Light
Application To turn on the lamp without a cooking function.
Conventional Cooking (Top / Bottom Heat) Top Heat
Bottom Heat
To bake and roast food on one shelf position.
To brown bread, cakes and pastries. To finish cooked dishes. To bake cakes with crispy bottom and to preserve food.
Grilling
To grill flat food and to toast bread.
Fast Grilling
To grill flat food in large quantities and to toast bread.
6.4 Main oven functions
Symbol
Oven function Light
Application To turn on the lamp without a cooking function.
ENGLISH 9
Symbol
Oven function True Fan Cooking
Pizza Setting
Application
To bake on up to two shelf positions at the same time and to dry food. Set the temperature 20 – 40 °C lower than for Conventional Cooking.
To bake pizza. To make intensive browning and a crispy bottom.
Conventional Cooking (Top / Bottom Heat)
Bottom Heat
To bake and roast food on one shelf position.
To bake cakes with crispy bottom and to preserve food.
Defrost Moist Baking
Grilling
To defrost food (vegetables and fruit). The defrosting time depends on the amount and size of the frozen food.
This function is designed to save energy during cooking. For the cooking instructions refer to “Hints and tips” chapter, Moist Baking. The oven door should be closed during cooking so that the function is not interrupted and to ensure that the oven operates with the highest energy efficiency possible. When you use this function, the temperature in the cavity may differ from the set temperature. The heating power may be reduced. For general energy saving recommendations refer to “Energy Efficiency” chapter, Energy Saving.This function was used to comply with the energy efficiency class according to EN 60350-1. When you use this function the lamp automatically turns off.
To grill flat food and to toast bread.
Turbo Grilling
To roast larger meat joints or poultry with bones on one shelf position. To make gratins and to brown.
7. CLOCK FUNCTIONS
7.1 Clock functions table
Clock function TIME OF DAY
Application To set, change or check the time of day.
DURATION
To set how long the appliance operates.
10 www.aeg.com
Clock function END
Application To set when the appliance deactivates.
TIME DELAY
To combine DURATION and END function.
MINUTE MINDER To set countdown time. This function has no effect on the operation of the appliance. You can set the MINUTE MINDER at any time, also when the appliance is off.
7.2 Setting the time. Changing the time
You must set the time before you operate the oven.
Only the top oven works without the set time.
The flashes when you connect the appliance to the electrical supply, when there was a power cut or when the timer is not set.
Press the or to set the correct time. After approximately five seconds, the flashing stops and the display shows the time of day you set.
To change the time of day press
again and again until starts to flash.
7.3 Setting the DURATION
1. Set an oven function and temperature.
2. Press again and again until starts to flash.
3. Press or to set the DURATION time.
The display shows .
4. When the time ends, flashes and an acoustic signal sounds. The appliance deactivates automatically.
5. Press any button to stop the acoustic signal.
6. Turn the knob for the oven functions and the knob for the temperature to the off position.
DURATION works only for the main oven.
7.4 Setting the END
1. Set an oven function and temperature.
2. Press again and again until starts to flash.
3. Press or to set the time.
The display shows .
4. When the time ends, flashes and an acoustic signal sounds. The appliance deactivates automatically.
5. Press any button to stop the signal. 6. Turn the knob for the oven functions
and the knob for the temperature to the off position.
The function works only for the main oven.
7.5 Setting the TIME DELAY
1. Set an oven function and temperature.
2. Press again and again until starts to flash.
3. Press or to set the time for DURATION.
4. Press .
5. Press or to set the time for END.
6. Press to confirm. Appliance turns on automatically later on, works for the set DURATION time and stops at the set END time. At the set time an acoustic signal sounds. 7. The appliance deactivates
automatically. Press any button to stop the signal. 8. Turn the knob for the oven functions and the knob for the temperature to the off position.
ENGLISH 11
TIME DELAY works only for the main oven.
7.6 Setting the MINUTE MINDER
1. Press again and again until starts to flash.
2. Press or to set the necessary time.
The Minute Minder starts automatically after 5 seconds. 3. When the set time ends, an acoustic
signal sounds. Press any button to stop the acoustic signal.
8. USING THE ACCESSORIES
4. Turn the knob for the oven functions and the knob for the temperature to the off position.
7.7 Cancelling the clock functions
1. Press the again and again until the necessary function indicator starts to flash.
2. Press and hold . The clock function goes out after some seconds.
WARNING! Refer to Safety chapters.
8.1 Inserting the accessories
Wire shelf: Push the shelf between the guide bars of the shelf support .
Wire shelf and deep pan together:
Push the deep pan between the guide bars of the shelf support and the wire shelf on the guide bars above.
Deep pan:
Push the deep pan between the guide bars of the shelf support.
Small indentation at the top increase safety. The indentations are also anti-tip devices. The high rim around the shelf prevents cookware from slipping of the shelf.
8.2 Trivet and Grill- / Roasting pan
WARNING! Be careful when you remove the accessories from a hot oven. There is a risk of burns.
You can use the trivet to roast larger pieces of meat or poultry on one shelf position.
12 www.aeg.com
1. Put the trivet into the deep pan so that the supports of the wire shelf point up.
1. Put the trivet into the deep pan so that the supports of the wire shelf point down.
2. Put the deep pan into the oven on the necessary shelf position.
You can use the trivet to grill flat dishes in large quantities and to toast.
9. ADDITIONAL FUNCTIONS
9.1 Cooling fan
When the oven operates, the cooling fan turns on automatically to keep the
10. HINTS AND TIPS
WARNING! Refer to Safety chapters.
The temperature and baking times in the tables are guidelines only. They depend on the recipes and the quality and quantity of the ingredients used.
10.1 Double oven
Top oven The top oven is the smaller of the two ovens. It has 4 shelf positions. Use it to cook smaller quantities of food. It gives especially good results when used to cook fruitcakes, sweets and savoury flans or quiche.
Main oven The main oven is the bigger of the two ovens. It is particularly suitable for cooking larger quantities of food.
2. Put the deep pan into the oven on the necessary shelf position.
surfaces of the oven cool. If you turn off the oven, the cooling fan can continues to operate until the oven cools down.
10.2 Baking
· Use the lower temperature the first time.
· You can extend baking times by 10 15 minutes if you bake cakes on more than one shelf position.
· Cakes and pastries at different heights do not always brown equally. There is no need to change the temperature setting if an unequal browning occurs. The differences equalize during baking.
· Trays in the oven can twist during baking. When the trays become cold again, the distortions disappear.
ENGLISH 13
10.3 Tips on baking
Baking results
Possible cause
Remedy
The bottom of the cake The shelf position is incor-
is not browned suffi-
rect.
ciently.
Put the cake on a lower shelf.
The cake sinks and becomes soggy, lumpy or streaky.
The oven temperature is too high.
The baking time is too short.
The next time you bake, set a slightly lower oven temperature.
Set a longer baking time. You cannot decrease baking times by setting higher temperatures.
There is too much liquid in the mixture.
Use less liquid. Be careful with mixing times, especially if you use a mixing machine.
The cake is too dry.
The oven temperature is too low.
The next time you bake, set a higher oven temperature.
The baking time is too long. The next time you bake, set a shorter baking time.
The cake browns unevenly.
The oven temperature is too high and the baking time is too short.
Set a lower oven temperature and a longer baking time.
The mixture is unevenly dis- Spread the mixture evenly on the
tributed.
baking tray.
The cake is not ready in The oven temperature is the baking time given. too low.
The next time you bake, set a slightly higher oven temperature.
10.4 Baking
To bake in the top oven use the function Conventional Cooking.
Top oven
Food
Temperature (°C)
Biscuits
170 – 190
Bread
200 – 220
Bread rolls / buns
170-180
Cakes:
– Small & Queen
160 – 170
– Sponges
160 – 175
– Victoria Sandwich
160 – 170
– Madeira
140 – 150
Time (min) 10 – 20 30 – 35 10 – 15
18 – 25 20 – 30 18 – 25 75 – 90
Shelf position 2 1 1
2 2 2 2
14 www.aeg.com
Food
Temperature (°C) Time (min)
– Rich Fruit
140 – 150
120 – 150
– Gingerbread
140 – 150
75 – 90
– Meringues
90 – 100
150 – 180
– Flapjack
160 – 170
25 – 30
– Shortbread
130 – 150
45 – 65
Casseroles:
– Beef / Lamb
160 – 170
150 – 180
– Chicken
160 – 180
75 – 90
Convenience Foods
Follow manufacturer’s instructions.
Fish
170 – 190
20 – 30
Fish Pie (Potato Topped) 190 – 200
20 – 30
Fruit Pies, Crumbles
190 – 200
30 – 50
Milk Puddings
150 – 170
90 – 120
Pasta, Lasagne etc.
170 – 180
40 – 50
Pastry:
– Choux
180 – 190
30 – 40
– Eclairs, Profiteroles
180 – 190
30 – 40
– Flaky / Puff Pies
210 – 220
30 – 40
Shortcrust:
– Mince Pies
190 – 210
15 – 20
– Meat Pies
190 – 210
25 – 35
– Quiche, Tarts, Flans
180 – 200
25 – 50
Scones
220 – 230
8 – 12
Shepard’s Pie
180 – 190
30 – 40
Souffles
190 – 200
20 – 30
Vegetables:
– Baked Jacket Potatoes 180 – 190
60 – 90
– Roast Potatoes
180 – 190
60 – 90
Yorkshire Pudding:
– Large
200 – 210
25 – 40
Shelf position 2 2 2 2 2
1 1
2 2 2 2 2
2 2 2
2 2 2 2 2 2
2 2
1
ENGLISH 15
Food – Individual
Temperature (°C) 210 – 220
Time (min) 15 – 25
Shelf position 1
Main oven
Food
Temperature (°C)
Time (min)
Conventional Cooking
True Fan Cooking
Shelf position
Biscuits
180 – 190
180 – 190
10 – 20
2
Bread
200 – 220
190 – 210
30 – 35
2
Cakes:
– Small & Queen 170 – 180
160 – 170
18 – 25
2
– Sponges
170 – 180
160 – 170
20 – 25
2
– Madeira
150 – 160
140 – 160
60 – 75
2
– Rich Fruit
140 – 150
130 – 140
120 – 150
2
– Christmas
140 – 150
130 – 140
180 – 270
2
Fish
170 – 180
160 – 180
20 – 30
3
Fruit Pies, Crum- 180 – 200 bles
170 – 180
30 – 50
3
Milk Puddings 150 – 170
140 – 160
60 – 90
3
Pastry:
– Choux
180 – 190
180 – 190
30 – 40
3
– Shortcrust
190 – 200
180 – 190
25 – 35
3
– Flaky
190 – 210
180 – 190
30 – 40
3
– Puff
Follow manufacturer’s instructions. Reduce the temperature by 20ºC for True Fan Cooking Function.
Plate Tarts
190 – 200
180 – 190
25 – 45
3
Quiches / Flans 200 – 210
170 – 180
25 – 45
3
Scones
220 – 230
210 – 230
8 – 12
2
10.5 Moist Baking
For best results follow suggestions listed in the table below.
16 www.aeg.com
Food
Accessories
Temperature Shelf posi- Time (min)
(°C)
tion
Sweet rolls, 16 baking tray or dripping 180
pieces
pan
2
40 – 50
Pizza, frozen, 0.35 kg
wire shelf
220
3
35 – 45
Swiss roll
baking tray or dripping 180 pan
2
40 – 50
Brownie
baking tray or dripping 180 pan
2
40 – 50
Soufflè, 6 pieces ceramic ramekins on wire 200 shelf
3
55 – 65
Sponge flan base
flan base tin on wire shelf 170
2
35 – 45
Victoria Sand- baking dish on wire shelf 160 wich
2
45 – 55
Poached fish, baking tray or dripping 180
0.3 kg
pan
3
30 – 40
Whole fish, 0.2 baking tray or dripping 180
kg
pan
3
30 – 40
Fish fillet, 0.3 kg pizza pan on wire shelf 180
3
40 – 50
Poached meat, baking tray or dripping 200
0.25 kg
pan
3
30 – 40
Shashlik, 0.5 kg baking tray or dripping 180 pan
2
30 – 40
Cookies, 16 pieces
baking tray or dripping 180 pan
2
35 – 45
Macaroons, 24 baking tray or dripping 160
pieces
pan
2
35 – 45
Muffins, 12 pieces
baking tray or dripping 180 pan
2
40 – 50
Savory pastry, baking tray or dripping 180
20 pieces
pan
2
35 – 45
Short crust bis- baking tray or dripping 150 cuits, 20 pieces pan
2
35 – 45
Tartlets, 8 pieces
baking tray or dripping 180 pan
2
35 – 45
Poached vege- baking tray or dripping 180 tables, 0.4 kg pan
3
40 – 50
ENGLISH 17
Food
Accessories
Vegetarian omelette
pizza pan on wire shelf
Vegetables,
baking tray or dripping
mediterrean 0.7 pan
kg
Temperature Shelf posi- Time (min)
(°C)
tion
200
3
40 – 50
180
4
45 – 55
10.6 Pizza Setting
Main oven
Food
Temperature (°C) Time (min)
Apple Pie
160 – 180
50 – 60
Plate Tart
180 – 200
25 – 50
Pizza
Follow manufacturer’s instructions.
Quiches / Tarts
180 – 200
25 – 50
Shelf position 3 3 3 3
10.7 Roasting
Use heat-resistant ovenware.
Roast large roasting joints directly in the tray or on the wire shelf placed above the tray.
Put some water in the tray to prevent the meat juices or fat from burning.
Meat with crackling can be roasted in the roasting tin without the lid.
Turn the roast after 1/2 – 2/3 of the cooking time.
To keep meat more succulent: · roast lean meat in the roasting tin with
the lid or use roasting bag. · roast meat and fish in large pieces (1
kg or more). · baste large roasts and poultry with
their juices several times during roasting.
10.8 Roasting tables – Main oven
Beef
Food
Quantity
Temperature (°C)
Time (min)
Shelf position
Roast beef or fillet: per cm of thick- 190 – 2001)
5 – 6
2
rare
ness
Roast beef or fillet: per cm of thick- 180 – 1901)
6 – 8
2
medium
ness
Roast beef or fillet: per cm of thick- 170 – 1801)
8 – 10
2
well done
ness
1) Preheat the oven.
18 www.aeg.com
Pork Food
Shoulder, neck, ham Pork chop Meat loaf Knuckle of pork (precooked)
Quantity (kg) 1 – 1.5
Temperature (°C)
160 – 180
Time (min) 90 – 120
1 – 1.5 0.75 – 1 0.75 – 1
160 – 180 160 – 170 150 – 170
60 – 90 45 – 60 90 – 120
Veal Food
Quantity (kg)
Roast veal
1
Knuckle of veal 1.5 – 2
Temperature (°C)
160 – 180
160 – 180
Time (min)
90 – 120 120 – 150
Lamb Food
Quantity (kg)
Leg of lamb, roast lamb
Saddle of lamb
1 – 1.5 1 – 1.5
Temperature (°C) 150 – 170
160 – 180
Time (min) 75 – 120 60 – 90
Game Food
Quantity (kg)
Saddle of hare, Up to 1 kg leg of hare
Loin of Game 1.5 – 2
Leg of Game 1.5 – 2
Temperature (°C) 220 – 250
210 – 220 200 – 210
Time (min) 25 – 40 75 – 105 90 – 135
Poultry Food
Poultry pieces Half chicken Poultry Duck Goose
Quantity (kg)
0.2 – 0.25 each 0.4 – 0.5 each 1 – 1.5 1.5 – 2 3.5 – 5
Temperature (°C) 200 – 220 190 – 210 190 – 210 180 – 200 160 – 180
Time (min)
35 – 50 35 – 50 45 – 75 75 – 100 150 – 210
Shelf position 2 2 2 2
Shelf position 2 2
Shelf position 2 2
Shelf position 2 1 1
Shelf position 3 3 1 1 1
ENGLISH 19
Food
Quantity (kg)
Turkey Turkey Fish (steamed) Type of meat
2.5 – 3.5 4 – 6
Quantity (kg)
Whole fish
1 – 1.5
Temperature (°C) 160 – 180 140 – 160
Temperature (°C) 210 – 220
Time (min) 105 – 150 150 – 240
Time (min) 40 – 60
Shelf position 1 1
Shelf position 1
10.9 Grilling
Always grill with the maximum temperature setting.
Set the shelf into the shelf position as recommended in the grilling table.
For grilling in the top oven adjust the shelf position to suit different thicknesses of food.
Always set the pan to collect the fat into the first shelf position.
Grill only flat pieces of meat or fish.
Always preheat the empty oven with the grill functions for 5 minutes.
CAUTION! Always grill with the oven door closed.
Grilling and Fast Grilling – Top oven
Food
Time (min)
Bacon Rashers
5 -6
Beefburgers
10 – 20
Chicken Joints
20 – 40
Lamb Chops
15 – 25
Pork Chops
20 – 25
Whole Fish, Trout / Makarel
10 – 12
Fillets, Plaice / Cod
4 – 6
Kebabs
12 – 18
Kidneys, Lamb / Pig
6 – 10
Sausages
20 – 30
Toasted Sandwiches
3 – 4
Steaks:
– Rare
4 – 6
– Medium
6 – 8
20 www.aeg.com
Food – Well Done
Grilling – Main oven
Food
Temperature (°C)
Roast beef
210 – 230
Filet of beef
230
Back of pork
210 – 230
Back of veal
210 – 230
Back of lamb 210 – 230
Whole Fish, 500 210 – 230 – 1000 g
Time (min) 12 – 15
Time (min) 1st side 30 – 40 20 – 30 30 – 40 30 – 40 25 – 35 15 – 30
2nd side 30 – 40 20 – 30 30 – 40 30 – 40 20 – 25 15 – 30
Shelf position
2 3 2 2 3 3 / 4
10.10 Defrost – Main oven
Remove the food packaging and put the food on a plate.
Use the first shelf position from the bottom.
Do not cover the food with a bowl or a plate, as this can extend the defrost time.
Food
Quantity Defrost-
(kg)
ing time
(min)
Chicken 1
100 – 140
Meat Meat Trout Strawberries Butter Cream
1 0.5 0.15 0.3
0.25 2 x 0.2
100 – 140 90 – 120 25 – 35 30 – 40
30 – 40 80 – 100
Gateau 1.4
60
Further defrosting time (min)
Comments
20 – 30
Put the chicken on an upturned saucer in a big plate. Turn halfway through.
20 – 30
Turn halfway through.
20 – 30
Turn halfway through.
10 – 15
–
10 – 20
–
10 – 15 10 – 15
60
–
Whip the cream when still slightly frozen in places.
–
ENGLISH 21
11. CARE AND CLEANING
WARNING! Refer to Safety chapters.
1. Pull the front of the shelf support away from the side wall.
11.1 Notes on cleaning
Clean the front of the oven with a soft cloth with warm water and a mild cleaning agent.
To clean metal surfaces, use a dedicated cleaning agent.
Clean the oven interior after each use. Fat accumulation or other food remains may result in a fire. The risk is higher for the grill pan.
Clean all accessories after each use and let them dry. Use a soft cloth with warm water and a cleaning agent. Do not clean the accessories in the dishwasher.
Clean stubborn dirt with a special oven cleaner. Do not apply oven cleaner on the catalytic surfaces.
If you have nonstick accessories, do not clean them using aggressive agents, sharp-edged objects or a dishwasher. It can cause damage to the nonstick coating.
Clean the moisture from the cavity after each use.
11.2 Stainless steel or aluminium ovens
Clean the oven door with a damp cloth or sponge only. Dry it with a soft cloth.
Do not use steel wool, acids or abrasive materials as they can damage the oven surface. Clean the oven control panel with the same precautions.
11.3 Removing the shelf supports
To clean the oven, remove the shelf supports.
CAUTION! Be careful when you remove the shelf supports.
2. Pull the rear end of the shelf support away from the side wall and remove it.
1
2
Install the removed accessories in the opposite sequence.
11.4 Catalytic cleaning
The cavity with a catalytic coating is selfcleaning. It absorbs fat. Before you turn on the catalytic cleaning: · remove all the accessories and
removable shelf supports. · clean the oven floor with warm water
and mild detergent. · clean the inner door glass with warm
water and soft cloth.
1. Set the function . 2. Set the oven temperature to 250 °C
and let the oven operate for 1 hour. 3. Turn off the oven. 4. When the oven cools down, clean
the cavity with a wet soft cloth. Spots or discolouration of the catalytic coating have no effect on Catalytic cleaning.
11.5 Removing and installing the door
You can remove the door and the internal glass panels to clean it. The
22 www.aeg.com
number of glass panels is different for different models.
WARNING! The door is heavy.
1. Open the door fully. 2. Fully lift up the clamping levers (A) on
the two door hinges.
A
CAUTION! Rough handling of the glass, especially around the edges of the front panel, can cause the glass to break.
7. Pull the door trim to the front to remove it.
8. Hold the door glass panels on their top edge one by one and pull them up out of the guide.
A 3. Close the door until it is at an angle
of approximately 45°.
45°
4. Hold the door with one hand on each side and pull it away from the oven at an upwards angle.
5. Put the door with the outer side down on a soft cloth on a stable surface.
6. Hold the door trim (B) on the top edge of the door at the two sides and push inwards to release the clip seal.
2
B 1
9. Clean the glass panel with water and soap. Dry the glass panel carefully.
When the cleaning is completed, do the above steps in the opposite sequence. Install the smaller panel first, then the larger and the door.
WARNING! Make sure that the glasses are inserted in the correct position otherwise the surface of the door may overheat.
11.6 Replacing the lamp
WARNING! Risk of electric shock. The lamp can be hot.
1. Turn off the oven. Wait until the oven is cooled down. 2. Disconnect the oven from the mains. 3. Put a cloth on the bottom of the
cavity.
The back lamp
The lamp glass cover is at the back of the cavity.
1. Turn the lamp glass cover counterclockwise to remove it.
2. Clean the glass cover.
3. Replace the oven lamp with a suitable 300 °C heat-resistant oven lamp.
12. TROUBLESHOOTING
ENGLISH 23
Use the same oven lamp type. 4. Install the glass cover.
WARNING! Refer to Safety chapters.
12.1 What to do if…
Problem
Possible cause
Remedy
You cannot activate or oper- The oven is incorrectly conate the oven. The display nected to an electrical supshows “400” and an acoustic ply. signal sounds.
Check if the oven is correctly connected to the electrical supply (refer to the connection diagram if available).
The oven does not heat up. The oven is deactivated.
Activate the oven.
The oven does not heat up. The clock is not set.
Set the clock.
The oven does not heat up. The necessary settings are Make sure that the settings
not set.
are correct.
The oven does not heat up. The fuse is blown.
Make sure that the fuse is the cause of the malfunction. If the fuse is blown again and again, contact a qualified electrician.
The lamp does not operate. The lamp is defective.
Replace the lamp.
Steam and condensation
You left the dish in the oven
settle on the food and in the for too long.
cavity of the oven.
Do not leave the dishes in the oven for longer than 15 20 minutes after the cooking process ends.
The display shows “12.00”. There was a power cut.
Reset the clock.
12.2 Service data
If you cannot find a solution to the problem yourself, contact your dealer or an Authorised Service Centre.
The necessary data for the service centre is on the rating plate. The rating plate is
on the front frame of the oven cavity. Do not remove the rating plate from the oven cavity.
We recommend that you write the data here:
Model (MOD.)
…………………………………..
Product number (PNC)
…………………………………..
24 www.aeg.com
We recommend that you write the data here:
Serial number (S.N.)
…………………………………..
13. ENERGY EFFICIENCY
13.1 Product Fiche and information according to EU 65-66/2014
Supplier’s name
AEG
Model identification
DCB331010M
Energy Efficiency Index
Top oven: 106.8 Main oven: 95.1
Energy efficiency class
Top oven: A Main oven: A
Energy consumption with a standard load, conventional mode
Top oven: 0.78 kWh/cycle Main oven: 0.94 kWh/cycle
Energy consumption with a standard load, fan-forced Top oven: not applicable
mode
Main oven: 0.77 kWh/cycle
Number of cavities
2
Heat source
Electricity
Volume
Top oven: 42 l Main oven: 61 l
Type of oven
Built-In Oven
Mass
50.5 kg
EN 60350-1 – Household electric cooking appliances – Part 1: Ranges, ovens, steam ovens and grills – Methods for measuring performance.
13.2 Energy saving
The oven contains features which help you save energy during everyday cooking.
General hints Make sure that the oven door is closed properly when the oven operates. Do not open the door too often during cooking. Keep the door gasket clean and make sure it is well fixed in its position.
Use metal dishes to improve energy saving.
When possible, do not preheat the oven before you put the food inside.
When the cooking duration is longer than 30 minutes, reduce the oven temperature to minimum 3 – 10 minutes before the end of the cooking time, depending on the duration of the cooking. The residual heat inside the oven will continue to cook.
Use the residual heat to warm up other dishes.
Keep breaks between baking as short as possible when you prepare few dishes at one time.
Cooking with fan When possible, use the cooking functions with fan to save energy.
ENGLISH 25
Keep food warm Choose the lowest possible temperature setting to use residual heat and keep a meal warm.
Moist Baking Function designed to save energy during cooking.
When you use this function the lamp is off.
14. ENVIRONMENTAL CONCERNS
Recycle materials with the symbol . Put the packaging in relevant containers to recycle it. Help protect the environment and human health by recycling waste of electrical and electronic appliances. Do not dispose of
appliances marked with the symbol with the household waste. Return the product to your local recycling facility or contact your municipal office.
*
26 www.aeg.com
ENGLISH 27
www.aeg.com/shop
867344483-C-032019
]]>
SAFETY INFORMATION
Before the installation and use of the appliance, carefully read the supplied instructions. The manufacturer is not responsible if an incorrect installation and use causes injuries and damages. Always keep the instructions with the appliance for future reference.
Children and vulnerable people safety
- This appliance can be used by children aged from 8 years and above and persons with reduced physical, sensory or mental capabilities or lack of experience and knowledge if they have been given supervision or instruction concerning use of the appliance in a safe way and understand the hazards involved.
- Do not let children play with the appliance.
- Keep all packaging away from children.
- Cleaning and user maintenance shall not be made by children without supervision
General Safety
- This appliance is intended to be used in household and similar applications such as:
- Farm houses; staff kitchen areas in shops, offices and other working environments
- By clients in hotels, motels, bed and breakfast and other residential type environments
- Use this appliance for storage of wine only.
- Keep ventilation openings, in the appliance enclosure or in the built-in structure, clear of obstruction
- Do not use mechanical devices or other means to accelerate the defrosting process, other than those recommended by the manufacturer.
- Do not damage the refrigerant circuit.
- Do not use electrical appliances inside the food storage compartments of the appliance, unless they are of the type recommended by the manufacturer.
- Do not use water spray and steam to clean the appliance.
- Clean the appliance with a moist soft cloth. Only us eneutral detergents. Do not use abrasive products, abrasive cleaning pads,solvents or metal objects.
- Do not store explosive substances such as aerosol cans with a flammable propellant in this appliance.
- If the supply cord is damaged, it must be replaced by the manufacturer, its service agent or similarly qualified persons in order to avoid a hazard.
SAFETY INSTRUCTIONS
Installation
 WARNING! Only a qualified person must install this appliance.
- Remove all the packaging.
- Do not install or use a damaged appliance.
- Obey the installation instruction supplied with the appliance.
- Always be careful when you move the appliance because it is heavy. Always wear safety gloves.
- Make sure the air can circulate around the appliance.
- Wait at least 4 hours before connecting the appliance to the power supply. This is to allow the oil to flow back in the compressor.
- Do not install the appliance close to radiators or cookers, oven or hobs.
- The rear of the appliance must stand against the wall.
- Do not install the appliance where there is direct sunlight.
- Do not install this appliance in areas that are too humid or too colds, such as the construction appendices, garages or wine cellars.
- When you move the appliance, lift it by the front edge to avoid scratching the floor.
Electrical connection
WARNING! Risk of fire and electrical shock.
- The appliance must be earthed.
- All electrical connections should be made by a qualified electrician.
- Make sure that the electrical information on the rating plate agrees with the power supply.
- If not contact an electrician.
- Always use a correctly installed shockproof socket.
- Do not use multi-plug adapters and extension cables.
- Make sure not to cause damage to the electrical components (e.g. mains plug, mains cable, compressor). Contact the Service or an electrician to change the electrical components.
- The mains cable must stay below the level of the mains plug.
- Connect the mains plug to the mains socket only at the end of the installation. Make sure that there is access to the mains plug after the installation.Do not pull the mains cable to disconnect the appliance. Always pull the mains plug.
Use
WARNING! Risk of fire and electrical shock or fire.
- Do not change the specification of this appliance.
- Do not put electrical appliances (e.g.ice cream makers) in the appliance unless they are stated applicable by the manufacturer. Be careful not to cause damage to the refrigerant circuit. It contains is obutane (R600a), a natural gas with a high level of environmental compatibility. This gas is flammable.
- If damage occurs to the refrigerant circuit, make sure that there are no flames and sources of ignition in the room. Ventilate the room.
- Do not let hot items to touch the plastic parts of the appliance.
- Do not store flammable gas and liquid in the appliance.
- Do not put flammable products or it that are wet with flammable product in, near or on the appliance Do not touch the compressor or the condenser.
- They are hot.
Care and cleaning
WARNING! Risk of injury or damage to the appliance.
- Before maintenance, deactivate the appliance and disconnect the mains plug from the mains socket.
- This appliance contains hydrocarbons in the cooling unit. Only a qualified person must do the maintenance and the recharging of the unit.
- Regularly examine the drain of the appliance and if necessary,clean it. If the drain is blocked, defrosted water collects in the bottom of the appliance.
Disposal
WARNING! Risk of injury or suffocation.
- Disconnect the appliance from the mains supply.
- Cut off the mains cable and discard it.
- Remove the door to prevent children and pets to be closed inside of the appliance.
- The refrigerant circuit and the insulation materials of thi appliance are ozone friendly.
- The insulation foam contains flammable gas. Contact your municipal authority for information on how to discard the appliance correctly.
- Do not cause damage to the part of the cooling unit that is near the heat exchanger.
PRODUCT DESCRIPTION
- Door Release Mechanism
- Telescopic runners
- Control panel
- Shelves
- Fastening bar
- Door
- Gasket
- Rating plate
CONTROL PANEL
- ON/OFF key
- Light key
- Display
- Temperature colder key
- Temperature warmer key
On/Off switch and temperature setting
To switch on the appliance press the ON/ OFF key.
The display shows the set default temperature (12°C).
The temperature can be adjusted from 5° to 20°C (with steps of 1°C) by touching the -/+ key.
To switch off the appliance press the ON/ OFF key for 5 seconds.
Light Key
When the door is opened, the LED light is on, when closed is off. If you want to keep the light on with the door closed, open the door, and press the light key.
If you want to restore the standard conditions, press the light key again.
Display
The display shows the temperature set, the error messages, if the demo mode is selected, if the keys are locked.
Lock keys mode
Press the + key and the light key for 3 mseconds to activate the lock keys mode.
The appliance will continue to work with the last settings.
To deactivate the lock keys mode, do the same procedure.
By selecting this function, the message “bl” appears on display touching any key.
Demo Mode
DEMO MODE has been created for exhibitions and showroom purposes.
The display will be ON with possibility to change the temperatures but the Cooling motor will be OFF.
To activate or deactivate the DEMO MODE, Press + and – simultaneously for3 seconds.
Display will show the ON for 5 seconds, then the temperature will be showed again.
It Is possible to keep the inner led light turned ON also when the door is closed.
Press the Light key to activate the light ON mode.
USE
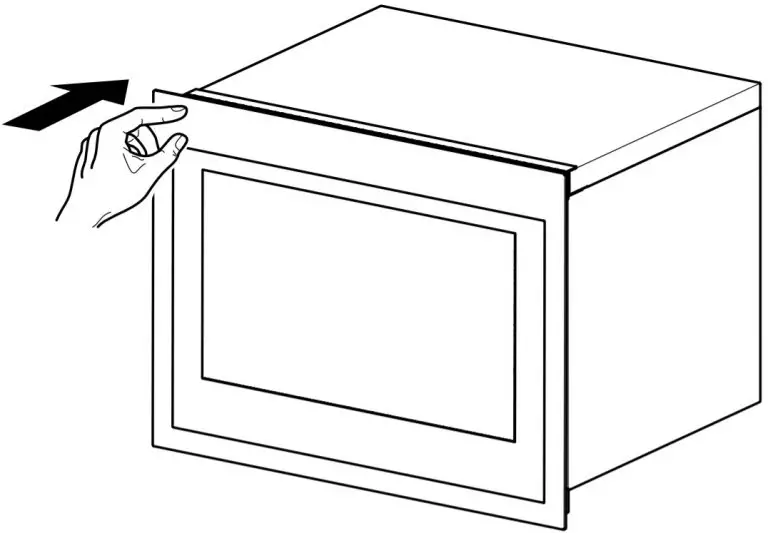
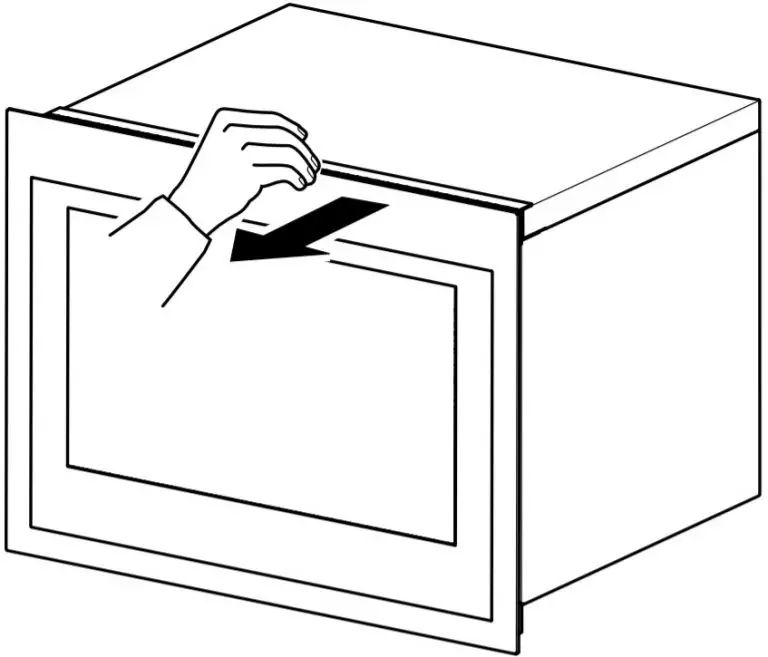
Door Opening
To open the door:
- push in the left side of the door panel, to open the door

- or pull it.
First Use
 Before using the appliance for the first time, wash the interior and all internal accessories with lukewarm water and some neutral soap, then dry thoroughly.
Warning : Do not use detergents or abrasive powders, as these will damage the finishing.
To turn on the appliance, press ON/OFF key and adjust temperature according to the wine stored.
Temperature Recollection Function
In the event of a power cut, the wine cellar can remember the previous temperature setting, and when power is recovered, the temperature will go back to the original.
Wine Storage
The storage time for wine depends on ageing, the type of grapes, alcoholic content and level of fructose and tannin contained in it. At the time of purchase,check if the wine is already aged or if it will improve over time.
Preservation temperature suggested:
- Champagne/Prosecco and Sparkling wines +6 to +8°C
- White Wines +10 to +12°C
- Rosé wines +12 to +16°C
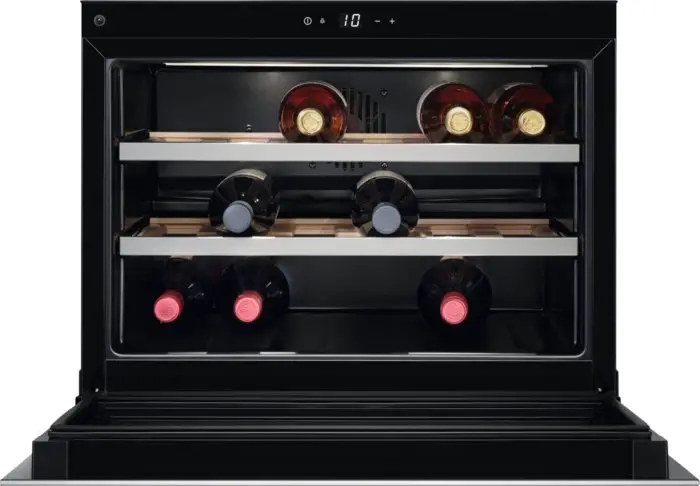
- Red Wines +14 to +18°C
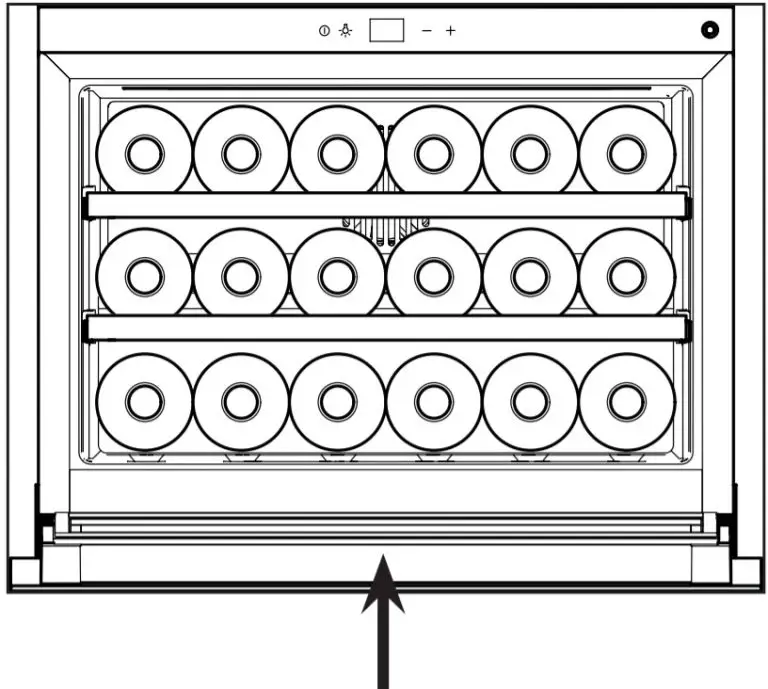
(for 750 ml Bordeaux bottles) Total: 18 bottles
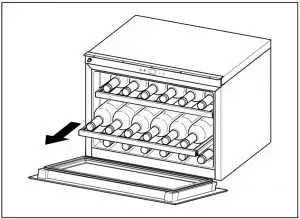
Wine Shelves
- For easy access to the bottles, pull the shelves out of the rail compartment.
Warning : To prevent damaging the door, make sure that the door is fully opened when pulling shelves out. - To remove or fit the wooden shelves lift or push the shelf.
Standard configuration
- To store up to 18 bordeaux bottles placing 6 bottles each level.

- The first level has been designed to accomodate larger and taller bottles.

- Suitable for large and tall bottles.
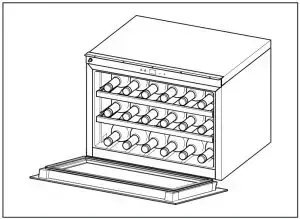
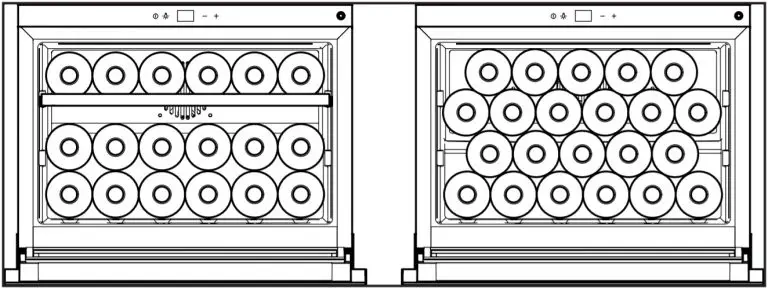
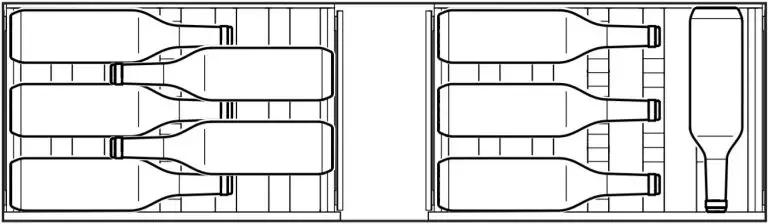
By removing the shelves is possible to increase the capacity as showed in the pictures.
WARNING! Please ensure in this case that the bottles do not come in contact with the back wall of the cavity.
Horizontal configuration


To easily store large and tall bottles on the second shelf, can be removed the upper shelf as showed in the picture.
INSTALLATION
Positioning
| Climate class | Ambient temperature |
| SN | +10 °C to +32 °C |
| N | +16 °C to +32 °C |
| ST | +16 °C to +38 °C |
| T | +16 °C to +43 °C |
Adequate air ventilation should be around the appliance, to prevent overheating. To achieve sufficient ventilation follow the installation instructions.
Install this appliance at a location where the ambient temperature corresponds to the climate class indicated on the rating plate of the appliance:
CARE AND MAINTENANCE
CAUTION! Unplug the appliance before carrying out any maintenance operation.
 This appliance contains hydrocarbons in its cooling unit; maintenance and recharging must therefore only be carried out by authorized technicians.
Periodic cleaning
The equipment has to be cleaned regularly:
Warning : Do not pull, move or damage any pipes and/or cables inside the cabinet.
Never use detergents, abrasive powders, highly perfumed cleaning products or wax polishes to clean the interior as this will damage the surface and leave a strong odour.
- Clean the inside surfaces with a warm water and baking soda solution. The solution should be about 2 tablespoons of baking soda to a quart of water.
- Clean the shelves with a mild detergent solution.
- Wring excess water out of the sponge or cloth when cleaning area of the controls, or any electrical parts.
- Clean the inside and accessories with lukewarm water and some neutral soap.
- Regularly check the door seals and wipe clean to ensure they are clean and free from debris.
- Rinse and dry thoroughly.
Periods of non-operation
When the appliance is not in use for long periods, take the following precautions:
- disconnect the appliance from electricity supply.
- remove all items.
- clean the appliance and all accessories.
- leave the door open to prevent unpleasant smells.
TROUBLE SHOOTING GUIDE
You can solve many common Wine cellar problems easily, saving you the cost of a possible service call. Try the suggestions.
| Problem | Possible cause | Solution |
| Wine cellar does not operate. |
|
|
| Wine cellar is not cool enough. |
|
|
| The compressor operates continuously. |
|
|
| The light does not work. |
|
|
| Too much vibration. |
|
|
| Too much noise. |
|
|
| The door does not close properly. |
|
|
| Acoustic alarm |
|
|
| E3 is displayed |
|
|
| E1 is displayed and an acoustic alarm will sound every 5 minutes. |
|
|
| E2 is displayed |
|
|
ENVIRONMENTAL CONCERNS
Recycle the materials with the symbol Put the packaging in applicable container to recycle it. Help protect the environment and human health and to recycle waste of electrical and electronic appliances.
Do not dispose appliances marked with the symbol with the household waste. Return the product to your local recycling facility or contact your municipal office.
]]>AEG Dishwasher

IMPORTANT INFORMATION THAT MAY IMPACT YOUR MANUFACTURER’S WARRANTY
Adherence to the directions for use in this manual is extremely important for health and safety. Failure to strictly adhere to the requirements in this manual may result in personal injury, property damage and affect your ability to make a claim under the AEG manufacturer’s warranty provided with your product. Products must be used, installed and operated in accordance with this manual. You may not be able to claim on the AEG manufacturer’s warranty in the event that your product fault is due to failure to adhere to this manual.
FOR PERFECT RESULTS
Thank you for choosing this AEG product. We have created it to give you impeccable performance for many years, with innovative technologies that help make life simpler features you might not find on ordinary appliances. Please spend a few minutes reading to get the very best from it.
Visit our website for:
Get usage advice, brochures, trouble shooter, service information: www.aeg.com
Register your product for better service: www.registeraeg.com
SAFETY INFORMATION
Before the installation and use of the appliance, carefully read the supplied instructions. The manufacturer is not responsible for any injuries or damage that are the result of incorrect installation or usage. Always keep the instructions in a safe and accessible location for future reference.
Children and vulnerable people safety
- This appliance can be used by children aged from 8 years and above and persons with reduced physical, sensory or mental capabilities or lack of experience and knowledge if they have been given supervision or instruction concerning the use of the appliance in a safe way and understand the hazards involved.
- Children between 3 and 8 years of age and persons with very extensive and complex disabilities shall be kept away from the appliance unless continuously supervised.
- Children of less than 3 years of age should be kept away from the appliance unless continuously supervised.
- Do not let children play with the appliance.
- Keep detergents away from children.
- Keep children and pets away from the appliance when the door is open.
- Children shall not carry out cleaning and user maintenance of the appliance without supervision.
General Safety
- This appliance is intended to be used in household and similar applications such as:
– farm houses; staff kitchen areas in shops, offices and other working environments;
– by clients in hotels, motels, bed & breakfast and other residential type environments. - Do not change the specification of this appliance.
- The operating water pressure (minimum and maximum) must be between 0.5 (0.05) / 8 (0.8) bar (kPa)
- Obey the maximum number of 15 place settings.
- If the supply cord is damaged, it must be replaced by the manufacturer, its Authorised Service Centre or a similarly qualified persons in order to avoid a hazard.
- Put knives and cutlery with sharp points in the cutlery basket with the points down or in a horizontal position.
- Do not leave the appliance with the door open, to avoid a tripping hazard.
- Before any maintenance operation, deactivate the appliance and disconnect the mains plug from the socket.
- Do not use high pressure water sprays and/or steam to clean the appliance.
- The appliance is to be connected to the water mains using the new supplied hose-sets. Old hose sets must not be reused.
- The ventilation openings in the base (if applicable) must not be obstructed by a carpet.
- Some dishwasher detergents are strongly alkaline. They can be extremely dangerous if swallowed. Avoid contact with the skin and eyes and keep children away from the dishwasher when the door is open.
- Check that the detergent receptacle is empty after completion of the wash cycle.
SAFETY INSTRUCTIONS
Installation
- Remove all the packaging.
- Do not install or use a damaged appliance.
- Follow the installation instructions supplied with the appliance.
- Always take care when moving the appliance as it is heavy. Always use safety gloves and enclosed footwear.
- Do not install or use the appliance where the temperature is less than 0 °C.
- Install the appliance in a safe and suitable place that meets installation requirements.
Electrical connection
- The appliance must be earthed.
- Make sure that the parameters on the rating plate are compatible with the electrical ratings of the mains power supply.
- Always use a correctly installed shockproof socket.
- Do not use multi-plug adapters and extension cables.
- Make sure not to cause damage to the mains plug and to the mains cable. Should the mains cable need to be replaced, this must be carried out by our Authorised Service Centre.
- Connect the mains plug to the mains socket only at the end of the installation. Make sure that there is access to the mains plug after the installation.
- Do not pull the mains cable to disconnect the appliance. Always pull the mains plug.
Water connection
- Do not cause damage to the water hoses.
- Before connection to new pipes, pipes not used for a long time, where repair work has been carried out or new devices fitted (water meters, etc.), let the water flow until it is clean and clear.
- Ensure that there are no visible water leaks during and after the first use of the appliance.
- The water inlet hose has a safety valve and a sheath with an inner mains cable.
- If the water inlet hose is damaged, immediately close the water tap and disconnect the mains plug from the mains socket. Contact the Authorised Service Centre to replace the water inlet hose.
Use
- Do not put flammable products or items that are wet with flammable products in, near or on the appliance.
- Dishwasher detergents are dangerous. Follow the safety instructions on the detergent packaging.
- Do not drink and play with the water in the appliance.
- Do not remove the dishes from the appliance until the programme is complete. Some detergent may remain on the dishes.
- Do not sit or stand on the open door of the appliance.
- The appliance can release hot steam if you open the door while a programme operates.
Service
- To repair the appliance contact the Authorised Service Centre.
- Use original spare parts only.
Disposal
- Disconnect the appliance from the mains supply.
- Cut off the mains cable and discard it.
- Remove the door catch to prevent children and pets to get closed in the appliance.
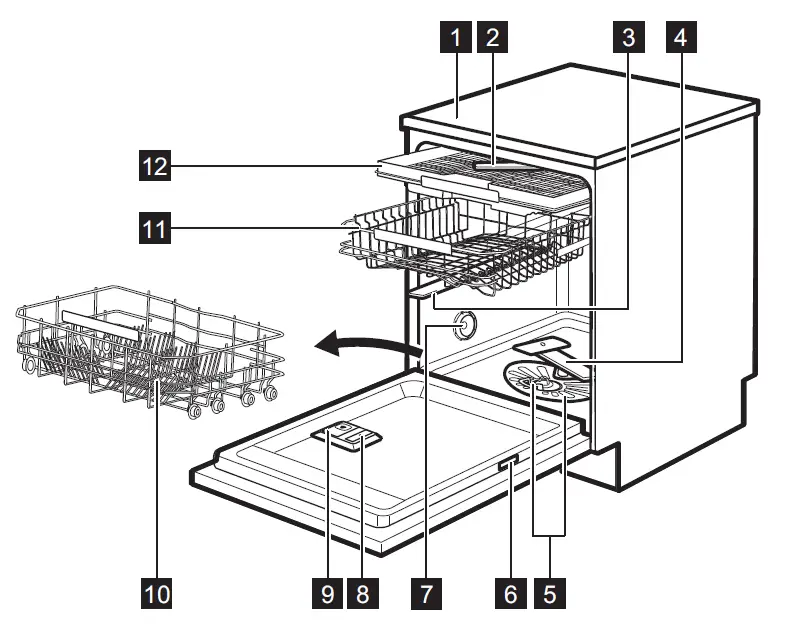
PRODUCT DESCRIPTION
- Worktop
- Ceiling spray arm
- Upper spray arm
- Lower spray arm
- Filters
- Rating plate
- Air vent
- Rinse aid dispenser
- Detergent dispenser
- Lower basket
- Upper basket
- Cutlery drawer
Beam-on-Floor
The Beam-on-Floor is a light that is displayed on the floor below the appliance door.
- When the programme starts, a red light comes on and stays on for the duration of the programme.
- When the programme is completed, a green light comes on.
- When the appliance has a malfunction, the red light flashes.
- The Beam-on-Floor is off when the appliance is deactivated.
- When AirDry is activated during the drying phase, the projection on the floor may not be completely visible. To see if the cycle has ended, check the control panel.
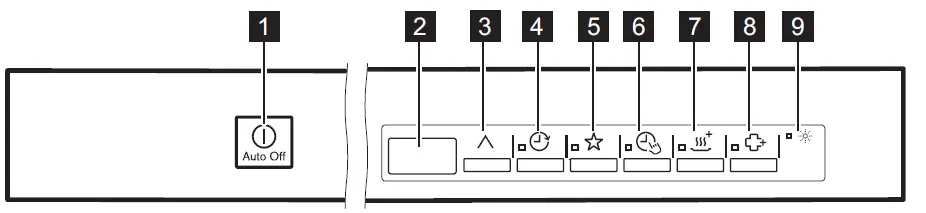
CONTROL PANEL
- On/off button
- Display
- Program button
- Delay button
- MyFavourite button
- TimeSaver button
- XtraDry button
- ExtraHygiene button
- Indicators
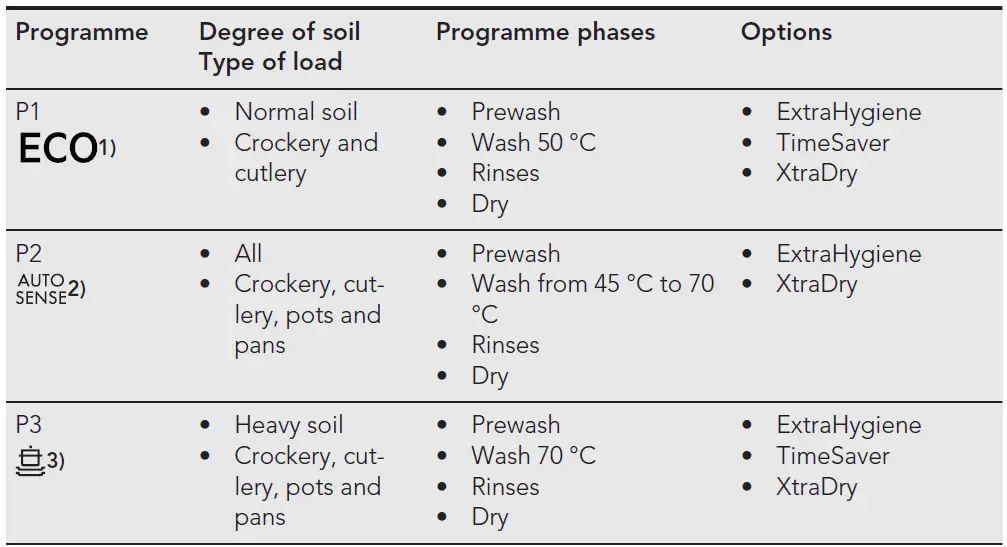
PROGRAMMES
The numbering of the programmes in the table (P1, P2, etc.) reflects their sequence on the control panel.
The order of the programmes in the table may not reflect their sequence on the control panel.

- This programme offers the most efficient use of water and energy consumption for crockery and cut-lery with normal soil. This is the standard programme for test institutes.
- The appliance senses the degree of soil and the quantity of items in the baskets. It automatically ad-justs the temperature and quantity of water as well as the wash duration.
- This programme is designed to wash heavily soiled items with high water pressure and at a high tem-perature.
- This programme controls the temperature of the water to provide special care for delicate items, glassware in particular.
- This programme is suitable for washing a load or a half load with fresh or light soil in a short time.
- With this programme, you can quickly rinse off food remains from the dishes and prevent odours form-ing in the appliance. Do not use detergent with this programme.
- This is the most silent programme. The wash pump works at a very low speed to reduce the noise generated by the appliance. Due to the low speed, the programme duration is long.
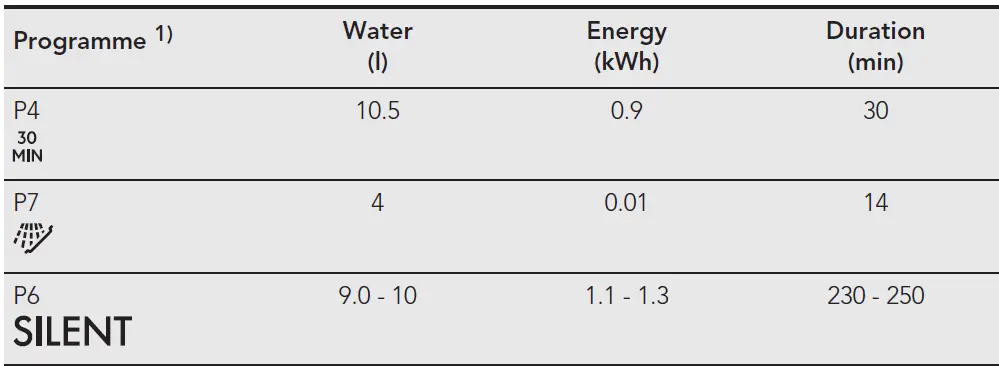
Consumption values
The pressure and the temperature of the water, the variations of the mains supply, the options and the quantity of dishes can change the values.
Information for test institutes
To receive the necessary information for conducting performance tests (e.g. according to EN60436), send an email to: [email protected]
SETTINGS
Programme selection mode and user mode
When the appliance is in programme selection mode, it is possible to set a programme and to enter user mode.
- Activation or deactivation of the rinse aid empty notification.
- The level of rinse aid according to the required dosage.
- Activation or deactivation of the acoustic signal for the end of a programme
- Activation or deactivation of the AirDry.
As the appliance stores the saved settings, there is no need to configure it before every cycle.
How to set the programme selection mode
The appliance is in programme selection mode when the display shows the programme number P1.
In your request please include the product number code (PNC) found on the rating plate.
For any other questions regarding your dishwasher please refer to the service book provided with your appliance.
After activation, the appliance is in programme selection mode by default. If not, set the programme selection mode the following way:
The rinse aid empty notification
The rinse aid helps to dry the dishes without streaks and stains. It is automatically released during the hot rinse phase.
When the rinse aid chamber is empty, the rinse aid indicator is turned on notifying to refill rinse aid. If the drying results are satisfactory while using multi-tablets only, it is possible to deactivate the notification for refilling rinse aid. However, for best drying performance, always use rinse aid.
If standard detergent or multi-tablets without rinse aid are used, activate the notification to keep the rinse aid refill indicator active.
AirDry
AirDry improves the drying results with less energy consumption.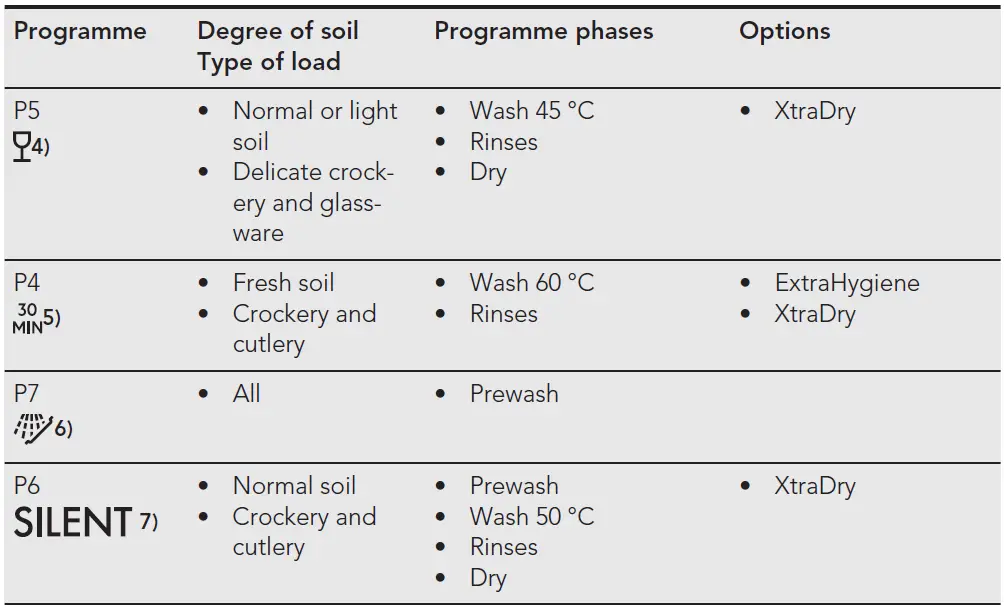
During the drying phase, the door opens automatically and remains ajar.
CAUTION! Do not try to close the appliance door within 2 minutes after automatic opening. This can cause damage to the appliance. If, afterwards, the door is closed for another 3 minutes, the running programme ends.
OPTIONS
- Desired options must be activated every time before you start a programme. It is not possible to activate or deactivate options while a programme is running.
- Not all options are compatible with each other. If you select non compatible options, the appliance automatically deactivates one or more of them. Only the indicators of the still active options are on.
- If an option is not applicable to a programme, the related indicator is off or it flashes quickly for a few seconds and then goes out.
- Activating options can affect the water and energy consumption as well as the programme duration.
XtraDry
Activate this option to boost the drying performance.
XtraDry is a permanent option for all programmes other than . It is automatically activated in next cycles. This configuration can be changed at any time.
Activating XtraDry deactivates TimeSaver and vice versa.
How to activate XtraDry
The related indicator is on.
The display shows the updated programme duration.
TimeSaver
The TimeSaver allows to reduce the duration of a selected programme by approximately 50%.
The washing results are the same as with the normal programme duration. The drying results can decrease.
This option increases the pressure and the temperature of the water. The washing and the drying phases are shorter.
By default, TimeSaver is off, but it is possible to activate it manually. This option cannot be combined with XtraDry.
How to activate TimeSaver
The related indicator is on.
The display shows the updated programme duration.
ExtraHygiene
This option provides better hygiene results by keeping the temperature at 70 °C for at least 10 minutes during the last rinsing phase.
How to activate ExtraHygiene
The related indicator is on.
The display shows the updated programme duration.
BEFORE FIRST USE
- Fill the rinse aid dispenser.
- Open the water tap.
- Start a program to remove any processing residuals that can still be inside the appliance. Do not use detergent and do not load the baskets.
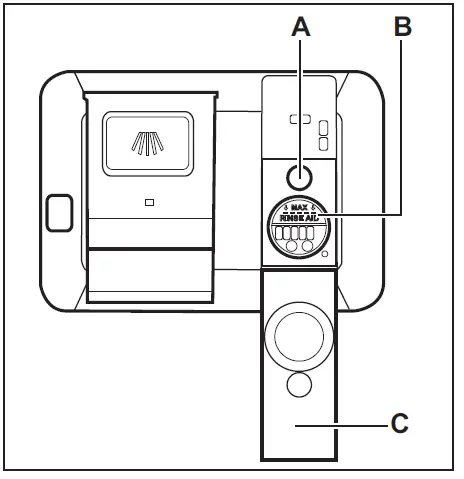
How to fill the rinse aid dispenser
- Open the lid (C)
- Fill the dispenser (B) until the rinse aid reaches the marking ”MAX”.
- Remove the spilled rinse aid with an absorbent cloth to prevent excessive foam formation.
- Close the lid. Make sure that the lid locks into position.
Fill the rinse aid dispenser when the indicator (A) is clear.
DAILY USE
- Open the water tap.
- Press the on/off button to activate the appliance.
Make sure that the appliance is in programme selection mode.
If the rinse aid indicator is on, fill the rinse aid dispenser. - Load the baskets.
- Add the detergent.
- Set and start a programme suitable for the type of load and the degree of soil.
Using the detergent
CAUTION! Only use detergent specifically designed for dishwashers.
- Press the release button (A) to open the lid (C).
- Put the detergent, in powder or tablets, in the compartment (B).
- If the programme has a prewash phase, put a small quantity of detergent on the inner part of the appliance door.
- Close the lid. Make sure that the lid locks into position.
Setting and starting a programme
The Auto Off function
This function decreases energy consumption by deactivating automatically the appliance when it is not operating.
The function comes into operation:
- 5 minutes after the completion of the programme.
- After 5 minutes if the programme has not started.
Starting a programme
- Keep the appliance door ajar.
- Press the on/off button to activate the appliance. Make sure that the appliance is in programme selection mode.
- Press repeatedly BUTTON until the display shows the number of the chosen programme. The display shows the programme number for approximately 3 seconds and then shows the programme duration.
- To select the MyFavourite programme, press .
- The indicators of the options related to the MyFavourite programme are on.
- Set the applicable options.
- Close the appliance door to start the programme.
Opening the door while the appliance operates
Opening the door while a programme is running stops the appliance. It may affect the energy consumption and the programme duration. After closing the door, the appliance continues from the point of interruption.
If the door is opened for more than 30 seconds during the drying phase, the running programme ends. It does not happen if the door is opened by AirDry function.
Cancelling the delay start while the countdown operates
When you cancel the delay start you have to set the programme and options again.
End of the programme
When the programme is complete, the display shows 0:00.
All buttons are inactive except for the on/off button.
- Press the on/off button or wait for the Auto Off function to automatically deactivate the appliance.
If you open the door before the activation of Auto Off, the appliance is automatically deactivated. - Close the water tap.
HINTS AND TIPS
General
Follow the hints below to ensure optimal cleaning and drying results in daily use and to help you protect the environment.
- Remove larger residues of food from the dishes into the waste bin.
- Do not pre-rinse dishes by hand. When needed, select a programme with a prewash phase.
- Always use the whole space of the baskets.
- Make sure that items in the baskets do not touch or cover each other. Only then can the water completely reach and wash the dishes.
- You can use dishwasher detergent and rinse aid separately or you can use the multi-tablets. Follow the instructions on the packaging.
- Select a programme according to the type of load and the degree of soil.
Using rinse aid and detergent
- Only use rinse aid and detergent for dishwasher. Other products can cause damage to the appliance.
- Detergent tablets do not fully dissolve with short programs. To prevent detergent residues on the tableware, we recommend that you use the tablets with long programs.
- Do not use more than the correct quantity of detergent. Refer to the instructions on the detergent packaging.
Loading the baskets
- Use the appliance to wash dishwasher-safe items only.
- Do not wash in the appliance items made of wood, horn, aluminium, pewter and copper.
- Do not wash in the appliance items that can absorb water (sponges, household cloths).
- Remove large food residues from dishes.
- Soak cookware with burnt-on food before washing it in the appliance.
- Put hollow items (cups, glasses and pans) with the opening facing downwards.
- Make sure that glasses do not touch each other.
- Put light items in the upper basket. Make sure that the items do not move freely.
- Put cutlery and small items in the cutlery drawer.
- Make sure that the spray arms can move freely before you start a programme.
Before starting a programme
Make sure that:
- The filters are clean and correctly installed.
- The spray arms are not clogged.
- There is dishwasher rinse aid (unless you use multi- tablets).
- The position of the items in the baskets is correct
- The programme is applicable to the type of load and for the degree of soil.
- The correct quantity of detergent is used.
Unloading the baskets
- For improved drying results with the most efficient use of energy select the AirDry option, otherwise open the door by approximately 10cm at the end of the program.
- Allow the tableware to cool for 30 -40 minutes.
- Hot items can be easily damaged, allow them to cool down before removing from appliance.
- First remove items from the lower basket then the upper basket.
At the end of the program water can still remain on the sides and on the door of the appliance.
CARE AND CLEANING
WARNING!
Before maintenance, deactivate the appliance and disconnect the mains plug from the main socket.
Dirty filters and clogged spray arms negatively affect the washing results. Check these elements regularly and, if necessary, clean them.
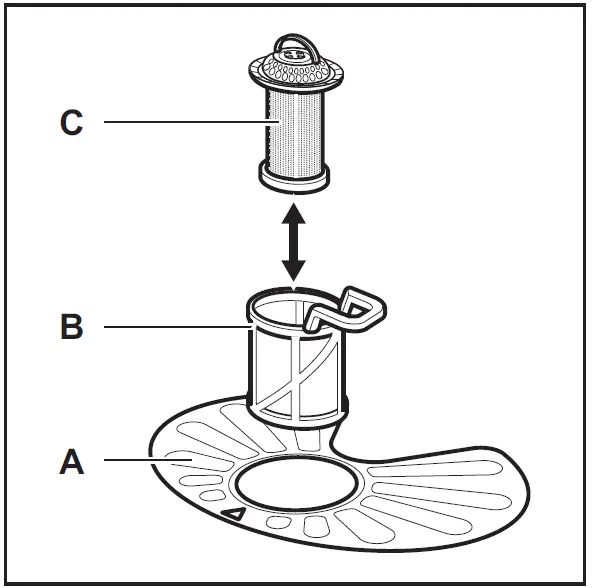
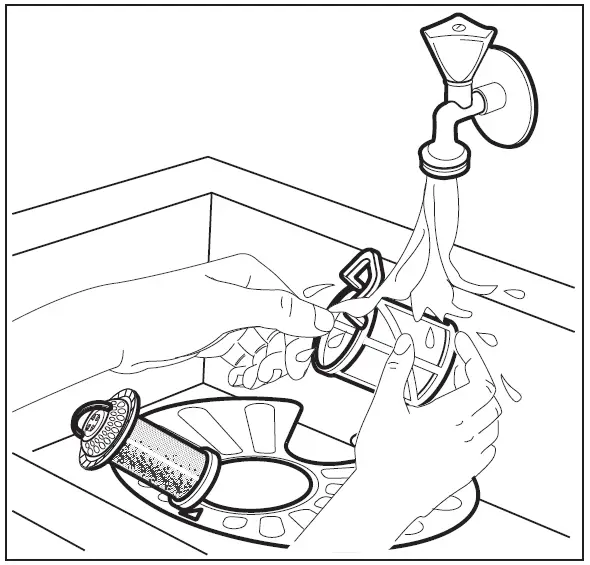
Cleaning the filters
The filter system is made of 3 parts.
- Turn the filter (B) counterclockwise and remove it.
- Remove the filter (C) out of filter (B).
- Remove the flat filter (A).

- Wash the filters.
- Make sure that there are no residues of food or soil in or around the edge of the sump.
- Put back in place the flat filter (A). Make sure that it is correctly positioned under the 2 guides.

- Reassemble the filters (B) and (C).
- Put back the filter (B) in the flat filter (A). Turn it clockwise until it locks.
CAUTION! An incorrect position of the filters can cause bad washing results and damage to the appliance.
Cleaning the upper spray arm
We recommend to clean the upper spray arm regularly to prevent soil from clogging the holes.
Clogged holes can cause unsatisfactory washing results.
- Pull out the upper basket.
- To detach the spray arm from the basket, press the spray arm upwards and simultaneously turn it clockwise.

- Wash the spray arm under running water. Use a thin pointed tool, e.g. a toothpick, to remove particles of soil from the holes.

- To install the spray arm back, press the spray arm upwards and simultaneously turn it counterclockwise until it locks into place.
External cleaning
- Clean the appliance with a moist soft cloth.
- Only use neutral detergents.
- Do not use abrasive products, abrasive cleaning pads or solvents.
Internal cleaning
- Carefully clean the appliance, including the rubber gasket of the door, with a soft damp cloth.
- To maintain the performance of your appliance, use a cleaning product designed specifically for dishwashers at least once a month. Carefully follow the instructions on the packaging of the product.
- Do not use abrasive products, abrasive cleaning pads, sharp tools, strong chemicals, scourer or solvents.
- Using short-duration programmes regularly can cause grease and limescale buildup inside the appliance. Run long-duration programmes at least twice a month to prevent the buildup.
TROUBLESHOOTING
If the appliance does not start or it stops during operation. Before you contact an Authorised Service Centre, check if you can solve the problem by yourself with the help of the information in the table.
WARNING! Repairs not properly done may result in serious risk to the safety of the user. Any repairs must be performed by qualified personnel.
With some problems, the display shows an alarm code.
The majority of problems that can occur can be solved without the need to contact an Authorised Service Centre.
| Problem and alarm code | Possible solution |
| You cannot activate the appliance. | • Make sure that the mains plug is connected to the mains socket.
• Make sure that there is no damaged fuse in the fuse box. |
| The programme does not start. | • Make sure that the appliance door is closed.
• If the delay start is set, cancel the setting or wait for the end of the countdown. |
| The appliance does not fill with water.
The display shows or . |
• Make sure that the water tap is open.
• Make sure that the pressure of the water supply is not too low. For this information, contact your local water authority. • Make sure that the water tap is not clogged. • Make sure that the filter in the inlet hose is not clogged. • Make sure that the inlet hose has no kinks or bends. |
| The appliance does not drain the water.
The display shows . |
• Make sure that the sink spigot is not clogged.
• Make sure that the drain hose has no kinks or bends. |
| The anti-flood device is on. The display shows . | • Close the water tap and contact an Authorised Service Centre. |
| The appliance stops and starts more times during operation. | • It is normal. It provides optimal cleaning results and en- ergy savings. |
| The program lasts too long. | • Select the TimeSaver option to shorten the program time (if applicable).
• If the delayed start option is set, cancel the delay setting or wait for the end of the countdown. |
| The remaining time in the display increases and skips nearly to the end of program time. | • This is not a defect. The appliance is working correctly. |
| The options of the program have to be set again every time. | • To save your favourite configuration use option MyFa- vourite. |
| Small leak from the appliance door. | • The appliance is not levelled. Loosen or tighten the ad- justable feet (if applicable).
• The appliance door is not centred on the tub. Adjust the rear foot (if applicable). |
| Problem and alarm code | Possible solution |
| The appliance door is difficult to close. | • The appliance is not levelled. Loosen or tighten the ad- justable feet (if applicable).
• Parts of the tableware are protruding from the baskets. |
| Rattling/knocking sounds from inside the appliance. | • The tableware is not properly arranged in the baskets. Refer to basket loading leaflet.
• Make sure that the spray arms can rotate freely. |
| The appliance trips the circuit beaker. | • The amperage is insufficient to supply simultaneously all the appliances in use. Check the socket amperage and the capacity of the meter or turn off one of the appliances in use.
• Internal electrical fault of the appliance. Contact an Authorised Service Centre. |
Refer to “Before first use”, “Daily use”, or “Hints and tips” for other possible causes.
Once you have checked the appliance, deactivate and activate the appliance. If the problem occurs again, contact an Authorised Service Centre.
For alarm codes not described in the table, contact an Authorised Service Centre.
The washing and drying results are not satisfactory
| Problem | Possible cause and solution |
| Poor washing results. | • Refer to “Daily use”, “Hints and tips” and basket loading leaflet.
• Use more intensive washing programmes. • Clean spray arm jets and filter. Refer to “Care and Cleaning”. • Make sure the spray arms are in correct positions. |
| Poor drying results. | • Tableware has been left for too long inside a closed appliance.
• There is no rinse aid or the dosage of rinse aid is not enough. Set the rinse aid dispenser to a higher level. • Plastic items may need to be towel dried. • For the best drying performance activate the option XtraDry and set AirDry. • We recommend to always use rinse aid, even in com- bination with multi-tablets. |
| There are whitish streaks or bluish layers on glasses and dishes. | • The release quantity of rinse aid is too much. Adjust the rinse aid level to a lower level.
• The quantity of detergent is too much. |
| There are stains and dry water drops on glasses and dishes. | • The released quantity of rinse aid is not sufficient. Ad- just the rinse aid level to a higher level.
• The quality of the rinse aid can be the cause. |
| Problem | Possible cause and solution |
| The dishes are wet. | • For the best drying performance activate the option XtraDry and set AirDry .
• The programme does not have a drying phase or has a drying phase with low temperature. • The rinse aid dispenser is empty. • The quality of the rinse aid can be the cause. • The quality of the multi-tablets can be the cause. Try a different brand or activate the rinse aid dispenser and use rinse aid and multi-tablets together. |
| The interior of the appliance is wet. | • This is not a defect of the appliance. it is caused by the humidity in the air that condenses on the walls. |
| Unusual foam during washing. | • Use the detergent for dishwashers only.
• There is a leak in the rinse aid dispenser. Contact an Authorised Service Centre. |
| Traces of rust on cutlery. | • Silver and stainless steel cutlery were placed together. Avoid to put silver and stainless steel items close to- gether. |
| There are residues of deter- gent in the dispenser at the end of the programme. | • The detergent tablet got stuck in the dispenser and therefore was not completely washed away by water.
• Water cannot wash away the detergent from the dis- penser. Make sure that the spray arm is not blocked or clogged. • Make sure that items in the baskets do not impede the lid of the detergent dispenser from opening. |
| Odours inside the appliance. | • Refer to “Internal cleaning”. |
| Limescale deposits on the tub and on the inside of the door. | • Clean the appliance with appliance cleaners which are particularly suitable for this purpose.
• Try different detergent. • Contact the detergent manufacturer. |
| Dull, discoloured or chipped tableware. | • Make sure that only dishwasher-safe items are washed in the appliance.
• Load and unload the basket carefully. Refer to basket loading leaflet. • Place delicate items in the upper basket. |
Refer to “Before first use”, “Daily use” or “Hints and tips” for other possible causes.
TECHNICAL INFORMATION
| Electrical connection 1) | Voltage (V) | 200 – 240 |
| Frequency (Hz) | 50 – 60 | |
| Wattage (W) | 1550-2200 | |
| Water supply pressure | bar (minimum and maximum) | 0.5 – 8 |
| kPa (minimum and maximum) | 50 – 800 | |
| Water supply | Cold water or hot water 2) | max 60 °C |
| Capacity | Place settings | 15 |
INSTALLATION
Fitting under a counter
The plinth of a freestanding appliance is not adjustable. Do not remove the work-top if you want to use the appliance as a freestanding unit.
It is not necessary to remove the work-top when installing under a standard kitchen counter. Only remove the work-top when installing the appliance under a close fitting sink unit or kitchen counter (820 mm).
Put the appliance adjacent to a water tap and a water drain.
Make sure that the dimensions of the recess agree with the dimensions in the picture.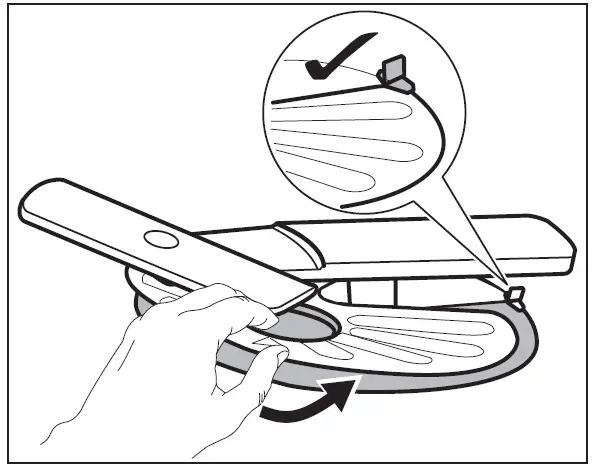
Removing the work-top
- Remove the rear screws (1).
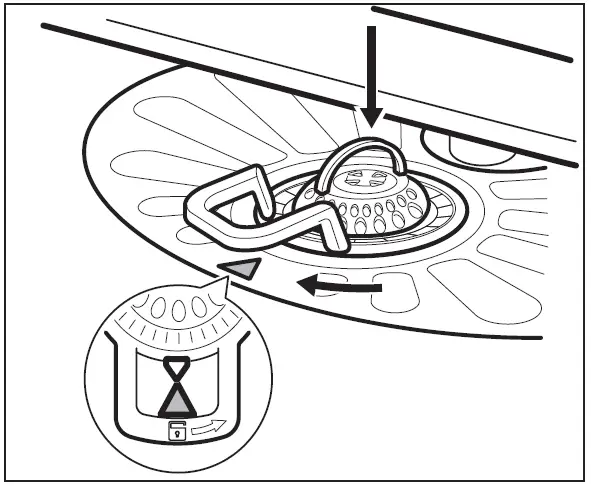
- Pull the work-top from behind (2).
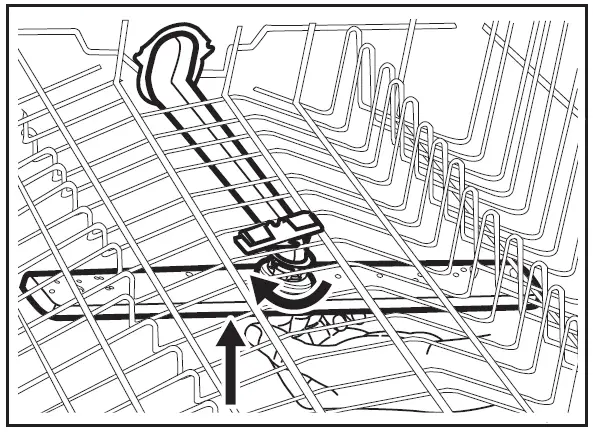
- Lift the work-top and move it from the front slots (3/4).
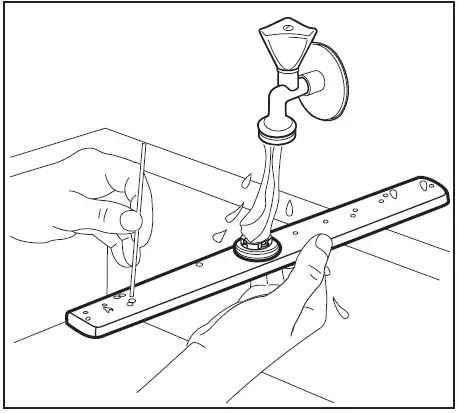
- Level the appliance using the adjustable feet.
- Install the appliance under the kitchen counter.
Adjusting the level of the appliance
A correct adjustment of the level of the appliance allows the door to close and seal correctly.
If the door does not close correctly, loosen or tighten the adjustable feet to level the appliance.
Water connection
Water inlet hose
Connect the inlet hose to a water tap with an external BSP thread spout of 3/4”.
For best washing performance it is recommended to connect the appliance to a cold water supply.
Energy savings can be made by connecting the appliance to a Solar water system and using economy options, however the water temperature must not exceed 60° C.
Inlet water supply
- Water pressure: 800 kPa max – 50 kPa min.
- Water flow rate 10 L / minute min.
- If water pressure is in excess of 800 kPa, a pressure reducing valve should be used. Check for leaks.
- If water temperature is in excess of 60° C, a tempering valve should be used. Check for leaks.
CAUTION!
Always use new hoses when you connect the appliance to the water mains. Old hoses must not be used. The water inlet hose must be examined at an interval of twelve months for deterioration and replaced if necessary.
The water pressure must be in the limits indicated in the chapter ”TECHNICAL
INFORMATION”. Make sure that the local water authority gives you the average mains pressure in your area.
Water drain hose
The highest point of the drain hose must be no more than 600 mm from the floor and must have a continuous fall to the plumbing connection.
The drain hose can be lengthened using additional lengths and connectors. These must be purchased from Electrolux Spare Parts. The extension length must not exceed 2 metres.
The drain hose must be free of obstructions.
Remove the sink plug when the appliance drains the water to prevent that the water goes back into the appliance.
The appliance has a security feature to prevent dirty water going back into the appliance. If the spigot of the sink has a non-return valve, this valve can cause the appliance to drain incorrectly. remove the non-return valve.
If you connect the water drain hose to a trap spigot under the sink, remove the plastic membrane. If you do not remove the membrane, remaining food can cause a blockage in the drain hose spigot.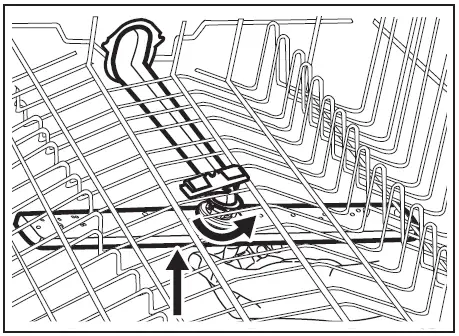
WARRANTY
This document sets out the terms and conditions of the product warranties for AEG Appliances. It is an important document. Please keep it with your proof of purchase documents in a safe place for future reference should there be a manufacturing defect in your Appliance. This warranty is in addition to other rights you may have under the Australian Consumer Law.
- In this warranty:
a) ‘ACL’ or ‘Australian Consumer Law’ means Schedule 2 to the Competition and Consumer Act 2010;
b) ‘Appliance’ means any Electrolux product purchased by you and accompanied by this document;
c) ‘ASC’ means Electrolux’s authorised serviced centres;
d) ‘AEG’ is the brand controlled by Electrolux Home Products Pty Ltd of 163 O’Riordan Street, Mascot NSW 2020, ABN 51 004 762 341 in respect of Appliances purchased in Australia and Electrolux (NZ) Limited (collectively “Electrolux”) of 3-5 Niall Burgess Road, Mount Wellington, in respect of Appliances purchased in New Zealand;
e) ‘Warranty Period’ means the period specified in clause 3 of this warranty;
f) ‘you’ means the purchaser of the Appliance not having purchased the Appliance for re-sale, and ‘your’ has a corresponding meaning. - Application: This warranty only applies to new Appliances, purchased and used in Australia or New Zealand and is in addition to
(and does not exclude, restrict, or modify in any way) other rights and remedies under a law to which the Appliances or services relate, including any non-excludable statutory guarantees in Australia and New Zealand. - Warranty Period: Subject to these terms and conditions, this warranty continues for in Australia for a period of 60 months and in New Zealand for a period of 60 months, following the date of original purchase of the Appliance.
- Repair or replace warranty: During the Warranty Period, Electrolux or its ASC will, at no extra charge if your Appliance is readily accessible for service, without special equipment and subject to these terms and conditions, repair or replace any parts which it considers to be defective. Electrolux may, in its absolute discretion, choose whether the remedy offered for a valid warranty claim is repair or replacement. Electrolux or its ASC may use refurbished parts to repair your Appliance. You agree that any replaced Appliances or parts become the property of Electrolux.
- Travel and transportation costs: Subject to clause 7, Electrolux will bear the reasonable cost of transportation, travel and delivery of the Appliance to and from Electrolux or its ASC. Travel and transportation will be arranged by Electrolux as part of any valid warranty claim.
- Proof of purchase is required before you can make a claim under this warranty.
- Exclusions: You may not make a claim under this warranty unless the defect claimed is due to faulty or defective parts or workmanship. This warranty does not cover:
a) light globes, batteries, filters or similar perishable parts;
b) parts and Appliances not supplied by Electrolux;
c) cosmetic damage which does not affect the operation of the Appliance;
d) damage to the Appliance caused by:
– negligence or accident;
– misuse or abuse, including failure to properly maintain or service;
– improper, negligent or faulty servicing or repair works done by anyone other than an Electrolux authorised repairer or ASC;
– normal wear and tear;
– power surges, electrical storm damage or incorrect power supply;
– incomplete or improper installation;
– incorrect, improper or inappropriate operation;
– insect or vermin infestation;
– failure to comply with any additional instructions supplied with the Appliance;
In addition, Electrolux is not liable under this warranty if:
– the Appliance has been, or Electrolux reasonably believes that the Appliance has been, used for purposes other than those for which the Appliance was intended, including where the Appliance has been used for any non-domestic purpose;
– the Appliance is modified without authority from Electrolux in writing;
– the Appliance’s serial number or warranty seal has been removed or defaced. - How to claim under this warranty: To enquire about claiming under this warranty, please follow these steps:
a. carefully check the operating instructions, user manual and the terms of this warranty;
b. have the model and serial number of the Appliance available;
c. have the proof of purchase (e.g. an invoice) available;|
d. telephone the numbers shown below. - Australia: For Appliances and services provided by Electrolux in Australia: Electrolux goods come with guarantees that cannot be excluded under the Australian Consumer Law. You are entitled to a replacement or refund for a major failure and for compensation for any other reasonably foreseeable loss or damage. You are also entitled to have the Appliance repaired or replaced if the Appliance fails to be of acceptable quality and the failure does not amount to a major failure. ‘Acceptable quality’ and ‘major failure’ have the same meaning as referred to in the ACL.
- New Zealand: For Appliances and services provided by Electrolux in New Zealand, the Appliances come with a guarantee by Electrolux pursuant to the provisions of the Consumer Guarantees Act, the Sale of Goods Act and the Fair Trading Act. Where the Appliance was purchased in New Zealand for commercial purposes the Consumer Guarantee Act does not apply.
- Confidentiality: You accept that if you make a warranty claim, Electrolux and its agents including ASC may exchange information in relation to you to enable Electrolux to meet its obligations under this warranty.
Contact us
FOR SERVICE
or to find the address of your nearest au-thorised service centre in Australia PLEASE CALL 1300 363 664
OR EMAIL
[email protected] For the cost of a local call (Australia only)
FOR SPARE PARTS
or to find the address of your nearest spare parts centre in Australia
PLEASE CALL 13 13 50
OR EMAIL [email protected]
For the cost of a local call (Australia only)
![]()