AIRTHINGS AI10021 Healthy Building Solutions 3+1 Hub

Congratulations on taking this important step toward a healthier building.
Airthings Healthy Building Solutions is a business solution to keep track of your indoor air quality and radon levels. You can make healthier decisions to increase productivity and energy levels, resistance to illness and more. Lessening your exposure to radon will reduce risk of lung cancer.
The Airthings Hub provides you 24/7 access to your Airthings indoor air quality Wave devices with detailed information about sensors on your Airthings Dashboard.
Breathe better, live better, work better.
The Airthings team
Get in touch
For technical support or if you have any questions or comments that we did not answer here, you can reach us at [email protected] or through the chat widget on the bottom right when you log into your account at dashboard.airthings.com
Warning
The Healthy Building Solution (HBS) Hub only works with HBS Airthings Wave devices. Connection to consumer Airthings devices could upset your subscription and cause additional charges. Please do NOT try to connect with any devices other than HBS devices.
What’s in the box
Hub
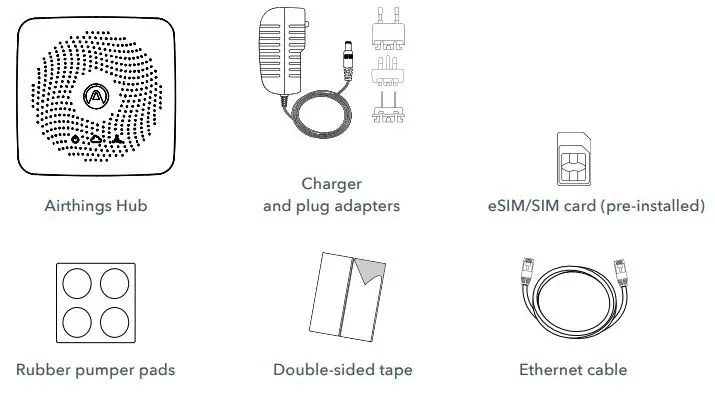
- Airthings Hub
- Charger and plug adapters
- eSIM/SIM card (pre-installed)
- Rubber pumper pads
- Double-sided tape
- Ethernet cable
Airthings Wave Device
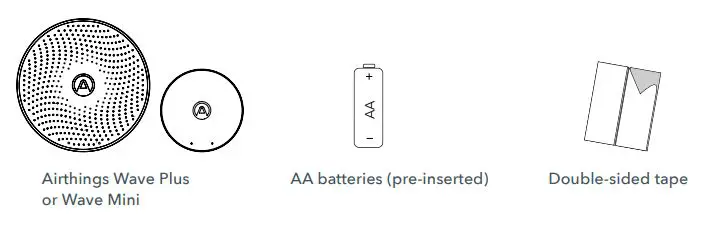
- Airthings Wave Plus or Wave Mini
- AA batteries (pre-inserted)
- Double-sided tape
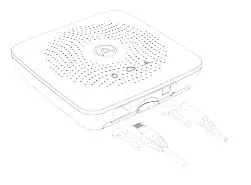
Hub specifications
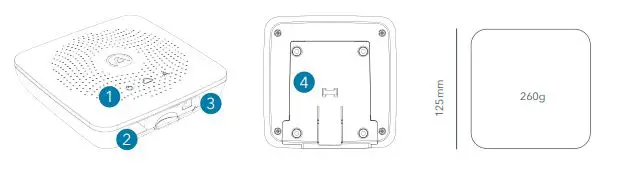
- Light indicator
- Ethernet port
- Power input
- Mounting bracket
Light indicators
Power Supply: Green when there is power to the Hub
Cloud: Green if cloud transfer is successful Off if transfer fails OR if no successful transfer to cloud within the last 6 minutes
Airthings SmartLink: Green when sensor data is received within the last 6 minutes
Connectivity

Hub Cellular Model 2820 can operate with ethernet connection or with the pre-installed eSIM/ SIM card Hub Model 2810 can only operate with ethernet connection.
App & Software
Manage your account and access your data at dashboard.airthings.com
Protocol
Airthings SmartLink, 868/915 MHz long range wireless connection
Remote access
Live data streaming to the cloud and accessible at dashboard.airthings.com or through Airthings API
Power Supply
100-240V AC / 50-60 Hz Adapter to 5V DC2A
Important information
Regional operation
The Hub can operate in EU and/or US / Canada.
During the activation of Airthings Healthy Building Solution (HBS) subscription, the user needs to select a region. Such region selection is performed once and for all and cannot be changed. The correct region must be selected for the Hub to operate in compliance with regional radio regulations. Wave devices can only operate in the region that is pre-programmed by Airthings.
EU devices are marked “Hub EU compatible”on the front of the box and have a blue dot sticker underneath the battery cover. US / Canada devices are marked “Hub US/CA compatible” and have a red dot sticker underneath the battery cover.
Wave device connection & monitoring
Do NOT connect your consumer Airthings devices to HBS Hub. That will cause additional charges to your HBS subscription due to the additional consumer devices connected.
Do NOT attempt to connect to your HBS Airthings Wave devices via Bluetooth (e.g. using mobile phone Bluetooth). Connect HBS Airthings Wave devices to your HBS Hub through SmartLink.
Monitor your HBS Wave devices via the Airthings dashboard at https://dashboard.airthings.com.
It is not recommended to monitor Wave devices using Airthings Wave App due to sensor data lag when multiple Wave devices are in operation.
Optimum radio range
The Smartlink radio signals can typically penetrate 3 thick walls, floors or typically 10 drywalls (non-loading bearing walls).
Place the Hub somewhere in the center of the area you want to cover.
Multiple Hubs are needed if there are more than 3 thick walls, floors or 10 drywalls between a Hub and the Wave devices. When there are multiple Hubs, Wave devices will connect to the closest Hub, as long as the installation sequence is followed.
Avoid placing the Wave devices so that there are large metal objects between the devices and the Hub. Avoid placing the Hub and the Wave devices in metal cabinets.
Moving Wave devices closer to the Hub will usually improve the radio range. In some cases, a Wave device might be in a local “radio shadow” where the Hub cannot see the device. Should a device display less radio signal strength than expected, try moving it slightly to see if signal strength improves.
Setting up
- Activate HBS account
- Set up Hub
- Set up Wave device
- Mount Wave device
Step 1 Activate Airthings HBS account
Check Airthings HBS invitation email sent to your email address. Follow the instructions in the email to activate your Airthings HBS account.
Attention
The Airthings Healthy Building Solution requires an active subscription. You will not be able to continue with the setup without activating your account.
If you do not receive an invitation email, please contact your Airthings Sales Representative.
Alternatively, please contact Airthings Support at [email protected].
Step 2 Set up Hub
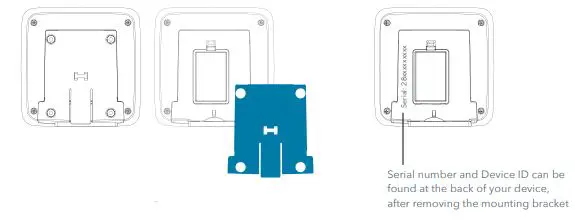
Serial number and Device ID can be found at the back of your device, after removing the mounting bracket
1. Register your Hub
a. Login to https://dashboard.airthings.com with your newly activated account
b. Remove the mounting bracket at the back of the Hub by slightly lifting it up and pulling it out.
c. Locate Serial Number and Device ID at the back of your device
d. Follow on-screen instructions to add and register your Hub
2. Start up Hub
Option A – Using Ethernet
- Register the Hub. The Hub has to be registered to an Airthings account before it will connect.
- Connect Hub to your Ethernet cable, one end of the cable to the Hub port, the other end to the ethernet outlet
- Connect Hub to power socket
- Wait for Hub firmware upgrade to be completed. This may take 10 to 70 minutes. Registering the Hub first (as specified in section 1) can help to reduce waiting time.
Question Where should I place the Hub?
Place the Hub somewhere in the center of the area you would like to measure air quality. Place and set up up to 30 Airthings Wave devices clustered around the Hub. For each Hub, fully complete also setup of the Airthings Wave devices within range, before moving onto next Hub
Attention
The Hub will not connect to any Wave devices before it has been registered. Make sure you register the Hub to your Airthings account at https://dashboard.airthings.com The Hub conducts a registration check on start-up, so to avoide issue register the device before powering the Hub.
Option B – Using cellular connection
- a. Register the Hub. The Hub has to be registered to an Airthings account before it will connect.
a. Connect Hub to power socket. An eSIM/SIM card is pre-inserted in the Hub and is ready for use.
b. Wait for Hub firmware upgrade to be completed. This may take 10 to 70 minutes. Registering the Hub first (as specified in section 1) can help to reduce waiting time.
Notes
Hub model 2810 can only operate with ethernet connection.
Hub Cellular model 2820 can operate with ethernet connection or eSIM/SIM card. An eSIM/SIM card is pre-inserted with this model. This eSIM/SIM card is locked to the Airthings Hub and will not work in other devices. Hub Cellular will only work with the eSIM/SIM card provided by Airthings.
Hub model name and number can be found at the back of the device after removing the mounting bracket.
Step 3 Set up Wave device
- Bring the Wave device to the room you want to monitor with the battery tab still inserted.
- Remove the mounting bracket at the back of the Wave device. The bracket is magnetic-attached to the device
- Pull the battery tab to power the Wave device. The device will start connecting to the nearest Hub. If the Wave device is moved to a different room reinsert batteries to reconnect to the nearest Hub.
- Login to https://dashboard.airthings.com
- Locate Serial Number and Device ID at the back of your Wave device
- Follow on-screen instruction to add and register your Wave device.
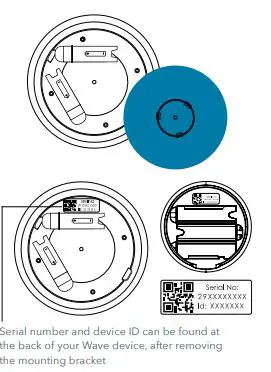
Serial number and device ID can be found at the back of your Wave device, after removing the mounting bracket
Question Where should I place the Wave device?
Place the Wave device in the area you would like to measure air quality and within the radio link range of the Hub. See “Optimal radio range” in page 3 for more information. Do not permanently mount your devices until the device is checked to be in good radio link range.
To set up multiple Wave devices Repeat Step 3
Notes
A Smartlink will be established between a powered-up Wave device and a nearby powered-up Hub. It take 20 minutes to establish such Smartlink.
It takes additionally 5 to 10 minutes for Wave device sensor data to be made available on Airthings dashboard.
If you register Wave devices using your computer, navigate to “Devices” tab to find your newly added device and view sensor data.
Wave devices are upgraded seamlessly in the background and you do not need to take any action in this process. Such upgrade can take up to 120 minutes for large installations.
Allow 7 days after deployment for data calibration of indoor air quality sensors such as Radon, TVOC and CO2.
Troubleshooting
I cannot see Wave device on the dashboard
Wave devices that do not show up at all are most likely completely out of radio range of the Hub. Note that one Hub can connect to maximum 30 Wave devices. If a Hub fills upwith more than 30 Wave devices, it can take up to 4 hours for Wave devices to find and connect to another HUB within radio range.
What do the radio bars mean?
You can check received radio signal strength for each Wave Plus device in the dashboard. With no signal bars, there is need for improvement. With one or two signal bars you might occassionally miss some sensor data samples. If you see missing data and want to improve move the Wave Plus device closer to the Hub or bring in an additional Hub
Warning
The Healthy Building Solution (HBS) Hub only works with HBS Airthings devices. Connection to consumer Airthings devices could upset your subscription and cause additional charges.
Please do NOT try to connect with any devices other than HBS devices.
Step 4 Mount Wave device
Once the Wave device is confirmed in good radio range to the Hub, you can permanently mount the Wave device.
Wave devices should be wall-mounted 150-170 cm above the floor. Mount the Wave device at least 1 m away from exterior walls, doors, air supply/exhausts, mechanical fans, heaters or any other significant source of heat or cold. Wave devices should not be mounted on the ceiling.
Use the included double-sided tape for temporary installations. For permanent installations we recommend using a screw to wall-mount. Ensure that the Wave device cannot fall onto someone or something and cause damage.
Airthings does not take responsibility for improperly installed Wave devices.
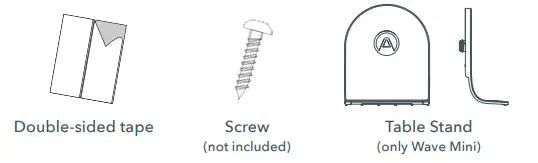
- Double-sided tape
- Screw (not included)
- Table Stand (only Wave Mini)
To set up multiple Hubs Repeat Step 2 – 4
Regulatory information
Safety & maintenance
The Airthings Hub is intended for indoor use only. Avoid direct exposure to sunlight for long periods. Avoid exposure to direct heat sources. For correct usage, make sure the detector is operating in the specified temperature range (see technical specifications).
Exposure to high humidity might permanently alter the detector sensitivity or damage it.
Do NOT disassemble. If the Airthings Hub does not work as specified or if you are in doubt, contact your local dealer or visit us at https://www.airthings.com/.
Use a dry cloth to clean the detector.
Use only the adaptor supply shipped with the product.
Always snap the mounting bracket to the rear side to protect the product, even if the product is not permanently mounted.
Disposal: electronic equipment.
Limited liability
The instrument is tested and quality-assured by production. It meets the accuracy values set out in the specifications.
It is recommended to keep the instrument constantly activated and the batteries in place until drained.
Airthings AS shall not be liable for damages related to failure or loss of data arising from incorrect operations and handling of the instrument.
Terms & conditions
Go to https://www.airthings.com/terms-of-use
For other languages or additional questions go to support.airthings.com
Copyright Airthings AS, 2019
Regulatory information Canada
Changes or modifications not expressly approved by the party responsible for compliance could void the user’s authority to operate the equipment.
Les changements ou modifications non expressément approuvés par la partie responsable de la conformité pourraient annuler l’autorisation de l’utilisateur d’utiliser l’équipement.
This device complies with Innovation, Science and Economic Development Canada’s license-exempt RSS(s). Operation is subject to the following two conditions: (1) This device may not cause interference; and (2) This device must accept any interference, including interference that may cause undesired operation of the device.
Le présent appareil est conforme aux CNR de l’ISDE applicables aux appareils radio exempts de licence. L’exploitation est autorisée aux deux conditions suivantes : (1) l’appareil ne doit pas produire de brouillage, et (2) l’utilisateur de l’appareil doit accepter tout brouillage radioélectrique subi, même si le brouillage est susceptible d’en compromettre le fonctionnement.
RF exposure safety
This product is a radio transmitter and receiver.
It is designed not to exceed the emission limits for exposure to radio frequency (RF) energy set by the ISED.
The antenna must be installed and operated with minimum distance of 20 cm between the radiator and your body.
This transmitter must not be co-located or operating in conjunction with any other antenna or transmitter.
Ce produit est un émetteur et un récepteur radio.
Il est conçu pour ne pas dépasser les limites d’émission pour l’exposition à l’énergie radiofréquence (RF) établie par l’ISDE.
L’antenne doit être installé de façon à garder une distance minimale de 20 cm entre la source de rayonnements et votre corps.
L’émetteur ne doit pas être colocalisé ni fonctionner conjointement avec à autre antenneou autre émetteur.
CAN ICES-3 (B)/NMB-3(B)
This Class B digital apparatus complies with Canadian ICES-003
Cet appareil numérique de clase B est conforme à la norme Canadienne ICES-003
Regulatory information US
Changes or modifications not expressly approved by the party responsible for compliance could void the user’s authority to operate the equipment.
This device complies with part 15 of the FCC Rules. Operation is subject to the following two conditions: (1) This device may not cause harmful interference, and (2) this device must accept any interference received, including interference that may cause undesired operation.
Class B device notice
NOTE: This equipment has been tested and found to comply with the limits for a Class B digital device, pursuant to part 15 of the FCC Rules. These limits are designed to provide reasonable protection against harmful interference in a residential installation. This equipment generates, uses and can radiate radio frequency energy and, if not installed and used in accordance with the instructions, may cause harmful interference to radio communications. However, there is no guarantee that interference will not occur in a particular installation. If this equipment does cause harmful interference to radio or television reception, which can be determined by turning the equipment off and on, the user is encouraged to try to correct the interference by one or more of the following measures:
- Reorient or relocate the receiving antenna.
- Increase the separation between the equipment and receiver.
- Connect the equipment into an outlet on a circuit different from that to which the receiver is connected.
- Consult the dealer or an experienced radio/TV technician for help.
RF exposure safety
This product is a radio transmitter and receiver.
It is designed not to exceed the emission limits for exposure to radio frequency (RF) energy set by the Federal Communications Commission.
The antenna must be installed and operated with minimum distance of 20 cm between the radiator and your body.
This transmitter must not be co-located or operating in conjunction with any other antenna or transmitter