Alcatel 4GLTE Cat4 Mobile Wi-Fi Linkzone
Getting to Know Your Mobile Hotspot
LED Description
| Part | Description |
| Power key | Hold the “Power” key for 3 seconds to power the device on/ off. |
| WPs key | Hold “WPS” key for 3 seconds to activate the WPS function. Once activated, the Wi-Fi LED indicator will flash every two seconds. If the network is not accessed within 2 minutes device will automatically exit WPS mode. |
| leD indicators | Displays signal, Wi-Fi, SMS, and battery charge status. |
| Charging / UsB Port | Use the USB jack to charge your device and connect your device to the client via the USB cable. |
| reset | Hold both “Power” and “WPS” keys simultaneously for 6 seconds. All LED indicators will flash blue 4 times to indicate that the device has been reset to factory mode. |
| reboot | Hold “Power” key for 10 seconds to restart device. |
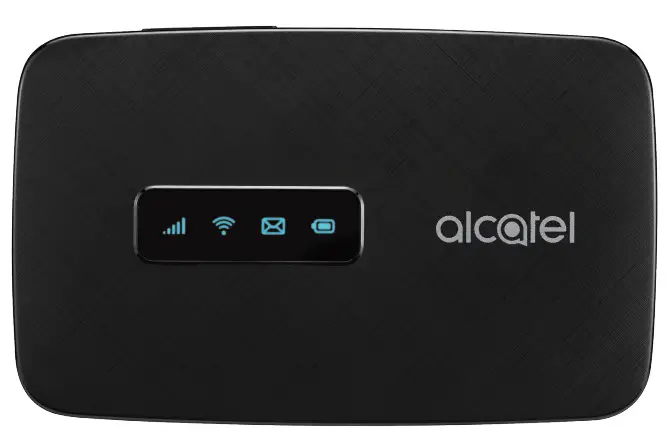
Indicators
When the hotspot is powered on, the following icons will illuminate. For a description of the icons, please refer to the table below:

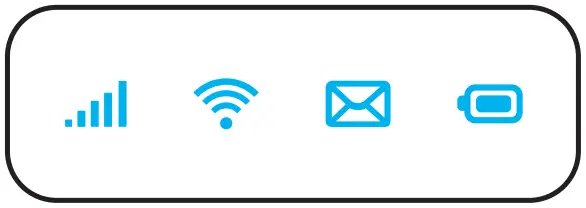 Network Indicator (Red or Blue LED)
 Wi-Fi Indicator (Blue LED)
 SMS Indicator (Blue LED)
 Battery Indicator (Red or Blue LED)
| LED | Description | |
| network Indicator | Solid Blue | Registered and connected to network. |
| Flashing Blue | Network disconnected. | |
| Solid Red | No network, no SIM card or SIM card error, limited or no service. | |
| Wi-Fi | Solid Blue | Wi-Fi is active. |
| sMs | Solid Blue | New message |
| Flashing Blue | Message inbox is full. | |
| Battery | Rapidly Flashing Blue | Working. |
| Rapidly Flashing Blue | The battery is being charged. | |
| Solid Blue | Full charged. | |
| Flashing Red | The battery level is less than 10%. |
Power saving mode:
If no keys are pressed for 30 seconds, all LED lights will automatically dim with the exception Signal and Wi-Fi LED indicators. LED indicators will remain lit when the USB cable is used to charge the device or if any key is pressed.
Setting Up Your Mobile Hotspot
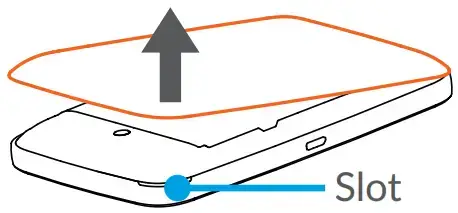
- remove back cover.

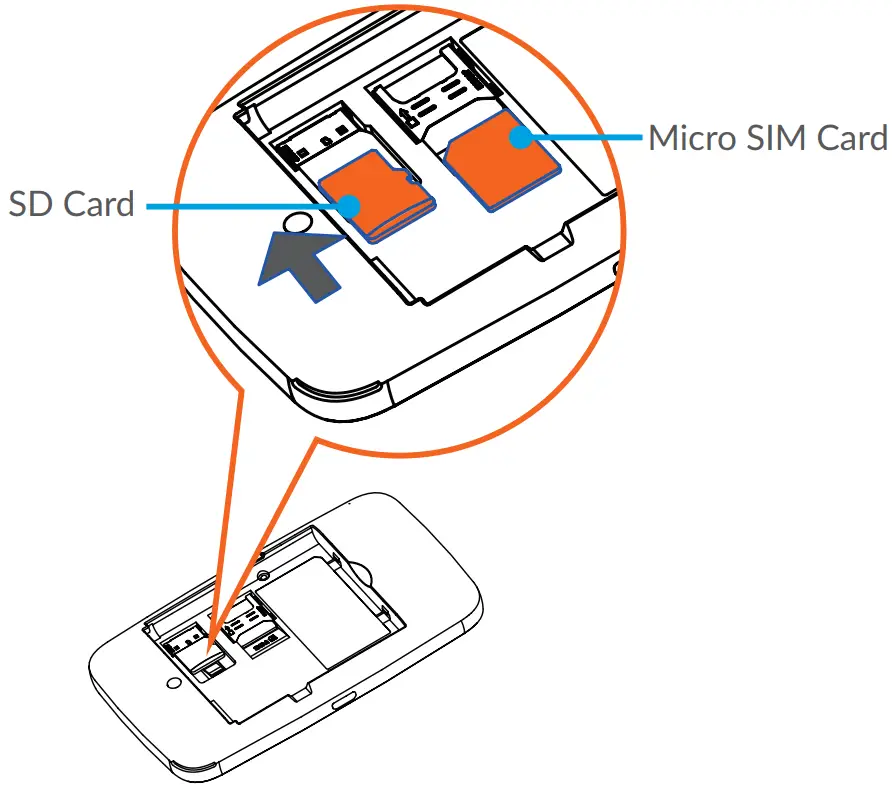
Note: Find the slot on front cover to open. - Install Micro sIM Card and
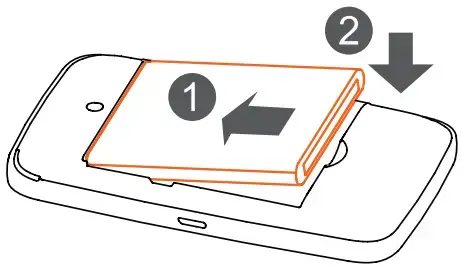
- Install battery
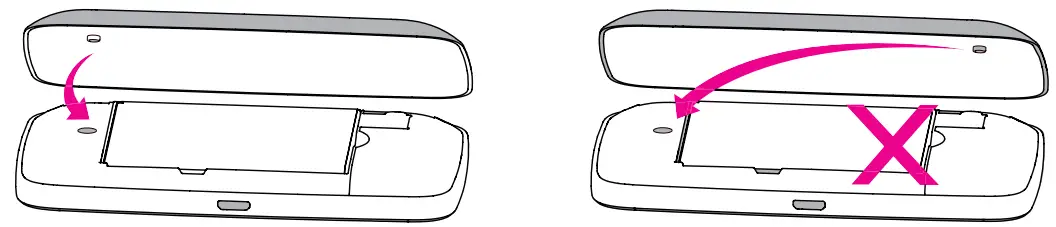
- Close back cover.
Orient the back cover so that locating nub is inserted into corresponding indentation (please refer to illustration below).
- Power device on.
Hold the “Power” key for 3 seconds until all LED indicators illuminate in blue.
Charge Your Mobile Hotspot
There are two ways to charge your mobile hotspot:
- Charge with a UsB adapter
Connect a USB cable between the device and the head of the adapter and plug it into a power socket to start charging. When the device is powered off, it takes about 3 hours before being fully charged. - Charge through connection to computer using USB cable
You can also charge the device by connecting it to a PC with the USB cable.
When the device is powered off, it takes about 4 hours to complete charging.
Note: When red battery indicator flashes, device should be charged in order to protect the battery.
OS supported
Windows (32 bit & 64 bit) 7/8/8.1/10 Mac OS X 10.6 to 10.11 with the latest upgrade
Connect your Wi-Fi device to your Mobile Hotspot
- Power on your mobile hotspot.
- On your computer or other Wi-Fi enabled device, search for available Wi-Fi networks and select network name (SSID) located on label on back panel of your mobile hotspot.
Note: Wi-Fi name (SSID) and Wi-Fi Password is located on the label inside the back cover of the device.
• From a Windows PC: Left-click Wireless Network Connection on the task bar to view available networks. View Available Networks. Choose the SSID from the list of available networks.
• From a Mac computer: Select System Preferences ->Network -> Airport. Click “Advanced” to choose SSID from the list of available networks. · From an iOS device: Settings -> Wi-Fi. Choose SSID from the available networks.
• From an Android device: Settings -> Wi-Fi settings. Choose the SSID from the available networks. - Enter password located on label on back panel and click OK.
Use the WPS
If your Wi-Fi device supports WPS, you do not have to input the password manually after WPS connection has been established. Please follow the following steps:
- Power on your Mobile Hotspot and enable the Wi-Fi function.
- Press and hold the WPS key on your device for more than 3 seconds to start Wi-Fi Protected Setup authentication process.
- Enable the WPS function on your Wi-Fi device in order to respond to this authentication process.
- Follow the system prompts on your Wi-Fi device to finish the connection.
- If no Wi-Fi device is connected within 2 minutes, WPS function will automatically close.
Managing Your Mobile Hotspot
Access Mobile Hotspot
You can access your Mobile HotSpot device information, using an Internet browser.
To access using a browser:
- Connect to your hotspot device through Wi-Fi using the network connection software on your computer. Provide the Wi-Fi network password, if requested.
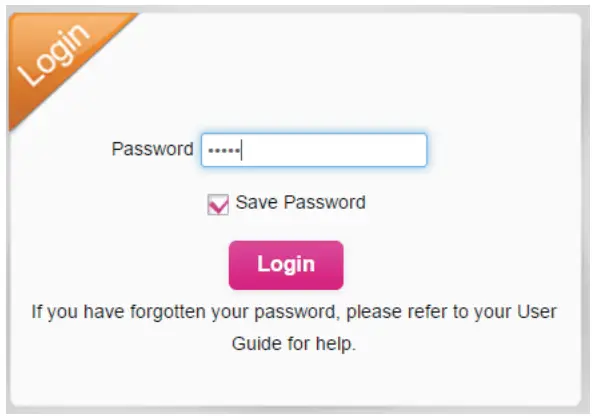
- Open a browser and enter http://mobile.hotspot or http://192.168.0.1 in the address bar. The Mobile Hotspot login screen will appear.
- Enter your Password in the field provided. The default password is admin.
- Select the Save Password checkbox if you wish to bypass the login screen in the future.
- Click Login. If you entered the correct password, the Web User Interface screen appears.

Access Using USB Cable
- Connect your Mobile Hotspot to the PC with USB cable.
- Power on your device.
- The OS detects and recognizes new hardware and finishes the installation automatically. After successful installation, the web connection icon will appear on your desktop.
Note: If the system does not launch installation automatically, you can run the installation program in path of My Computer -> Mobile Hotspot. - Double click the icon to open the login screen.
- Enter your Password in the field provided. The default password is admin.
- Select the Save Password checkbox if you wish to bypass the login screen in the future.
- Click Login. If you entered the correct password, the Dashboard screen appears.
Change Mobile Hotspot Admin Password
- Access http://mobile.hotspot or http://192.168.0.1.
- Click Settings in the navigation area.
- Select the Device Settings tab.
- Follow steps under Account Management to update your Password.
- Click Apply. If everything is entered correctly, the Admin Password Changed dialog appears indicating the password was successfully changed.
Change Mobile Hotspot Network Name (SSID)
- Access http://mobile.hotspot or http://192.168.0.1.
- Click Settings in the navigation.
- Select the Wi-Fi Settings tab.
- Change the name that appears in the Network Name (SSID) field in the Wi-Fi Settings area.
- Select or deselect the Broadcast Network Name checkbox to enable or disable broadcasting the hotspot’s Network Name (SSID).
- Click Apply to save your changes on the Wi-Fi Settings tab of the Settings screen.
Change Mobile Hotspot Wi-Fi Password
- Access http://mobile.hotspot or http://192.168.0.1.
- Click Settings in the navigation area.
- Select the Wi-Fi Settings tab.
- Change the value that appears in the Password field in the SSID area. 5. Click “Apply” in the SSID area to save your changes on the Wi-Fi Settings tab of the “Settings” screen.
How to use Mobile Hotspot’s Whitelist Function
Your mobile hotspot is equipped with a “whitelist” function that will allow you to secure your network’s privacy. When this function is activated, only users that have been granted access by adding user’s MAC address will be able to connect to the network. When the primary user deactivates this feature, all other users will be allowed access to network via Wi-Fi and use of correct password.
- Log in the web User Interface.
- Select Settings -> Wi-Fi Settings -> Allowed Devices.
- The switch is off by default, all user input correct password can access.
- After open the whitelist function, you need to know the user client’s MAC address and add to the list, the format is XX:XX:XX:XX:XX:XX. You can add up to 10 devices if they are all going to connect, because the Wi-Fi chip can only support 10 devices connected at the same time.
- If you would like to remove a users in the whitelist. They will no longer be allowed to connect to the network, click the button, and then click Yes to remove.