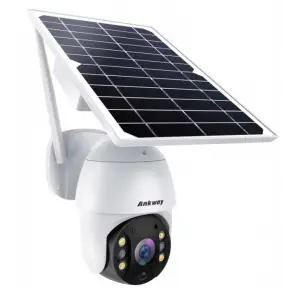
Ankway Solar Energy Alert PTZ Camera

Before Installation
- This camera can only be set up with 2.4g Wi-Fi network. (It’s ok to use Cell phone 4G data to live viewing it after the camera was set up with 2.4g Wi-Fi network firstly.)
- The product may require a Wi-Fi extender if your Wi-Fi signal is weak in the installation location (ex. Backyard, front yard, etc.)
- Please insert the micro SD card only when the camera powered off. (Micro SD card is not provided in the package.)
- Make sure the distance between your phone, router and the camera is no more than 1.5 feet when you’re ready to pair the camera. Ensure that the Wi-fi signal strength on your phone is good.
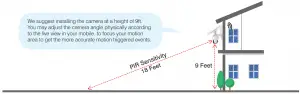
- The PIR range is 18 feet in diameter and the recommended camera installation height is 9 feet. To avoid potential false alarms, we suggest you do not install the camera with nearby bushes, shrubs, grasses and tree leaves coming into the PIR range.
- Two Storage method of PIR activity: Subscribe the App Cloud Service or Install a micro SD card.
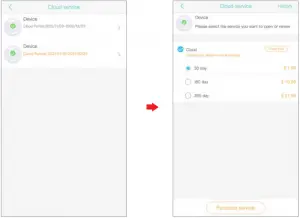
1) Cloud: Each camera will be banded with one cloud storage service and has one month cloud service for free trial .Subscribe the free trial, the video footage from PIR activities will be saved in cloud storage and the videos in the Cloud can be playback in the app. After 30 days, cloud service will expire and you will have to pay for the cloud storage services.
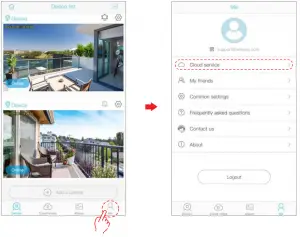
Tap “Me”-“Cloud Service” to check the cameras you have and the expiration date of each cloud service.
2) TF: If chose install a micro SD card, Please insert your micro SD card to the slot as shown in the picture below. Note, the camera only supports class 10 above micro SD card with capacity ranging from 8GB to 128GB. Please make sure to insert the micro SD card when you power off the camera, this camera doesn’t support hot-plugging and play.
Please Note: We suggest you format the SD card to FAT32 on your app for the first time use. And the videos of live viewing can also be saved in the SD card.
- Videos can be saved on the mobile phone album:
(1). The videos of REC mode
(2). The screenshot
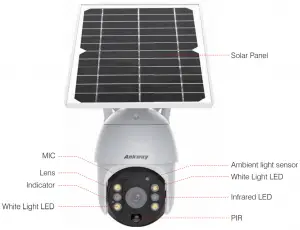
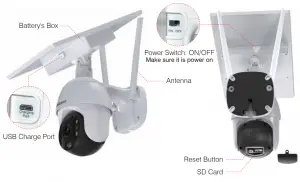
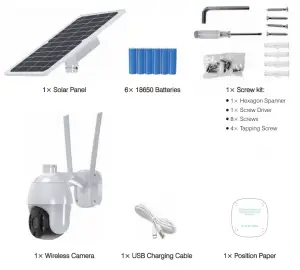
Product Diagram and Packing List
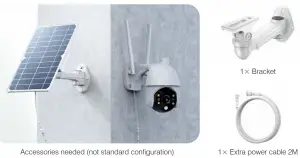
- Product Diagram
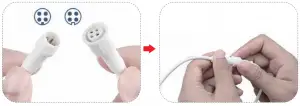
4 Pin Cable:
Connect the cables between the panel and camera, then tighten the waterproof cap.
Product Diagram
Installation Process
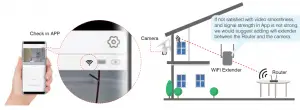
- Check your camera signal strength
- Recommended height to install the camera
- If your camera get numerous motion alerts unexpected
1) Please adjust your camera installation angle to focus the motion area.
2) Please change your PIR sensitivity to Low to reduce the PIR sensitivity.
3) Do not install the camera with nearby bushes, shrubs, grasses and tree leaves coming into the PIR range - Integrated installation:

Stick the position paper on the wall where you want to install the camera. drilling the 4 holes according to the 4 red dots on the paper and then fix the bracket using the expansion screws.
Point the antenna upwards, do not point towards the earth. The antenna is not waterproof upside down
- Separated installation:
FAQ
Q1: Why does the camera fail to connect to the app via QR code?
A:
- Make sure your phone is connected to your 2.4G Wi-Fi. And Input the CORRECT WiFi password of your router, if you input a wrong password, the product will not be able to connect successfully. Click the eye icon to double confirm the password you entered correct.
- Let your phone to forget your 5G Wi-Fi connection from your Phone Wi-Fi list to avoid proity pick up.
- The QR codes on the user manual is for downloading the Ubox app. As soon as you connect the camera to the solar panel the camera will turn on and ask you to hold your phone about four inches away from the camera lens while you phone is scanning. You had to keep moving it back and forth until got the connection.
- Try to avoid your phone screen too light or too dark so that camera can read the QR code clearly on the phone without reflecting light.
- Enable your router DHCP option and set your router to dynamic IP addressing to avoid conflict with your other wireless devices for one static IP address.
- Reboot your router to reallocate your IP address and refresh your network.
- Reset and reconnect. Hold on the reset button for 4-5 seconds and then release it when you hear “system reset “ to reset your camera to default.
Q2: Why do I fail to connect the camera to the App by sound wave?
A:
- Please make sure the camera is powered on and there will be voice prompts that indicates it.
- Make sure the distance between your mobile phone and the device is no more than 30cm. And your mobile, camera and router are in the same room.
- Make sure your phone volume is turned up and your router ID + password no more than 32 digits.
Q3: When In-App setup is done, why I could not see the livestreams on my mobile?
A:
First, check in App to confirm the wifi signal is strong enough. If not, we would suggest adding wifi extender in between.
Q4: Why I cannot receive any alarm after I finished connecting the camera with the App ?
A:
- Click the in App to confirm you have turned on the push mode.
- Check your mobile settings to allow the notification.
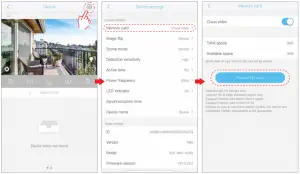
- Check your PIR setting, When you set the PIR as Disabled, you will not record and receive any motion triggered events.
Q5: Why there isn’t any record videos on the app when I get a motion alert?
A:
- You need to subscribe the App Cloud Service or Install a micro SD card at first.
- Then if you installed SD card, please turn the icon “cloud” to “TF” and then you can select the date and watch the record videos on SD card.
Others
LED indicators trouble shooting:
Battery box LED blinks green: Camera is in charging
Battery box LED stays green: Camera is fully charged
Camera LED blinks blue: Camera is ready for pairing
Camera LED stays blue: Camera paired successfully
Camera LED Blinks red once and stay solid blue: Camera detected motion
Camera NO LED after pairing successfully: Camera is in standby mode
Camera LED stays red: Camera didn’t pick up Wi-Fi correctly
Camera LED always blinks red: Camera hardware defective
Warranty Service
Thank you for purchasing an Ankway product!
Having issues with your Ankway cameras? Any problem please feel free to contact us by emailing
email: [email protected].
Our customer service team at Ankway will offer a detailed solution to your issue within 48 hours.
