PH20 Value pH Tester Kit
User Manual

APERA INSTRUMENTS, LLC
aperainst.com
Thank you for purchasing the Apera Instruments PH20 Pocket pH Tester Kit. Please read this manual carefully before use in order to properly use and maintain the product.
For video tutorials, please go to support.aperainst.com
■ Latest Upgrade
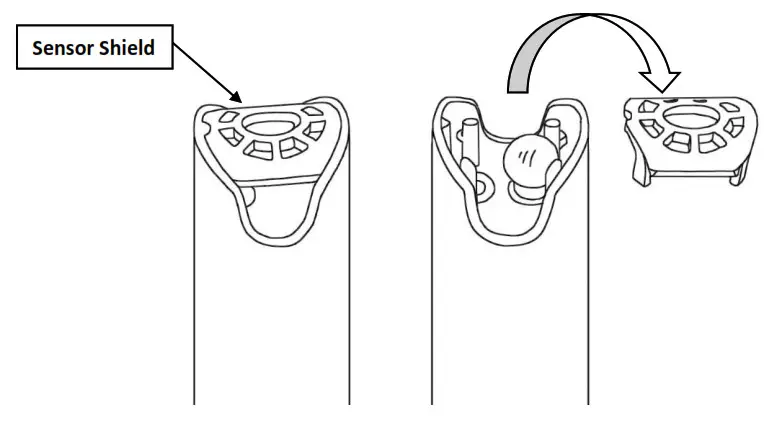
The latest PH20 Tester comes with an upgraded probe structure, which is equipped with a sensor shield that prevents the glass sensor breakage from accidental collisions (see picture below). Users can remove the shield when rinsing and cleaning the sensor and put it back on afterward.

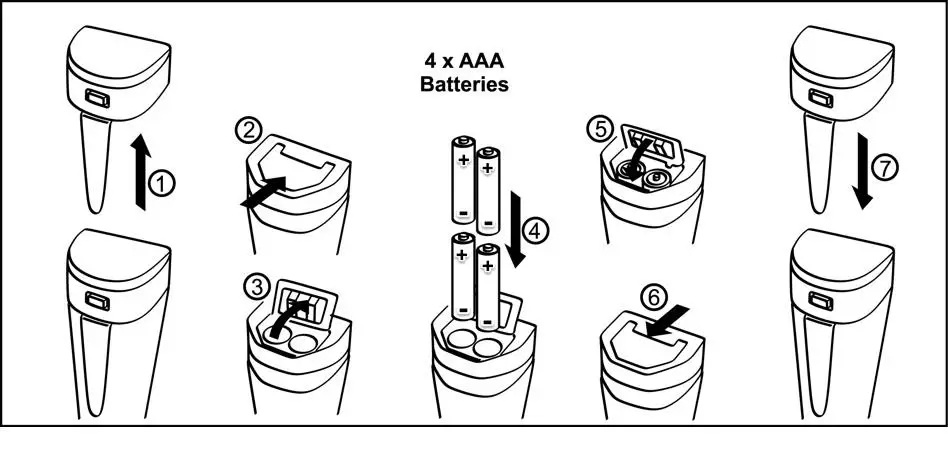
Battery Installation
Please install batteries according to the following steps. *Please note the correct direction of the battery installation:
The Positive Side (“+”) OF EVERY SINGLE Battery MUST FACE UP.
(THE WRONG INSTALLATION OF BATTERIES WILL CAUSE DAMAGE TO THE TESTER AND POTENTIAL HAZARDS!)

Keypad Functions
■Short press——- < 2 seconds
■Long press——– > 2 seconds
 |
1. Short press to turn on, long press to turn off; 2: When turned off, long press to enter setup; 3: In settings, short press to change parameter; |
 |
1.When turned on, long press to enter calibration mode. 2.In calibration mode, short press to finish calibration; 3.In settings, short press to confirm changes. |
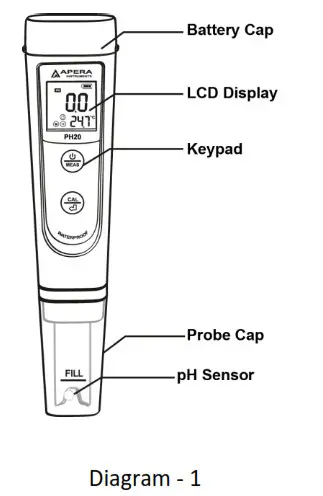
What’s in the Kit?

Preparation before Use
Things needed in addition to what’s in the box
A cup of distilled water (8-16oz) for rinsing the probe, and clean tissue paper for removing excess water.
■ Note
Before shipment, the factory adds some water droplets to the tester’s cap to maintain a hydrated atmosphere for the probe. This ensures that the pH sensor keeps its sensitivity.
Therefore, users can begin using their tester immediately upon receiving it. This practice of adding several drops of water into the cap is highly recommended for frequent users when storing the tester. However, if the tester has not been used for a long time (e.g. > 1 month) and doesn’t perform as well as it used to be, users can soak it in a 3M KCL (SKU: AI1107) solution overnight to recover its sensitivity.
* DO NOT use any other brand’s storage solutions because different chemicals may be used and potential damage could be caused to the probe.
Calibration
1) Short press to turn on. Rinse in distilled water; use a clean tissue to dap off excess water.
2) Long press![]() to enter calibration mode (short press to go back to measurement mode if you want to cancel the calibration).
to enter calibration mode (short press to go back to measurement mode if you want to cancel the calibration).
3) Insert the probe in the 7.00 pH calibration solution to start 1 st point calibration; Stir gently; leave it to stand; Wait for ![]() to appear and stay on the screen (see Diagram 3); short press
to appear and stay on the screen (see Diagram 3); short press![]() to finish 1st point calibration; tester returns to measurement mode; calibration M icon displays on the button left side of the screen.
to finish 1st point calibration; tester returns to measurement mode; calibration M icon displays on the button left side of the screen.
4) Rinse the probe in distilled water. Long press ![]() to enter calibration mode; insert the probe in the pH 4.00 calibration solution to start the 2 nd point calibration, stir gently; leave it to stand; wait for to appear and stay on the screen; then short press
to enter calibration mode; insert the probe in the pH 4.00 calibration solution to start the 2 nd point calibration, stir gently; leave it to stand; wait for to appear and stay on the screen; then short press![]() to finish the 2nd point calibration, tester returns to measuring mode, calibration icons L M display on the bottom left.
to finish the 2nd point calibration, tester returns to measuring mode, calibration icons L M display on the bottom left.
5) Repeat step 4) and use 10.01 pH standard buffer (sold separately) to perform 3 rd point calibration L M H. will show up on the bottom left.

■ Notes
a) Tester will automatically recognize pH buffer solution, users can choose calibration points: 1 point, 2 points, or 3 points. But the 1st point calibration must be in calibration solution of 7.00 pH, then followed by 2nd or 3rd point calibration. For details, please refer to the following table:
| Calibration Solution | Calibration icon | When to do | |
| 1-point Calibration |
7.00 pH | M | Required Accuracy.? 0.3 pH |
| 2-point Calibration |
7.00 pH and 4.00 pH | L M | Target pH level< 8.5 pH |
| 7.00 pH and 10.01 pH | L M | Target pH level> 8.5 pH | |
| 3-point Calibration |
7.00 pH, 4.00 pH and 10.01 pH |
L M H | Wide measuring range |
b) Automatic self-diagnostic information: In calibration mode, when the measured value hasn`t been stable yet (![]() is not staying on LCD), pressing
is not staying on LCD), pressing ![]() will cause LCD to display
will cause LCD to display
“Er2”). For more details, please refer to Section 8.
c) Only pH 4.00 and pH 7.00 buffer solutions are included in the test kit, pH 10.01 is not.
Users can purchase it separately if needed (when your target pH level is >8.5 pH).
d) Keeping the standard calibration buffers in good condition is the foundation of taking reliable pH measurements. The bottled buffers (2 oz.) can be used for about 10 times as long as they are not contaminated (make sure they are tightly closed when not in use).
After that, we recommend replacing them with fresh ones to keep the accuracy.
Measurement
- Short press to turn on the tester. Rinse the probe in distilled water. Then shake off excess water and dap with tissue paper.
- Stir the probe in your sample solution to accelerate stabilization and leave it to stand.
Record the readings after comes up and stays on the screen.
■ Notes
a) After each test, users should rinse the pH probe thoroughly with distilled water or purified water and remove excess water before the next test. Warm soap water and a
soft brush can be used to remove tough contaminants on the glass sensor.
b) When testing purified water like RO water or distilled water, it will take longer for the readings to get fully stabilized (typically 2-5 minutes).
c) Do NOT store the probe in purified water because that will cause permanent damage to the pH electrode. Purified water is only recommended for rinsing the probe.
Parameter Setting
Settings table
| Prompt Mark | Parameter Setting Content | Code | Factory Default Setting |
| P1 | Select pH buffer series | USA — NIST | USA |
| P2 | Select temperature unit | °F — °C | °F |
| P3 | Back to the factory default setting (erase calibration record) |
No — Yes | No |
Parameter Setting
When turned off, long press to enter setup → short press![]() to switch P1-P2-P3→ Short press, parameter flashing →short press to choose, short press
to switch P1-P2-P3→ Short press, parameter flashing →short press to choose, short press![]() to confirm parameter change →Long press to go back to measurement mode.
to confirm parameter change →Long press to go back to measurement mode.
Parameter Setting Instruction
Select standard pH buffer solution (P1): There are two options of standard buffer solutions: USA series and NIST series (refer details to the following table).
| Icons | pH standard buffer series | ||
| USA series | NIST series | ||
| Three-Point calibration | L | 4.00 pH | 4.01 pH |
| M | 7.00 pH | 6.86 pH | |
| H | 10.01 pH | 9.18 pH | |
Common Problems
The tester has a self-diagnosis function to help you fix common problems:
| Symbol | Self-Diagnosis information | How to fix |
 |
Wrong pH calibration solution, which exceeds the recognizable range of the meter. | 1. Check if the correct buffer is used (1st point calibration must be 7.00 pH). 2.Check if the buffer is expired or contaminated. 3. Check if the probe is damaged. 4. Check if there is an air bubble in the glass bulb sensor |
 |
Wait for the smiley face to appear and stay, then press |
* If any air bubbles are found inside the sensor shield, shake the probe in sample solution with force to remove them. The existence of air bubbles will cause unstable measurements.
* For more FAQs, go to support.aperainst.com
Technical Specifications
| pH | Range | 0 — 14.0 pH |
| Resolution | 0.1 pH | |
| Accuracy | ±0.1 pH | |
| Calibration Points | 1 — 3 points | |
| Automatic Temperature Compensation | 0 — 50°C (32 — 122°F) | |
| Temperature | Range | 0 — 50°C (32 — 122°F) |
| Resolution | 0.1 °C | |
| Accuracy | ±0.5°C |
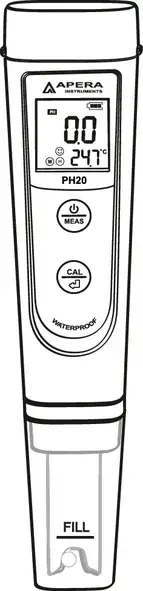
Icons and Functions
8.1 Calibration points indication: L M H
8.2 Stable Measurement: ![]() appears and stays on the screen
appears and stays on the screen
8.3 Self-Diagnostic information: Er1, Er2
8.4 Low-Voltage warning: flashes, a reminder of battery replacement ![]()
8.5 Auto Power-Off in 8 minutes if no operation.
Warranty
We warrant this instrument to be free from defects in material and workmanship and agree to repair or replace free of charge, at the option of APERA INSTRUMENTS, LLC, any malfunctioned or damaged product attributable to the responsibility of APERA INSTRUMENTS, LLC for a period of TWO YEARS (SIX MONTHS for the probe) from the delivery. This limited warranty does not cover any damages due to: Transportation, storage, improper use, failure to follow the product instructions or performing any
preventive maintenance, modifications, combination or use with any products, materials, processes, systems or other matter not provided or authorized in writing by us, unauthorized repair, normal wear, and tear, or external causes such as accidents, abuse, or other actions or events beyond our reasonable control.
APERA INSTRUMENTS, LLC
Address: 6656 Busch Blvd, Columbus Ohio 43229
Tel: 1-614-285-3080
Email: [email protected]
Website: aperainst.com