
instruction manual
ART-712SB
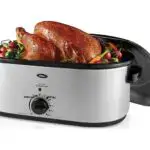
Roaster Oven
Questions or concerns about your Aroma product?
www.AromaCo.com/Support
1-800-276-6286
|
|
|
|
|
|
Here at Aroma, we strive to make a difference —to design and distribute products that enhance and enrich people’s lives.
The aroma offers an array of exceptional products to make cooking simple and satisfying. Discover other countertop appliances and cookware from our current product lineup to complement your kitchen.
Stay connected for more recipe ideas and monthly giveaways!
/AromaHousewares
Basic safety precautions should always be followed when using electrical appliances, including the following:
- Important: Read all instructions carefully before first use.
- Do not touch the hot metal surfaces. Use handles or knobs.
- To protect against electrical shock, do not immerse the appliance, cord, or plug in water or other liquid. See instructions for cleaning.
- Close supervision is necessary when any appliance is used by or near children. This appliance is not intended to be used by children.
- Unplug from outlet when not in use and before cleaning. Allow cooling before putting on or taking off parts, and before cleaning the appliance.
- Do not operate any appliance with a damaged cord or plug or after the appliance malfunctions or has been damaged in any manner. Contact Aroma Customer Service for examination, repair, or adjustment.
- The use of accessory attachments not recommended by Aroma Housewares may result in fire, electrical shock, or injury.
- Do not use outdoors.
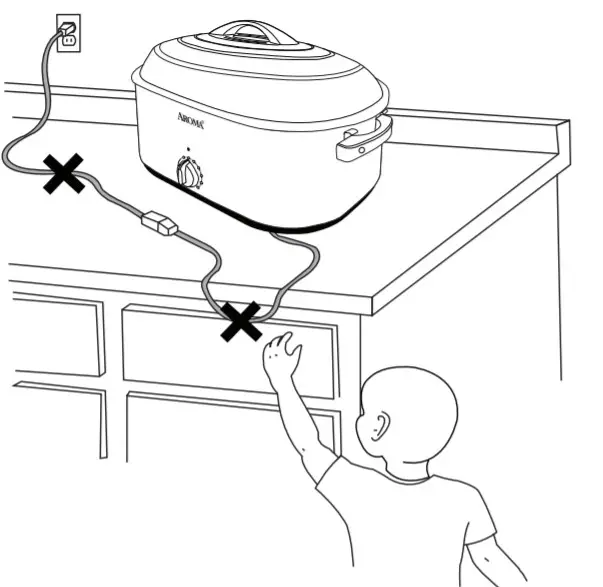
- Do not let the cord touch hot surfaces or hang over the edge of a counter or table.
- Do not place on or near a hot gas or electric burner or in a heated oven.
- Extreme caution must be used when using or moving an appliance containing hot oil or other hot liquids.
- Do not use the appliance for anything other than its intended use.
- Do not clean with metal scouring pads Pieces may break off the pad and touch electrical parts, creating a risk of electric shock.
- Be sure to use it on a dry, level, and heat-resistant surface.
- Keep at least 4 inches away from walls and other flammables in a well-ventilated area.
- Prior to plugging an appliance into the wall outlet, ensure the Temperature Control Dial is set to the Min position. To disconnect, turn the temperature control
to the Min position, and then remove the plug from the wall outlet. - Do not store any materials, other than those accessories recommended by Aroma Housewares, in this oven, when not in use.
- Use only with a 120V AC power outlet.
- The Roaster Oven should be operated on a separate electric circuit from other operating appliances. If the electric circuit
is overloaded with other appliances, this the appliance may not operate properly. - Always make sure the outside of the removable Enameled Cooking Pan is dry prior to use. If the cooking pan is returned to the Roaster Oven when wet, it may damage or cause the product to malfunction.
- To reduce the risk of electric shock, cook only in the removable Enameled Cooking Pan provided.
- Oversize foods or metal utensils must not be inserted in the Roaster Oven as they may create a fire or risk electric shock.
- A fire may occur if the Roaster Oven is covered by or touching flammable materials, including curtains, draperies, walls, and the like, when in operation. Do not store any item on top of the appliance when in operation.
- Do not cover any part of the Roaster Oven with metal foil. This will cause overheating of the Roaster Oven.
- Use extreme caution when opening the Lid during or after cooking. Hot steam will escape and may cause scalding
- To disconnect, first, turn the temperature control to the Min position, then remove the plug from the wall outlet. Never pull on the cord.
- Use oven mitts when removing the Enameled Cooking Pan and/or cooked food from the Roaster Oven.
- Do not wrap or tie the cord around the appliance.
- Some countertop surfaces are not designed to withstand the prolonged heat generated by certain appliances. Use only on a flat, heat-resistant surface.
SAVE THESE INSTRUCTIONS
Short Cord Instructions
- A short power-supply cord is provided to reduce the risks resulting from becoming entangled in or tripping over a longer cord.
- Longer extension cords are available and may be used if care is exercised in their use.
- If a longer extension cord is used:
a.) The marked electrical rating of the extension cord should be at least as great as the electrical rating of the appliance.
b.) The longer cord should be arranged so that it will not drape over the countertop or tabletop where it can be pulled by children or tripped over unintentionally.

DO NOT DRAPE THE CORD!
KEEP AWAY FROM CHILDREN!
Polarized Plug
This appliance has a polarized plug (one blade is wider than the other); follow the instructions below:
To reduce the risk of electric shock, this plug is intended to fit into a polarized outlet only one way. If the plug does not fit fully into the outlet, reverse the plug. If it still does not fit, contact a qualified electrician. Do not attempt to modify the plug in any way.
If the supply cord is damaged, it must be replaced by the manufacturer, its service agent, or a similarly qualified person in order to avoid a hazard.
THIS APPLIANCE IS FOR HOUSEHOLD USE ONLY.
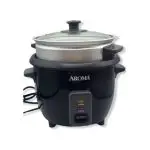
Parts Identification
Controls/Functions
| Temperature Dial | Keep Warm | Defrost |
| Manually set to the desired temperature between 150°F-450°F. | Manually set the temperature to keep food warm between 125°F-175°F. | Defrost frozen food at 275°F. |
Before First Use
- Read all instructions and important safeguards.
- Remove all packaging materials and check that all items have been received in good condition.
- Tear up all plastic bags and dispose of them properly as they can pose a suffocation or choking risk to children.
- Wash the removable Lid and all other accessories in warm, soapy water. Rinse and dry thoroughly.
- Remove the Roasting Rack from the Roaster Oven and clean with warm, soapy water. Rinse and dry thoroughly before returning to the roaster.
- Wipe body clean with a damp cloth.
Note: Do not use harsh abrasive cleaners, scouring pads, or products that are not considered safe to use on nonstick coatings. Any other servicing should be performed by Aroma® Housewares.
Preheating Your Roaster Oven
Due to the manufacturing process, slight smoke and odor may be emitted during the first use, which is normal. We RECOMMEND preheating the Roaster Oven prior to the first use in order to eliminate the smoke and odor.
- Ensure the Temperature Control Dial is set to the Min position and plug into a 120V AC outlet.
- Preheat the oven for 30 minutes at 400°F, or until smoke and/or odors have completely dissipated.
To preheat, turn the Temperature Control Dial to 400°F. The indicator light will illuminate while the Roaster Oven is preheating. - Turn the Temperature Control Dial to the Min position and it is ready for you to use.
To Clean
- Turn the oven off by Setting the Temperature Control Dial to Min and unplugging the power cord from the electrical outlet. Allow the oven to cool completely
- After the Roaster Oven has cooled completely, clean the Enameled Cooking Pan and Roasting Rack thoroughly with warm, soapy water and a damp sponge or cloth.
- For tough cleaning jobs, pour 2 inches of water into the Enameled Cooking Pan. Let soak until the mess easily wipes out.
Using The Roaster Oven
- Place the Enameled Cooking Pan into the Roaster Oven Body. Place the Lid on the Enameled Cooking Pan.
- Set the Temperature Control Dial to the Min position.
- Plugin the power cord into a 120V AC wall outlet.
- Preheat the Roaster Oven to the desired temperature.
- Once the oven has reached the desired temperature, carefully remove the Lid and place it on the convenient Lid Holder (see “Figure A” to the right for details). Next,
- Once the food has reached the desired doneness, turn the Temperature Control Dial to the Min position and unplug.
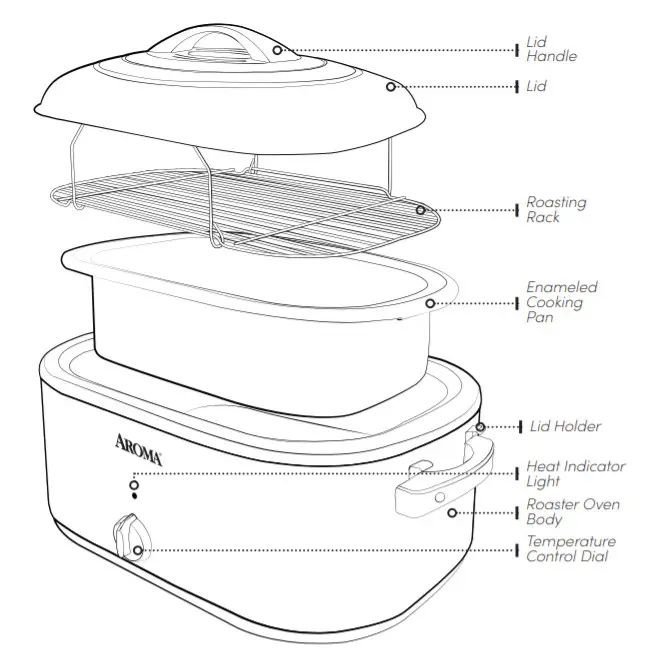 Fig. A
- The Lid Holder offers a safe and convenient way to rest the Roaster Oven’s Lid.
- With the handle of the Lid facing down, attach the end of the Lid down to two hooks located directly above the Roaster Oven’s handles.
Using The Keep Warm Setting
- Follow steps 1-5 in “Using the Roaster Oven” on page 7.
- When the cooking is done, switch the Temperature Control Dial to the desired Keep Warm setting (125°F-175°F).
- The roaster will maintain the selected temperature until you are ready to serve.
- When finished serving, turn the Temperature Control Dial to the Min position and unplug.
Using The Defrost Setting
- Insert the Enameled Cooking Pan and Roasting Rack into the Roaster Oven Body. Turn the Temperature Control Dial to Defrost and preheat for 15-20 minutes.
- Place your unwrapped frozen turkey on the Roasting Rack and cover with the Lid.
- Once legs and thighs have reached 90°F-100°F, use a baster to remove any excess liquid or ice chunks remaining in the cavity.
- When you are done defrosting, turn the Temperature Control Dial to 325°F to begin roasting your turkey. Your turkey will be finished once the breast reaches 165°F and the legs and thighs reach 175°F.
Note:
Using a reliable meat thermometer to check to defrost temperatures from time to time is important. However, refrain from opening the lid too many times in order to prevent heat loss inside the Roaster Oven.
Cooking Instructions
| Type Of Cooking | Temp | Preparation Instruction |
| Bake | Desired Temperature | Food can be baked in a heat-safe bowl or pan. Food can be left uncovered or covered with aluminum foil depending on preference. |
| Roast | Desired Temperature | When roasting poultry or meat with a medium to high-fat content, add 2 cups of water to the bottom of the Enameled Cooking Pan to prevent drippings from burning and creating smoke. When roasting, there is no need to preheat, baste, or turn. |
Caution:
During and after use, the Enameled Cooking Pan and other parts will become very hot. Be sure to use the handles and wear protective oven mitts or gloves.
NEVER FILL THE ROASTER OVEN WITH OIL. THIS APPLIANCE IS NOT INTENDED TO BE USED AS A DEEP FRYER.
Note:
Wooden, heat-proof plastic, or nylon utensils are recommended for use with this Roaster Oven. Some metal utensils may scratch the Enameled Cooking Pan.
Cooking & Baking
Cooking/Roasting Guide
| Food | Temp | Minutes Per Pound | Time |
| Whole Turkey, 10-22 lbs | 350°F – 400°F | 13 to 18 | 2 to 31/2 hrs |
| Whole Chicken, 4-6 lbs | 450°F | 15 to 18 | 1 to 11/2 hrs |
| Whole Duck, 4-6 lbs | 325°F – 350°F | 18 to 24 | 11/4 to 3 hrs |
| Beef, 3-5 lbs | 325°F – 350°F | 15 to 20 | 3/4 to 13/4 hrs |
| Pork, 3-5 lbs | 325°F – 350°F | 20 to 35 | 1 to 21/4 hrs |
| Lamb, 5-8 lbs | 325°F – 350°F | 20 to 30 | 11/2 to 31/2 hrs |
| Ham, 6-9 lbs | 325°F – 350°F | 15 to 25 | 11/2 to 31/2 hrs |
Baking
| Food | Temperature | Time |
| Bread | 375°F | 45-75 min |
| Pie | 375°F | 45-60 min |
| Cake | 325°F | 45-60 min |
| Cookies | 375°F | 10-15 min |
| Rolls | 375°F | 15-20 min |
| Muffins | 400°F | 20-25 min |
Note:
These charts are for reference only. As meat temperature, thickness, bone content, ingredients of stuffing, etc. may affect the actual cooking time. Always make sure foods are cooked thoroughly to prevent food-borne illness.
Caution:
During and after use, the Roasting Rack and other parts will become very hot. Be sure to use the handles and wear protective oven mitts or gloves.
NEVER FILL THE ROASTER OVER WITH OIL. THIS APPLIANCE IS NOT INTENDED TO BE USED AS A DEEP FRYER.
Helpful Hints
The indicator light will shut off when the oven has reached the selected temperature. During operation the light will turn on and off to indicate that the proper temperature is being maintained Always preheat the oven, unless the recipe specifies otherwise. Repeatedly removing the Lid will result in a loss of heat and steam and may result in increased cooking time. If adding liquid, for example, broth, to enhance flavor do so during the last 30 minutes of cooking. Since the thickness and condition of meat may vary, check the meat 10 to 15 minutes before the recommended finishing time to ensure the best results. Use a meat thermometer to measure internal meat temperature toward the end of the looking cycle.
Caution:
Be sure to fully cook all meat according to internal meat temperature as recommended by www.foodsafety.gov
Recipes
Teriyaki Roast Chicken
| 1 | whole chicken (about 4 lbs.) |
| ½ cup | soy sauce |
| ¼ tsp | garlic salt |
| ¼ tsp | white pepper powder |
| ¼ cup | dry sherry |
| ¼ cup | sugar |
| 3 slices | fresh ginger root |
| 1½ tsp | honey |
| 3 tbsp | water |
| 1½ tbsp | cornstarch |
Wash the whole chicken; rinse well and pat dry. Set aside. Combine soy sauce, garlic salt, white pepper powder, dry sherry, ginger, and sugar in a small saucepan. Boil and simmer over medium heat for 2-3 minutes. Mix water with cornstarch and stir in to thicken the sauce. Set aside to cool. Place the chicken in a large bowl. Brush or rub the sauce all over
the chicken, inside and out. Cover and refrigerate for 2 hours. Place the chicken on the Roasting Rack. Roast at 325°F for approximately 1½ hours.
SERVES 4.
Roast Lamb
| 1 | leg of lamb (5-6 lbs.) |
| 1½ | large onions, thinly sliced |
| 6-May | cloves garlic, chopped |
| 1/3 cup | extra virgin olive oil |
| ½ cup | dry red wine |
| ½ cup | light soy sauce |
| 2½ tsp | fresh thyme |
| – – | salt and freshly ground black pepper |
Preheat the oven to 325°F. Wash and trim the thicker portions of fat from the lamb. Marinate lamb with all ingredients, except onions. Cover and refrigerate overnight. Take the meat out from the marinade, saving the remaining marinade for basting. Place sliced onions on the meat. Place the lamb on the Roasting Rack. Roast for approximately 1½ to 3½ hours, until done. Baste periodically with reserved marinade. After cooking is complete, let the lamb sit for 5-10 minutes before slicing.
SERVES 6.
NOTES
Limited Warranty
Aroma Housewares Company warrants this product against defects in material and workmanship for one year from the provable date of purchase in the United States.
Within this warranty period, Aroma Housewares Company will repair or replace, at its discretion, defective parts at no charge, provided the product is returned, freight prepaid with proof of purchase, and the U.S. $25.00 for shipping and handling charges payable to Aroma Housewares Company. Before returning an item, please call the toll-free number below for a return authorization number. Allow 2-4 weeks for return shipping.
This warranty does not apply if the warranty period expired; the product has been modified by any unauthorized service center or personnel; the defect was subject to abuse, improper use not conforming to product manual instructions, or environmental conditions more severe than those specified in the manual and specification, neglect of the owner or improper installation; the defect was subject to Force Majeure such as flood, lightning, earthquake, other natural calamities, war, vandalism, theft, brownouts or sags (damage due to low voltage disturbances).
This warranty gives you specific legal rights, which may vary from state to state, and does not cover areas outside of the United States.
Note:
Proof of purchase is required for all warranty claims.
Service & Support
In the event of a warranty claim, or if service is required for this product, please contact Aroma® customer service toll-free at:
1-800-276-6286
M-F, 8:30am-4:30pm, Pacific Time
Or we can be reached online at:
[email protected]
For your records, we recommend stapling your sales receipt to this page along with a written record of the following:
· Date of Purchase:
· Place of Purchase:
Aroma Housewares Company
6469 Flanders Drive, San Diego, CA 92121, U.S.A.
1-800-276-6286 | www.AromaCo.com
M-F, 8:30 am – 4:30 pm, Pacific Time
Published By:
Aroma Housewares Co. | 6469 Flanders Drive, San Diego, CA 92121, U.S.A.
1-800-276-6286 | www.AromaCo.com
©2020 Aroma Housewares Company | All rights reserved.