
Astrolux FT03
The FT03 is a powerful EDC lamp. Rechargeable over Type-C 2A USB port It is fitted with one luminus SST40.2 and uses a NarsilM v1.3 Firmware.
USER MANUAL
Safety precautions
- Use only reputable 26650 cell of known origin. (Recommended unprotected >10A discharging current battery)
- Use a type-C cable for charging.
- Remove and recharge cells when the low voltage indication is given by the FT03 (4 blinks and repeated step-downs in light level and eventual shutdown of the light).
- The extraordinary energy density that 26650 cell offers also means that hazardous conditions are created when a cell is short-circuited or damaged. Always treat cells with respect and properly dispose of damaged cells.
- The FT03 is a very high-intensity flashlight. Do not point the lamp directly at a person, animal, moving vehicles or flammable materials.
- When running at higher output levels the head of the FT03 will quickly heat. This is normal. In warmer ambient conditions this temperature may exceed 60ºC, so please take the necessary precautions when handling the FT03.
Quick start
- Unscrew the tail-cap and insert a 26650 cell.
- Double check the polarity every time before
closing: The battery must point with plus (nipple) towards the head. - Screw the tail-cap back. The FT03 will flash twice when electrical contact is made. Continue to tighten the tail-cap to a gentle stop. Do not overtighten.
- All functions are performed using the single side button. Note that pressing this button continuously for more than 16 s enters the UI configuration settings (indicated by the light blinking). If this is done inadvertently, exit the configuration settings by simply releasing the button briefly then pressing it again continuously for about 4 s until all the resulting blinks stops.
- The FT03 comes factory-set to use the RAMPING UI: From OFF, press&hold the side button. The light output will ramp up from a very low level to full power. Release the button when the required light level is reached. (The full ramp takes about 3 s. To signal ‘End of Ramp’ it does a subtle blink ) Use a
single-click at any time to turn the FT03 OFF. Please see below for further details. - There is a very small drain on the battery while OFF. This should not be of any concern, but we recommend removing the cell (or partially loosening the tail-cap) if the FT03 will not be used for several months.
- If you transport this light in a bag use at least the electronic lock-out! It will burn things on higher levels!
Default UI: Smooth ramping
This feature-rich UI provides for smooth ramping of the light output between 0 and 50%, with an easilyaccessible 100% TURBO mode.
Turn the FT03 ON: single-click the button, FT03 turns ON using the previously used light output level
Ramp light level: press&hold button
Reverse ramp: while ramping in one direction, release button briefly and press&hold again
Instant TURBO: double-click
Turn the Lamp OFF: single-click
MOON mode: from OFF: press the button and release as soon as the FT03 turns on
Strobes: double-click for TURBO, and then double-click again
The strobes are deactivated by default. To enable strobes you must klick 3 times in setting #4 (ramping) or setting #8 (modes). (Use single-clicks to cycle forward through the different types of strobes, but you have to be quick: If resting on a strobe longer than 1.2 s it locks in and the next single-click is OFF. Press & hold at any time to cycle backwards through the strobes.)
Alternative UI: Mode-sets
The FT03 is factory-set to operate using the contemporary RAMPING user interface, as described in the previous section. However, the FT03 can also be operated using a more conventional MODE-SET style user interface. (See next section for detail on how to set UI options). Using the MODE-SET UI the output does not ramp, it steps from one mode to the next using single-clicks.
- Turn the FT03 ON: single-click
- Next mode: single-click before the current mode ‘locks in’ (1.2 s)
- Previous mode: press & hold
- Last mode [100%]: from OFF: press & hold
- Turn the Lamp OFF: single-click button, after resting on a mode more than 1.2 s (mode locked in)
- Strobes: press & hold
The strobes are deactivated by default. To enable strobes you must klick 3 times in setting #4 (ramping) or setting #8 (modes). (Use single-clicks to cycle forward through the different types of strobes, but you have to be quick: If resting on a strobe longer than 1.2 s it locks in and the next single-click is OFF. Press & hold at any time to cycle backwards through the strobes.) - Battery status: from OFF: single-click followed by press & hold (4 blinks, a short pause, then 1 blink would indicate 4.1 V average per cell, for example)
- Electronic lock-out: from OFF: double-click followed by press & hold, same to reenable the FT03
- Factory reset: from OFF, single-click followed by a press & hold (battery status mode), then double-click (driver temperature mode), DoubleClick again (firmware version mode), then press & hold for about 2 s. Four blinks confirm a successful reset.
Advanced operation
By default the FT03 is set to suit most users and applications, but several settings are user-configurable. To enter the configuration settings, press&hold the button for about 16 s (3 s if in the MODE-SET UI), do not release until a double flash followed by a single blink is seen. The single blink is the prompt for the first setting. Click the button as many times as required for that setting, or leave the setting alone and simply wait for the next double flash, this time followed by two blinks, indicating that we are now at setting #2, etc.
The FT03 confirms each click with a blink. A press & hold skips to the next setting. A continuous press exits the setup menu completely. Four blinks indicate that the setup is completed.
The available settings differ, depending if the FT03 is currently set to the RAMPING UI or the MODE-SET UI. Note that changing setting 1 flips to the other UI and immediately kicks you into the table for that UI: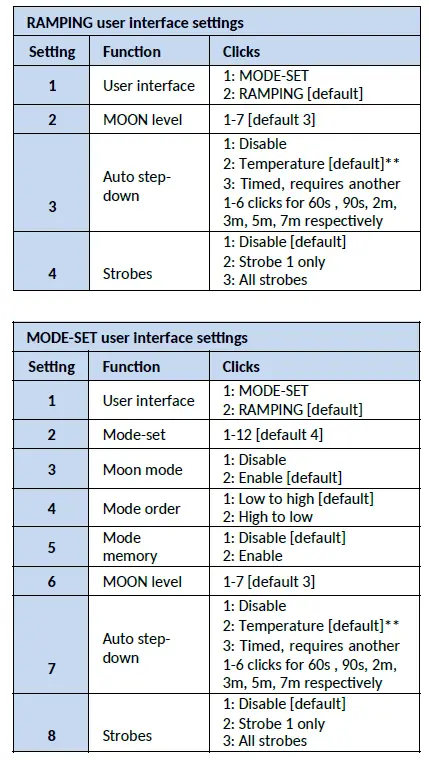
** If [temperature] is selected for auto step-down, the FT03 goes to 100% output. Leave the lamp to heat to the desired limit, and then click to set that temperature as the trip point (this can take a minute, use fresh cells for this). Or click within 5 s to keep previous setting.
The mode-sets have been selected to suit a high-power thrower like the FT03: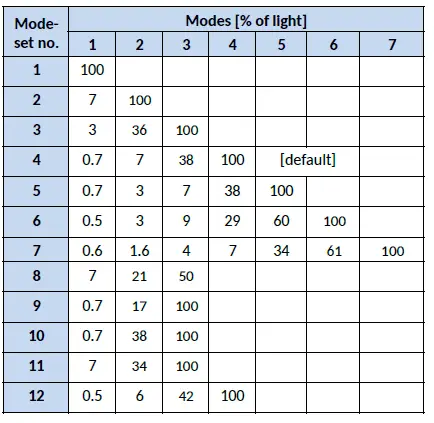
Note that MOON mode is enabled by default, adding one extra mode (mode 0) to the above.
Pre-programmed strobes (disabled by default):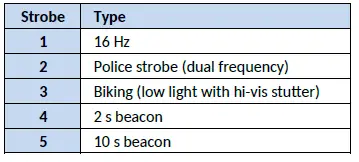
Additional UI settings are available to control the button back-light. While in the battery check mode, press&hold the button. A double flash followed by a single blink is again the prompt for the first setting: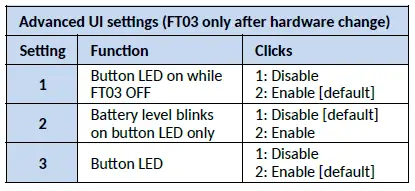
Specifications
- Emitter: one LED, cool white or neutral white , mounted on copper DTP MCPCB
- Flux: 2400 lumen
- Intensity: 190,000cd
- Range: 875 meters
- Firmware: Tom E’s open-source GPL NarsilM v1.3 adapted by Texas_Ace
- User interface:
- By default the FT03 is set to use the very intuitive Narsil smooth RAMPING UI. Instant access to a TURBO mode is also provided.
- A more conventional discrete level MODE-SET UI is available as an alternative. Any one of 12 predefined mode-sets can be selected.
- MOMENTARY mode is useful for signaling purposes or rapidly/briefly lighting up targets.
- Battery: One 26650 cell (or a 21700/18650 cell) Cells are not included.
- Driver: Texas Avenger FET Driver with charging
- Reflector: High quality smooth reflector
- Lens: Glass with anti-reflective coating
- Body: Aluminum alloy with Type III hardcourt anodizing
- Button: Silicone rubber
- Ingress rating: Equivalent to IPX7, do not immerse in liquids
- Impact resistance: Up to 1.5 meters
- Weight: Approximately 496g without cells
- Dimensions: 170mm*69.5mm*34.5 (length*head diameter*body diameter)
Charging
Battery is not included. Over-discharging and overcharging protection Use a type-c USB cable to charge the light. The red light indicates it is charging. When the LED-Switch turns green unplug the charger.
Notice: When battery is over 4.0v, it cannot be charged by type-c usb port because of the protection of charging chip, it can be charged continuously from low voltage to 4.2v (Do not unplug the cable, or it cannot be charged when plugging in again if battery is over 4.0v)