Clock Radio Projection – Hi-Lo Dimmer
![]()
EN Instruction Manual
Clock radio
Projection – hi-lo dimmer
CL-1492
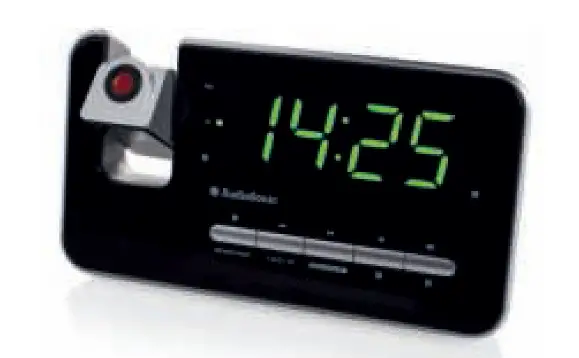
PARTS DESCRIPTION
Instruction manual
SAFETY
- By ignoring the safety instructions the manufacturer can not be hold responsible for the damage.
- If the supply cord is damaged, it must be replaced by the manufacturer, its service agent or similarly qualified persons in order to avoid a hazard.
- Never move the appliance by pulling the cord and make sure the cord can not become entangled.
- To protect yourself against an electric shock, do not immerse the cord, plug or appliance in the water or any other liquid.
- Within an equilateral triangle, is used to indicate that a specific component shall be replaced only by the component specified in that documentation for safety reason.
LIGHTNING FLASH WITH ARROWHEAD SYMBOL within an equilateral triangle, is intended to alert the user to the presence of uninsulated dangerous voltage within the products enclosure that may be of sufficient magnitude to constitute a risk of electric shock to persons.
- The mains plug is used as the disconnect device and it shall remain readily operable. To completely disconnect the power input, the Mains plug of the apparatus must be disconnected from the mains Completely. The mains plug should not be obstructed or should be Easily accessed during intended use.
PARTS DESCRIPTION
- Projection On/Off
- Projection 180° flip
- Snooze/ Sleep/ Dimmer/DST
- On/ Off/ Alarm off
- MEM/ M+/ NAP
- Tune / year/ month/ day
- Tune +/ Display auto off
- Alarm 1/ Volume down
- Alarm 2/ Volume up
BEFORE THE FIRST USE
- This unit is equipped with a battery backup system, which requires a CR2032 lithium battery (not included). Place the battery in the battery compartment and make sure that the + and battery terminals correspond with the symbols in the battery compartment. If an AC power failure occurs, the clock will automatically switch to the battery power and the internal clock memory will continue running (note that the display is switched off and the radio won’t operate). When the AC power resumes, the unit automatically switches back to the AC power and will return to normal operation.
USE
- Press and hold the “MEM/M+” button in standby mode to enter time set mode, use the tune buttons to adjust the settings. Press the “MEM/M+” button to change the mode cycle as follows: Year date 12/24 H format Real time Hour Real time Min.
Alarm setting
- Press the “alarm 1/2” button in standby mode to show the alarm time. Press, and press immediately again and hold (when the alarm time is still displayed) to enter the alarm set mode. Use the tune buttons to adjust the settings, press the alarm set button to confirm and change the mode cycle as follows: Hour Min Weekday alarm wake tone wake radio volume. · Different weekday modes: 15: Monday to Friday 17: Whole week 67: Saturday & Sunday 11: One day of week Enable/ disable the alarm
- Press and hold the “alarm 1/ 2” button to enable or disable the alarm. Once the alarm is activated, the symbol will appear on the display. Snooze Function · When the alarm rings, press the “snooze” button to suspend the alarm & to activate the snooze function, Beep or Radio alarm will stop and will ring again after 9 minutes. Stop the alarm · Press the “on/ off” button to stop the alarm completely. Radio mode Note: Ensure that the FM antenna is completely unrolled and extended to have the best FM reception. · Press the Radio “on/ off” button to turn the unit on. · Use the “tune / +” button to select the desired radio station. Set and recall the radio presets · Press and hold the “memory” button “P01” will blink in the display. Use the “tune+/ ” button to select the desired preset station (P01P10). Press the “memory” button again to set the preset. · For recalling preset stations, press the “memory” button repeatedly to select the preset number. Dimmer control · In standby mode, press the “dimmer” button to set the brightness of the LCD display. Sleep operation · When you listen to the radio, press the “sleep” button to enter into the sleep mode. You can adjust the sleep timer from 90 minutes to 15 minutes by pressing this button repeatedly. When sleep timer is selected, the unit will automatically turn off once time is up. NAP timer function · Press the NAP button in standby mode, by pressing this button again the NAP time will change from 90 min. to 10 min. Projection · Press the “Projection On/off” button to activate the projection. Adjust the projection brightness/focus by turning the adjustment wheel under the projection lens. Press the “180° Flip” button to flip the projected time. Display auto off · Press and hold the “display auto off” button for 3 seconds, the indicator will light on, the LED display will automatically turn off after 15 seconds. Press any button to light up the LED display for 15 seconds. · Press and hold the “display auto off button” for 3 seconds, the LED display Indicator will light off to cancel this function.
GUARANTEE
- This product is guaranteed for 24 months granted. Your warranty is valid if the product is used in accordance to the instructions and for the purpose for which it was created. In addition, the original purchase (invoice, sales slip or receipt) is to be submitted with the date of purchase, the name of the retailer and the item number of the product.
- For the detailed warranty conditions, please refer to our service website: www.service.tristar.eu
ENVIRONMENT
Fixed width narrow, This appliance should not be put into the domestic garbage at the end of its durability, but must be offered at a central point for the recycling of electric and electronic domestic appliances. This symbol on the appliance, instruction manual and packaging puts your attention to this important issue. The materials used in this appliance can be recycled. By recycling of used domestic appliances you contribute an important push to the protection of our environment. Ask your local authorities for information regarding the point of recollection. Support You can find all available information and spare parts at service.tristar.eu!