AURIOL 4-LD5641 Radio Controlled Weather Station Instruction Manual

Important safety information
 WARNING! RISK OF INJURY!
This device may be used by persons (including children over 8 years of age) with reduced physical, sensory or mental abilities or lack of experience and knowledge, if they are supervised or instructed regarding the safe use of the device and understand the dangers that may arise. Children may not play with the device. Cleaning and user maintenance of the device may not be performed by children without supervision. Keep packaging films out of the hands of children. There is a danger of suffocation.
Important safety information for the batteries
WARNING! HEALTH HAZARD! RISK OF EXPLOSION!
Keep new and old batteries/rechargeable batteries out of reach of small children. If a battery/rechargeable battery is swallowed, medical help must be obtained immediately.
 The batteries/rechargeable batteries must always be inserted with the correct polarity. Clean the battery and device contacts beforehand if necessary. Do not attempt to recharge, short-circuit, or open the batteries/rechargeable batteries. Never heat the batteries/rechargeable batteries to recharge them. Do not expose the batteries to excessive heat such as sunshine, fire or the like. There is an increased risk of leakage! Never throw batteries/rechargeable batteries into fire, as they can explode. Improper use of the batteries/rechargeable batteries poses a risk of explosion and leakage of the battery fluid. If the batteries/rechargeable batteries should leak, avoid contact with skin, eyes and mucous membranes. Use gloves. In the event of contact with battery fluid, immediately rinse the affected areas with plenty of clean water and consult a doctor immediately. Remove exhausted batteries/rechargeable batteries from the device immediately, there is an increased risk of leakage.
Introduction
Congratulations on the purchase of your new weather station. You have chosen a high quality product. The instruction manual is part of the product- it contains important information about safety, use and disposal. Read the manual with all usage and safety notes before using the weather station. Only use the weather station in the intended way and for the intended applications. If the weather station is given to someone else, include all documentation with the weather station. Please keep the packaging and the instruction manual for future reference.
Intended use
This electronic appliance is intended for time display and the described additional features. Any other use or modification of the electronic appliance does not comply with the intended uses. The manufacturer is not liable for damages caused by improper use or misuse. The device is not intended for commercial use.
Scope of delivery
Note: Please check the scope of delivery after purchase. Make sure that all parts are present and not defective. If the delivery is incomplete and/or parts are damaged, do not use the weather station. Contact the service department (see “Warranty case processing”).

- 1 x Weather station
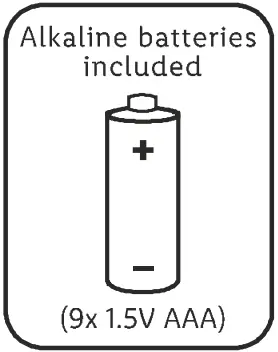
- 3 x Battery 1.5 V AAA LR03
- 3 x Sensors for indoor or outdoor use
- 6 x Batteries 1.5 V AAA LR03
- 4 x Anchor/dowel
- 4 x Screws
- 1 x Instruction manual
Specifications
Weather station
- DCF77 radio time signal
- Measuring range/temperature: 0 – 50 °C
- Temperature display/tolerance: +/- 1 °C (0 – 40 °C); +/- 1,5 °C (40 – 50 °C)
- Measuring range/humidity: 20 – 95 %
- Humidity display/tolerance: +/- 5 % (30 – 80 %); +/- 8 % (20 – 30 %, 80 – 95 %)
- Dimensions: approx. 10,9 x 11,9 x 2,5 cm
- Weight: approx. 168 g (excl. batteries)
- Battery: 3 x 1.5 V AAA R03/LR03
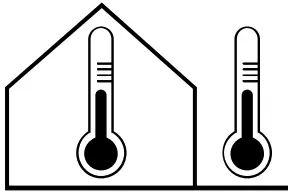
Outdoor sensor
- Measuring range/temperature: -20 – 50 °C
- Temperature display/tolerance: +/- 1 °C (0 – 40 °C); +/- 2 °C (-20 – 0 °C, 40 – 50 °C)
- Measuring range/humidity: 20 – 95 %

- Humidity display/tolerance: +/- 5 % (30 – 80 %); +/- 8 % (20 – 30 %, 80 – 95 %)
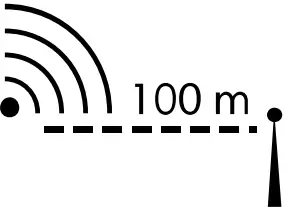
- Range: max. 100 m
- Frequency: 433 MHz
- Transmission power: 0.024 W
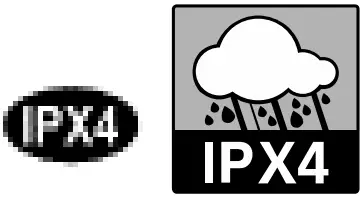
- Protection offered by the case (outdoor sensor): IPX4 (Water resistant according to IEC norm 60529)
- Dimensions: approx. 9,6 x 5,0 x 3,0 cm
- Weight: approx. 46 g (excl. batteries)
- Battery: 2 x 1,5 V AAA R03/LR03
 Symbol for direct voltage
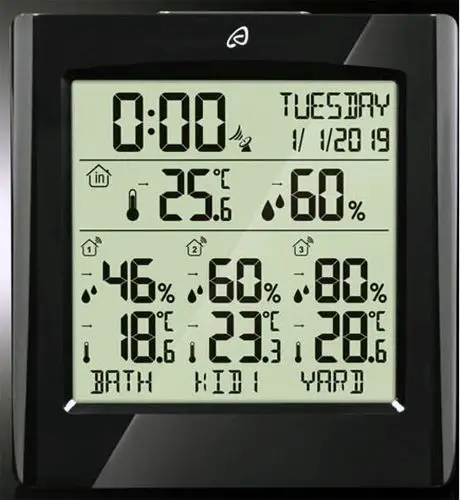
Display of the weather station
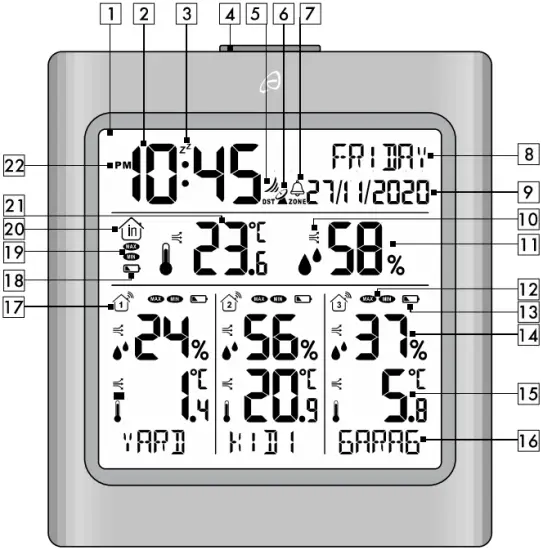
| 1 | Display | 2 | Time display |
| 3 | SNOOZE-symbol | 4 | SNOOZE/LIGHT-button |
| 5 | Radio wave symbol | 6 | Radio tower symbol |
| 7 | Bell symbol | 8 | Day of the week |
| 9 | Date (day/month/year) | 10 | Station trend symbol |
| 11 | Station humidity display | 12 | MAX/MIN-symbol sensors 1, 2, 3 |
| 13 | Battery level indicator sensors 1, 2, 3 | 14 | Humidity display sensors 1, 2, 3 |
| 15 | Temperature display sensors 1, 2, 3 | 16 | Room name sensors 1, 2, 3 |
| 17 | Reception and channel sensors 1, 2, 3 | 18 | Station battery level indicator |
| 19 | Station MAX/MIN- symbol | 20 | Station icon |
| 21 | Station temperature display | 22 | AM/PM-symbol |
Weather station controls
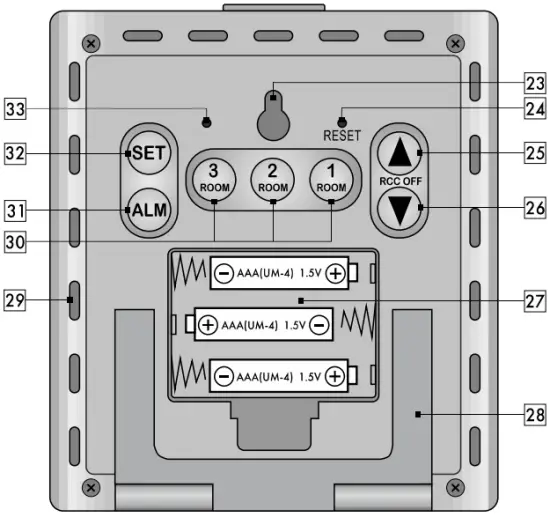
| 23 | Hole for wall mounting | 24 | RESET-button |
| 25 |  up-button up-button |
26 |  down-button/RCC OFF down-button/RCC OFF |
| 27 | Battery compartment | 28 | Folding stand |
| 29 | Ventilation slots | 30 | ROOM-1-3-buttons |
| 31 | ALM-button / alarm | 32 | SET-button |
| 33 | Buzzer |
Outdoor sensor
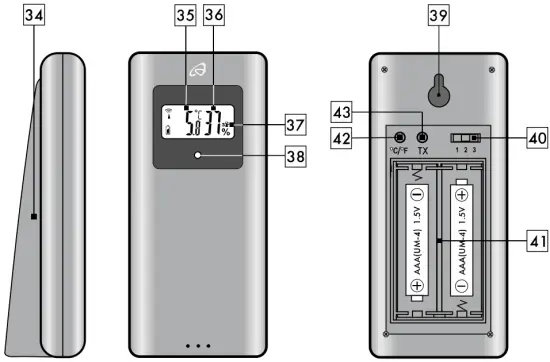
| 34 | Folding stand | 35 | Temperature display |
| 36 | Humidity display | 37 | Selected channel |
| 38 | LED operating indicator | 39 | Hole for wall mounting |
| 40 | Channel selection switch | 41 | Battery compartment |
| 42 | °C/°F-button | 43 | TX-button |
Securely placing or mounting the weather station
The weather station with outdoor sensor is not designed for operation in rooms with high humidity (i. e. bathroom). Use the included screws and anchors for wall mounting. Before mounting to a wall, make sure that there are no gas, water or electricity lines at the drilling location. Pay attention to the condition of the wall. The enclosed mounting material is not suitable for all types of walls. The manufacturer is not liable for any damage caused by improper mounting. Protect sensitive surfaces before setup, otherwise scratches may occur. Make sure that:
- sufficient ventilation is always guaranteed (don’t place the device on shelves or where curtains or furniture block the ventilation holes 29, and ensure that there are at least 10 cm of space on all sides);
- the device isn’t placed on a thick carpet or bed during operation, no direct heat sources (i.e. radiators) influence the device;
- no direct sunlight reaches the device;
- contact with splashing or dripping water must be avoided (don’t place any items filled with liquids, i.e. vases, onto or next to the device);
- the device doesn’t stand near magnetic fields (i.e. speakers);
- no foreign objects or dust penetrate the housing;
- candles and other open flames must be kept away from this product at all times to prevent the spread of fire.
Securely placing or mounting the outdoor sensor
Place the sensor in a location where it is protected from the weather, for example under an awning or carport. The sensor has an IPX4 rating and is therefore protected from water splashes. Use the included screws and anchors for wall mounting. Before mounting to a wall, make sure that there are no gas, water or electricity lines at the drilling location. Pay attention to the condition of the wall. The enclosed mounting material is not suitable for all types of walls. The manufacturer is not liable for any damage caused by improper mounting. Protect sensitive surfaces before setup, otherwise scratches may occur. Make sure that:
- the sensor hangs or stands upright;
- sufficient ventilation is always guaranteed (don’t place the device on shelves or where curtains or furniture block the ventilation holes, and ensure that there are at least 10 cm of space on all sides);
- no direct sunlight reaches the device;
- the device doesn’t stand near magnetic fields (i.e. speakers);
- no foreign objects or dust penetrate the housing;
- sensitive surfaces are protected before placement.
Setup
- Set a different channel 1-3 40 on each outdoor sensor.
- Insert batteries into the battery compartment 41 of the sensors first!
- Then insert batteries into the battery compartment 27 of the radio-controlled weather station.
 Remove the protective film from the radio controlled weather station and the sensors. Open the battery compartments 41 of the sensors 1-3. Set a different channel 1-3 40 on each outdoor sensor and insert 2 of the included 1.5 V AAA LR03 batteries into each compartment in the correct polarity.
The operating LED 38 will light up briefly and the temperature 35, the humidity 36 and the selected channel 37 will appear. Close the battery compartments 41.
Open the battery compartment 27 of the radio-controlled weather station and insert 3 of the included 1.5 V AAA LR03 batteries in the correct polarity. Close the battery compartment 27. A short beep will sound. The temperature 21 and the humidity 11 will appear. The radio tower symbol  6 will blink on the display and the radio-controlled weather station will receive the DCF77 radio signal. This process can take 3-10 minutes.
! Note: Please do not move the radio controlled weather station or the sensors during the reception process.
During the reception process, no buttons except the SNOOZE/LIGHTbutton 4 will function.
If the radio signal reception is successful, the time 2, the day of the week 8 and the date 9 will be set automatically and the radio control symbol 6 will appear on the display permanently.

During daylight saving time DST will appear on the display below the radio control symbol  6. The radio-controlled weather station will now receive the signals of the sensors 1-3. This process can take a few minutes. If reception is successful, the signal reception
  17 of each sensor 1-3, the current temperature 15 and the current humidity 14 will be displayed.
If reception is unsuccessful for 10 minutes, the radio control symbol 6 will disappear. Set the time manually (see Basic settings). The radio controlled weather station will attempt to receive the DCF77 radio signal at 01:00 o’clock, 02:00 o’clock and 03:00 o’clock. If the radio signal reception remains unsuccessful, the radio-controlled weather station will attempt to receive the signal again at 04:00 o’clock and 05:00 o’clock and correct the time automatically if reception is successful.
Time zone adjustment
If you are in a country, in which the current time differs from the received DCF77 time signal, use the time zone adjustment to set your radio controlled weather station to another time zone than the default setting (UTC + 1 = Central European Time). Set the difference in hours of your time zone (for example -01) to Central European Time. Press the SET-button 32 1 x long and 6 x short while in normal time display mode. The time zone (00) will blink on the display and can be set by pressing the up button 25 or the down button 26. Press the SET-button 32 to confirm your setting. The radio-controlled weather station will now immediately show the changed time (for example: one hour less). Press the SET-button 32 repeatedly until the normal time display is shown.
Reception problems
The DCF77 radio signal is transmitted from a location near Frankfurt am Main and can be received within a radius of approximately 1500 km around Frankfurt am Main. However, there are some obstacles and sources of interference, which may substantially hinder reception. If your weather station does not correctly receive the DCF77 radio signal, please hang or place the weather station in a different location at your site. Please note that devices such as computers, telephones, radios and televisions may cause electromagnetic radiation which can interfere with the DCF77 signal reception. Other possible detriments to reception are: strong building insulation (metal building materials), nearby mountains or atmospheric interference. It may also be necessary to replace the batteries.
Switch the DCF77 radio time signal reception on or off
 The DCF77 radio time signal reception can be turned off by pressing the up-button 25 and the down-button 26 (RCC OFF) together for 3 seconds. The radio tower symbol 6 will disappear.
The radio-controlled weather station will now no longer receive the DCF77 radio signal. DCF77 Radio signal reception can be turned back on by once again pressing the up-button 25 and the down-button 26 (RCC OFF) together for 3 seconds. The radio wave symbol 5 will disappear. The radio-controlled weather station will attempt to receive the DCF77 radio signal at 01:00 o’clock, 02:00 o’clock and 03:00 o’clock. If the DCF77 radio signal reception remains unsuccessful, the radiocontrolled weather station will attempt to receive the signal again at 04:00 o’clock and 05:00 o’clock and correct the time automatically if reception is successful. If reception is successful, the radio control symbol 6 will appear on the display permanently.
DCF77 radio signal reception can be restarted manually by pressing and holding the down-button 26 for 3 seconds. The radio control symbol 6 will blink and the radio controlled weather station will attempt to receive the DCF77 radio signal. This process can take 3 to 10 minutes.
If the radio signal reception is successful, the time 2, the day of the week 8 and the date 9 will be set automatically and the radio control symbol6 will appear on the display permanently. Radio reception has now been restored.
Speed setting
Press and hold the up-button 25 and the down-button 26 to use the speed setting feature when setting numerical values.
Basic settings
The following settings are available: Time, time format, date, time zone and language of the day of the week. Press and hold the SET-button 32 in normal time display mode for 3 seconds. The hours will blink and can be set by pressing the up-button 25 or the down-button 26. Press the SET-button 32 to confirm your setting. Set the minutes, 12/24-hour time format, year, month, day, time zone (00) ±12 hours and language of the day of the week (ENGLISH, GERMAN, ITALIAN, FRENCH, SPANISH, DANISH and SWEDISH) in the same way.
If no button is pressed within 30 seconds, the radio-controlled weather station will automatically return to the normal time display.
Light
Press the SNOOZE/LIGHT-button 4 to briefly activate the backlight.
12/24-hour time format
Press the SET-button 32 1 x long and 2 x short in normal time display mode. The 12- or 24-hour time format will blink and can be set by pressing the up-button 25 or the down-button 26. In 12 hour time format the display will show the AM-Symbol 22 before noon and the PM symbol 22 after noon. Press the SET button 32 repeatedly to return to normal time display mode.
Alarm

The radio-controlled weather station has an alarm feature. The pre-set alarm time is 06:00 o’clock. To activate or deactivate the alarm time, press the ALM-button 31 on the back side of the radio-controlled weather station. The display will switch to the alarm time display and show the words ALARM OFF and ALARM ON to indicate whether the alarm feature is on or off. Press the up-button 25 to activate the alarm. Press the down-button 26 to deactivate the alarm. If the alarm feature is activated, the bell symbol 7 will appear on the display. If the alarm feature is deactivated, the bell symbol 7 will disappear from the display.
To change the alarm time, first press the ALM-button 31 briefly. Then press and hold the ALM-button 31 for 3 seconds until setting mode is activated. The hours will blink on the display and can be set by pressing the up-button 25 or the down-button 26. Confirm your setting by pressing the ALM-button 31. Set the minutes in the same way. After setting the minutes, the display will automatically return to the normal time display.
Snooze (SNOOZE)
Press the SNOOZE/LIGHT-button 4 when the alarm sounds to briefly deactivate the alarm. The bell symbol 7 and the Z Z symbol 3 will blink on the display. After 5 minutes, the alarm will sound again. Press any button except the SNOOZE/LIGHT-button 4 to turn the alarm off. The alarm will remain activated for the following day.
Temperature unit
Press the down-button 26 in normal time display mode to select the temperature unit Celsius (°C) or Fahrenheit (°F).
Trends
Your radio controlled weather station can show trends 10 for the weather data values temperature and humidity for the station and the sensors 1-3.
 Humidity/temperature rising
 Humidity/temperature steady
 Humidity/temperature falling
Maximum and minimum values
The radio-controlled weather station begins to record the maximum and minimum temperature and humidity values when the batteries are inserted.
Press the up-button 25 briefly to show the maximum values  for temperature and humidity of the station 19 and the sensors 1-3 on the display 12.
Briefly press the up-button 25 repeatedly to show the minimum value  for the temperature and humidity of the station 19 and the sensors 1-3 on the display 12.
To delete the maximum and minimum values, press and hold the up button 25 for 3 seconds. The stored values are deleted and the radio controlled weather station will begin to record new values.
Battery level indicator
If the battery charge is too low to power the radio controlled weather station, the sensors and data transmission, the battery level indicator 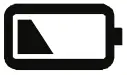 13 or 18 will appear on the display. The batteries should be replaced in all devices as soon as possible. Restart the weather station.
Channel setting for sensors 1-3
Your radio-controlled weather station can be used with up to 3 sensors at the same time. Open the battery compartments of the sensors 41 and set the channel (1, 2, 3) you wish to use for each sensor using the channel selection switches 40. The radio-controlled weather station will now receive the signals from the sensors 1-3 and the signal reception symbol 17 will appear on the display of the radiocontrolled weather station. To manually transmit the measured data from the sensor to the radio-controlled weather station, press the TXbutton 43. Press the °C/°F button 42 to select the temperature unit °C-Celsius and °F-Fahrenheit. Close the battery compartment.
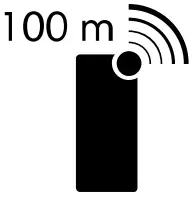
! Note: The sensors must be set up within a maximum of 100m from the weather station with no obstacles.
The sensors flash briefly as they collect data from the environment.
Get sensor data
The weather station regularly receives the data from the sensors. If the
data reception fails, you may carry out a data update directly by pressing and holding the ROOM 1, 2 or 3 button 30. If reception is successful, the signal reception symbol 17 appears in the display.
Naming the sensors
The sensors can be placed in different rooms or outdoors. It is possible to assign a name to each sensor on the radio controlled weather station at 16. For example, a sensor placed in the bathroom could be named BATH. When setting the names it is possible to select one of the pre-set names: BATH, BEDRM, KID1, KID2, YARD. It is also possible to enter custom names with up to 5 characters each.
Setting pre-set names
| Room 1 | Room 2 | Room 3 | Room 4 | Room 5 | |
| DE | BAD | BETT | KIND1 | KIND2 | GARTN |
| GB | BATH | BEDRM | KID1 | KID2 | YARD |
| FR | BAIN | SOMML | ENF1 | ENF2 | JARDN |
| IT | BAGNO | SONNO | BAMB1 | BAMB2 | GIARD |
| ES | BANO | DORMI | NINO1 | NINO2 | JARDN |
| DK | BADEV | SOEVN | BARN1 | BARN2 | HAVE |
| SE | BADRM | SOEMN | BARN1 | BARN2 | TRADG |
To select a name for sensor 1, press the 1-ROOM-button 30. Press the 1-ROOM-button 30 again to view the different pre-set names. If you wish to select one of the names, wait for 5 seconds until the selected name no longer blinks. The name is now set. Select the names for the other rooms in the same way.
Setting custom names
Custom names can also be set for the sensors. Up to 5 custom names can be set. When a sixth name is set, the first stored name will by overwritten automatically. To set a custom name, the letters A-Z, the special characters  and the numbers 0-9 are available. To set a custom name for Sensor 1, please proceed as follows: Pre s the 1-ROOM-button 30 and then immediately press the up-button 25. Press the up-button 25 or the down-button 26 to select a character. When the desired character appears, press the 1 ROOMbutton 30 to confirm your setting and move to the next character of 5 possible characters in the name. It is possible to delete characters by pressing the SET-button 32. Once 5 characters have been entered the display will automatically return to normal time display mode. If you have entered less than 5 characters, press the 1-ROOM-button 30 2x to return to normal time display mode. Set the names for sensors 2 and 3 in the same way.
Reset (RESET)
Press the RESET-button 24 with a thin tool to reset the radio controlled weather station and restart the radio signal reception.
Cleaning instructions
Improper cleaning can damage the device. Do not submerge the device in water or other liquids. Do not use aggressive cleaners, brushes with metal or nylon bristles, or sharp or metallic cleaning tools such as knives, scrapers or similar implements. These may damage the surface of the device. Clean the device using a soft, dry, lint-free cloth, such as a glasses cleaning cloth.
Storage
If the radio-controlled weather station with sensors is not used for a longer period of time, remove the batteries and store the devices, cleaned and protected from sunlight, in a dry, cool place, ideally in the original packaging.
Simplified EU declaration of conformity
 Hereby, digitech gmbh declares that the radio equipment type radio-controlled weather station 4-LD5641 is in compliance with Directive RED 2014/53/EU, article 10 (8). The full text of the EU declaration of conformity is available at the following internet address:
http://www.digi-tech-gmbh.com/ce/354196_2010_FWS3S.pdf
Disposal
This device and all the packaging materials are recyclable. Please dispose of them separately for better waste handling. You can find out about disposal options for your product by contacting your municipality.
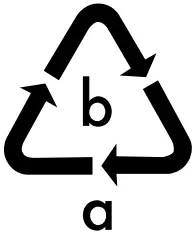 Please take note of the marking of packaging material when separating waste materials. They are marked with abbreviations (a) and numbers (b) with the following meanings:
1-7: plastics
20-22: paper and cardboard
80-98: composite materials.
Disposal of the electronic device
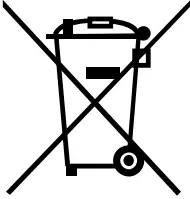
 Remove the batteries before disposal and dispose of them separately (see Disposal of the batteries). This wall clock must not be disposed of in the normal household waste. In the interest of the environment, when your device has reached the end of its usefulness, do no throw it in the normal household
trash. Dispose of it in the proper and correct way. You can find out
about collection sites and their business hours from your public
administration. Please adhere to applicable requirements.
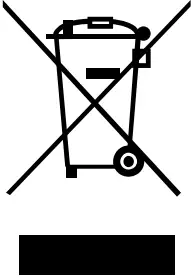
Battery disposal
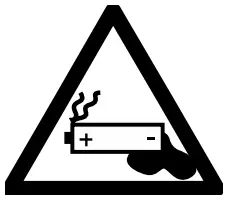
 The accompanying symbol indicates that batteries and rechargeable batteries must not be disposed of with normal household waste. Defective or used batteries/rechargeable batteries must be recycled in accordance with Directive 2006/66/EC and its amendments. Consumers are legally obliged to dispose of all batteries and rechargeable batteries, regardless of whether they contain harmful substances such as: Cd = cadmium, Hg = mercury, Pb = lead, Li = lithium or not, at a collection point in their municipality / district or at a retail outlet, for environmentally friendly disposal and for the recovery of valuable raw materials such as cobalt, nickel or copper.
The return of batteries and accumulators is free of charge.
WARNING!
Environmental damage through incorrect disposal of batteries/ rechargeable batteries!
Some of the possible materials such as mercury, cadmium and lead are poisonous and, if not disposed of properly, endanger the environment. For example, heavy metals can have harmful effects on the health of humans, animals and plants and accumulate in the environment and in the food chain, and can then enter the body indirectly via food.
WARNING! Danger of explosion!
With used batteries containing lithium (Li = lithium) there is a high risk of fire. Therefore, special attention must be paid to the proper disposal of used batteries and rechargeable batteries containing lithium. Incorrect disposal can also lead to internal and external short circuits due to thermal effects (heat) or mechanical damage. A short circuit can lead to a fire or an explosion and have serious consequences for humans and the environment.
For this reason, tape off the poles of lithium-based batteries and rechargeable batteries prior to disposal in order to avoid an external short circuit.
Batteries and rechargeable batteries that are not permanently installed in the device must be removed and disposed of separately before disposal of the device.
Please return batteries and rechargeable batteries only when they have been discharged! Use rechargeable batteries instead of disposable batteries whenever possible.
Recycling

The product packaging consists of recyclable materials. Please dispose of them properly at the available collection sites.
Waste disposal
Dispose of the packaging in an environmentally responsible fashion. Please note the marking of the different packaging materials and separate them if applicable.

digi-tech gmbh warranty
This weather station includes a 3 year warranty starting on the day of purchase. In case of defects of this weather station you have, by law,certain rights regarding the vendor of the weather station. These rights are not changed by the warranty which is described in the following paragraphs.
Warranty conditions
The warranty duration starts on the date of purchase. Please keep the receipt in a safe place. The receipt is needed as a proof of purchase. If a defect occurs in the weather station within 3 years, the weather station will be repaired or replaced (according to our choice) free of charge. This warranty requires that, within the 3 year warranty period, the weather station and the receipt can be made available to us along with a short written description of the defect and when it occured. If the defect is covered by the warranty, you will receive the repaired weather station or a new weather station. Repair or replacement does not cause the warranty period to restart.
Warranty period and defects liability
The warranty period is not increased by the defect liability. This also applies to repaired or replaced parts. If defects are noticed at the time of purchase they must be reported immediately upon unpacking the item. Paid repair may be available after the end of the warranty period.
Scope of the warranty
The weather station was manufactured according to strict quality guidelines and was carefully inspected before delivery. The warranty does not include parts that experience normal wear and tear and can thus be seen as wear parts or fragile parts that are damaged. Examples include Switches, Batteries or parts made of glass.
This warranty becomes void if the weather station is damaged, is not used in the recommended way or is improperly repaired. For proper use of the weather station all instructions in this manual must be adhered to exactly. Use of the weather station in a way that is discouraged in the manual must be avoided. The weather station not intended for commercial use. Abusive or improper use, excessive force and changes that are made by nonauthorized repair centers will void the warranty.
Warranty claim procedure
To ensure that your call is processed in a fast and efficient manner please note the following directions:
- Have your receipt (as proof of purchase) and the article number (354196_2010) handy.
- The article number can be found on the type label, an engraving, the front page of the manual (bottom left) or a sticker on the back side or bottom side of the case.
- In case defects occur, please first contact the service center (see below) by phone or email.
 Visit www.lidl-service.com to download this and many other manuals, product videos and software.
With this QR-Code you can reach the Lidl-ServiceSite (www.lidl-service.com) directly and you can open your manual by entering the article number (354196_2010).
Service
Inter-Quartz GmbH
Valterweg 27A
65817 Eppstein
GERMANY
Email: [email protected]
Telephone: +49 (0)6198 571825
 HU 0680 981220
SI 0800 80847
CZ 800 142 315
SK 0800 004449
 Year of manufacture: 2021
 Supplier
Please note that the following address is not a service address. Please first contact the service address (see above).
digi-tech gmbh
Valterweg 27A
65817 Eppstein
GERMANY