![]() Smart Ceiling Fan
Smart Ceiling Fan
User Manual
Read this owner’s manual thoroughly before operating the I appliance and keep it handy for reference at all times.
![]()
![]()
SAFETY INSTRUCTIONS
The following safety guidelines are intended to prevent unforeseen risks or damage from unsafe or incorrect operation of the appliance. The guidelines are separated into ‘WARNING’ and ‘CAUTION’ as described below.
This symbol is displayed to indicate matters and operations that can cause risk. Read the part with this symbol carefully and follow the instructions in order to avoid risk.
 WARNING
This indicates that the failure to follow the instructions can cause serious injury or death.
CAUTION
This indicates that the failure to follow the instructions can cause a minor injury or damage to the product.
IMPORTANT SAFETY INSTRUCTIONS
WARNING
To reduce the risk of explosion, fire, death, electric shock, injury or scalding to persons when using this product, follow basic precautions, including the following:
Children in the Household
This appliance is not intended for use by persons (including children) with reduced physical, sensory or mental capabilities, or lack of experience and knowledge unless they have been given supervision or instruction concerning the use of the appliance by a person responsible for their safety. Children should be supervised to ensure that they do not play with the appliance.
Installation
- Electrical or installation work needs to be performed by qualified service personnel.
- Do not install the appliance less than 2.3 m from the ground and 1 m from the wall to the blades.
- Do not install the appliance with a dimmer switch.
- Ensure that the ceiling hook can sustain more than 10 times the appliance weight.
- Ensure that the shaft has been fully tightening to the motor shaft and
- Firmly tighten the blade screws using a screwdriver.
- Do not install the appliance in a place where flammable liquids or gases such as gasoline, propane, paint thinner, etc., are stored.
- Do not install the appliance somewhere exposed to direct sunlight.
- Do not install the appliance in an area prone to combustible gas leaks, grease, or metal dust.
Operation
- Connect this appliance as per the rated voltage and frequency printed on the nameplate.
- Do not touch the power switch with wet hands.
- Do not disassemble, repair, modify or touch the appliance while it is
- Do not insert hands or any objects into the appliance.
- Do not place any objects on the appliance.
- Do not use or store flammable or combustible substances (ether, benzene, alcohol, chemical, LPG, combustible spray, insecticide, air freshener, cosmetics, etc.) near the appliance.
- If there is a gas leakage [isobutane, propane, natural gas, etc.), do not touch the appliance or power switch and ventilate the area immediately.
- Cut off the power supply if there is any noise, smell, or smoke coming from the appliance.
- Do not expose the appliance to splashing water or rain.
- Do not touch, operate, or repair the appliance with wet hands.
- Dispose of all packaging materials (such as plastic bags and Styrofoam) away from children. The packaging materials can cause
Maintenance
- Before cleaning or performing maintenance, disconnect the power supply and wait until the blade stops.
- Do not use an abrasive cloth, sponge, or a metal brush to clean the
Battery
- 2 MA batteries are used in the remote controller of the appliance. This battery is not rechargeable. May explode or leak if charged, connected reversely, disposed of in fire.
- Replace all batteries in the remote controller with new ones of the same type. Do not mix old and new batteries or different types of batteries
CAUTION
To reduce the risk of minor injury to persons, malfunction, or damage to the product or property when using this product, follow basic precautions, including the following:
Installation
- Do not install the appliance at a wet, high temperature, high humidity area, high vibration, windy places.
- Do not install the appliance in freezing temperature.
- Do not install the appliance on or near items that may be damaged or discolored by heat or humidity.
- Do not install the appliance near curtains.
- Do not install the appliance within 1 m of a TV or stereo equipment. It may cause interference.
- After installation make sure the appliance does not tremble
Operation
- Do not use the appliance in place of a vent hood. Doing so will shorten the appliance’s lifespan.
- Do not operate in an area with unstable voltage, the appliance may automatically shut down to protect appliance components.
- This appliance is intended to be used in household and domestic applications only and must not be used for commercial purposes.
Maintenance
- Replace all the blades if any of them breaks or cracks.
- Never use strong cleaning agents or solvents when cleaning the Use a smooth cloth.
- Use a sturdy stool or ladder, when cleaning, maintaining or repairing the ceiling fan at height.
Battery
- Do not modify the battery arbitrarily.
- Misplaced battery may cause an explosion.
- Do not recharge or take apart the battery.
- Do not throw the battery in the fire for disposal or leave it near the
- Remove and store the battery in a safe location if you don’t intend to use the remote controller for a long time.
PRODUCT OVERVIEW
Parts and Accessories
![]()
Accessories
Thank you for purchasing our smart ceiling fan! Please check the accessories list immediately after unpacking.
| Parameters | Values | |
| Model Number | AFL44L | AFL5OL |
| Item Weight(Net) | 12.5 pounds | 12.7 pounds |
| Size | 44 inches | 50 inches |
| Color | Matte Black, Wood Grain Blades | |
| Style | Contemporary | |
| Material | Metal, Wood Laminate | |
| Power Source | AC | |
| Voltage | 120 Volts | |
| Wattage | 25 watts | |
| Type of Source | LED Panel. 24 watts | |
| Luminous Flux | 1800 Lumen | |
| Lamp Temp. | 3000K | |
| Plug Profile | Downrod Mount | |
| Usage | Ceiling Fan | |
| Batteries Included? | Yes, AAA 1.5V x 2PCS | |
| Special Features | Reversible Airflow Remote Control App Control Anywhere Works with Amazon Alexa Works with Google Assistant |
|
NOTE
Specified weight may differ from the actual weight.
INSTALLATION GUIDE
Tools Required
![]()
If there is no existing mounting box, then read the following instructions. Disconnect the power by removing the fuses or by turning off the circuit breakers.
Secured the outlet box directly to the building structure. Use appropriate fasteners and building materials. The outlet box and its support must be able to fully support the moving weight of the fan(at least 35 Ibs]. Do not use plastic outlet boxes.
WARNING
To reduce the risk of fire, electric shock, or another personal injury, mount fan only to an outlet box marked acceptable for fan support and use the mounting screws provided with the outlet box outlet boxes commonly used for the support of lighting fixtures may not be acceptable for fan support and may need to be replaced. Consult a qualified electrician if in doubt.
Hanger Options
To avoid possible electrical shock, before installing your fan, disconnect the power by turning off the circuit breakers to the outlet box associated with the Wall switch location.
a. Installing the mounting bracket
Step 1. Pass the power wires through the hole in the mounting bracket as shown in Fig.1.
Step2. Secure the mounting bracket to the ceiling outlet box with the wood screws and falt washer provided with your outlet box.
![]()
b.Installing the mounting bracket
When the case of concrete ceiling, use a drill hole drilled in the ceiling of two 08 (distance between the two holes should be appropriate), expansion screw into the hole, then put the mounting bracket expansion screw set into the tum flat washers and nuts and tighten with a spanner.
![]()
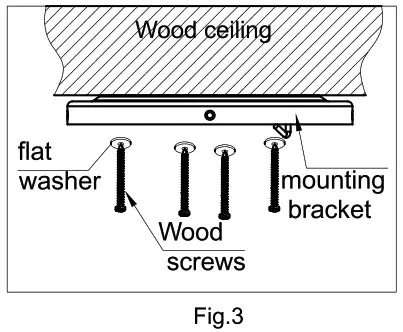
c.Installing the mounting bracket
The ceiling is made of wood, please lock with a screwdriver mounting bracket on the ceiling[Figure 3), Parts bag flat washer set into the wood screws.
![]()
Hanging Motor housing
Lift the Motor housing and hang it on the hook of the mounting bracket.![]()
Wiring (continued)
![]()
- Connect the 2 grounding wires (green, green/yellow stripe, or bare copper) coming from the ceiling, download, and hanger.
- Connect the white wire from the receiver to the white wire from the fan.
- Connect the blue wire from the receiver to the blue wire from the fan.
- Connect the UVW wire from the receiver to the UVW wire from the
- Connect the blue wire from the receiver to the white wire from the
- Connect the brown wire from the receiver to the black wire from the ceiling.
The controller installation
Put the controller in the Motor housing after the wire is connected
![]()
Installing Motor housing
Remove the motor housing from the hook and align it with the mounting bracket hole of the suspension plate and tighten it with screws.
![]()
Attaching the Fan Blades
Place each blade between a blade iron and medallion. install three-blade screws and washers, found in the hardware bag, to attach the medallion to the blade iron. Repeat steps for the remaining blades.
![]()
Blade assembly installation
- Remove blade iron screws from fan motor
- Attach the blade irons to the motor with blade iron screws
- Repeat this step for each blade assembly
![]()
Switch housing installation
- Feed the wire through the center hole of the switch housing
- Attach the switch housing to the motor with screws
![]()
The LED installation
- Connect the wire from fan to the LED. Blue to black, white to white
- The LED is attracted to the switch housing by a magnet
![]()
The lampshade installation
Beand the lampshade properly and then put it in the switch housing.
![]()
Remote Configuration
- Diagram of Remote
- How to pair a smart ceiling fan with a remote controller?
When the ceiling fan is powered on, you will hear a sound of “beep” in 3 seconds, press the key of the PAIR CODE until you hear two sounds of “beep beep”, done.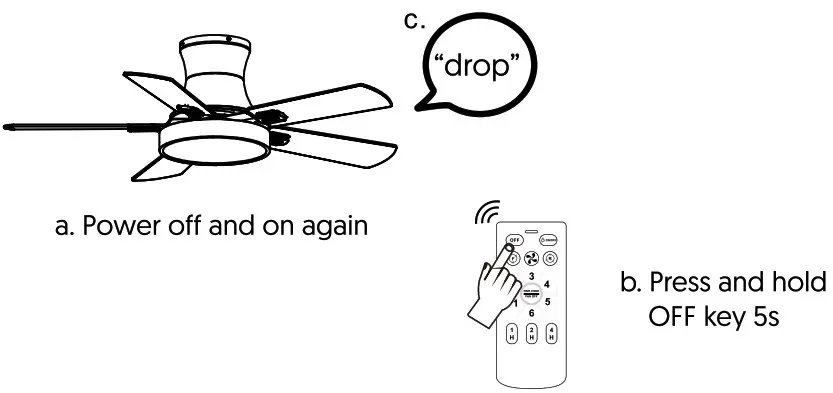
APP Connection
- Download AvatarControls App
Download AvatarControls from Apple Store or Google Play Store or scan the OR code below to install the Avatar Controls APP for either iOS or Android.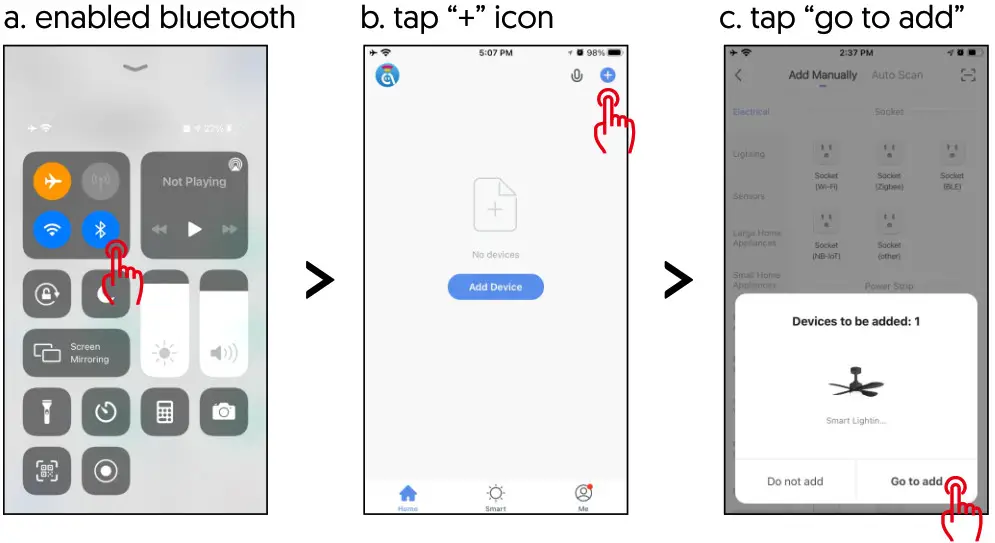
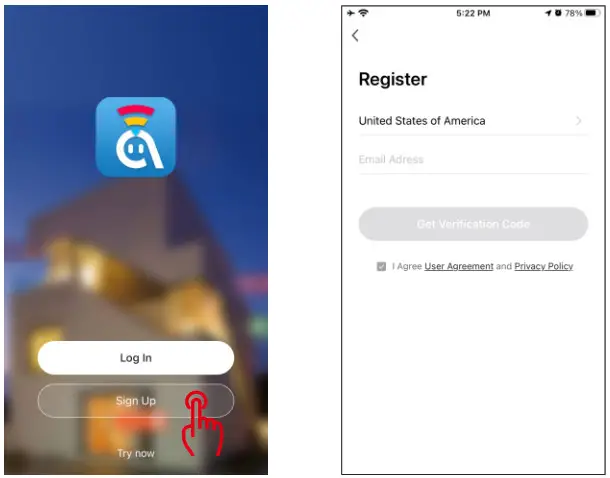
https://smartapp.tuya.com/avatarsmarthome - Register an account in AvatarControls APP
•Open AvatarControls APP into account registration page, click on the “Sign Up”
•At the registration page, select your region and enter the email to create a new account.
•After successful registration, you can add a device on your APP now.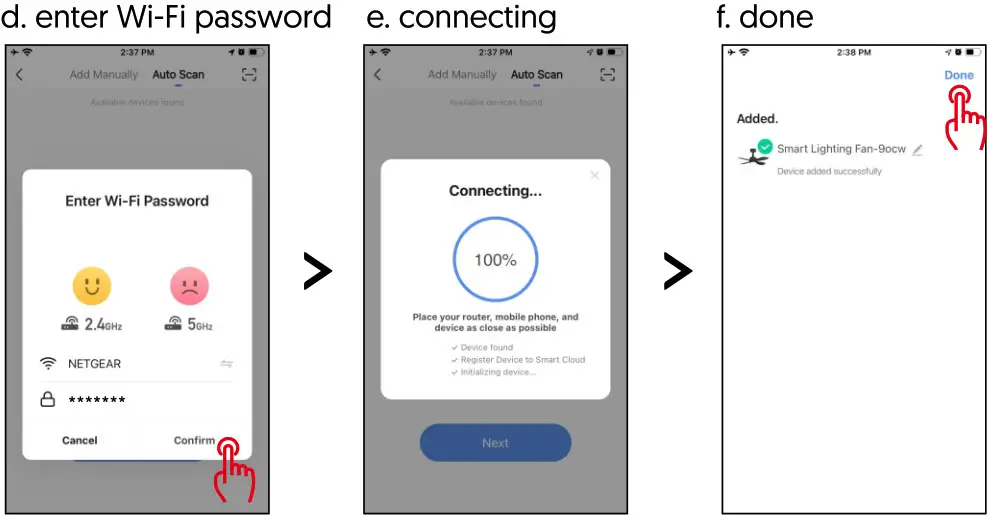
- Activate smart ceiling fan to network paring mode Power on the smart ceiling fan again, then press the remote OFF key for 5 seconds until the smart ceiling fan makes a “drop” sound, that’s mean the smart ceiling fan has entered the network pairing mode.
- Add device in AvatarcontrolsApp
 NOTE: The router WiFi can not be set to the hidden state, and the WiFi must be 2.4G network. The product does not support 5G network temporarily. The WiFi hidden state controller cannot be successfully distributed, and the router WiFi name must be in English
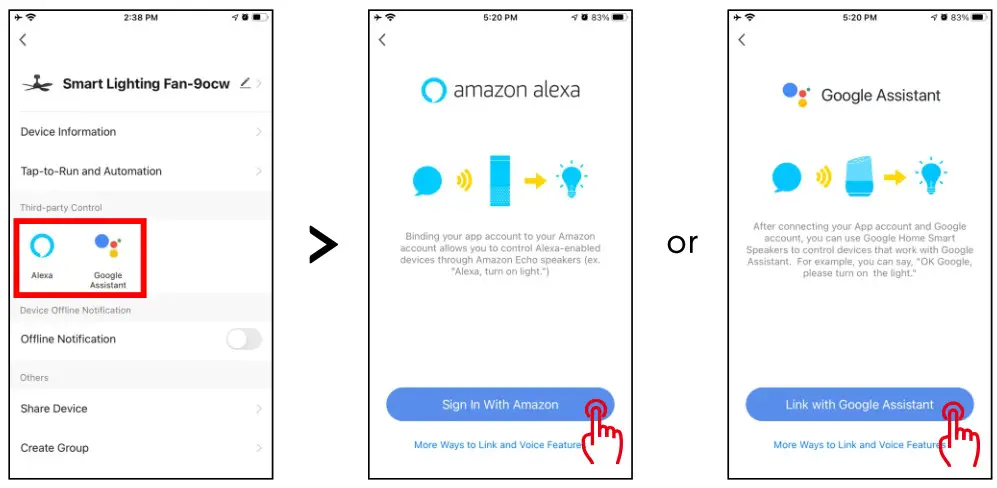
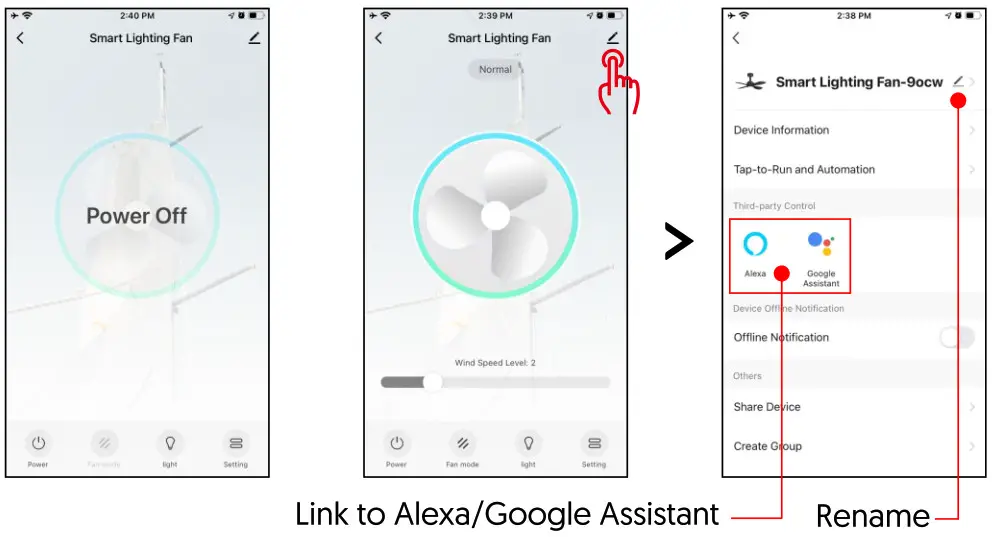
- App cPanel After the device be added successfully, you can control ceiling fan power on/off, wind speed level [level 1-6), fan mode[normal or nature), lamp on/off, and fan direction(forward or reverse). You also can tap L icon to the device attribute page to get more function configurations, like device rename, 3rd-party control, share device, create group, etc.

- How to works with Amazon Alexa/Google Assistant?
• Tap the “ ” icon of the smart ceiling fan main panel
• Tap the 3rd-party control Alexa or Google icon to be operated
• Sign in with your Amazon Alexa or Googe account
![]()
Now you can use your voice to control the smart ceiling fan:
| Functions | Alexa Commands |
| Fan On/Off | Alexa, turn <device name> on/o |
| Fan Speed | Alexa, set <device name> speed to 1/2/3/4/5/6 |
| Fan Mode | Alexa, set <device name> to nature/normal |
| Fan Direction | Alexa, set <device name> to forward/reverse |
| Light On/Off | Alexa, turn on/oe name> |
| Functions | Google Commands |
| Fan On/Off | Hey Google, turn <device name> on/o |
| Fan Speed | Hey Google, set <device name> speed to 1/2/3/4/5/6 |
| Fan Mode | Hey Google, set <device name> to nature/normal |
| Fan Direction | Hey Google, set <device name> to forward/reverse |
| Light On/Off | Hey Google, turn on/oe name> |
Need help?
![]()
https://www.youtube.com/channel/UCsGqB4IKW1NmZlK2mfBBAww https://www.tidio.com/talk/service_chatonline