![]()
JS043K
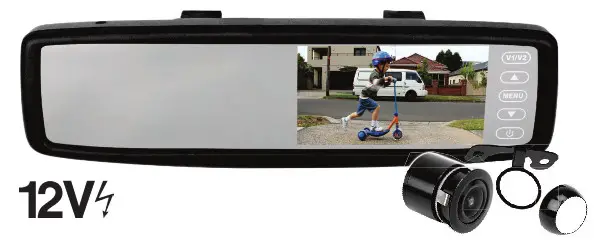
REARVIEW MIRROR MONITOR/CAMERA SYSTEM
INTEGRATED 4.3″ DISPLAY CLIP ON STYLE
SPECIFICATIONS
| MONITOR | |
| – TFT Panel: | 4.3” New TFT LCD (Digital) Super Slim DesignTouch Screen Button Control |
| – Mirror: | Anti-Glare Multi-Layered Glass |
| – Format: | 16:9 Widescreen |
| – Video System: | PAL / NTSC Auto-Switching |
| – Resolution: | 480 x 272 |
| – Brightness: | 350CD/M2 |
| – Video Inputs: | Video 1-2nd Camera or Multimedia/NAV Video 2-Camera-In |
| – Operating Temp: | -10 ~ 60°C |
| – Power Consumption: | 1.5W (0.4W Standby) |
| – Installation: | Clip Over Original Factory Mirror |
| CAMERA | |
| – Lens: | 1/4” CMOS Imaging Clip P3030 Quality Sensor Chip |
| – Viewing Angle: | 150° Wide View |
| – Protection: | IP66 – Water & Dust Ingress |
| – Video System: | PAL |
| – Image: | Mirror Image |
| – Illumination: | 0.5 Lux Minimum |
| – Power Source: | 12 Volt DC |
| – Installation: | Surface Mount or Insert 1. Number Plate, Boot Lid or other Surface 2. Insert to Bumper (Hole Cutter Included) |
| – Cables: | 8M Camera to Monitor Lead |
| INCLUDED | |
| – Dual Mounting Heads for Camera | |
| – 8M RCA~RCA Video Cable | |
| – Installation Hardware | |

INSTALLATION MANUAL
REARVIEW MIRROR MONITOR CAMERA SYSTEM
GENERAL:
This rearview system discreetly clips over the existing mirror of the vehicle and automatically activates the mini camera when reverse gear is selected. This provides a clear image for the driver and protects children, pedestrians, etc from injury, and avoids costly repairs for dents and other damage when reversing. A second Video Input allows a second camera or input for multimedia/navigation/DVD.
CAMERA:
The DUAL HEAD system included with your purchase allows for flexible installation options, either surface mount (eg number plate or boot lid) or stealth insert mount (eg humper). The video cable simply connects with the mirror monitor supplied. A second camera or multimedia source can also be added.
CAUTION: Carefully check the +/- wiring sequence during installation. Ensure safety when installing wires near the fuel tank.

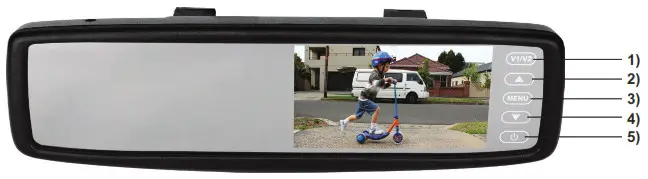
- V1/V2 – Change between the two camera inputs
- Up Arrow – Increase value
- Menu – Press to open the menu;
Press repeatedly to select different options to adjust with the up and down arrows - Down Arrow – Decrease vaiue
- Power – Turn the screen on and off
INSTALLATION:
MONITOR INSTALLATION
- Simply clip over the original mirror
- Carefully run wiring loom around windscreen or hood lining
- Connect camera extension cable (RCA M) to Video 2
- Connect RED cable to 12V+
- Connect BLACK cable to ground
- Connect GREEN cable to Reverse Light 12V+
- Carefully insulate all connections to avoid short circuits
CAMERA INSTALLATION
- Determine installation location (usually the centre-rear of vehicle)
a) Butterfly Type – Mount on surface using double-sided tape or screws
b) Insert Type – Carefully drill hole (hole saw supplied) in bumper and insert camera - Connect RED cable to 12V+ power cable of Reversing Light circuit
- Connect BLACK cable to ground
- Connect signal extension cable
- Connect RCA (Yellow) video cable to LCD monitor
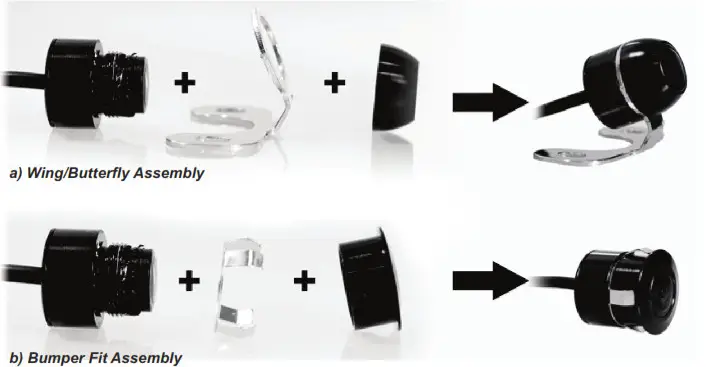
CAMERA ASSEMBLY OPTIONS:
The JS043K Camera is supplied with Dual Mounting Heads:
See diagram below:
CABLE CONNECTIONS:
See wiring diagram below:
MIRROR MONITOR CONNECTIONS:
See wiring diagram below:

WARRANTY
Congratulations on your purchase of a quality ![]() Mobile Safety System! You’re joining thousands of satisfied customers who enjoy & experience the benefits of the products we distribute. In the unlikely event that some technical difficulty arises with your purchase, be assured that we are most anxious to see that the problem is quickly rectified to your satisfaction. Please familiarise yourself with the following simple conditions of our warranty.
Mobile Safety System! You’re joining thousands of satisfied customers who enjoy & experience the benefits of the products we distribute. In the unlikely event that some technical difficulty arises with your purchase, be assured that we are most anxious to see that the problem is quickly rectified to your satisfaction. Please familiarise yourself with the following simple conditions of our warranty.
This warranty covers faults through component failure or failure of the product to operate in accordance with published specifications. Product failure as a result of unreasonable environmental conditions, accident, misuse, improper installation, unauthorized repair, vehicle electrical or wiring faults or neglect etc, will not be covered by this warranty. Removal and installation costs, if any, would be paid by the owner as well as any freight or postage costs of transporting the product to AudioXtra. AudioXtra shall not be liable or responsible for any loss of use of this product or any form of consequential loss.
CONSUMER WARRANTY
This product is warranted by Audioxtra International Pty Ltd to be free from defects in materials and workmanship under NORMAL USE for a period of TWENTY FOUR MONTHS from the date of purchase.
WITHIN 30 DAYS OF PURCHASE DATE: Please retum the unit for a replacement to our National Service Centre or the Retailer from where you made the purchase. All accessories must be included. Proof of purchase date must accompany the products.
AETER 30 DAYS OF PURCHASE DATE: Warranty repair and service is carried out by our National Service Centre. Repair and service will be carried out at no cost to the owner if proof of ownership and the date of purchase can be verified to the satisfaction of the authorised centre concerned with this repair. This proof should take the form of either:
a) The warranty card accompanying this product, stamped and dated by the dealer.
b) A Tax Invoice or Receipt showing full details of original vendor, purchaser, model number and serial number.
COMMERCIAL WARRANTY: A product used in or associated with a commercial application will carry a limited SIX MONTH warranty. An abnormal commercial application is one where usage, dust, vibration, heat/cold and other environmental conditions exist at an extreme level.
Our goods come with guarantees that cannot be excluded under the Australian Consumer Law. You are entitled to a replacement or refund for a major failure and for compensation for any other reasonably foreseeable loss or damage. You are also entitled to have the goods repaired or replaced if the goods fail to be of acceptable quality and the failure does not amount to a major failure.
Please complete details below in the event of warranty service being required.
PurchasersName:_____________________________________________________________
Purchaser’s Address: __________________________________________________________
__________________________________________________________________________
Model Number: JSO43K SerialNumber. _________________________________________
DealerName: ________________________Date of Purchase: _________________________
Dealer Address: _____________________________________________________________
Invoice/Sales Docket no: ______________________________________
General Hints: To expedite service and prompt retum of the equipment, please:
a) Clearly describe the fault in detail
b) Safety and security pack the unit for transport
c) Include your return address
d) Provide proof of purchase date as outlined above
National Service Centre:
10 STODDART ROAD, PROSPECT, SYDNEY NSW 2148 Australia
Telephone: (02) 8841 9000 Fax: (02) 9636 1204
email: [email protected]