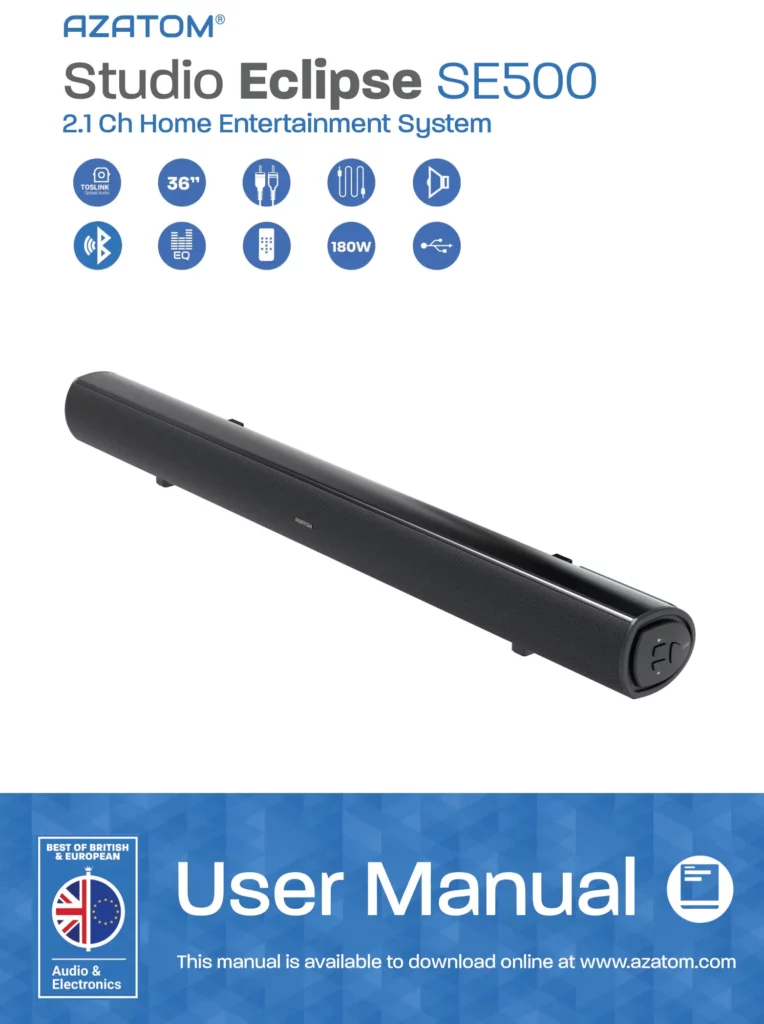
AZATOM Studio Eclipse SE500 User Manual
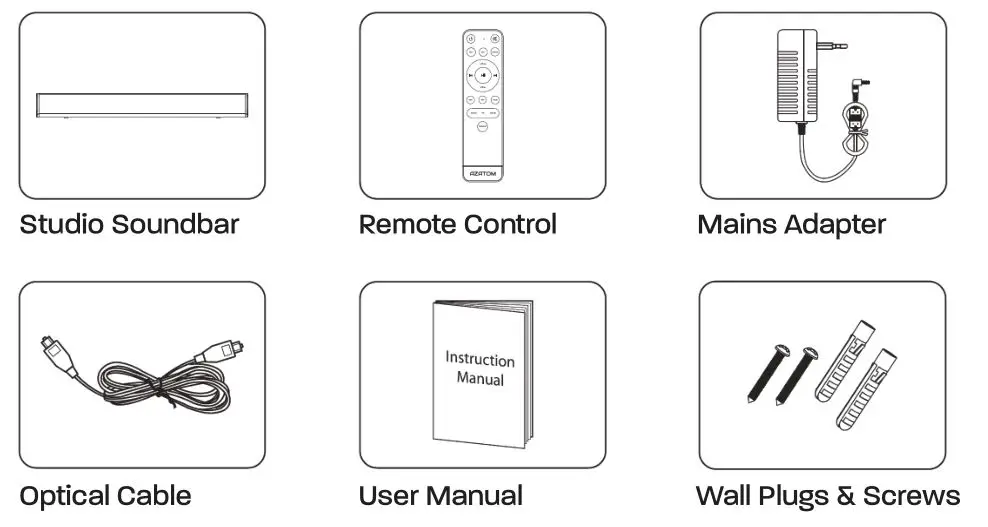
What’s in the box:
- Studio Eclipse SE500 Soundbar
- Remote Control
- Mains Adapter
- Optical Cable
- User Manual
- Wall Plugs and Screws

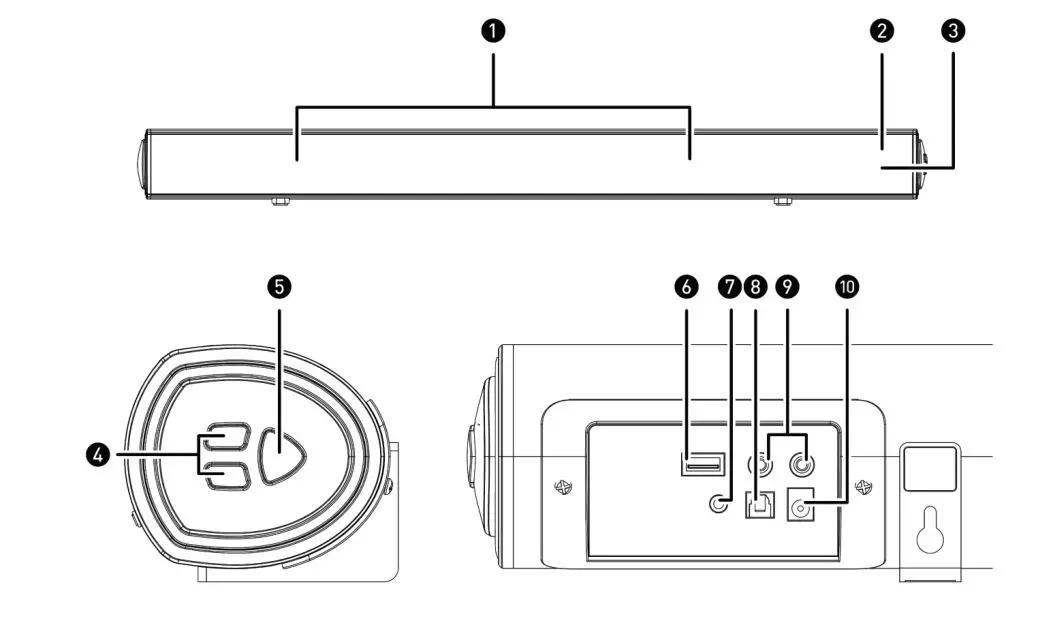
Controls and Interface:
- Speaker Drivers
- LED Indicator Light
- Remote Control Sensor
- Volume + and –
– Press to adjust volume up or down - Power Button
- USB Port
- 3.5mm Line-IN Socket
- Optical-IN Socket
- Aux (RCA L/R) Socket
- DC (20V 1.2A) Socket
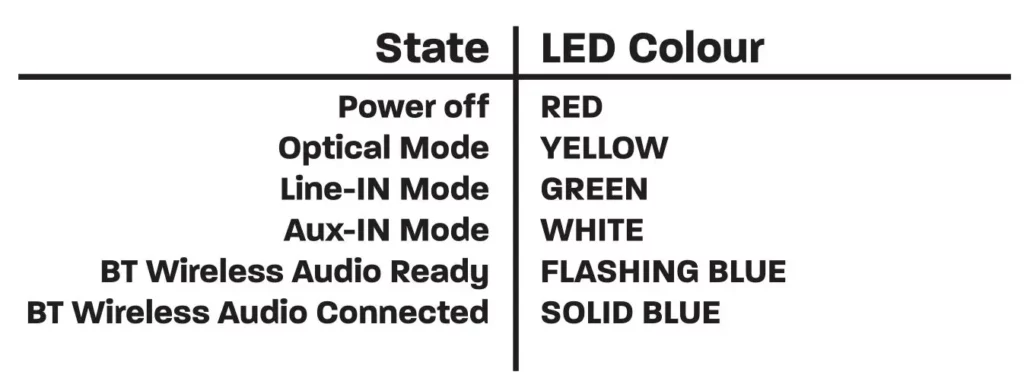
Indicator Lights:
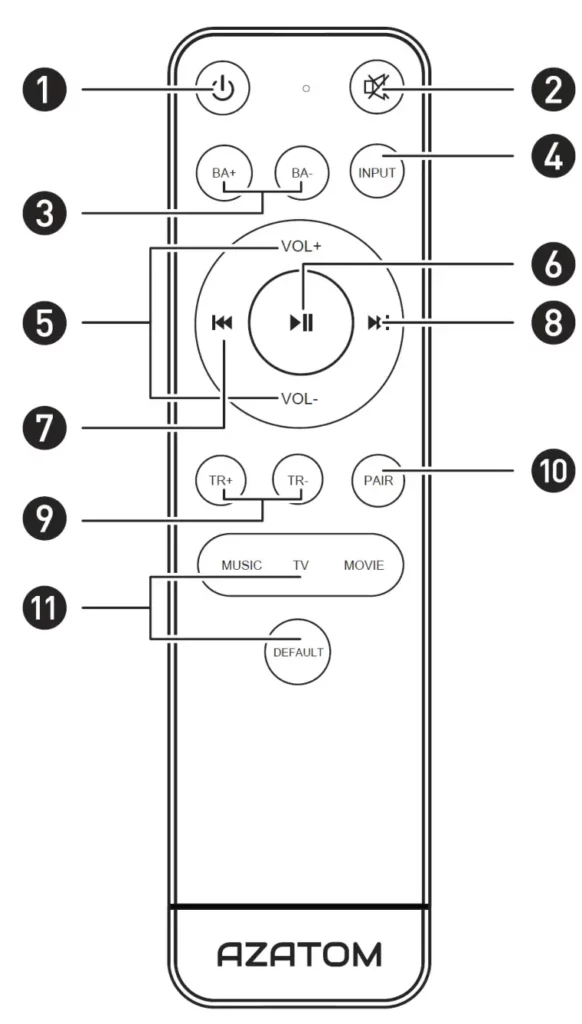
Remote Control:
Remote Control Buttons:
- Power Button
- Mute Button
- Bass + / Bass – Button
- Source / Input Button
- Volume + / Volume – Buttons
- Play / Pause Button
- Rewind / Skip Backwards Button (BT Wireless Audio Mode)
- Fast-Forward / Skip Forward Button (BT Wireless Audio Mode)
- Treble + / Treble – Button
- BT Wireless Audio Pair Button ( / Disconnect Device)
- Equaliser Button – Choose a sound mode (Music/Voice/TV/Movie/Default)
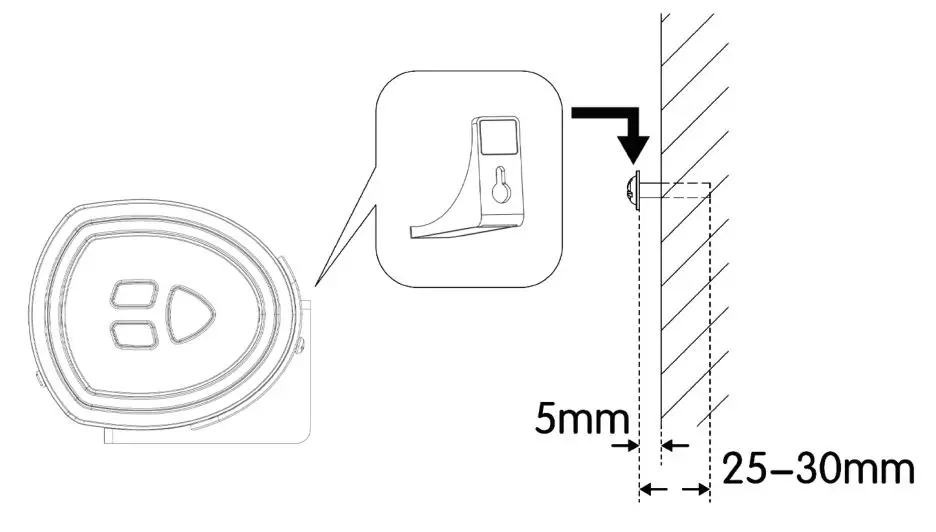
Wall Mounting:
It is the installer responsibility to verify that the wall safely supports the total weight of the Soundbar.
– Additional tools (not included) are required for the installation.
- Drill 2 parallel holes (Ø3-8mm each according to wall type) in the wall. The distance between 2 holes should be 580mm.
- Firmly fix a wall plug (included) into each hole in the wall if necessary.
- Insert a screw (included) into each dowel. Make sure to leave a 5mm gap between the wall and the screw’s head. Lift the Bar over the heads of the screws and slot into place.
Connections:
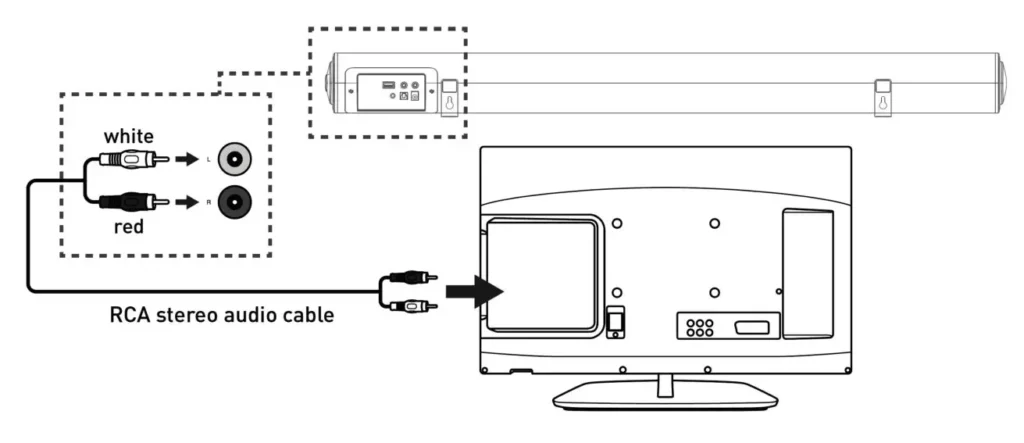
Using the AUX (RCA) Connection:
Use the RCA Stereo Audio Cable to connect the TV’s stereo RCA(L/R). Audio output socket to the AUX(L/R) Sockets of the unit.
Then press the AUX button on the remote control or press the SOURCE button on the unit to choose the AUX function. Turn on your television set to use the Studio Eclipse SE500.
Using the Line-IN Connection:
Plug one end of a 3.5mm audio input cable (included) into the Line in on the unit. Before use, disconnect any cables connected to the Stereo RCA Inputs. Plug the other end of the cable into the audio output/headphone output on an MP3 player or other audio source.
-Press the POWER button on side panel or POWER button directly on the remote control to switch on the unit.
-One touch the SOURCE button repeatedly or directly press LINE in button on remote control to enter LINE in mode. The mode indicator will turn green.
-Audio played through the connected device will now be heard through the speakers.
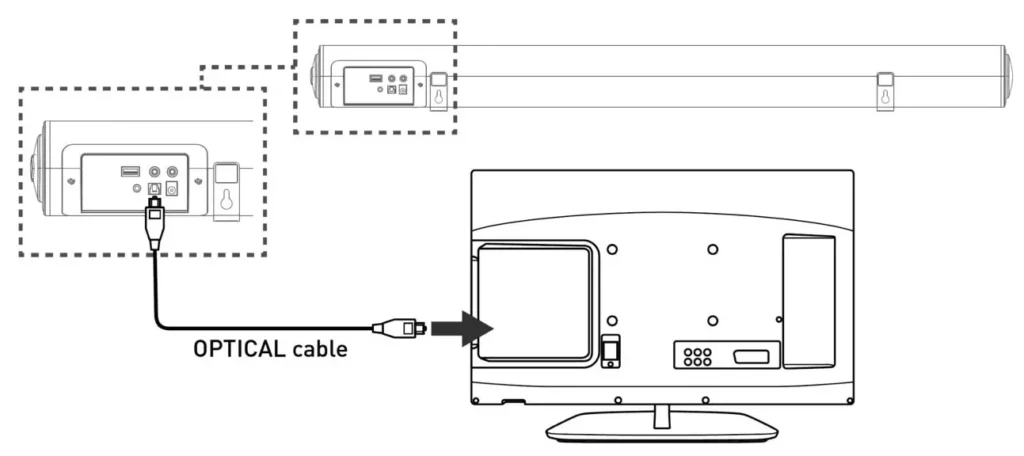
Using the Optical Connection:
You will need: An audio source device with an optical audio output and a digital optical audio cable.
Connect the Digital Optical Audio cable to the optical output on the audio source and to the Optical Input on the speaker bar. Press the POWER/SOURCE button on side panel or POWER button directly on the remote control to switch on the unit. Press the OPTICAL button on the remote control to switch to Optical mode or one touch POWER/SOURCE button on main unit repeatedly to select the Optical mode. The mode indicator LED will turn Yellow.
Using the native controls on your connected device, make sure the audio settings are set to PCM or Optical Audio and are turned on. Audio from the connected audio source will now be played through the speakers. Using the native controls on your connected device, make sure the audio settings are set to PCM or optical audio and are turned on.

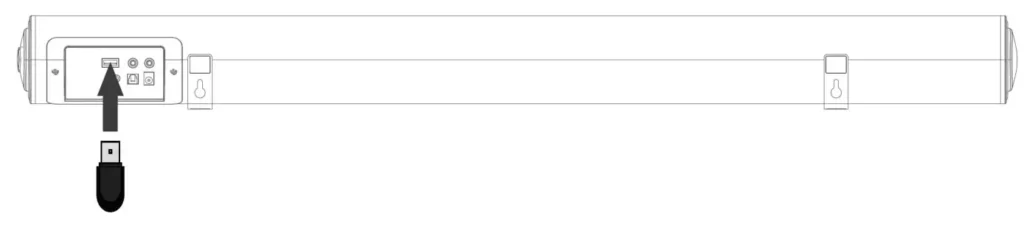
Using the USB Connection:
Connect your USB device to the USB jack on the soundbar. Press the “INPUT” button on the remote, and the LED indicator will be BABY BLUE. Play music files from the USB device through the Soundbar.
Connecting to the Mains Power Adapter:
Ensure that the power supply voltage is in the voltage of 100V~240V. This unit is designed to use adapter. Connecting the unit to any other power source may cause damage to the unit. Unwind the mains cable to its full length. Connect the mains plug to a mains socket. Make sure the mains plug is fully inserted into the mains socket. The mains plug/appliance coupler is used as the disconnect device, the
disconnect device must remain readily operable.
Connect the Adapter to the unit and AC Socket.
ENSURE ALL AUDIO CONNECTIONS OF THE UNIT ARE CONNECTED BEFORE CONNECTING THE MAIN POWER SOCKET. Unplug the power cord from the outlet when the unit is not being used for an extended period of time.
BT Wireless Audio Operation:
Pairing a BT Wireless Audio Device for the First Time: Press the POWER button on the unit or the POWER button on the remote control to switch on the unit.
Select and press the BT button directly on the remote control or press the SOURCE button repeatedly to enter BT Wireless Audio mode, indicated by a flashing blue light.
Using the native controls on your BT Wireless Audio device, selects the “STUDIO ECLIPSE SE500” in your BT Wireless Audio
settings to pair.
If your device requests a password, enters the default “0000”.
Refer to the “user manual” for your specific device for instructions on pairing and connecting BT Wireless Audio devices.
When successfully paired and connected, a beep will issue from the unit and the Pairing Indicator will display a solid blue light. After initial pairing, the unit will stay paired unless unpaired manually by the user, or until it is erased due to a reset of the device. Soundbar has BT Wireless Audio connected to a device, you can press and hold the MUTE/PAIR button 3 seconds to exit this device in order to pair the device with another BT Wireless Audio device.
If your device should become unpaired or you find it is unable to connect, repeat the above steps.
Playing Audio Wirelessly:
Follow the instructions for pairing a device with the Soundbar. Use the controls on the connected device to select and play a track. To play, pause or skip a track, use the controls on the connected audio playing device.
Specifications:
Amplifier:
Power Output: Max power output 180W
Frequency Response: 20Hz – 20KHz ± 3dB
Input Sensitivity: 700mV
Main Unit:
Power Supply:
Input: 100 – 240V ~ 50-60Hz
Output: 20V 1.2A
Standby Power Consumption: ≤ 0.5W
Full Range Speaker Drivers:
Impedance: 4ohm (3 inches)
Frequency Response: 180Hz ~ 20KHz
Dimensions: 912 x 101 x 87mm
Mains Cable Length: 1.5 Metre
For Technical support please see the product page for the Studio Eclipse SE500 on www.azatom.com or email us directly at: [email protected]