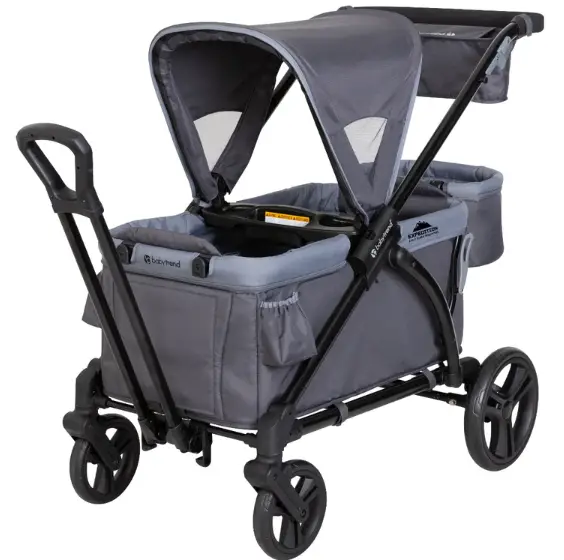
baby trend WG01D13A Expedition 2 In 1 Stroller Wagon Plus

PARTS
Check that you have all the parts for this model before assembling the stroller.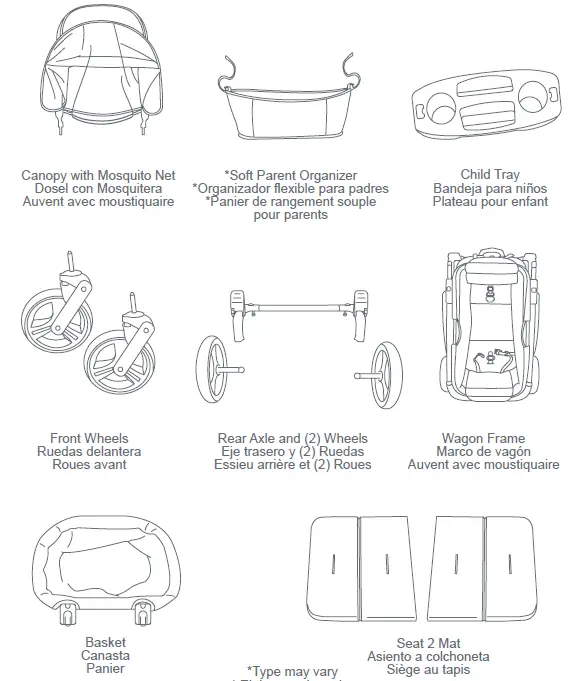
Car seat adapter- fabric cover
(visit babytrend.com for compatibility chart) 
WARNINGS
- Please follow all of these instructions to ensure the safety of your child. Keep these instructions for future reference.
- Failure to follow these instructions could result in serious injury or death. Avoid serious injury from falling or sliding out, always use the safety harness and ensure that the children are properly positioned according to these instructions.
- Never leave children unattended.
- Care must be taken when folding and unfolding the stroller to prevent finger entrapment.
- This stroller is designed for up to 2 children only. Use with more than 2 children may cause an unbalanced condition which can injure a child. Children must be at least 6 months old and be able to sit upright unassisted.
- Purses, shopping bags, parcels, diaper bags or accessory items may change the balance of the stroller and cause a hazardous, unstable condition.
- Be certain the stroller is completely opened and locked in place before allowing a child near the stroller.
- The maximum weight that can be carried in the child tray is 5 lbs (2.26 kg).
- The maximum weight that can be carried in the soft parent organizer is 2 lbs (0.90 kg).
- The maximum basket weight is 20 lbs (9.07 kg).
- The maximum weight capacity of the stroller is 55 lbs (24.94 kg) for each child. The maximum weight capacity of the stroller in combination with any accessories is 110 lbs (49.89 kg) total. Exceeding the weight limit will cause excessive wear and stress on the stroller and may cause a hazardous unstable condition to exist.
- NEVER use the stroller on stairways or escalators.
- NEVER use the stroller with roller skates, in-line skates, skateboards or bicycles.
- NEVER allow your stroller to be used as a toy.
- To clean use only mild household soap or detergent and warm water on a sponge or clean cloth.
- Check your stroller for loose screws, worn parts, torn material or stitching on a regular basis. Replace or repair parts as needed.
- Discontinue use of stroller should it malfunction or become damaged.
ASSEMBLY
IMPORTANT! To ensure safe operation of your product, please follow these instructions carefully. Please keep these instructions for future reference.
IMPORTANT! Before assembly and each use, inspect this product for damaged hardware, loose joints, missing parts or sharp edges. NEVER use if any parts are missing or broken.
IMPORTANT! Adult assembly is required.
WARNING: Care must be taken when unfolding the stroller to prevent finger entrapment.
CAUTION: Do not allow children near stroller while unfolding.
FRAME SETUP
To attach the wheels, unfold stroller as described in the following section:
- Release the fold latch (Fig. 1a).
- Unfold the stroller frame by pulling the stroller handle upward until it clicks into locked position (Fig. 1b).
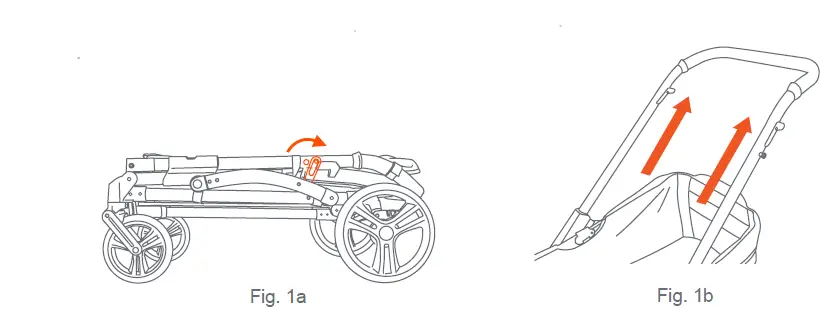
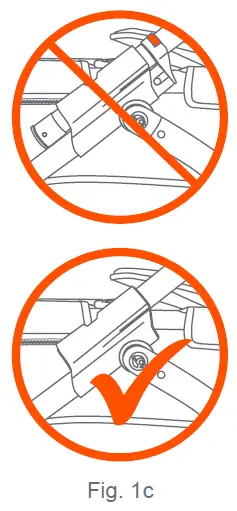
The RED indicator on the handle will not be visible when stroller is fully open. If RED indicator are visible check open position lock is engaged before continuing (Fig. 1c).
FRONT WHEELS
Insert front wheel axle pin into the wheel hub until the wheel locks firmly into place. Repeat on other side. (Fig. 2).
NOTE: Pull on the wheel assembly to ensure that it is securely attached to the stroller. 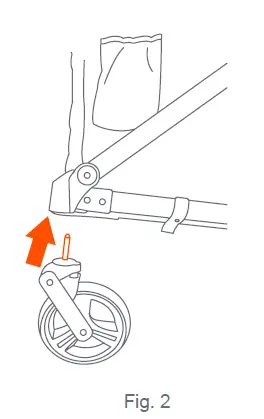
REAR AXLE-WHEELS
Attach the rear axle assembly and wheels as follows:
Position stroller with rear leg tubes facing upward. Place the rear axle with wheels over the rear legs and apply downward pressure on both sides. Ensure both sides lock into place (Fig. 3).
NOTE: NEVER use stroller if wheels do not lock into place. If you need assistance, please contact our customer service department at 1-800-328-7363, M-F, between 8am and 4:30pm, PST. 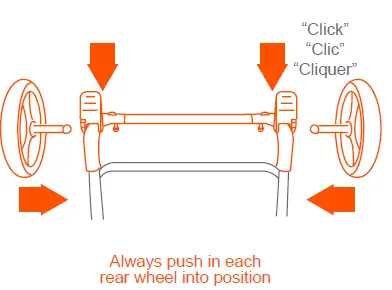
SOFT PARENT ORGANIZER
WARNING: Do not place hot liquids or more than 2 lb. (0.90kg) pounds in the parent tray. Serious burns or unstable conditions can result.
Strap In The Soft Parent Organizer:
Use the hook and loop to hang the soft parent organizer onto the stroller handle. Follow illustrations 1-3 (Fig. 4). Be sure to fasten tightly. 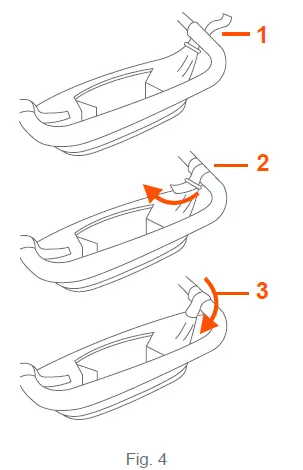
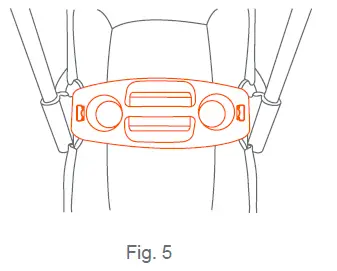
CHILD TRAY
WARNING: Do not place hot liquids or more than 5 pounds in the child tray. Serious burns or unstable conditions could result.
Attach child tray by lining up the corresponding slots located on stroller frame. Slide down into position until locked into place (Fig. 5).
NOTE: Check to make sure the child tray is secure before using.
CANOPY
- To install the canopy: Add the canopy frame into the designated slots located on the child tray (Fig. 6a).
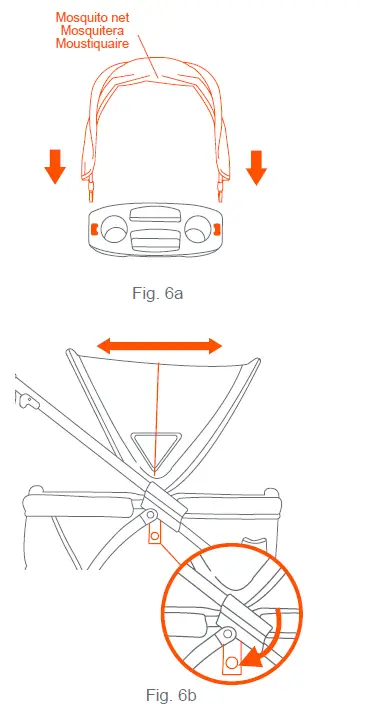
- To open the canopy: Behind the main fold mechanism use the strap and snap closure to anchor the canopy. Firmly spread out both sides of the canopy (Fig 6b).
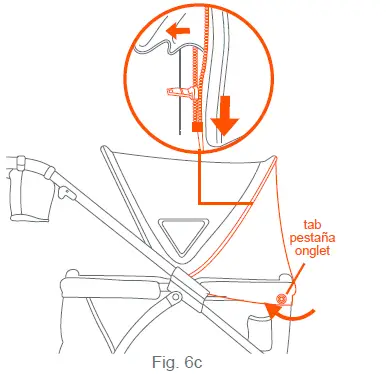
- Install mosquito net: Unzip and pull out the net from the storage pocket. Stretch the net around the top edge of the frame and hook each corner to the the circle tabs.
- Repeat for the other side and ensure to hook the net to all 4 tabs (Fig. 6c)
- To store away the mosquito net: Lift the mosquito net at the elastic end and start to roll toward canopy. Locate the zipper attached to canopy end and connect zipper to track. Continue to tuck canopy into pocket while zipping pocket closed (Fig. 6d).

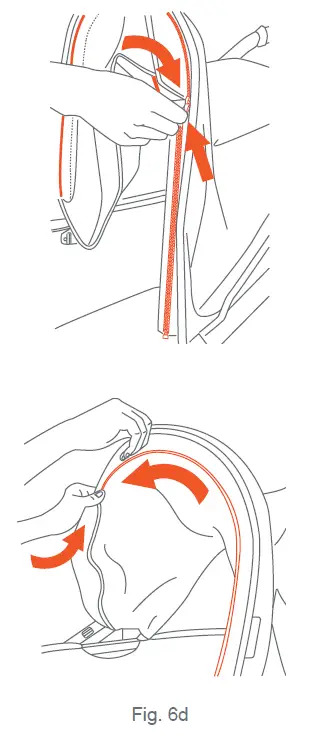
- NOTE: Tuck and Zip in sections.
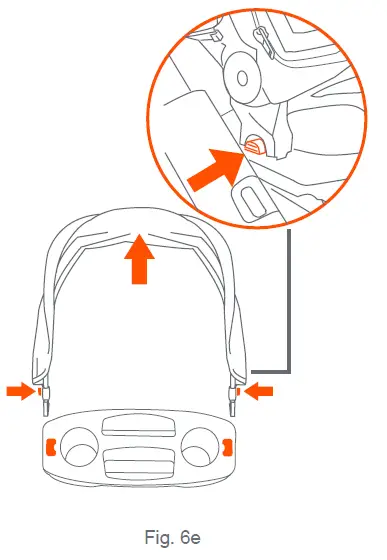
- To remove the canopy: Press the tab on each end of the canopy, and lift up the entire canopy from the bottom ends slots of the child tray (Fig. 6e).
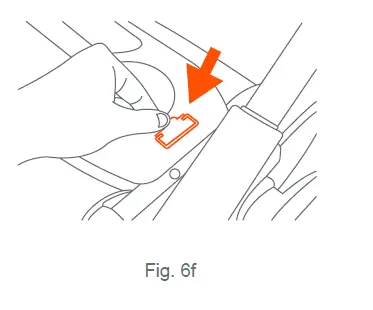
- To remove the child tray: push the tabs outward and pull out the child tray (Fig. 6f). NOTE: The canopy may also be installed without the child tray. Insert the ends into holes.
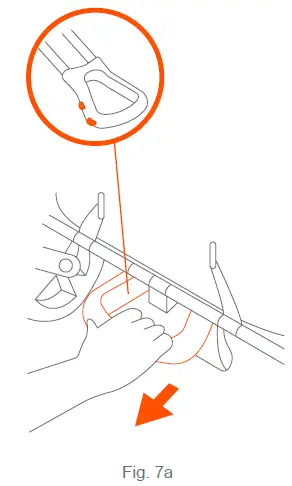
PULL HANDLE STORAGE
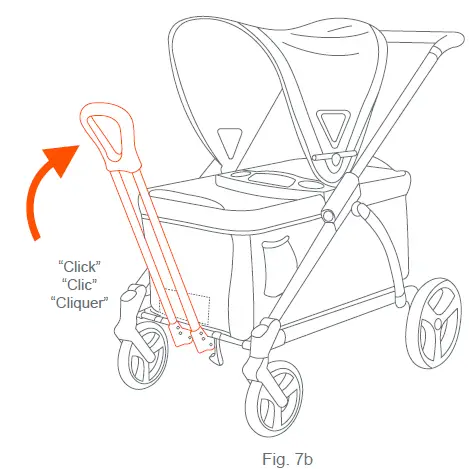
TO USE THE HANDLE: Locate the handle underneath the frame and press the release button to unlatch. Pull the bar completely out of the frame (Fig. 7a). Rotate up to desired position (Fig. 7b).
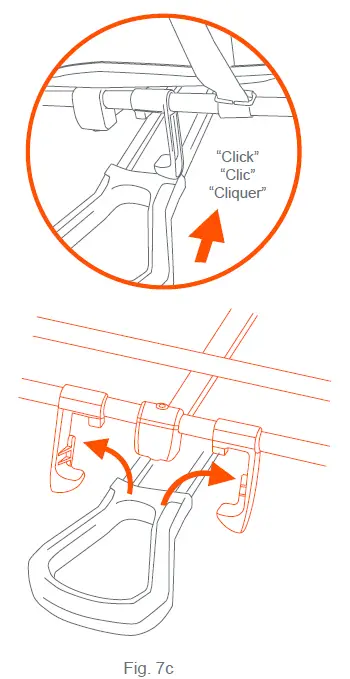
TO PUT IT AWAY: Reverse step (Fig. 7a) ensure to push the handle completely in until it clicks into position.
NOTE: Ensure the handle is resting on the storage hooks (Fig. 7c)
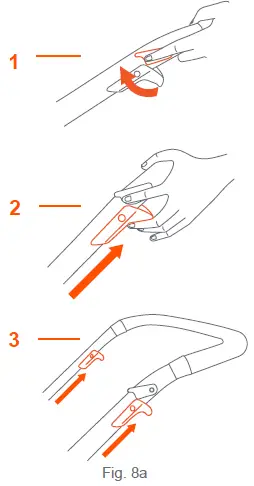
TO FOLD STROLLER
WARNING: Care must be taken when folding the stroller to prevent finger entrapment.
CAUTION: Do not allow children near stroller while folding.
- Close the canopy by reversing (Fig. 6b).
- To use the double lock feature: (1) push the safety lock up. (2) Lift up the trigger to hold the safety lock into place. (3) Pull both triggers together (Fig. 8a).
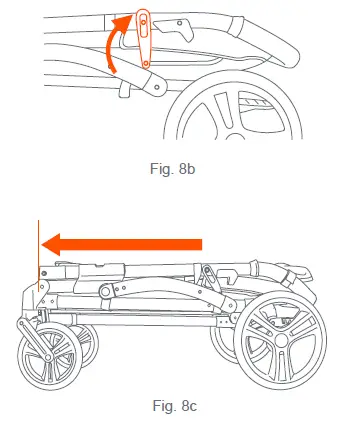
- Push down on the stroller handle until the stroller is completely folded. Ensure the fold latch clicks and secures the stroller closed (Fig. 8b).
- For a full compact fold ensure the handle is completely pushed to the front of the stroller (Fig. 8c).
UNFOLD
TO UNFOLD STROLLER
Release the fold latch (Fig. 9a). Unfold the stroller frame by pulling the stroller handle upward until it clicks into locked position (Fig. 9b). The RED indicator on the handle will not be visible when stroller is fully open. If RED indicator are visible check open position lock is engaged before continuing.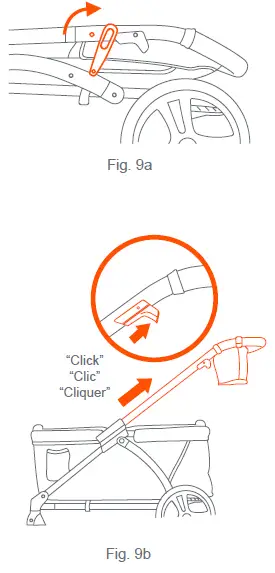
SAFETY
TO USE THE SAFETY HARNESS
WARNING: Avoid serious injury from falling or sliding out. Always use the safety harness.
STRANGULATION HAZARD:
A child can strangle in loose straps. Never leave child in seat when straps are loose or undone.
- The child tray is not designed to hold the child in the stroller. Stay near and watch child during use. NEVER leave child unattended.
- Place the crotch strap between your child’s legs. Insert the Harness Buckles into the Center Clasp with the Button.
- Adjust waist straps for your child’s comfort and safety by sliding buckles in either direction. Safety straps are to fit snug around your child (Fig. 10).
IMPORTANT: keep the harness set in the lowest position only. Highest position is for the folded Seat 2 Mat only.
TO RELEASE SAFETY BELT
• Push Button on Center Clasp, the two Harness Buckles will pop free (Fig. 11).
BRAKES
WARNING: Always set brakes when the stroller is not being pushed so that the stroller will not roll away. NEVER leave stroller unattended on a hill or incline as the stroller may slide down the hill.
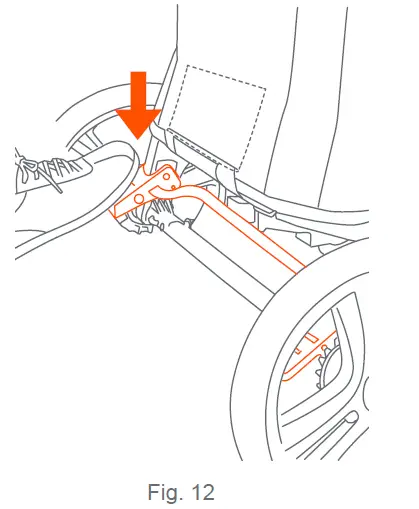
To engage brakes, apply light downward pressure to the brake lever located on each rear wheel. The stroller may require slight forward or rearward movement in order to line up the teeth on the brake with each wheel brake cluster (Fig. 12).
NOTE: Check that the stroller will not move and that both brakes are properly applied.
- To release, gently lift up on the brake lever.
INFANT SEAT
WARNING: For maximum weight used in the adapter refer to the manual of the car seat it will attach to. Prevent serious injury or death from falls, ensure car seat adapter is securely attached to the stroller frame before use. Tray and/or Canopy CANNOT be used with the with the car seat adapter.
CAUTION: Avoid serious injury from falling, always use the safety belt to secure car seat to stroller.
CAR SEAT ADAPTER
Always remove the child tray and canopy from the wagon to install the adapter. See pages 13 to 15.
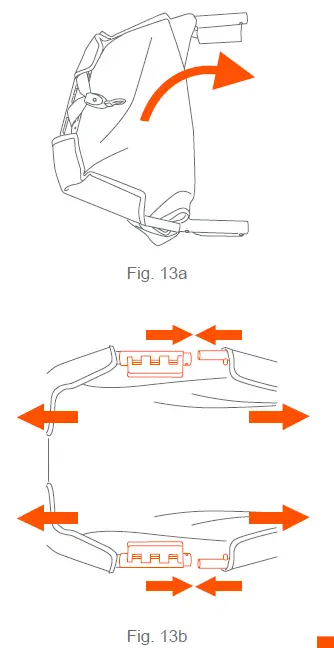
- Unfold the adapter and place it on a flat surface with the straps faced down (Fig 13a). Connect both ends of the adapter bars together as shown on (Fig 13b).
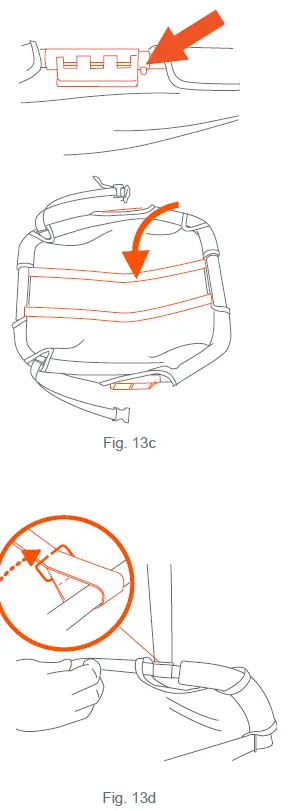
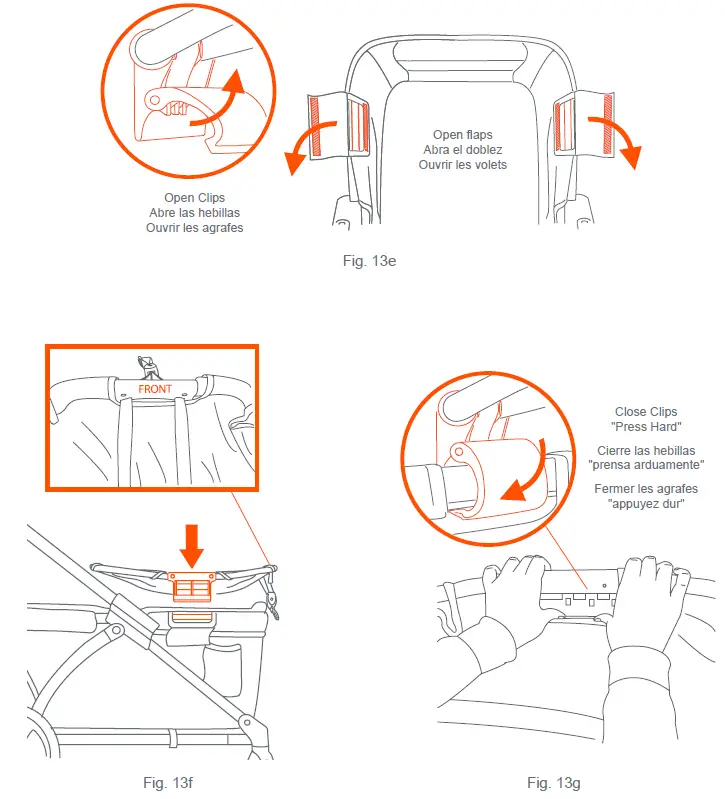
NOTE: Ensure both pins click into the holes. Flip the adapter with the straps facing upwards (Fig 13c). Ensure both straps and D-rings are attached to the side bar at foot-end next to the foam (Fig. 13d). - Open the clips on both sides of the adapter, open the flaps on the wagon cover to expose the bar connection (Fig. 13e). Face the front of the adapter to the front of the wagon. Align the clips to the bar as you press them into place (Fig. 13f). Close the clips firmly from the inside with your thumbs and check that it is secured into the frame (Fig. 13g).
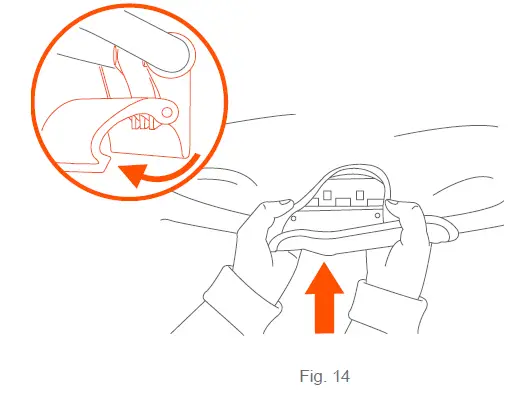
REMOVAL: To remove the adapter wrap your thumbs over the wagon frame and use all your other fingers to apply pressure on the clip to release it from the bar (Fig. 14).
NOTE: Refer to pages 30 and 31 for car seat installation.
INFANT CAR SEAT Sold Separately
- Place the car seat onto the Car Seat Adapter. The front of the car seat should be facing the same direction as the adapter buckle. Ensure the car seat stoppers are resting on the Adapter Bar (Fig. 15a).
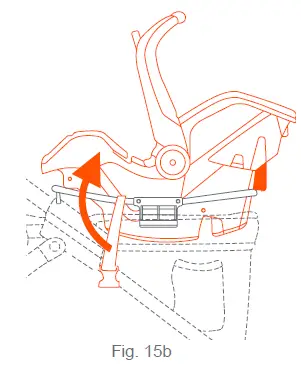
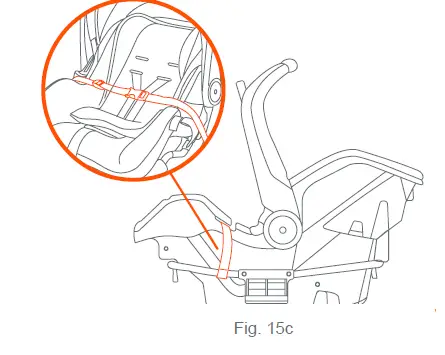
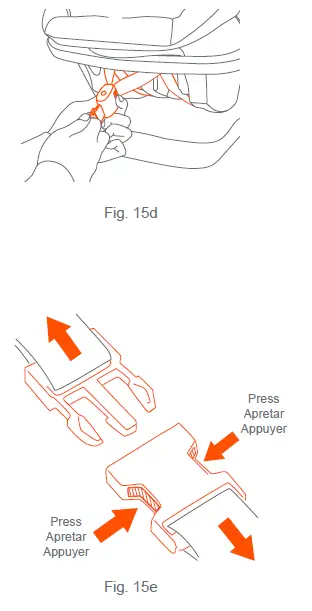
- Strap the Safety Belts through the Belt Path on the Car Seat and connect the buckles together (Fig.15b). Tighten the strap so it fits snugly and the car seat is secured to the frame (Fig. 15c). Tighten the bottom support straps, located on the back of the upper frame, by pulling back on the loop and sliding the adjuster forward for a snug fit (Fig. 15d).
NOTE: The Safety Belt MUST ALWAYS be installed through the Belt Path before using this product.
REMOVAL: Release the safety strap (Fig. 15e), reverse step 15 and then follow step 14.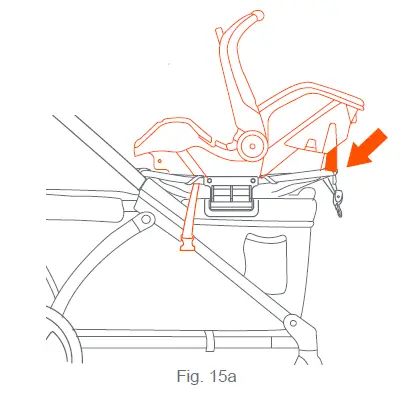
MAINTENANCE
WAGON FABRIC
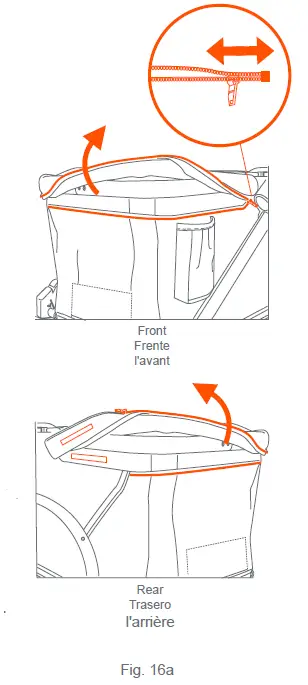
To detach the fabric: for cleaning or replacement, unzip from the front and rear of the wagon frame (Fig. 16a).
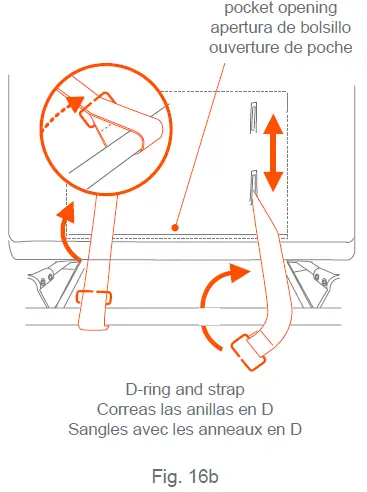
- Through the pocket opening, remove the D-Rings straps from the fabric near the bottom front and rear frame to unthread the harness straps (Fig. 16b). Remove the
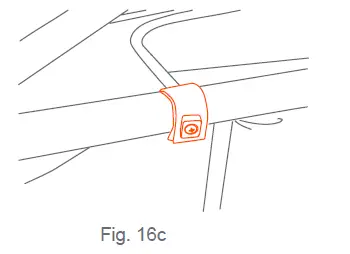
screws on the underside of the frame (Fig. 16c). - To reattach the fabric: ensure that the fabric is aligned to the corresponding front and rear end frame.
- Through the pocket opening, insert the D-Ring straps through the slots. The straps must be secured completely with the D-Ring. Refer to (Fig. 16b).
- To ensure the fabric is securley attatched, the zippers should be zipped and the hook and loop fasteners are attatched (Fig. 16a).
NOTE: Check for worn parts, torn material, or stitching on a regular basis. Replace or repair parts as needed.
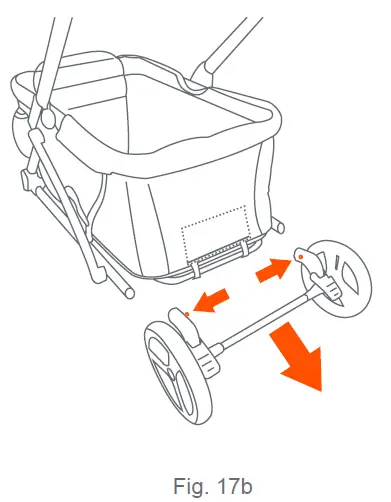
 REAR AXLE WHEEL REMOVAL
Attach the rear axle assembly and wheels as follows:
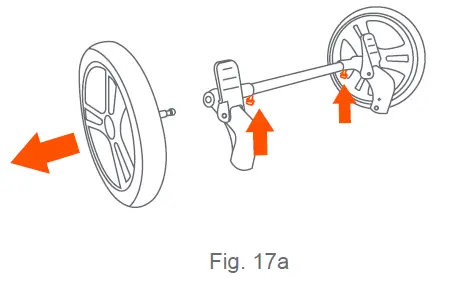
- To release the entire rear wheel assembly, push in the rear wheel release. The wheel easily detaches from the bushing (Fig. 17a).
- If replacing the rear axle, press the pin on each side behind the wheel hub. Pull the rear axle out from the hub (Fig. 17b).
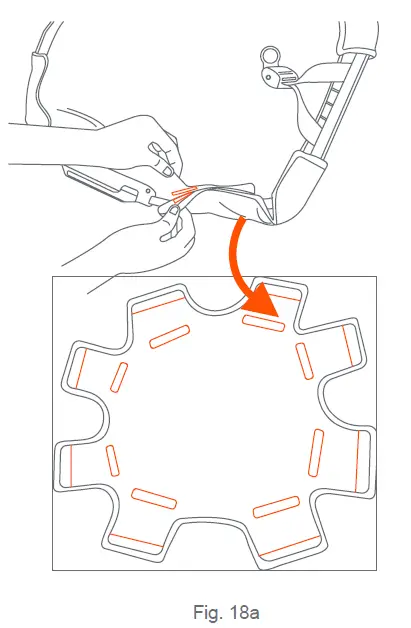
ADAPTER FABRIC
- Use the hook and loop fasteners on the underside of the adapter bar to remove the fabric (Fig. 18a).
- To reattach, wrap all the panels over the bar and attach with the hook and loop (Fig. 18b).
ACCESSORIES
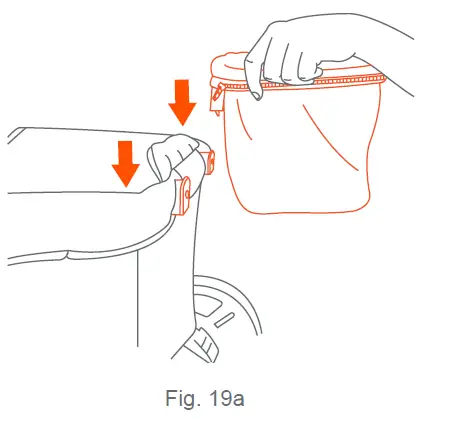
BASKET
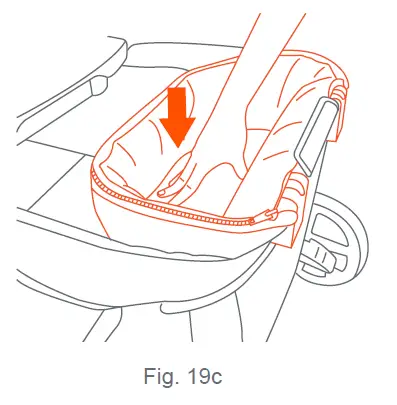
To install: Attach the basket from the outside frame of the wagon. Ensure both latches are straight, facing the frame. Insert by pushing in and sliding down the latches until it locks (Fig. 19a).
IMPORTANT: DO NOT put child in the basket.
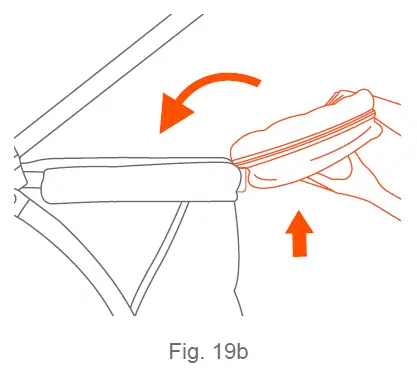
To flip basket into the wagon: From the bottom of the basket, push it upward and over into the wagon, until the basket is entirely inside (Fig. 19b). Push down into basket to ensure its secure (Fig. 19c)
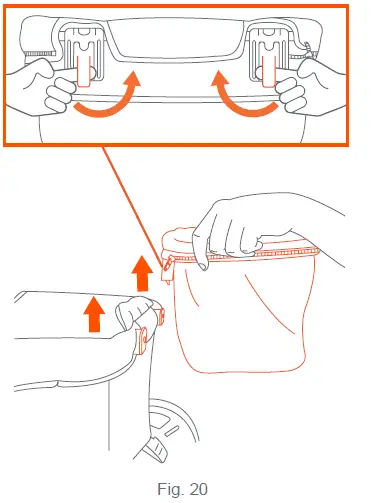
TO REMOVE BASKET
To detach: Flip the basket over the wagon frame. Pull the latch levers forward and lift up, until the basket comes off completely (Fig. 20).
SEAT 2 MAT
Option 1 Mat(s): Lay flat in stroller (Fig. 21a). IMPORTANT: Only use the harness in the lowest position, and place mat(s) with round edge towards the back seating position as shown in (Fig. 21b). (See step 16 for rethreading).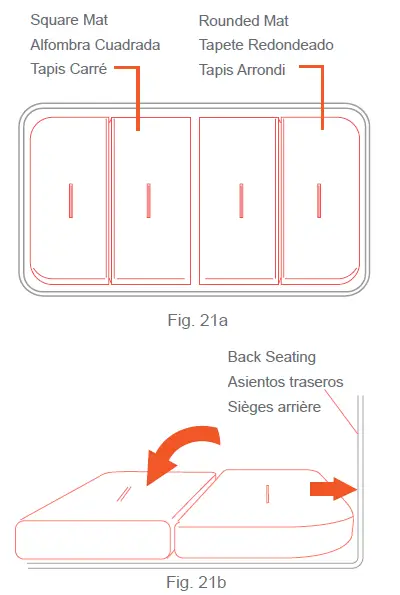
Option 2 Seat(s): To use as seat(s) thread the crotch buckle through the folded or unfolded mat(s).
IMPORTANT: Only use the lowest position for the unfolded mat and the highest position for folded mat (Fig. 21c) (Fig 21d). Always buckle the harness to use as a stroller. Refer to step 10 for harness instructions. (See step 16 for rethreading).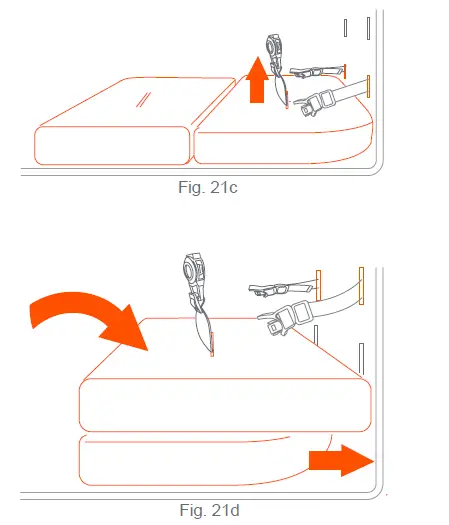
SEAT 2 MAT WASHING INSTRUCTIONS: Remove the foam and wash the cover separately. Do not wash it with other fabrics . Machine wash on gentle / delicate cycle with cold water. Do not bleach. Do not tumble dry. Hang dry. Do not iron. Do not dry clean.
NOTE: NEVER use stroller if wheels do not lock into place. If you need assistance, please contact our customer service department at 1-800-328-7363, M-F, between 8am and 4:30pm, PST.
CARE AND MAINTENANCE
- Cleaning Seat Pad: Spot clean only – Surface wash small spots with mild solution of soap and water. Rinse with water to remove soap solution. Wipe or air dry.
- Cleaning Stroller: Surface wash stroller frame, plastic parts and fabric with mild solution of soap and water. Wipe surfaces with water to remove soap solution. Wipe or air dry.
- Check your stroller for loose screws, worn parts, torn material or stitching on a regular basis. Replace or repair parts as needed.
BABY TREND® CUSTOMER SERVICE
The Customer Service Department can be contacted at 1 (800) 328-7363 Monday through Friday between 8:00 a.m. and 4:30 p.m. (PST). Return Authorizations are required prior to returning product(s) to Baby Trend®
WARRANTY
DO NOT RETURN YOUR PRODUCT TO THE STORE. PLEASE CONTACT BABY TREND® FOR REPLACEMENT PARTS, SERVICE AND REPAIR.
The Baby Trend® warranty covers workmanship defects within 1 year of purchase. Any product which has been subjected to misuse, abuse, abnormal use, excessive wear and tear, improper assembly, negligence, environmental exposure, alteration or accident, or has had its serial number altered or removed invalidates all claims against the manufacturer. Any damage to property during installation is the sole responsibility of the end user. Customer Service Department can be contacted at 1 (800) 328-7363 Monday through Friday between 8:00 a.m. and 4:30 p.m. (PST). Return Authorizations are required prior to returning product(s) to Baby Trend®. Please visit http://babytrend.com/pages/limited-warranty for complete warranty details.
Baby Trend, Inc.
13048 Valley Blvd.
Fontana CA 92335
1-800-328-7363
(8:00am ~ 4:30pm PST)
www.babytrend.com