
BaByliss FOR men TITANIUM Nitride 7427U User Manual

TITANIUM NITRIDE FACE AND BODY GROOMER
The BaByliss for Men Pro Titanium Nitride is a professional grade, high powered multi-trimmer for full face and body grooming. The acute angle Titanium Nitride cutting blade delivers smooth, effortless cutting. A rapid charging system delivers 45 minutes of cordless, high power from only a 3 hour charge. The 5 interchangeable heads offer total versatility so you can trim, shave and tidy to define your style.
FEATURES
- Cord/cordless trimmer with 5 interchangeable attachment heads.
- Precision Trimmer with acute Titanium Nitride cutting blades for long lasting sharpness
- 6-position comb guide (4-18mm)
- 3-position stubble comb guide (1.0mm,1.5mm,2.0mm)
- Body Groomer with Titanium Nitride cutting blades for long lasting sharpness
- 6-position comb guide (13-23mm)
- Nose & Ear Hygienic Rotary Head
- Detail Trimmer
- Foil Shaver
- Charging and storage stand
- Cleaning brush
- Oil
- 3 year guarantee
SAFETY CAUTIONS
- This appliance should only be used as described within this instruction book. Please retain for reference.
IMPORTANT CHILD SAFETY
WARNING! Polythene bags over the product or packaging may be dangerous. To avoid danger of suffocation, keep away
from babies and children. These bags are not toys.
IMPORTANT SAFETY
 Do not immerse the appliance in water or other liquids.
- Always inspect the appliance before use for noticeable signs of damage. Do not use if damaged or if the appliance has
been dropped. In the event of damage contact the Conair Customer Care Line (refer to UK After Sales Service section for further information). - Only use the attachments supplied with this appliance.
- Do not leave the appliance unattended when switched on.
- Do not place the appliance on any surface whilst in operation.
- Special care is required when using the appliance close to the ears, eyes and face.
- This appliance should not be used by adults whose reduced physical, sensory or mental capabilities, or whose lack of experience and knowledge, might cause a hazard, unless they have been correctly instructed to understand the safe use and hazards involved and are adequately supervised.
- Careful adult supervision is required when this appliance is used on or near children. Do not use on very young children.
- This appliance should not be used, cleaned or maintained by children. Keep out of reach of children.
- Always ensure that this appliance is kept out of the reach of children at all times, particularly during use and whilst cooling.
- Allow the appliance to cool before storing away.
- This product complies fully with all appropriate EU and UK Legislation and the standards relevant to this type and class of appliance. We are an ISO9001:2015 credited company that continually evaluates our Quality Management System performance. If you have any queries regarding product safety and compliance, please contact the Conair Customer Care Line (refer to «UK After Sales Service» section).
• The battery should be removed for safe disposal at the end of its life.
INSTRUCTIONS FOR USE
IMPORTANT! Only use the adaptor and attachments supplied with this appliance
Inserting the Adaptor Cord into the Stand
- Remove the trimmer and accessories from the stand.
- Insert the adaptor plug into the hole on the back of the stand and push firmly into position.
- Should you wish to charge the appliance without using the charging stand, simply place the adaptor plug directly into the bottom of the main trimmer unit.
Charging the Appliance
- Before using for the first time, the appliance should be fully charged continuously for 3 hours. This initial super-charge ensures optimum power performance to ensure smooth fast trimming every time. Maximum battery capacity will only be reached after 3 charging and discharging cycles.
- A full 3 hour charge will provide approximately 45 minutes of cordless use.
- The red LED light will flash when charging the appliance, and the red light will stop flashing but remain on when fully charged.
- When the appliance is about to run out of power, the charging indicator will flash and you will have approximately 3 minutes of use remaining.
- Ensure the appliance is switched off.
- Insert the appliance into the charging and storage stand or place the adaptor plug directly into the main trimmer unit.
WARNING: If the charging light suddenly starts to flash rapidly, the appliance is faulty. If this happens, please stop charging and remove the adapter from the outlet and contact our customer care center for further advice.
Preserving the batteries
In order to maintain the optimum capacity of the rechargeable batteries, the trimmer should be fully discharged and then recharged for 3 hours every 6 months.
- For optimum performance, we recommend you charge the unit for at least 30 minutes before using the appliance each time. This applies to whether you are using it with mains or cordless power.
Preparation for Use
- Always inspect the appliance before use for noticeable signs of damage. Do not use if damaged.
- Ensure the heads are free from hair and debris and that the blades are properly oiled (refer to Cleaning & Maintenance section for further information).
- Ensure the appliance is sufficiently charged.
- Use on clean, dry hair that has been combed until tangle-free.
Mains Operation
- Ensure the appliance is switched off.
- Connect the adaptor to the base of the appliance and plug the adaptor into a suitable mains socket.
- The red LED will appear when the adaptor is correctly inserted into the appliance and connected to the mains.
- The appliance is now ready for use.
- NOTE: The appliance should not be used for longer than 20 minutes when operated from the mains.
Cordless Operation
- Insert the adaptor into the base of the appliance, plug into a suitable mains socket and switch off. The red LED will appear when the adaptor is correctly inserted into the appliance and connected to the mains.
- Once the appliance in fully charged, the red light will stop flashing but remain on. Unplug the adaptor from the mains socket and appliance and prepare for use.
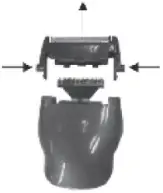
Changing the Heads
- Before changing the heads, ensure the appliance is switched off.
- To remove a head, hold the handle of the appliance with one hand, hold the head with the other hand and pull the head back and away from the front of the handle.
- To attach a head, the driving pin needs to be in a central position. If it is not in the centre, manually move the pin into position. Then, making sure that the base of the head is seated in the handle, click the head into position. Make sure taper control is set to position number 1 when changing head.
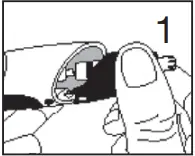
Installing the nose/ear trimmer
- Insert the pin of the trimmer body into the hexagonal hole of the trimmer head as shown in Fig.1.
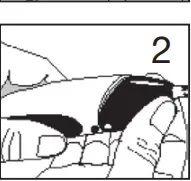
- Press and snap the trimmer head onto the body as shown in Fig. 2.
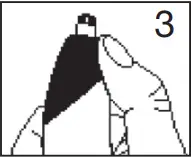
- Detaching the nose/ear trimmer:
- Hold the trimmer in the way as shown in Fig.3 with the thumb pressing the top front part of the trimmer head and snap it off.
Comb Guides
6-Position Comb Guide For Precision Trimmer:
- Ensure the appliance is switched off.
- Attach the Precision Trimmer head.
- Slide the smaller of the 2 comb guides onto the front of the Precision Trimmer head and push down at the rear to lock into place – you will hear a clicking noise when it’s in position.
- The comb guide will be set to the shortest of the six cutting lengths.
- To adjust the cutting length, push the guide forward to the required position. The comb guide has 6 length settings: 4mm, 6mm, 9mm, 12mm, 15mm & 18mm.
- To remove the comb, gently lift the guide off the head by lifting the rear section.
6-Position Comb Guide For Body Groomer:
- Ensure the appliance is switched off.
- Attach the Body Groomer head.
- Align the larger of the 2 comb guides onto the front of the Body Groomer head and push down at the rear to lock into place – you will hear a clicking noise when it’s in position.
- The comb guide will be set to the shortest of the six cutting lengths.
- To adjust the cutting length, push the guide forward to the required position. The comb guide has 6 length settings, 13, 15, 17, 19, 21 & 23mm.
- To remove the comb, gently lift the guide off the head by lifting the rear section.
TRIMMING
Precision Trimmer
Using the Precision Trimmer with 6-position comb guide:
- Attach the smaller of the 6-position comb guides and select the required length (4-18mm).
- If you require more than one cutting length, start with the longest length first.
- Adjust the taper control for super fine cut adjustment as required.
- Switch the trimmer on.
- Hold the trimmer with the teeth of the trimmer pointing upwards, yet flat against the skin.
- Move the trimmer upwards and outward through the hair, against the direction of hair growth.
- The trimmer will work most efficiently when cutting through hair at its own speed.
- Never switch the appliance off whilst in the hair.
- Note: The Precision Trimmer can be used without any comb guides and will cut roughly to a length of 0.5mm.
Using the Precision Trimmer with the 3-position stubble combs:
- Attach the 3-position stubble comb (I = 1mm, II = 1,5mm and III = 2mm).
- If you require more than one cutting length, start with the longest length first (2mm).
- Switch the trimmer on.
- Hold the trimmer with the teeth of the trimmer pointing upwards, yet flat against the skin.
- Move the trimmer upwards and outward through facial hair you wish to trim.
- To blend-in a shorter length use a shorter length and use in the same way as above.
- The trimmer will work most efficiently when cutting through hair at its own speed.
- Never switch the appliance off whilst in the hair.
To outline using the Precision Trimmer:
- Do not attach a comb guide.
- Hold the trimmer upside down with the blade facing downwards, yet flat against the skin.
- Move the trimmer gently downwards in small strokes around the edge of the area you wish to outline.
- Having defined the outline, hold the trimmer with the blades pointing upwards, yet flat against the skin and move the trimmer upwards against the direction of hair growth. This will trim the unwanted hair adjacent to the outline.
Body Groomer
Using the Body Groomer with 6-position comb guide:
- Attach the larger of the 6-position comb guides and select the required length (13-23mm).
- Adjust the taper control for super fine cut adjustment as required.
- Switch the trimmer on.
- Hold the trimmer with the teeth of the trimmer pointing upwards, yet flat against the skin.
- Move the trimmer upwards and outward through the hair, against the direction of hair growth.
- Make sure to be particularly careful when trimming sensitive areas.
- The trimmer will work most efficiently when cutting through hair at its own speed.
- Never switch the appliance off whilst in the hair.
- Note: The Body Groomer can be used without any comb guides and will cut roughly to a length of 0.5mm.
Foil Shaver
Using the Foil Shaver:
- Finish edges with a smooth, close shave result with the Foil Shaver head attachment.
- Always ensure the foil is not damaged before each use.
- Switch the trimmer on.
- Move the shaver gently over the skin, applying minimal pressure and shaving in the direction of hair growth.
- Make sure to be particularly careful when trimming sensitive areas.
- Never switch the appliance off whilst in the hair.
Nose & Ear Trimmer
Using the Nose & Ear Trimmer:
- For the safe and easy removal of unwanted nose and ear hair use the rotary trimmer head.
- Switch the trimmer on.
- Insert the trimmer into the nose or ear and gently move the trimmer in a circular motion.
- Only use the trimmer at the entrance to the ear or nose. Do not use any deeper, as this could cause injury.
- Never turn the trimmer off whilst in the nose and ear hair.
Detail Trimmer
Using the Detail Trimmer:
- For accurate tramlines and detailed effects, attach the Detail Trimmer head.
- Switch the trimmer on.
- Gently move the blade through the area of hair you wish to trim.
- The trimmer will work most efficiently when cutting through hair at its own speed.
- Never turn the trimmer off whilst in the hair.
CLEANING and MAINTENANCE
To maintain optimum performance, the appliance should be cleaned after each use:
- Remove the comb guide after use. Rinse under running water and dry thoroughly before storage or use.
- Remove the trimmer head after use. The heads are washable for easy cleaning. Rinse under running water and dry thoroughly before storage or use.
- Do not disassemble the blades.
- Periodically, it may be necessary to oil the blades. After cleaning, attach a trimmer head, switch on and oil the blades using a few drops of the lubricating oil supplied. Only use the lubricating oil supplied with the appliance as this is specifically formulated for high speed trimmers and does not evaporate or slow the blades.
- For instructions on how to re-attach the head, please refer to ‘‘Changing the Heads’’ section.
TO CLEAN THE FOIL SHAVER HEAD
- Press buttons on both sides of the shaver head and remove the foil attachment for cleaning.
- Do not touch the shaver blade as it is sharp.
- Shaver foil is thin, handle with caution.
BATTERY DISPOSAL
 To minimize hazards to health and the environment at the end of this product’s life, laws dealing with Waste Electrical and Electronic Equipment (WEEE) and The Waste Battery Directive require you to dispose of these products and their batteries at a suitable collection facility where they will be sent for appropriate recycling. Please contact your local authorities for more details on recycling and safe disposal of these in your area.
UK GUARANTEE
The Conair Group Ltd, Unit 3, Waterfront Business Park,
Fleet GU51 3TW
This BaByliss for Men appliance is guaranteed for consumer use for 3 years and is only valid within the United Kingdom. This guarantee covers consumer use only i.e. defects occurring under normal use within the home from date of purchase or date of delivery, whichever is later. If the product develops a fault due to defects in materials or manufacture
within 12 months from the date of purchase, to avoid delays and unnecessary inconvenience, where possible please return the product to the point of purchase for an exchange, If the product develops a fault due to defects in materials or manufacture
after 12 months from the date of purchase, and within the guarantee period, Conair UK After Sales Service will repair or replace the product.
Exclusions This guarantee will no longer be valid meaning that The Conair Group Ltd will not be liable to repair or replace your product where:
- The appliance has been used on a voltage supply other than that which is marked on the product, or advised within this instruction booklet
- The appliance has been purchased from an unauthorized stockiest*
- The appliance is used for professional / non domestic usage
- Repairs or alterations have been attempted by unauthorized persons
- The failure of the appliance is a direct result of misuse
- The failure is a result of not following the instructions for use
This guarantee does not cover any cosmetic damage due to misuse of the product nor any damage to persons or property that occurs because of product misuse.
*unauthorized stockiest include, but are not limited to online auction sites, private sellers and those selling second hand goods, refurbished products etc
Please contact the Conair Customer Care Line on 03705 133 191 (09:00 to 17:00 Monday to Friday) or e-mail [email protected] for further information on authorized stockiest.
It is important to retain your proof of purchase. We recommend attaching your receipt to this page.
Even where a refund may be applicable, no refund will be provided without a valid receipt or proof of purchase, we will only be able to offer a repair or replacement service. Please note this does not apply if the product was purchased directly from The Conair Group Ltd.
Guarantees on replacement products run from the original purchase date or date of delivery, whichever is later, and not from the date of replacement.
This guarantee is an additional benefit and does not affect your statutory rights as a consumer.
If you have any queries regarding this guarantee please contact the Conair Customer Care Line on 03705 133 191 (09:00 to 17:00 Monday to Friday) or e-mail [email protected]
UK AFTER SALES SERVICE
For further advice on using the appliance, contact the Conair Customer Care Line on 03705 133191 (09:00 to 17:00 Monday to Friday) or email our enquiry to [email protected].
If you should need to return your appliance to us please send it to the following address:
Customer Care Centre
Conair Logistics
Unit 4
Revolution Park
Buckshaw Avenue
Buckshaw Village
Chorley
PR7 7DW
Please enclose your name and address, together with a copy of proof of purchase and details of the fault.
Please note this Instruction Booklet is not the guarantee.