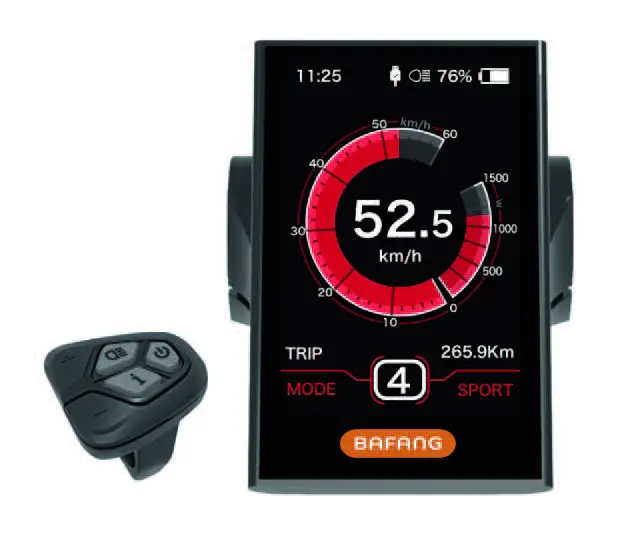

BAFANG DPC-18 Electric Bike Display
INTRODUCTION
- Name: Intelligent display
- Model: DP C18.UART
- Scope: electrically power assistance cycle
- Appearance: the shell is made of PC; The liquid crystal display is made of hardened PMMA

- Numbering on the back of the display Number on the middle of display back, num-ber is divided into up row and down row:
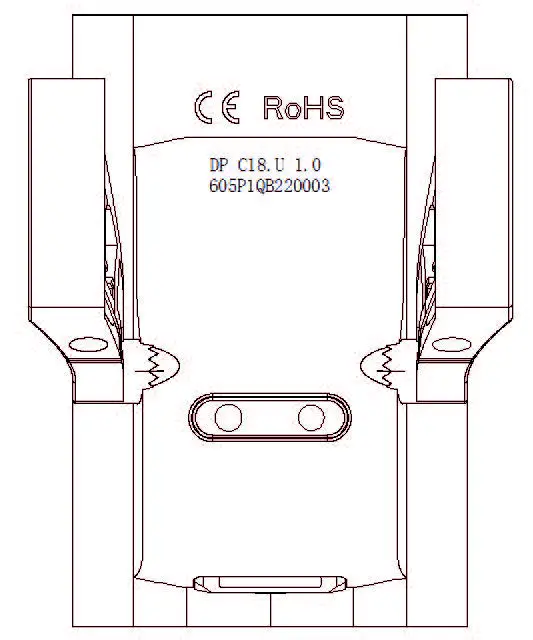
- Up row number (as below)
DP C18.U 1.0- DP C18.U: BAFANG display model
- 1.0: hardware version number
- Down row number (as below) 605P1QB220003
- 605: Wire length and connector model is 230mm M5.2
- P1: design number
- 1 QB220003: Production date is 21st Nov. 2016; SN is 0003
- Display P-type wire label number rule Number on the middle of P type label, num-ber is divided into up row and down row and QR code is at right side (as shown in the below figure)
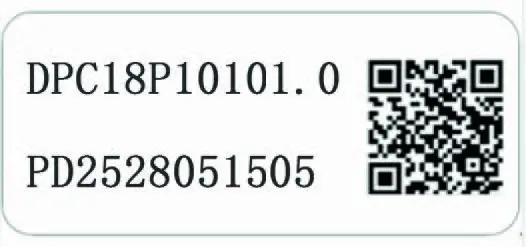
Content of QR code:
DPC18P10101.0, PD2528051505, DP C18.U 1.0 ,605P1QB220003
The first line: DPC18P10101.0 – Software version
The second line: PD2528051505 – Parameter code
The last two lines: DP C18.U 1.0 / 605P1QB220003 – SN
OVERVIEW DRAWING
SPECIFICATIONS
- Rated voltage: 36V/43V/48V DC
- Rated current: 10mA lines(as shown in the figure)
- Maximum operating current: 30mA
- When power off, leak current is less than: 1uA
- Operating current supplied to controller: 50mA
- Operation temperature: -20℃~45℃
- Storage temperature: -30℃~70℃
- IP level: IP65
- Storage humidity: 30%-70%
FUNCTIONAL OVERVIEW
- Use of a two-way serial communication protocol, simple operation of the display via the external 5-key keypad.
- Speed display: displaying the real-time speed as SPEED, the maximum speed as MAXS and the average speed as AVG.
- Km or mile: The user can choose between km and mile.
- Intelligent battery level indication: With an optimization algorithm, a stable display of the battery level is ensured, and the problem of fluctuant battery level indication common with other displays is avoided. The user can define display mode of battery level as volt-age or percentage.
- Automatic light-sensitive lights: The head-light, taillight and display backlight will be automatically turned on/ off depending on lighting conditions.
- 5 levels off display backlighting: 10% is most dark, 100% is highest light.
- 6-Level-Support: setting power Levels 0 to 5.
- Trip distance indication: The maximum distance displayed is 99999. Single-trip distances TRIP or the total distance TOTAL can be displayed.
- Display of error messages
- Walk assistance
- Two kind of riding mode: “ECO”/“SPORT”
- Intelligent display: including motor’s output power W for riding, output current A, Remaining miles RANGE, consumption of energy CALORIES.
- Set boot password: user can set boot pass-word by himself.
- Set parameters: Various parameters, e.g. power assistance level, wheel diameter, speed limit etc., can be set on the computer via a communication cable. Please see the detailed in the description of the computer parameter configuration.
- Through the display, it can switch wheel diameter and speed limit.
NORMAL INDICATION AREA
- Time display:
The time is represented in the 24-hour system and show the current time, time can be set in the“Set clock”. - USB charge display:
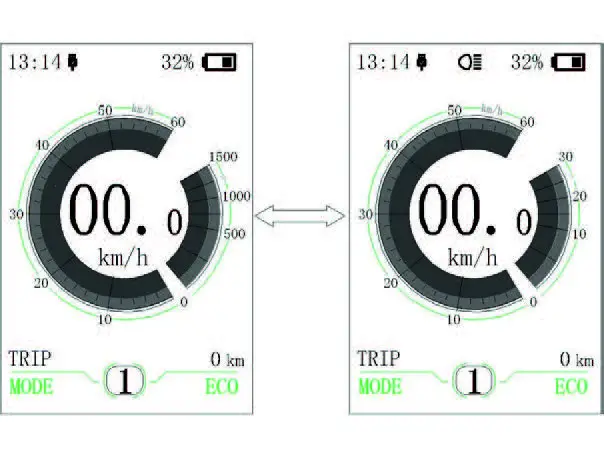
When external connect into the display, it display the symbol. - Headlight indication:
Only shows when headlight is on. - Speed scale display:
the scale value is in accordance with the digital value. - Mode select:
single-trip distance (TRIP) → total distance ODO → maximum speed (MAX) → average speed (AVG) →remaining distance (RANGE) energy consumption (CALORIES) → time (TIME). - Battery level display:
Display current battery level value. - Voltage display/percentage display:
Display actual battery level value, display mode can be set in the “Soc View”. - Speed digital display:
Display current speed value, speed unit can be set in“Unit”. - Power scale display/current scale display:
Display current output value, output unit can be set in“Power View”. - 10 Power assistant level display/walk assistance:
Display the seven levels as“0”/“1”/“2”/“3”/ “4”/ “5”/“ ”, briefly press (0.5S) or to switch the level. Touch and hold (2S) to start the mode “ walke assistance”, display symbol - Made data display:
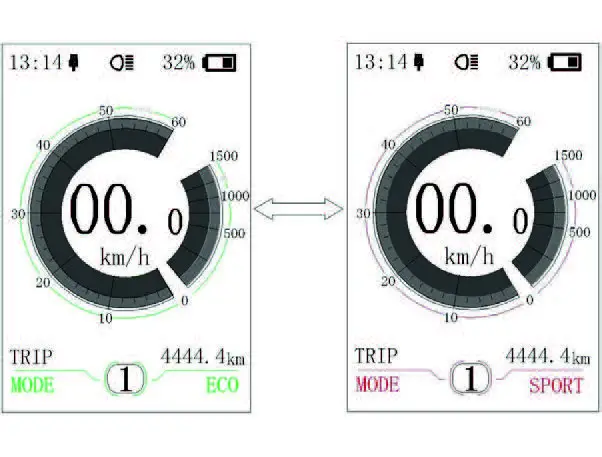
Display current data corresponding to the mode. - Riding mode display:
Display current riding mode, “SPORT” or “ECO”, can touch and hold (2S) to switch the mode.
BUTTON DEFINITION
NORMAL OPERATION
- On/off switch
Turn on the power, press and hold (>2S)
to power on the display, the display begin to operate. Press and hold (>2S) again to power off the display. If the bike is not used, after 5 minutes (time can be set in
“Auto Off”) the display will be automatically turned off. If the password function of the display is activated, need to input the correct password to enter into the normal display interface. - Power assistance level select
In the manual gearshift mode, briefly press (<0.5S) or to switch the level to change the assistance power, The lowest level is Level 0, the highest Level 5. When the display is on, the default mode is Level 1,“0”means no power assistance.
- Switch between Distance Mode and Speed Mode
Briefly press (0.5s) to switch the display between the distance and speed, cycle show signal-trip distance (TRIP) → total distance (ODO) → maximum speed (MAX) → average speed (AVG) → remaining distance (RANGE) → energy consumption (CALORIES) → time (TIME).Energy consumption unit CALO-RIES means kCal.
- Headlight / Disp Backliglayht Switch
Press and hold (>2S) to turn on the display backlight as well as headlight. Press and hold (>2S) again to turn off the display backlight and the headlight. There are 5 levels of backlight brightness that can be selected by the user (can be set in the“Brightness”). (If the display is turned on in a dark environment, the display backlight/headlight will be turned on automatically. If the display backlight/headlight are turned off manually, they also need to be turned on manually afterwards)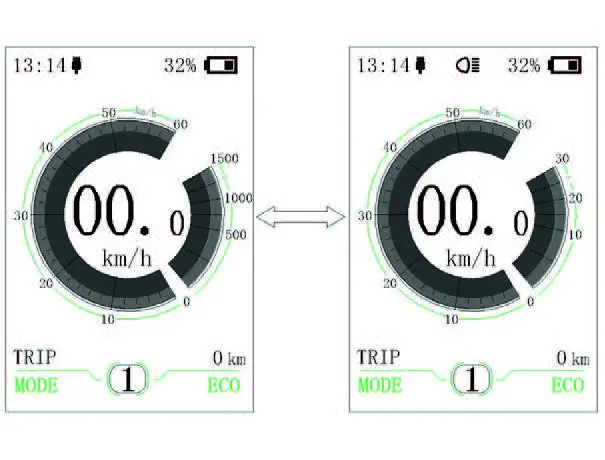
- alk assistance moWde
Press and hold (>2S) to enter into walk assistance mode, the symbol is displayed, when release key , will exit the walk as-sistance the mode.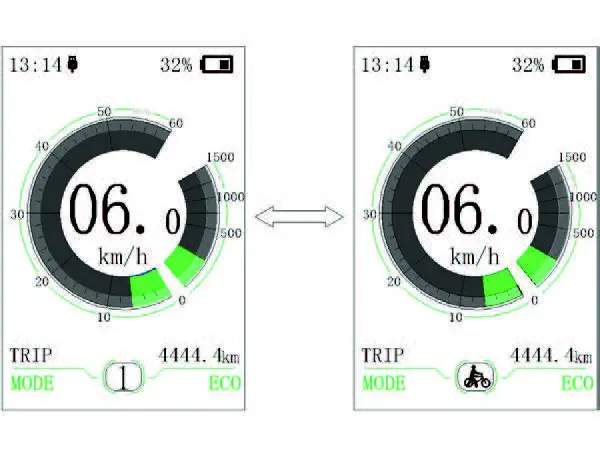
- Switch mode between ECO and SPORT Press and hold (>2S) to switch riding mode into “ECO”or “SPORT”.
INTRODUCTION
- Name: Intelligent display
- Model: DP C18.UART
- Scope: electrically power assistance cycle
- Appearance: the shell is made of PC; The liquid crystal display is made of hardened PMMA
- Numbering on the back of the display Number on the middle of display back, num-ber is divided into up row and down row:
- Up row number (as below)
DP C18.U 1.0- DP C18.U: BAFANG display model
- 1.0: hardware version number
- Down row number (as below) 605P1QB220003
- 605: Wire length and connector model is 230mm M5.2
- P1: design number
- 1 QB220003: Production date is 21st Nov. 2016; SN is 0003
- Display P type wire label number rule Number on the middle of P type label, num-ber is divided into up row and down row and QR code is at right side (as shown in the below figure)
Content of QR code:
DPC18P10101.0, PD2528051505, DP C18.U 1.0 ,605P1QB220003
The first line: DPC18P10101.0 – Software version
The second line: PD2528051505 – Parameter code
The last two lines: DP C18.U 1.0 / 605P1QB220003 – SN
OVERVIEW DRAWING
SPECIFICATIONS
- Rated voltage: 36V/43V/48V DC
- Rated current: 10mA lines(as shown in the figure)
- Maximum operating current: 30mA
- When power off, leak current is less than: 1uA
- Operating current supplied to controller: 50mA
- Operation temperature: -20℃~45℃
- Storage temperature: -30℃~70℃
- IP level: IP65
- Storage humidity: 30%-70%
FUNCTIONAL OVERVIEW
- Use of a two-way serial communication protocol, simple operation of the display via the external 5-key keypad.
- Speed display: displaying the real-time speed as SPEED, the maximum speed as MAXS and the average speed as AVG.
- Km or mile: The user can choose between km and mile.
- Intelligent battery level indication: With an optimization algorithm, a stable display of the battery level is ensured, and the problem of fluctuant battery level indication common with other displays is avoided. The user can define display mode of battery level as volt-age or percentage.
- Automatic light-sensitive lights: The head-light, taillight and display backlight will be automatically turned on/ off depending on lighting conditions.
- 5 levels off display backlighting: 10% is most dark, 100% is highest light.
- 6-Level-Support: setting power Levels 0 to 5.
- Trip distance indication: The maximum distance displayed is 99999. Single-trip distances TRIP or the total distance TOTAL can be displayed.
- Display of error messages
- Walk assistance
- Two kind of riding mode: “ECO”/“SPORT”
- Intelligent display: including motor’s output power W for riding, output current A, Remaining miles RANGE, consumption of energy CALORIES.
- Set boot password: user can set boot pass-word by himself.
- Set parameters: Various parameters, e.g. power assistance level, wheel diameter, speed limit etc., can be set on the computer via a communication cable. Please see the detailed in the description of the computer parameter configuration.
- Through the display, it can switch wheel diameter and speed limit.
NORMAL INDICATION AREA
- Time display:
The time is represented in the 24-hour system and show the current time, time can be set in the“Set clock”. - USB charge display:
When external connect into the display, it display the symbol. - Headlight indication:
Only shows when headlight is on. - Speed scale display:
the scale value is in accordance with the digital value. - Mode select:
single-trip distance (TRIP) → total distance ODO → maximum speed (MAX) → average speed (AVG) →remaining distance (RANGE) energy consumption (CALORIES) → time (TIME). - Battery level display:
Display current battery level value. - Voltage display/percentage display:
Display actual battery level value, display mode can be set in the “Soc View”. - Speed digital display:
Display current speed value, speed unit can be set in“Unit”. - Power scale display/current scale display:
Display current output value, output unit can be set in“Power View”. - 10 Power assistant level display/walk assistance:
Display the seven levels as“0”/“1”/“2”/“3”/ “4”/ “5”/“ ”, briefly press (0.5S) or to switch the level. Touch and hold (2S) to start the mode “ walke assistance”, display symbol - Made data display:
Display current data corresponding to the mode. - Riding mode display:
Display current riding mode, “SPORT” or “ECO”, can touch and hold (2S) to switch the mode.
BUTTON DEFINITION
NORMAL OPERATION
- On/off switch
Turn on the power, press and hold (>2S)
to power on the display, the display begin to operate. Press and hold (>2S) again to power off the display. If the bike is not used, after 5 minutes (time can be set in
“Auto Off”) the display will be automatically turned off. If the password function of the display is activated, need to input the correct password to enter into the normal display interface. - Power assistance level select
In the manual gearshift mode, briefly press (<0.5S) or to switch the level to change the assistance power, The lowest level is Level 0, the highest Level 5. When the display is on, the default mode is Level 1,“0”means no power assistance. - Switch between Distance Mode and Speed Mode
Briefly press (0.5s) to switch the display between the distance and speed, cycle show signal-trip distance (TRIP) → total distance (ODO) → maximum speed (MAX) → average speed (AVG) → remaining distance (RANGE) → energy consumption (CALORIES) → time (TIME).Energy consumption unit CALO-RIES means kCal. - Headlight / Disp Backliglayht Switch
Press and hold (>2S) to turn on the display backlight as well as headlight. Press and hold (>2S) again to turn off the display backlight and the headlight. There are 5 levels of backlight brightness that can be selected by the user (can be set in the“Brightness”). (If the display is turned on in a dark environment, the display backlight/headlight will be turned on automatically. If the display backlight/headlight are turned off manually, they also need to be turned on manually afterwards) - alk assistance moWde
Press and hold (>2S) to enter into walk assistance mode, the symbol is displayed, when release key , will exit the walk as-sistance the mode. - Switch mode between ECO and SPORT Press and hold (>2S) to switch riding mode into “ECO”or “SPORT”.
BAFANG DPC-18 Electric Bike Display
INTRODUCTION
- Name: Intelligent display
- Model: DP C18.UART
- Scope: electrically power assistance cycle
- Appearance: the shell is made of PC; The liquid crystal display is made of hardened PMMA
- Numbering on the back of the display Number on the middle of display back, num-ber is divided into up row and down row:
- Up row number (as below)
DP C18.U 1.0- DP C18.U: BAFANG display model
- 1.0: hardware version number
- Down row number (as below) 605P1QB220003
- 605: Wire length and connector model is 230mm M5.2
- P1: design number
- 1 QB220003: Production date is 21st Nov. 2016; SN is 0003
- Display P type wire label number rule Number on the middle of P type label, num-ber is divided into up row and down row and QR code is at right side (as shown in the below figure)
Content of QR code:
DPC18P10101.0, PD2528051505, DP C18.U 1.0 ,605P1QB220003
The first line: DPC18P10101.0 – Software version
The second line: PD2528051505 – Parameter code
The last two lines: DP C18.U 1.0 / 605P1QB220003 – SN
OVERVIEW DRAWING
SPECIFICATIONS
- Rated voltage: 36V/43V/48V DC
- Rated current: 10mA lines(as shown in the figure)
- Maximum operating current: 30mA
- When power off, leak current is less than: 1uA
- Operating current supplied to controller: 50mA
- Operation temperature: -20℃~45℃
- Storage temperature: -30℃~70℃
- IP level: IP65
- Storage humidity: 30%-70%
FUNCTIONAL OVERVIEW
- Use of a two-way serial communication protocol, simple operation of the display via the external 5-key keypad.
- Speed display: displaying the real-time speed as SPEED, the maximum speed as MAXS and the average speed as AVG.
- Km or mile: The user can choose between km and mile.
- Intelligent battery level indication: With an optimization algorithm, a stable display of the battery level is ensured, and the problem of fluctuant battery level indication common with other displays is avoided. The user can define display mode of battery level as volt-age or percentage.
- Automatic light-sensitive lights: The head-light, taillight and display backlight will be automatically turned on/ off depending on lighting conditions.
- 5 levels off display backlighting: 10% is most dark, 100% is highest light.
- 6-Level-Support: setting power Levels 0 to 5.
- Trip distance indication: The maximum distance displayed is 99999. Single-trip distances TRIP or the total distance TOTAL can be displayed.
- Display of error messages
- Walk assistance
- Two kind of riding mode: “ECO”/“SPORT”
- Intelligent display: including motor’s output power W for riding, output current A, Remaining miles RANGE, consumption of energy CALORIES.
- Set boot password: user can set boot pass-word by himself.
- Set parameters: Various parameters, e.g. power assistance level, wheel diameter, speed limit etc., can be set on the computer via a communication cable. Please see the detailed in the description of the computer parameter configuration.
- Through the display, it can switch wheel diameter and speed limit.
NORMAL INDICATION AREA
- Time display:
The time is represented in the 24-hour system and show the current time, time can be set in the“Set clock”. - USB charge display:
When external connect into the display, it display the symbol. - Headlight indication:
Only shows when headlight is on. - Speed scale display:
the scale value is in accordance with the digital value. - Mode select:
single-trip distance (TRIP) → total distance ODO → maximum speed (MAX) → average speed (AVG) →remaining distance (RANGE) energy consumption (CALORIES) → time (TIME). - Battery level display:
Display current battery level value. - Voltage display/percentage display:
Display actual battery level value, display mode can be set in the “Soc View”. - Speed digital display:
Display current speed value, speed unit can be set in“Unit”. - Power scale display/current scale display:
Display current output value, output unit can be set in“Power View”. - 10 Power assistant level display/walk assistance:
Display the seven levels as“0”/“1”/“2”/“3”/ “4”/ “5”/“ ”, briefly press (0.5S) or to switch the level. Touch and hold (2S) to start the mode “ walke assistance”, display symbol - Made data display:
Display current data corresponding to the mode. - Riding mode display:
Display current riding mode, “SPORT” or “ECO”, can touch and hold (2S) to switch the mode.
BUTTON DEFINITION
NORMAL OPERATION
- On/off switch
Turn on the power, press and hold (>2S)
to power on the display, the display begin to operate. Press and hold (>2S) again to power off the display. If the bike is not used, after 5 minutes (time can be set in
“Auto Off”) the display will be automatically turned off. If the password function of the display is activated, need to input the correct password to enter into the normal display interface. - Power assistance level select
In the manual gearshift mode, briefly press (<0.5S) or to switch the level to change the assistance power, The lowest level is Level 0, the highest Level 5. When the display is on, the default mode is Level 1,“0”means no power assistance. - Switch between Distance Mode and Speed Mode
Briefly press (0.5s) to switch the display between the distance and speed, cycle show signal-trip distance (TRIP) → total distance (ODO) → maximum speed (MAX) → average speed (AVG) → remaining distance (RANGE) → energy consumption (CALORIES) → time (TIME).Energy consumption unit CALO-RIES means kCal. - Headlight / Disp Backliglayht Switch
Press and hold (>2S) to turn on the display backlight as well as headlight. Press and hold (>2S) again to turn off the display backlight and the headlight. There are 5 levels of backlight brightness that can be selected by the user (can be set in the“Brightness”). (If the display is turned on in a dark environment, the display backlight/headlight will be turned on automatically. If the display backlight/headlight are turned off manually, they also need to be turned on manually afterwards) - alk assistance moWde
Press and hold (>2S) to enter into walk assistance mode, the symbol is displayed, when release key , will exit the walk as-sistance the mode. - Switch mode between ECO and SPORT Press and hold (>2S) to switch riding mode into “ECO”or “SPORT”.
USER SET
- Operating process in the set interface
- Enter into “SETTING” interface.
After turn on the display, briefly press (<0.5S)
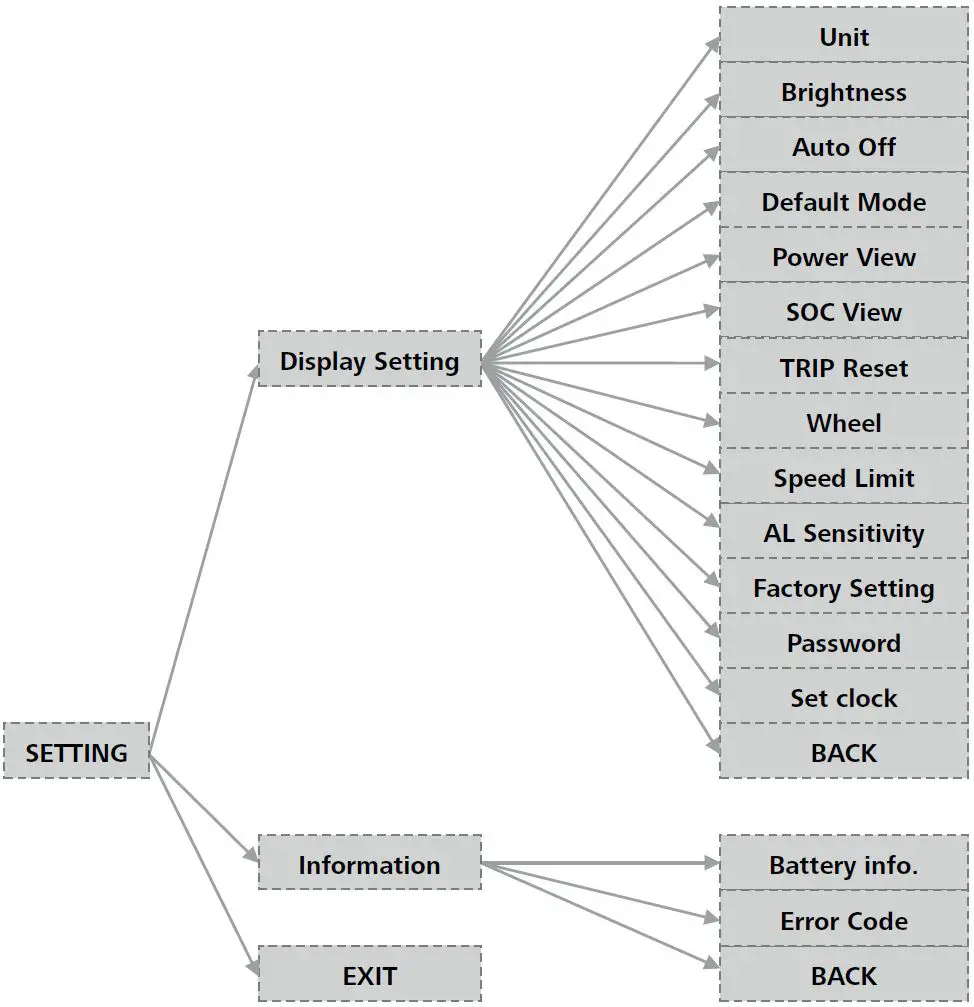
for two times to enter into the“SETTING” interface. The interface includes the three options as “Display setting”,“Information”a nd“EXIT”. Briefly press (<0.5S) or to switch the options and then briefly press<0.5S) to confirm and enter into the op-tion. Select “EXIT” and briefly press (<0.5S)
to exit the interface or briefly press(<0.5S) for two times in any interface to exit the set inface. The set dates are saved for the two exit mode. If there is no any operaion within 20s and then exit the set interface, no any dates are saved. - Enter into“Display setting” interface
In the “SETTING” interface, briefly press (<0.5S) or to select “Display setting” and then briefly press (<0.5S) to confirm and enter into “Display setting”. There are thirteen set options in the interface.- “Unit”switch between the km and mile Briefly press (<0.5S) + or – to select“Unit”, and then briefly press (<0.5S) to enter into the set interface. Briefly press (<0.5S)
or to select “Metric”/ “Imperial”, and then briefly press (<0.5S) to save the set and exit back to“Unit” interface. Briefly press for two times (interval time is less than 0.5S) to exit back to main interface,or select “BACK” → “EXIT” to exit back to the main interface.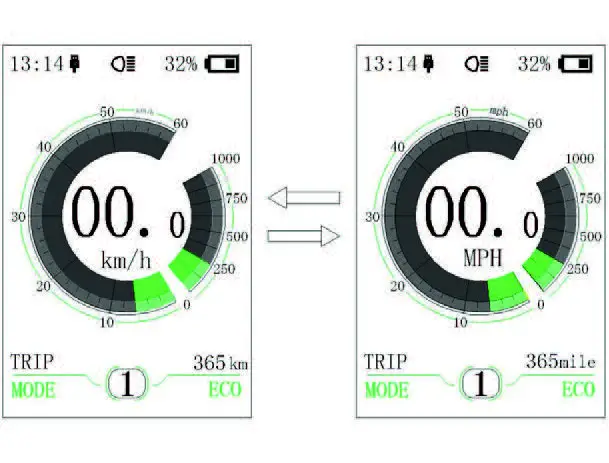
- “Brightness”- set display brightness Briefly press (<0.5S) or to select “Brightness” and then briefly press (<0.5S) . This moment, briefly press (<0.5S) or to switch the percentage as “100%”/ 75%”/“50%”/“30%”/“10%”. 100% is the highest brightness, 10% is lowest bright-ness. After select the brightness percentage, briefly press (<0.5S) again to save the set and exit back to “Brightness”. Briefly press for two times (interval time is less than 0.5S) to exit back to main interface, or select “BACK” → “EXIT”to back the main interface
- “Auto Off”— set automatic Off time Briefly press (<0.5S) or to select “Auto Off”, and then briefly press (<0.5S) . This moment, briefly press (<0.5S) or to switch automatic Off time as “OFF”/“9”/“8”/“7”/“6”/“5”/ “4”/“3”/“2”/“1”. The unit is minute. After selection, briefly press (<0.5S) to save the set and exit back to “Auto Off”. Briefly press for twe times (interval time is less than0.5S) to exit back to main interface or select “BACK” → “EXIT” to exit back to main interface.
- “Default Mode”— set riding mode for starting up Briefly press (<0.5S) + or -to selcet “SOC View”, and then briefly press (<0.5S) . This moment, briefly press (<0.5S) or to switch display mode for output as “Percent”/“Voltage”. After confirmation, briefly press (<0.5S) to save the set and exit back to “SOC View”. Briefly press for two times (interval time is less than 0.5S) to exit back to the main interface, or select “BACK” → “EXIT” to exit back to the main menu.
- “Power View”— set output display mode Briefly press (<0.5S) or to select“Power View”, and then briefly press (<0.5S). This moment, briefly press (<0.5S)or to switch the output display mode as “Power”/“Current”. After confirmation, briefly press (<0.5S) again to save the set and exit back to “Power View”. Briefly press for two times (interval time is less than 0.5S) to exit back to the main interface, or select “BACK” → “EXIT” to exit back the main interface.
- “SOC View” — set display mode for battery level Briefly press (<0.5S) +or – To selcet “SOC View”, and then briefly press (<0.5S) . This moment, briefly press (<0.5S) or
to switch display mode for output as “Percent”/“Voltage”. After confirmation, briefly press (<0.5S) to save the set and exit back to “SOC View”. Briefly press for two times (interval time is less than 0.5S) to exit back to the main interface, or select “BACK” → “EXIT” to exit back to the main menu.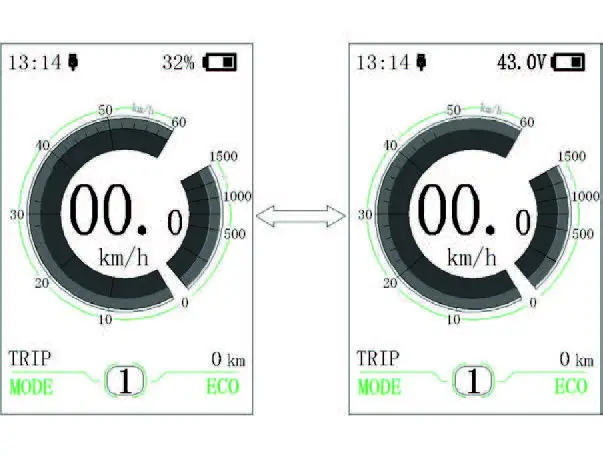
- “TRIP Reset” — set reset function for single-trip distance Briefly press (<0.5S) or to select “TRIP Reset”,and then briefly press (<0.5S) . This moment, briefly press (<0.5S) or
to switch between “NO” and “YES”. TRIP Re-set includes maximum speed (MAXS), aver-age speed (AVG), single-trip distance (TRIP). After confirmation, briefly press (<0.5S) again to save the set and exit back to the “TRIP Reset”. Briefly press for two times (interval time is less than 0.5S) to exit the main interface, or select “BACK” → “EXIT”to exit back to the main interface. The data is not reset automatically when turn off the display or turn off the power of the bicycle. - “Wheel” — set the wheel diameter Briefly press (<0.5S) or to select “Wheel”, and then briefly press (<0.5S) . This moment, briefly press (<0.5S) or to select the wheel diameter as “6”/“7”/“8”/ ……/“32”/“33”/“34”. After confirmation, briefly press (<0.5S) to save the set and exit back to “Wheel”. Briefly press for two times (interval time is less than 0.5S) to exit back to main interface or select “BACK” “EXIT” to exit back to main menu.
- “Speed Limit” — set speed limit Briefly press (<0.5S) or to select “Speed Limit” and then briefly press (<0.5S) . This time, briefly press (<0.5S) or to select the number as “10”/“11”/“12 ”/……/“58”/“59”/“60”. After confirmation, briefly press (<0.5S) to save the set value and exit back to “Speed Limit”. Briefly press for two times (interval time is less than 0.5S) to exit back to main interface or select “BACK” → “EXIT” to exit back to main interface.
- “AL Sensitivity” — set light sensitivity Briefly press (<0.5S) or to select “AL Sensitivity”, and then briefly press (<0.5S) . This moment, briefly press (<0.5S) or to switch level of the light ensitivity between “0”/“1”/“2”/“3”/“4”/“5”/“OFF”. “OFF” means close the function. Level 1 is the weakest light sensitivity and level 5 is the strongest light sensitivity. Select the level esired and briefly press (<0.5S) again to save the setting and exit back to “AL Sensi-tivity”. Briefly press for two times (interval time is less than 0.5S) to exit back to main interface or select BACK” → “EXIT” to exit back to main interface.
- “Factory Setting”— Restore factory Set-tings Briefly press (<0.5S) +or – to select “Factory Setting” and then briefly press (<0.5S) . This moment, briefly press (<0.5S) or to select “YES” / NO”. Select “YES” and briefly press (<0.5S) . When display the “OK”, it means it is successful to restore the factory setting. Briefly press for two times(interval time is less than 0.5S) to exit ack to main interface or select “BACK” → “EXIT” to exit the main interface.
- “Password”— boot password setting Briefly press (<0.5S) + or- to select “Password” and then briefly press (<0.5S) . This momen, briefly press (<0.5S) orto select “Start PassWord” and hen briefly press (<0.5S) again. Briefly press (<0.5S) or to switch between “OFF” / “ON”, the below is the specific way of switching. Starting password: Enter into “Start PassWord” interface and select “ON”. Briefly press (<0.5S) , and then it show input password in the interface.
This moment, briefly press (<0.5S) or to switch numbers “0-9”, and then briefly press (<0.5S)
to confirm input number. After input, it show input password again in the interface. Repeat the above step to input password again. If the password is same with the previous time, the system will prompt it is successful to set password, otherwise it need to repeat the first step to input the new password and then re-confirm.
After setting the passwrod, the interface exit back automatically to original interface within two seconds. Briefly press for two times (interval time is less than 0.5S) to exit back to main interface or select “BACK” → “EXIT” to exit back to main interface.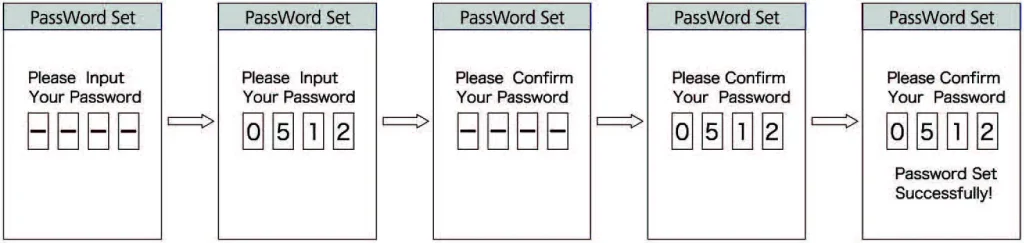
- “Unit”switch between the km and mile Briefly press (<0.5S) + or – to select“Unit”, and then briefly press (<0.5S) to enter into the set interface. Briefly press (<0.5S)
Change password:
After setting the password, the interface “Password” will add option “Reset Password”. Briefly press (<0.5S) or to select “Reset Password”, and then briefly press (<0.5S) . This time it prompt input current password in the interface. If inputing worng password for ten tiems, the display will turn off automatically. When inputing right password, it prompt input new passwrod in the interface. The following step is same with starting password. After changing the password, it will exit auto-matically back to the original interface within two seconds. Briefly press for two times (interval time is less than 0.5S) to exit back to the main interface or select “BACK” → “EXIT” to exit back to main interface.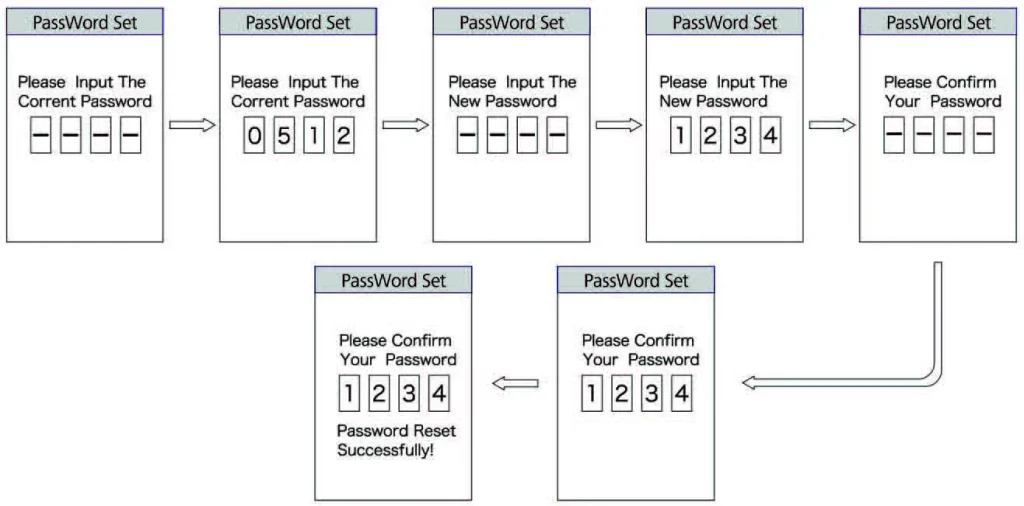
Close password:
Enter into “Start PassWord” interface to select “OFF” and then briefly press (<0.5S)
. This moment, it prompt input password in the interface. If inputing wrong password for ten times, the display will turn off auto-matically. After inputing right password, it prompt it is successful to close password in the interface. Two seconds later, it exit back automatically to the original interface. Briefly press for two times (interval time is less than 0.5S) to exit back to the main interface or select “BACK” → “EXIT” to exit the main interface.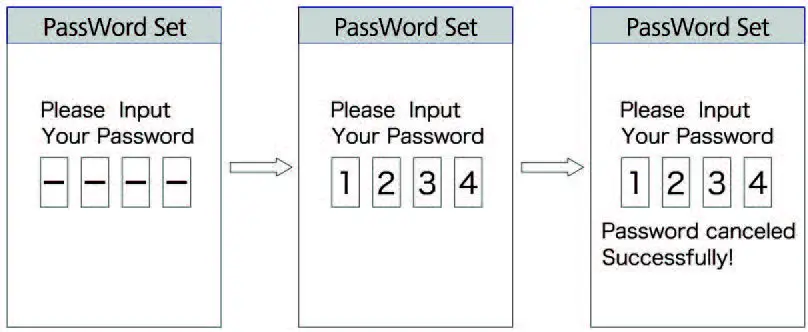
- “Set Clock”— time setting
Briefly press (<0.5S) or select “Set Clock” and then briefly press (<0.5S) . The time is represented in the 24-hour system. Cursor stays at the first digit of the clock. Briefly press or to select “0-2” and then briefly press (<0.5S) to confirm the selection. At this moment, the cursor switch to the second digit of the clock. Briefly press
or to select “0-9”, and then briefly press (<0.5S) to confirm the selection. And the cursor will switch to the first digit of the minute. Briefly press + or- to select “0-5”, and then briefly press (<0.5S) to confirm the selection. The cursor will switch the second digit of the minute, and then briefly press (<0.5S) or to select “0-9”. Briefly press (<0.5S) to save the selection and exit back to “Set Clock”. Briefly press for two times (interval time is less than 0.5S) to exit back to the main interface or select “BACK” → “EXIT” to exit back to the main interface. - Enter into the “Information” interface
Enter into “SETTING” interface and briefly press (<0.5S)+ or to select “Information” and briefly press (<0.5S) to confirm and enter into the interface. It can check all content in the interface “Information”, but can’t use the display to modify the content. - “Battery Info.”check
Briefly press (<0.5S) or to select “Battery Info.” and briefly press (<0.5S) to enter into information display interface. This moment, select “Nest Page” and briefly press (<0.5S) to switch the display interface. If detecting no data, it display “–”. See the content and corresponding explanation shown in the table below: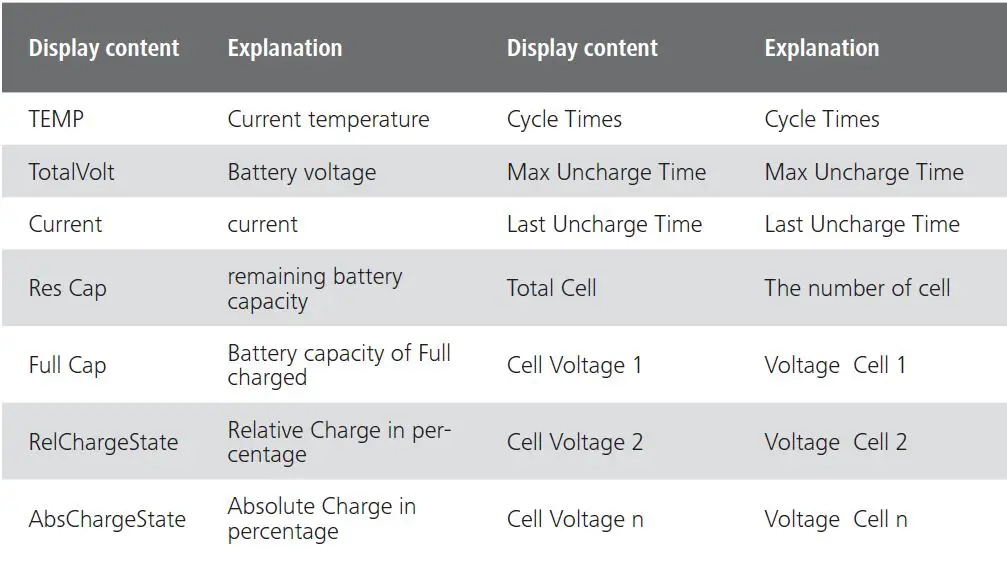
- “Error Code”check Briefly press (<0.5S) or to select “Error Code” and briefly press (<0.5S) to enter into the interface in which it display information. “E-CODE” display the error information for last ten times. “E-CODE 1” represents the error content for the last time. “E-CODE 10” represents the error content up to the tenth time. The maximum ten records can be kept. Error code “00” means no error. Please see the error code table to know about the definition of the other codes.
ERROR CODE DEFINITION
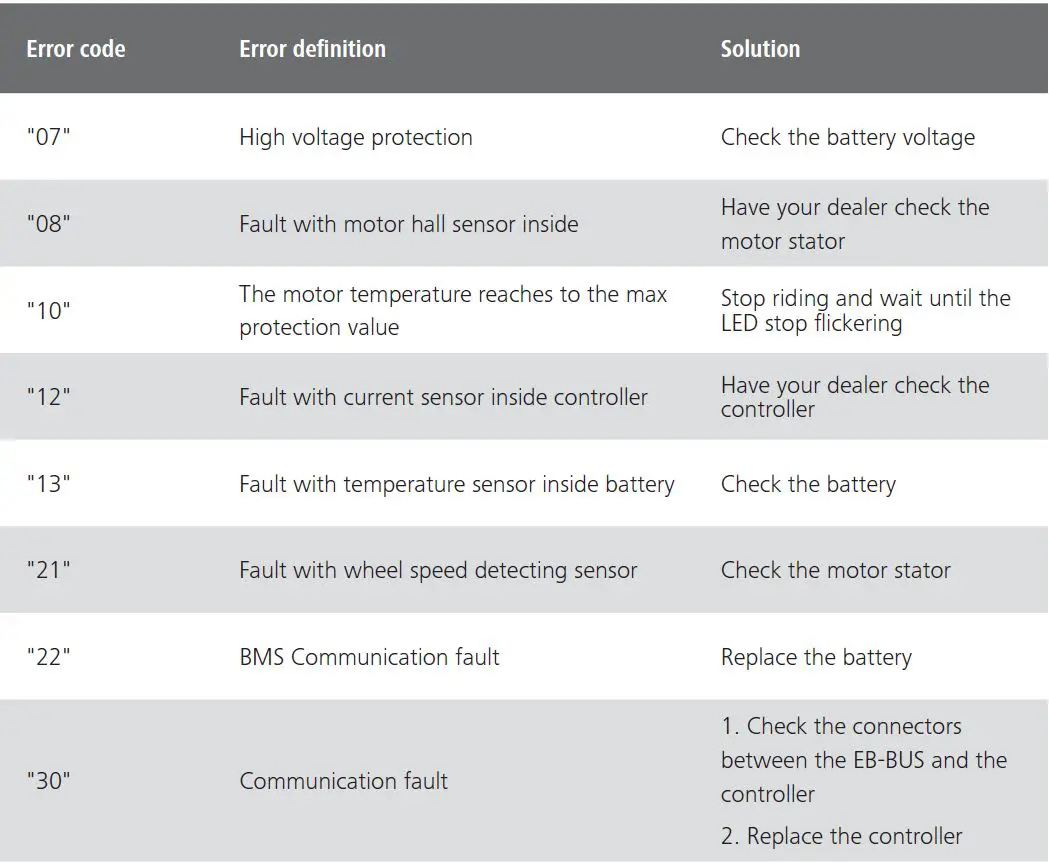
DP C18.UART display can show e-bike faults. When a fault is detected, the icon following error codes will be displayed