Banter Bliss Candle Making Instructions
Candle Making
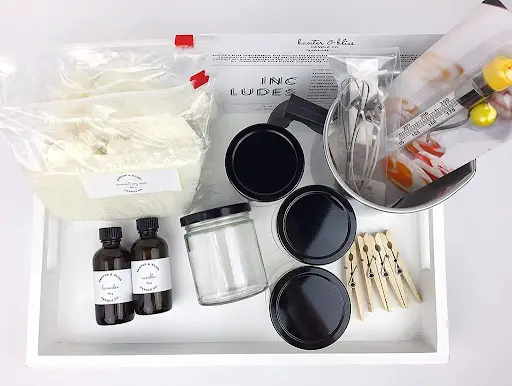
Banter & Bliss Candle Co.’s Complete DIY Coconut Wax Blend Starter Candlemaking Kit includes the essentials to get you well on your way to becoming a master chandler! All ingredients are pre-weighed and kit includes supplies to make four (4) 7 ounce scented coconut soy candles in two (2) different scents. No measuring needed! A totally hassle-free way to DIY. Thermometer, pour pitcher, clothes pins, and mini whisk can be used more than once. Check out our Make More Kits for all the supplies needed to make more candles once you’ve completed this beginners kit. Gift box option available.
What’s included in the kit
- Candlemaking thermometer
- 2lb Pour pitcher
- (4) Warning labels
- (4) Cotton wick
- (4) Clothes pins
- (4) 9 oz. straight sided jars with lid
- (2) 360 grams Banter & Bliss coconut soy wax
- 7” Mini whisk
- (4) Wick stickers
- (2) 36 grams Premium fragrance oil
- (2) Color dye chips x 2 (choose from 13 colors)
What you’ll need
- Stove
- Medium saucepan
- Water
Making your candle
- Add 360 grams (1 bag) of Banter & Bliss coconut soy wax to your pour pitcher.
- Melt the wax on a stove using a double boiler. Heat to 200 F. Be careful not to overheat the wax.
Check the temperature periodically and make sure the wax is never left unattended. - Once the temperature reaches 200 F, add 36 grams of premium fragrance oil (1 bottle) to your pour pitcher and one (1) color dye chip (do not use a color chip if you want your candles to be white). Stir all the ingredients together at 200 F then remove from heat and let the wax cool to 190 F.
- While the wax is cooling, place a wick sticker on the bottom of the pre tabbed cotton wick and affix the wick to the inside of the candle jar. Try to place the wick in the center to ensure even burn.
Apply the warning label to the bottom of the jar. Repeat this step for the remaining jars. - When the wax cools to 190 F, carefully pour the wax evenly into two (2) jars.
- Gently thread the wick through the metal hole in your clothes pin. Allow the clothes pin to slide down the wick and rest on the top of the jar. This will keep the wick straight and centered while the candle is cooling. Repeat this step for the second candle that you poured.
- Repeat the above steps to make your last two (2) candles.
- Allow your candles to cool completely before removing the clothes pins. Removing the clothes pins before the candle has completely cooled will crack the wax around the wick.
- Trim the wick to ¼” before lighting. Do not trim your wick too short. Your candles will not burn properly if the wicks are cut too short.
Needle Felt Hedgehog
The Needle Felt Hedgehog workshop with Sheep Farm Felt’s Megan Benson is the perfect kid-friendly craft. Using a handful of materials, you’ll instantly create a cute new friend that doubles as an adorable gift!
What’s included in the kit
- Gray wool yarn for quills
- (3) Felting needles
- (1) Foam block
- Gray and black wool roving
What you’ll need
- Stove
- Medium saucepan
- Water
Making your hedgehog
- Cut the quills – Take 1 or 2 strands of wool yarn and wrap them around your ruler. Using sharp scissors, cut vertically up the ruler to create pieces of wool yarn that will be approximately 2 inches long.
Continue until all of the quills are cut. - Draw the outline – Using your fabric or permanent marker, draw a line around your hedgehog that resembles the drawing.
- Needle Felt the quills – Lay 4 pieces of wool yarn down on the hedgehog form. Create a Plus sign (+) and then an (x) on top. Use your thumb and forefinger to secure the top strand of wool down. Using an up and down motion with your felting needle, poke the center of the strands into the form. Repeat until all of the form is covered with quills inside of the line that you drew. Using your hand, cover and hold down the quills at the face of the form. Needle Felt the yarn down so it appears the quills are growing back as opposed to sticking straight up.
- Make the face – Take 1x 2 inch section of gray roving and roll it until you have a cylinder. Bring the two ends of the cylinder together and place onto the form to create an ear into the concave section of quills. Repeat for the other ear. Use a very small amount of black roving and roll it between your fingers to create a small ball. Secure onto the form to make eyes. Roll a larger ball to make the nose and needle felt on the tip of the form. Use a bit of black roving and roll between your hands to make a thin strand of yarn. Needle Felt it onto the form to make a mouth.
- Trim – Using your scissors, trim any quills that are sticking up.
Floral Salt Soak
Achieve next level rest and relaxation with Live by Being’s Floral Salt Soak. Using a specially crafted oil blend and flowers and pre-packed, all natural ingredients, this activity is easy to follow and takes no time at all. This soak pairs perfectly with a long and warm bath!
What’s included in the kit
- (1) Glass Jar with label
- (1) Wooden scoop
- (1) Cotton Muslin Bag
- (1) Pack of Dead Sea Salt
- (1) Jasmine & Lavender Oil Blend
- (1) Pack of Coconut Milk
- (1) Pack of Sodium Bicarbonate (Baking Soda)
- (1) Pack of Lavender Flowers
What you’ll need
- Large bowl
- Spatula (optional)
Making your floral salt soak
- In a large bowl combine the coconut milk and baking soda blend well with hands or spatula removing clumps.
- Mix in the Dead Sea Salt which includes the essential oils.
- Add the lavender flowers last and give mix a gentle toss.
- Fill jar with the jasmine and lavender oil blend.
- Add 1-2 scoops to bath water OR into the included cotton muslin bag and drop the bag under the running water as you draw the bath.
- Breathe deeply to enjoy this aromatherapeutic blend that inspires calm and balance.
Flower Painting
Rebeca will bring the magic of the woods home with this workshop. Using base paste, you’ll transform a framed screen into a piece of art, featuring beautiful hydrangeas and wildflowers. Don’t forget to sign your masterpiece!
What’s included in the kit
- (1) Black canvas
- (1) Plate
- (1) Brush and paint set
- (1) Reference Picture
What you’ll need
- Water
- Small Bowl or cup
- Napkins
Making your hydrangea painting
- First, we’ll make the stem – mix green, yellow, and a little black paint. (It’s going to be dark and that’s ok, it’s supposed to be!) As you paint the stem, make sure you curve the stem, it will make it look more realistic!
- Using that same color, draw 3 hearts on the sides to create leaves.
- Highlight your stem and leaves with a lighter green by mixing green, yellow, and white. Use that color to create strokes on your stem and leaves.
- Moving on to the actual flower! To measure the size of the hydrangea, put two open hands together.
That will be the size of your hydrangea! We’ll start with the outline. Grab some purple paint and draw the outline of a brain or cloud. - Paint your hydrangea – mix purple with a little black and fill in the rest of your “brain” with this purple color.
- Apply white and purple paint to your brush and start make petals by doing small strokes (you’ll need a lot of them!), letting it dry and adding more white paint as you go.
- Use the back tip of the brush to add little yellow centers and very tiny smiley faces under the yellow with black.
- Make a lavender color by mixing purple with a lot of white and apply a bit of water. Use small brush strokes to create petals flying from the flower. Make sure your brush doesn’t have a lot of paint for this!
- You’re done — almost! Sign your name and make it look like a masterpiece!
@amazonhandmade
#CampHandmade