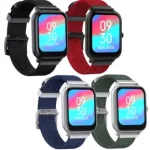
BAUHN ASW-0822 Smart Watch with Sleep Tracking
![]()
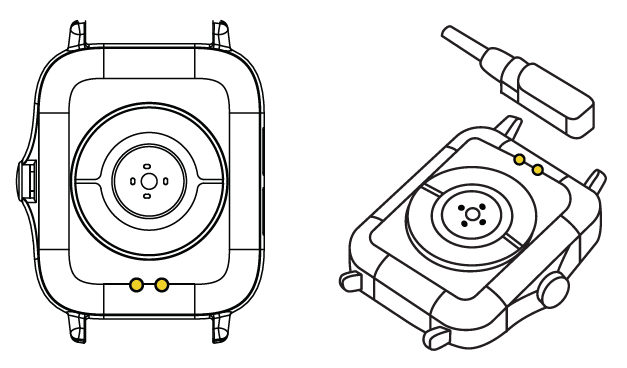
Parts of the watch
![]()
- Touch screen
- Side button
- Microphone
- Charging pins
- Heart rate, blood pressure and oxygen sensor
- Speaker
NOTE:
The images in this guide are for reference only. Your watch may be a different colour.
First Time Use
Charge your watch before using for the first time, you will need to charge it for about 3 hours.
Charging steps:
- Align the charging pins on the back of the watch to the charging pins on the charging cable. It will snap into position once correctly aligned.
- Connect the charging cable to a USB charging adaptor (not included) or a USB port on your computer.
- Once fully charged, unplug the charging cable from the charger. To keep the charging pins clean, please use a damp cloth and gently clean the charging pins weekly.
GloryFit App
Search for the GloryFit app in the app store to download, or scan the QR code below for installation.![]()
![]()
Google Play and the Google Play logo are trademarks of Google LLC. Apple, the Apple logo, iPhone, and iPad are trademarks of Apple Inc., registered in the U.S. and other countries and regions. App Store is a service mark of Apple Inc.
NOTE:
the display menu will have minor differences between the iOS and Android version of the app.
Turn on the Watch
Once the watch is fully charged, press and hold the side button for 3 seconds to turn on the watch. To turn off the watch, press and hold the side button for 3 seconds.
Connect to the App
Open the GloryFit app. On the main page, tap “Profile” and set up your account. Then select “Device” > “Add a new device” > “Select device” and it will automatically start to search for nearby devices. On the devices list, select “ASW-0822(ID-XXXX)” to connect to the watch. On iOS devices, you may need to tap on “Pair” on a pop up window.
Disconnect from the App
For both iOS and Android devices, open the GloryFit app on your smartphone. Tap “Device” and select “Unbind (Android)/Unpair (iOS)” to disconnect the watch from the app. You will also need to open the Settings menu on your smartphone. Go to Bluetooth settings, tap on the “i” (for iOS) or “setting” (for Android) icon on the right side of “ASW-0822” and then tap “Forget This Device” to finish disconnecting.
Turn On the Screen
To turn on the screen, Tap on the touch screen or raise your arm if you’re wearing the watch, or press the side button. Press the button again to turn off the screen. Raising your arm too quickly or slowly may not turn the screen on.
Functions On the Home Screen
- Swipe right to get to the main menu. From here, swipe up/down for the menu screens.
- Swipe left for the quick access settings to a pedometer, heart rate, sleep monitor and weather.
- Swipe up for the notifications screen.
- Swipe down for the shortcut menu.
Functions in any Screen
- Swipe right or press the side button to return to the previous screen or main screen.
- Tap on any icon to get into the sub-screen.
Applications
Please allow permission and enable the notification settings on the respective smartphone application.
Sleep Monitor
The watch has a dedicated built-in sleep monitor that automatically activates and records your sleep details when you fall asleep (you must be wearing the watch during the sleep duration for the function to work). Whether you are taking an afternoon nap or a night’s sleep, the sleep monitor will automatically activate at any time of the day.
On the main menu, tap on the icon to enter the Sleep interface and view the ![]()
The watch will record your daily, weekly and monthly sleep data and generate reports accordingly.
NOTE:
If the sleep duration is less than 3 hours, the data will be not recorded.![]()
From the reports you can view:
- Average sleep duration (sleep, deep sleep, light sleep)
- Earliest/latest sleep time
- Earliest/latest time woken up
Pedometer (Status)
On the main menu, tap on the ![]()
Alarm
You can set alarms on the app.
For iOS: select “Device” > “Alarm” then set the time, period and turn alarm on/off. Tap “<” to go back and save, tap “Yes” to confirm the alarm setting. For Android: select “Device” > “Smart Alarm Clock” > “+Add to” then tap “Time” and “Period” to set the time and period. Tape the tick icon to save and confirm. Tap “+ Add to” to add the next alarm setting. When the set time is up, the watch will alert. You can set up to 3 alarms.
Message
After your smartphone is connected to the watch, you can view new messages and other app notifications on the watch. The latest 10 notifications will be displayed on the watch. Your smartphone’s “SMS reminder” must be set to on. You can set which app notifications to receive under “App reminder(Android)/App (iOS)” on the GloryFit app.
NOTE:
Under “permission settings” on the GloryFit app, enable the messages to run in the background.
Sedentary Reminder
Set reminders to notify you to be active. Set the reminder times on the GloryFit app and the watch will alert you on the set time.
Remote Camera
On the GloryFit app, Select “Device” > “More Setting (iOS)/Universal Setting (Android)” “Shake to take picture.” You can now use the watch as a camera remote for your smart phone. Once connected, shake you wrist to remotely take a photo.
Heart Rate
On the main menu, tap on the ![]()
Blood Pressure
On the main menu, tap on the icon to enter the blood pressure interface. Tap the touch screen to start measurement. Synchronise the data to the GloryFit app to keep detailed records.
Blood Oxygen
On the main menu, tap on the ![]() icon to enter the blood oxygen interface and the function will automatically start to measure. Swipe right to exit and you can set Auto measurement intervals and view more detailed data on the GloryFit app.
icon to enter the blood oxygen interface and the function will automatically start to measure. Swipe right to exit and you can set Auto measurement intervals and view more detailed data on the GloryFit app.
When using the heart rate, blood pressure and blood oxygen functions, ensure the following:
- The smartwatch has good contact with your wrist.
- Check that the sensor is clean and there is no dirt or debris covering it.
- It may take over 30 seconds before the first result is shown on the screen.
NOTE:
The results and measurements of heart rate blood pressure and blood oxygen data cannot be used for medical reference and should be used as a guide only.
Watch Face Screen
You can change the style of the watch interface. On the main screen, press and hold the touch screen or tap the ![]() icon on the settings menu for the watch face selection page. Swipe left/right for different options, then tap the touch screen again to confirm selection.
icon on the settings menu for the watch face selection page. Swipe left/right for different options, then tap the touch screen again to confirm selection.
Sports (Training)
On the main menu, tap on the ![]()
Virtual GPS connection: select the ![]()
Tap the![]()
![]()
NOTE:
The smart watch will only save data if the distance is more than 200 steps/5 minutes in duration. GPS function must be turned on mobile and be connected to the mobile network.
Bluetooth Calls
On the main menu, tap on the ![]() icon to enter the Bluetooth call menu where you can view call history, contact list and dialer. Tap the “Switch” to turn the Bluetooth call function on. The function will automatically turn off after 15 minutes if not connected with your smart phone.
icon to enter the Bluetooth call menu where you can view call history, contact list and dialer. Tap the “Switch” to turn the Bluetooth call function on. The function will automatically turn off after 15 minutes if not connected with your smart phone.
NOTE:
Your smart phones Bluetooth must be paired to “ASW-0822” to use the function. To enable the watch for your smartphone’s Bluetooth calls, music playback and remote capture, please refer to the below: For Android devices: Go to your mobile settings Bluetooth. Select “Pair new device” and select “ASW-0822” from the list.
For iOS devices: Go to your mobile settings > Bluetooth. Select “ASW-0822” from the “Other Devices” list. Please ensure the shortcut menu shows.
Call Operation
After your smartphone is connected to the watch, you can directly answer/reject incoming calls through the watch.
To answer an incoming call, tap the ![]()
![]()
![]() icon to mute/unmute. Tap the icon and swipe up/down to adjust the volume.
icon to mute/unmute. Tap the icon and swipe up/down to adjust the volume.
Bluetooth Music Playback
- On the main menu, tap the

- Open the music app on your smart phone.
- Tap play/pause icon to play/pause music.
- Tap previous/next icon to play the previous/ next song.
Your smart phones Bluetooth must be connected to “ASW-0822” to use the function.
NOTE:
For iOS devices, music playback and remote capture will not work if you do not pair “ASW-0822(ID-XXXX)” on the pop up screen.
Weather
On the main menu, tap on the icon to view live weather (you can see up to a 3 day forecast). You must be connected to the GloryFit app.
NOTE:
You must have Internet/mobile connection for this function to work. Your phone location/GPS must also be turned on. The weather displayed may not be the same as your phone’s default weather app.
Shortcut menu
Swipe down to access the shortcut menu where you can adjust brightness, enter settings, turn on/off do not disturb mode and ‘find phone.’
Find Phone
After your smart phone is connected to the watch, tap the find phone icon and your smart phone will ring or vibrate.
NOTE:
before using the Find Phone function, Bluetooth Call function must be turned off on the watch. The ringing and vibration duration will differ between iOS and Android phones.
Settings
On the main menu, tap on the ![]()
![]()
- : Change watch face screen.
- : Adjust touch screen brightness.
- : Display Bluetooth, Mac address and software version.
- : Turn off the watch.
- : Reset to factory settings.
Function
On the main menu, tap on the ![]()
- Stopwatch
- Timer
- Flashlight
- Tap the icon and your smartphone will ring or vibrate.
Specifications
| Display | 1.7”, 240 x 280 pixels |
| Ingress protection | IP68 |
| Charging time | 1.5 hrs (approx.) |
| Charging base input |
5V 150mA |
| Bluetooth Range | < 10m |
| Built-In Battery | Li-ion 3.7V 220mAh |
| Weight | 47g (approx.) |
| Dimensions (mm) | 39 (W) x 51 (H) x 11.7 (D) |
The Bluetooth® word mark and logos are registered trademarks owned by Bluetooth SIG,Inc. and any use of such marks by Hands (IP) Holdings Pty Ltd is under license. Other trademarks and trade names are those of their respective owners.
Warranty Information
The product is guaranteed to be free from defects in workmanship and parts for a period of 12 months from the date of purchase. Defects that occur within this warranty period, under normal use and care, will be repaired, replaced or refunded at our discretion, solely at our option with no charge for parts and labour. The benefits conferred by this warranty are in addition to all rights and remedies in respect of the product that the consumer has under the Competition and Consumer Act 2010 and similar state and territory laws.
Our goods come with guarantees that cannot be excluded under the Australian Consumer Law. You are entitled to a replacement or refund for a major failure and to compensation for any other reasonably foreseeable loss or damage. You are also entitled to have the goods repaired or replaced if the goods fail to be of acceptable quality and the failure does not amount to a major failure.
Repair and Refurbished Goods or Parts Notice
Unfortunately, sometimes faulty products are manufactured, which need to be returned to the supplier for repair. Please be aware that if your product is capable of retaining user-generated data (such as files stored on a computer hard drive, telephone numbers stored on a mobile telephone, songs stored on a portable media player, games saved on a games console or files stored on a USB memory stick) during the process of repair, some or all of your stored data may be lost. We recommend you save this data elsewhere prior to sending the product for repair.
You should also be aware that rather than repairing goods, we may replace them with refurbished goods of the same type or use refurbished parts in the repair process. Please be assured though, that refurbished parts or replacements are only used where they meet ALDI’s stringent quality specifications. If at any time you feel your repair is being handled unsatisfactorily, you may escalate your complaint. Please telephone us on 1300 002 534 or write to us at: Tempo (Aust) Pty Ltd ABN 70 106 100 252 PO Box 132, Frenchs Forest, NSW 1640, Australia Telephone: 1300 002 534 (Aust) – Fax: (02) 8977 3765 Tempo Help Desk: 1300 002 534 (Aust) (Operating Hours: Mon-Fri 8:30am-6pm; Sat 9am-6pm EST). Email: tempo.org/support.