

Low Profile TV Wall Mount
Model Number: ALPB80-0719
INSTRUCTION MANUAL

Model: ALPB80-0719 Product Code: 9365 07/2019
Welcome
Congratulations on choosing to buy a BAUHN® product. All products brought to you by BAUHN® are manufactured to the highest standards of performance and safety and, as part of our philosophy of customer service and satisfaction, are backed by our comprehensive 1 Year Warranty. We hope you will enjoy using your purchase for many years to come.
Version 1.0
Warranty Details
Register your purchase at www.aldi.com.au/en/about-aldi/product-registration
to stay updated with important product information
The product is guaranteed to be free from defects in workmanship and parts for a period of 12 months from the date of purchase. Defects that occur within this warranty period, under normal use and care, will be repaired, replaced or refunded at our discretion. The benefits conferred by this warranty are in addition to all rights and remedies in respect of the product that the consumer has under the Competition and Consumer Act 2010 and similar state and territory laws.
Our goods come with guarantees that cannot be excluded under the Australian Consumer Law. You are entitled to a replacement or refund for a major failure and to compensation for any other reasonably foreseeable loss or damage. You are also entitled to have the goods repaired or replaced if the goods fail to be of acceptable quality and the failure does not amount to a major failure.
General Safety Instructions
IMPORTANT SAFETY INSTRUCTIONS
READ CAREFULLY AND KEEP FOR FUTURE REFERENCE
Read these instructions carefully before assembling and using the Low Profile TV Wall Mount to ensure your personal and other people’s safety and to avoid any property loss. If you do not understand these directions, or have any questions in relation to the safety of the installation, we recommend you contact a qualified professional. For all other general inquiries, please contact our After Sales Support centre (see details at the bottom of the page).
- Check carefully to ensure that there are no missing or defective parts.
- Never use defective parts. Our customer service representatives can quickly assist you with installation queries and replacement for missing or defective parts.
- Do not use this product for any other purpose than what is specified in this manual.
- Improper installation may cause damage or serious injury. We assume no liability for any eventual damage or injury caused by incorrect assembly, mounting or use, or by noncompliance with these instructions.
- This product is not intended for use by persons (including children) with reduced physical, sensory or mental capabilities, unless they have been given supervision or instruction by a person responsible for their safety.
- This product is not a toy. Before installing the Low Profile TV Wall Mount, make sure to keep the product away from infants and children. Supervise young children to ensure they do not play with the product or its parts.
- This product is intended for indoor use only. Do not install outdoors.
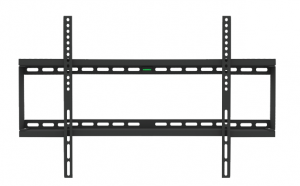
Product Overview
Low Profile TV Wall Mount
- Supports 800 x 400mm max VESA Hole pattern.
- Suitable for TVs sized 42-80” (106-203cm), weighing up to 65kg.
- Low profile, extending only 30mm (approx.) from the wall.

Supplied Parts and Hardware
The illustration below is to help you identify the parts; some parts are not shown at the same scale.

Wall Mounting Instructions

- This product can be mounted to a brick, concrete or stud wall. DO NOT attach it to a hollow plasterboard wall or decorative wall divider.
- If you want to install the wall mount to a wood stud wall, use a commercially available stud finder to locate the studs in the wall. If you have any doubts regarding this installation, consult a professional installer for advice. The wall must be structurally sound and strong enough to hold the weight of the TV and wall mount. If your builder approves mounting to a wood stud wall, follow the instructions on page 9.
- Be aware of the health hazard associated with asbestos fibres potentially present in the wall structure when drilling.
- If you want to install the wall mount to a steel stud wall, purchase suitable steel stud fasteners from your local hardware store. DO NOT use the supplied large self-tapping screws in steel studs.
- Before installing the wall mount, make sure you have read and understood all instructions. Also ensure that the wall is strong enough to hold the weight of the TV as well as the wall mount.
Tools Needed for Wall-Mounting:

Wall Mounting Instructions (Cont.)
Step 1: Attaching the Wall Plate
Mounting to a Brick or Concrete Wall
- Choose a solid wall area far away from any water source and direct sunlight. Avoid hollow areas or the mortar joints between bricks.
- Using the wall plate and its built-in spirit level, outline the location of the six holes on the wall (see Diagram 1). Ensure the holes are level.
- Using an appropriate the masonry plug, pre-drill a 50mm deep hole in each marked location.
- Place the masonry plugs (B) into the holes and gently tap them with a hammer until they are flush with the wall.
- Position the wall plate and insert the self-tapping screws (A) and flat washers (E) into the plugs. Secure the wall plate to the wall, making sure the upper and lower raised sections of the plate sit away from the wall.
Mounting to a Stud Wall
- Locate the edges of studs in the wall using a commercially available stud finder and mark the centre of the studs. Confirm the presence of the studs by drilling a small diameter pilot hole.
- Using the wall plate and its built-in spirit level, outline the location of the six holes on the studs (see Diagram 1). Ensure the wall plate is level.
- Position the wall plate and screw the self-tapping screws (A) and flat washers (E) into the studs. Secure the wall plate to the wall, making sure the upper and lower raised sections of the wall plate sit away from the wall (see Diagram 2).
NOTE: All 6 screws must be firmly installed to support the heavy load of a TV.
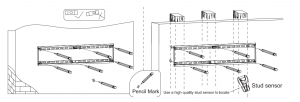
Diagram 1: Mark drill hole positions in a brick/concrete (left) or wood stud (right) wall.


Diagram 2: Secure the wall plate to a brick/concrete (left) or wood stud (right) wall using the appropriate installation hardware.
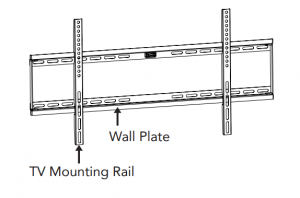
Step 2: Mounting the Rails to a Television
- Using a blanket or towel to protect the front of the screen, place your flat screen TV, and face down on the floor or a suitable table.
- On the rear of the TV, locate the screw holes used for attaching a wall bracket. Position the two mounting rails vertically over these holes, ensuring the hooks of the rails (with the square holes either side) are toward the top of the TV (see Diagram 3, below).
- Determine the correct size screws (F/G/H/I/J/K) to suit the screw holes in the screen.
NOTE: If the television manufacturer included different screws, use them, not the ones that are included with this bracket. - Insert the appropriate screws and alignment washers (C) and secure the rails to the television using a screwdriver.
NOTE: If the screw reaches the end of its travel but has not firmly secured the rail, then you may need to use thicker washers (not supplied) to reduce the depth the screw travels inside the chassis of the TV.

Diagram 3
Step 3: Attaching the Television to the Wall Plate
- Loosen the screws on the rail so that the rail can sit securely on the wall plate.
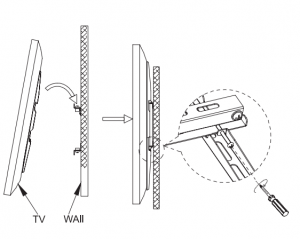
- Safely lift the TV and hook the mounting rails onto the top edge of the wall plate.
- Gently allow the screen to sit against the wall plate.
- Tighten the screws on the rails to lock it to the wall plate.

Fixing a flat panel TV to a wall mount requires specialist knowledge. We assume no liability for any injury or material damage incurred due to incorrect assembly or use. Make sure to follow all instructions and if you require professional advice, please consult a relevant tradesperson.

Repair and Refurbished Goods or Parts Notice
Unfortunately, from time to time, faulty products are manufactured which need to be returned to the supplier for repair.
Please be aware that if your product is capable of retaining user-generated data (such as files stored on a computer hard drive, telephone numbers stored on a mobile telephone, songs stored on a portable media player, games saved on a games console or files stored on a USB memory stick) during the process of repair, some or all of your stored data may be lost. We recommend you save this data elsewhere prior to sending the product for repair.
You should also be aware that rather than repairing goods, we may replace them with refurbished goods of the same type or use refurbished parts in the repair process.
Please be assured though, refurbished parts or replacements are only used where they meet ALDI’s stringent quality specifications.
If at any time you feel your repair is being handled unsatisfactorily, you may escalate your complaint. Please telephone us on 1300 886 649 or write to us at:
Tempo (Aust) Pty Ltd ABN 70 106 100 252
PO Box 6056 Frenchs Forest, NSW 2086, Australia
Tempo Help Desk: 1300 886 649 (Aust)
(Operating Hours: Monday-Friday 8:30am-6pm; Saturday 9am-6pm AEST)
Email: [email protected]
Model: ALPB80-0719 Product Code: 9365 07/2019