Beijing Puppy Robotics Hachi Infinite M1 Mini Interactive Touchscreen Projector

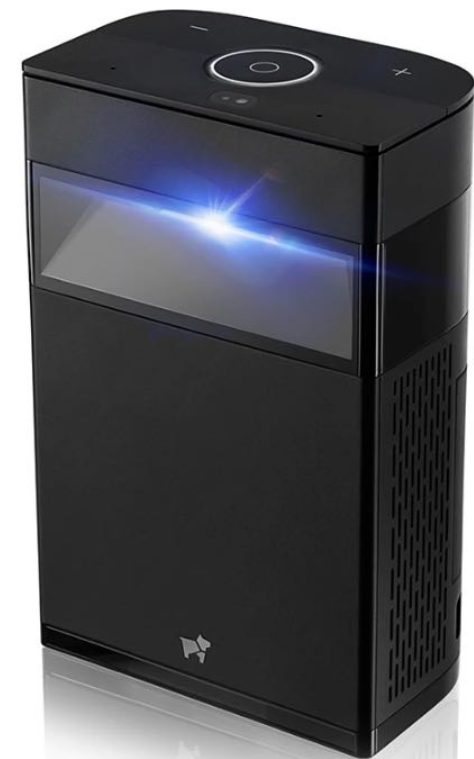
Projector Overview

- Power button
- Camera
- Volume button
- Microphone

- Vents
- Projector Window

- HDMI port
- Type- c port
- Head phone jack
- Charging port
Getting Started

- Power Button
Power-On :
When the device is off, press and hold the power button for 3 seconds to turn it on.
Power-Off:
When the device is on, press and hold the power button for 3 seconds and select Power Off in the shutdown menu that appears.
- Restart When the device is on, press and hold the power button for 3 seconds and select Reboot in the shutdown menu that appears.
- Sleep and Wake Up When the device is on, press the power button to put the device to sleep. The device will also enter sleep mode if you do not perform any operations for a period of time. After the device goes to sleep, press the power button on the projector or the remote control to wake it up.
Basic Knowledge
Vertical

- Please do not place any objects in the projection area or 5cm around and avoid strong light sources that shine on the projection area.
Vertical Touch Control Projection Stand the device upright on a flat surface. After turning it on, you can perform touch control operations in the projection area. The touch control interface supports 10-point touch control and can distinguish between taps, long-presses, two-finger zoom, and other common touch control gestures.
Horizontal Cinema Project

Do not place objects in the projection path or projection area and avoid strong external light sources that shine on it. When the device is in the horizontal mode, it is better to operate it using the remote control. Horizontal Cinema Projection Lay the device horizontally on a flat surface. After turning it on, you can project a large cinema-style screen on a wall or projection screen (place the device as shown in the figure). To enlarge or reduce the projection area, adjust the distance between the wall or projection screen and the device. The farther away, the larger the projection area will become.
Auto Focus


- Focus Button
- The image above is the device’s auto-focusing page.
After the device turns on, it will autofocus for about 4 seconds. To repeat the autofocus procedure, tilt the device forward about 30°and stand it up straight again. Pressing the “Focus Button” on the remote control will also cause the device to autofocus.
Restore Factory Setting

- If the system encounters a problem, or you need to delete the data and settings on the device, you can use the “Restore Factory Settings” function.
- Go to “Settings”->”About the Device” and tap “Restore Factory Settings” to restore the factory settings.
Remote Control
Remote Control Overview

- On/Off/stand by button
- Home button
- Back button
- Reset hole
- Indicator
- Focus button
- Orientation button
- Menu button
- Volume
- Micro USB
Please download the Hachi Remote Control App in the following app stores.
Remote Control Pairing


- Move the remote control near the device and long-press the back button and the menu button until the red and blue indicators flash.
- Open the device “Settings”-“Connect”-“Bluetooth” page, find “Hachi remote control” in the device list, click connect to complete the pairing.
Remote Control Charging

- Reset hole
- Micro USB
- The remote uses a standard Micro-USB port for charging. The port is located on the bottom of the remote.
- To charge the remote, use a USB data cable to connect it to a USB socket or power outlet with a USB power brick. With a full charge, the remote control’s battery life is about one month of normal use.
Remote control indicator

System

Homepage
- App Store: Built-in application store
- App list portal: Tap to go to the “App List”
- System settings portal: Tap to go to “System Settings”
- Back button: Tap to go to the previous page
- Home button: Tap to go to the homepage
- Overview button: Tap to go to the “Overview”
- Hide button: Tap to hide the current task
Custom Application

Press and hold the app card for 3 seconds to remove or replace the app.
Theme and Wallpaper

Swipe down from the top to open the “Notification Center”, and click the theme button to choose a different theme or wallpaper.
Cast screen
HDMI Input Projection

Insert one end of an HDMI cable in the HDMI port on the back of the projector and connect the other end to an input device. This will cause the projector to enter HDMI mode automatically. If the screen did not cast automatically with the HDMI cable inserted, please go to the “App List” and select the “Hachi HDMI” App in the “App List” manually.
Wireless Screen Casting
IOS:
Find the casting image in the iPhone / iPad’s control center, click and select the device name (Hachi Infinite-XXXX) and you can connect.
Android:
Please ensure that the Android phone and Hachi Infinite are on the same network Find the cast button in the drop-down shortcut bar, click and select the device name (Hachi Infinite-XXXX) and you can connect. If you still cannot connect, please download the app “Hachi Cast” in Google Play. Then select the device name (Hachi Infinite-XXXX) in the App, and the screen can be casted after the connection.
- For related support, please check “Settings” – “Connect” – “Screencast”.
- The device names displayed may be different based on different brands of Android phones.
Product Specifications

Common Troubleshooting

- Power button
If the device crashes or does not work normally, press and hold the power button for 15 seconds to force restart the device.
Touch Control Failure

- Make sure the projector is placed on a clean and flat surface.
- Do not place any objects in the projection area.
- The projection area must not be near strong light sources.
- Make sure that the projection window and the bottom of the projector (indicated in red in the figure below) are clean and unobstructed.
- The above conditions affect the accuracy of touch control.
Remote Control Pairing Failed

Cannot find the remote control in the Bluetooth list:
Make sure the remote control has been sufficiently charged.
The remote is in the “Paired Devices” list, but it is still in the “Not Connected” status:
Tap the “Puppy Remote” option in the list, select “Disconnect” in the dialog box that appears, and then follow the pairing steps to pair the remote again.
Precautions
- Do not point the projector at eyes, as it may cause injury.
- Do not obstruct the air inlet/outlet. Otherwise, abnormal heat ventilation may cause damage to the device.
- Do not place the device in areas with excessively high or low temperatures. The temperature of the operating environment should be -10°C to 40°C.
- Use the device in a clean and dry environment. Avoid exposure to liquid splashes and rain, as the device is not designed to be water-resistant.
- Do not rinse the device using chemicals, detergents, or water. You can gently wipe the device’s surface with a dry cloth.
- Do not squeeze the device with force or place heavy objects on the device, as this may damage the device.
- Do not throw, knock, or violently shake the device. Otherwise, damage may be caused to the internal components.
- Do not dry the device by putting it in heating equipment.
- Do not dismantle the device without authorization from Puppy Robotics. Contact Customer Service service@puppyrobot.com
Cautions
Changes or modifications not expressly approved by the party responsible for compliance could void the user’s authority to operate the equipment. This device complies with Part 15 of the FCC Rules. Operation is subject to the following two Conditions:
- this device may not cause harmful interference, and
- this device must accept any interference received, including interference that may cause undesired operation.
Note:
This equipment has been tested and found to comply with the limits for a Class B digital device, pursuant to Part 15 of the FCC Rules. These limits are designed to provide reasonable protection against harmful interference in a residential installation. This equipment generates, uses, and can radiate radio frequency energy, and if not installed and used in accordance with the instructions, may cause harmful interference to radio communications. However, there is no guarantee that interference will not occur in a particular installation. If this equipment does cause harmful interference to radio or television reception, which can be determined by turning the equipment off and on, the user is encouraged to try to correct the interference by one or more of the following measures:
- Reorient or relocate the receiving antenna.
- Increase the separation between the equipment and receiver.
- Connect the equipment into an outlet on a circuit different from that to which the receiver is connected.
- Consult the dealer or an experienced radio/TV technician for help.
This equipment complies with FCC radiation exposure limits set forth for an uncontrolled environment. This equipment should be installed and operated with a minimum distance of 20cm between the radiator & your body. This transmitter must not be co-located or operating in conjunction with any other antenna or transmitter.