
BELLSOUTH AD-T388 Walkie Talkie Instruction Manual
PIC 01
PIC 02
Instructions for use
This set includes 2 walkie-talkie units: these are communication devices which operate on mobile radio frequencies. They come with 8/20/22(option) channels as well as a back-lit LCD screen, enabling you to communicate over several kilometres free-of-charge (up to 3 km in open areas)
NOTE: Please read these user instructions carefully before using the equipment and retain for future consultation!
SPECIFIC RECOMMENDATIONS
- If you carry any kind of personal medical device, consult a doctor before use.
- To avoid the risk of burns, do not use the device if the aerial is damaged in any way.
- Do not use the device in a potentially explosive setting (e.g. around petrol pumps, on the lower deck of a boat or around a fuel storage installation or chemical products)
- If travelling in a car or by bike, stop before using the device. Switch off the device if on an aeroplane or in a hospital.
- Never use the device in close proximity to a radio to avoid interference.
- Remove the batteries if the device is not in use for an extended period of time. Never mix used and new batteries.
- Position the transmitter and antenna at least 25 cm from your face. Direct the antenna upwards and speak normally.
- Clean the device with a damp cloth. Avoid the use of cleaning agents and solvents.
- Do not modify the device in any way. In the event of damage occurring, ensure that the device is checked by a qualified professional.
- The device cannot be used to contact the emergency services.
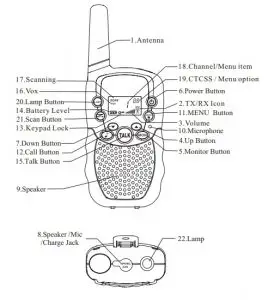
ITEM DESCRIPTION (Pic 01,02)
- Antenna
- RX icon

TX icon
- Volume level indicator
- Adjustor button Up (

- Continued reception( MON )
- On /off button(

- Adjustor button Down (

- Earphone socket
- Loud speaker
- Microphone
- Menu:
Enter the menu settings - Call button (CALL)
- Keypad lock indicator
- Battery level indicator
- Push to talk (TALK) button
- VOX indication
- Scanning indication:
Displayed during scan mode - Channel/Menu item indication
- CTCSS / Menu option -value
- Lamp Button
- .Scan Button
- Lamp
- Belt attachment clip
- Belt attachment
- Batteries (not supplied)
- Battery compartment


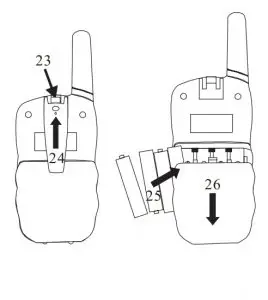
BEFORE USE (Pic 02)
To insert batteries into the devices, first remove the belt attachment:
lift the attachment clip (23) and press the belt attachment upwards (24). Open the battery compartment (26) and insert 4 AAA batteries (25) (not supplied), ensuring that the poles are correctly aligned. Then close the lid.
USING THE TWINTALKER
- Turning the device on/off:
To turn the devices on or off, hold down the on/off button (6) for 3 seconds a BEEP sound will be played to confirm. - Adjusting the volume:
To increase the volume, press the Up adjustor button - Note: The volume level (3) is displayed on the screen.
- Battery Charge Level/Low Battery Indication
The battery charge level is indicated by the number of squares
present inside the battery icon on the LCD Screen.
Battery Full 
Battery 2/3 charged 
Battery 1/3 charged 
Battery empty When the battery charge level is low, the battery icon will flash and a
beep will be heard to indicate that the batteries need to be replaced or
recharged. - Receiving/transmitting communications:
The devices are in ‘Reception’ mode when lit up, i.e. they are ready to receive a call or sound transmitted on the activated frequency.- When you press the Call tone button (12), the device switches to ‘Transmission’ mode. You are then transmitting a sound signal to the
other device. - To send a voice message, press the TALK button (15) and speak into the microphone (10). Continue to press the button until you have finished transmitting your message. Hold the microphone a minimum of 5 cm from your face.
Note: - The other device must be set to the same channel and have set the
same CTCSS code(see point 7) - When the transmission is complete and the TALK button (15) is no longer held down, the other device will emit a sound (BEEP) to indicate that this device is ready to transmit.
- When you press the Call tone button (12), the device switches to ‘Transmission’ mode. You are then transmitting a sound signal to the
- Changing Channels
- Press the MENU button (11)once, the current channel number
flashes on the display. - Press the
- Press the TALK – button to (15) confirm and return to stand-by Mode.
Note: If no button is pressed within 15 seconds during setting, the
unit will return to standby.
- Press the MENU button (11)once, the current channel number
- CTCSS (Continious Tone Coded Squelch System)
License free radio’s operating on the 462 MHz frequency band, like the Twintalker , have 22 available radio channels. If there are many radio’s users in your neighborhood, there is a chance that some of these users are operating on the same radio channel. To prevent that you receive signals from other users, sub-channels have been integrated.
Two radio’s will only be able to communicate with each other when they are operating on the same radio channel and when they have selected exactly the same sub-channel.There are two kind of subchannels :- Continuous Tone Coded Squelch System (CTCSS) When using CTCSS, a low frequency tone (between 67 and 250 Hz) will be transmitted along with the voice signal. There are 38 available tones to choose from. You are free to choose one of these 38 available tones. Due to filtering, these tones will generally not be audible so they will not disturb the communication.
- CTCSS
- Press theMENU-button(11) twice : The current CTCSS code flashes
on the display. - Press the
- Press the TALK-button(15) to confirm and return to stand-by mode.
Note: To disable CTCSS, select code “0F” for CTCSS in the menu.When the entry is confirmed, “OF” will be displayed.
- Press theMENU-button(11) twice : The current CTCSS code flashes
- Monitor
You can use the monitor feature to check for weaker signals in the current channel.- Press the MON-button to activate channel monitoring.
- Press the MON-button to stop channel monitoring.
Note: During channel monitoring the receiver circuit in the Radio’s will not listen to CTCSS codes.
- VOX Selection
The Radio’s is capable of voice activated (VOX) transmission. In VOX mode, the radio will transmit a signal when it is activated by your voice or other sound around you. VOX operation is not recommended if you plan to use your radio in a noisy or windy environment.
Note: VOX mode will be overrided when you press the TALK – button “15”- Press the MENU- button(11) three times, the current VOX setting flashes on the display and the VOX icon is displayed.
- Press
- Press
- Press the TALK-button(15) to confirm and return to stand-by mode.
- Scanning for an active radio channel
- Press the SCAN -button(21) : The ‘Scan’ function indicator (17) will appear on the screen and the channel (18) will scan continuously from 1 to 22.
- Press the
- When the transmission on the found channel stops, the scanning will
resume automatically.
NOTE: If you press the TALK button(15) while listening to a found channel, the Radio’s will go back in stand-by mode on the found channel.
- Call Tones
A call tone alerts others that you want to start talking.- Setting the Call Tone
The Twintalker has 10 call tones.- Press the MENU- button(11) four times, “CA” is displayed and the current call tone is flashing.
- Press the
- Press the TALK – button(15) to confirm and return to stand-by Mode.
- Sending a call Tone
- Press the CALL-button(12) briefly. The call tone will be transmitted on the set channel.
- Setting the Call Tone
- Key-Tone On/Off
When a button is pressed, the unit will beep briefly.
To set the key-tone.- Press the MENU- button(11) five times. “tO” will be displayed.
- Press
- Press the TALK – button(15) to confirm your selection and return to
the standby mode.
- Roger Beep On/Off
After the TALK-button is released, the unit will send out a roger beep to confirm that you have stopped talking.
To set the Roger Beep.- Press the MENU- button(11) six times. “rO” will be displayed.
- Press
- Press the TALK – button(15) to confirm your selection and return to the standby mode.
- Button Lock
- Press and hold the MENU- button(11) for two seconds to activate the Button lock mode. The button lock icon is displayed on the LCD Screen.
- Press and hold the MENU- button(11) again for two seconds deactivate button lock
Note: The PTT – button(15) , the CALL -button(12), MON-button(5) and the on/off button (6) will still be functional when the Button Lock is activated.
- Display back light
To activate the backlight of the LCD display, press any button except the MENU- button(11) or the MON-button(5) . The LCD backlight will light up for 5 seconds. - Earpiece connection
The Twintalker can be used with the included earpiece. The connector is located on the upper side of the unit(8) . Insert the earpiece plug into the connector (2,5mm jack). The small button on the earpiece has the same function as the TALK – button(15) on the unit
When you use the TALK – button (15) from the Earpiece, you must also use the microphone from the earpiece to talk into.
Note: Do not connect other earpieces. This may damage your device. - Battery saving function:
When the device has not been used for 6 seconds, the economy mode is automatically activated. This does not affect the reception of transmissions and the standard mode is automatically reactivated as soon as a signal is detected. - BUILT-IN FLASH LIGHT
As an added feature,your Radio’s has a built-in flashlight that can be used in sending light signals or for your lighting needs - Technical specifications
Channels 22 Sub-code CTCSS 38 Frequency 462.5625~467.7125MHz Range Up to 3 Km (Open field) Battery 4xAAA Transmission Power =< 500mW ERP Modulation Type FM – F3E Channel spacing 25 kHz


Disposal of Old Electrical & Electronic Equipment (Applicable in the European
Union and other European countries with separate collection systems)This symbol on the product or on its packaging indicates that this product shall not be
treated as household waste. Instead it shall Be handed over to the applicable collection point for the recycling of electrical and electronic equipment. By ensuring this product is disposed of correctly, you will help prevent potential negative consequences for the environment and human health, which could otherwise be caused by inappropriate waste handling of this product. The recycling of materials will help to conserve natural resources. For more detailed information about recycling of this product, please contact your local city office or your household waste disposal service.
Portable Radio Operation and EME Exposure
Antenna Care
Use only the supplied or an approved replacement antenna.
DO NOT hold the antenna when the radio is “IN USE” Holding the antenna affect range.
Two-way Radio Operation
When Using your radio as a traditional two-way radio, hold the radio in a vertical position with the microphone 1 to 2 inches (2.5 to 5 cm) away from the lips.
Body-Worn Operation
If you wear a radio on your body when transmitting, always place the radio in a supplied or approved clip, holder, holster, case or body harness for this product. If you do no use one of the supplied or approved body-worn accessories, and are not using the radio held in the normal use position, ensure the radio and its antenna are at least 1 inc (2.5 cm) from your body when transmitting.
Data Operation
If applicable, when when using any data feature of the radio with or without an accessory cable, position the radio and its antenna at least 1 inch (2.5 cm) from the body.
Electromagnetic Interference/Compatibility
Note: Nearly every electronic device is susceptible to electromagnetic interface (EMI) if inadequately shielded, designed, or otherwise configured fro electromagnetic compatibility.
Facilities
To avoid electromagnetic interference and/or compatibility conflicts, turn off your radio in any facility where posted notices instruct you to do so. Hospitals or health care facilities may be using equipment that is sensitive to external RF energy.
Aircraft
When instructed to do so, turn off your radio when on board’ an aircraft.
Any use of a radio must be accordance with applicable regulations per airline crew instructors.