
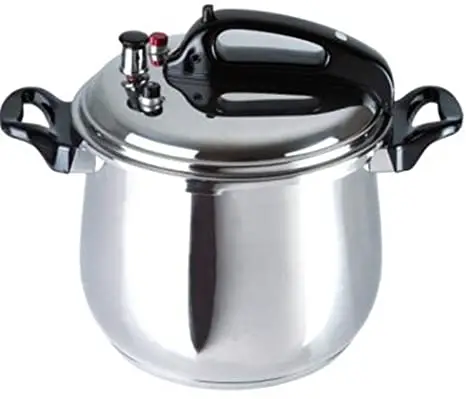
bene casa BC-33868 Stainless Steel Pressure Cooker
IMPORTANT SAFEGUARDS
When using pressure cookers, basic safety precautions should always be followed:
- Read all instructions.
- Do not touch hot surfaces. Use handles or knobs.
- Close supervision is necessary when the pressure cooker is used near children.
- Do not place the pressure cooker in a heated oven.
- Extreme caution must be used when moving a pressure cooker containing hot liquids.
- Do not use pressure cooker for other than intended use.
- This appliance cooks under pressure. Improper use may result in scalding injury. Make certain unit is properly closed before operating.
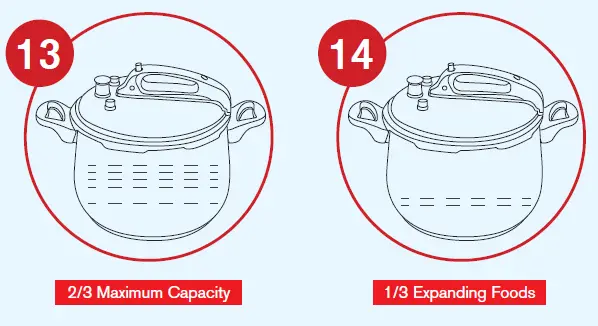
- Do not fill the unit over 2/3 full. When cooking foods that expand during cooking such as rice or dried vegetables, do not fill the unit over 1/2 full. Over filling may cause a risk of clogging the vent pipe and developing excess pressure.
- Be aware that certain foods, such as applesauce, cranberries, pearl barley, oatmeal or other cereals, split peas, noodles, macaroni, rhubarb, or spaghetti can foam, froth, and sputter, and clog the pressure release device (steam vent). These foods should not be cooked in a pressure cooker.
- Always check the pressure release devices for clogging before use.
- Do not open the pressure cooker until the unit has cooled and all internal pressure has been released. If the handles are difficult to push apart, this indicates that the cooker is still pressurized – do not force it open. Any pressure in the cooker can be hazardous.
- Do not use pressure cooker for pressure frying with oil.
- When the normal operating pressure is reached, turn the heat down so all the liquid, which creates the steam, does not evaporate.
- SAVE THESE INSTRUCTIONS.
WARNING: DO NOT DEEP FRY OR PRESSURE FRY IN THIS PRESSURE COOKER. THIS MAY CAUSE FIRE OR OTHER SERIOUS DAMAGES.
CONSUMER ADVIOSRY
Perishable foods such as meat and poultry products, fish, cheese and other dairy products cannot be left at room temperature for more than 2 hours (No longer than 1 hour if room temperature is above 90°F).
SAVE THESE INSTRUCTIONS
Please read ALL of the instructions in this manual carefully before you begin to use this appliance. Proper care and maintenance will optimize life and operation of this appliance. Please save these instructions and refer to them as needed.
GETTING TO KNOW YOUR BENE CASA PRESSURE COOKER
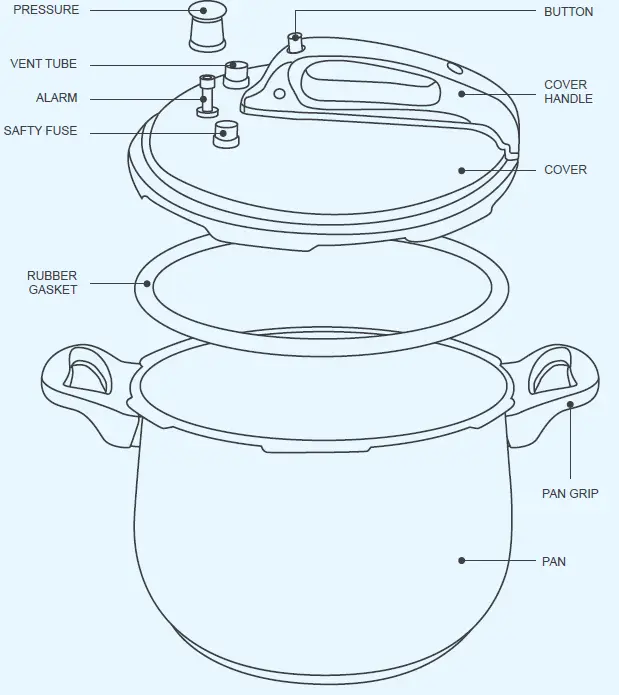
SAFETY SYSTEM
PRESSURE RELEASE VALVE
If the pressure inside the cooker becomes too high, this valve starts working to release the excess steam.
FLOATING VALVE
Safety feature. As the cooker builds pressure, this valve is pushed up which creates a seal, locking the lid.
PRESSURE SAFETY VALVE
Safety feature that allows excess pressure to escape if too much pressure builds up.
SPECIAL INSTRUCTION
HOW TO PLACE THE RUBBER GASKET
After washing both cover and rubber gasket in hot suds and then drying both thoroughly each time the pan is used, please slip the rubber gasket right back into the cover.
NOTE: MUST KEEP THE DIRECTION OF ARROW ON THE RUBBER GASKET POINTING TO THE COVER. PLEASE DO NOT FORGET THIS POINT. If the rubber is placed up-side down, the pressure cooker will not be functioning.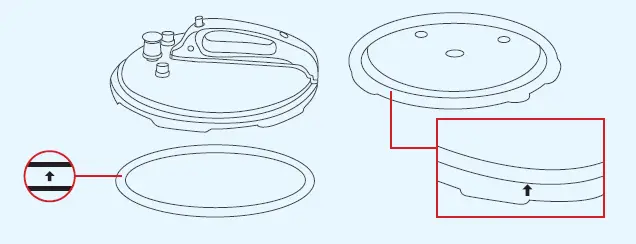
BEFORE FIRST USE
Remove the sealing ring by pulling it out of the inside rim of the lid. Wash sealing ring, lid and pressure cooker body in hot, soapy water. Rinse all parts with warm water and dry. Replace the sealing ring to the inside rim of the lid.
HOW TO WORK
- Put food in pan and add required amount of water. With gasket in place, setcover on pan and press it down. (Don’t cook applesauce, rhubarb, cranberries, split peas, pea soup.)
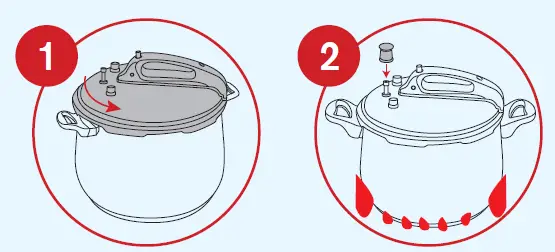
- Turn cover handle left to close directly, till you hear a “click” sound that means the cover is locked completely (picture 1). Never attempt to cook with out hearing a “click” sound. Although the cover may seem to be loose, the gasket automatically seals the cover when the cover is completely closed. Lubricating the gasket with cooking oil will help the cover to slide open and close more easily.
- Place pan with contents over high heat, and then set control over vent tube after steam begins to escape from vent tube (picture 2) (Foods such as pasta, noodles and dried vegetables need medium heat at this time.)
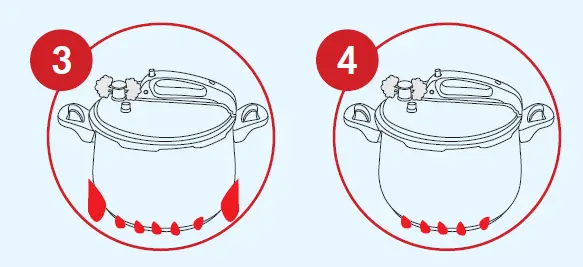
- When the pressure is going up to certain level, the control will jiggle and sputter, a few drops of water may trickle from the control. At this moment, reduce heat so that control jiggles slowly (picture 4). Constant jiggling causes excessive loss of moisture, the occasional jiggle and a hissing sound indicates pressure is being maintained. If steam escapes in a steady stream after heat is reduced, nudge control to seal it properly. IF STEAM SHOULD ESCAPE AROUND EDGE OF COVER AND PRESSURE FAIL. TO RISE, cool pan under faucet, remove control and open pan. Wipe gasket, pan rim and inside of cover, dry and start over.
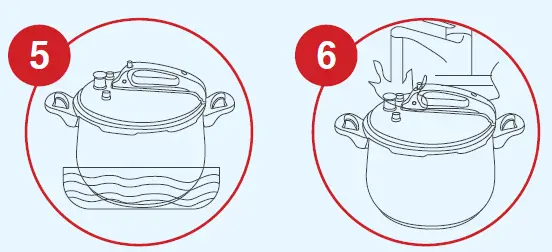
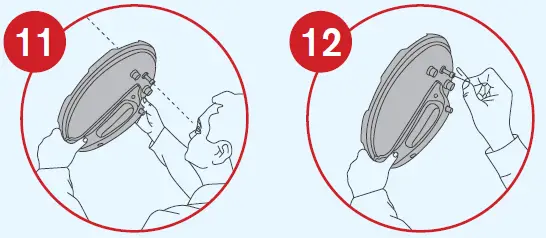
- After the cooking is completed, cool pan and remove control, then open pan. When pressure has been maintained for the required length of time, remove cooker from heat and allow pressure to drop BEFORE REMOVING THE CONTROL, many conditions call for instant reduction of pressure by setting cooker under faucet or by placing it in a dish of cold water (picture 5&6). This method reduces pressure in about 15 seconds. Allowing pressure to drop normally without cooling under faucet takes from ten to twenty – five minutes depending upon amount of food in the pan.
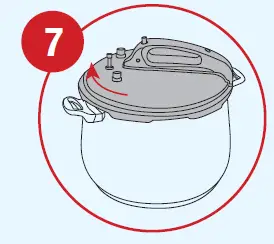
- After reducing pressure, please nudge the control to test if pressure is completely reduced. If steam spurts out, pressure is not yet down. If no steam spurts out, remove control with a fork. Press down the button on the handle of the cover with thumb, slide cover right to open position and lift cover (picture 7). Never TUG the handle or TRY to force cover open. A locked cover indicates STEAM PRESSURE is still inside the cooker. When pressure is completely reduced and control removed away, the cover should slide open with ease.
CLEANING AND CARE
- To make cleaning easier, pour warm water into the pan immediately after removing food. Wash in hot and clean suds. If pan should become stained from “hard” water, boil a solution of 2 level tablespoons cream of tartar to a quart of water in the cooker. A strong vinegar solution is also effective. Then rinse and dry.
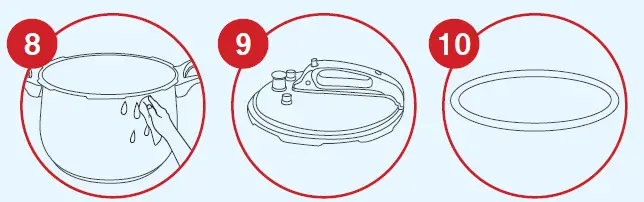
- The gasket has been designed so that you can slip it out of the cover. This makes it possible to thoroughly wash both cover and gasket in hot suds each time the cooker is used. Dry both thoroughly, also clean the filter at the same time. Then slip the gasket right back into the cover so that the cooker is always ready for instant use, Note: WHEN YOU SLIP THE GASKET BACK INTO THE COVER, KEEP THE DIRECTION OF ARROW ON THE GASKET POINTING TO THE COVER (please read the special instruction attached). If the cover does not close easily, apply a little cooking oil to the gasket. When storing, place cover upside down on the cooker and keep the pressure control inside the cooker.
- After washing and rinsing the cover, hold it up to the light to see if the vent tube is clear. It is highly important that the tube be unobstructed. If it should be clogged by food particle, carefully insert a piece of wire as illustrated. Then rinse with hot water.
- Usually the pressure control remains perfectly clean because live steam cleanses it while it operates. However, washing it in hot clean suds and rinsing thoroughly will not harm the control and will insure its being free of particles which might hamper its operation.
IMPORTANT SAFETY REMINDERS
- Don’t attempt to cook without having cooker closed properly. Only after hearing a “click” sound when turning the cover to the left, can you place the cooker on the heat.
- Don’t attempt to open cooker until you remove the pressure control, and don’t remove the control until you are sure the pressure is reduced. See step 5 of “How to cook”.
- Don’t tug at handles or try to force cover open if it seems to be locked tight. Cool cooker again under faucet to reduce every bit of pressure. Cover then slides easily. (In the very unusual case where the cover might seem to stick in spite of repeated and prolonged celling, before pushing open the cover, insert a piece of wire into vent tube to make sure it is clear and pressure completely reduced.)
- Don’t beat spoon, potato masher, etc., on rim of pan as this might mar the rim to the extent that a perfect seal could not be effected.
- Don’t cook apple sauce, rhubarb, cranberries, pearl barley, split peas or pea soup in the pressure cooker, because they tend to froth or sputter and sometimes block vent tubes. With the tube blocked, pressure may appear to be down when the control is removed, whereas, actually a food like applesauce may remain above boiling point for 40 minutes after the cooker is removed from the heat unless it is cooled thoroughly under water. This means that some degree of pressure remains in the cooker, and no attempt should be made to try to force open the cover while it be locked tight by the pressure.
- Don’t use high heat to cook spaghetti, noodles, dried vegetables, or other foods which can easily cause a heavy froth in cooking.
- Don’t fill pan oven 2/3 full and more than 1/3 for the foods that can cause froth and foam when cooking.
- Don’t place cover on hot surface that may damage gasket and melt safety fuse.
- Don’t cook when there is no water in the pan.
- Don’t use high heat after control jiggling. Reduce heat so that control does not jiggle often.
PROBLEMS, CAUSES and SOLUTIONS
| Problem | Possible reason | Solution | |
| The safety | 1. The cooker is not closed properly. | 1. Open and close the lid again. | |
| valve is not | |||
| rising after | 2. The heat is too low to build up pressure. | 2. Set the heat source at its highest setting. | |
| heating for an | |||
| extended time. | |||
| 3. The sealing ring is dirty, damaged or improperly placed. | 3. Clean or replace the parts. | ||
| 4. There is too little liquid in the cooker. | 4. Add at least 8 ounces of liquid. | ||
| Noise from | 1. Pressure regulator valve is blocked. | 1. Clean valve. | |
| Pressure | |||
| Regulator | 2. Vent pipe is blocked. | 2. Clean vent pipe. | |
| Valve can be | |||
| heard, but no | |||
| 3. Boiled Dry. | 3. Turn off the heat immediately, release all pressure, open lid and add liquid. | ||
| steam is seen. | |||
| 4. There is too little liquid in the cooker. | 4. Add at least 8 ounces of liquid. | ||
| Steam is | 1. Vent pipe is blocked. | 1. Clean vent pipe. | |
| escaping from | |||
| safety valve | 2. Pressure cooker is over filled with food. | 2. Remove food until it is only 2/3 full or less. | |
| after indicator | |||
| rings are up. | |||
| 3. Temperature is too high. | 3. Turn down the heat. | ||
| Steam is | 1. Sealing lid is placed incorrectly in the lid. | 1. Correct seal position. | |
| escaping from | |||
| the edges of | 2. Sealing ring is damaged. | 2. Replace sealing ring. | |
| the lid. | |||
| 3. Sealing ring is dirty. | 3. Clean or insert a new gasket. | ||
| 4. Pressure cooker is not closed properly. | 4. Clean or replace the parts. |
COOKING TIMETABLE
| QUANTITY OR SIZE | CUPS OF LIQUID | TIME (MINUTES) | |
| MEAT | |||
| BEEF | |||
| Chuck Roast | 3 pounds | 2 | 45-50 |
| Corned Beef | 3 pounds | 2 | 60 |
| Rolled Rib Roast | 3 pounds | 1½ | 30-35 |
| Round Steak | 1˝ thick | 1 | 18* |
| Round Steak | ½˝ thick | 1 | 10* |
| Short Ribs | 3 pounds | 1½ | 25 |
| HAM | |||
| Slice | 3 pounds | 1½ | 30-35 |
| Picnic | 3 pounds | 1½ | 30-35 |
| LAMB | |||
| Chops | 1˝ thick | 1 | 12* |
| Chops | ½˝ thick | 1 | 5* |
| Leg of Lamb | 3 pounds | 2 | 35-45 |
| PORK | |||
| Chops | 1˝ thick | 1 | 15* |
| Chops | ½˝ thick | 1 | 8* |
| Butt Roast | 3 pounds | 2 | 55 |
| Fresh Picnic Roast | 3 pounds | 2 | 55 |
| Steak | 1˝ thick | 1 | 12* |
| VEAL | |||
| Steak | ½˝ thick | 1 | 5* |
| Chops | 1˝ thick | 1 | 12* |
| Chops | ½˝ thick | 1 | 5* |
| Roast | 3 pounds | 2 | 45-50 |
| Steak | 1˝ thick | 1 | 10* |
| POULTRY | |||
| Whole Chicken | 2-3 pounds | 1 | 13-15 |
| Chicken | Cut into portions | 1 | 8 |
| Chicken Breast | Boneless | 1 | 3-4 |
| Turkey Breast | 3-4 Pounds | 1.5 | 35 |
| VEGETABLES | |||
| FRESH | |||
| Artichoke | Whole, 6 to 8 ounces | 1 | 10 |
| Asparagus | Stems cut into 1-inch pieces | 1 | 0-1 |
| Beans (green, wax) | Whole or sliced | 1 | 1-3 |
| Beets | Whole, 2½-inch diameter | 11/2 | 15-16 |
| QUANTITY OR SIZE | CUPS OF LIQUID | TIME (MINUTES) | |
| Broccoli | Flowerets | 1 | 0-2 |
| Brussels Sprouts | Small, 1-inch diameter | 1 | 1-3 |
| Cabbage (red, green) | Wedges, 2-inch thick | 1 | 3-5 |
| Thinly sliced | 1 | 2-3 | |
| Carrots | Baby cut | 1 | 3-5 |
| ½-inch slices | 1 | 3-5 | |
| Cauliflower | Flowerets | 1 | 0-2 |
| Collards* | Leaves coarsely chopped, stems thinly sliced | 1 | 3-4 |
| Corn on-the-cob | Whole, 2½-inch diameter | 1 | 3 |
| Eggplant | Cubed, 1 to 1½-inches thick | 1 | 2-3 |
| Sliced, 1⁄2-inch thick | 1 | 2 | |
| Kale | Leaves coarsely chopped, stems thinly sliced | 1 | 1-2 |
| Parsnips | Sliced, ½-inch thick | 1 | 0-2 |
| GRAINS | |||
| Amaranth | 1 cup | 1¾ | 4-5 |
| Barley (Hulled) | 1 cup | 2½ | 25-28 |
| Barley (Pearl) | 1 cup | 2½ | 9-12 |
| Buckwheat | 1 cup | 2 | 3-4 |
| Bulgar | 1 cup | 1½ | 2-3 |
| Millet | 1 cup | 2 | 9-10 |
| Oats (whole groats) | 1 cup | 1½ | 20-25 |
| Oats (steel cut) | 1 cup | 2 | 4-5 |
| Quinoa | 1 cup | 1½ | 1 |
| Rice (brown) | 1 cup | 1½ | 10-12 |
| Rice (white) | 1 cup | 1½ | 5-8 |
| Rye Berries | 1 cup | 1½ | 20-25 |
| Spelt | 1 cup | 2 | 25-30 |
| Wheat berries | 1 cup | 2 | 25-30 |
| Wild Rice | 1 cup | 1½ | 20-25 |
| SEAFOOD | |||
| FRESH OR FROZEN | |||
| Crab Legs | 1 | 1 | |
| Fish Filets | 1″ thick | 1 | 2 |
| Salmon Filets | 1″ thick | 1 | 2 |
| Tuna Filets | 1″ thick | 1 | 2 |
| Scallops | Large | 1 | 1 |
| Camarones | Medium to Large (36-40 pieces) | 1 | 1 |
| Extra Large (21-25 Pieces) | 1 | 1 | |
DRY BEANS AND PEAS
Pressure Cooking is ideal for preparing dry beans and peas quickly. However, dry beans and peas tend to froth and foam during cooking, which could cause the vent pipe to become blocked. Therefore, it is necessary to use the following precautions when pressure cooking dry beans and peas:
- Never fill the cooker over the ½ full line (this includes beans, ingredients, and water).
- Add 1 tablespoon vegetable oil for cooking.
- Allow pressure to drop of its own accord.
Soaking beans and peas
Soaking is strongly recommended for all beans and peas, except lentils and black-eyed peas, for even cooking and to remove water-soluble, gas-producing starches. Soaking can be done using the traditional or the quick-soak method.
Traditional method:
Clean and rinse beans; cover with three times as much water as beans. Soak 4 to 8 hours. Drain.
Quick method:
Clean and rinse beans; cover with three times as much water as beans. Bring beans to a boil and boil for 2 minutes. Remove from heat, cover, and let stand for 1 to 2 hours. Drain.
Cooking beans and peas
After soaking, rinse beans and remove any loose skins. Place beans in pressure cooker. Add fresh water to just cover the beans and add 1 tablespoon vegetable oil. Close cover securely. Cook according to the times in thetimetable below. For more firm beans for salads and side dishes and when cooking less than 2 cups of beans or peas, use the shorter time. For soups and stews, use the longer time. After cooking is complete, allow pressure to drop of its own accord. *add 1/2 to 1 teaspoon salt to soaking and cooking water to keep bean skins intact.
| Beans | Time |
| Adzuki | 1-3 |
| Anasazi | 1-3 |
| Black beans | 2-4 |
| Black-eyed peas | 2 – 4 |
| Chickpeas (garbanzo) | 7 – 10 |
| Great Northern beans | 2 – 5 |
| Kidney beans | 1 – 3 |
| Lentils (brown, green) | 3 – 5 |
| Lima beans (large) | 0 – 1 |
| Lima beans (baby) | 1 – 3 |
| Navy beans (pea) | 1 – 3 |
| Peas (whole yellow, green) | 6-9 |
| Pinto beans | 3-6 |
| Red beans | 3-6 |
| Soy beans (beige) | 8-11 |
![]()