
![]() BK-S2 Bluetooth Headset
BK-S2 Bluetooth Headset
User Manual
Safety remarks:
- Please read the following safety remarks to correctly use the product and to avoid possible severe injury, death, and/ or asset loss.
Use of product
- Please read the following notices to avoid injury to the body or damage to the product.
Warning:
- To use the product at a high volume for a long period of time may damage your ears and hearing.
- If there is an unusual smell, high heat, or other abnormal phenomena during the use and/or the charging of the product, stop using the product immediately, otherwise, there could be damage, an explosion, or fire. If any of the above occurs, contact the dealer. It’s dangerous to use the product without caution while riding a motorbike. The effect could be injury, death, or damage. Please understand the safety-related issues of the product while riding to lower the risk of danger.
- In any radio communication prohibited area, such as hospitals or on a plane, please shut down the product to avoid the possible danger or accident caused by radio signals.
- Make sure the product is stable and correctly fixed onto the helmet. The product falling apart from the helmet during riding will cause damage to the product as well as unexpected accidents.
- Do not use the product in an explosive area. In this kind of environment, follow the rules, signs, and instructions.
- While using the product during the operation of transportation, follow the safety regulations of the operator. Transportation means motorbikes, scooters, bicycles, vehicles, or trains.
- While using the product, you must be in good condition and not under the influence of alcohol & drugs, nor should you be lacking sleep.
Note:
- The product is to be used with a helmet. Follow the user manual to install the product.
- Keep sharp-pointed items away from the product to avoid damage.
- Keep children or pets away from the product to avoid damage.
- Any unauthorized disassembly, maintenance, or modifications to the products will cause the warranty to be void.
Battery
- A battery is included in the product. Read the user’s manual carefully to understand all the safety information. Improper use of the product might cause the possible battery to overheat, explode, combustor damage to those nearby.
Warning:
- Do not continuously charge after the battery is fully charged as this might cause the battery to overheat, explode or combust.
- Keep the product away from fire as this might cause the battery to overheat, explode or combust.
- Do not use an already damaged power adapter to charge the product to avoid possible explosion and accidents.
- The certified low-power radiofrequency device is not allowed to change operating frequency whether it is done by firms or users. Enlarging the transmission power or changing the features or functionality of the original design is also not allowed. Low power radio frequency devices can not affect aircraft flying safety and legal radio communication. If there is a case of interference, stop using the device and do not use it again until the interference is removed. The legal radio communication mentioned above means the operation under the government telecommunication regulations. The certified low-power radiofrequency device must withstand the interference from the radio equipment of legal communication and other radio radiation devices of industry, science, and medicine.
FEDERAL COMMUNICATIONS COMMISSION
INTERFERENCE
STATEMENT
This equipment has been tested and found to comply with the limits for a Class B digital device, pursuant to part 15 of the FCC Rules. These limits are designed to provide reasonable protection against harmful interference in a residential installation. This equipment generates, uses, and can radiate radio frequency energy and, if not installed and used in accordance with the instructions, may cause harmful interference to radio communications. However, there is no guarantee that interference will not occur in a particular installation. If this equipment does cause harmful interference to radio or television reception, which can be determined by turning the equipment off and on, the user is encouraged to try to correct the interference by one or more of the following measures:
- Reorient or relocate the receiving antenna.
- Increase the separation between the equipment and receiver.
- Connect the equipment into an outlet on a circuit different from that o which the receiver is connected.
- Consult the dealer or an experienced radio/ TV technician for help.
Any changes or modifications not expressly approved by the grantee of this device could void the user’s authority to operate the equipment.
This device and its antenna(s) must not be co-located or operating in conjunction with any other antenna or transmitter.
This device complies with Part 15 of the FCC Rules. Operation is subject to the following two conditions: (1) this device may not cause harmful interference, and (2) this device must accept any interference received, including interference that may cause undesired operation.
RF Exposure Information (SAR) This device meets the government’s requirements for exposure to radio waves. This device is designed and manufactured not to exceed the emission limits for exposure to radiofrequency (RF) energy set by the Federal Communications Commission of the U.S. Government.
The exposure standard employs a unit of measurement known as the Specific Absorption Rate or SAR. The SAR limit set by the FCC is 1.185 W/kg. Tests for SAR are conducted using standard operating positions accepted by the FCC with the EUT transmitting at the specified power level in different channels.
The FCC has granted an Equipment Authorization for this device with all reported SAR levels evaluated as in compliance with the FCC RF exposure guidelines. SAR nformation on this device is on file with the FCC and can be found under the Display Grant section of www.fcc.gov/eot/ea/fccid after searching on FCC
ID: WTU-28658913-A5.
To ensure that RF exposure levels remain at or below the tested levels, use a belt clip, holster, or similar accessory that maintains a minimum separation distance of 0mm between your body and the device.
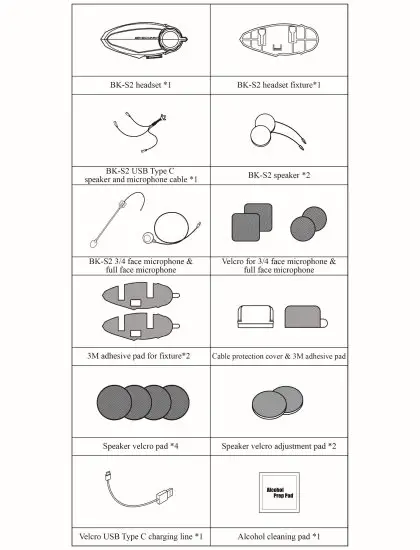
Package contents
Contact the dealer for any missing items.
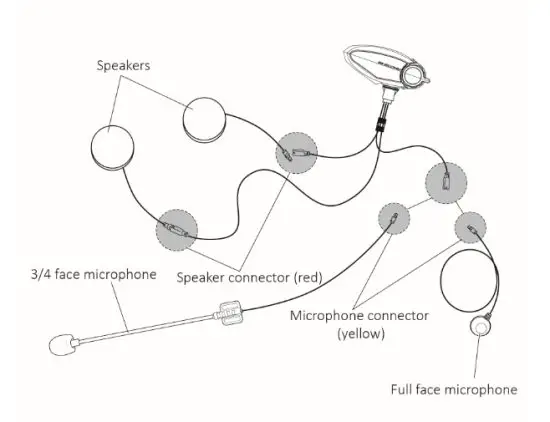
Product details
Installation of Speakers /Microphone /Headset Fixture
Note: Clean the area with a cleaning wipe before applying the adhesive pads.
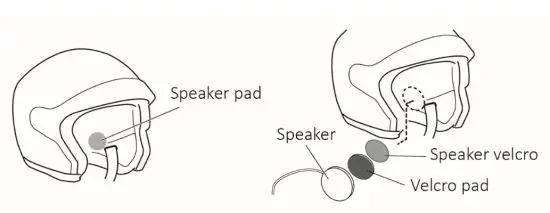
Speaker installation
There are two cables for USB Type C. The longer one is for the speaker on the right and the short one is for the speaker on the left.
- Tear off the paper cover of the speaker pad and paste it to the helmet headphone jack. Locate the proper positions for the speakers before pasting.
- While there is an obvious gap between the ear and the speaker, paste the velcro adjustment pad to narrow it.
- Follow the arrow sign to connect the USB Type C speaker cable (red connector) with the speaker connector (red connector).
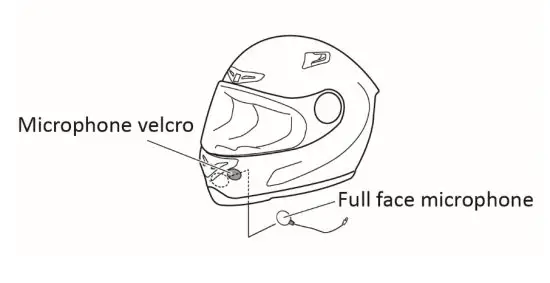
Microphone installation
Microphone for 3/4 face helmet
- Remove the paper on the microphone pad and attach it to the velcro pad inside the left side of the helmet.
- Put back the inner lining.
- Move the microphone white triangle spot toward the mouth position.
- Follow the arrow sign to connect the USB Type C microphone cable (yellow connector) with the 3/4 open face helmet microphone connector (yellow connector).
- Remove the paper on the velcro pad, and attach it to the inside of the helmet chin protector. Attach the microphone to the velcro.
- Follow the arrow sign to connect the USB Type C microphone cable (yellow connector) with the full-face helmet microphone connector (yellow connector).
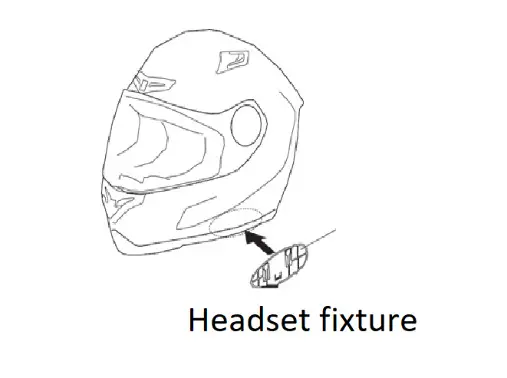
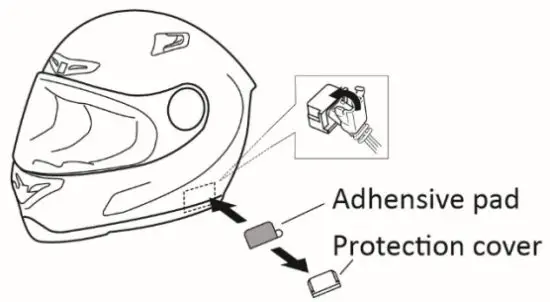
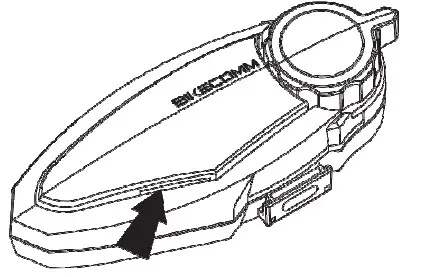
Headset fixture installation
- Remove the cover of the adhesive pad on the back of the headset fixture and fix it to the helmet. Do not remove the fixture from the helmet for 12 hours to assure maximum adhesion.
Note: Clean the area with a cleaning wipe before applying the adhesive pad.
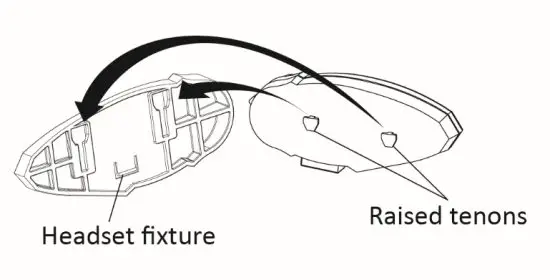
- Fix the headset: Insert the two raised tenons in the back of the headset into the two holes of the fixture and slide down to secure the headset tightly.
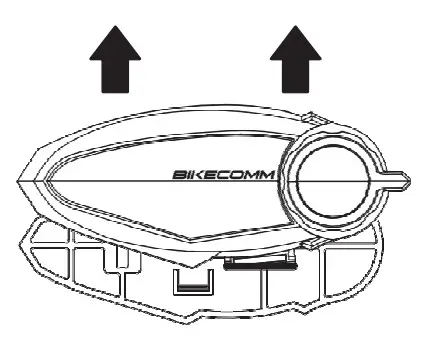
- Remove the headset: Push the headset upwards to remove the headset from the fixture.
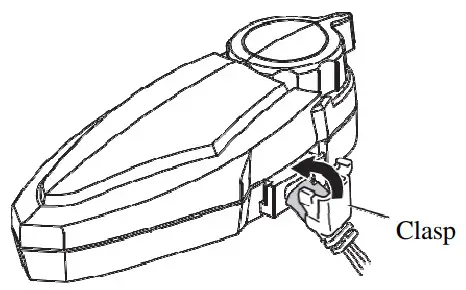
USB Type C speaker and microphone cable
- Connect the USB Type C speaker and microphone cable to the headset and tighten the clasp.
- Untie the clasp to remove the headset from the fixture.
Fix the USB Type C speaker and microphone cable protection cover
- Remove the paper on the protection cover and attach it to the helmet tightly.
- While not connecting to the headset, always fix the USB Type C speaker and microphone cable to the protection cover.
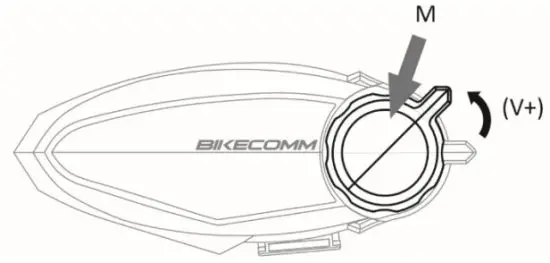
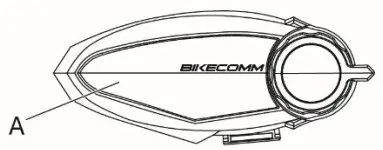
Headset layout
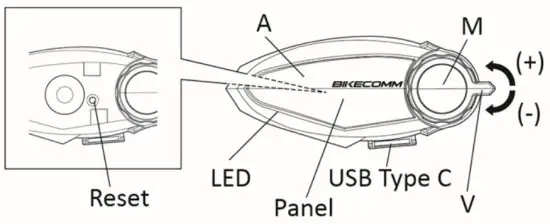
| Button | Function |
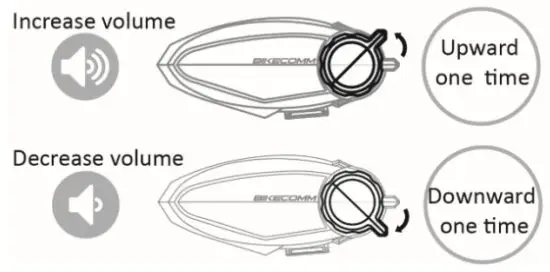
| V | Adjust volume/ select previous or next track |
| A | Activate intercom/ stop intercom |
| M | BT devise pairing/mobile phone operation/Play music/Pause music |
| USB Type C | Connect to speaker and microphone cable, and is also for charging the battery |
| LED | LED indicator |
| Panel | The standard panel is black. Other colors are optional purchases. |
| Reset | Remove the panel to access the headset reset button. |
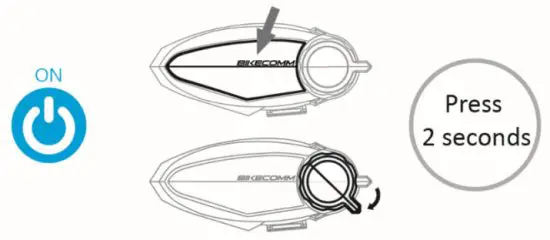
Power on/Power off/Charge
Power on: Press the A button and V button at the same time for 2 seconds until the LED flashes blue to power on.
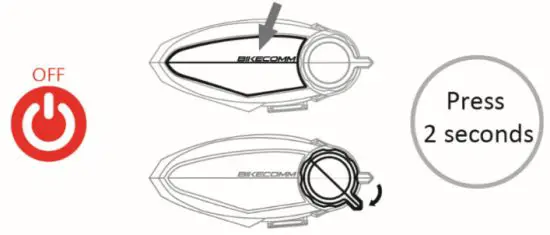
Power off: Press A button and V button at the same time for 2 seconds until the LED flashes red to power off. The firmware version and the battery’s remaining capacity will be heard upon power off.
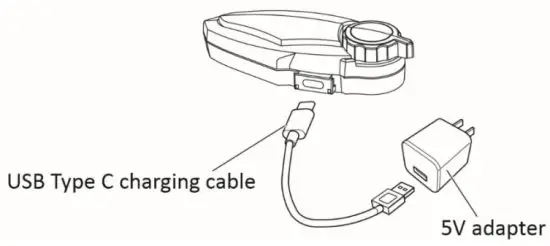
Charge: Use the USB Type C charging cable with a commercially available DC 5V adapter to charge the headset. The LED flashes red while charging and it flashes blue when the charging is completed. The full charging time takes about 2.5 hours.
Note: The USB Type C charging cable does not support fast charging devices. Please do not use the cable to connect to fast charging devices.)
Adjustment of voice prompts and headset audio volume
- Adjust voice prompts volume
While the headset is in pairing status and a “Do Do” sound is played, use V+ and V- knob to adjust the volume of voice prompts. During the adjustment process, a voice notification is played. After finishing the adjustment, cancel the headset pairing or power off to complete the adjustment. - Adjustment of headset audio volume
During the headset operation, use V+ and V- knob to adjust audio volume. During the adjustment process, a “Don Don” notification sound is played. When the audio volume reaches the highest level or the lowest level, a “Bee Bee” notification sound is played. The audio volume adjustment is independent for each audio source, and the adjustment is only effective during the headset operation when using that audio source. The adjustment setting will be saved even after power off.
Pairing with mobile phone/ Other BT devices
To use a headset operating with other BT devices for the first time, it’s necessary to do the pairing. The headset can pair with a mobile phone, another headset, a GPS or other BT devices, such as a mobile phone, GPS navigator, and BT MP3 player.
To use a headset operating with other BT devices for the first time, it’s necessary to pair them. The headset can be paired with a mobile phone, another headset, a GPS, or other BT devices, such as a mobile phone, GPS navigator, and BT MP3 player.
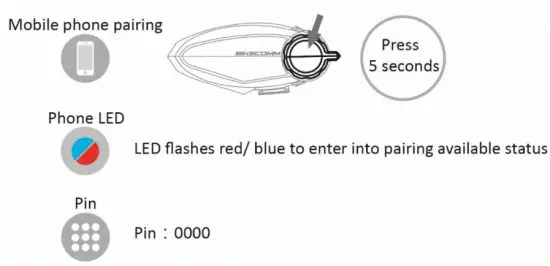
Pairing with mobile phone
- Press the M button for 5 seconds and for the LED to flash red/ blue to enter pairing status.
- Activate mobile phone BT and search for a device to pair. If a PIN is required by the mobile phone, enter 0000.
- After the pairing completes, a voice prompt “Bluetooth device is paired.” is played and the LED flashes blue slowly.
- To cancel the pairing operation, press the M button for 2 seconds.
- If the connection between the headset and mobile phone is lost, press the M button once to resume the BT connection.
- The headset can connect two mobile phones or two BT devices at the same time, but during the group intercom with the headset connecting to two other headsets, the headset will disconnect with one of the two BT devices.
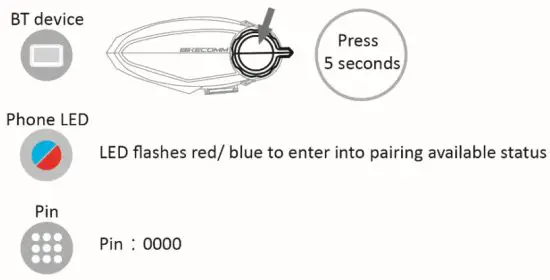
Pairing with other BT devices (HFP device)
- With the headset powered on, press the M button for 5 seconds, and the LED will flash red/ blue to enter pairing status.
- The BT device activates pairing operation and searches for other BT devices. If a PIN is required by the BT device, enter 0000.
- After the pairing completes, a voice prompt “Bluetooth device is paired.” is played and the LED flashes blue slowly.
- To cancel the pairing operation, press the M button for 2 seconds.
- If the connection between the headset and mobile phone is lost, press the M button once to resume the BT connection.
Headset operation and answering mode settings
Headset answering/ dialing operation
- Press the M button once to answer an incoming call.
- Press the M button once to hang up the call.
- Reject the call: Press the M button for 2 seconds to reject the call.
- Press the M button once to activate Siri or Google assistant.
- Last code redial: Press the M button quickly twice to redial the last code.
- Speed dial: Use the Setting tool to set 3 phone numbers first and press the M button quickly 3 times to dial the first phone number, 4 times to dial the second phone number, and 5 times to dial the third phone number. (Link to www.openroad.com.tw to download BK-S2 Tool)
- Answering incoming calls automatically: After the call rings for 8 seconds, the call will automatically be answered. (Refer to Phone answering mode operation)
 Phone answering mode operation
With the headset powered on and press the M and V buttons at the same time for 8 seconds to switch the Phone answering mode between manual answering and automatic answering. After completing the setting, a voice prompt “Automatic answering mode” or “Manual answering mode” is played. (The default setting is Manual answering mode.)
Play music (Play the music of BT devices)
Play/Pause: Press the M button for 2 seconds, then release.
Next track: V+ upward for 2 seconds, then release
Previous track: V- knob downward 2 seconds then release
Dual Music Chatting mode (DMC mode)
- With 2 headsets in intercom mode, they can also listen to music from the same mobile phone. To use this function, switch the two headsets to dual music chatting mode.
- Switch to dual music chatting mode: In headset power off status, Press the A and M buttons for 2 seconds until LED flashes blue 5 times to enter into dual music chatting mode.
- Headset A activates intercom with headset B.
- Press the M button on headset A for 2 seconds and release, and a voice prompt “Activate music sharing” is played to indicate the operation is completed. The music of mobile phones (paired with headset A) will be shared with headset B while they can also chat at the same time.
- To end music chatting mode: Press the V- knob quickly 3 times.
- The headset pairing data will be erased if the headsets are switched between Instant link mode and dual music chatting mode. However, the pairing data between the headset and BT devices will be saved.
- Note: While the headset pairs wi h other headsets, they have to be in the same mode (instant link mode or dual music chatting mode) before they can intercom with each other. The details of instant link mode are listed in section 12 below.
Other BT device operation (HFP device)
Follow the instructions of other BT devices (HFP devices, such as a GPS navigation device) to pair with the headset, then you can listen to the audio navigation from the GPS navigation device to the headset. The headset provides the audio mixer feature with a GPS navigation device which can be set in the BK-S2 tool downloadable from www.openroad.com.tw.
Note: These BT devices need to support HFP format, such as the Garmin Zumo series.
Instant Link mode
There can be a maximum of 6 headsets paired together for intercom in instant link mode. No matter what is the number of headsets to be paired, the pairing procedure is all the same. There will be one headset that acts as the active pairing device while all other headsets act as passive pairing devices. The following are two examples to illustrate pairing 2 headsets and pairing 6 headsets.
After the pairing is completed, the next time when any headset of the pairing group activates the intercom, the group intercom commences immediately. Even if any headset of the group leaves, the other group members stay on the intercom without being affected. When that member rejoins the group again, it will resume the intercom automatically.
The pairing data of instant link mode is saved after power off, so there is no need to go through the pairing procedure while powering on again. However, if there are new members that join the group intercom, the pairing procedure needs to be executed again.
To pair more than 3 headsets (including 3 headsets), the headsets need to be set as instant link mode. With the headset powered off, press the A and M buttons at the same time for 2 seconds until the LED flashes blue 5 times to complete the setting.
Note: The pairing data will be erased when the headsets switch between instant link mode and dual music sharing mode, while the pairing data between the headset and other BT devices will be kept. Make sure the headsets are in the same mode to pair and to intercom with other headsets.
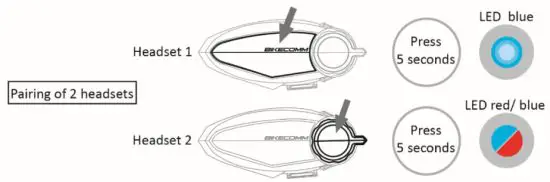
Two headsets paired for Instant link mode
- Power on headset 1 and headset 2.
- Headset 1: Press the M button for 5 seconds until the LED flashes red and blue.
- Headset 2: Press the A button for 5 seconds until the LED flashes blue quickly.
- The headsets begin to pair and after the completion, a voice prompt “Headset is paired” is played.
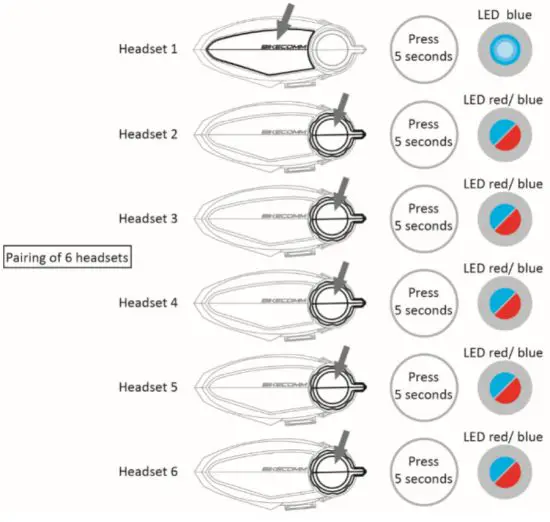
Six headsets paired for Instant link mode
- Power on all headsets.
- Press the M button on headsets 2, 3, 4, 5, and 6 for 5 seconds until the LED flashes red and blue.
- Press the A button on headset 1 for 5 seconds until the LED flashes blue quickly.
- The headsets begin to pair automatically and after the completion, a voice prompt “Headset is paired” is played.
- Note: The pairing for all 6 headsets to complete takes around 30 seconds and it is normal to hear the voice prompt “Intercom is ended.” as the headset needs to end the connection with the currently paired headset before pairing with the next headset.
Headset intercom for instant link mode and dual music chatting mode
Headset intercom operation for both instant link mode and dual music chatting mode is all the same as stated below. Make sure all headsets are paired according to the procedures in sections 12-1 and section 12-2.
- Activate intercom/ End intercom
Activate intercom: Press the A button.
End intercom: Press the A button for 2 seconds.
- When any member of a pairing group presses the A button to activate the intercom, the group intercom commences immediately. Even if any headset of the group leaves, the other group members stay on the intercom without being affected. When that member rejoins the group again, it will resume the intercom automatically.
To pair and operate BK-S2 headset with headsets of other makers
BK-S2 headset can pair and intercom with other headsets.
Pairing procedures:
- With the BK-S2 headset powered on, press the A button to enter pairing status.
- Make other headsets enter into searchable pairing status.
- BK-S2 headset starts the pairing with other headsets and completes the pairing.
Intercom procedures:
Activate intercom: Press the BK-S2 headset A button 2 times quickly.
End intercom: Press the BK-S2 headset A button for 2 seconds.
BK-S2 Tool Program/ Mobile phone App connection
There are two ways to use the BK-S2 Tool Program:
A. Download BK-S2 Tool from www.openroad.com.tw and install it on the computer. After installation is completed, connect BK-S2 to the computer via USB cable and use the BK-S2 Tool to adjust the settings.
B. BK-S2 Tool App is also available in the App Store and Google Play for download. Search for BK-S2 Tool and install it on the mobile phone. Pair BK-S2 with the mobile
phone to establish a connection and use BK-S2 Tool App to adjust the settings.
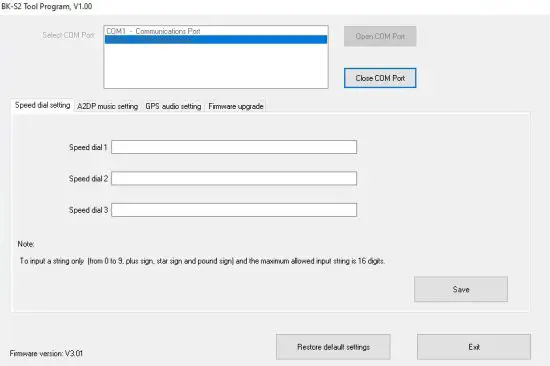
BK-S2 Tool Program for computer
- Connect BK-S2 to the computer via USB cable. Open the BK-S2 Tool and select COM Port.
- Speed dial setting: Input 3 phone numbers for speedy dialing.
- A2DP music setting: To adjust the volume percentage between intercom voice and music/ GPS navigation device.
- GPS audio setting: To adjust the volume of an HFP device (mobile phone etc…) or share the voice to other headsets.
- Firmware upgrade: To upgrade the firmware version of the headset
- Save the settings after the adjustments.
- Restore default settings: To restore the default settings of the headset manufacturer.
- Exit: To exit from BKS-Tool.
Note: BK-S2 Tool Program does not support Windows 8 and Windows 8.1
BK-S2 APP for mobile phone
For iOS:
- Open BK-S2 Tool App。
- Press and hold the headset A button and press the M button quickly 3 times to activate the mode. After activation the LED flashes green 3 times.
- In the App, pull down to “Scan for devices,” locate BK-S2, and click “Agree to pair.”
- To adjust the necessary settings in BK-S2 in the Tool App.
- After the settings are completed, power off the BK-S2 headset to shut down.
- Power on the headset again when you want to use it.
For Android:
- Use the mobile phone BT pairing function to pair with BK-S2.
- Open the BK-S2 Tool App to establish a connection and to adjust the settings.
Clear pairing data/ Reset for troubleshooting
- Clear pairing data
In power-off status, press the A and V+ buttons for 8 seconds until the LED flashes red 5 times to clear pairing data, and a voice prompt “Clear pairing information” is played. - Reset for troubleshooting
If the BK-S2 headset operates abnormally or enters into a mistaken status caused by any unknown reasons, try to reset the headset to solve the problem first. You can remove the panel and find the reset button. After resetting the headset enters into power off and to use it again, power on the headset. The reset operation will not clear pairing data and will not restore the default settings of the manufacturer.
BK-S2 voice prompt list
| State | Voice Prompt beginning | Voice Prompt ending |
| Battery Charge | “Battery Charge” | “Full” “Above 80%” “Above 50%” “Low approaching 25%” “Critical 10%” “Warning, Low battery” |
| Pairing (for intercom Headset) | “Bluetooth Device is paired” “Headset is paired” “Stop Pairing” “The headset connection is successful” |
|
| intercom already in use | “intercom cancelled” “Connection lost” “Auto-reconnection fail” “Intercom is activated” “Intercom is ended” | |
| Answering Mode & Cell phone dialing | “Answering Mode” | “Automatic Answering Mode” “Manual Answering Mode” “Speed Dial Number 1” “Speed Dial Number 2” “Speed Dial Number 3” “Last Number Redialed” |
| Cell phones must support AVRCP | “Play” “Pause” “next track” “previous track” “Activate music sharing” “End music sharing” |
|
| Others | “Dual Music Chatting Mode” “Instant link Mode” “Clear pairing information” |