
![]()
Owner’s Manual
IMPORTANT SAFEGUARDS and CAUTIONS
IMPORTANT SAFEGUARDS
- Basic electrical safety precautions should always be followed.
READ ALL INSTRUCTIONS BEFORE USING
- For use with 120V 60Hz: The power supply must be a 15 Amp GFCI outlet.
- The electrical cord must be connected to a GFCI outlet.
- The GFCI outlet should be 1ft. above the floor.
- Install only in well-ventilated areas to avoid excess humidity.
- Do not install in narrow toilet stalls or in shower stalls.
- Install only where direct contact with water is minimized.
- Do not install near any heat source.
- Avoid using extension cords if possible. Consult with a certified electrician where extension cords are necessary.
DANGER – To reduce the risk of electrocution:
- Do not use it while bathing.
- Do not place or store product where it can fall or be pulled into a tub or sink.
- Do not place in or drop into water or other liquid.
- Do not reach for a product that has fallen into the water. Unplug immediately.
WARNING- To reduce the risk of burns, electrocution, fire, or injury to persons:
- Close supervision is necessary when this product is used by, on, or near children.
- Use this product only for its intended use as described in this manual. Only use attachments recommended by the manufacturer.
- Never operate this product if it has a damaged cord or plug if it is not working properly, has been dropped or damaged, or dipped into the water. Return the product to a service center for examination and repair.
- Keep the cord away from heated surfaces.
- Never drop or insert any object into any opening or hose.
- Do not use outdoors or operate where aerosol (spray) products are being used or where oxygen is being administered.
- Connect this product to a properly grounded outlet only. See grounding instructions.
- Unplug this product before filling. Fill (reservoir) with water only.
SAVE THESE INSTRUCTIONS
CAUTIONS BEFORE INSTALLATION
GROUNDING INSTRUCTIONS
DANGER- Improper use of the grounding plug can result in a risk of electric shock.
- This product has a three-prong grounding plug, which must be plugged into an outlet that is properly installed and grounded. In the event of an electrical short circuit, grounding reduces the risk of electric shock by providing an escape wire for the electric current. If repair or replacement of the cord or plug is necessary, do not connect the grounding wire to either flat blade terminal. The wire with insulation having an outer surface that is green with or without yellow stripes is the grounding wire. Check with a qualified electrician or serviceman if the grounding instructions are not completely understood, or if in doubt as to whether the product is properly grounded.
- This product is for use on a nominal 120V circuit and has a grounding plug that looks like the plug illustrated in sketch A in Figure 1. A temporary adapter, which looks like the adapter illustrated in sketches B and C, may be used to connect this plug to a 2-pole receptacle as shown in sketch B if a properly grounded outlet is not available.
- The temporary adapter should be used only until a properly grounded outlet (sketch A) can be installed by a qualified electrician. The green-colored rigid ear, lug, or the like extending from the adapter must be connected to a permanent ground such as a properly grounded outlet box cover. Whenever the adapter is used, it must be held in place by a screw.
THIS APPLIANCE HAS TO BE EARTHED.
Figure 1


MAIN UNIT and PARTS

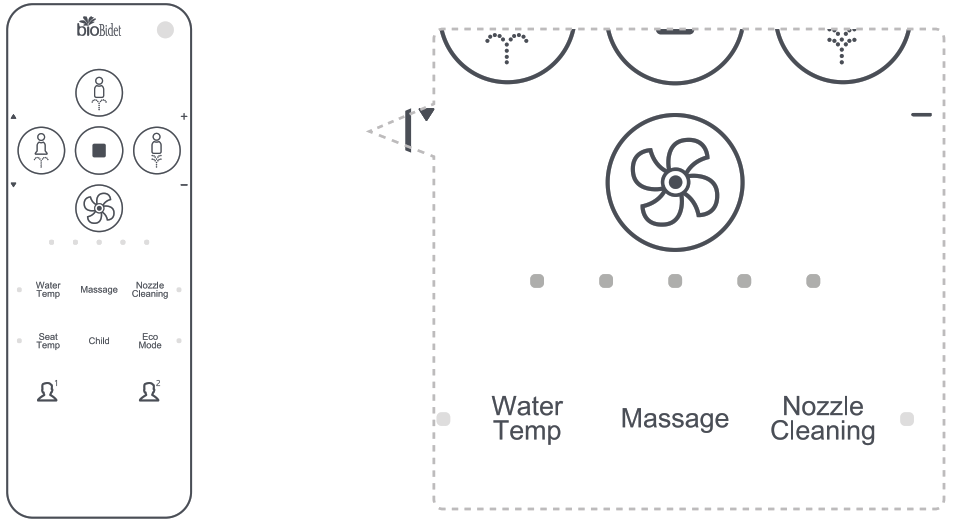
REMOTE CONTROL

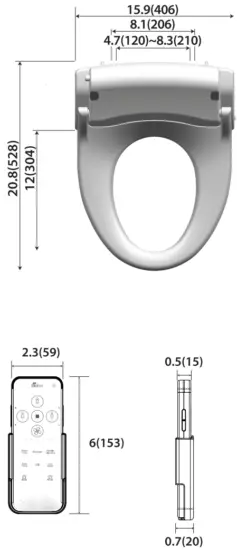
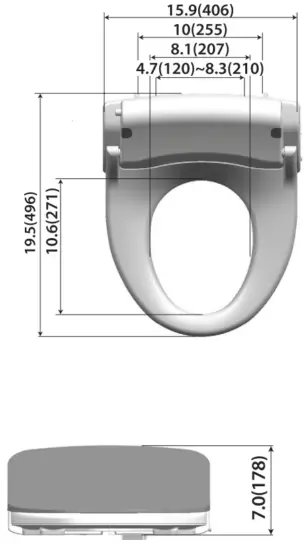
DIMENSIONS
Elongated Type
Round Type
INSTALLATION
- Remove the seat from the existing toilet body.
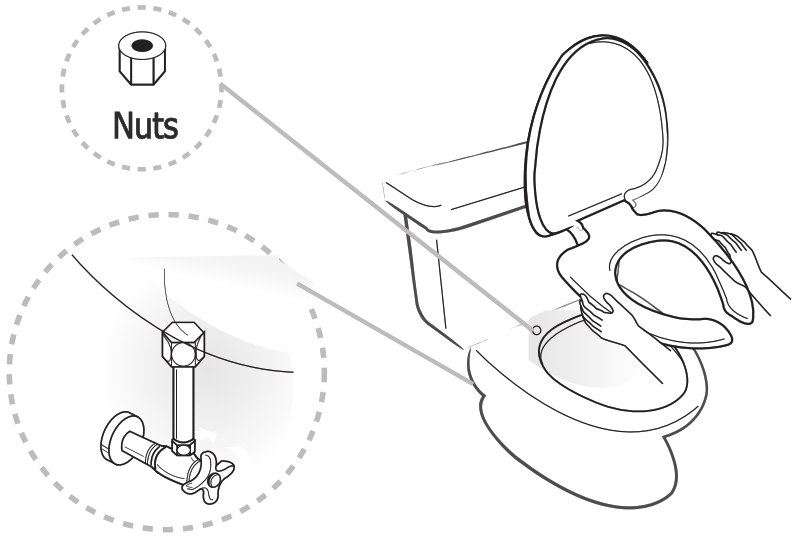
• Store the seat in a proper place for future use.
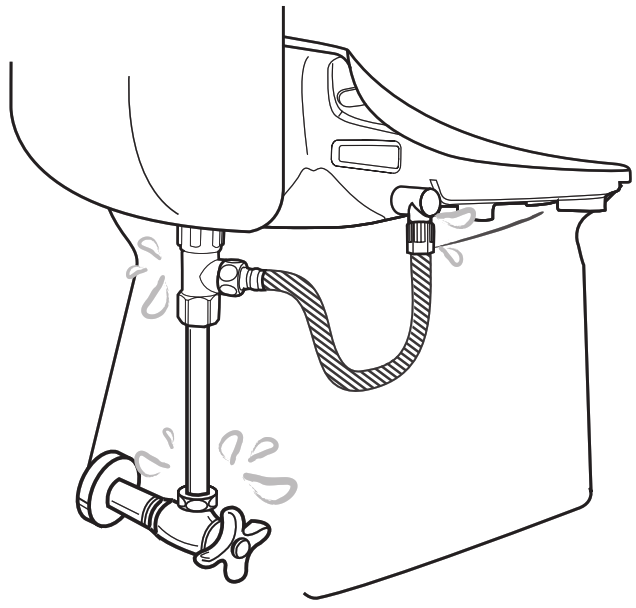
• Turn off the water. - Install the T-valve.

• Attach the T-valve to the bottom of the toilet.
• Connect the water hose to the T-valve. - Fix the catch plate onto the toilet.

• Align the bolt guides over the toilet bolt holes.
• Secure the catch plate to the toilet by hand tightening the bolts. - Push the main body towards the catch plate completely.

• When the product is not installed well, it may cause leakage.
• Adjust as needed before tightening bolts.
*Do not over tighten bolts - After installing the T-valve, connect the supplied bidet hose from the center of the T-valve to the bidet.

- Turn on the water and check for leaks
- Plugin and be sure that the nozzle comes out and retracts when powered on.


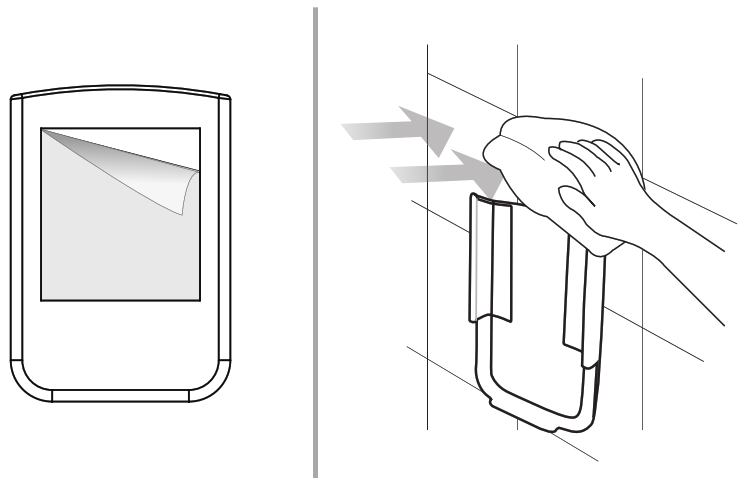
REMOTE INSTALLATION
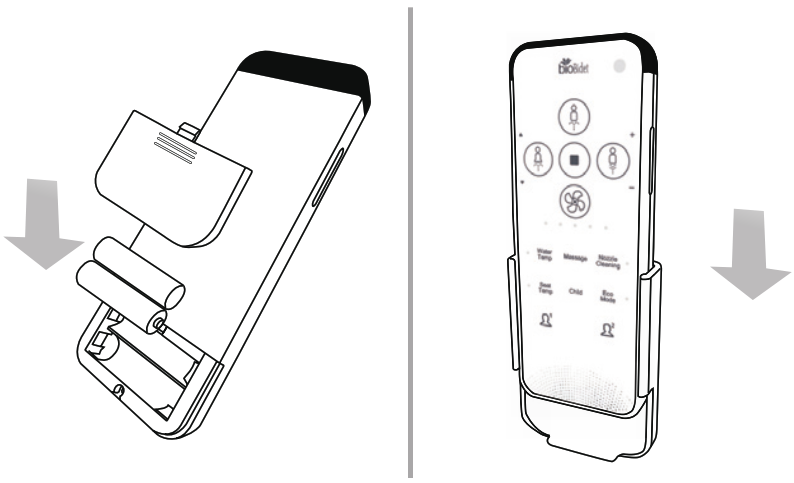
- Remove the adhesive protection to attach the remote control bracket to the wall or other surface
- Insert two “AAA” type batteries (included) as indicated inside the battery compartment.
- When the batteries have reached the end of service life, all LEDs (5 points) will blink. Replace the batteries with new AAA size x 2 pcs.
- If the unit does not work after replacing the batteries, unplug and wait for 3 seconds. Plugin again.
- Remote Control ID Setting
ID setting is required to protect the remote signal interruption if more than one bidet seat is installed at one place (public toilets)
• After replacing the batteries, the ID of the unit will be initialized as “00” (factory initialization) and its ID will be equalized ID of the remote control that reaches the unit first. This ID assigning function will be needed to prevent signal interruption of more than 2 units used at one place. In the case of using one unit only, no setting is needed.
• If you want to change the ID, please refer to “Remote Control ID Setting”
The indicator of “Nozzle Cleaning” blinks and the unit is ready for ID setting.
2. Set the ID by pressing Power Control “+” or “-” (1~5 IDs available)
3. Press “Stop” to save the ID. The main unit will be synchronized simultaneously.
• The remote should be located nearby the main unit when ID is set.
• Default ID of remote is “0”
• In case of battery replacement, power resetting of the main unit, or factory initialization, ID will be initialized, “0,” and the setting process should be done again.


OPERATION
- Sit on the toilet seat
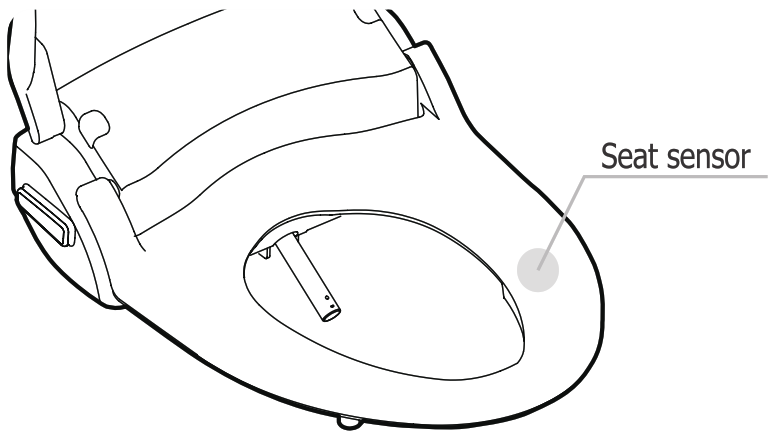
• Skin to seat contact needs to occur to activate the seat. - Wash, Bidet, Turbo

• When pressing the selected function again, the nozzle will oscillate back and forth to wash a wider range.
• Press the button once again to stop the oscillating function.
• The specialized water spray in Turbo function helps relieve constipation. - Dry Temperature Control

• Dryer temperature is adjustable by pressing “+” or “-” buttons. (5 Levels).
• Dryer effect will be improved if you wipe the moisture lightly before operating the drying function. - Massage

• Pulse function will not operate during the operation of Sitz bath*
*See how to use it on page 26 - Child Function

• 1 min Bidet – 30 sec Bidet Oscillating – 30 sec Bidet Pulse
What it does
• Extra extended nozzle position
• Lower water pressure
• Lower seat temperature
• Lower water temperature - Nozzle Position Control /Water Pressure Control


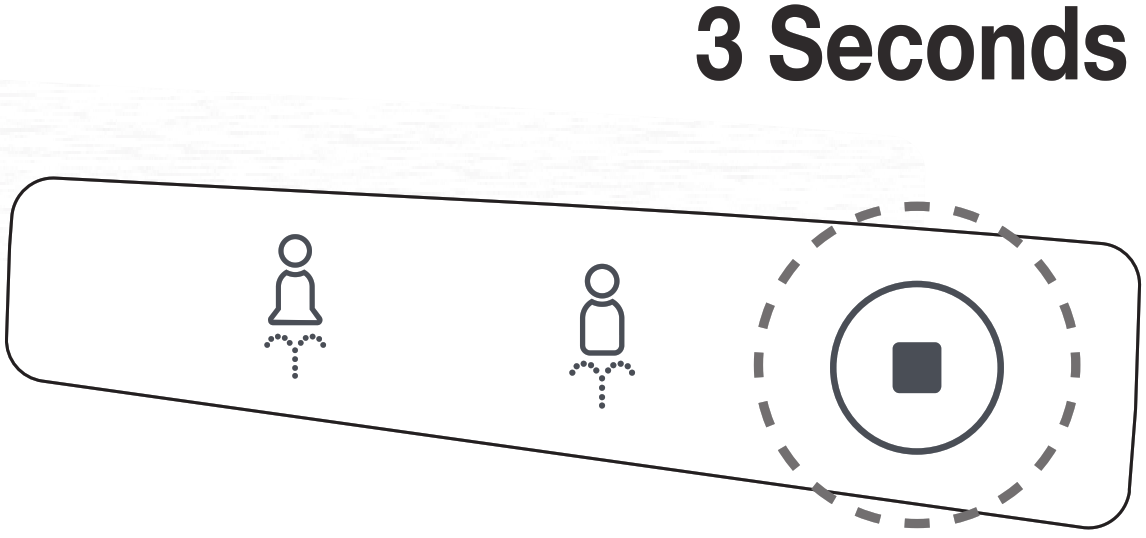
• If the water or screen filters become blocked, it may cause low water pressure. - Stop

• When pressing the stop button for 3 seconds, the unit will turn off.
• Press Stop, Wash, Bidet, or Turbo to turn on. - Seat/Water Temperature Control

• To reduce the chance of low-temperature burns, the seat has a safety feature that turns to low temperature (35°C, 95°F) when the seat is occupied for more than 15 minutes consecutively. - Energy Saving Function

This mode is activated by pressing the Energy Saving button until the yellow LED lights up. (Seat and water temperature will be kept at 89°F)
• Powerful energy-saving mode
This mode is activated by pressing the Energy Saving button until the green LED lights up. (Seat and water heater will be kept off)
• Deactivated energy-saving mode
Press the Energy Saving button until the LED lamp turns off.
• When the unit is occupied, it adjusts to the preset temperature and it returns to the saving mode when the seat is unoccupied.
• If the seat and water temperature are off they will remain off. - Nozzle Cleaning

• Clean the nozzle with a brush and press the STOP button after completion of manual cleaning. Then nozzle cleans itself 3 times and retracts.
• NOZZLE CLEANING will not operate if the seat sensor is activated. - Night Light

• Night light can be turned on and off by pressing “+” for 3 seconds while not seated.
• Night light setting cannot be adjusted if the seat sensor bypass feature is activated. - Sitz Bath

• Water pressure is switched to 1st level regardless of preset water pressure settings and Sitz Bath operates for 5 minutes.
• LED of Nozzle Cleansing turns on during the operation of Sitz Bath.
• Select the Nozzle Cleaning again to switch to normal Wash or Bidet. - Seat Sensor Bypass

• If the seat sensor is deactivated, the unit works without occupying the seat and select features* cannot be controlled.
*Features: Night Light, Silent mode, Nozzle cleaning. - Reset
• After 3 seconds, the seat will power off. Keep holding another 2 seconds and the seat will power back on.
This completes the factory reset process. - User Preset
• Nozzle position, water pressure, and dry/water/seat temperature can be preset and stored for 2 different users.
How to preset
1. Adjust nozzle, position, water pressure, and dry/water/seat temperature to your preference.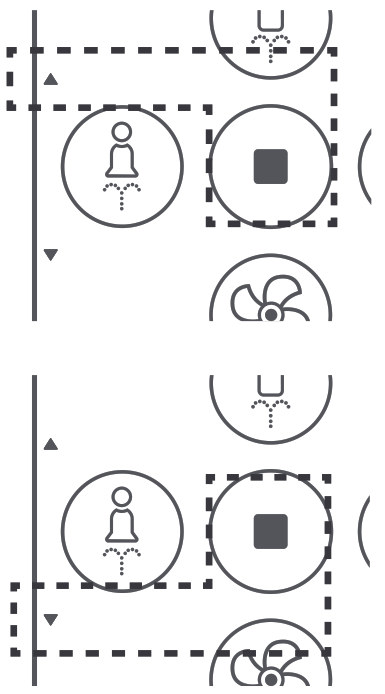
 ” simultaneously for 3 seconds.
Preset 2: Press the stop button and “ ” simultaneously for 3 seconds.
3. Press the “Stop” button or just wait to complete.
Using the Preset Features
1. Press the selected preset button
2. Preset nozzle position, water pressure, and temperatures will be activated.


MAINTENANCE and CLEANING
- Screen Filter Cleaning
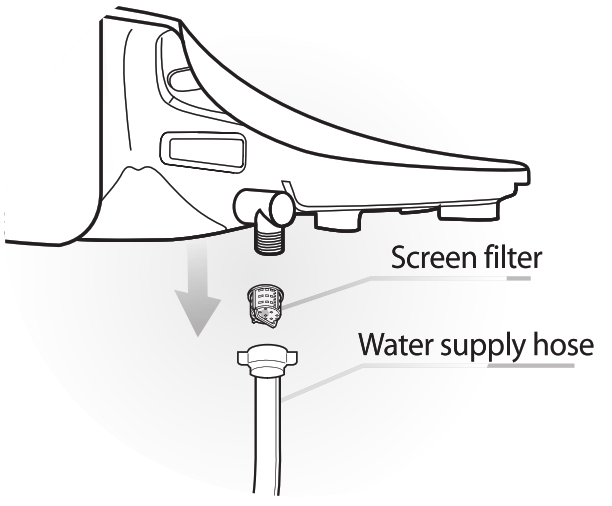
• Disconnect the water supply hose. Take the screen filter out and clean it with a soft brush.
• Return the filter after cleaning and reconnect the water supply hose.
• Open the water valve. - Seat Cleaning

• Wipe the surface with a soft damp cloth. Do not spray water directly onto the surface.
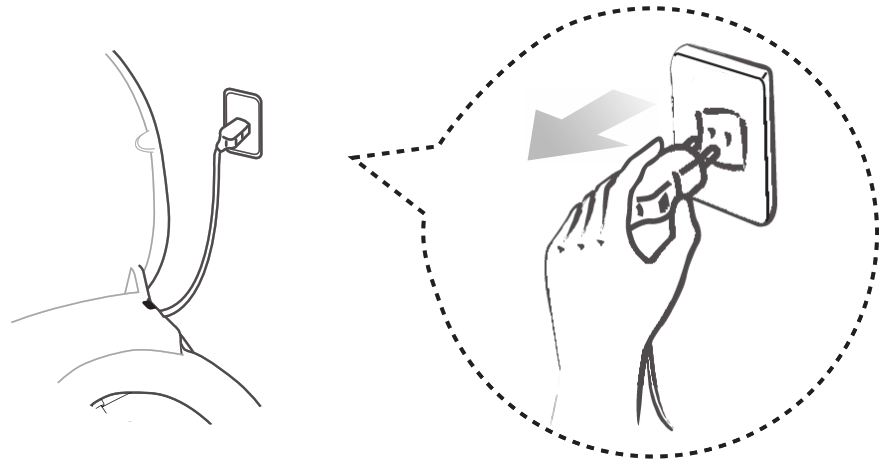
• Clean the body after removing the power plug from the outlet. Be sure no water splashes onto the power plug or outlet.
• Be careful of not dropping any chemical detergents or toilet cleaner on the main body or supply hose to avoid damage. - Extended Non-Use

- Draining of Tank

• Close the water feed valve.
• Press the release button and gently pull to remove the unit from the catch plate.
• Use a flat-head screwdriver to open the drain plug.


SETTINGS
User settings with the remote control
![]() Seat sensor “off”
Seat sensor “off”
![]()

| No. | Function | Seat Status | Switch Operation | Description | Initial Status |
| 1 | Silent mode | “-” for longer than 3 seconds. | To turn on/off the operating chime sound. | ON | |
| 2 | Seat Sensor Bypass | “Massage” for longer than 3 seconds. |
The seat sensor feature will be deactivated | OFF | |
| 3 | Night Light | “+” for longer than 3 seconds. | To turn on/off the night light. | ON | |
| 4 | Automatic tank draining | ” |
The automatic tank draining feature will be deactivated. | OFF |
*The unit will work without sitting on the seat if the occupied seat sensor is deactivated. (Turn off)
*If the seat sensor is deactivated, some features cannot be controlled. (Night light on/off, silent mode on/off, and nozzle cleaning.)
User settings with the side control (auxiliary panel)
| No. | Function | Seat Status | Switch Operation | Description | Initial Status |
| 1 | Factory reset | Press and hold the Stop button for 5 seconds. | After 3 seconds, the seat will power off. Keep holding another 2 seconds and the seat will power back on. This completes the factory reset process. |
ON | |
| 2 | Power off | ” |
Press one of Stop, Wash, Bidet, Intensive or Dry to power on. |
TROUBLESHOOTING GUIDE
| Problem | Check List |
| Completely out of order | • • |
| Water does not spray out. | • • • • |
| Water pressure is low. | • • |
| The water is not warm enough. | •level, or economy mode. |
| Seat is not warm enough. | • |
| The water tank is drained intermittently | • |
Using an inline carbon filter
The use of external water filters is only recommended in areas with known hard water issues. If a filter is used, it must be replaced every 3 months. This product is designed and intended for use exclusively with Bio Bidet water filters. The purchase or use of any other water filter is not the responsibility of BBC Innovation LLC. As such, any use of non-Bio Bidet water filters is prohibited and will void the warranty for those Bio Bidet products. Bio Bidet will not be responsible for any resulting damages or claims related to the
misuse or distribution of non-Bio Bidet filters.
SPECIFICATIONS
| Item | U770, U770R | ||
| Rated Voltage | AC 120V, 60Hz | ||
| Max. Power Consumption | 870W | ||
| Power cord length | 1.2m | ||
| Water feed method | Directly connects to water pipe | ||
| Recommended inlet water pressure | 99-106.6 psi | ||
| Wash | Feed Volume | Wash | 0.13-0.21 gal/min |
| Bidet | 013-0.18 gal/min | ||
| Turbo | 0.13-0.18 gal/min | ||
| Child | 013-0.16 gal/min | ||
| Pressure | 5 Levels | ||
| Temperature Control | 4 Levels (off – low – middle – high) | ||
| Heater capacity | 800W | ||
| Safety device | Water level sensor, Thermal fuse, Bimetal, temperature sensor | ||
| Heated Seat | Temperature control | 4 levels (off – low- middle – high) | |
| Heater capacity | 55W | ||
| Safety device | Thermal fuse | ||
| Dry | Temperature control | Room temp. – 122°F | |
| Heater capacity | 250W | ||
| Safety device | Thermal fuse, Bi-metal | ||
| Feedwater temp. tolerance range | 37 – 95°F (recommended 54 – 95°F) | ||
| Usage room temp. tolerance range | 37 – 95°F (recommended 50 – 95°F) | ||
| Dimension | Elongated | 15.9″ (406) x 20.8″ (528) x 7.0″ (178) | |
| Round | 15.9″ (406) x 19.5″ (496) x 7.0″ (178) | ||
| Weight Net weight (Gross weight) |
Elongated | 10.5 lb (15.2) | |
| Round | 10.2 lb (14.9) | ||
WARRANTY
- We hereby guarantee the product as follows in accordance with the regulation of consumer damage compensation.
- In case of product failure, please contact Bio Bidet
- The product warranty will be effective for one year from the date of purchase.
Regarding Product Warranty Regulation
- We will repair the product free of charge in case it fails under normal operating circumstances in accordance with the user guide during the warranty period.
- Although it is within the warranty period, we will charge the repair service fee, etc. (repair + parts + travel expense) if it falls under the following cases:
Voiding Warranty
- Defects occurred from the user’s careless handling
- Defects occurred from usage with incorrect power voltage (E.g. 220V was used for the 110V product.)
- Defects occurred from Force Majeure (fire, salt, flood, etc.)
- Failure or damage due to mishandling during operation after installation.
- Defects occurred from interior modification at the user’s discretion.
Thank You![]()
7900 S Route 31 Crystal Lake, IL 60014
T: 847.458.2334
U.S. TOLL-FREE: 877.339.5214
[email protected]
www.biobidet.com