BOAVISION W54F5MP-WP Wireless Pan/Tilt Home Security Camera

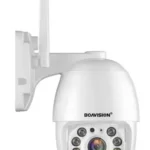
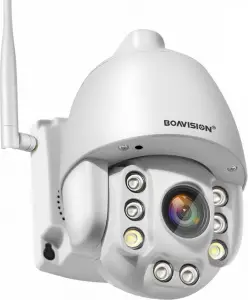
Product Detail


 Note: Note:
|
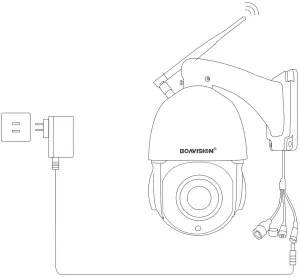
Start Up
Note:
- Allow Camhipro To Access Mobile Cellular Data And Wireless Lan, Otherwise It Can not Add Camera.
- Allow Camhipro To Receive Pushed Messages, Otherwise The Phone Will Not Receive an Alarm Push Message.
- Allow Camhipro To Use The Microphone When You Want To Use 2 Way Audio Function.
 Download The “Camhipro” App From The Apple App Store Or From The Google Play Store.
 |
 |
 |
 |
 |
Note:
Please Keep Your Phone and Camera Close to WiFi Router

Note:
Please Use Supplied Power Adapter
Note: Please Make Sure Your Router Is Working Properly,And The Wifi Signal Is 2.4Ghz,Camera Only Support 2.4Ghz Wifi, Not 5Ghz. If Your 2.4Ghz Wifi And 5Ghz Wifi Are Same Ssid, You Need To SeparateThe Ssid, By Login To Your Wifi Router.
Add Camera
Setup Via AP Mode
Please follow the steps below to find the hotspot AP of the camera and connect to it, set up the camera’s WiFi, and let it connect to the WiFi router in your home wirelessly.
Note:
If You Do Not Find The AP Wifi of The Camera,Press And Hold The Reset Button (On The Tail Line) For 20 Seconds to Reset the Camera and Search Again in Your WLAN.
Step 1.
Turn On The Mobile Wlan And Look For The Hotspot Wifi “IPCAM-XXXXX” In Your Network List Use The Default Password “01234567” To Connect.
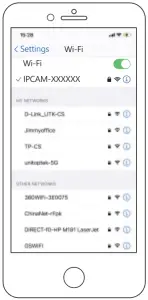
Step 2.
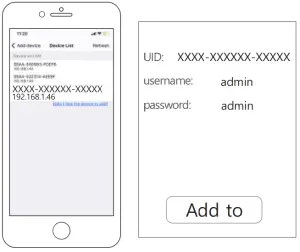
Open The Camhipro App, Select —>“+”—>“IP camera”—>“Device in Use”—>“Search nearby devices”


Step 3.
Tap On The Device Listed Under Lan. The Name Should Be “XXXX-XXXXX-XXXXX”(Default User”admin”,Password “admin”).Click“Add To”And Setup The Device Name.
Step 4.
Now, Tap On The Gear Wheel Icon “  ” —> Tap On Wireless Setting “
  ” And Select Prefered Network And Enter The Password.


Note: If You Can not Successfully Connect To The Camera Via Ap(Access Point Wifi), We Suggest To Try The Optional Setup As Below
Setup With Network Cable (Optional)

- Connect The Camera To The Lan Port Of Your Wifi Router With A Network Cable Temporarily.
- Then Repeat as above.
- Then Remove The Cable And Wait 10 Seconds The Camera Will Connect To Your Wifi Router Wirelessly.

 Wireless setup is successful |
Note: It is highly recommended to change password.
|
Wall Mount
Paste The Drilling Location Mark On The Wall, Then Drill The Hole According To The Mark And Insert The anchors, Pass The Screw Through The Back Of The Bracket, And Fix The Top Of The Bracket On The Wall.
- Mark Position
Place the mounting template where you want the camera. For wall mounting, drill four holes through four circles. - Mount Camera
Affix the camera base using the screws. For wall mounting, insert four anchors into the holes and use the screws to affix the camera base over the anchors.
Trouble Shooting
| No | Lssues Description | Solutions |
| 1 | Can not see the camera’s WiFi Signal in phone WLAN setting | Please make sure the camera is NOT connecting Ethernet cable, press and hold the reset button on the cable for 20 seconds, wait for 30 seconds, check in your phone WLAN settinge, there should be a WiFi signal named IPCAM-xxxxx, if still can not find the wifi signal, quick press the reset button and wait for 20 seconds, there should be a wifi signal now, the format is IPCAM-XXXXX. |
| 2 | Connection can not be established | 1) Check your Wi-Fi name and password, if there is any special character. 2) Make sure your WiFi is 2.4G, it does not support 5G. 3) Make sure your camera and mobile phone are near the router. 4) Email contact customer service staff to solve your problem within 24 hours |
| 3 | Reset to default | 1) Press and hold the reset button for 20 seconds. 2) Hear “Dong” sound, and wait for reboot |
| 4 | How to connect the camera to a NEW WIFI |
1) Reset camera 2) Delete the camera from Camhipro device list 3) Setup the camera as a new one |
| 5 | Alarm captures without a person | 1) Please try to adjust the camera position or direction,make the camera further from the monitor area 2) Some objects (Fly, Leaves, Dust) trigger the motion sensor, please reduce the motion sensitivity, and adjust the monitor area to avoid the false alarm area. |
| 6 | Alarm too frequent | Please reduce the motion sensitivity, adjust the monitor area, setup schedule alarm time in advanced setting |
| 7 | Cannot get alarm push | Enable notification of the Camhipro app in the mobile settings. |
| 8 | No alarm video recorded | Please insert the micro SD card, make sure the sd card is readable in sd card setting page (you can see the memory size) |
| 9 | Device offline | Check if the network works well, maybe the camera location is too far from the router, move to a closer place and try |
| 10 | Video delay | Check the WIFI network, the distance between the camera and the router should not be too far |
| 11 | The camera keep rebooting or crashing | Please check if your SD card is installed correctly, or replace with another brand new memory card (Class 10) and go through the whole set up again. |
Warranty and Support
Dear Users:
Thank You For Purchasing Boavision Products. In Order To Protect Your Rights, Please Read The Following Carefully After Purchasing:
- The Following Situations Do Not Belong To The Scope Of Free MaintenancePlease Note:
• Disassemble And Repair The Product Without Permission.
• Intentional Damage To The Product, Such As The Use Of Unsuitable Adapters, Mechanical Damage, Etc.
• Product Failure Or Damage Caused By Force Majeure Such As Earthquake, Fire, Flood, Lightning, Etc - Technical Support&Software Upgrade Service:
Before You Return The Product, Please Contact Our After-Sales Team To Confirm Whether The Product Is Faulty. We Suggest That You Provide Us With Photos Or Videos Related To The Problem By Email, And We Will Reply To You Within 24 Hours.
 E-Mail: [email protected] E-Mail: [email protected] |
 Phone: +1484-862-1346 Phone: +1484-862-1346(9AM-6PM EST Mon-Fri) |
| For More Software Download And Use Help For The Product, Please Scan The QR Code Below Or Enter The URL To Access:
www.boavision.com/download.html
|
You Can Also Follow Our Official Youtube Channel For More Product Guidance Videos.
|


Declaration
Copyright 2021 Boavision Technology Co.,Ltd All Rights Reserved. Without Written Permission, Please Do Not Imitate, Reproduce, Or Translate Part Or All Of The Contents Of This Manual, And Cannot Be Used For Commercial Dissemination In Any Form.
This guide provides a brief introduction to the Pan/Tilt Home Security Wi-Fi Camera and the CamHipro app, as well as regulatory information.Please note that The Product Specifications, Appearance Pictures And Related Information Mentioned In This Manual Are For Reference Only and may not reflect your actual Boavision Camera experience.

|

|
Conventions
In this guide, the following convention is used.
| Convention | Description |
| Key information appears in teal, including management page text such as menus, items, buttons and so on. | |
| Hyperlinks are in teal and underlined. You can click to redirect to a website. | |
| Note: |
Ignoring this type of note might result in a malfunction or damage to the device. |
7050 Frankford Ave Ste 1 Philadelphia, Pa 19135
Ph: +1484-862-1346
Website: www.Boavision.com
E-mail: [email protected]