Ion Pro / Ion 200 RT / Flare RT GPS Bicycle Light User Manual
About this manual
This manual is for Bontrager lights Ion Pro RT, Ion 200 RT (headlights) and Flare RT (tail light). RT indicates light is rechargeable and remote controllable when paired with Bontrager Transmitr remote, PN 502865, or another ANT+ compatible device.
WARNING
The light may be hot and could cause a burn or damage material it may contact. Do not activate (turn on) light in enclosed area. Avoid accidental wireless activation.
Please read the additional Warning, page 2, before using this light.
Specifications
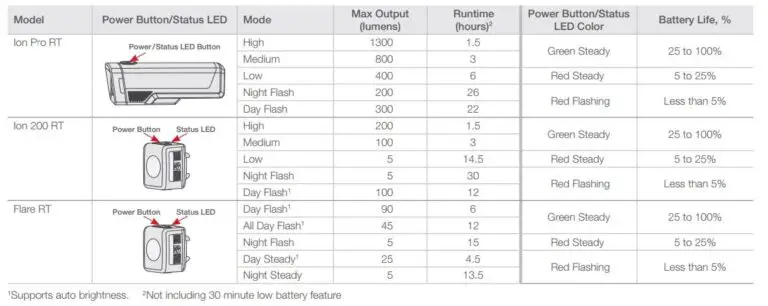
- Ion Pro RT: 4800 mAh, 3.6 Vdc, 17.3 Wh, lithium Ion battery
- Ion 200RT and Flare RT: 420mAh, 3.7 Vdc, 1.6 Wh lithium polymer battery
For more information
If you need help not offered by this manual, talk to your Bontrager retailer or visit trekbikes.com.
Basic operation (see Table 1)
- To turn on, double click (Ion Pro RT) (similar to a computer mouse) and single click (Ion 200 RT / Flare RT) the power button.
- To turn off, press and hold the power button. To change mode, quick-press the power button.
NOTE: When turned on Ion Pro RT, Ion 200 RT and the Flare RT will return to the last active mode.
Table 1. Modes, runtime, and battery life
Battery charging and care (see Table 2)
Although the light is charged at the factory, it is recommended to charge it before first use.
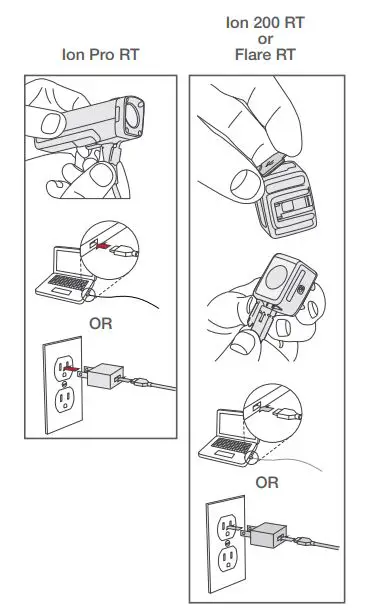
To charge the battery
IMPORTANT: For best results, charge at room temperature in a dry place. Use a quality CE or UL approved USB charger rated for 500 mA or greater. Avoid extreme conditions including wet, cold, or extremely hot.
- Open the USB port cover.
- Plug the Micro charger cable into the USB port on the light.
- Plug the cable into a computer or wall adapter.
- When the charge is complete, unplug the Micro charger cable and close the USB port cover.
IMPORTANT: Ensure the USB cover is latched before riding in rain or in wet conditions. If the USB cover is not closed, damage to the light may occur.

Table 2. Battery charging and care

- Flashes fast (2 Hz) with 4 wire USB cable and a 500mA charger, or slow (1 Hz) with 2 wire USB cable
- When fully charged, status led remains steady for 1 minute then turns off
- Requires a 4 wire USB cable, supplied, and a 500mA charger
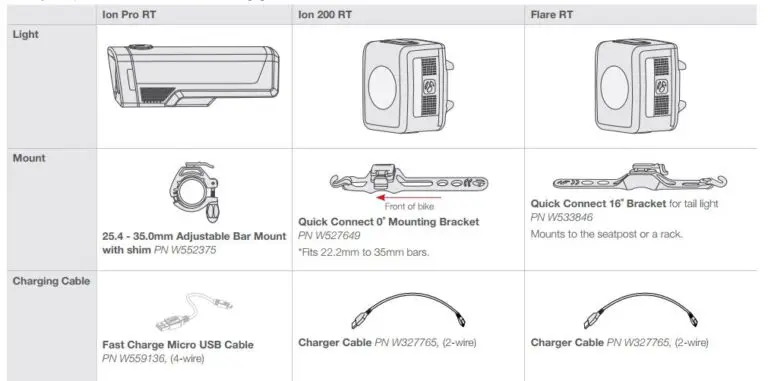
List of parts
You may have purchased one or more of the following lights.

Accessories (purchase separately)

Caring for the battery
Store the light at room temperature in a dry place. Avoid moisture, or extreme hot or cold.
Store the light in the charged condition. Avoid ‘deep discharge’. Battery life will decrease if the battery is stored in a fully discharged condition.
Over time, the run time of the battery will diminish. Expect about 500 full charges, depending on care. After a full life, the battery will continue to charge but with a lower run time. When the run time is unsatisfactory, do not open the case of the light or incinerate; please recycle.
Traveling with the battery
Li-ion batteries cannot be shipped by air due to airline regulations. When traveling by air, place the light in your carry-on.
Recycling
Please recycle the battery. In the US, you can find out where to do this at www.call2recycle.org
This symbol on the product(s) and / or accompanying documents means that used electrical and electronic products should not be mixed with general household waste. For proper treatment, recovery and recycling, outside the US, please take this product(s) to designated collection points. Alternatively, in some countries you may be able to return your products to your local retailer upon purchase of an equivalent new product.
Disposing of this product correctly will help save valuable resources and prevent any potential negative effects on human health and the environment, which could otherwise arise from inappropriate waste handling. Please contact your local authority for further details of your nearest designated collection point. Penalties may be applicable for incorrect disposal of this waste, in accordance with your national legislation.
Ion Pro RT information, installation, and special features
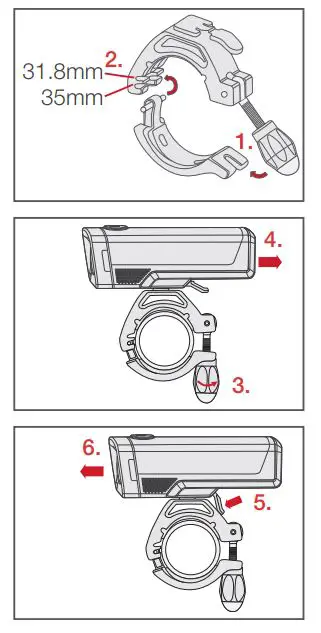
Installation
- Loosen knob and open.
- Adjust for bar size (31.8mm or 35mm).
- Close and tighten knob.
- Slide light onto mount until it locks in place.
NOTE: Use provided shim to fit 25.4 bars.
Removal - Press down.
- Slide light to remove.
Low battery feature
When the battery charge drops below 5% the light automatically adjusts the output brightness to 50 lumens. This extends the light output for an additional 30 minutes.
Locking/Unlocking the mode
Turn on and select the desired mode, then press and hold the power button 8 seconds to select it. The light will turn off and the main LED will flash once. To unlock, repeat the process.
Reset
To reset the light to factory default settings, with the light on, press and hold the power button for 15 seconds. The main LED will flash once at 8 seconds, and again at 15 seconds. Release the button after the second flash.
Wireless Communication
The light is shipped with ANT+ and Bluetooth wireless connectivity enabled. To disable, with the light off, press and hold the power button for 15 seconds. The main LED will flash once at 8 seconds, and again at 15 seconds. Release the button after the second flash.
NOTE: The status LED flashes blue every 15 seconds when wireless is enabled.
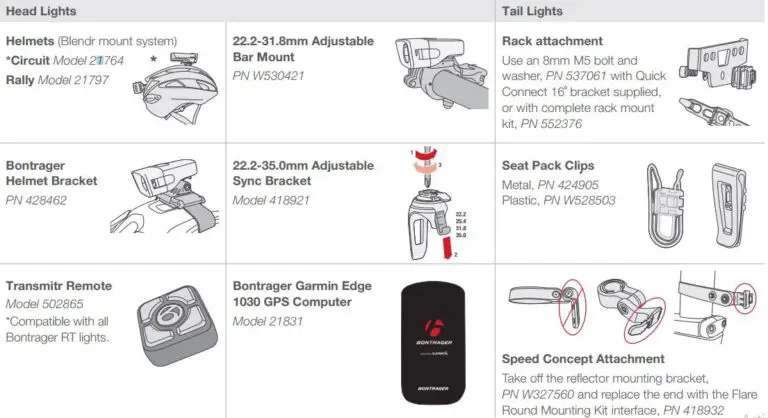
Pairing to the Transmitr Remote, Bontrager Garmin Edge® GPS computer or select Garmin Edge® computers
The Transmitr Remote (or select Garmin Edge computers, sold separately) allows remote control of the light. This feature is only available on the Ion Pro RT, Ion 200 RT, and the Flare RT as well as other compatible Transmitr lights.
For more complete instructions, refer to the Transmitr manual at trekbikes.com. For Garmin related instruction and a complete listing of compatible Edge devices visit support. garmin.com.
Before starting, place the remote and all lights within a small area. Move 15 feet from other Transmitr / ANT+ compatible lights to prevent unintentional pairing. If a light is unintentionally paired, restart the pairing process at the beginning.
NOTE: All pairings must be done in a single session. After pairing is finished, pairing any additional lights will require that you repeat the entire pairing procedure.
- Place the light close to the Transmitr Remote (within 15cm / 6in).
- Quick-press the power button on the light to turn it on, then quick-press to turn it off again.
NOTE: After completing this step, do not press the power button on the light again until pairing is complete. - Press-and-hold the center button on the Transmitr Remote for at least 8 seconds. When the corner buttons flash, release the center button.
- While the remote searches for a light, its center button flashes red. When the Transmitr Remote finds a light, the center button on the remote will change from red to green, and the found light will flash.
- While the found light is still flashing, quick-press the button on the Transmitr Remote to which you would like to pair the light. The selected button will glow, and the found (paired) light will stop flashing and turn off. NOTE: After the pairing, the center button on the remote will flash red until the Transmitr Remote finds another available light.
- Repeat Step 4 and Step 5 for each additional light to be paired.
To exit pairing
- When all lights are paired, quick-press the center button on the remote. The
button will stop flashing and turn off.
To verify pairing
- Quick-press the center button on the remote to turn on all paired lights.
- Press-and-hold the center button to turn off all of them.
- Turn on each light individually. Quick-press each paired corner button on the
remote to turn on the individual light(s). - Press-and-hold the same corner button to turn off the light.
Using the Transmitr Remote
To turn on all lights
- ON: Quick-press the center button.
- OFF: Press and hold the center button.
To turn on an individual light
- ON: Quick-press the corner button that controls the light.
- OFF: Press and hold the same button.
To change modes of an individual light
Each quick-press of a button that controls a light will cycle through the modes.
To see battery power status on the remote
When a corner button is pressed, the center button will show the battery status of the light.

Ion 200 RT information, installation, and special features
Installation
To attach with the Quick Connect 0˚ offset bracket
- Place the quick connect on the handlebar with the hook in front.
- Stretch the strap under the bar and connect to the hook.
NOTE: Use the second hook to latch excess strap. - Slide the Ion 200 RT onto the bracket until it clicks. The power button should be facing up and the lens of the light should be perpendicular to the road.
Removal
Press down on the tab and slide the light away from the lever. Alternatively, you can remove the entire quick-connect bracket, with the light attached.
Low battery feature
When the battery charge drops below 5% the light automatically adjusts the output brightness to 5 lumens. This extends the light output for an additional 30 minutes.
Locking/Unlocking the mode
Turn on and select the desired mode, then press and hold the power button 8 seconds to select it. The light will turn off and the main LED will flash once.
To unlock, repeat the process.
Auto brightness
The light is shipped with an ambient light sensor enabled. The light automatically changes modes with ambient light conditions. It changes from Day Flash to High Steady. To disable, with the light off, press and hold the power button 8 seconds. The light will flash once.
NOTE: When auto brightness is enabled, all modes are manually accessible.
Reset
To reset the light to factory default settings, with the light on, press and hold the power button for 15 seconds. The main LED will flash once at 8 seconds, and again at 15 seconds. Release the button after the second flash.
Wireless Communication
The light is shipped with ANT+ and Bluetooth wireless connectivity enabled. To disable, with the light off, press and hold the power button for 15 seconds. The main LED will flash once at 8 seconds, and again at 15 seconds. Release the button after the second flash.
NOTE: The status LED flashes blue every 15 seconds when wireless is enabled.
Flare RT information, installation, and special features

Installation
To attach with the Quick Connect 16˚ offset bracket.
IMPORTANT: The seatpost/saddle icon shows that the lens is oriented perpendicular to the ground to optimize visibility.
NOTE: Use the second hook to latch any excess strap.
![]()
To attach to a seat pack
Attach the seat pack clip to the bag loop. To optimize visibility, ensure the light lens is oriented perpendicular to the ground.
To attach to a rack
Remove the quick connect clip from the rubber strap and attach to a rack with a M5 bolt and washer, sold separately, PN 537061.
Low battery feature
When the battery charge drops below 5% the light automatically adjusts the output brightness and begins to flash. This extends the light output for an additional 30 minutes.
Locking/Unlocking the mode
Turn on and select the desired mode, then press and hold the power button 8 seconds to select it. The light will turn off and the main LED will flash once. To unlock, repeat the process.
Auto brightness
The light is shipped with an ambient light sensor enabled. The light
automatically changes modes with ambient light conditions. It changes from Day Flash or All Day Flash to Night Flash, OR Day Steady to Night Steady. To disable, with the light off, press and hold the power button 8 seconds. The light will flash once.
NOTE: When auto brightness is enabled, Day Flash, All Day Flash and Day Steady are manually accessible.
Reset
To reset the light to factory default settings, with the light on, press and hold the power button for 15 seconds. The main LED will flash once at 8 seconds, and again at 15 seconds. Release the button after the second flash.
Wireless Communication
The light is shipped with ANT+ and Bluetooth wireless connectivity enabled. To disable, with the light off, press and hold the power button for 15 seconds. The main LED will flash once at 8 seconds, and again at 15 seconds. Release the button after the second flash.
NOTE: The status LED flashes blue every 15 seconds when wireless
is enabled.
WARNING
A bicycle without correct lights and reflectors might be difficult for other people to see, and you might not be able to see. If you cannot see, or other people cannot see you, you could have an accident. Make sure your lights operate correctly and that batteries are charged.
European Union Compliance
Ion Pro RT and Ion 200 RTdo not comply with German StVZO regulations! Trek Bicycle Corporation and Bontrager hereby declare that the wireless device identified as ‘Ion Pro RT’, ‘Ion 200 RT’ and ‘Flare RT’are in compliance with the following European Directives:
- Radio Equipment Directive 2014/53/EU (Ion Pro RT only)
- EMC Directive 2014/30/EU
- Low Voltage Directive 2014/35/EU (Ion Pro RT only
- RoHS Directive 2011/65/EU
The full text of the EU declaration of conformity is available from your dealer, or at the following internet address: http://www.trekbikes.com/support