Braun Series 9 Premium Electric Razor User Manual

Our products are designed to meet the highest standards of quality, functionality, and design. Thank you for your trust in Braun’s quality, and we hope you enjoy your new Braun shaver. Read these instructions completely, they contain safety information. Keep them for future reference.
Warning Your appliance is provided with a special cord set, which has an integrated Safety Extra Low Voltage power supply. Do not exchange or tamper with any part of it, otherwise, there is a risk of an electric shock. Only use the special cord set provided with your appliance.
If the appliance is marked  492, you can use it with any Braun power supply coded 492-XXXX.
 This appliance is suitable for cleaning under running water and use in a bath or shower. For safety reasons it can only be operated cordless.
Do not shave with a damaged foil or cord.
This appliance can be used by children aged from 8 years and above and persons with reduced physical, sensory or mental capabilities or lack of experience and knowledge if they have been given supervision or instruction concerning the safe use of the appliance and understand the hazards involved. Children shall not play with the appliance. Cleaning and user maintenance shall not be made by children unless they are older than 8 years and supervised.
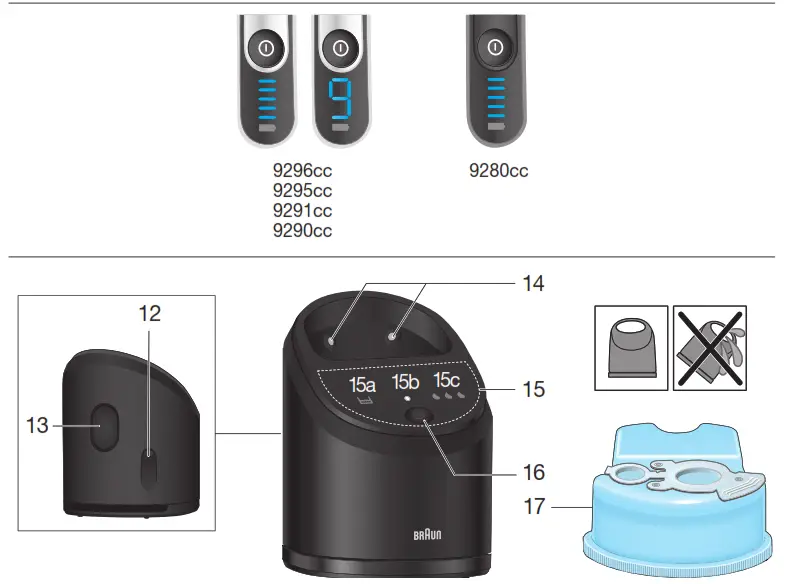
Clean&Charge Station
To prevent the cleaning fluid from leaking, ensure that the Clean&Charge Station is placed on a flat surface. When a cleaning cartridge is installed, do not tip, move suddenly or transport the station in any way as cleaning fluid might spill out of the cartridge. Do not place the station inside a mirror cabinet, nor place it on a polished or lacquered surface.
The cleaning cartridge contains a highly flammable liquid so keep it away from sources of ignition. Do not expose to direct sunlight and cigarette smoking nor store it over a radiator. Do not refill the cartridge and use only original Braun refill cartridges.
Shaver
- Foil & Cutter cassette
- Cassette release buttons
- MultiHeadLock switch
- On/off switch
- Shaver display (design can differ)
- Long hair trimmer
- Shaver-to-station contacts
- Release button for long hair trimmer
- Shaver power socket
- Special cord set (design can differ)
- Travel case
First use and Charging
Connect the shaver to an electrical outlet by snapping the special cord set (10) into the power socket (9) or for cc models via the Clean&Charge Station (see Chapter «Clean&Charge Station»).
Charging and basic operating information
- When charging for the first time, charge continuously for 1 hour.
- A full charge provides up to 50 minutes of cordless shaving time. This may vary according to your beard growth and environmental temperature.
- Recommended ambient temperature for charging is 5 °C to 35 °C. The battery may not charge properly or at all under extreme low or high temperatures.
- Recommended ambient temperature for shaving is 15 °C to 35 °C.
- Do not expose the appliance to temperatures higher than 50 °C for extended periods of time.
- When the shaver is connected to an electrical outlet, it may take some minutes until the display illuminates.
Shaver display
Charge status The shaver display (5) shows the charge status of the battery when connected to an electrical outlet:
- During charging the respective battery segment will blink.
- When fully charged all battery segments will light up for a few seconds then the display turns off.
Low charge
The low-charge light  flashes red when the battery is running low. You should be able to finish your shave. With switching off the shaver a beep sound reminds of the low charge status. The last 9 minutes of remaining shaving time are displayed in digits (depending on your model /display).
Cleaning status The cleaning indicator  lights up when the shaver needs to be cleaned in the Clean&Charge Station.
Travel lock The lock symbol  lights up when the shaver has been locked to avoid unintended starting of the motor (e.g. for storing in a suitcase).
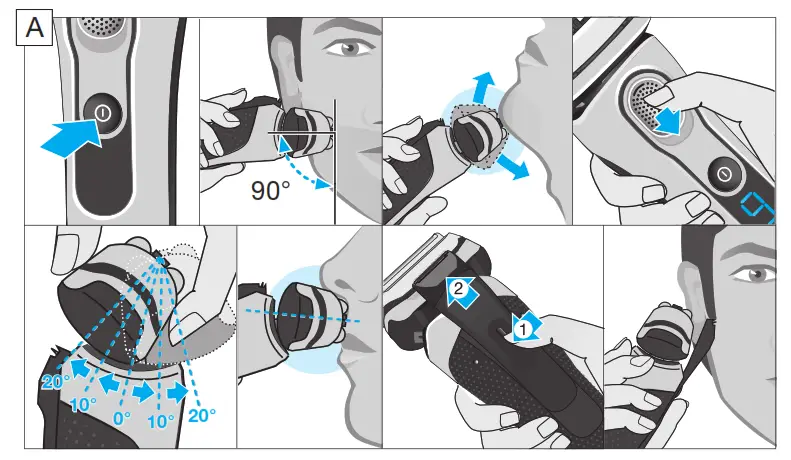
Using the shaver (see fig. A)
Press the on/off switch (4) to operate the shaver.
Tips for a perfect dry shave
- Always shave before washing your face.
- At all times, hold the shaver at the right angle (90°) to your skin.
- Stretch your skin and shave against the direction of your beard growth.
MultiHeadLock switch (headlock) To shave hard-to-reach areas (e.g. under the nose) slide the MultiHeadLock switch (3) down to lock the shaver head. The shaver head can be locked in five positions. To change position, move the shaver head with your thumb and forefinger back or forth. It will automatically click into the next position.
For automatic cleaning in the Clean&Charge Station, the headlock should be released.
Long hair trimmer To trim sideburns, mustache or beard press the release button (8) and slide the long hair trimmer (6) upwards.
Travel lock
- Activation: By pressing the on/off switch (4) for 3 seconds the shaver is locked. This is confirmed by a beep sound and the lock symbol in the display. Afterwards the display turns off.
- Deactivation: By pressing the on/off switch for 3 seconds the shaver is unlocked again.
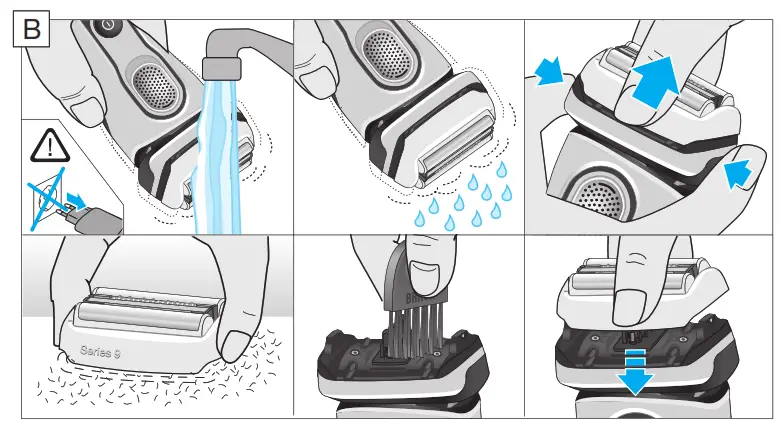
Manual cleaning of the shaver (see fig. B/C)
Cleaning under running water
- Switch on the shaver (cordless) and rinse the shaver head under hot running water until all residues have been removed. You may use liquid soap without abrasive substances. Rinse off all foam and let the shaver run for a few more seconds.
- Next, switch off the shaver, press the release buttons (2) to remove the Foil & Cutter cassette (1), and let it dry completely.
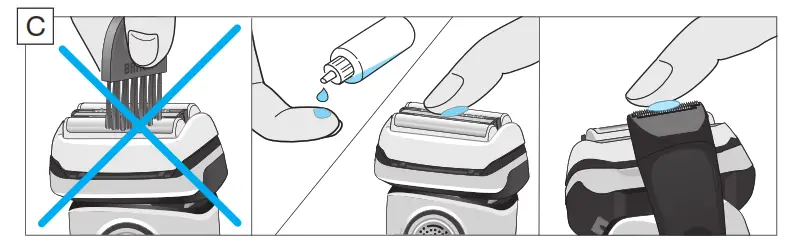
- If you regularly clean the shaver underwater, then apply once a week a drop of light machine oil on top of the Foil & Cutter cassette.
The shaver should be cleaned after each foam usage.
Cleaning with a brush
- Switch off the shaver. Remove the Foil & Cutter cassette (1) and tap it out on a flat surface. Using the brush, clean the inner area of the pivoting head. Do not clean the cassette with the brush as this may damage it!
The Foil & Cutter cassette can be attached either way. There is no impact on the shaving performance.
Clean&Charge Station
The Clean&Charge Station has been developed for cleaning, charging, lubricating, disinfecting, drying, and storing your Braun shaver.
12 Station power socket 13 Lift button for cartridge exchange 14 Station-to-shaver contacts 15 Clean&Charge Station display 15a Level indicator 15b Status light 15c Cleaning program indicator 16 Start button 17 Cleaning cartridge
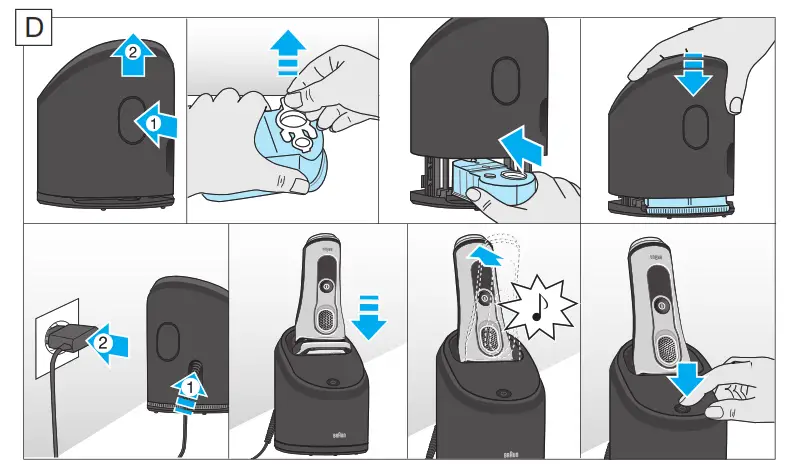
Installing the Clean&Charge Station (see fig. D)
- Press the lift button (13) at the rear side of the Clean&Charge Station to lift up the housing.
- Hold the cleaning cartridge (17) down on a flat, stable surface (e.g. table).
- Carefully remove the lid from the cartridge.
- Slide the cartridge from the rear side into the base of the station until it snaps into place.
- Slowly close the housing by pushing it down until it locks.
- Connect the station to an electrical outlet by snapping the special cord set (10) into the power socket (12).
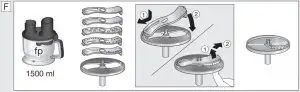
Charging the shaver in the Clean&Charge Station (see fig. D) Insert the shaver head with the front showing and released head lock into the cleaning station. Important: The shaver needs to be dry and free from any foam or soap residue! The contacts (7) on the back of the shaver need to align with the contacts (14) in the station. Push the shaver in the correct position. A beep sound confirms that the shaver sits properly in the station. Charging will start automatically.
Cleaning the shaver (see fig. D) When the cleaning indicator lights up in the shaver display, insert the shaver into the Clean&Charge Station, as described above and press the start button (16).
The hygiene status will be analyzed and is shown by the cleaning program indicators (15c) in the Clean&Charge Station display.
If status light (15b) does not shine (Clean&Charge Station switches to stand-by after about 10 minutes), press the start button twice. Otherwise cleaning will not start. For best shaving results, we recommend cleaning after each shave.
The cleaning process consists of several cycles, in which cleaning fluid is flushed through the shaver head. Depending on the program selected, the cleaning time takes up to 3 minutes, followed by an active drying phase of about 40 minutes, during which a fan is running.
Afterward charging will resume, which is indicated in the shaver display. When the shaver is fully charged the display turns off.
Cleaning programs

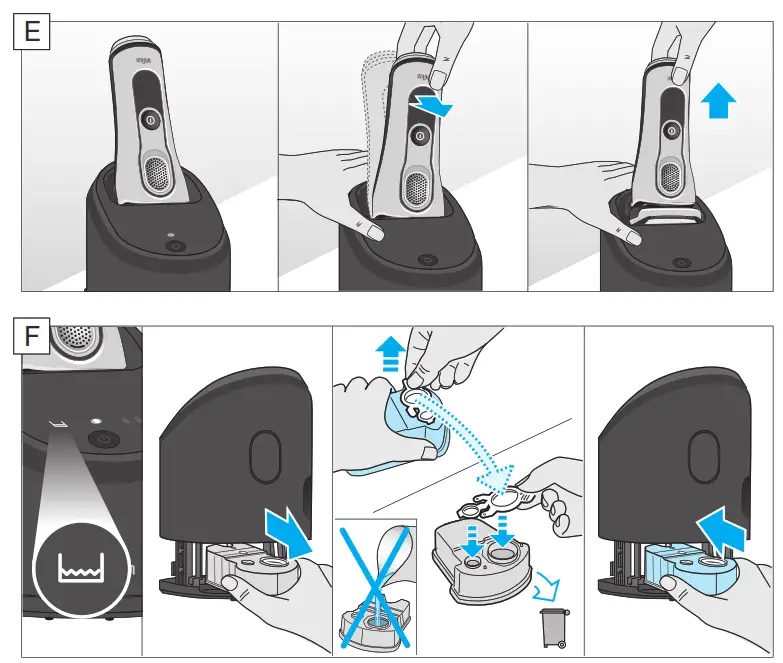
Removing the shaver from the Clean&Charge Station (see fig. E) Hold the Clean&Charge Station with one hand and tilt the shaver slightly to the front to release it.
Cleaning Cartridge / Replacement (see fig. F) When the level indicator (15a) lights up permanently red, the remaining fluid in the cartridge is sufficient for about 3 more cycles. When the level indicator blinks red, the cartridge needs to be replaced (about every 3 weeks when used daily).
After having pressed the lift button (13) to open the housing, wait for a few seconds before removing the used cartridge to avoid any dripping. Before discarding the used cartridge, make sure to close the openings using the lid of the new cartridge, since the used cartridge will contain contaminated cleaning solution.
The hygienic cleaning cartridge contains ethanol or isopropanol (specification see cartridge), which once opened will naturally evaporate slowly. Each cartridge, if not used daily, should be replaced after approximately 8 weeks to ensure optimal disinfection. The cleaning cartridge also contains lubricants for the shaving system, which may leave residual marks on the outer foil frame and the cleaning chamber of the Clean&Charge Station. These marks can be removed easily by wiping gently with a damp cloth.
Accessories
Braun recommends changing your shaver’s Foil & Cutter cassette every 18 months to maintain your shaver‘s maximum performance.
Available at your dealer or Braun Service Centres: • Foil & Cutter cassette: 92S/92B • Cleaning cartridge Clean&Charge Station: CCR • Braun Shaver cleaner spray
Environmental notice
 Product contains batteries and/or recyclable electric waste. For environmental protection do not dispose of in household waste, but for recycling take to electric waste collection points provided in your country.
The cleaning cartridge can be disposed of with regular household waste. Subject to change without notice. For electric specifications, see printing on the special cord set.
Guarantee We grant a 2 year guarantee on the product commencing on the date of purchase. Within the guarantee period we will eliminate any defects in the appliance resulting from faults in materials or workmanship, free of charge either by repairing or replacing the complete appliance at our discretion.
This guarantee extends to every country where this appliance is supplied by Braun or its appointed distributor.
This guarantee does not cover: damage due to improper use, normal wear and tear (e.g. shaver foil or cutter block) as well as defects that have a negligible effect on the value or operation of the appliance. The guarantee becomes void if repairs are undertaken by unauthorized persons and if original Braun parts are not used.
To obtain service within the guarantee period, hand in or send the complete appliance with your sales receipt to an authorised Braun Customer Service Centre (address information available online at www.service.braun.com).
For UK only: This guarantee in no way affects your rights under statutory law. 
FAQS
How long does the charge last?
It depends on how often you use it and how thick your hair is. If you shave every day, it should last for about a week.
How long does it take to charge?
It takes about an hour to fully charge the razor.
How do I clean the shaver?
You can clean the shaver by running it under water, or by using the cleaning brush that comes with your shaver.
How do I know when to replace the blades?
You can check for wear and tear of the blades by using the cleaning brush that comes with your shaver. If you notice any wear and tear, then it’s time to replace them.
How do I change the blades?
You can find replacement parts for your shaver at Braun’s website. Just go to www.braun.com and click on “Support”.
Does anyone know the difference between the 9290 and the 9295 besides the color?
According to the Series 9 User Manual, the 9290 and 9295 are identical except for finish. If the manual is correct, the responses by Hall and by Gates are incorrect.
how well does this work on the head?
It works great, I shave my head every week, very close shave
Does this have an adjustment for closeness?
No, our Series 9 Electric Shavers do not have an adjustment for closeness. – The Braun Team
What are the dimensions of the base?
The base is 6″ high, 4.5″ wide and 6″ deep. Installing the shaver into the base adds 4″ to the height
Where can I find the return policy for this item on the product page?
On the top tray of Amazon at the right hand side you will see your cart. Just to the left side of the cart is “Returns and Orders”. Click on it and scroll down to find the Item you want to return. On the right hand side of the item will be a “Return items” box, click on it. If it is not there, you have waited too long. You normally have 30 days to return.
Shaver was beeping yesterday for hours. I would push the on off button it starts for a second and turn off. working now but won’t clean in base?
It’s possible your shaver isn’t securely in place in our Clean & Renew Station. To make sure, please insert your shaver into the Clean & Renew Station and push it to the rear side of the station (contacts of the shaver need to align with contacts in the station). Insert a new cleaning cartridge and press the start button again. This should do the trick, however, if it doesn’t, we’d be more than happy to further troubleshoot this with you. Just give us a call at (800) 272-8611.
Does the shaving head come off so I can clean the blades from inside?
The top of the head ( the blade section) comes off when you squeeze in the sides. I rinse the blades after each shave to keep it clear. Let it dry before replacing.
Can the charge station that comes with the Series 9 9330 be used for the 9390?
The clean and charge stations are specially designed to only work with the model shavers that they come with. If a shaver doesn’t come with one, then it won’t be compatible with any of the ones we make.
How to clean 9330s?
Use the cleaning solution in the tower, it not only cleans but lubricates the foil. If you don’t have a charging/ cleaning tower just run the foil and head of the unit under warm water but the best option is the aforementioned step.
What is the maximum length of hair for which this shaver is effective? (1 mm? 3 mm? Longer?)
There is no specified maximum length as the 9 Series has features to maintain its cutting efficacy in many circumstances. If you have grown past stuble, it would be beneficial to use a trimmer with no guard to prepare the beard for shaving. Not only will it be a better shave, but you will help maintain the expected life of the razor’s head.
Will the 2 year warranty cover for any malfunction and product damage?
That’s a great question! Our 2-year limited warranty covers manufacturer defects. However, it will not cover damages caused by misuse or lifetime wear on the device. – The Braun Team
Can you charge the shaver without using the cleaning station, i.e., plug the cord into a wall outlet and directly into the shaver itself?
Yes. The shaver has a socket that you can plug in the charging cord directly. Note that you can’t use the shaver while it is connected, however.
]]>
IRT3030
Braun ThermoScan® 3
Compact infrared ear thermometer for the whole family
- Reliable & easy to use entry ear thermometer
- From no. 1 brand among doctors*
- With new design and new Audio fever indicator
Fast & accurate
- Precise measurement in just 1 second
- Measures the infrared heat generated by the eardrum and the surrounding tissues, with clinically proven accuracy
- Improved clean ability of the sensor tip if accidentally used without a probe cover (new)
New Audio fever indicator
Easy to interpret the temperature value: number of beeps indicates normal (1 beep), elevated (2 beeps) and high temperature (4 beeps)
Features for easy & pleasant usability
- Compact design is easy to hold
- Easy to read LCD display
- Probe suitable for use with newborns
- Memory recalls the last temperature reading
- Auto shut-off after 60 seconds for longer battery life.
- Readings in Celsius (34 – 42.2°C) or Fahrenheit (93.2 – 108°F)
Disposable lens filters for hygienic use
- With BPA & latex free disposable probe covers i.e. no need to clean or disinfect the probe
- Using a clean disposable cover with each measurement:
1) ensures hygienic use
2) protects from cross-contamination 3) ensures earwax residues do not impact accuracy of the reading.
Accessories
- Probe cover protection cap
- 21x lens filter
- 1 x cell battery. Battery door with a safety lock to prevent choking hazard (new)
Impactful in-store presentation
- Attractive packaging with premium look and feel, with visible product. Hanging hole for in store merchandising
- Based on survey of paediatricians and general practitioners in UK, France, Germany and the Netherlands.


Braun-Manual Download
Questions about your Manual ? Post in the comments!
References
]]>
Product Overview


Our products are engineered to meet the highest standards of quality, functionality and design. We hope you thoroughly enjoy your new Braun appliance.
Before use
Please read instructions carefully and completely before using the appliance.
Caution :
- The blades are very sharp! To avoid injuries, please handle blades with utmost care.
- Care shall be taken when handling the sharp cutting blades, emptying the bowl and during cleaning.
- This appliance can be used by persons with reduced physical,sensory or mental capabilities or lack of experience and knowledge if they have been given supervision or instruction concerning use of the appliance in a safe way and if they understand the hazards involved.
- Children shall not play with the appliance.
- This appliance shall not be used by children.
- Children shall be kept away from the appliance and its mains cord.
- Always switch off and unplug the appliance when it is left unattended and before assembling, disassembling, cleaning and storing.
- If the supply cord is damaged, it must be replaced by the manufacturer, its service agent or similarly qualified persons in order to avoid a hazard.
- Before plugging into a socket, check whether your voltage corresponds with the voltage printed on the bottom of the appliance.
- This appliance is designed for household use only and for processing normal household quantities.
- Do not reach into the filling shaft when the appliance is plugged in,especially while the motor is running. Always use the pusher to guide food through the shaft.
- Do not use the appliance for any purpose other than the intended use described in the user manual. Any misuse may cause potential injury.
- Do not use any part in the microwave.
- Please clean all parts before first use or as required, following the instructions in the Care and Cleaning section.
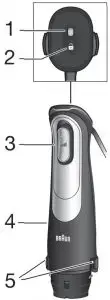
Parts and Accessories
- Pilot light
- Safety button
- Smartspeed switch / variable speeds
- Motor part
- EasyClick Plus release buttons
- Active Blade shaft
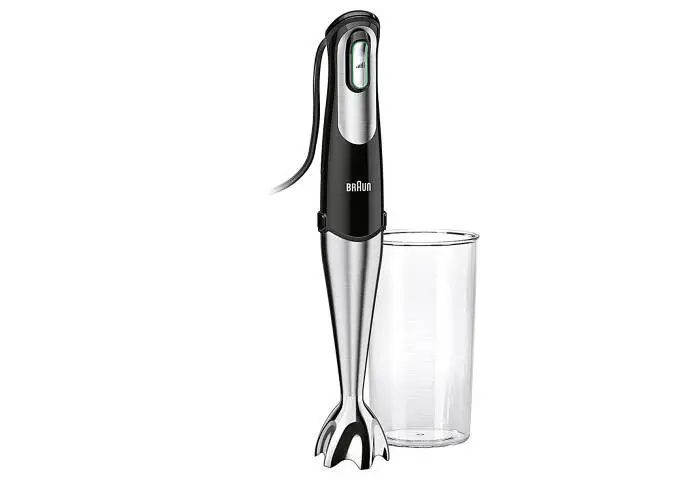
- Beaker
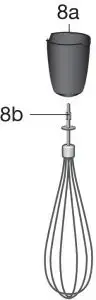
- Whisk accessory
- Gearbox
- Whisk
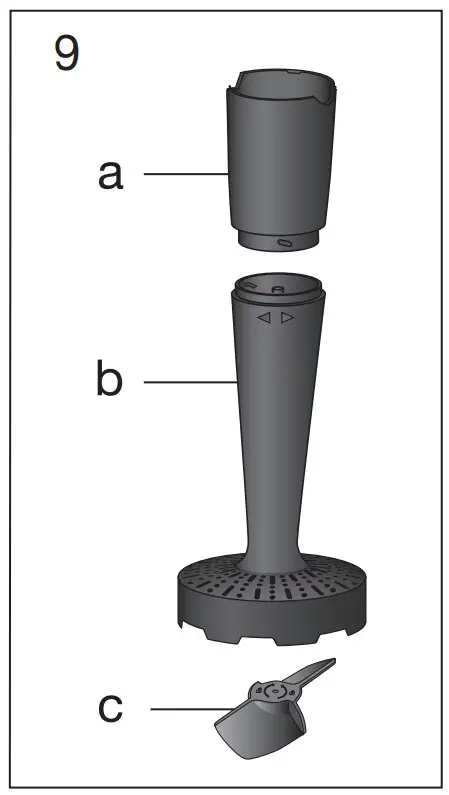
- Puree accessory
- Gearbox
- Puree shaft
- Paddle
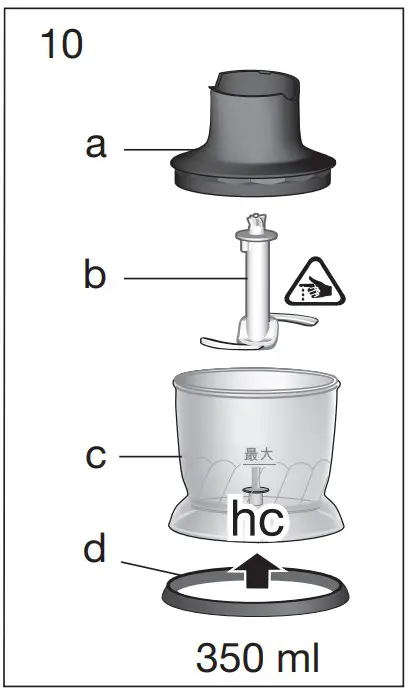
- 350 ml chopper accessory «hc»
- Lid
- Chopping blade
- Chopper bowl
- Anti-slip rubber ring
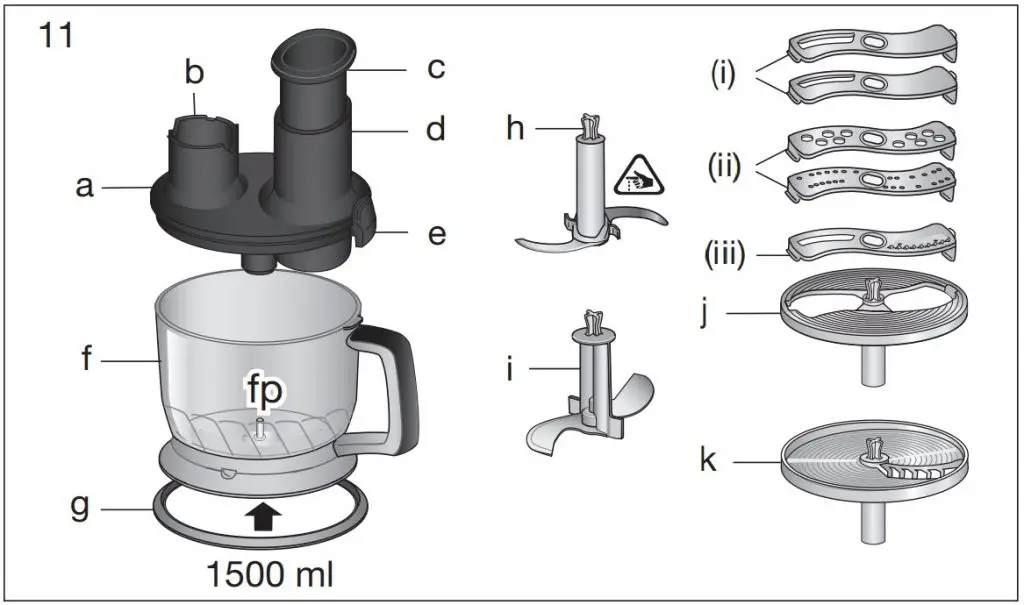
- 1500 ml food processor accessory «fp»
- Lid (with gear
- Coupling for motor part
- Pusher
- Feed tube
- Lid latch
- Food processor bowl
- Anti-slip rubber ring
- Chopping blade
- Kneading hook
- Insert holder
- Slicing insert (fine, coarse)
- Shredding inserts (fine, coarse)
- Julienne insert
- French fry disc
Unpacking
Take the unit out of the carton. Remove all pieces of the packing. Remove any possibly extant labels on the unit (do not remove the rating plate).
Pilot Light
The pilot light (1) shows the status of the appliance, when it is connected to an electrical outlet.
| Pilot light | Appliance / Operating status |
| Flashing red | Appliance is ready for use. |
| Solid green | Appliance is released (switch release button is pressed) and can be switched on. |
| Solid Red | Early warning about overheating. Motor slows down, step by step, till shut off . Let the appliance cool down. It is ready for use again when the pilot light fl ashes red. |
If the maximum speed decreases under high load and long running time you can still finish your preparation, however you should let the appliance cool down afterwards.
How to Use the Appliance
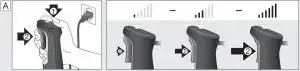
Smartspeed Switch for Variable Speeds
- One squeeze, all speeds.
- The more you press, the higher the speed.
- The higher the speed, the faster and finer the blending and chopping results.
- One handed operation: the Smartspeed switch (3) allows you to turn on the appliance and control the speed with one hand.
Operating your Hand Blender :
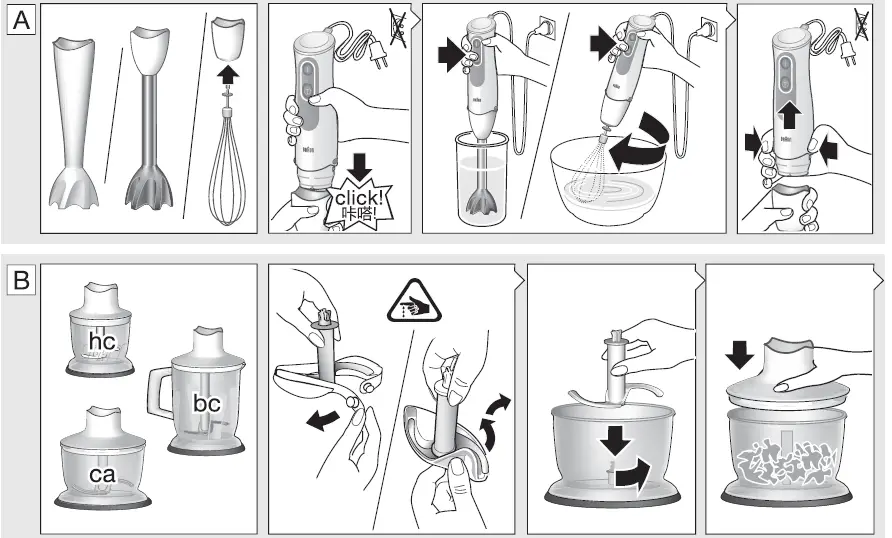
First use: Remove the transportation lock from the motor part (4) by pulling it at the red strap.
Switching On (A)
The appliance comes equipped with a safety button for releasing the Smartspeed switch. To safely turn it on, follow these points:
- Press the safety button (2) with your thumb. The Pilot Light will turn solid green.
- Immediately press the Smartspeed switch and adjust to the desired speed.
Note: If the Smartspeed switch is not pressed within 2 seconds, the appliance cannot be switched on for safety reasons. The pilot light will flash red. To switch the appliance on, start again with first. - During operation you do not need to keep the safety button pressed.
ActiveBlade Shaft (B)
The hand blender is equipped with an Active Blade shaft, which enables the knife extend to the bottom of the bell. The adjustment is made automatically by pressure required in blending tasks, especially suited to mix hard foods e.g raw fruits and vegetables.
It is also perfectly suited for preparing dips, sauces,salad dressings, soups, baby food, as well as drinks, smoothies and milkshakes.
For best results, use the highest speed
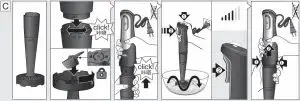
Assembly and Operation :
- Attach the Active Blade shaft (6) to the motor part until it clicks.
- Place the Active Blade shaft into the mixture to be blended. Then switch the appliance on as described above.
- Blend ingredients to the desired consistency using a gentle up-and-down motion. Depending on the pressure applied, the Active Blade shaft will depress and blade will extend.
- After use, unplug the hand blender and press the EasyClick Plus release buttons (5) to detach the Active Blade shaft.
Caution :
- For easier cleaning, liquids or ingredients should not overlap the green line of the Active Blade shaft.
- If using the appliance to purée hot food in a saucepan or pot, remove the saucepan or pot from the heat source and ensure the liquid is not boiling. Allow hot food to cool slightly to avoid risk of scalding.
- Do not let the hand blender sit in a hot pan on the cooktop when not in use.
- Do not scratch the Active Blade Shaft over the bottom of pans and pots.
Recipe Example: Mayonnaise : 250 g oil (e.g. sunflower oil), 1 egg and 1 extra egg yolk, 1–2 tbsp. vinegar,
Salt and pepper to taste :
- Place all ingredients (at room temperature) into the beaker in the order as above.
- Place the hand blender at the bottom of the beaker. Blend at maximum speed until the oil starts emulsifying.
- With the hand blender still running, slowly raise the shaft to the top of the mixture and back downto incorporate the rest of the oil.
NOTE: Processing time: approx. 1 minute for salads and up to 2 minutes for a thicker mayonnaise (e.g. for dip).
Whisk Accessory (B)
Use the whisk only for whipping cream, beating egg whites, making sponge cakes and ready-mix desserts.
Assembly and Operation :
- Attach the whisk (8b) to the gearbox (8a).
- Align the motor part with the assembled whisk accessory and push the pieces together until they click.
- After use, unplug and press the EasyClick Plus release buttons to detach the pull the whisk out of the gearbox.
Tips for Best Results :
- Move the whisk clockwise while holding it at a slight incline.
- To prevent splattering, start slowly and use thewhisk attachment in deep containers or pans.
- Place the whisk in a bowl and only then switch the appliance on.
- Always ensure the whisk and mixing bowl are completely clean and free of fat before whisking egg whites. Only whip up to 4 egg whites.
Recipe Example: Whipped Cream : 400 ml chilled cream (min. 30% fat content, 4 – 8 °C).
- Start with low speed (light pressure on the switch) and increase the speed (more pressure on switch) while whipping.
- Always use fresh chilled cream to achieve greater and more stable volume when whisking.
Puree Accessory (C)
The puree accessory can be used to mash cooked vegetables and fruits such as potatoes, sweet potatoes, tomatoes, plums and apples.
Before Use :
- Do not mash hard or uncooked food, as this may damage the unit.
- Peel and remove any stones or hard parts; cook and drain then mash the fruit/vegetable.
Assembly and Operation :
- Fit the gearbox (9a) to the shaft (9b) by turning in a clockwise direction until it locks into place.
- Turn the puree accessory upside down and fit the paddle (9c) over the central hub and turn counter- clockwise to locate. (If the gearbox is not fitted properly, then the paddle will not secure in place).
- Align the assembled puree accessory with the motor part and click the two parts together. Plug in.
- Dip the puree accessory into the ingredients and switch on the appliance.
- Using a gentle up and down motion, move the puree accessory through the ingredients until the desired texture is achieved.
- Release the Smartspeed switch and ensure the puree accessory has completely stopped turning before removing it from the food.
- After use, unplug the appliance. Remove the paddle (9c) by turning clockwise.
- Press the EasyClick Plus release buttons to detach the puree accessory from the motor part. Separate the gearbox from the shaft by turning counter-clockwise.
Caution :
- Never use the puree accessory in a saucepan over direct heat.
- Always remove the saucepan from the heat and allow to cool slightly.
- Sit the saucepan or bowl on a stable, flat surface, and support it with your free hand.
- Do not tap the puree accessory on the side of the cooking vessel during or after use. Use a spatula to scrape excess food away.
- For best results when mashing never fill a saucepan or bowl more than half full with food.
- Do not process more than one batch without interruption.
- Let the appliance cool down for 4 minutes before you continue processing.
Recipe Example: Mashed Potatoes :
- 1 kg cooked potatoes
- 200 ml warm milk
- Place the potatoes in a bowl and mash for 30 seconds (3/4 way on the Smartspeed switch)
- Add the milk. Resume mashing for another 30 seconds.
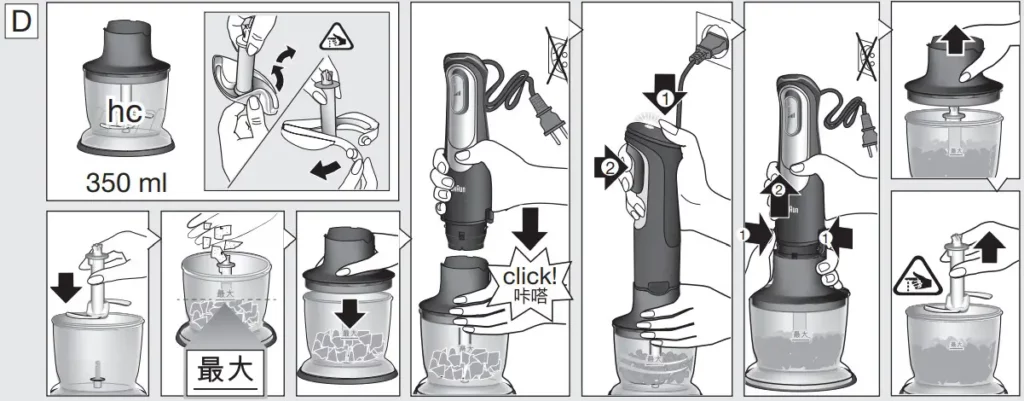
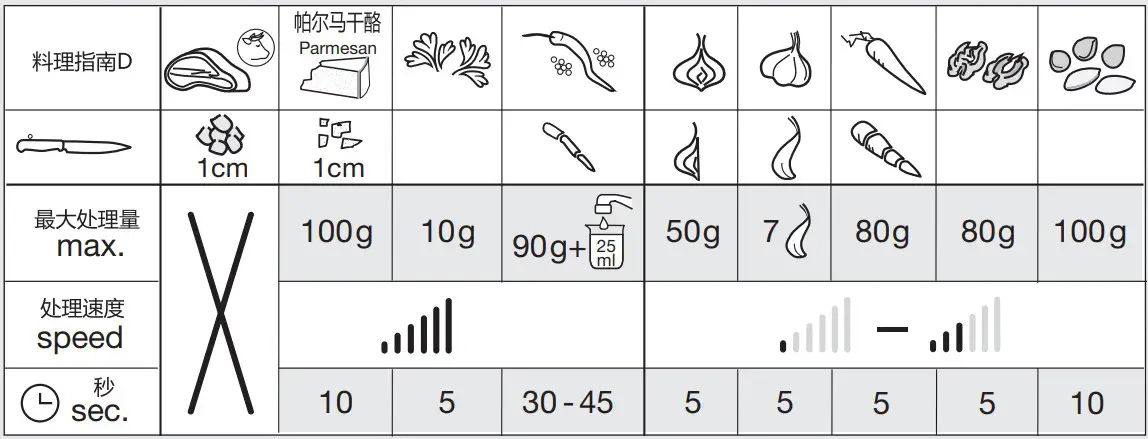
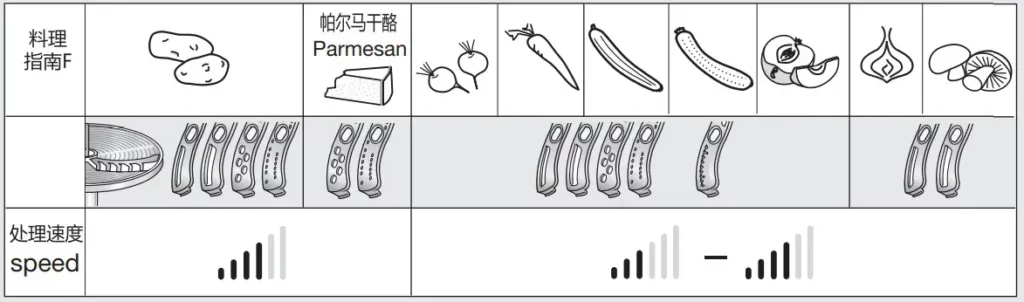
Chopper Accessory (D)
- The chopper (10) is perfectly suited for chopping hard cheese, onions, herbs, garlic, vegetables bread, crackers and nuts.
- Use the «hc» chopper (10) for fine results.It is not suitable for meat.
- Refer to the Processing Guide D for maximum quantities, recommended times and speeds.
- For «hc» chopper do not exceed the quantity of ingredients higher than max line. Maximum operation time for the «hc» chopper: 1 minute for large amounts of wet ingredients, 30 seconds for dry or hard ingredients.
NOTE: leave an interval of at least 3 minutes before operating again (To prevent faults). Immediately stop processing when motor speed decreases and/ or strong vibrations occur.
Before Use :
- Pre-cut foods into small pieces for easier chopping.
- Remove any bones, tendons and gristle from meat to help prevent damage to the blades.
- Make sure the anti-slip rubber ring (10d) is attached to the bottom of the chopper bowl.
Assembly and Operation :
- Carefully remove the plastic cover from the blade.
- The blade (10b) is very sharp! Always hold it by the upper plastic part and handle it carefully.
- Place the blade on the center pin of the chopper bowl (10c). Press it down and give it a turn so that it locks into place.
- Fill the chopper with food and put on the lid (10a).
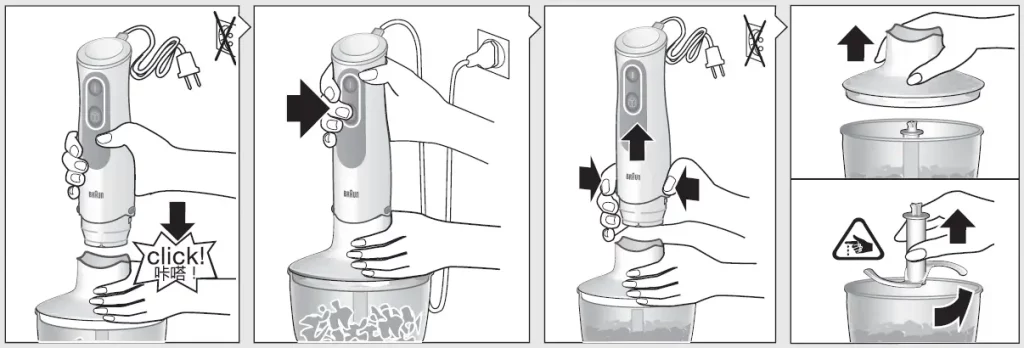
- Align the chopper with the motor part (4) and click together.
- To operate the chopper, switch on the appliance. During processing, hold the motor part with one hand and the chopper bowl with the other.
- Always chop harder foods (e.g. parmesan cheese) at full speed.
- When chopping is complete, unplug and press the EasyClick Plus release buttons (5) to detach the motor part.
- Lift the lid up. Carefully take out the blade before pouring out the contents of the bowl. To remove the blade, slightly turn it then pull it off.
Caution :
- Do not use the chopper accessory to process extremely hard foods, such as unshelled nuts, ice cubes, coffee beans, grains, or hard spices e.g. nutmeg. Processing these foods could damage the blades.
- Never place the chopper bowl in the microwave oven.
Recipe example: Honey-Prunes (as a pancake stuffing or spread): 50 g prunes 100 g creamy honey
- Fill the «hc» chopper bowl with prunes and creamy honey.
- Store at 3°C in refrigerator for 24 hours.
- Chop 1,5 seconds at maximum speed (fully press the Smartspeed switch).
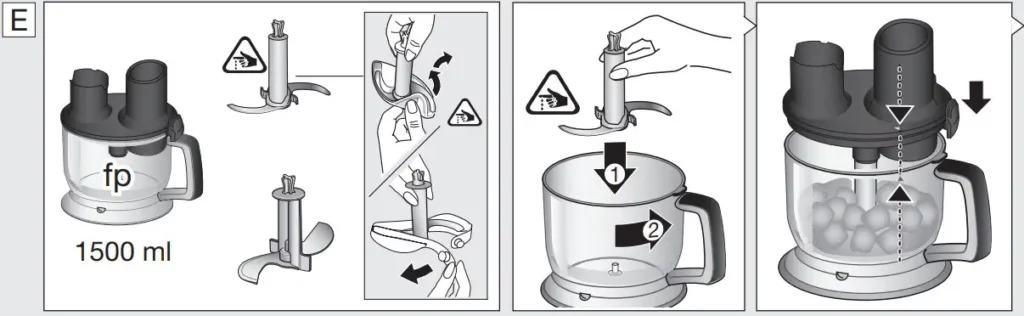
Food Processor Accessory
The food processor accessory (11) can be used for:
- Chopping, blending and mixing light batter;
- kneading dough (based on max. 250 g flour);
- slicing, shredding, julienning, and making french fries.
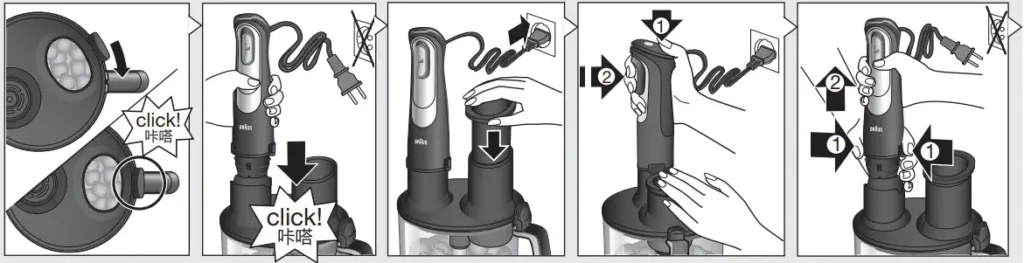
Chopping (E) :
- Using the blade (11h) you can chop meat, hard cheese, onions, herbs, garlic, vegetables, bread, crackers, and nuts.
- Refer to the Processing Guide E for maximum quantities, recommended times and speeds.
Before Use :
- Pre-cut foods into small pieces for easier chopping.
- Remove any bones, cartilage, tendons and gristle from meat to help prevent damage to the blades.
- Remove stems from herbs, shell nuts.
- Make sure the anti-slip rubber ring (11g) is attached to the bottom of the food processor bowl.
Assembly and Operation :
- Carefully remove the plastic cover from the blade.
- The blade (11h) is very sharp! Always hold it by the upper plastic part and handle it carefully.
- Place the blade on the center pin of the bowl (11f). Press it down and give it a turn so that it locks into place.
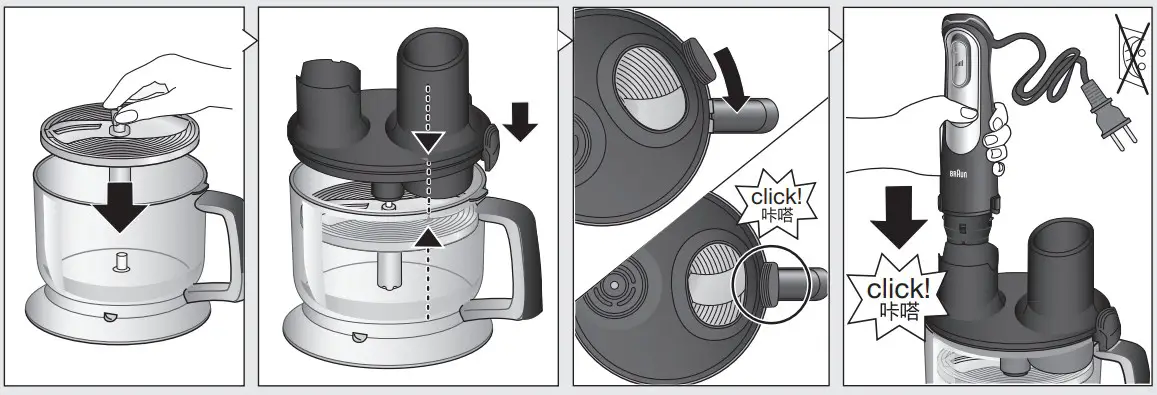
- Fill the bowl with food. Attach the lid (11a) to the bowl with the latch (11e) positioned to the right of the bowl handle and align with marks.
- To lock the lid, turn it clockwise so that the latch engages with a click.
- Insert the motor part (4) into the coupling (11b) until it locks.
- Plug in the appliance and insert the pusher (11c) in the feed tube (11d).
- To operate the food processor, switch on the appliance. During processing, hold the motor part with one hand and the food processor bowl on the handle.
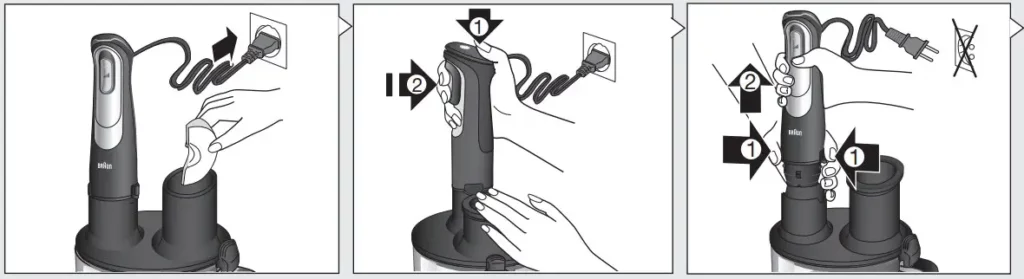
- When chopping is complete, unplug and press the EasyClick Plus release buttons (5) to detach the motor part.
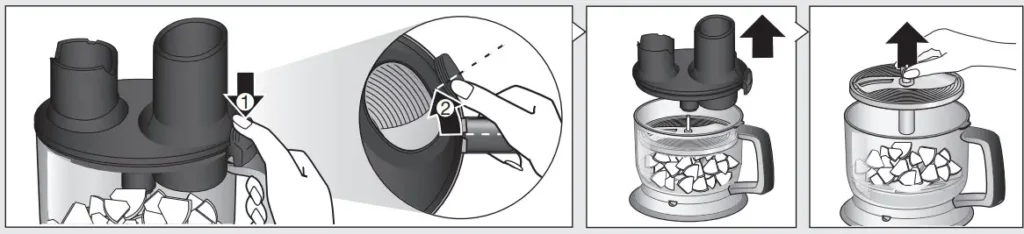
- Press the lid latch (11e) and hold it. Turn the lid (11a) counter-clockwise to unlatch it.
- Lift the lid up. Carefully take out the blade before pouring out the contents of the bowl. To remove and unlock the blade, slightly turn it then pull it off.
Caution :
- Do not use the food processor accessory to chop extremely hard foods, such as unshelled nuts, ice cubes, coffee beans, grains or hard spices e.g. nutmeg. Processing these foods could damage the blades.
- Never place the food processor bowl in the microwave oven.
Using the blade (11h), you may also mix light batter like a pancake batter or a cake mixture based on up to 250 g of flour.
Recipe Example: Pancake Batter : 375 ml milk 250 g plain flour 2 eggs
- Pour milk into the bowl, then add flour and finally the eggs.
- Using full speed, mix the batter until smooth.
Kneading Dough (E) : Figure E also applies for the use of the kneading hook (11i). The kneading hook is ideal for kneading different dough types such as yeast or pastry.
Assembly and Operation :
- Place the kneading hook on the center pin of the bowl (11f). Press it down and give it a turn so that it locks into place.
- Fill the bowl with flour (max. 250 g), then add the other ingredients except the liquids.
- Turn the appliance on with ¾ way pressure on the Smartspeed switch.
- Add liquids through the feed tube while the motor is running.
NOTE: Maximum kneading time: 1 minute – then allow the motor to cool down for 10 minutes.
Recipe Example: Pizza dough : 250 g plain flour ½ tsp salt ½ tsp dried yeast 5 tbsp olive oil 150 ml water (lukewarm).
- Put all ingredients except water into the bowl and start kneading.
- Add water through the feed tube while the motor is running.
Recipe Example: Sweet Pastry : 250 g plain flour 170 g unsalted butter (cold/hard, small pieces) 80 g sugar 1 vanilla sugar 1 small egg 1 pinch salt
- Put butter and sugar into the bowl and start kneading. For good results use cold butter.
- Add flour and the rest of the ingredients.
- Dough will become too soft from over kneading. Stop kneading shortly after dough has formed a ball.
- Cool down the dough in the refrigerator for halfan hour before proceeding.
Slicing / Shredding / Julienne / French Fry (F) :
- Use the fine and coarse slicing inserts (i) to slice raw fruit and vegetables into fine, thin slices; e.g. cucumbers, onions, mushrooms, apples, carrots, radishes, potatoes, zucchini and cabbage.
- Use the fine and coarse shredding inserts (ii) to shred foods such as apples, carrots, potatoes, beetroot, cabbage, cheese (soft to medium).
- Use the julienne insert (iii) to cut fruit and vegetable into julienne.
- Use the French fry disc (11k) to prepare french fries.
- Refer to the Processing Guide F for recommended speeds.
Assembly and Operation :
For slicing / shredding / julienning place an insert into the insert holder (11j) and snap into position. Place the assembled insert holder or French fry disc on the center pin of the bowl and give it a turn so that it locks into place.
- Attach the lid to the bowl with the latch positioned to the right of the bowl handle.
- To lock the lid, turn it clockwise so that the latch engages with a click.
- Insert the motor part into the coupling until it locks.
- Plug in the appliance and insert the food to be processed into the feed tube.
- For best French fry results, place 3-4 potatoes (depending on the size) in the feed tube of the lid while the motor is switched off.
- Switch the appliance on to operate. Never reach into the feed tube when the appliance is switched on. Always use the pusher to feed in food.
- After use, unplug and press the EasyClick Plus Release buttons to detach the motor part.
- Press the lid latch and hold it. Turn the lid counter-clockwise to unlatch it.
- Lift the lid up. Carefully take out insert holder or French fry disc before pouring out the contents of the bowl. To remove the insert holder or French fry disc, slightly turn it then pull it off.
- To remove an insert, push it up at the one end that protrudes at the bottom side of the insert holder.
Care and Cleaning (G)
- Always clean the hand blender and the suitable accessories thoroughly for first use and after every use with water and detergent.
- Unplug hand blender before cleaning.
- Do not immerse the motor part (4) or gearboxes (8a, 9a) in water or any other liquid. Clean with a damp cloth only.
- The lid (11a) can be rinsed under running water. Do not immerse in water, nor place in a dishwasher.
- All other parts can be cleaned in a dishwasher. Do not use abrasive cleaners that could scratch the surface.
- You may remove the anti-slip rubber rings from the bottom of the bowls for an extra thorough clean.
- When processing foods with high pigment content (e.g. carrots), the accessories may become discolored. Wipe these parts with vegetable oil before cleaning them.
Both the design specifications and these user instructions are subject to change without notice.
 Please do not dispose of the product in the household waste at the end of its useful life. Disposal can take place at a Braun Service Centre or at appropriate collection points provided in your country.
 Materials and accessories coming into contact with food conform to EEC regulation 1935/2004.
BRAUN Hand blender
Overview
Our products are engineered to meet the highest standards of quality, functionality and design. We hope you thoroughly enjoy your new Braun appliance.
Before use
Please read instructions carefully and completely before using the appliance.
Caution
- The blades are very sharp! To avoid injuries, please handle blades with utmost care.
- Care shall be taken when handling the sharp cutting blades, emptying the bowl and during cleaning.
- This appliance can be used by persons with reduced physical, sensory or mental capabilities or lack of experience and knowledge if they have been given supervision or instruction concerning use of the appliance in a safe way and if they understand the hazards involved.
- Children shall not play with the appliance.
- This appliance shall not be used by children.
- Children shall be kept away from the appliance and its mains cord.
- Always unplug or switch off the appliance when it is left unattended and before assembling, disassembling, cleaning and storing.
- If the supply cord is damaged, it must be replaced by the manufacturer, its service agent or similarly qualified persons in order to avoid a hazard.
- Before plugging into a socket, check whether your voltage corresponds with the voltage printed on the bottom of the appliance.
- This appliance is designed for household use only and for processing normal household quantities.
- Do not use any part in the microwave.
- Please clean all parts before first use or as required, following the instructions in the Care and Cleaning section.
Parts and Accessories
- On switch: speed «I»
- On switch: speed «II»
- Motor part
- EasyClick Release buttons
- Blender shaft
- Beaker
- Whisk accessory
- Gearbox
- Whisk
- 350 ml chopper accessory «hc»
- Lid
- Chopping blade
- Chopper bowl
- Anti-slip rubber ring
- 500 ml chopper accessory «ca»
- Lid (with gear)
- Chopping blade
- Chopper bowl
- Anti-slip rubber ring
- 1250 ml chopper accessory «bc»
- Lid (with gear)
- Chopping blade
- Ice blade
- Chopper bowl
- Anti-slip rubber ring
How to Use the Appliance
Blending Shaft (A)
The hand blender is perfectly suited for preparing dips, sauces, salad dressings, soups, baby food, as well as drinks, smoothies and milkshakes. For best results, use the highest speed.
Assembly and Operation
- Attach the blending shaft (5) to the motor part until it clicks.
- Place the blending shaft into the mixture to be blended. Then switch the appliance on.
- Blend ingredients to the desired consistency using a gentle up-and-down motion.
- After use, unplug the hand blender and press the release buttons (4) to detach the blending shaft.
Caution
- If using the appliance to purée hot food in a saucepan or pot, remove the saucepan or pot from the heat source and ensure the liquid is not boiling. Allow hot food to cool slightly to avoid risk of scalding.
- Do not let the hand blender sit in a hot pan on the cooktop when not in use.
Recipe Example:
Mayonnaise 250 g oil (e.g. sunflower oil)
1 egg and 1 extra egg yolk
1–2 tbsp. vinegar
Salt and pepper to taste
- Place all ingredients (at room temperature) into the beaker in the order as above.
- Place the hand blender at the bottom of the beaker. Blend at maximum speed until the oil starts emulsifying.
- With the hand blender still running, slowly raise the shaft to the top of the mixture and back down to incorporate the rest of the oil.
NOTE: Processing time: approx. 1 minute for salads and up to 2 minutes for a thicker mayonnaise (e.g. for dip).
Whisk Accessory (A)
Use the whisk only for whipping cream, beating egg whites, making sponge cakes and ready-mix desserts.
Assembly and Operation
- Attach the whisk (7b) to the gearbox (7a).
- Align the motor part with the assembled whisk attachment and push the pieces together until they click.
- After use, unplug and press the release buttons to detach the motor part. Then pull the whisk out of the gearbox.
Tips for Best Results
- Move the whisk clockwise while holding it at a slight incline.
- To prevent splattering, start with speed «I» and use the whisk attachment in deep containers or pans.
- Place the whisk in a bowl and only then switch the appliance on.
- Always ensure the whisk and mixing bowl are completely clean and free of fat before whisking egg whites. Only whip up to 4 egg whites.
Recipe Example: Whipped Cream
400 ml chilled cream (min. 30% fat content, 4 – 8 °C)
- Only use speed «I» to operate the whisk
- Always use fresh chilled cream to achieve greater and more stable volume when whisking.
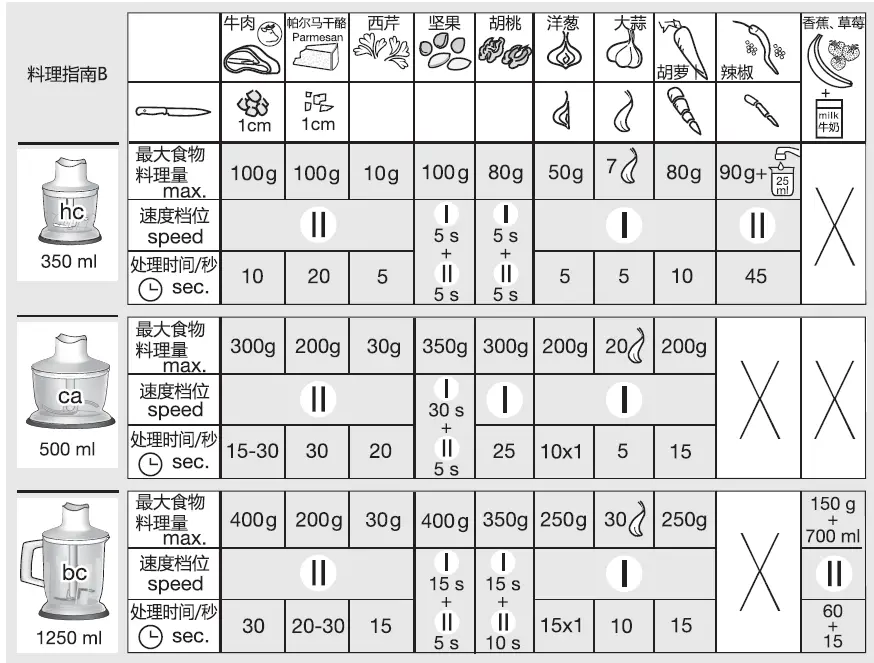
Chopper Accessory (B)
The choppers (8/9/10) are perfectly suited for chopping meat, hard cheese, onions, herbs, garlic, vegetables, bread, crackers and nuts.
Use the «hc» chopper (8) for fine results. Use the «ca» (9) and «bc» chopper (10) for larger quantities and for hard foods.
Furthermore, the «bc» chopper offers a variety of other applications like shakes, drinks, purées, batter or crushed ice.
Refer to the Processing Guide B for maximum quantities, recommended times and speeds.
Maximum operation time for the «hc» chopper:
2 minutes for large amounts of wet ingredients, 30 seconds for dry or hard ingredients or amounts < 100 g. Immediately stop processing when motor speed decreases and/or strong vibrations occur.
Before Use
- Pre-cut foods into small pieces for easier chopping.
- Remove any bones, tendons and gristle from meat to help prevent damage to the blades.
- Make sure the anti-slip rubber ring (8d/9d/10e) is attached to the bottom of the chopper bowl.
Assembly and Operation
- Carefully remove the plastic cover from the blade.
- The blades (8b/9b/10b/10c) are very sharp! Always hold them by the upper plastic part and handle them carefully.
- Place the blade on the center pin of the chopper bowl (8c/9c/10d). Press it down and give it a turn so that it locks into place.
- Fill the chopper with food and put on the lid (8a/9a/10a).
- For ice crushing, fill up to 7 ice cubes into the chopper bowl (10d) and use the special ice blade (10c).
- Align the chopper with the motor part (3) and click together.
- To operate the chopper, switch on the appliance. During processing, hold the motor part with one hand and the chopper bowl with the other.
- Always chop harder foods (e.g. parmesan cheese) at full speed.
- When chopping is complete, unplug and press the release buttons (4) to detach the motor part.
- Lift the lid up. Carefully take out the blade before pouring out the contents of the bowl. To remove the blade, slightly turn it then pull it off.
Caution
- Do not use the chopper accessories (8/9/10) to process extremely hard foods, such as unshelled nuts, coffee beans, grains, or hard spices e.g. nutmeg. Processing these foods could damage the blades.
- Only the «bc» chopper accessory with the special ice blade is allowed to crush ice cubes.
- Never place the chopper bowl in the microwave oven.
«bc» Recipe Example: Pancake Batter
375 ml milk
250 g plain flour
2 eggs
- Pour milk into the «bc» bowl, then add flour and finally the eggs.
- Using speed «II», mix the batter until smooth.
«hc» Recipe example: Honey-Prunes (as a pancake stuffing or spread):
50 g prunes
70 g creamy honey
10 ml water (vanilla-flavored)
- Fill the «hc» chopper bowl with prunes and creamy honey.
- Chop 4 seconds at maximum speed
- Add 10 ml water (vanilla-flavored).
- Resume chopping for another 1,5 seconds.
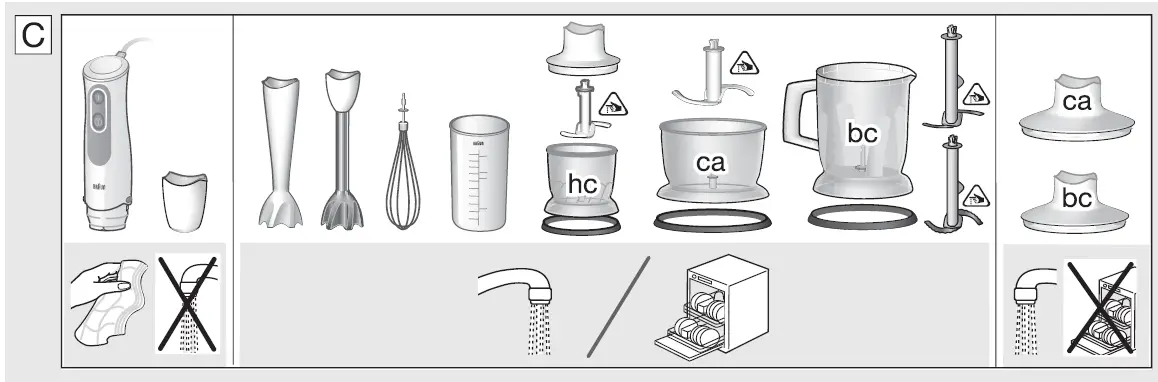
Care and Cleaning (C)
- Unplug hand blender before cleaning.
- Do not immerse the motor part (3) or gearbox (7a) in water or any other liquid. Clean with a damp cloth only.
- The lid (9a/10a) can be rinsed under running water. Do not immerse in water, nor place in a dishwasher.
- All other parts can be cleaned in a dishwasher.
- Do not use abrasive cleaners that could scratch the surface.
- You may remove the anti-slip rubber rings from the bottom of the bowls for an extra thorough clean.
- When processing foods with high pigment content (e.g. carrots), the accessories may become discolored. Wipe these parts with vegetable oil before cleaning them.
Both the design specifications and these user instructions are subject to change without notice.
Do not dispose of the product in household waste at the end of its useful life.
Materials and accessories coming into contact with food conform to EEC regulation 1935/2004.
]]>BRAUN Silk Expert Pro 5 Hair Removal
Pro 5 Skin tone & Body hair type chart:
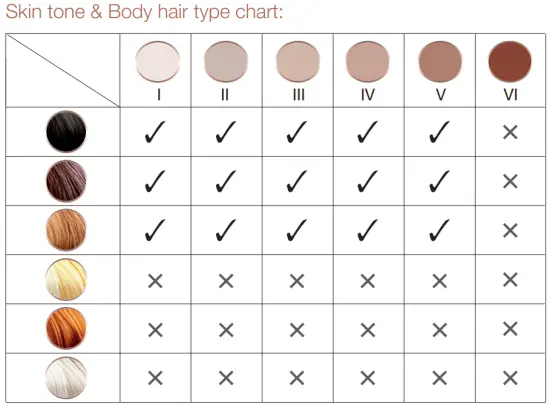
✓ Suitable
✖ Not Suitable
Our products are designed to meet the highest standards of quality, functionality and design. Using professional light technology, Braun Silk·expert Pro 5 Intense Pulsed Light (IPL) allows you to permanently remove unwanted, visible hair comfortably at home. Before using the device, please read the use instructions carefully, including all contraindications, warnings and safety information, and keep them for future reference.
This device has been designed to effect long-term hair growth reduction after a certain period of treatment. Ideal body areas for use include:
Women: Legs, arms, underarms, bikini area and face (below cheek bones)
CAUTION: Do not use the device near the eyes and along the forehead.
Men: Shoulders and below (chest, back, arms, stomach, legs)
CAUTION: Do not use on the face, neck or genital area.
Usage on male beards or facial hair may lead to permanent or uneven results which may produce changes in facial characteristics that may not be desirable.
IPL is not suitable for everyone. It is most effective on light to medium skin tones and dark hair colors.
Please, refer to the skin tone and hair color chart on page 3 to see if the device is suitable for you.
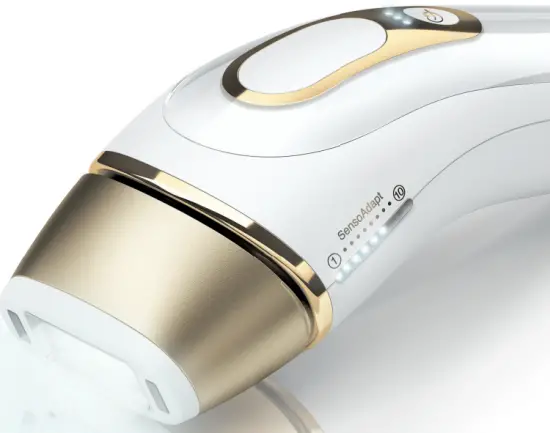
Description
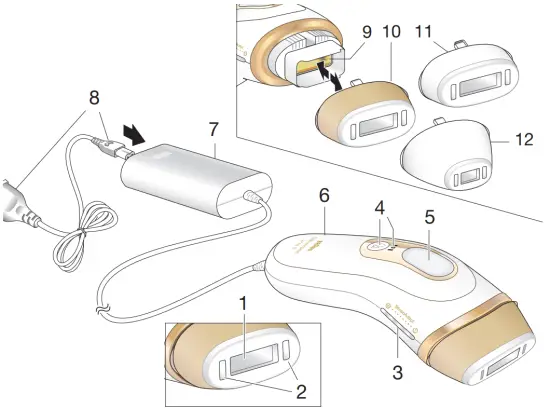
- Treatment window
- SensoAdapt™ skin tone sensors
- LED Power bar
- Gentle mode button with indicator lights
- Treatment button
- Handle
- Base station
- Mains cord
- Glass filter (integrated UV filter)
- Standard head
- Wide head*
- Precision head*
*not with all models
How does it work?
Braun Silk·expert Pro 5 works beneath the skin surface by targeting the melanin in the hair follicle, helping to break the cycle of hair re-growth. With continued, periodic use, the light energy helps prevent unwanted hair from reaching the skin surface.

The intelligent SensoAdapt™ skin sensors (2) continuously read your skin tone before every flash, automatically adapting the light intensity for best efficacy and safety. This allows treatment of appropriate skin tones, but prevents treatment if your skin tone is too dark.
Contraindications
Do not use the device …
- if your skin is darker than skin tone V shown on the skin tone chart on page 3. Since dark skin absorbs more light energy, treating very dark skin may cause discomfort/pain and adverse effects (e.g., burns, blisters, discoloration or scarring) and injure your skin.
- if you are pregnant, lactating, or under the age of 18 as this device has not been tested with these individuals.
- if you have a history of skin cancer or precancerous lesions (e.g., nevi or a large number of moles).
- If your skin has been artificially or naturally tanned recently. Your skin may be sensitive following sun exposure and particularly susceptible to side effects of IPL treatment (e.g. burn, blister, discolour or scar to your skin). Also, avoid unprotected exposure to direct sunlight after your IPL treatment.
Certain conditions can also prohibit the use of this device. Do not use the device if any of the following applies:
- You have a chronic medical condition.
- You have a chronic skin disease (e.g. psoriasis or vitiligo) or damaged skin (e.g. sunburn, cuts, open wounds or active infections) in the areas you wish to treat.
- You have varicose veins in the area you wish to treat.
- You have a known sensitivity to sunlight (photosensitivity) or are taking medication that may make the skin more sensitive (e.g. Retin A, Accutane and/or other topical retinoids).
- You have had a professional skin peel treatment on the area you wish to treat.
- You have any of the above, this device may injure your skin or make existing conditions worse. You may experience side effects such as burns, blisters and skin color changes (hyper- or hypo-pigmentation) or scarring.
If you are unsure whether this device is safe for you to use, please consult your physician or dermatologist.
If you take any kind of medication regularly and over a long period of time, please consult your physician for any potential impact on skin sensitivity to light.
Warnings
Do not use on …
- scalp, eyebrows or anywhere near or around the eyes. Use in these areas may permanently damage your eyes.
- a tattoo or permanent makeup in the treatment area.
- nipples, genitals or around the anus. These areas may have a darker skin color and/or greater hair density and using the device in these areas may cause discomfort/pain or injure your skin.
- dark brown or black spots such as freckles, birthmarks, moles or warts in the treatment area.
- beard / facial hair for men.
It is not recommended to use the device on areas of skin where dermal fillers are present.
Do not use more than once a week on the same area. Damage of skin my occur after prolonged or repeated treatment on one site.
Eye safety
Do not look directly into the glass filter (9) or attempt to activate the device toward the eyes. To protect the safety of your eyes and those of individuals nearby, the device will only activate when both skin tone sensors are placed against the skin. If at any time the device activates when both sensors are NOT in contact with the skin, STOP use immediately and contact your retailer.
Possible eye injury (potentially leading to loss of vision) or skin injury if instructions are not followed. Protect the eye from exposure. Do not use the appliance over the eye lids or close to the eye.
Precautions
- The device is intended for a single user.
- It is not intended for use by people under 18 years old.
- People with reduced physical, sensory or mental capabilities or lack of experience and knowledge, may use the device if they have been given supervision or instruction concerning the safe use of the device and understand the hazards involved.
- Children should be supervised to ensure that they do not play with the device. Always keep the device out of children’s reach.
Electrical and fire safety
Regularly check the device and cords for visible signs of damage. In case of damage or cracks, stop using the device. Electric shock may result from using a damaged device. In case of defects, have the device checked and repaired by an authorized service center. Unqualified repair work can lead to extreme hazards for the user. Always unplug the device after use.
DANGER
Never attempt to repair and open the device, as this may expose you to dangerous electrical components and to pulsed light energy, either of which may cause serious bodily damage and/or permanent eye injury.
Do not use in or near water and wet surfaces such as bathtubs, showers, basins or other vessels that may contain water. If the device becomes wet, it should not be used. Electric shock may result from using a wet device.
 Do not use if the device is damaged (e.g. cracked housing, cord damage etc). Internal parts contain electric charges that are hazardous. Regularly inspect the treatment window (1) for damage:
Do not use if the glass filter (9) is cracked or missing.
Do not use if the built-in reflector is missing or not in correct place.
Do not touch the glass filter during or directly after use since it will get hot.
Do not use petroleum-based or flammable cleaning agents (alcohol, acetones) on the device as these pose a fire risk.
Do not use abrasive cleaning agents. These may damage the device or scratch the glass filter.
Do not attempt to use this device other than for removing unwanted hair.
Do not use the device on a surface other than skin. Do not press the treatment button when the treatment window (1) is not placed in full contact with the skin.
Do not block the cooling vents. The device may overheat and pose an electric shock risk or fire hazard.
How to use
Preparing the treatment area
Remove any visible hair on the skin before using the device. You may use your preferred hair removal method. To keep the treatment window clean and intact, ensure there is no hair remaining on the skin surface. Clean the treatment area and pat it dry
To power on the device:
Use the mains cord (8) to connect the base station to an electrical outlet. Press any button (4 or 5) to activate the device. The LED power bars (3) will light up once and a fan starts running. This means the device is in READY mode. During operation, the device will heat up slightly.
Automatic light adaptation
When both skin tone sensors (2) have skin contact, the device reads your skin tone and selects the appropriate light intensity which is indicated by white LEDs on the Power bars (3). These confirm that the device is ready to flash.
 |
light skin tone ➜ high light intensity |
 |
dark skin tone ➜ low light intensity with fast flash rate |
 no LEDs no LEDs |
no skin contact ➜ device will not flash |
 red LED red LED |
invalid skin tone ➜ device will not flash |
Gentle mode
Push the gentle mode button (4) to reduce the light intensity. You can toggle through the following 3 settings:
Standard: 3 indicator lights
Gentle: 2 indicator lights
Extra gentle: 1 indicator light (lowest light intensity with fast flash rate)
Gentle and extra gentle settings are intended for sensitive areas and first time users. With reduced light intensity, more treatments may be required to see the desired effects.
The power bars flash to confirm a change in the light intensity setting.
When holding the gentle mode button (4) longer than 3 seconds, the device is deactivated. After 10 minutes without use, the device is automatically deactivated. Press any button to re-activate it.
Patch Test
Before your first treatment, we recommend you test your skin for reaction to Braun Silk·expert on a small area of skin of the body part you plan to treat (about 2 x 3 cm in size; equivalent to the size of two flashes, side by side).
Perform a patch test as described below in chapter «Treatment methods», section «STAMPING».
Wait 48 hours to examine the test area. If the skin appears normal, begin your first treatment. If a skin reaction develops, discontinue using the device and consult your physician.
Treatment methods
The area to be treated must be hair-free, clean and dry. Before pushing the treatment button, look away from the device to avoid the bright light. In seldom cases, a user may find the flash too bright. However, there is no safety risk associated with this. For increased comfort, we recommend treating in a well-lit room to help reduce the perceived brightness.
| GLIDING for fast and efficient treatment of large areas (e.g. legs). 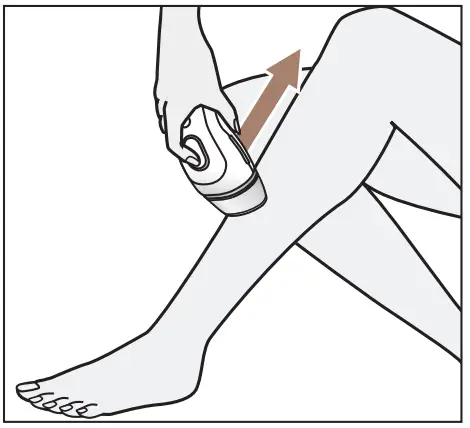 |
STAMPING for treating small, hard-to reach areas (e.g. face for females, bikini line, underarms, knee, chin, ankles) 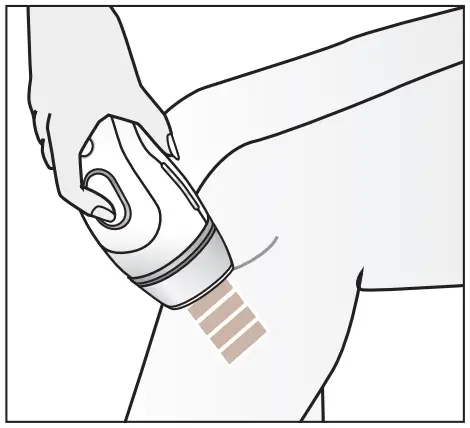 |
| 1. Place the treatment window firmly on your skin, ensuring both skin sensors have skin contact. The power bars (3) show white LEDs | |
| 2. Press and hold the treatment button (5). The device will begin to flash. | 2. Press and instantly release the treatment button (5). The device will emit a flash. |
| 3. Move the device slowly and continuously from the bottom to the top of the treatment area. Make sure to always keep full skin contact so that the device flashes continuously. | 3. Lift off the device and place it onto the next adjacent spot to be treated. Wait for the power bars to show white LEDs. Then press and release the treatment button. |
| Once the gliding stroke is completed, lift the device off the treatment area. Repeat steps 1-3 to treat the next adjacent area in a parallel stroke. | Continue treatment spot by spot until you have completed the entire area you wish to treat. |
Make sure you avoid missed areas by placing the treatment window directly next to the previously treated spot without leaving any space between treated areas.
Avoid overlapping treatment or treating the same area twice as this may increase the chance of producing adverse reactions.
If you feel intense pain, stop treatment immediately and consult your physician before using the device again.
Treatment head(s)
The standard head (10) can be used on all areas.
The wide head (11)* is efficient on large body areas.
The precision head (12)* has been specifically designed for small, curvy, hard to reach areas.
In case your Silk-expert comes with two precision heads, one of it is marked +. This helps distinguishing the head used on the face from the one used on other body areas.
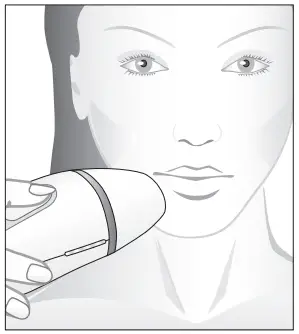
How to treat the face (females only)
- Before treating the face, make sure you have done a patch test. Remove any visible hair and cosmetics, lotions and creams from the area you wish to treat.
- Before pressing the treatment button, close your eyes or look away to avoid the bright light. Avoid treating the same area twice as this may increase the chance of producing adverse reactions.
- When treating the upper lip area, a void contact with the lips and the nostrils. The central area below the nostrils might be sensitive.
- Do not use on permanent / semi-permanent lip liner on the lip margin.
- TIP: You can press your lips together to ensure that the light does not activate on the upper lip itself.
- Hair growth under the chin can be denser and coarser. This can sometimes lead to slight skin reddening following a treatment. This redness is temporary and should completely disappear after 24 hours.
NOTE:
- If redness or a burning sensation occurs and lasts for several minutes, apply a cool cloth/pad to soothe the area.
- If any pigment changes in the skin, e.g., lightening or darkening, are observed, stop using the device. Seek medical advice to determine the cause which may be due to an underlying medical condition.
Treatment plan
| Start-up phase | 1 treatment per week (4-12 weeks) |
| Maintenance treatment | continue treating to your needs, e.g. every 1-2 months. |
The typical hair growth cycle varies between individuals and could take up to 16 months depending on body area (underarm, lower leg, bikini area). Since only hairs in their growing phase are susceptible to treatment with light, it is important to do multiple treatments to achieve continuously smooth skin. For this reason, we recommend
In case you no longer see hair growing, you do not need to complete the full 12 weekly treatments. You can switch to the maintenance treatments.
After treatment
Once you have completed your treatment, unplug the mains cord from the electrical outlet.
After treatment, we recommend using sunscreen SPF >15 whenever treated areas may be exposed to the sun. We recommend avoiding exposure to artificial light sources, such as tanning booths or solariums.
Avoid any activity or skin products that may irritate your skin for 24 hours after treatment. This includes using hot tubs or saunas, wearing tight-fitting clothing, using bleaching creams, perfumed products or exfoliation products. The above may cause irritation, such as itching and redness, in the treated areas.
Cleaning and storage
After each treatment, inspect the treatment window (1), the skin tone sensors (2), the glass filter (9) and the built-in reflectors for damage. Do not touch or clean the glass filter immediately after use to allow it to cool down. Wipe the treatment window with a dry, lint-free cloth if any marks or black spots are visible. Do not rinse or immerse the device in water or any other liquid. To ensure maximum performance, keep the heads (10, 11, 12) with their built in reflectors free from dirt, hair or other debris. Do not clean in water, but use a dry cloth for cleaning them carefully. Store the device in a cool, dry place. Make sure the treatment window and skin sensors are protected from damage.
Possible side effects
Some people will experience slight discomfort (e.g. heat or redness of the skin) when using the device – this is normal. You may feel heat and tingling when activating the flash, followed by redness in the skin.
This type of reaction usually disappears within 24 hours. Adverse reactions are usually immediate or appear within 24 hours. In rare cases, they may take up to 72 hours to appear. If you experience abnormal skin reactions please contact your physician.
| Side effect | How to assess and react |
| Warm feeling or tingling sensations during treatment which typically disappear after a few seconds to a minute and decrease with continued use. | This is expected and normal for all IPL treatments. You can keep on using the device as instructed. |
| Discomfort or pain is intense during treatment or persists after a treatment. | Stop using the device and consult your physician before using it again. |
| Skin redness during or after treatment which disappears within minutes to several hours. | This is expected and normal for all IPL treatments. You can keep on using the device as instructed once skin redness has disappeared. |
| Skin redness which does not go away within 24 – 48 hours after treatment. | Stop using the device and consult your physician before using it again. |
| In very rare cases: | |
| Swelling and redness around the hair follicle that disappears within two or three days. | You can keep on using the device as instructed once swelling and redness around the hair follicle has disappeared. |
| Swelling and redness around the hair follicle that
does not disappear within two to three days. |
Stop using the device and consult your physician before using it again. |
| Temporary changes in skin color (lightening or darkening). | If your skin color changes, stop using the device and consult your physician. |
| Increase in hair growth in areas of treatment (more likely to be seen with subjects of Mediterranean descent). | If this increase persists over several treatments, stop using the device and consult your physician. |
In case of adverse events please contact your national competent authority and the device manufacturer.
Trouble shooting
The following troubleshooting guide may help you solving initial problems you may experience with this device.
| Problem | Solution |
| Power bars do not light up when treatment window is placed on the skin. | Make sure the device is connected to an electrical outlet. Press any button (4 or 5) to activate it. Ensure both skin tone sensors are in full contact with the skin. If needed, move the device in a way that both skin tone sensors get skin contact. |
| The device doesn’t work on small areas. | Use the precision head* (12) on small, hard-to- reach areas (*if available). Make sure both skin tone sensors are in contact with the skin. |
| Flashing sequence slows down. | Device is in heat-protection mode. To get back to normal speed, allow device to cool down. |
| On the power bar, only the first LED illuminates red. | Invalid skin tone reading. Your skin is either too light or too dark. The device will not flash. |
| Centre gentle mode light is flashing. | Device is deactivated. Press any button to re-activate it. |
| First LED on power bars flashes red. | Head (10, 11, 12) has been taken off. Re-attach it. |
| The power bars show an unfamiliar pattern of one red LED shining along with individual white LEDs. | Device error. Device will not operate. Unplug and reconnect. If error persists, contact a Braun Service Centre for repair. |
| All white LEDs flash. | End of product lifetime. Maximum number of flashes (400,000) has been reached. |
| The device is broken, cracked or appears defective. | Do not use if the handle, the base station or the mains cord is damaged. If you are in any doubt about the safety or suspect it is damaged in any way, you must not use it. |
Disposal
 The product contains recyclable electronic waste. To protect the environment, do not dispose of it in the household waste, but take it to appropriate local collection points.
Labels and symbols
The base station is marked with the following symbols:
 |
Type BF Applied Part |  |
WEEE waste disposal mark of the European Union |
 |
Class II equipment |  |
Conformity mark of the European Union with Notified body number |
 |
Optical radiation |  |
Manufacturer: |
 |
Follow instructions for use |  |
Keep Dry |
|
Not suitable for use in a bathtub or shower | UDI | Unique device identifier |
 |
Serial number | LOT | Lot/Batch number |
 |
European representative of manufacturer |
Technical specifications
| Repetition rate: | every 0.5 – 0.9 seconds (depending on setting), continuous operation |
| Max optical output: | 6 J/cm2 |
| Pulse length: | 2.6 msec FWHM |
| Wave length: | 510 – 2000 nm |
| Power line input: | 100 – 240V~, 50-60Hz, 1.7 – 0.91A |
| Operating temperature: | 5°C – 40°C |
| Optimum operating temperature: | 15°C – 30°C |
| Operating humidity: | up to 93% R.H. non-condensing |
| Operating pressures: | 700 hPa to 1060 hPa |
| Treatment area (spot size) | |
| Standard head: | 3 cm2 |
| Wide head: | 4 cm2 |
| Precision head: | 1.5 cm2 |
| Transport Conditions: | |
| Temperature range: | – 25°C to 70°C |
| Humidity: | up to 93% R.H. non-condensing |
| Pressures: | 500 hPa to 1060 hPa |
The device includes 400,000 flashes and is intended for use up to 6 years by a single user.
This device complies with the standards IEC 60601-1:2005/A2:2012, CAN/CSA-C22.2 No. 60601-1:2014, ANSI/AAMI ES60601-1:2005 / A1:2012, IEC 60601-1-11:2015, IEC 60601 2-57:2011, EN 55014-1:2017, EN 55014-2:2015, EN 61000-3-2:2014, EN 61000-3-3:2013.
Subject to change without notice.
Guarantee
We grant a 2-year guarantee on the product commencing on the date of purchase. Within the guarantee period we will eliminate any defects in the appliance resulting from faults in materials or workmanship, free of charge either by repairing or replacing the complete appliance at our discretion.
Depending on availability replacement might result in a different color or an equivalent model.
This guarantee extends to every country where this appliance is supplied by Braun or its appointed distributor.
This guarantee does not cover: damage due to improper use, normal wear and tear (e.g. shaver foil or cutter block) as well as defects that have a negligible effect on the value or operation of the appliance. The guarantee becomes void if repairs are undertaken by unauthorised persons and if original Braun parts are not used.
To obtain service within the guarantee period, hand in or send the complete appliance with your sales receipt to an authorised Braun Customer Service Centre (address information available online at www.service.braun.com).
For UK only:
This guarantee in no way affects your rights under statutory law

]]>
BRAUN IRT3030 ThermoScan 3 Ear Thermometer
Product description
- Protective cap
- Disposable Hygiene cap
- Probe
- «start» button
- Probe tip (lens)
- Hygiene cap detector
- Display
- Battery door safety lock
- Battery door (1 X 3V type 2032 battery)
The Braun ThermoScan® Ear Thermometer is indicated for intermittent measurement and monitoring of human body temperature for people of all ages.
Important safety information
Please consult your doctor if you see symptoms such as unexplained irritability, vomiting, diarrhea, dehydration, changes in appetite or activity, seizure, muscle pain, shivering, stiff neck, pain when urinating, etc. in spite of absence of fever. The operating ambient temperature range for this thermometer is 10 – 40 °C (50 – 104 °F). Do not expose the thermometer to temperature extremes (below –25 °C / –13 °F or over 55 °C / 131 °F) or excessive humidity (> 95 % RH). This thermometer must only be used with genuine Braun ThermoScan® disposable Hygiene caps. Other probe covers can lead to inaccuracy. To avoid inaccurate measurements always use this thermometer with a new, clean, disposable Hygiene cap. If the thermometer is accidentally used without a disposable Hygiene cap, clean the lens after use (see «Care and cleaning»). Keep disposable Hygiene caps out of reach of children. This thermometer is intended for household use only. Use of this thermometer is not intended as a substitute for consultation with your physician. The ThermoScan® Ear thermometer is not intended to interpret hypothermic temperatures. This thermometer must stay in stable ambient (room) temperature for 30 minutes before operating.
Audio fever indicator
Thermometer will signal by beeps normal temperature, fever or high fever. 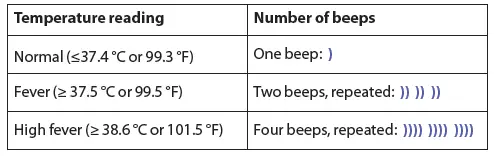
Body temperature
Normal body temperature is a range. It varies by site of measurement and it tends to decrease with age. It also varies from person to person and fluctuates throughout the day. Therefore, it is important to determine normal temperature ranges.
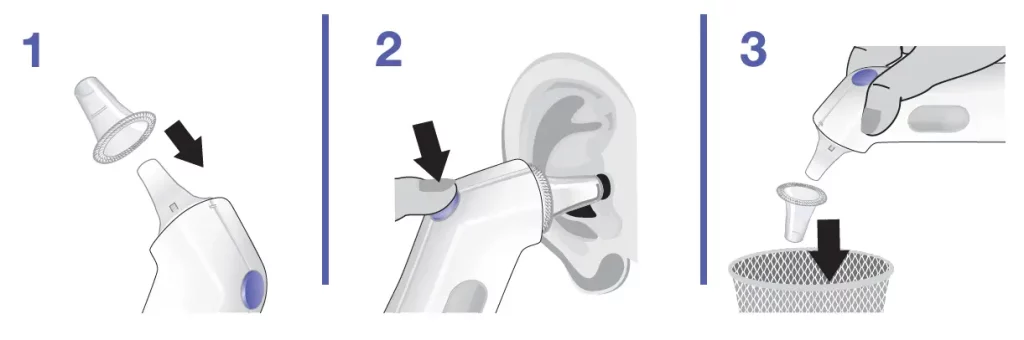
How to use your Braun ThermoScan®
Before taking the temperature, make sure the ear is free from obstructions or excess earwax. Do not attempt to take the reading without a disposable Hygiene cap on – the measuring sensor must be kept protected and clean from earwax to give accurate readings. Change the disposable Hygiene cap with each use to ensure hygiene, to keep a child safe from cross-contamination and to ensure earwax residues on the disposable Hygiene cap do not impact accuracy of the reading.
- To turn the thermometer on, push the «start» button (4).
- During an internal self-check, the display shows all segments.

- The reading shown on the screen is the last temperature taken.

- A flashing symbol of a Hygiene cap will appear if no Hygiene cap is attached. Temperature can be taken only if Hygiene cap is mounted on the probe.

- The thermometer is ready to use after two beeps are sounded and the non-flashing ear icon appears.

- During an internal self-check, the display shows all segments.
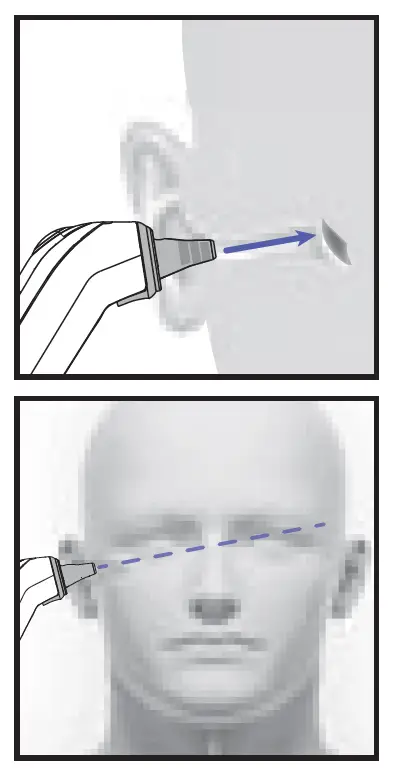
- In clinical studies, precision and accuracy of ear thermometer measurement has been shown to be influenced by variability in user technique. Correct probe placement is essential for accurate measurements. Place the ear probe snugly in ear canal and direct towards opposite temple, then push the “start” button (4). Keep the thermometer steady in the ear canal.
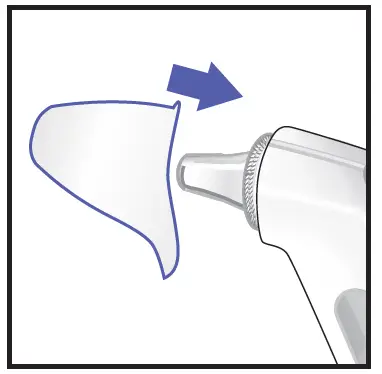
The temperature in right and left ear differs, always compare measurements from the same ear. The natural physiological difference may reach 0.2 °C. In the absence of confounding factors, in high-risk population (like infants or immunosuppressed people) use the highest of the two to interpret the patient’s condition. One beep signals normal temperature. Audio fever indicator will trigger 2 consecutive beeps when the reading is equal or higher to 37.5 °C (99.5 °F) and 4 beeps if the reading is equal or higher to 38.6 °C (101.5 °F). The result is shown on the display (7). - Gently pull off the disposable Hygiene cap (2). Do not use force in removing the disposable Hygiene cap.
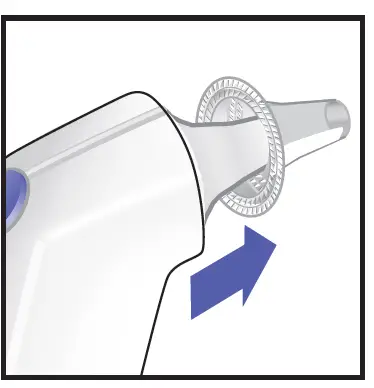
- Put on a new, clean, disposable Hygiene cap by snapping into position.

- Place the protective cap on (1).
The Braun ThermoScan Ear thermometer turns off automatically after 60 seconds of inactivity. The thermometer can be turned off by pressing and holding the start button for more than 5 seconds.
Disposable Hygiene caps
Use a clean disposable Hygiene cap with each measurement:
- To ensure hygienic use
- To protect your child from cross-contamination
- To ensure earwax residues do not impact the accuracy of the reading.
Earwax and dirt on the tip of the disposable Hygiene cap, even in microscopic layers, can create an obstacle between the sensor and the infrared heat emitted by the ear and impact the accuracy of the measurement.
Temperature-taking hints
- Replace the disposable Hygiene cap with every use to to maintain accuracy, hygiene and to prevent cross-contamination.
- A measurement taken in the right ear may differ from the measurement taken in the left ear. Therefore, always take the temperature in the same ear.
- The ear must be free from obstructions or excess earwax build-up to take an accurate reading.
- External factors may influence ear temperatures, including when an individual has:
- been lying on one ear or the other
- had their ears covered
- been exposed to very hot or very cold temperatures, or
- been recently swimming or bathing.
- In these cases, remove the individual from the situation and wait 20 minutes prior to taking a temperature.
- If ear drops or other ear medications have been placed in the ear canal of one ear, take the temperature in the untreated ear.
Care and cleaning
The probe tip (5) is the most delicate part of the thermometer. It has to be clean and intact to ensure accurate readings. If the thermometer is accidentally used without a disposable Hygiene cap, clean the probe tip as follows: Very gently wipe the surface with a cotton swab or soft cloth moistened with alcohol. Do not use cleaners other than alcohol on the probe tip. Use of other cleaners could damage the tip.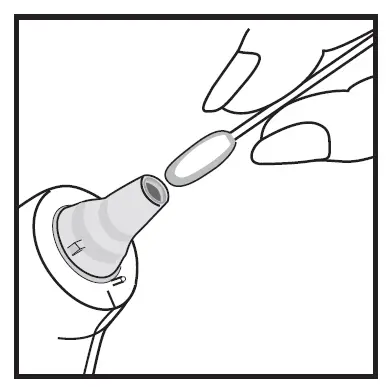 Once the alcohol has dried completely, a new disposable Hygiene cap can be put on and a temperature measurement taken. If the probe tip is damaged, please contact your authorized local service center. Use a soft, dry cloth to clean the thermometer display and product exterior. Do not use abrasive cleaners. Never submerge this thermometer in water or any other liquid. Store the thermometer and disposable Hygiene caps in a dry location free from dust and contamination and away from direct sunlight. Additional disposable Hygiene caps (LF40) are available at most stores selling Braun ThermoScan.
Trouble-shooting
Changing the temperature scale
- Make sure the thermometer is turned off. Press and hold down the <<start>> button. Keep holding down the <<start>> button and after about 3 seconds the display will start to cycle between temperature scales (°C or °F).
- Release the start button when the desired scale is shown. This will reset the thermometer to the new temperature scale.
Replacing the battery
The thermometer is supplied with one 3V Lithium cell battery (type 2032). Insert new battery when the low battery symbol appears on the display. 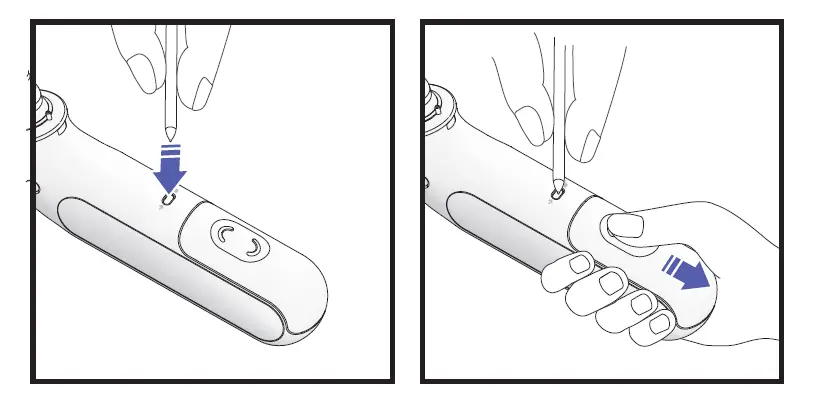 The battery door design is intended to prevent a small child from easily opening the battery door to address aNB possible choke hazard. Open the battery compartment by inserting a narrow pointed object such as a ball point pen or paperclip into the small hole above the battery door (8). While pressing into the hole slowly slide back the battery door with the other hand. To close battery door align the tabs along the side of the battery into the battery compartment and slowly slide back into position until the door clicks into its locked position.
Calibration
This product has been calibrated at the time of manufacture. If used according to the use instructions, periodic calibration is not required. This device is not intended as a substitute for regular check-ups by your doctor, please consult your doctor if you have any doubt about the temperature reading. LOT and Serial numbers of your product must be provided as they are essential to record and follow up your inquiry or claim. The LOT and Serial numbers are located in the battery compartment. The production date is given by the LOT number and can be deciphered as explained below: The first 3 numeric digits in the LOT number represent the day of the year of manufacture. The next 2 numeric digits represent the last two numbers of the calendar year of manufacture and the letter(s) at the end designate the manufacturer of the product. (E.g.: LOT No.: 12313tav this product was made on the day 123, year 2013 at the manufacturer code tav.)
Guarantee
EMC tables and Consumer Card are available on our website at www.hot-europe.com/support. For support requests, please visit www.hot-europe.com/support or find service contact information on the last page of this manual. UK only: This guarantee in no way affects your rights under statutory law.
]]> BRAUN IRT6525 ThermoScan 7+ Ear Thermometer
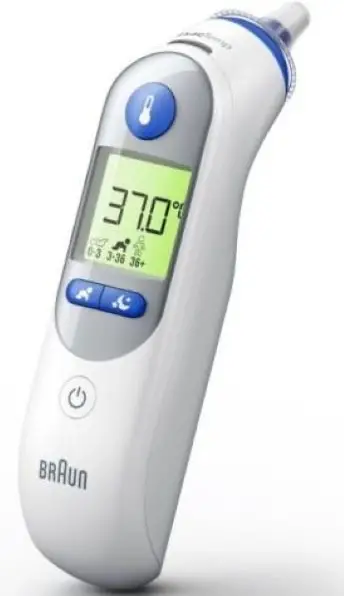
Product description 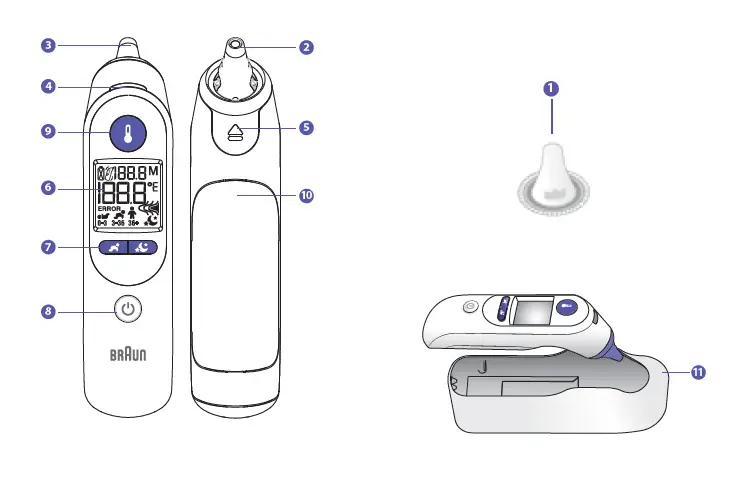
- Disposable Hygiene cap (a box of 20 is supplied + 1 already installed)
- Probe tip
- Probe
- ExacTemp® light
- Hygiene cap ejector
- Display
- Age Precision® and night mode/flashlight buttons
- Power button
- Start button
- Battery door (2 X 1.5V type AA (LR6) batteries)
- Protective case
Intended use and contraindications
The Braun ThermoScan® Ear thermometer is intended to be used by home users for intermittent measurement of the body temperature of patients having ages ranging from normal weight (full term) new-born to geriatric adult.
This thermometer is not intended for clinical use in a professional environment and are for home usage only.
The Age Precision feature is not intended for pre-term babies or small-for-gestational age babies.
This thermometer is not intended to interpret hypothermic temperatures.
Do not allow children under 12 to take their temperatures unattended.
Warnings and Precautions
- Please consult your physician if you see symptoms such as unexplained irritability, vomiting, diarrhea, dehydration, changes in appetite or activity, seizure, muscle pain, shivering, stiff neck, pain when urinating, etc. in spite of any colour of the background light or absence of fever.
- Please consult your physician if the thermometer shows elevated temperature (yellow or red background lights).
The operating ambient temperature range for this thermometer is 10 – 40 °C (50 – 104 °F). Do not expose the thermometer to temperature extremes (below -25 °C / -13 °F or over 55 °C / 131 °F) or excessive humidity (>95% RH). This thermometer must only be used with genuine Braun ThermoScan disposable Hygiene caps (LF 40). To avoid inaccurate measurements always use this thermometer with a new, clean Hygiene cap attached. If the thermometer is accidentally used without a Hygiene cap attached, clean the lens (see «Care and cleaning» section). Keep Hygiene caps out of reach of children. This thermometer is intended for household use only. This product is not intended to diagnose any disease, but is a useful screening tool for temperature. Use of this thermometer is not intended as a substitute for consultation with your doctor. Do not modify this equipment without authorization of the manufacturer. Parents/guardians should call the pediatrician upon noticing any unusual sign(s) or symptom(s). For example, a child who exhibits irritability, vomiting, diarrhea, dehydration, seizure, changes in appetite or activity, even in the absence of fever, or who exhibits a low temperature, may still need to receive medical attention. Children who are on antibiotics, analgesics, or antipyretics should not be assessed solely on temperature readings to determine the severity of their illness. Temperature elevation as indicated by Age Precision may signal a serious illness, especially in adults who are old, frail, have a weakened immune system, or neonates and infants. Please seek professional advice immediately when there is a temperature elevation and if you are taking temperature on:
- neonates and infants under 3 months (consult your doctor immediately if the temperature exceeds 37.4 °C or 99.4 °F)
- patients over 60 years of age
- patients having diabetes mellitus or a weakened immune system (e.g. HIV positive, cancer chemotherapy, chronic steroid treatment, splenectomy)
- patients who are bedridden (e.g. nursing home patient, stroke, chronic illness, recovering from surgery)
- a transplant patient (e.g. liver, heart, lung, kidney)
Fever may be blunted or even absent in elderly patients.
This thermometer contains small parts that can be swallowed or produce a choking hazard to children. Always keep the thermometer out of children’s reach.
Age Precision® color-coded display
Clinical research shows the definition of fever changes as newborns grow into children and children grow into adults1. Braun’s Age Precision colour-coded display takes the guesswork out of interpreting temperature for the entire family. Simply use the Age Precision button to select the appropriate age setting, take a temperature and the colour-coded display will glow green, yellow or red to help you understand the temperature reading. 1 Herzog L, Phillips S. Addressing Concerns About Fever. Clinical Pediatrics. 2011; 50(#5): 383-390.
How to use your Braun ThermoScan®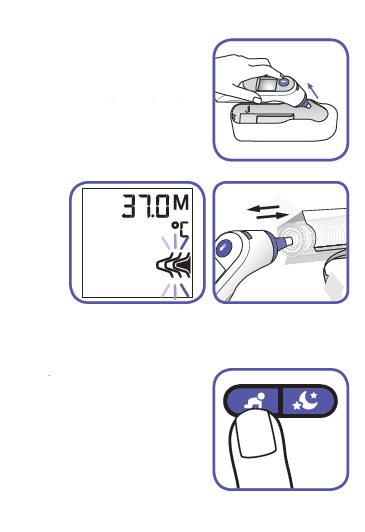
- Remove the thermometer from the protective case.
- Push the Power button . During an internal self-check, the display shows all segments. Then the last temperature taken will be displayed for 5 seconds.
- The Hygiene cap indicator will blink to signal one is needed. To achieve accurate measurements, make sure a new, clean Hygiene cap is in place before each measurement. Attach a new Hygiene cap by pushing the thermometer probe straight into the Hygiene cap inside the box and then pulling out.
Note: The Braun ThermoScan will not work unless a Hygiene cap is attached.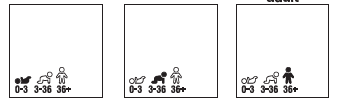
- Select age with Age Precision button as shown below. Press button to toggle through each age group.
NOTE: You must select an age in order to take a measurement.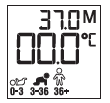
The thermometer is ready to take a temperature when the display looks like the images below. - Fit the probe snuggly into the ear canal and direct towards opposite temple. Then push and release the Start button .
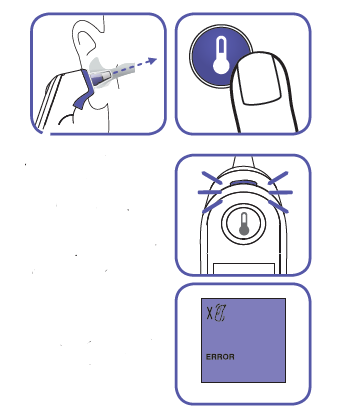
- ExacTemp® light will pulse while temperature measurement is in progress. The light will remain solid for 3 seconds to indicate that a successful temperature reading has been achieved. NOTE: If the probe has been properly inserted into the ear canal during the measurement, a long beep will sound to signal the completed measurement.
If the probe has not been constantly placed in a stable position in the ear canal, a sequence of short beeps will sound, the ExacTemp light will go out and the display will show an error message (ERROR + position error animated icon = position error). See «Errors and troubleshooting» section for more information. - The confirmation beep indicates that an accurate temperature measurement has been taken. The result is shown on the display. Temperature reading displayed is an equivalent of oral temperature.
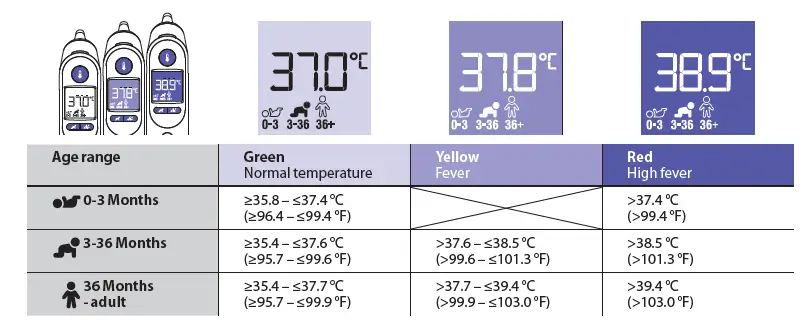
- For the next measurement, press Eject button to remove and discard used Hygiene cap, and put on a new, clean Hygiene cap.
NOTE: Defaults to last age setting used if you do not change.
The Braun ThermoScan Ear thermometer turns off automatically after 60 seconds of inactivity. The thermometer can also be turned off by pressing the Power button .
The display will briefly flash OFF and it will go blank.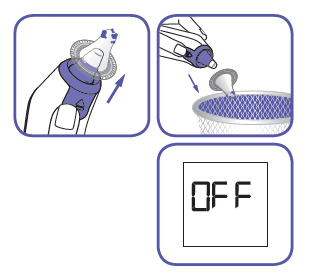
Temperature-taking hints
Replace disposable Hygiene cap (single use device) with every use to maintain accuracy, hygiene and to prevent cross-contamination. Earwax and dirt on the tip of the Hygiene cap, even in a microscopic layer, can create an obstacle between the sensor and the infrared heat emitted by the ear and impact the accuracy of the measurement. External factors like poor probe replacement, used Hygiene cap or dirty Hygiene cap may influence ear temperature measurements. In clinical studies, precision and accuracy of ear thermometer measurement has been shown to be influenced by variability in user technique. Correct probe placement is essential for accurate measurements.
Temperature in right and left ear differs, always compare measurements from the same ear. The natural physiological difference may reach 0.2 °C. In the absence of confounding factors, in high-risk population (like infants or immunodepressed people) use the highest of the two to interpret the patient’s condition.
In the following cases, wait 20 minutes prior to taking a temperature: extreme changes in room temperature, hearing aid, lying on a pillow. Use the untreated ear if ear drops or other medications have been placed in the ear canal.
Night mode
Night mode is entered by pressing the night mode button. Secondary press of night mode button turns nightmode off – both sound on and flashlight off. The night mode remains on until the
thermometer enters sleep mode through time out or power button press. When the thermometer is turned back on it will enter normal mode. In night mode, all audible beeps are muted, the Night mode icon is displayed on the screen and flashlight will turn on. At completion of the measurement the flashlight will flash twice and stay on afterwards. Nightmode will stay on until night mode button is pressed or the device is turned off.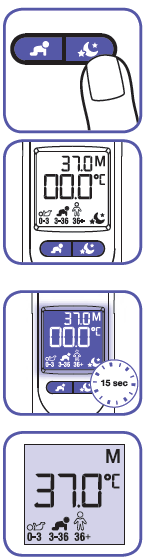
How to illuminate the display
The thermometer includes a convenient night light to illuminate the display in a dim environment. The light will turn on when you press any button. It will stay on until the thermometer is inactive for up to 15 seconds even after temperature is taken.
Last reading recall 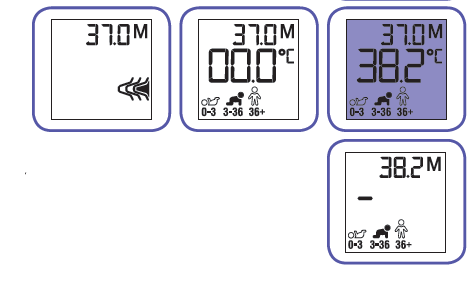
The previous measurement will be displayed during start up.
After this, the prvious measurement will be displayed in the upper right-hand corner of the display with an ‘M’ next to it. The memory in the upper right corner will update to the new reading with the first button press after the reading is completed.
How to set a default age group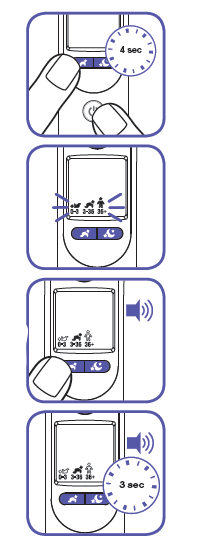
You have the option to set a default Age Precision age group. This will allow the device to power on and be used in default selection without re-selecting with each power on.
- When the device is off, hold both the power button and the Age Precision button for 4 seconds, the backlight will turn yellow, you can then release the buttons.
- All Age Icons will flash continuously until the Age Precision button is pressed.
- Press the Age Precision button, the 0-3 month icon will be filled in and flash and the other icons will be empty. A second button press will advance to the 3-36 month icon flashing, a third will advance to 36+months flashing. This cycle continues in order with each button press. A full beep will sound with every button press.
- After 3 seconds of no button press, the displayed icon will remain on the screen and a full beep will sound. The device will turn off. When the device is turned back on, the default will be set.
The default will be set on the device until the batteries are removed and then put back in.
How to change the temperature between °C and °F
Your Braun ThermoScan is shipped with the Celsius (°C) temperature scale activated. If you wish to switch to Fahrenheit (°F) and/or back from Fahrenheit to Celsius, proceed as follows:
- Make sure the thermometer is turned off.
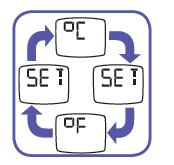
- Press and hold down the Power button . After about 3 seconds the display will show this sequence: °C / SET / °F / SET.
- Release the Power button when the desired temperature scale is shown. There will be a short beep to confirm the new setting, then the thermometer is turned off automatically. short beep to confirm the new setting, then the thermometer is turned off automatically.
Care and cleaning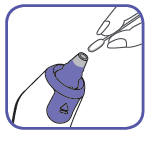
The probe tip is the most delicate part of the thermometer. It must be clean and intact to ensure accurate readings. If the thermometer is ever accidentally used without a Hygiene cap, clean the probe tip as follows:
Very gently wipe the surface with a cotton swab or soft cloth moistened with alcohol. After the alcohol has completely dried out, you can put a new Hygiene cap on and take a temperature measurement. If the probe tip is damaged, please contact Consumer Relations. Use a soft, dry cloth to clean the thermometer display and exterior. Do not use abrasive cleaners. Never submerge this thermometer in water or any other liquid. Store thermometer and Hygiene caps in a dry location free from dust and contamination and away from direct sunlight. Additional Hygiene caps (LF 40) are available at most stores carrying Braun ThermoScan.
Replacing the batteries
- Insert new batteries when the battery symbol appears on the display.
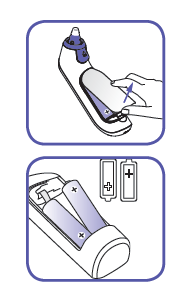
- Open the battery compartment. Remove the batteries and replace with new batteries, making sure the poles are in the right direction.
- Snap battery door into place.
Errors and troubleshooting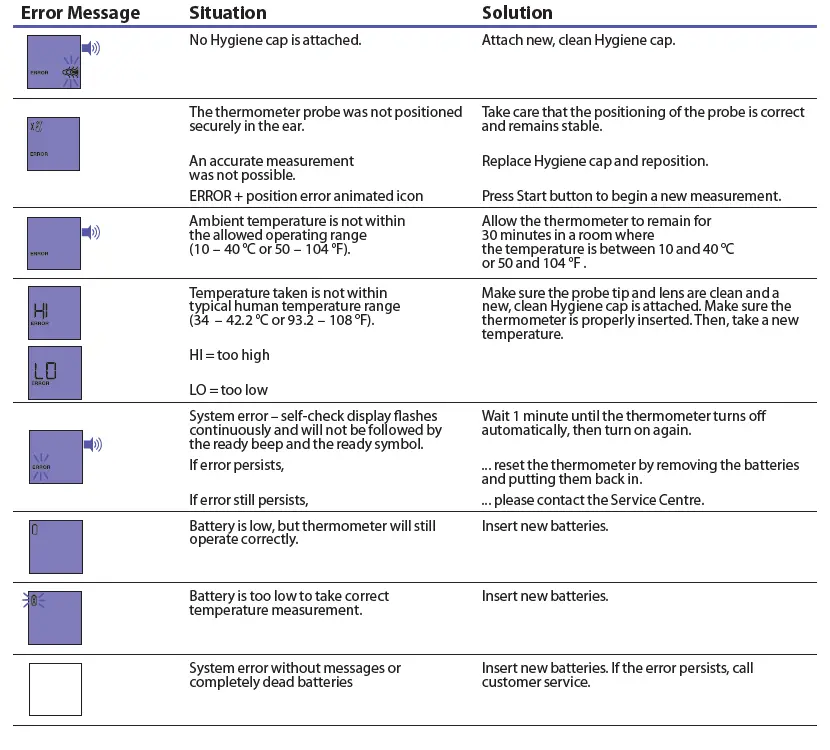
Product specifications
- Displayed temperature range: 34 – 42.2 °C (93.2 – 108 °F)
- Operating ambient temperature range: 10 – 40 °C (50 – 104 °F)
- Storage temperature range: -25 – 55 °C (-13 – 131 °F)
- Operating and storage relative humidity: 10-95% RH (non condensing) Display
- resolution: 0.1 °C or °F
- Accuracy for displayed temperature range Maximum Laboratory Error 35 – 42 °C (95 – 107.6 °F): ±0.2 °C (±0.4 °F)
- Outside this range: ±0.3 °C (±0.5 °F)
- Clinical repeatability: ±0.14 °C (±0.26 °F)
- Battery life: 2 years/350 measurements/ 100 minutes in nightmode
- Service life: 5 years
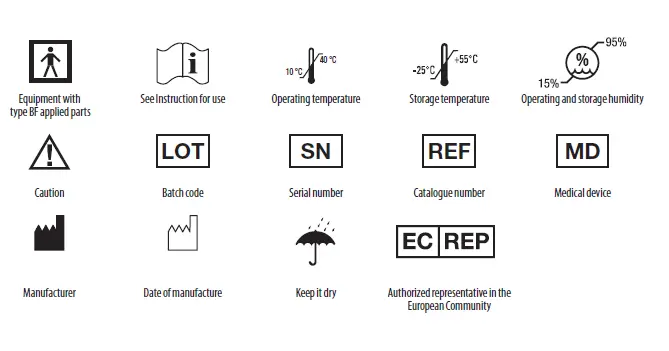
Subject to change without notice.
This medical device carries the CE mark and is manufactured in conformity with RoHS Directive 2011/65/EU and other applicable directive and/or regulations as specified in the EU Declaration of Conformity. Full responsibility for the conformance of the product to the standard is assumed by Kaz Europe Sarl, Place Chauderon 18, CH-1003 Lausanne, Switzerland.
ASTM laboratory accuracy requirements in the display range of 37 to 39 °C (98 to 102 °F) for IR thermometers is ±0.2 °C (±0.4 °F), whereas for mercury-in-glass and electronic thermometers, the requirement per ASTM Standards E667-86 and E1112-86 is ±0.1 °C (±0.2 °F).
MEDICAL ELECTRICAL EQUIPMENT needs special precautions regarding EMC. NOTE: Do not use this device in the presence of electromagnetic or other interference outside the normal range specified in EN 60601-1-2. For detailed description of EMC requirements please visit website (Support / Document center) or contact service center.
Portable and mobile RF communications equipment can affect MEDICAL ELECTRICAL EQUIPMENT.
This product contains batteries and recyclable electronic waste. To protect the environment, do not dispose of it in the household waste, but take it to appropriate local collection points.
Calibration
This product has been calibrated at the time of manufacture. If used according to the use instructions, periodic calibration is not required. This device is not intended as a substitute for regular check-ups by your doctor, please consult your doctor if you have any doubt about the temperature reading.
Inquiry
In Europe, any serious incident (e.g. death, life-threatening injury, surgical intervention, …) that has occured in relation to this thermometer should be reported to Kaz Europe (see Helen of Troy Authorized Service Centers) and to the competent authority of your member state.”
REF, LOT and Serial numbers of your product must be provided as they are essential to record and follow up your inquiry or claim. The LOT and Serial numbers are located in the battery compartment. The production date is given by the LOT number and can be deciphered as explained below: – The first 3 numeric digits in the LOT number represent the day of the year of manufacture. The next 2 numeric digits represent the last two numbers of the calendar year of manufacture and the letter(s) at the end designate the manufacturer of the product. (E.g.: LOT No.: 12313tav this product was made on the day 123, year 2013 at the manufacturer code tav.)
Guarantee
Please read all instructions before attempting to use this device. Please retain the receipt as proof of and date of purchase. The receipt must be presented when making any claim within the relevant guarantee period. Any claim under the guarantee will not be valid without a proof of purchase. Your device is guaranteed for Two Years (2 Years) from date of purchase.
This guarantee covers defects in materials or workmanship that occur under normal use; defective devices meeting these criteria will be replaced free of charge. The guarantee DOES NOT cover defects or damage resulting from abuse or failure to follow the user instructions. The guarantee becomes void if the device is opened, tampered with, or used with non-Braun branded parts or accessories, or if repairs are undertaken by unauthorized persons. Accessories and consumables are excluded from any warranty. For support requests, please visit www.BraunHealthcare.com/uk_en/ or find service contact information at the end of this owner’s manual. This Guarantee is applicable to Europe, Russia, Middle East and Africa only. UK Only: This does not affect your consumer statutory rights.
BRAUN Series 5 Shaver Instruction Manual
Our products are designed to meet the highest standards of quality, functionality and design. Thank you for your trust in Braun’s quality and we hope you enjoy your new Braun product.
Read these instructions completely, they contain safety information. Keep them for future reference.
Warning
Your appliance is provided with a special cord set, which has an integrated Safety Extra Low Voltage power supply. Do not exchange or tamper with any part of it, otherwise there is risk of an electric shock. Only use the special cord set provided with your appliance.
If the appliance is marked  492, you can use it with any Braun power supply coded 492-XXXX.
 This appliance is suitable for cleaning under running water and use in a bathtub or shower. For safety reasons it can only be operated cordless.
Detach the shaver from the power supply before using it with water.
Do not shave with a damaged foil or cord.
This appliance can be used by children aged from 8 years and above and persons with reduced physical, sensory or mental capabilities or lack of experience and knowledge if they have been given supervision or instruction concerning the safe use of the appliance and understand the hazards involved. Children shall not play with the appliance. Cleaning and user maintenance shall not be made by children unless they are older than 8 years and supervised.
Clean&Charge Station
To prevent the cleaning fluid from leaking, ensure that the
Clean&Charge Station is placed on a flat surface. When a cleaning cartridge is installed, do not tip, move suddenly or transport the station in any way as cleaning fluid might spill out of the cartridge.
Do not place the station inside a mirror cabinet, nor place it on a polished or lacquered surface.
The cleaning cartridge contains a highly flammable liquid so keep it away from sources of ignition. Do not expose to direct sunlight and cigarette smoking nor store it over a radiator.
Do not refill the cartridge and use only original Braun refill cartridges.
Shaver
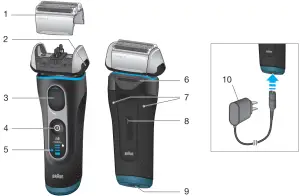
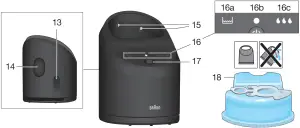
- 1 Foil & Cutter cassette
- 2 Cassette release button
- 3 MultiHeadLock switch
- 4 On/off switch
5 Shaver display - 5 a Lock symbol (travel lock)
- 5 b Charging segments
- 5 c Cleaning indicator
- 5 d Battery symbol
- 6 Long hair trimmer
- 7 Shaver-to-station contacts
- 8 Release button for long hair trimmer
- 9 Shaver power socket
- 10 Special cord set (design can differ)
- 11 Protection cap*
- 12 Travel case*
* not with all models
Using Instructions
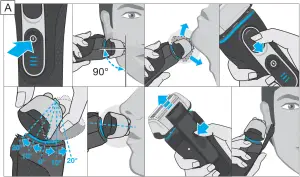
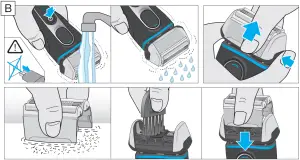
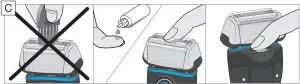
First use and Charging
Connect the shaver to an electrical outlet by snapping the special cord set (10) into the shaver power socket (9) or for cc models via the Clean&Charge Station («Clean&Charge Station»).
Basic operating information
- A full charge provides up to 50 minutes of cordless shaving time. This may vary according to your beard growth and environmental temperature.
- Recommended ambient temperature for charging is 5 °C to 35 °C. The battery may not charge properly or at all under extreme low or high temperatures.
- Recommended ambient temperature for storage and shaving is 15 °C to 35 °C.
- Do not expose the appliance to temperatures higher than 50 °C for extended periods of time.
- When the shaver is connected to an electrical outlet, it may take some minutes until the display illuminates.
Charging / low charge
The charge status is shown in the shaver display (5).
- During charging the respective charging segment (5b) will blink.
- When the shaver is fully charged and connected to an electrical outlet, all 3 charging segments will light up for a few seconds. Then the display turns off.
- The battery symbol (5d) will flash red, when the battery is running low. You should be able to finish your shave. With switching off the shaver a beep sound reminds of the low charge status.
Using the shaver
Press the on/off switch (4) to operate the shaver.
Tips for a perfect dry shave
For best results, Braun recommends you to follow 3 simple steps:
- Always shave before washing your face.
- At all times, hold the shaver at the right angle (90°) to your skin.
- Stretch your skin and shave against the direction of your beard growth.
MultiHeadLock switch (head lock)
To shave hard-to-reach areas (e.g. under the nose) slide the MultiHeadLock switch (3) down to lock the shaver head. The shaver head can be locked in five positions.
To change position, move the shaver head with your thumb and forefinger back or forth.
It will automatically click into the next position.
For automatic cleaning in the Clean&Charge Station the head lock should be released.
Long hair trimmer
To trim sideburns, moustache or beard press the release button (8) and slide the long hair trimmer (6) upwards.
Travel lock
- The lock symbol (5a) lights up in the display when the shaver has been locked to avoid unintended starting of the motor (e.g. for storing it in a suitcase).
- Activation: By pressing the on/off switch (4) for 3 seconds the shaver is locked. This is confirmed by a beep sound and the lock symbol in the display. Afterwards the display turns off.
- Deactivation: By pressing the on/off switch for 3 seconds again the shaver is unlocked.
Manual cleaning of the shaver
Cleaning under running water
- Switch on the shaver (cordless) and rinse the shaver head under hot running water until all residues have been removed. You may use liquid soap without abrasive substances. Rinse off all foam and let the shaver run for a few more seconds.
- Next, switch off the shaver, press the release button (2) to remove the Foil & Cutter cassette (1) and let it dry.
- If you regularly clean the shaver under water, then once a week apply a drop of light machine oil on top of the Foil & Cutter cassette.
The shaver should be cleaned after each foam usage.
Cleaning with a brush
Switch off the shaver. Remove the Foil & Cutter cassette (1) and tap it out on a flat surface. Using the brush, clean the inner area of the pivoting head. Do not clean the cassette with the brush as this may damage it!
Clean & Charge Station (C&C) (not with all models)
The Clean&Charge Station has been developed for cleaning, charging, lubricating, disinfecting, drying and storing your Braun shaver.
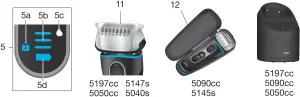
- 13 Station power socket
- 14 Lift button for cartridge exchange
- 15 Station-to-shaver contacts
- 16 Clean&Charge Station display
- 16 a Level indicator
- 16 b Status light
- 16 c Cleaning program indicators
- 17 Start button
- 18 Cleaning cartridge
Installing the C&C
- Remove the protection foil from the C&C display.
- Press the lift button (14) at the rear side of the C&C to lift up the housing.
- Hold the cleaning cartridge (18) down on a flat, stable surface (e.g. table).
- Carefully remove the lid from the cartridge.
- Slide the cartridge from the rear side into the base of the station until it snaps into place.
- Slowly close the housing by pushing it down until it locks.
- Using the special cord set (10), connect the station power socket (13) to an electrical outlet.
Using the C&C
Important: The shaver needs to be dry and free from any foam or soap residue!
Insert the shaver in the C&C upside down, with the front showing and released head lock (3).
The contacts (7) on the back of the shaver need to align with the contacts (15) in the C&C. Push the shaver in the correct position. A beep sound confirms that the shaver sits properly in the C&C.
The C&C analyzes the hygiene status. The status is shown by the cleaning program indicators (16c) in the C&C display (16).
Charging the shaver in the C&C
Charging will start automatically when the shaver has been placed in properly.
Cleaning the shaver in the C&C
When the cleaning indicator (5c) lights up in the shaver display, insert the shaver into the C&C, as described above.
Cleaning programs
 short economical cleaning
 normal level of cleaning
 high intensive cleaning
Start automatic cleaning
Start the cleaning process by pressing the start button (17). If status light (16b) does not shine (C&C switches to stand-by after ca. 10 minutes), press start button twice.
Otherwise cleaning will not start. For best shaving results, we recommend cleaning
after each shave.
Each cleaning program consists of several cycles, where cleaning fluid is flushed through the shaver head. Depending on your Clean&Charge Station model and/or program selected, the cleaning time takes up to 3 minutes. During this time the status light blinks. Leave the shaver in the station for drying. It takes several hours until remaining moisture evaporates depending on the climatic conditions.
After completing the cleaning and charging procedure, all indicators turn off.
Removing the shaver from the C&C
Hold the C&C with one hand and tilt the shaver slightly to the front to release it.
Cleaning cartridge / Replacement
When the level indicator (16a) lights up permanently red, the remaining fluid in the cartridge is sufficient for about 3 more cycles. When the level indicator blinks red, the cartridge needs to be replaced – about every 4 weeks when used daily.
After having pressed the lift button (14) to open the housing, wait for a few seconds before removing the used cartridge to avoid any dripping. Before discarding the used cartridge, make sure to close the openings using the lid of the new cartridge, since the used cartridge will contain contaminated cleaning solution.
The hygienic cleaning cartridge contains ethanol or isopropanol (specification see cartridge), which once opened will naturally evaporate slowly. Each cartridge, if not used daily, should be replaced after approximately 8 weeks to ensure optimal disinfection. The cleaning cartridge also contains lubricants for the shaving system, which may leave residual marks on the outer foil frame and the cleaning chamber of the C&C. These marks can be removed easily by wiping gently with a damp cloth.
Accessories
Braun recommends changing your shaver’s Foil & Cutter cassette every 18 months to maintain your shaver’s maximum performance.
Available at your dealer or Braun Service Centres:
- Foil & Cutter cassette: 52S/52B
- Cleaning Cartridge: CCR
- Braun Shaver cleaner spray
Environmental notice
 Product contains batteries and/or recyclable electric waste. For environment protection do not dispose of in household waste, but for recycling take to electric waste collection points provided in your country.
The cleaning cartridge can be disposed of with regular household waste.
Subject to change without notice.
For electric specifications, see printing on the special cord set.
Troubleshooting
| Problem | Possible reason | Remedy |
| SHAVER | ||
| Shaver does not charge completely and keeps blinking. | Ambient temperature is out of valid range. | Recommended ambient temperature for charging is 5 °C to 35 °C. |
| Charging does not start when connected to power socket. |
|
|
| Unpleasant smell from the shaver head. |
|
|
| Battery performance dropped significantly. |
|
|
| Shaving performance dropped significantly |
|
|
| Shaver head is damp. |
|
|
| CLEAN & CHARGE STATION | ||
| Cleaning does not start when pressing the start button. |
|
|
| Increased consumption of cleaning fluid. | Drain of the Clean& Charge station is clogged. |
|
FAQS
Serie 5 5018s works with 220V?
Positive. If you order one. For me it works.
What is the difference between these three model shavers which one shaves the best??
All of our shavers will provide a close and comfortable shave. However, your experience will vary depending on what model you have. To know the difference between our shavers, and give you a product recommendation, give us a call at 800-272-8611. – The Braun Team
Is the good for the genital area as well?
No, face only.
this works with 220v?
Yes, since our Series 5 5050cs has a voltage of 100-240V, it will work with 220V.
does it have a replacement blade indicator on this model?
There is no replacement blade indicator on our Series 5 5050cs.
When the battery is fully discharged or damaged can you still use it by just plugged it in ?
No, (for safety reasons?) the shaver is designed not to operate while plugged in.
What is foil adapter?
Some Braun shavers have a foil adapter for the beard and a hair adapter for clipping longer beard and regular hair. Foil is a misleading name for the regular shaver adapter because it’s a thick metal piece and most US customers would not refer to that as a “foil.” But it is what is is according to Braun.
Will this shaver turn on if it is plugged in? I’m looking for a razor that will outlast its battery?
Yes, it will turn on if it’s plugged in.
Which one works best for the face? The foil or the stainless steel one? Confusing?
The Foil gives the closest shaves from an electric Razor, however nothing is better than steel blades for close evening entertainment.
Will it work on legs?
Yes, our Series 5 5050cs can work on legs. However since it’s designed to be used on the face/neck area, it won’t be as effective.
Is there a travel case available for these new design shavers ?? they are longer and bulkier than the old design?
We do not currently make a travel case for this shaver.
Where is this product manufactured?
Our Series 5 Shavers are made in Germany.
does it shave close and easy under nose?
With the Precision Trimmer EasyClick attachment, you’ll have no problems getting a close and easy shave with our Series 5 5020s.
Does this give as close a shave as a razor blade? Almost as close as a razor blade?
No it does not shave as close as a regular razor.
Does this come with charger?
Yes of course it comes with a charger. It works with 110 and 220 voltage. So can be used while traveling to any country.
![]()
![]()

91834978/IV-18

Type 5542
Braun GmbH
Frankfurter Straße 145
61476 Kronberg/Germany
www.braun.com
www.service.braun.com
 Braun Infolines
DE/AT 00 800 27 28 64 63
00 800 BRAUNINFOLINE
CH 08 44 – 88 40 10
UK 0800 783 7010
IE 1 800 509 448
FR 0 800 944 802
(service & appel gratuits)
BE 0 800 14 592
ES 900 814 208
PT 808 20 00 33
IT 800 440 017
NL 0 800-445 53 88
DK 70 15 00 13
NO 22 63 00 93
SE 020 – 21 33 21
FI 020 377 877
GR 210-9478700
HK (852) 2986 9886
DKSH Consumer Service Centre
DE/UK/FR/ES/PT/IT/NL/DK/NO/SE/FI/GR


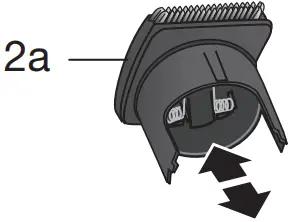
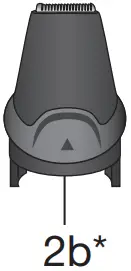
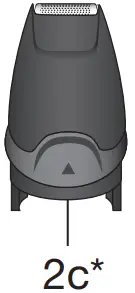
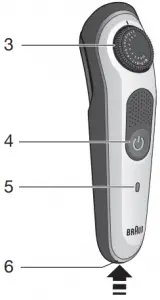
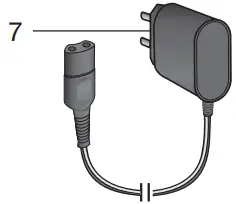
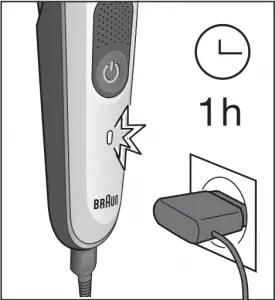

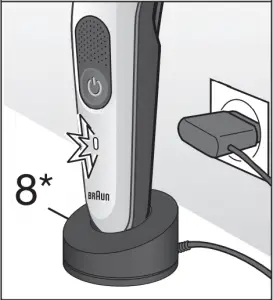
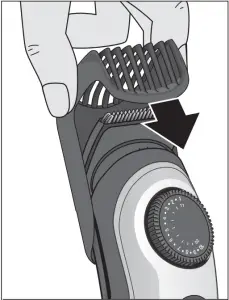
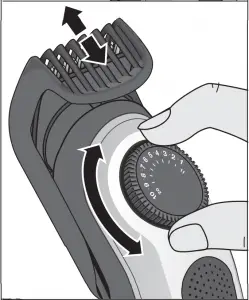


3
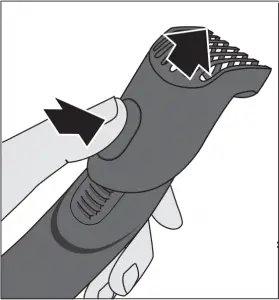
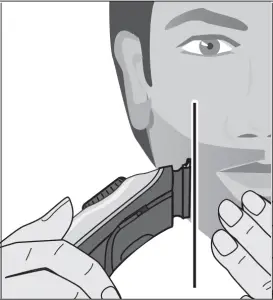

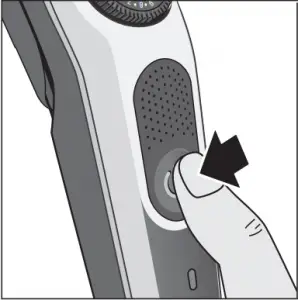
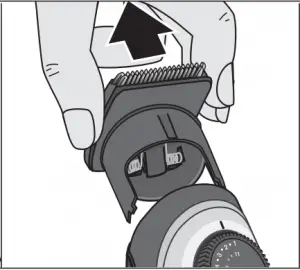
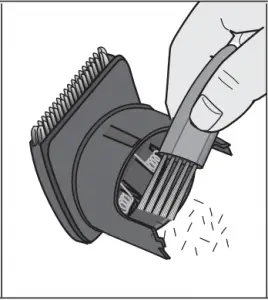
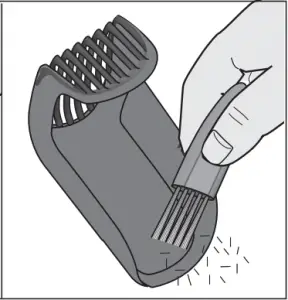
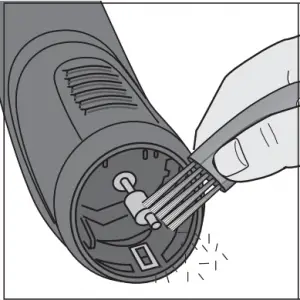
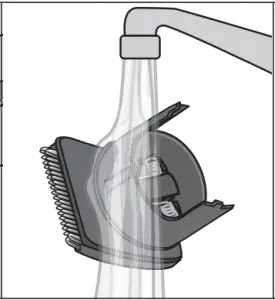
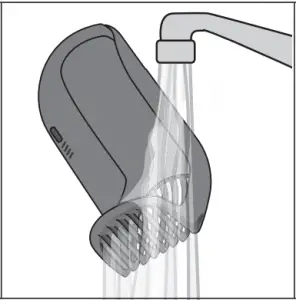
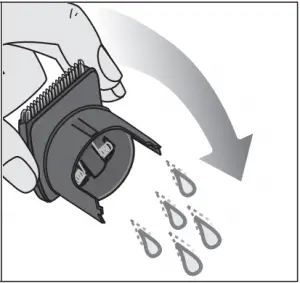
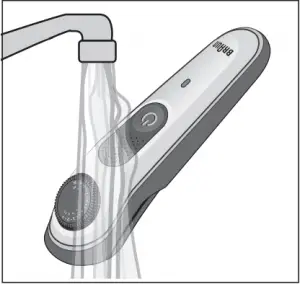

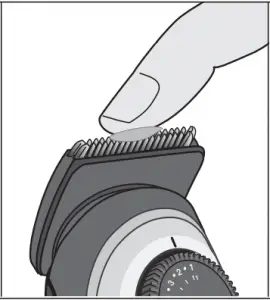
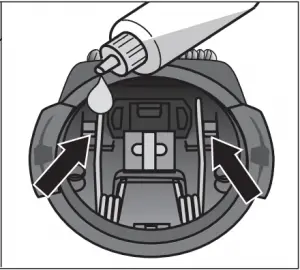
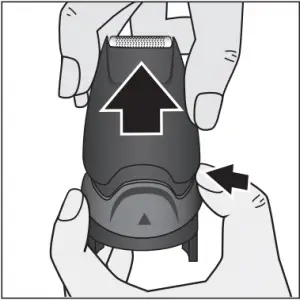
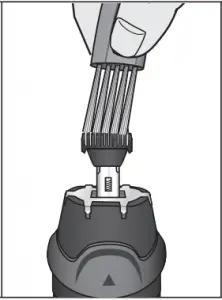
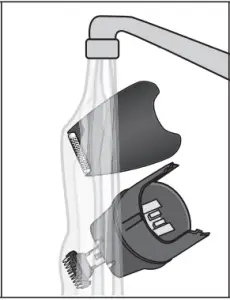
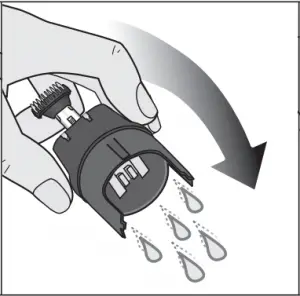
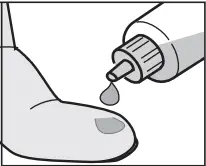
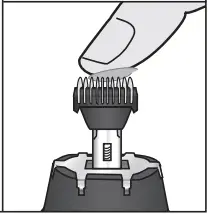
4
Read these instructions completely, they contain safety information. Keep them for future reference.
Warnings

The appliance is suitable for cleaning under running tap water. Detach the appliance from the power supply before cleaning it with water.
The appliance is provided with a special cord set with integrated Safety Extra Low Voltage power supply. Do not exchange or manipulate any part of it. Otherwise there is a risk of electric shock.
Only use the special cord set provided with your appliance.
If the appliance is marked  491 or 492, you can use it with any Braun power supply coded 491-XXXX or 492-XXXX.
Never use the appliance with any damaged accessory like trimmers, combs or special cord set.
Do not open the appliance!
This appliance can be used by children aged from 8 years and above and persons with reduced physical, sensory or mental capabilities or lack of experience and knowledge if they have been given supervision or instruction concerning the safe use of the appliance and understand the hazards involved. Children shall not play with the appliance. Cleaning and user maintenance shall not be made by children unless they are older than 8 years and supervised.
Description
1a Precision beard comb (1-10 mm)
1b Precision hair comb (11-20 mm)
9
2a Trimmer head
2b Detailed trimmer head*
2c Mini foil shaver head*
3 Length selector
4 On/off button
5 Charging indicator
6 Power socket
7 Special cord set (design can differ)
8 Charging stand*
* not with all models
For electric specifications, see printing on the special cord set.
Charging
Recommended ambient temperature for charging is 5 °C to 35 °C.
The battery may not charge properly or at all under extreme low or high temperatures. Recommended ambient temperature for trimming is 15 °C to 35 °C. Do not expose the appliance to temperatures higher than 50 °C for extended periods of time.
- Connect the appliance via the special cord set (7) to an electrical outlet.
- A full charge takes approx. 1 hour and provides up to 100 minutes of cordless operation time.
- Once the appliance is completely charged, discharge it through normal use. Then recharge again to full capacity.
Charging indicator
- The charging indicator blinks green when the appliance is being charged.
- It lights up permanently green for a few seconds when the battery is fully charged. During usage it shines permanently green.
- The charging indicator shines permanently red when the battery is running low. Once it flashes red, connect the appliance to the mains.
Usage
- Exchange the attachments only when the appliance is switched off.
- Place one of the precision combs (1a, 1b) over the trimmer head (2).
Beard Trimming / Hair Clipping
- Turn the length selector (3) to your desired cutting length. The comb slides automatically up or down.
- Length settings precision beard comb (1a): 1 to 10 mm in 0,5 mm steps.
10
- Length settings precision hair comb (1b): 11 to 20 mm in 0,5 mm steps.
- Push the on/off button (4) to turn the appliance on.
- Trim against hair growth by guiding the flat comb part over the skin.
- Avoid clogging the comb with hair. Remove and clean it from time to time.
Precision and Contour Trimming
- Use the trimmer head (2a) without comb attachment, the detailed trimmer head (2b) or the mini foil shaver head (2c) for shaping sideburns, moustaches and partial short beards.
Travel lock
Press the on/off button (4) for 3 seconds to lock the appliance. A beep confirms that the travel lock is activated. To unlock, press the on/off button 3 seconds. 3 beeps will sound when your unlock attempt failed. Try again or simply connect the appliance to the mains.
Cleaning and maintenance
- Switch off the appliance.
- Take off the head and combs.
- Use the brush to clean the head, combs and the appliance.
- Do not clean the foil of the mini foil shaver head with a brush as this may damage it.
- The mini foil shaver head can be disassembled for proper cleaning. In case the foil frame is pulled out, it can just be clicked into the housing again.
- The handle, heads and combs can be cleaned under running water. Rinse until all residues have been removed. Let dry completely before reassembling them.
- To keep the attachments working properly, oil trimmers and foils with a drop of light machine oil (not included) regularly.
Travel lock
Press the on/off button (4) for 3 seconds to lock the appliance. A beep confirms that the travel lock is activated. To unlock, press the on/off button 3 seconds. 3 beeps will sound when your unlock attempt failed. Try again or simply connect the appliance to the mains.
Environmental notice
![]()
Product contains a battery and/or recyclable electric waste. For environment protection do not dispose of in household waste, but for recycling take to electric waste collection points provided in your country.
11
Subject to change without notice.
Guarantee
We grant a 2 year guarantee on the product commencing on the date of purchase. Within the guarantee period we will eliminate any defects in the appliance resulting from faults in materials or workmanship, free of charge either by repairing or replacing the complete appliance at our discretion. This guarantee extends to every country where this appliance is supplied by Braun or its appointed distributor.
This guarantee does not cover: damage due to improper use, normal wear or use as well as defects that have a negligible effect on the value or operation of the appliance. The guarantee becomes void if repairs are undertaken by unauthorised persons and if original Braun parts are not used.
To obtain service within the guarantee period, hand in or send the complete appliance with your sales receipt to an authorised Braun Customer Service Centre (address information available online at www.service.braun.com).
For UK only:
This guarantee in no way affects your rights under statutory law.
For Australia & New Zealand only:
Warranty
In Australia, our goods come with guarantees that cannot be excluded under the Australian Consumer Law. You are entitled to a replacement or refund for a major failure and for compensation for any other reasonably foreseeable loss or damage. You are also entitled to have the goods repaired or replaced if the goods fail to be of acceptable quality and the failure does not amount to a major failure.
The benefits given by this warranty are in addition to other rights and remedies of the consumer law.
For warranty claims please contact:
Procter & Gamble Australia Pty Ltd
Level 4, 1 Innovation Road
Macquarie Park, NSW 2113
Telephone (AU): 1 800 641 820
Telephone (NZ): 0 800 108 909
Email (AU and NZ): Visit link https://pgconsumersupport.secure.force.com/ContactUs/emailus
12
Our Warranty
This appliance is also covered by a 24 Month Replacement Warranty commencing on the date of purchase (Our Warranty).
Our Warranty applies in all States and Territories of Australia and in New Zealand and is in addition to any mandatory statutory obligations imposed on Procter & Gamble Australia Pty. Ltd., its distributors and its manufacturer. Our Warranty does not purport to exclude, restrict or modify any such mandatory statutory obligations.
Our Warranty only covers defects in the appliance resulting from faults in workmanship or materials. Therefore, if your appliance becomes faulty as a result of faults in workmanship or materials, it will be exchanged by your retailer, on presentation of proof of purchase.
Our Warranty only applies to domestic or household use of this appliance and the warranty will only apply if the correct operating instructions included with this product have been followed. For any appliance replaced under this warranty, Our Warranty ends on the expiry of the warranty period that applied to the original appliance.
Our Warranty does not cover:
A. Damage arising from improper use or operation on incorrect voltages.
B. Breakages to shaver foils, glass jars, etc.
C. Normal wear due to moving parts.
D. Repairs undertaken by unauthorised service personnel or use of non genuine parts.
E. Appliances that are outside the warranty period or are not faulty.
This appliance is not intended for use by young children or infirm persons without supervision. Young children should be supervised to ensure that they do not play with the appliance.
If the appliance is powered by a cord extension set or electrical portable outlet device these should be positioned so they are not subject to splashing or ingress of moisture.
To the extent permitted by the laws of the Commonwealth of Australia and New Zealand and applicable laws of a State or Territory of Australia, and without affecting any mandatory statutory obligations imposed by law, Our Warranty is given in exchange for any other rights you may have against Procter & Gamble Australia Pty. Ltd. or its distributors or manufacturer, whether at law, in tort (including negligence), in equity or under statute.
13
Please retain proof of purchase of this appliance. If you have any questions in relation to Our Warranty, please call our Consumer Service line (see below for numbers).
If you intend to make a claim please telephone our Customer Service line on the numbers set out below to obtain information about your claim and any costs associated with claiming under Our Warranty. You will bear the cost of returning your product to us.
Repairs and service
If you are sending your appliance for repair under Our Warranty, please pack the appliance adequately and send it to your nearest Service Agent, at your expense.
For service or replacement parts refer to the authorised Service Agents listed overleaf. Local Service Agents may change from time to time in that event please contact the Consumer Service free call number below for updated local service agent details.

Australian & New Zealand Service Agents
Statewide Services Pty Ltd trading as J A Appliances
17-19 Hossack Avenue
Coburg North, VIC 3058
Tel. (03) 8371 9100
Fax. (03) 9355 8644
Email: [email protected]
Mark 1 Appliances
Unit 1, 46 Abernethy Road
Belmont, WA 6104
Tel. (08) 9475 0911
Fax. (08) 9475 0922
Email: [email protected]
Walters Import trading as Brisbane
Appliance Service Centre
449 Beaudesert Road
Moorooka QLD 4105
Tel. (07) 3277 0360
Fax. (07) 3274 2909
Email: [email protected]
Faulder Appliance Services Pty Ltd
Shop 4,
9 Evans Road,
Rooty Hill, NSW 2766
Tel. (02) 9625 3064
Fax. (02) 9625 3037
Email: [email protected]
14
Adelaide Service Centre
Shop B2,
Parkholme Shopping Centre
319 Oaklands Road, Parkholme
Adelaide, SA 5043
Tel. (08) 8357 5800
Fax. (08) 8357 5833
Email: [email protected]
Key Service Ltd
34A Cryers Road
East Tamaki
Auckland
New Zealand
(PO Box 38569, Howick, Auckland,
New Zealand)
Tel. (09) 916 0960
Fax. (09) 916 0970
Email: [email protected]
15
]]>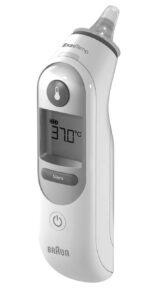
Braun ThermoScan® Ear thermometer [IRT 6020/6500/6510]
Contact Us
Questions or Comments?
Call: 1-800-327-7226
eMail: [email protected]
Visit: www.kaz.com/braun
Write: Consumer Relations, Kaz USA, Inc.,
250 Turnpike Road, Southborough, MA 01772, USA
This product is manufactured by Kaz USA, Inc., under license to the ‘Braun’ trademark.
‘Braun’ is a registered trademark of Braun GmbH, Kronberg, Germany.
ThermoScan is a registered trademark of Kaz USA, Inc.
Kaz USA, Inc.
250 Turnpike Rd.
Southborough, MA 01772
© 2014 Kaz USA, Inc. All rights reserved.
www.kaz.com/braun
Patents:
Kaz Braun Trademarks and Patents
Imported by
Kaz Canada, Inc.
510 Bronte St S.
Milton, Ontario L9T 2X6, Canada
Designed in Germany. Made in Mexico.
IRT 6020 / 6500

IRT 6510
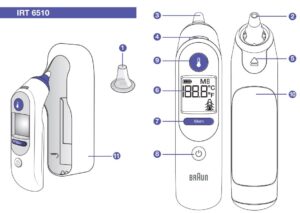
Product Description
IRT 6020/6500 Series
- Lens filter (Box of 20)
- Probe tip
- Probe
- ExacTemp light
- Lens filter ejector
- Display
- Power button
- Start button
- Battery door
- Protective cap (IRT 6020 only)
- Protective case (IRT 6500 only)
IRT 6510 Series
- Lens filter (Box of 20)
- Probe tip
- Probe
- ExacTemp light
- Lens filter ejector
- Display
- Memory button
- Power button
- Start button
- Battery door
- Protective case
The Braun ThermoScan thermometer has been carefully developed for accurate, safe and fast temperature measurements in the ear.
The shape of the thermometer probe prevents it from being inserted too far into the ear canal which can hurt the eardrum.
However, as with any thermometer, proper technique is critical to obtaining accurate temperatures.
Therefore, read the instructions carefully and thoroughly.
The Braun ThermoScan thermometer is intended for intermittent measurement and monitoring of human body temperature for people of all ages. It is intended for household use only.
Use of this thermometer is not intended as a substitute for consultation with your physician.
WARNINGS AND PRECAUTIONS
- Please consult your doctor if you see symptoms such as unexplained irritability, vomiting, diarrhea, dehydration, changes in appetite or activity, seizure, muscle pain, shivering, stiff neck, pain when urinating, etc. in spite of absence of fever.
- Please consult your doctor if the thermometer shows elevated temperature.
The operating ambient temperature range for this thermometer is 50 – 104 °F (10 – 40 °C).
Do not expose the thermometer to temperature extremes (below –13 °F / –25 °C or over 131 °F / 55 °C) or excessive humidity (> 95 % RH). This thermometer must only be used with genuine Braun ThermoScan lens filters (LF 40).
To avoid inaccurate measurements always use this thermometer with a new, clean lens filter attached.
If the thermometer is accidentally used without a lens filter attached, clean the lens (see «Care and cleaning» section). Keep lens filters out of reach of children.
This thermometer is intended for household use only. Use of this thermometer is not intended as a substitute for consultation with your physician.
This thermometer is not intended for pre-term babies or small-for-gestational age babies.
It is not intended to interpret hypothermic temperatures. Do not allow children under 12 years to take their temperature unattended.
Do not modify this equipment without authorization of the manufacturer.
Parents/guardians should call the pediatrician upon noticing any unusual sign(s) or symptom(s). For example, a child who exhibits irritability, vomiting, diarrhea, dehydration, seizure, changes in appetite or activity, even in the absence of fever, or who exhibits a low temperature, may still need to receive medical attention.
People who are on antibiotics, analgesics, or antipyretics should not be assessed solely on temperature readings to determine the severity of their illness.
Temperature elevation may signal a serious illness, especially in neonates and infants, or in adults who are old, frail, or have a weakened immune system. Please seek professional advice immediately when there is a temperature elevation and if you are taking temperature on:
- Neonates and infants under 3 months (Consult your physician immediately if the temperature exceeds 99.4 °F or 37.4 °C).
- Patients over 60 years of age (Fever may be blunted or absent in older patients).
- Patients having diabetes mellitus or a weakened immune system (e.g., HIV positive, cancer chemotherapy, chronic steroid treatment, splenectomy)
- Patients who are bedridden (e.g., nursing home patient, stroke, chronic illness, recovering from surgery)
- A transplant patient (e.g., liver, heart, lung, kidney).
This thermometer contains small parts that can be swallowed or produce a choking hazard to children. Keep out of reach of children under 12 years.
Body temperature
Normal body temperature is a range. It varies by site of measurement, and it tends to decrease with age. It also varies from person to person and fluctuates throughout the day. Therefore, it is important to determine normal temperature ranges. This is easily done using Braun ThermoScan. Practice taking temperatures on yourself and healthy family members
to determine the normal temperature range.
Note: When consulting your physician, communicate that the ThermoScan temperature is a
temperature measured in the ear and if possible, note the individual’s normal ThermoScan
temperature range as additional reference.

How does Braun ThermoScan work?
Braun ThermoScan measures the infrared heat generated by the eardrum and surrounding tissues. To help avoid inaccurate temperature measurements, the probe tip is warmed to a temperature close to that of the human body. When the Braun ThermoScan is placed in the ear, it continuously monitors the infrared energy. The measurement is finished and the result displayed when the thermometer detects that an accurate temperature measurement has been taken.
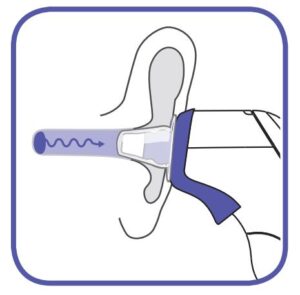
Why measure in the ear?
The goal of thermometry is to measure core body temperature1 which is the temperature of the vital organs. Ear temperatures accurately reflect core body temperature2, since the eardrum shares blood supply with the temperature control center in the brain3 , the hypothalamus. Therefore, changes in body temperature are reflected sooner in the ear than at other sites. Axillary temperatures measure skin temperature and may not be a reliable indicator of core body temperature. Oral temperatures are influenced by drinking, eating and mouth breathing. Rectal
temperatures often lag behind changes in core body temperature and there is a risk of cross-contamination.

How to use your Braun ThermoScan


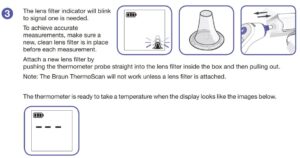
- Guyton A C, Textbook of medical physiology, W.B. Saunders, Philadelphia, 1996, p 919
- Guyton A C, Textbook of medical physiology, W.B. Saunders, Philadelphia, 1996, p 754-5
- Netter H F, Atlas of Human Anatomy, Novartis Medical Education, East Hanover, NJ, 1997, pp 63, 95.
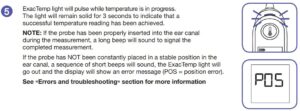

Temperature Taking Hints
Always replace disposable lens filters to maintain accuracy and hygiene. The right ear measurement may differ from the measurement taken in the left ear. Therefore, always take the temperature in the same ear. The ear must be free from obstructions or excess earwax build-up to take an accurate reading.
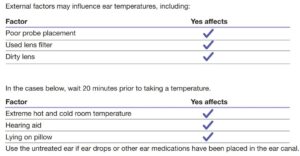
Memory Mode

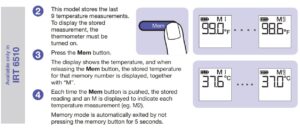
Night Light Feature

Changing the Temperature Scale

Care and Cleaning

Replacing the Batteries

Calibration
The thermometer is initially calibrated at the time of manufacture. If this thermometer is used according to the use instructions, periodic re-adjustment is not required. If at any time you question the accuracy of temperature measurements, please contact Consumer Relations.
Manufacturing date is given by the LOT number located inside the battery compartment. The first three (3) digits after LOT represent the Julian date that the product was manufactured and the next two (2) digits represent the last two numbers of the calendar year the product was manufactured. The last identifiers are the letters that represent the manufacturer.
An example: LOT 11614KTC, this product has been manufactured on the 116th day of the year 2014.
Errors and Troubleshooting
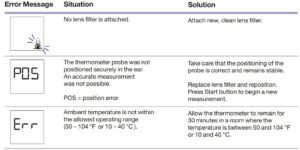
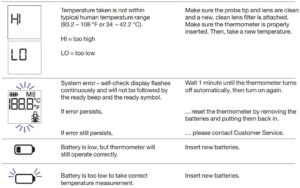
Product specifications
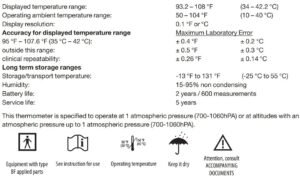
Subject to change without notice.
This appliance conforms to the following standards:
Standard Reference Edition Title:
EN 12470-5: 2003 Clinical thermometers – Part 5: Performance of infra-red ear thermometers (with maximum device).
EN 60601-1: 2006 Medical electrical equipment – Part 1: General requirements for basic safety and essential performance.
EN ISO 14971: 2012 Medical devices – Application of risk management to medical devices.
EN ISO 10993-1: 2009 Biological evaluation of medical devices – Part 1: Evaluation and Testing within a risk management process.
EN 60601-1-2: 2007 Medical electrical equipment – part 1-2: General requirements for basic safety and essential performance
- Collateral standard: electromagnetic compatibility
- Requirements and tests
EN 980: 2008 Symbols for use in labeling of medical devices.
EN 1041: 2008 Information supplied by the manufacturer of medical devices.
EN 60601-1-11: 2010 Medical electrical equipment — Part 1-11: General requirements for basic safety and essential performance — Collateral standard: Requirements for medical electrical equipment and medical electrical systems used in the home healthcare environment.
This product conforms to the provisions of the EC directive 93/42/EEC.
MEDICAL ELECTRICAL EQUIPMENT needs special precautions regarding EMC. For detailed description of EMC requirements please contact Customer Service.
Portable and mobile RF communications equipment can affect MEDICAL ELECTRICAL EQUIPMENT.
 Please do not dispose of the product in the household waste at the end of it useful life. To protect the environment, dispose of empty batteries at appropriate collection sites according to national or local regulations.
Limited Three Year Warranty
Kaz, Inc. warrants this product against any defects that are due to faulty material or workmanship for a period of three years from the original date of consumer purchase or receipt as a gift. This warranty applies when used for normal household use in accordance with the Use and Care Manual and excludes the battery and damage to the product resulting from accident or misuse. This product is not warranted when used in a professional environment.
In no event shall Kaz, Inc. be liable for any special, incidental, indirect or consequential damages in connection with the purchase or use of this product or costs over the original cost of the product.
If the product should not perform to specifications within the warranty period, please contact Consumer Relations. In Canada, you can contact at 510 Bronte Street S, Milton, ON, L7T 2X6, Canada. Kaz, Inc. reserves the right to replace a non conforming product with the most comparable product currently available. This product has a five year minimum expected lifetime.
While this warranty gives you specific legal rights, you may also have other rights which vary from state to state/province to province


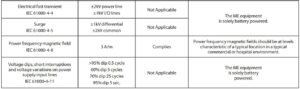
Frequently Asked Questions
What is the best way to achieve an accurate reading from my thermometer?
ALWAYS replace the disposable lens filters with a genuine Braun lens filter to maintain accuracy and hygiene. The use of any other brand may alter the reading.
The right ear measurement may differ from the measurement taken in the left ear. Therefore, ALWAYS take the temperature in the same ear. The ear must be free from obstructions or excess earwax build-up to take an accurate reading.
External factors may influence ear temperatures, including when an individual has:
- Poor probe placement
- Used lens filter
- Dirty lens
In the cases below, wait 20 minutes prior to taking a temperature.
- Extreme hot and cold room temperature
- Hearing aid
Use the untreated ear if ear drops or other ear medications have been placed in the ear canal.
Use the ear that has been facing upwards, if an individual has been lying down on their side with an ear face down on a pillow.
What is my Braun Thermometer warranty?
This 3-year limited warranty applies to repair or replacement of product found to be defective in material or workmanship. This warranty does not apply to damage resulting from commercial, abusive, unreasonable use or supplemental damage. Defects that are the result of normal wear and tear will not be considered manufacturing defects under this warranty.
What should I do if my thermometer is reading an Err message?
This will occur if the ambient temperature is not within the allowed operating range (50 – 104 °F or 10 – 40 °C.) In order to resolve this, we would recommend you allow the thermometer to remain for 30 minutes in a room where the temperature is between 50 and 104 °F or 10 and 40 °C.
What does a flashing display or no display mean when I turn on my thermometer?
A flashing display indicates a system error. We suggest waiting 1 minute until the thermometer turns off by itself and then turns on again. If the problem persists, reset the thermometer by removing the batteries momentarily.
How do I change the temperature scale from Celsius to Fahrenheit (or vice versa) on my thermometer?
Press and hold the start button.
The Thermometer will turn on and show the start screen, where you will see all of the symbols on the display.
Continue holding the button down, it will show C or F for one second and then change to say SET for one second.
The pattern will continue as you hold down the start button. F → SET → C → SET
To select the option you want, release the activation/start button when the setting you want appears on the screen.
How can I view the last temperature taken on my thermometer?
This model stores the last 9 temperature measurements. To display the stored measurement, the thermometer must be turned on. Press the Mem button. The display shows the temperature, and when releasing the Mem button, the stored temperature for that memory number is displayed, together with “M”. Each time the Mem button is pushed, the stored reading and an M is displayed to indicate each temperature measurement (e.g. M2). Memory mode is automatically exited by not pressing the memory button for 5 seconds.
How do I store my thermometer?
Store thermometer and lens filters in a dry location free from dust and contamination and away from direct sunlight. Always store the thermometer with the protective cap or with the cradle in place to prevent dirt and scratches from damaging the device.
Do not store this thermometer in temperature extremes below -13 °F or over 131 °F or in excessive humidity (above 95% relative humidity).
If thermometer is stored in a location that is cooler or warmer than where it will be used, allow it to acclimate to the room temperature for 10 minutes before taking the measurement.
How do I use the Braun Lens Filter?
To avoid inaccurate measurements ALWAYS use this thermometer with a new, clean lens filter attached.
If the thermometer is accidentally used without a lens filter attached, clean the lens.
The lens filter indicator will blink to signal one is needed.
Attach a new lens filter by pushing the thermometer probe straight into the lens filter inside the box and then pulling out.
Note: The Braun ThermoScan will not work unless a lens filter is attached.
For the next measurement, press Eject button to remove and discard used lens filter, and put on a new, clean lens filter. For models without and eject button (ThermoScan 3 and 4), pull off lens filter and discard.
What is ExacTemp®?
ExacTemp® is a guidance system that confirms good position in the ear with a light and a beep to ensure accurate temperature measurement.
Does Braun offer a stick thermometer?
Braun does not offer a digital stick thermometer, but we recommend using the Vicks digital thermometers. They are clinically accurate, provide color-coded fever guidance and fast readings.
Are batteries included with thermometers?
Yes, the Braun Thermoscan® 5 IRT6500 includes two AA batteries.
Do Braun thermometers come with lens filters?
Lens filters are included with all our Ear thermometers. Please use a new lens filter after each use for an accurate reading.
Do all Braun thermometers take the same size lens filter?
Yes. Braun lens filters are universal across all our Ear thermometers & Braun lens filters are the only brand to ensure an accurate reading when used with Braun thermometers.
Are Braun lens filters BPA free?
Yes, Braun disposable lens filters are BPA & latex free.
What are the benefits to using an ear thermometer?
The ear is a good site for temperature measurement because it reflects the core temperature of the body[1]. Body temperature is regulated by the hypothalamus[2], which shares the same blood supply as the tympanic membrane[3]. This means changes in core body temperature are usually detected sooner in the tympanic membrane than other areas. All Braun infrared ear thermometers feature ThermoScan® technology, which measure heat generated by the eardrum and surrounding tissue to give an accurate temperature on an easy to read digital display in seconds.
How do I clean my thermometer?
Gently wipe the surface of the probe tip with a cotton swab or soft cloth moistened with rubbing alcohol (70% Isopropyl).
What is Age Precision® Technology?
Clinical research shows the definition of fever changes as newborns grow into children & children grow into adults. The Age Precision feature takes the guesswork out of temperature taking, allowing you to select the appropriate age setting – 0-3 months, 3-36 months or 36+ months.
]]>